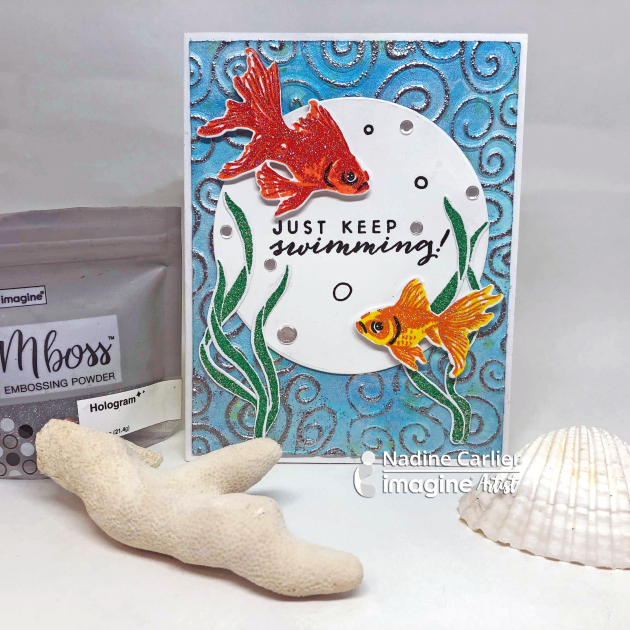
In today’s tutorial, I show you how to use your Mboss embossing powder in Shimmering Night Sky to create an underwater scene. Together with Fireworks spray and Memento ink you can create a gorgeous card straight from a mermaid’s home, complete with sea critters. I show you beginning to end how to create a sea-filled, embossed, and watercolored card.
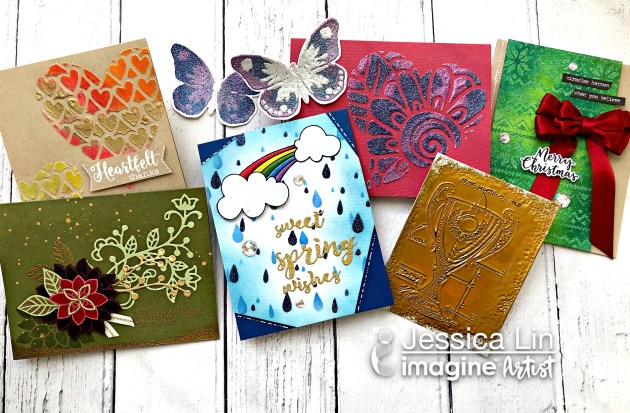
Hello there! Today, I have a Mboss Spiral card that I made featuring the new Mboss Embossing Powder from Imagine. I had the opportunity to buy this spiral background stamp a long time ago during a vacation but I never used it. I couldn’t find exactly what project this spiral shape would fit with. Now that Imagine has released the Mboss Embossing Powder, I made decided to use it for an embossing color blend project.
Skill: Intermediate Time: 1 hour
Directions
Step 1
I started my process using basic black card stock and the small inkpad (or cube) of the VersaMark. I placed my stamp inside of my stamping tool and applied the ink starting in the center. I stamped this part and covered with Valentine Mboss. Then I removed the card stock and melted the powder with the heat tool. I repeated the process several times using Princess Party, Birthday Party, Sparkle, and Lucky Stars. I applied VersaMark in a circular way to keep the spiral shape.
Step 2
I resized the stamped layer and added a whisper white mat before to paste over the basic black card base. I finalized the card adding a die cut flower and sentiment that I stamped with Memento Ink Lilac Posies.
Hi everyone! Today’s video is all about heat embossing—from stamp layering with embossing powder, creating a faux branding iron look, to stenciling with VersaMark… these techniques really take heat embossing to the next level. If you like heat embossing and are eager to learn new tips and tricks, this video is a must-watch!
Mboss embossing powders are the latest addition to the Imagine product range. I hope you’ll get a chance to play with these new powders soon; there are so many amazing colors to choose from! In addition, Mboss powders come in several gorgeous shimmering glitter versions that are perfect for creating self-made paper embellishments and beautiful card backgrounds!
Skill: Intermediate Time: 1 hour
Directions
Step 1
I wanted to try the Mboss powders on a stamped background. Use a circle punch to ink the paper with VersaMark, sprinkle Mboss in Valentine, and heat set. I think it looks cool! Love that golden sparkle together with the bright red!
Step 2
On kraft cardstock, stamp the main Kitten image with VersaFine Clair in Acorn. Detail with color pencils and fussy cut the kitten.
Step 3
Stamp “Hello Sunshine” on a scrap piece and mount on a flag. Assemble all the pieces together on the embossed paper, mount on dark red paper. Apply washi tape and adhere kitten stamped image. A cute card made in just 30 minutes!
This card is dressed with the new Mboss Embossing Powder from top to bottom.
Watch my video below to see the different techniques I used to create my card. Enjoy!
There is nothing better than using your crafting skills to create a gift for someone. That is what I did for this mum, or chrysanthemum, flower project—a gift for my mom. (Get it – a mum for mom?!) Crucial to achieving this fun look, I used Vertigo in Prism and Mboss Embossing Powder in Hologram. I created a 5”x 5” framed Mixed Media piece full of color and texture. See the video slideshow or my instructions below to see how I get some extra dimension with the Vertigo sheet!
Skill: Advanced Time: 30 minutes
Directions
Step 1
Cut Vertigo into 5” x 5” panel.
Step 2
Stamp the Mum flower onto the center of Vertigo panel with StazOn Pigment Piano Black.
Step 3
On the opposite side of the stamped image, color the mum with VersaMagic ink and Fantastix applicators. Simply touch the tips of the Fantastix to the inkpad to pick up the color and use like a marker.
Step 4
Die-cut the mum with coordinating die.
Step 5
On white cardstock, sponge VersaMagic ink to add color.
Step 6
Stamp script stamp with StazOn Pigment.
Step 7
Add texture to Vertigo panel with Hologram Mboss Embossing Powder. To do this, swipe the front of your Vertigo Panel with VersaMark inkpad. Apply powder sparingly and shake off excess. If you want a more sparse texture, you can always use a dry brush to knock off more before heat setting.
Step 8
Add black paint splatters.
Step 9
Add Tear It Tape to the back side of the Vertigo panel.
Step 10
Adhere tulle between the cardstock and Vertigo panels, then adhere to piece of prepared cardstock.
Step 11
Embellish with sequins.
Step 12
Tie a white string around the panel.
Step 13
Add double sided dimensional tape to the tulle.
Step 14
Spray the Mum Die cut element with GooseBumps for extra shine.
Step 15
Once dry, adhere the mum to the panel.
Step 16
Adhere sticker saying “let life surprise you” sentiment. Add any additional finishing touches and insert into the picture frame.