Beginner Guide: Using Stamps & Stencils on Fabric with VersaCraft and Fabrico

by Nicole Watt

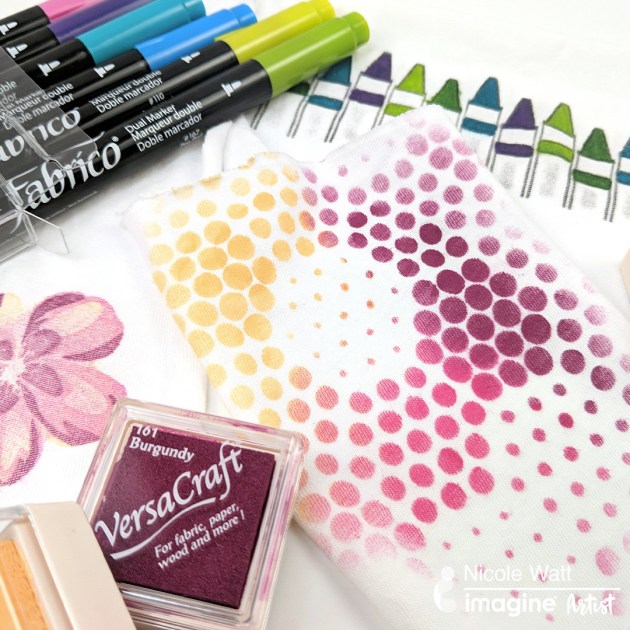
Join Nicole as she shows you how to use stencils and stamps on fabric! Using VersaCraft Inks and Fabrico Markers will have you looking at your stamping and crafting supplies in a whole new way.

Skill: Beginner
Time: Varies

Directions

Sponge Daubers

Other

  • Altenew – Flowering Cistus Stamps 
  • A Colorful Life Designs – 50 Shades Stencil 
  • Honey Bee – Brilliant Day Stamps 
  • My Sweet Petunia – Misti Stamp Positioner 
  • Fabric of Choice – Nicole uses t-shirt material


See How to Use Fantastix to Color on Fabric

by Elina Stromberg

Charming Mini Purse Waffle Flower stamp set

This little purse was inspired by the charming stamp set called “Faye” by Waffle Flower. The cute, crisp image was a great choice for stamping on fabric, and the size was just right for decorating a mini metal frame purse. Metal framed purses are not difficult to make, and there are lots of tutorials available on the web. The project always starts with drawing the cutting pattern; the sizes and shapes of the frames vary, and the pattern needs to be adjusted to the frame used. There are many tutorials for that step too! Try googling with search words “metal frame purse pattern”. Once you find a pattern and design you like then you can sync with this tutorial. The size of my purse is approximately 4 x 4 inches with plenty of space for the stamped image. It is also perfect for coins or your favorite cosmetics!

Skill: Intermediate
Time: 1.5 hours + drying time

Directions

Charming Mini Purse Waffle Flower stamp
Step 1

Trace the purse pattern on the fabric. Stamp images using Memento Luxe ink. Heat set with iron.

all purpose ink and fantastix
Step 2

Color the image and part of the background using All-Purpose Inks and Fantastix. You can dip the Fantastix directly into the ink barrel for coloring. The thickness of the All-Purpose ink is great for fine detailing on fabric. Use short dabbing stokes to make sure the ink soaks into the fabric fibers. Heat set with iron.

Charming Mini Purse embroidery
Step 3

Place the fabric in an embroidery hoop. Using two strings of embroidery yarn decorate the colored image with straight stitches.

handmade purse
Step 4

Cut the back-exterior piece and two identical lining pieces. Cut two pieces of fusible interfacing (without seam allowance), and iron them on the back sides of the exterior pieces.


Step 5

Stack all four pieces with right sides together. Sew around the edge. Turn the purse around.


Step 6

Using a zig zag stitch, attach a thin cord around the top edge of the purse.


Step 7

Open the frame and practice putting one side of the purse in it (without the glue). Once you feel comfortable place glue inside one side of the frame. Wait a minute (or follow the instructions of the glue manufacturer) and work the fabric into the channel. Use a knitting needle to make sure all fabric is tucked tight into the frame. Remove glue stains immediately with a wet paper towel. 
Let dry for 30 minutes before repeating the steps on the other side. Once everything has dried, your craft project is complete! You can gift this to a friend and personalize any way you wish. Enjoy!

Supplies

Imagine
Other
  • Waffle Flower – ‘Faye’ stamp set
  • Fabric – grey, pink
  • Fusible interfacing
  • Metal purse frame
  • Pink embroidery yarn
  • Embroidery hoop
  • Embroidery needle
  • Sewing machine
  • Fabric glue
  • Scissors
  • Cord
  • Knitting needle
  • Paper and pencil for making the cutting pattern

Save

Save

Save

Dye Embroidery Thread with Fireworks Shimmery Craft Spray

by Jennifer Vanderbeek 

Use Stamps for Stitching by Jennifer Vanderbeek. pink rose embroidery thread. green, white frame.

We invest a lot of money into our craft supplies, so why not use them to their potential! We can find new uses for craft sprays, embroidery threads, and stamps and stretch our craft budgets. In this tutorial, I outline how to use stamps as a template for embroidery. And while we’re at it, why not use sprays to make custom-colored embroidery thread, too!

Skill: Advanced
Time: 2 – 3 hours + drying time

Directions

Step 1

Spray Rose Bud, Lilac Posies and New Sprout Fireworks directly onto the craft mat close to each other for the dye ink to blend. These colors will create the Rose petal colors. Add a length of white embroidery floss across the three puddles and let them soak up the color.

Step 2

Repeat with New Sprout Fireworks and Walnut Ink for the Rose stem colors thread. Allow both floss color themes to dry completely.

Step 3

Stamp the chosen image onto pressed linen with VersaFine. Let dry.

Step 4

Thread a needle with 3 (of the 6) strands of the dyed floss and fill in the stamped sections with the different colors. The sample project uses satin stitch for the petals and leaves, detached chain stitch for the stem, and French knots for accents.

Step 5

Embellish the stamped image with a stitched frame or other embellishments.

Step 6

Paint a bare wood frame with a wash of white acrylic paint and spray with Desert Sand Fireworks to add a touch of age and shimmer.

Step 7

Cut a piece of chipboard to fit behind the opening of the frame and wrap the embroidered linen around it. Secure it inside the frame and project is ready to go!

This project makes a great gift or can be a lovely decorative item in a craft room.

Supplies

Imagine
Other
  • White embroidery thread
  • Acrylic blocks
  • 
Close to My Heart – rose stamp
  • 
Linen fabric
  • Embroidery needle
  • 
Embroidery hoop
  • 
Wooden frame
  • White acrylic paint
  • Paint Brush
  • 
Chipboard
  • Scissors


Don’t Be Eye Candy Be Soul Food by Tenia Nelson

I wanted to make a super fun card encouraging ladies to be made of the good stuff while also strutting your stuff! I started with stamping an image with VersaMark onto watercolor paper and heat embossing it. I then used Bamboo Leaves Memento marker to scribble onto an acrylic block and watercolor the lady. I did the same technique with Tuxedo Black Memento Marker and Rich Cocoa Memento ink for the skin tones. I then sprayed New Sprout Fireworks Craft onto the whole image panel to pull the design together, stamped the sentiment onto a piece of cardstock using Cottage Ivy Memento Ink and finished it with adding sequins and washi tape. And mounted the whole piece onto a blank card base.

Supplies

Imagine
Other
  • Unity Stamp Company – stamp
  • Watercolor
  • Embellishments – sequins, washi tape, sticker stitches
  • Heating Tool