
This is indeed a blog treat for you today! Two of our amazingly talented Artists In Residence are here to share with you their coloring techniques using Imagine Crafts line of products. We’re sure that you’ll be borrowing these techniques for your next project!
Thanks A Bunch Video Tutorial
by Cathy

Cathy is here to show you in this video tutorial how to create your own stunning card using Delicate Silvery Shimmer as a resist. Discover how easy it is to achieve this watercolor effect using Memento Markers.
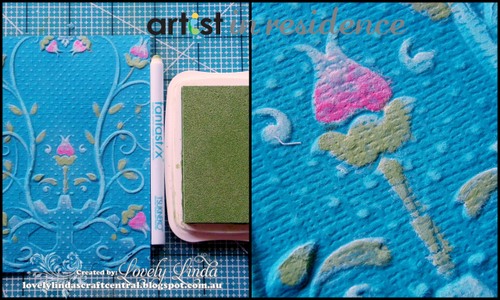
Painting with Memento Luxe
by Linda

Supplies:
- IMAGINE Crafts/Tsukineko Memento Luxe™Mixed Media Pigment Ink: Wedding Dress, Pistachio, Angel Pink, Rose Bud; Fantastix applicators; Sponge Daubers
- Spellbinders: Grand Calibur Machine, Raspberry Plate; Le Papillions Two Shapeabilities; Floral Jewels 3D M-Bossabilities folder
- Scrapbook Adhesives by 3L™: E-Z Adhesive Runner
- Want2Scrap: 72 Count White Peals (self adhesive)
- Miscellaneous: pink, turquoise and white cardstock; scissors; liquid glue, Kindy Glitz; sanding block, paper rose
Directions:

1. Emboss turquoise cardstock using the Floral Jewels 3D Embossing Folder.
2. Trim to size, approximately 4-1/4˝ x 5-1/2˝.
3. Lightly sand the raised parts with a sanding block

4. Using a Fantastix and Wedding Dress ink, highlight the embossed portions of the pattern (particularly the flowers and leaves).
5. Apply a second layer in the same manner.

6. Using a Fantastix and Angel Pink Ink, apply to the flowers.
7. Apply a second layer in the same manner.

8. Using a Fantastix and Rose Bud Ink, apply to the base of the flowers toward the tip, getting lighter as you go..
9. Apply a second layer near the base.
10. Using a Fantastix and Pistachio Ink, apply to the leaves.
11. Apply a second layer near the base of the leaves.

12. Cut pink cardstock slightly larger than the embossed image.
13. Adhere image to the pink cardstock.
14. Adhere the layers to a white base measuring 4˝ x 6˝.
15. Cut/emboss one Butterfly from white cardstock.
16. Color the butterfly using previously inked Sponge Daubers to add soft color to the butterflies.
17. Add Kindy Glitz on the butterfly wings for dimensional shimmer.

18. Adhere paper rose to the centre of the butterfly.
19. Add bling to the corners.
.

Two Beautiful Cards 🙂
These cards are beautiful ladies 🙂
Thanks so much purplecinn! {{{hugs}}}
Two fantastic techniques, thanks for sharing.
Thanks so much Jan – appreciate you support – we will do this in Class at some stage! {{{hugs}}}
Linda your card looks so pretty!
Thanks so much Cathy – I came across to say the same about yours – always love your tutorials! 🙂
I love learning new techniques from such talented artists. Beautifully done.
Thanks so much Judy – I love the fact that we learn from one another! 🙂
Another outstanding masterpiece 😀 Love the flower in the center of the butterfly as well as the feeling of movement in the background!
Thank you Alice! {{{hugs}}}
Beautiful cards, Cathy and Linda – just wish the purse and the wants were compatible.. too many wants and not enough $$$ 🙂
Thank you Maxine – I hear you – one bite at a time will get you there! {{{hugs}}}
I love both of these cards! And I need to find out more about the ruler Cathy used! You two are so amazing!
Thank you so much Debbie! {{{hugs}}}