Color a Journal Page in the Style of a Cute Nature Scene

by Elina Stromberg

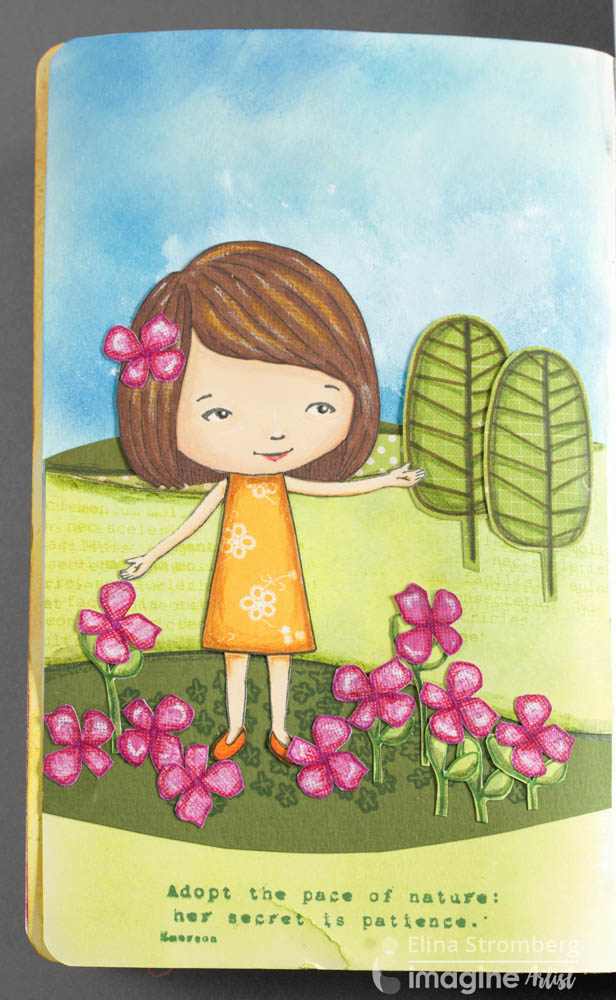
Stamped collages provide an easy way to create beautiful and colorful pages into your art journal book. For this technique, you can mix and match stamps from various sets and take those small pieces of leftover papers and put them into use. Main images on stamped collages are like paper dolls; first, you stamp and cut out the body, then hair, clothes, and accessories. Finished pieces contain several layers; just like dressed paper dolls!

Skill: Intermediate
Time: 2 hours

Directions


Step 1

Stamp the main image on cream cardstock and again on brown, orange and patterned floral paper.


Step 2

Color the image face, hands, and legs. Add shadows and highlights to the brown hair and the flower-patterned skirt. Cut out. On the non-visible areas trim body image slightly smaller on the edges; this will ease the positioning of the colored and cut details.


Step 3

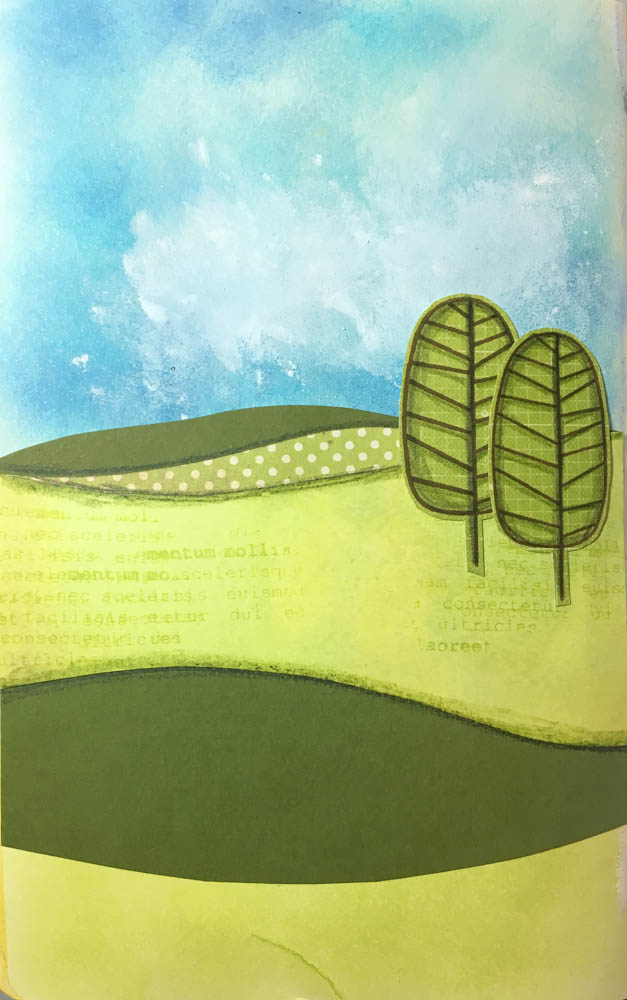
Using green papers hand-cut waves to build a landscape scenery. If you wish, decorate with stamped patterns.


Step 4

Ink the page background: Dab green ink on the bottom part of the page, and both lighter and darker blues on the top. The area in the middle may be left white as it will be covered with the green scenery papers. 
Create clouds on the inked sky by adding a hint of white gesso on top of the blue ink.


Step 5

Stamp trees on green patterned paper. Highlight the stamped lines with a color pencil. 
Cut out.


Step 6

Stamp flowers and stems on patterned or solid color paper. Color with color pencils and cut out.


Step 
7

Stamp small flower patterns on the layered landscape. Glue flowers on the background. Place the main image on the page. Stamp sentiment text on the bottom of the page. Done!

Supplies

Imagine
Other
  • Art Journal book
  • Colorful pieces of leftover papers
  • Carabelle Studio – “The girl smiling” stamp
  • 
Simon Says Stamp – One With Nature
  • 
Studio Calico – Set 17179
  • Gesso – white
  • Color pencils
  • Scissors

Learn How To Craft A Beautiful Card With Feathers

by Elina Stromberg

Learn How To Craft A Beautiful Card With Feathers

I hope you will soon get the chance to try the new StazOn Pigment inks. They are amazing! Like the standard StazOn inks, StazOn Pigment inks work well on various surfaces, they dry quickly and are super easy to use. Beautiful and bright colors are opaque and ‘juicier’ than the standard StazOns, giving you a crisp image every time.

I was curious to test the new inks on a bit glossy, non-paper surface, but instead of going for an acetate sheet or a glass jar I remembered a pack of feathers I had purchased several years back. What if I decorated the feathers with stamped patterns to give them a fun and interesting look?

Skill: Beginner
Time: 1 hour

Directions


Step 1

Gently bend the feathers and separate the barbs by pulling them towards the quill until you have reached the look you want.


Step 2

Place the feather on a folded paper towel. This soft surface will ease the stamping over the hard shaft in the middle of the feather. Stamp patterns on the feather, using pattern stamps and ink colors of your choice.


Step 3

Add a hint of white with a gel pen. Let dry. StazOn Pigment ink will dry very quickly, but the gel pen color may need a few minutes for drying.


Step 4

Cut a diamond shape from black cardstock. Cutting lines drawn on the back of the cardstock will help in cutting a symmetrical shape.


Step 5

Tape the black diamond shape on a piece of grey/monotonous patterned paper. Glue the feathers on top. Using Tear It double sided tape mat the card front on a piece of matching color cardstock and adhere on a folded card base.


Step 6

Stamp the sentiment text “Congrats” on a paper strip and glue on the card. I used another stamped feather on a different card layout, and even if that design is even simpler, I think the card looks quite nice!

Supplies

Imagine
Other
  • Craft feathers
  • Pattern stamp of your choice (I used a stamp from ‘Mini Textures’ set by Carabelle Studio)
  • Letter stamps by Studio Calico
  • White gel pen
  • Tacky glue
  • Cardstock – Black, white, red, patterned grey
  • White/green folded card base
  • Pencil
  • Ruler
  • Scissors
  • Paper Towels