Wedding Day Blessings Card with VersaFine Clair

By Katy Ingram

Hello Friends! Katy here with another project for you. Today’s card features a wedding day theme, but as always you can use this design for what ever you need! In fact, I used it for a sympathy card when I first designed it.

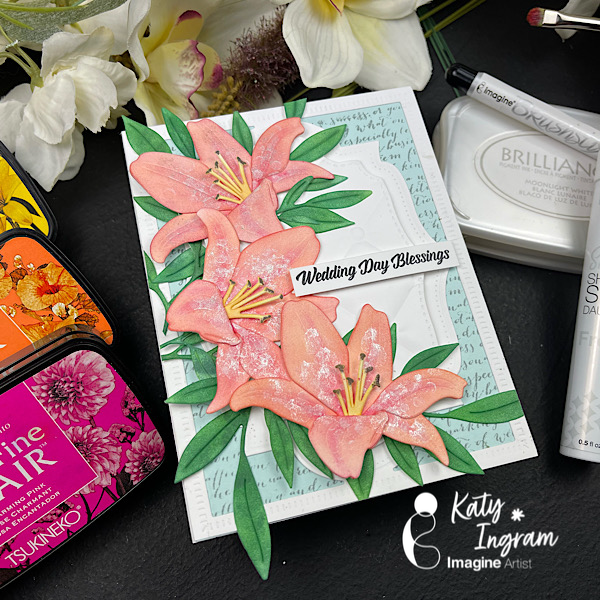
In todays video I share how I used detail blending brushes to create a peach blend on some Lily florals using VersaFine Clair in Summertime and Charming Pink. I also add a bit of shimmer using Sheer Shimmer Stix Dauber in Frost. Check out the video below for all the details.

Skill: Intermediate, Advanced
Time: 30 minutes

Art Supplies

Imagine Products

VersaFine Clair – Cheerful
VersaFine Clair – Warm Breeze
VersaFine Clair -Summertime
VersaFine Clair – Charming Pink
VersaFine Clair – Spruce
VersaFine Clair – Grass Green
VersaFine Clair- Rainforest
VersaFine Clair – Morning Mist
VersaFine Clair – Nocturne
VersaFine Clair- Pinecone
Brilliance Moonlight White
BrushStix
Sheer Shimmer Stick Dauber – Frost
Tear It! Tape

Other Products Used

Affiiate links below at no additional cost to you.
Thank you for your support

The Greetery Botanicut Lily
The Greetery Ruscus Die
Honey Bee Stamps Vintage Labels
Hero Arts Script Background Stamp
Spellbinders 3D Tufted Embossing Folder
Simon Says Stamp Sea Glass Cardstock
100 lb White Cardstock
Craft Foam
Altenew StampWheel

Monochromatic Father’s Day Card with VersaFine Clair

By Katy Ingram

Hello Friends! Katy here with another quick project for you. Today’s card is for Father’s Day, but as always you can use this design for what ever you need!

I decided to do a monochromatic theme. What’s that mean really? Well that simply means consisting of one color or hue. Today’s color or hue is blue. Great for masculine. Todays project also allows us to stretch our supplies by using a holiday background stamp, genius I know. Check out the video below for all the details.

Skill: Beginner
Time: 15 minutes

Art Supplies

Imagine Products
• VersaFine Clair – Bali Blue, Warm Breeze, Paradise
• Sheer Shimmer Stick Dauber – Frost
• Tear It! Tape

Other Products Used
• Affiliate links here https://ldli.co/e/qypqyed at no additional cost to you. Thank you for your support • Simon Says Stamp Poinsettia Background-No Longer Available, see below for other options
• Kat Scrappiness Upper and Lower Case Condensed Alphabet dies
• Spellbinders Cobalt Hot Foil • Spellbinders Ideal Moments BetterPress Plate
• The Greetery Crimped Frames

Make a Father’s Day Card for Your Home Improvement Hero

By Jessica Lin

Skill Level: Medium
Time: 30 min

Hi everyone! It’s Jessica here. Today I would like to share a Father’s Day card that showcases different tools to thank my dad for all the home improvement projects he has done in the past year. I also ink blended Memento inks on the die cut pieces to create more depth. If you’d like to learn some tips and tricks on ink blending small paper elements, just keep reading!

Step 1:
First, I die cut several tools from a silver cardstock. I’ve had this paper for a long time since my scrapbooking days, and I am glad to finally use it again. I also adhered Stick It sheets to the back of the silver cardstock before die cutting, so that all of the elements are adhesive backed. This will make adhering to the small tool pieces easier and mess-free.

Step 2:
Die cut again with colored cardstock to create the handles on the tools. I used So Saffron cardstock for the wrench and Cajun Craze cardstock for the hammer.

Step 3:
For the power drill, I used Misty Moonlight and Blueberry Bushel cardstock. I also die cut a bolt from the silver cardstock to decorate this power drill.

Step 4:
One of the things I love about this die set is that it includes this pegboard die. You can extend the size of this die by matching up the holes on the die with a row of die cut holes and die cut again. They will fit like a puzzle and it almost feels like it is “locked” once the fitting is matched up.

Step 5:
I decided to dress up the die cuts further by ink blending the edges with Memento Inks. Since the die cut pieces are small, I opted for the small sponge daubers instead of my regular blending brushes. These small daubers are great for precise ink blending. I also lay the die cuts on Altenew’s Grip Mat, which conveniently secures the paper pieces and ink pads so they don’t shift around when ink blending.

Step 6:
The Jumbo Dauber is also a great blending tool. I used Desert Sand Memento Ink to add some shadows to the bottom edges of the pegboard piece.

Step 7:
Finally, I adhered the pieces with Tear It Tape and stamped the sentiment from Stampin Up’s Heartfelt Hello set. This card was fun to put together and I hope you enjoyed it.

Craft Supplies

Imagine Supplies:

Other Supplies:

  • Stampin’ Up! – Stamps – Heartfelt Hellos
  • Stampin’ Up! – Dies – Trusty Tools
  • Foam Tape
  • Colored cardstock