Let Your Light Shine: Lighthouse Card Tutorial

By Ceal Pritchett

Hello everyone!

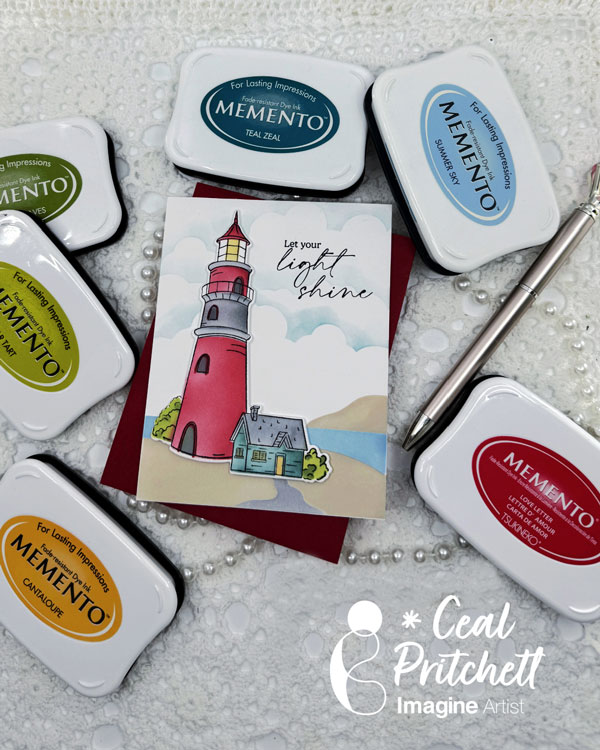
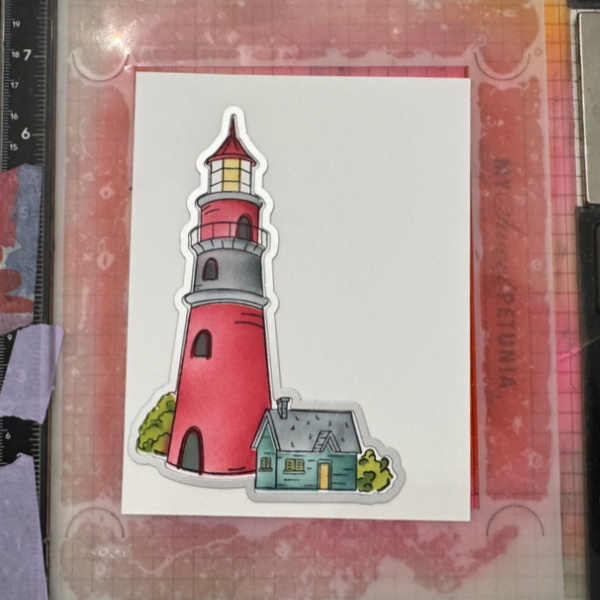
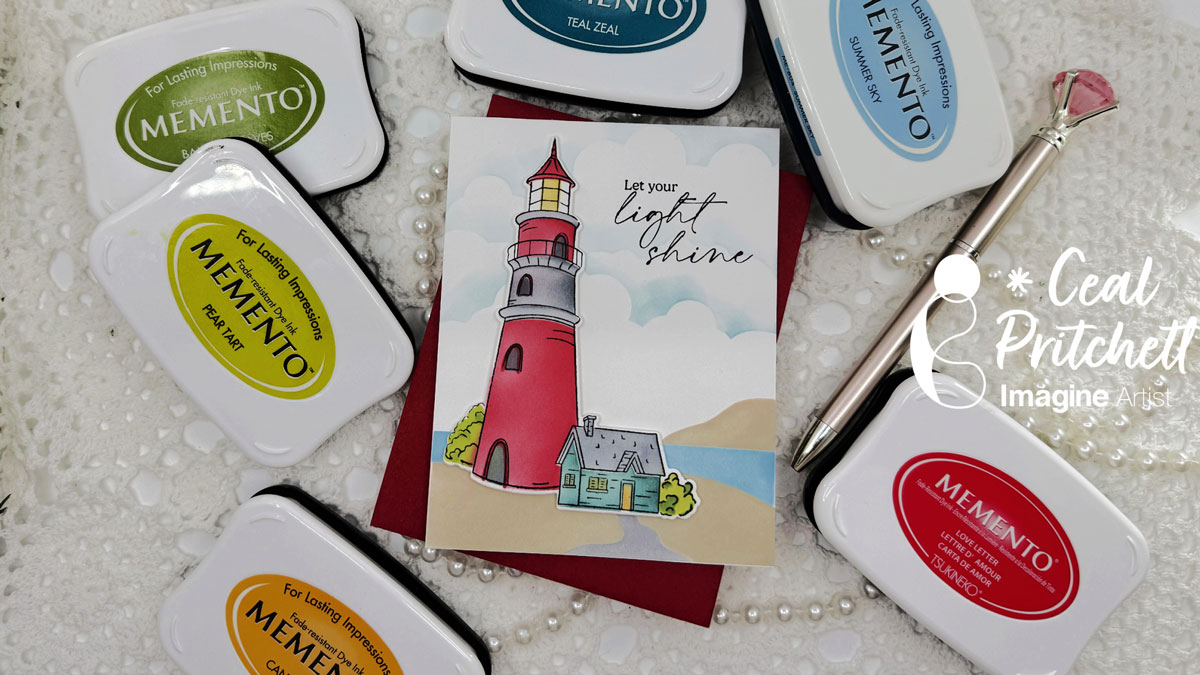
It’s Ceal, here. Today I am sharing how to make this beautiful light house card using supplies by Pinkfresh studio and Memento Inks.

Skill: Intermediate to Advanced
Time: one hour

Directions:

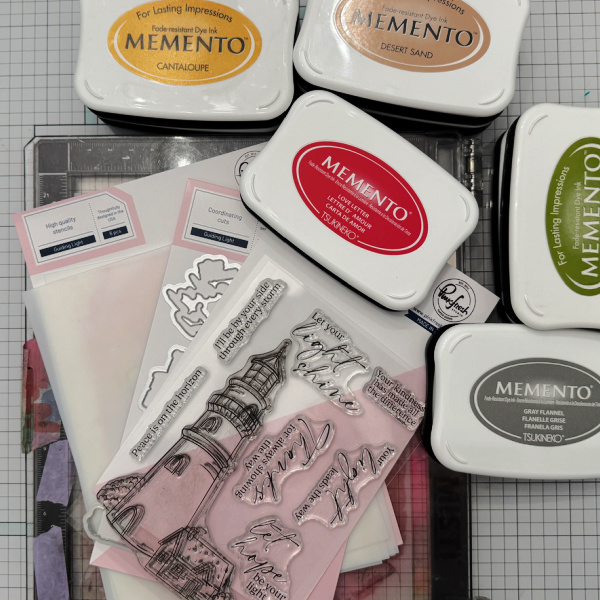
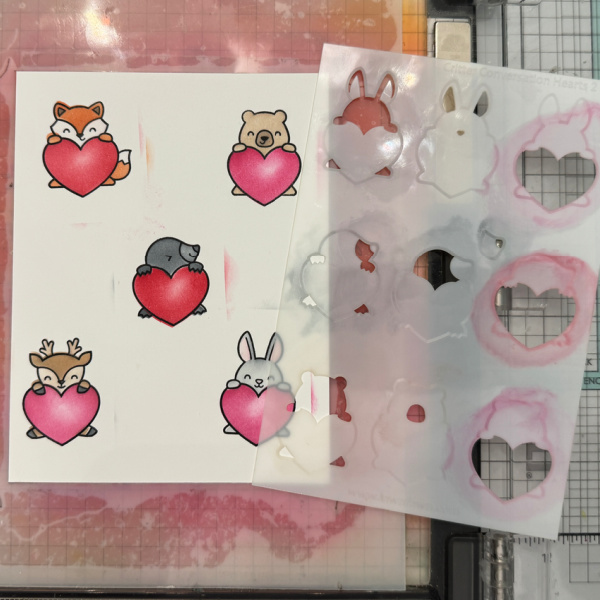
Gather your supplies.  You will need a lighthouse or similar stamp set with coordinating stencils and dies. To make this card I started with a white top folding A2 card base and a white panel.
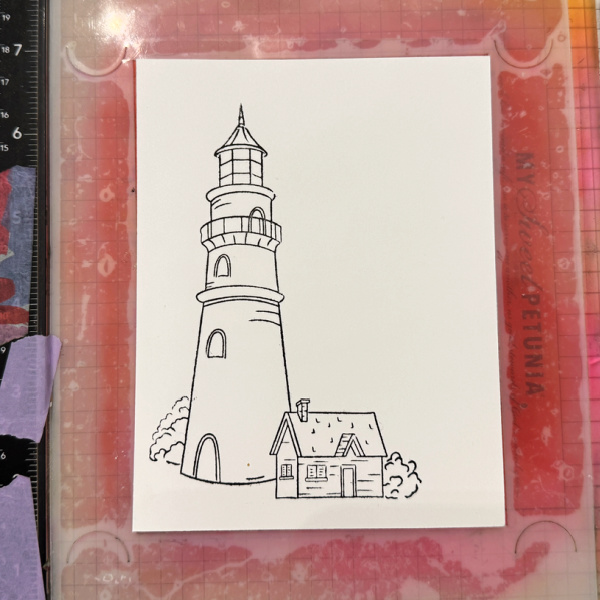
Step 1:
Stamp the image with VersaFine Clair Nocturne ink on a white panel.
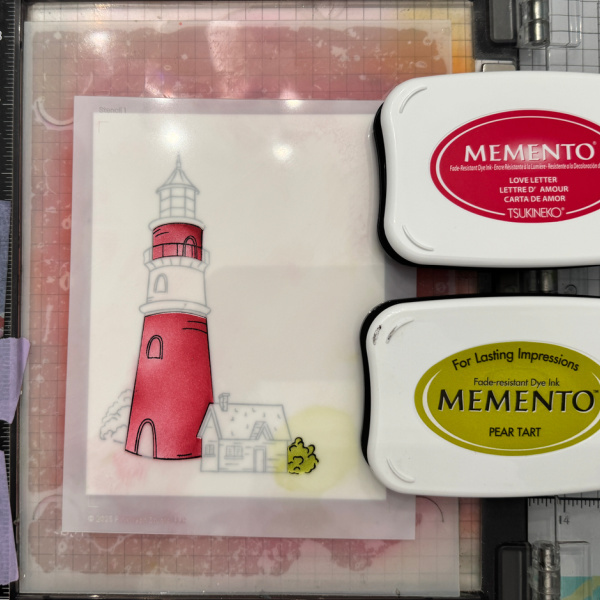
Step 2:
Using the first stencil color the portion of the lighthouse and bush. I used Love Letter and Pear tart Memento ink.
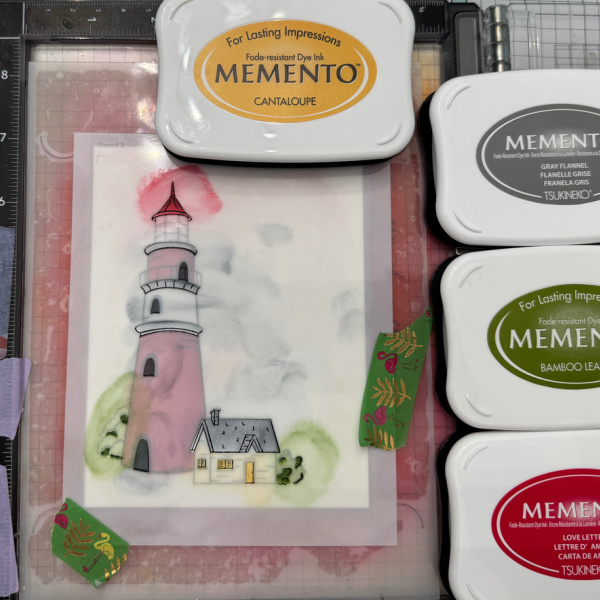

Step 3:

Color the open portions of the second stencil. I used Gray Flannel, Love Letter, Cantaloupe, and Bamboo Leaves
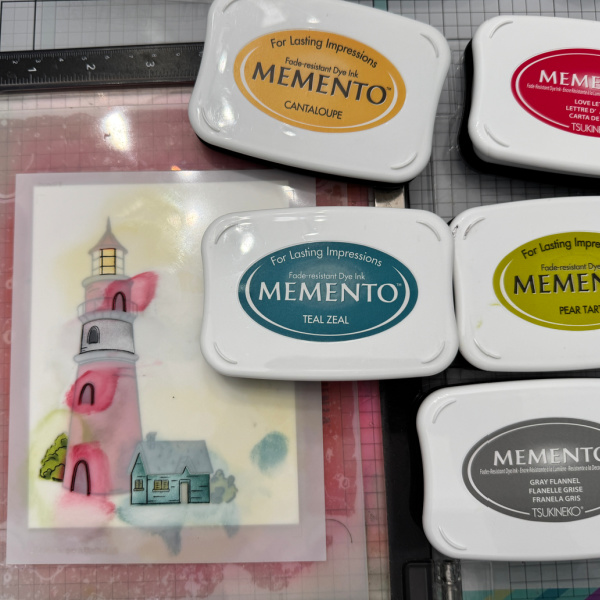

Step 4:

Color the open portions of the third stencil. I used Cantaloupe, Love Letter, Teal Zeal, Pear Tart and Gray Flannel. This will complete the coloring of the image.

Step 5:
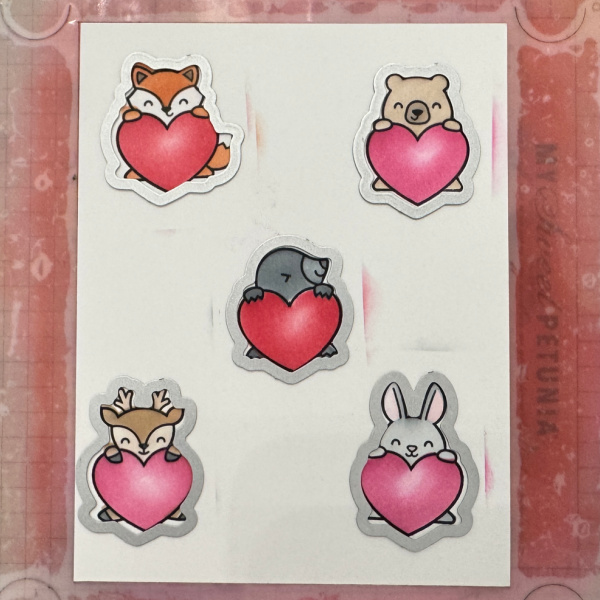
Cut the image out with the cording die using a die cutting machine.

Step 6:
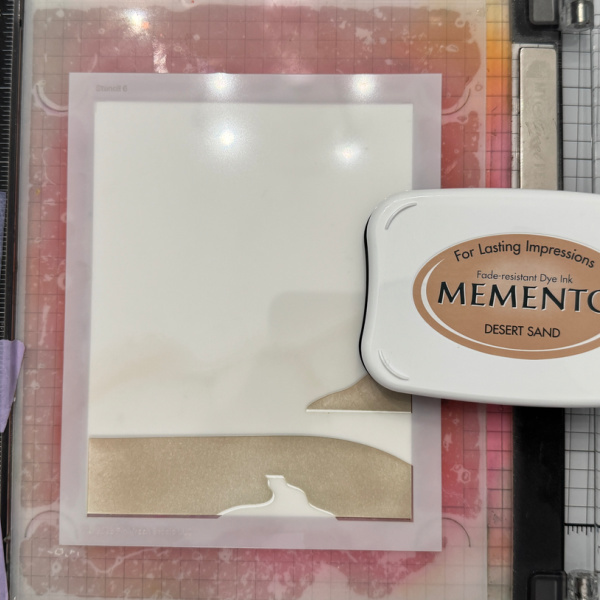
Color the open portion of the fourth stencil creating the sand. I used Desert Sand. For the walkway/path I used Gray Flannel.

Step 7:
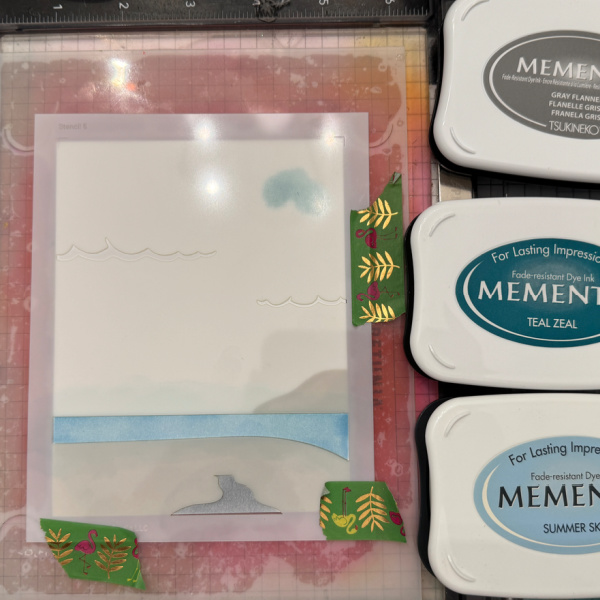
Color the open portion of the stencil creating the water. I used a mixture of Summer Sky and Teal Zeal.

Step 8:
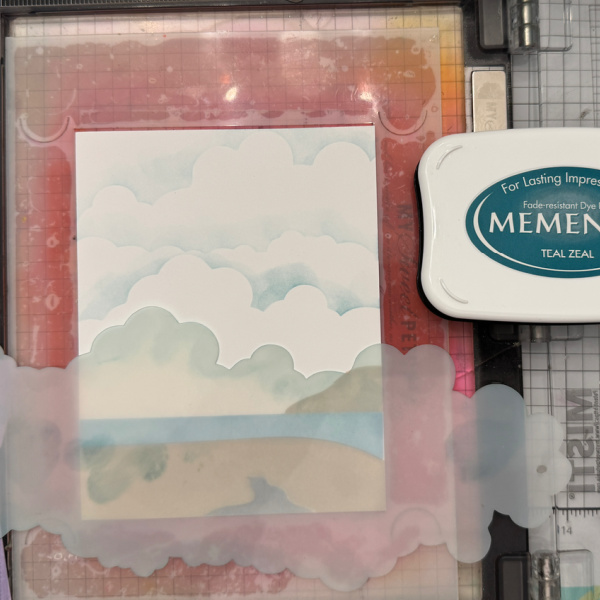
Create clouds in the background by using a cloud stencil. The ink I used is Teal Zeal.

Step 9:
Add a sentiment to the panel and adhere the finished panel to the card base popping up the lighthouse.

Products Used:

Imagine Products:
Memento Inks in the following colors
Teal Zeal
Summer Sky
Pear tart
Bamboo Leaves
Love Letter
Cantaloupe
Desert Sand
Gray Flannel

Other Supplies:

Guiding Light by Pinkfresh Studio
Stamp set
Coordinating Coloring Stencils
Coordinating Dies

Creating a Colorful Seahorse | Step-by-Step Art Process

By Tracy Fear

Join Me Creating a Colorful Seahorse | Step-by-Step Art Process
Tracy

Skill: Intermediate
Time: 60 Minutes

Art Supplies
100lb white paper
A2 Card Base
Stamp Platform
Silver Pen
White Gel Pen
Glue

Imagine Products
VersaFine Clair in Warm Breeze, Lilac Bloom, Charming Pink, Monarch, and Twilight

VersaMagic Ink in Mango Madness, Sea Breeze, Ocean Depth, Purple Hydrangea, Pink Grapefruit, and Turquoise

Memento ink in Tuxedo Black

Other Products Used
Lavinia Stamps from my stash.
PVA Adhesive
Deckle Trimmer
Ink blending brushes
Ink Blending domed foam pads and handles

ALTERNATIVE PRODUCTS THAT CAN BE USED TO RECREATE SOMETHING SIMILAR
Any Inks and stamps

Make a One-of-a-Kind Stop-Motion Animation Card

By Jessica Lin

Skill: Intermediate
Time: 40 minutes

Hi everyone! It’s Jessica here. Interactive cards are so fun to make! Today, I am trying out a new kind of interactive mechanism that resembles stop-motion animation. I haven’t seen this type of papercraft before, and was surprised by the result. If you like interactive cards, be sure to check this out!

Step 1:
On a piece of 3 ¼’’ x 4 ⅝’’ white cardstock, stamp the larger butterfly image with VersaColor Pink ink pad. Try to stamp it straight with the help of a stamp positioning tool or a T-ruler.

Step 2:
Then, lining up the head and tail of the butterfly, stamp the smaller butterfly image with VersaColor Orange ink pad. The stamped image looks a little odd right now, but don’t fret, this was how the You Move Me stamp set from Stampin’ Up was designed.

Step 3:
On a piece of 3 ¾’’ x 5’’ yellow cardstock, die cut the window die from the coordinating die set. This window is going to be the key of the interactive mechanism. I die cut it towards the top of the card panel since I will be adding sentiment strips on the bottom.

Step 4:
Adhere thin foam strips around the sides and bottom of the die cut panel. Don’t forget to leave the top open! TIP: lay the stamped panel on top of the die cut panel, and adhere the foam strips as close to the die cut panel as possible. This would leave less wiggle room for the stamped panel to move around, creating a smoother fluttering effect. After that, adhere the die cut panel to an A2 white cardbase.

Step 5:
Punch a hole on the top of the stamped panel and add a small piece of ribbon on top.

Step 6:
Stamp additional floral elements with VersaColor Pink, Orange, Canary, and Green ink pads. Die cut each image with coordinating dies.

Step 7:
Stamp the sentiment with VersaColor Pink and Green ink pads. Adhere them to the front of the die cut panel, and this fun, interactive card is complete!

Craft Supplies

Imagine Supplies:

Other Supplies:

  • Stampin’ Up! – Stamps – You Move Me
  • Stampin’ Up! – Dies – Move Me
  • Stampin’ Up! – Tool – Cut & Emboss Machine
  • We R – Tool – Precision Press Stamp Positioning Tool
  • Adhesive Foam Strips
  • White and Yellow Cardstock

Easy Winter Scene for Any Occasion

By Katy Ingram

Hello Friends! Katy here with my latest video using a color palette of blue and gray VersaFine Clair inks to create a simple winter scene. This design is great for winter birthday cards or simple greetings. Video has all the details. Thanks for watching. 

Skill: Beginner
Time: 20 minutes

Directions:


Art Supplies

Imagine Products

Other Products Used

Strathmore 500 Series Hot Pressed Watercolor Paper
100 lb Cardstock
Penny Black Winter Tree Stamp
Penny Black Seasons Marvel Stamp Set
Hero Arts CM308 Stacking Snowflakes
Blending Brushes
Tim Holtz Moon Mask

Adorable Filmstrip Valentine’s Card

By Ceal Pritchett

Hello everyone!
Today I am sharing how I made this filmstrip valentines card using some Memento inks.

Skill: Intermediate
Time: 1 hour

Directions:

Gather your supplies. To make this card, you will need a valentines set (preferably with small images to fit in the film strip), a film/postage strip die, and sereral colors of ink.

I started with a white top folding A2 card base and a white panel for the images. I used a set from Lawn Fawn that has coordinating stamp, coloring stencils and dies.  I used Memento inks in several colors to color the images and a stamp/film strip die.

Step 1:
Stamp the images in VersaFine Nocturne ink on a panel of white cardstock.

Step 2:
Using stencil No. 1, color the images in the desired colors. I used Morocco for the fox and Desert Sand for the deer.

Step 3:
Using stencil No. 2, color the remaining images in the desired color. I used Desert Sand for the bear and Gray Flannel for the seal and Bunny just heavier handed on the seal.  I used Angel Pink for the ears.

Step 4:
Using the coordinating dies and a die cutting machine, cut out the images.

Step 5:
Cut out the postage/film strip and then color with coordinating stencil. I used Summer Sky.

Step 6:
Cut out a background using a heart cover plate.

Step 7:
Stamp the greeting and then cut down at an angle. Put all the elements together on the card base.

The postage/film strip will hang over a little and will need to be trimmed. You can prevent this by madding a horizontal card rather than a vertical one.

Craft Supplies:

Imagine Products:

• Memento Inks in the following colors
Desert Sand, Summer Sky, Gray Flannel, Love Letter, Lulu Lavender, Angel Pink and Rose Bud

Other Products

Critter Conversation Hearts by Lawn fawn
Stamp Set
Coordinating Coloring Stencils
Coordinating Dies
Postage/Film strip die by Gina K Designs

Strawberry-licious Handmade Greeting Card

By Tracy Fear

Berries Galore!
Join Me Creating a a fun and whimsical card featuring delicious strawberries!

Tracy

Skill: Intermediate
Time: 60 Minutes

Art Supplies
100lb white paper
A2 Card Base
Stamp Platform
Colored Texture Paste
Stencils
Ribbon
Blending Brushes

Imagine Products
VersaFine Clair in Baby Pink, Strawberry, Grass Green, and Nocturne

Other Products Used
Simon Hurley 
Very Berry Stencil Set
Berry Best Stamp and Coordinating Dies
Stellar paste in Black Widow
Lunar Paste in Later Gator
PVA Adhesive 
Ink blending brushes