Make an Adorable Gingerbread House Card

By Kathy Pisupati –

Good morning!  Kathy here, creating art for Imagine Crafts!  Today I have a new tutorial for you.  Have you tried the VersaMark Frost ink?  This was the perfect ink to provide a sugar-like coating to today’s Gingerbread card.  The VersaColor inks make your die-cutting easy and stop the search for the perfect colored scraps!

So today I have a project for you that uses the VersaMark Frost and VersaColor Inks.  So, let’s make a card.

Skill Level: Intermediate

Time to complete: 1 hour

Step 1

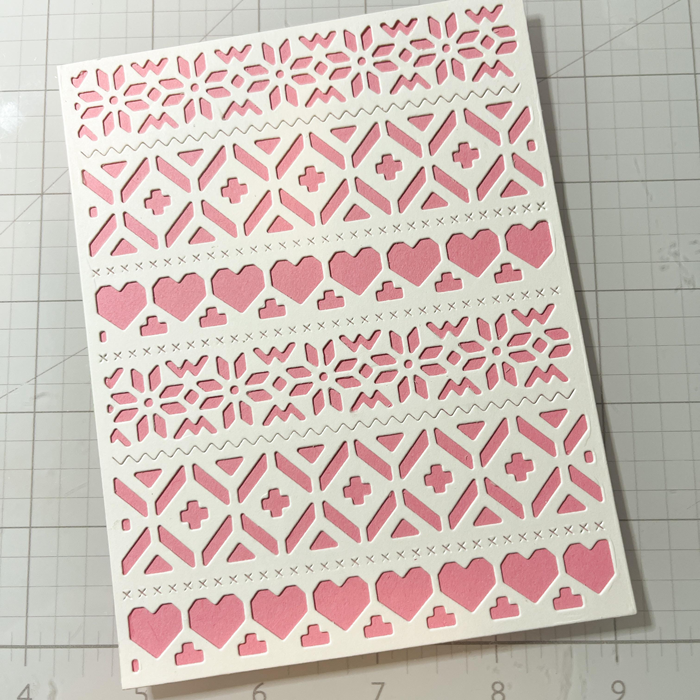
You will need a top-folding card base measuring 4 1/4 x 5 1/2“. You will also need a piece of colored card stock measuring 4.25” x 5.5” and another piece of white, layering card stock the same size.

Using Maker’s Movement A2 Sweater Cover plate, die-cut the white card stock and and adhere to the colored card with On-Point liquid glue.  Adhere the entire panel to the card base with Tear-It! Tape.

Step 2

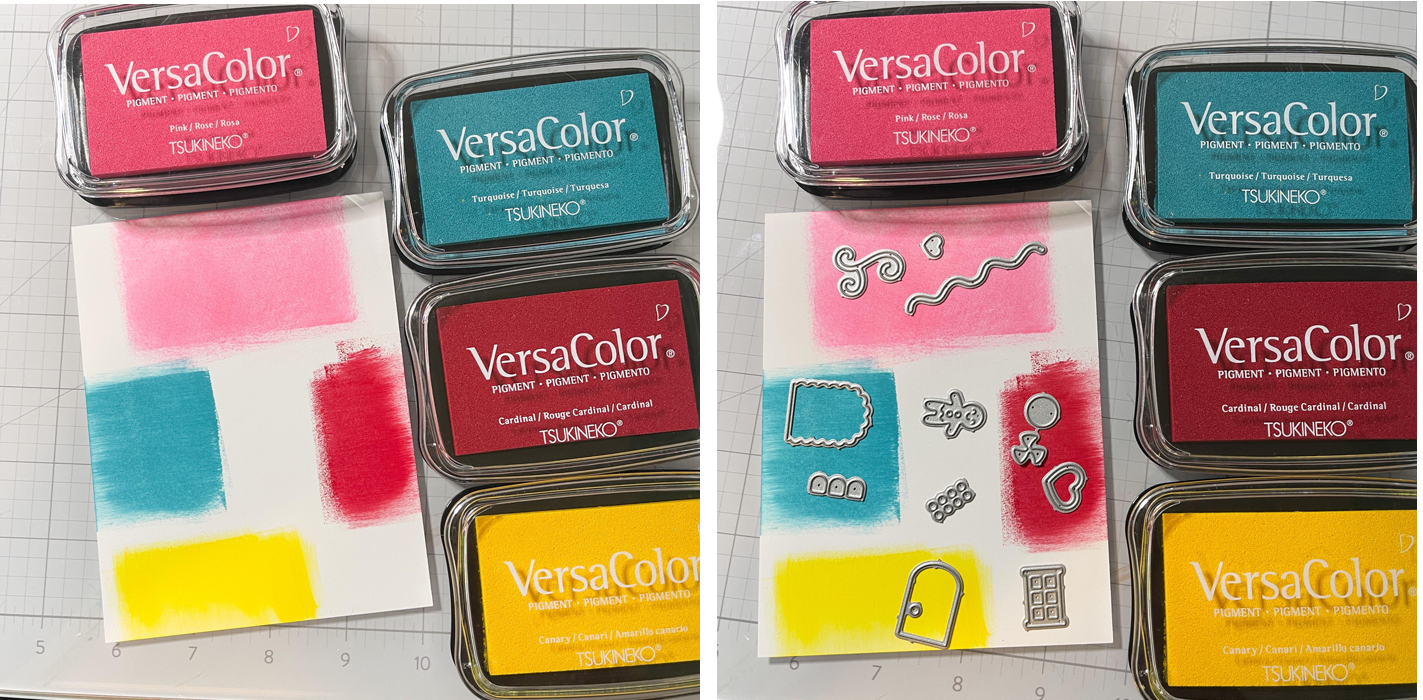
I inked a piece of scrap card stock with a variety of VersaMark Inks.  I allowed this panel to dry.  This is a quick way to small pieces of colored card stock for small die-cutting.

Step 3

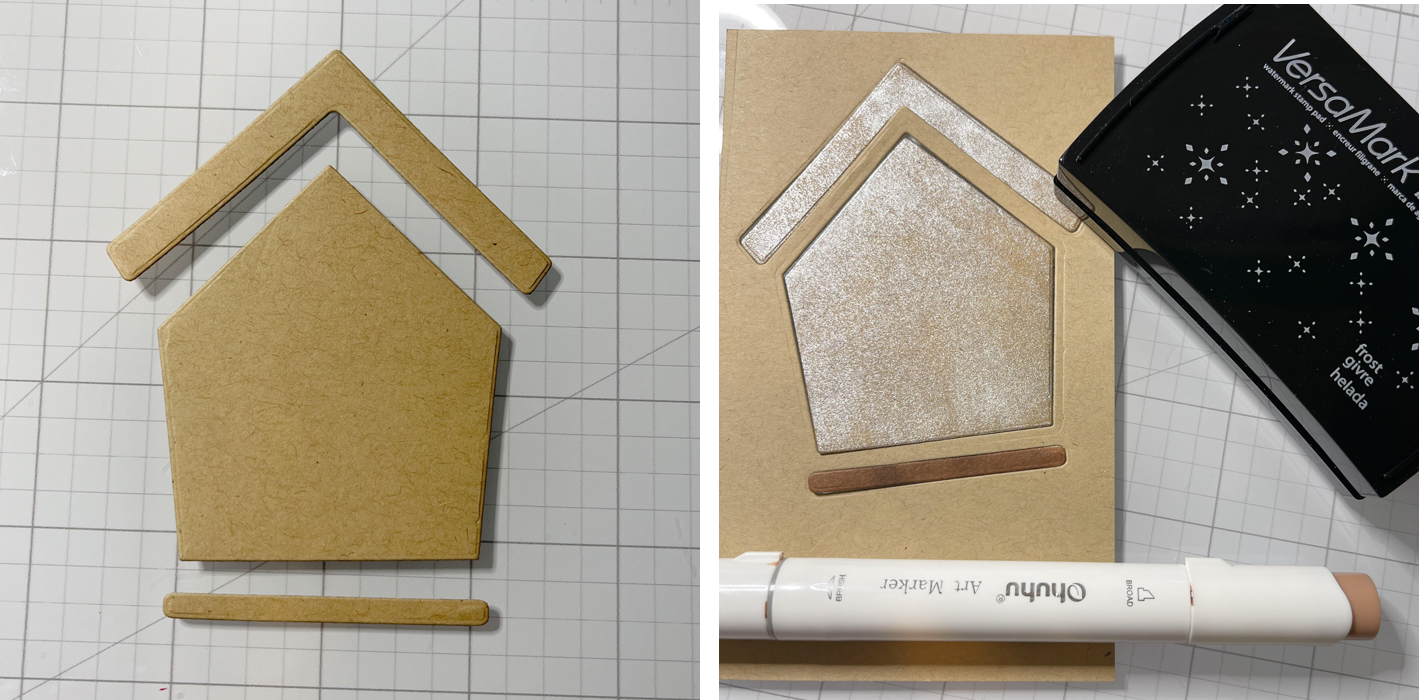
Cut the Gingerbread House from a piece of Kraft colored card stock.  Then use the VersaMark Frost ink to apply a “sugar coating”.  This is what I am calling it.  The picture doesn’t do it justice but it sure looks sugar coated in real life!

Step 4

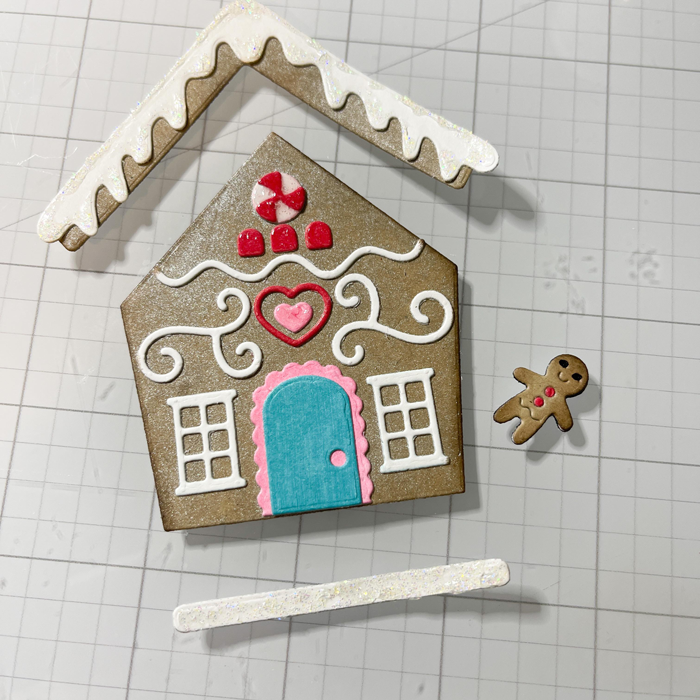
Now it’s time to cut all the cute little pieces from this Gingerbread House set.  I added some Glossy Accents to some pieces, some shimmer pen to others and did a little ink blending around the house and the gingerbread man.  I also added a glitter glue to the snow on the roof and the ground.
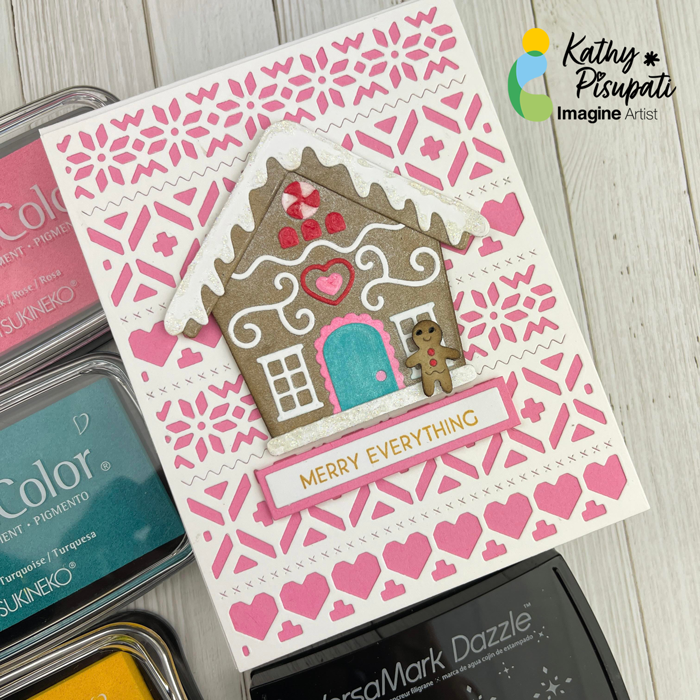
Step 5

Stamp a sentiment and add a shadow to the strip. I used Delicata Golden Glitz ink for my sentiment.  Now you can assemble your card.  The house, gingerbread man and sentiment were all adhered with foam tape.

I hope you enjoy this card and the tutorial. Thanks for stopping by I appreciate all of you!

Supplies Used:

Imagine

Imagine Crafts

• VersaColor Pink

• VersaColor Cardinal

• VersaColor Turquoise

• VersaColor Canary

• VersaMark Frost

• Delicata Golden Glitz

• Imagine Sponge Daubers

• Imagine Craft Mat

• On Point Glue

• Tear-It! Tape

Other

• Maker’s Movement Gingerbread House Dies

• LDRS Christmas Sentiments and Coordinating Dies

• Glossy Accents

• Spellbinders Platinum 6 Die-Cutting machine

• Colored card stock

• Neenah Classic Crest Solar White 110lb

• Paper Trimmer

• Teflon bone folder

• Foam Tape

Learn How to Create a 3-D Holiday Card

by Roni Johnson

Learn How to Create a Dynamic Holiday Card

I was so excited when I found out one of our challenges this month was focused on Winter Windows. Immediately,  I knew I wanted to make a shadow box card looking out over the wintery countryside. I didn’t want a tiny little card though so I remembered a lucky find at a garage sale earlier in the year. I found a stack of #10 side-load envelopes. These are the standard business size envelopes but with a side flap instead of on top. This envelope allowed me to make a nice large scene that when opened and standing up measures 4” x 7” x 2.5” giving me enough room to add 4 layers of snow and holiday imagery.

Skill: Advanced
Time: 1 hour + dry time

Directions


Step 1

I began my cutting 2 strips of 4 x 9.75” white cardstock; cutting a 3 x 6” window in the center of one panel. Glue the two panels together. Stamp a snowflake image to the outside portion of the card panels using Sapphire Blue Delicata ink.


Step 2

Free-hand cut three “hills” for the layers in the card. Apply Radiant Neon Amplify! in White to the “hills”; sprinkle with extra fine clear glitter; heat to activate the medium.


Step 3

Stamp several evergreens using Northern Pine Memento. Dauber on Bamboo Leaves and New Sprout colors to the evergreens that will be on the second and third layers to create shadow and depth.


Step 4

Stamp countryside scene on white cardstock and watercolor with a water brush and Memento Dew Drops.


Step 5

Add highlights to the snow drifts, pond and houses using On Point Glue and the extra fine glitter. I used the Amplify and glitter method for the trees on the front layer too. Affix the countryside scene to the back portion of the box. Attach each of the 3 hill layers and trees to the sides of the center portion of the card spaced evenly. Finish assembling the card.

Thank you for stopping by the Imagine blog and if you enjoyed this tutorial then please comment below or share on social media! 

Supplies

Imagine
Other
  • Cardstock
  • Just For Fun Stamps – “Evergreens”, “Countryside Scene”
  • Chapel Road Artstamps – Snowflakes Everywhere
  • Extra Fine Clear Glitter
  • Waterbrush
  • Heat tool

Color of the Month for December is Evergreen

Color of the Month for December is Evergreen. Delicata new color Emerald Green, Memento has Cottage Ivy and Kaleidacolor Fresh Greens 5 color palette

To celebrate the month of December we decided to challenge our Artists with the color Evergreen! We love seeing the fresh greenery in Holiday decor, Christmas tree stamp collections, and a variety of green imagery. Some of our favorite Tsukineko brands feature fabulous green ink colors to satisfy the Evergreen challenge. Delicata has a new color called Emerald Green, Memento has Cottage Ivy and if you are looking for something outside the norm you can try the Kaleidacolor Fresh Greens 5 color palette. In today’s post, Martha creates a sweet mason jar die cut window in a holiday card, Kyriakos gets crafty with ornaments and Mischelle creates a greenery frame on stationery.

Winter Wonderland Holiday Card by Martha Lucia Gomez Kaleidacolor diecut window mason jar shape deer

Winter Wonderland Holiday Card by Martha Lucia Gomez

Our color challenge this month is Evergreen and I decided to use it in conjuntion with a die cut and one of my favorite versatile inks. Creating winter scenes is so much fun, you can stamp several images or use a complete stamp. On this card, I am using the Bright all Night image from Close to My Heart. I stamped it over the whisper white card base using Fresh Greens Kaleidacolor Ink. It looks simple and gorgeous with different tones of green. I love the look of the sentiment stamped outside the window in the matching ink!

Supplies

Imagine
Other
  • Close to My Heart – “Bright all Night” stamp set
  • So Suzy Stamps – Doe Small
  • Stampin Up – Everyday Jars framelits
  • Die cut machine
  • Cardstock

Christmas Tree Ornament by Kyriakos Pachadiroglou

Christmas Tree Ornament by Kyriakos Pachadiroglou

Handmade Christmas ornaments are always special to make and share. They represent your style of home decoration during this festive season and they go far away from the commercial ones. With green color being one of the top choices every year, I chose to make ornaments in tree shape that fit well on Christmas tree, gift boxes, and any other decorations and projects.

The wooden tree shapes are covered with All-Purpose Ink and Delicata Emerald Green. The designs on top follow the same color choice, but with a little of sparkle, using Imagine’s Verdigris embossing powder. The process shows two ways to color the trees using the inks used in a reverse way.

Stamp with VersaMark and Viva clear stamps and heat set Imagine’s embossing powder Verdigris with your heat gun

Heavily cover the tree shape with Delicata Emerald Green. Let it dry. Use a soft flat paint brush and make repetitive strokes with the White All-Purpose Ink following the shape of the tree branches. The two inks will start to blend creating soft lines. Repeat on the other side. For the second ornament try the opposite. Paint the tree shape with the All-Purpose Ink, and then make strokes with the Delicata following again the shape of three and the way branches should look. After your ink is dry, emboss with Imagine’s Verdigris embossing powder. Add rhinestones to further embellish the trees.

Supplies

Imagine
Other
  • Wooden tree shapes
  • Rhinestones
  • Heat gun
  • Ribbon
  • Viva Decor – “Peacock Feathers” stamp set

Custom Christmas Letter Stationery by Mischelle Smith - wise men still seek him. nativity. Close to My Heart – Perfectly Pine, Reason for the Season stamps

Custom Christmas Letter Stationery by Mischelle Smith

It’s Christmas! It is a time of year that makes me think of stationery. I have always loved stationery and love that I can easily create my own for any season and in any color palette. Imagine’s color of the month is Evergreen and that makes me think of pine trees. I combined some of my favorite greens and blues to create this fabulous stationery ready for this year’s Christmas letter.

With Nautical Blue ink – stamp nativity, saying “Wise Men still Seek Him” and several pine tree branches. Stamp the remaining pine tree branches with Memento Northern Pine and Bamboo Leaves. Since dye ink dries so quickly you can start writing on the stationery soon after creating the frame. Enjoy!

Supplies

Imagine
  • Memento – Nautical Blue, Northern Pine, Bamboo Leaves
Other
  • Close to My Heart – Perfectly Pine, Reason for the Season stamps
  • White paper

How to Amplify Your Holiday Cards

by Nadine Carlier

Pinecone Holiday Card by Nadine Carlier ic wm


Using Neon Radiant Amplify on holiday cards is a fabulous way to create a snowy effect. On my card today I used Amplify in white with a stencil and some Dark Brown Shimmer Delicata Ink. I am really loving how the pinecone on my card looks like it is flocked with snow!

Watch my video tutorial below to see exactly how I created my card. Enjoy!

Skill: Intermediate
Time: 30 min.

Supplies

Imagine
Other

Visit our YouTube Channel for more inspirational videos and subscribe to get updates for when we post new videos.

Announcing 6 New Luxurious Colors in Delicata

Announcing 6 New Luxurious Colors in Delicata


We love Tsukineko’s Delicata ink. We also love all the Rose Gold decor, fashion, make-up and crafty goodness we’ve seen hit the market recently! We thought, hey we have this metallic ink and Rose Gold would be super popular, and we have this awesome relationship with Tsukineko…maybe we can make Rose Gold ink a reality! Eek! Office dance party (with rose gold balloons)!

In our quest for Rose Gold, we worked with Tsukineko on some other luxurious colors and options to present at the same time. The additional colors we are announcing are: Pink Shimmer, Champagne, Sapphire Blue, Ruby Red and Emerald Green. Also new—small inkpads in all 12 Delicata colors! Not only is anything tiny immediately cute, the smaller inkpad comes with a smaller price.

This expansion of Delicata ink aims to offer the highest quality in metallic pigment ink in full-size and small inkpads as well as a new range of colors to expand your metallic palette. We challenged our artist with Rose Gold and Delicata for the month of September so stay tuned to our blog to see the amazing art our little geniuses cook up!

Announcing 6 New Luxurious Colors in Delicata

Let the cheer begin – the hottest holiday inks are available this September! Be sure to check back in with us for availability on imaginecrafts.com.

Save

Save

Save

Love Across the Miles

2015_November_RJ_SendingMyLove_15

Across the Miles by Roni Johnson

Who says you can’t add texture without the bulk. This card is jam-packed with all sorts of fun textures and dimension both real and faux to create a treat for the eyes and hands.

More sweet and sentimental weekend inspiration!

012015_sb_newproducts3_result_blog irResistablesLoveCard AO_2013_Nov_Challenge_main