Make an Adorable Gingerbread House Card

By Kathy Pisupati –

Good morning!  Kathy here, creating art for Imagine Crafts!  Today I have a new tutorial for you.  Have you tried the VersaMark Frost ink?  This was the perfect ink to provide a sugar-like coating to today’s Gingerbread card.  The VersaColor inks make your die-cutting easy and stop the search for the perfect colored scraps!

So today I have a project for you that uses the VersaMark Frost and VersaColor Inks.  So, let’s make a card.

Skill Level: Intermediate

Time to complete: 1 hour

Step 1

You will need a top-folding card base measuring 4 1/4 x 5 1/2“. You will also need a piece of colored card stock measuring 4.25” x 5.5” and another piece of white, layering card stock the same size.

Using Maker’s Movement A2 Sweater Cover plate, die-cut the white card stock and and adhere to the colored card with On-Point liquid glue.  Adhere the entire panel to the card base with Tear-It! Tape.

Step 2

I inked a piece of scrap card stock with a variety of VersaMark Inks.  I allowed this panel to dry.  This is a quick way to small pieces of colored card stock for small die-cutting.

Step 3

Cut the Gingerbread House from a piece of Kraft colored card stock.  Then use the VersaMark Frost ink to apply a “sugar coating”.  This is what I am calling it.  The picture doesn’t do it justice but it sure looks sugar coated in real life!

Step 4

Now it’s time to cut all the cute little pieces from this Gingerbread House set.  I added some Glossy Accents to some pieces, some shimmer pen to others and did a little ink blending around the house and the gingerbread man.  I also added a glitter glue to the snow on the roof and the ground.

Step 5

Stamp a sentiment and add a shadow to the strip. I used Delicata Golden Glitz ink for my sentiment.  Now you can assemble your card.  The house, gingerbread man and sentiment were all adhered with foam tape.

I hope you enjoy this card and the tutorial. Thanks for stopping by I appreciate all of you!

Supplies Used:

Imagine

Imagine Crafts

• VersaColor Pink

• VersaColor Cardinal

• VersaColor Turquoise

• VersaColor Canary

• VersaMark Frost

• Delicata Golden Glitz

• Imagine Sponge Daubers

• Imagine Craft Mat

• On Point Glue

• Tear-It! Tape

Other

• Maker’s Movement Gingerbread House Dies

• LDRS Christmas Sentiments and Coordinating Dies

• Glossy Accents

• Spellbinders Platinum 6 Die-Cutting machine

• Colored card stock

• Neenah Classic Crest Solar White 110lb

• Paper Trimmer

• Teflon bone folder

• Foam Tape

Thankful… an Easy to Make Fall Decor Project

By LeeAnn McKinney –

Hello there! Today’s tutorial is to show you how easy is create texture with Memento Inks. This is a very simple process that you can create with a score lines and or embossing folders. On this card, I used Memento Ink Desert Sand, Peanut Brittle and Teal Zeal.

Directions:

Art Supplies:

Imagine:

• Imagine Craft Mat – 

• VersaFine Clair Nocturne – 

• StazOn Stamp Cleaner – 

• VersaFine Clair Summertime – 

• VersaFine Clair Pinecone – 

Other Products:

• Cutting Board from Walmart

• Blender Brushes from Amazon

Create Texture with Memento Inks

By Martha Lucia Gomez –

Hello there! Today’s tutorial is to show you how easy is create texture with Memento Inks. This is a very simple process that you can create with a score lines and or embossing folders. On this card, I used Memento Ink Desert Sand, Peanut Brittle and Teal Zeal.

Skill: Medium

Time: 45 minutes

Directions:

Step 1:

Create score lines over a piece of White Smooth Cardstock. This will be your top layer and you can decide the wide or directions of the lines accordingly with your design.

Step 2:

The lines of my sample card are 0.5” wide and I am using a regular size of cardstock for an A2 card, 5-1/2”x4-1/4”.

Step 3:

Pass the ink pad of Memento Ink Desert Sand directly over the scored panel following the vertical scored lines. Just keep in mind that you need to go border to border to obtain a uniform coverage.  

Step 4:

Before to introduce the inked layer inside of an embossing folder the type of image that you want to obtain. You can use the embossed raise or the debossing. In my sample, I used the emboss raise side. Pass your embossing sandwich through your die cut machine.

Step 5:

Using a different color of ink to cover the raised pattern of your embossing folder. On this card, I am using Memento Peanut Brittle

Step 6:

Let the ink dry naturally or speed the process with a heat tool. Now you can assemble the card and decorate it.

Step 7:

To make the message of the card, I used a clear stamp sentiment and an hexagon die cut. I stamped the sentiment with Memento Ink Teal Zeal. 

Step 8:

I used the same die cut as frame to add some color to the message. I just applied the Memento Ink Desert Sand with a sponge after securing the die cut over it with washi tape.

Step 9:

To coordinate the colors of your card, you can pass an additional coat of ink to the top layer in a coordinating color with your card. In my sample, I used the Memento Ink Teal Zeal.

Just assemble your card and decorate with some embellishments. To paste the layers I used Tear It! Tape

Art Supplies:

Imagine:

• Memento – Desert Sand, Peanut Brittle and Teal Zeal.

• Tear it! Tape

• Craft Mat

Other:

• Give Thanks Clear Stamp Set by Joy Clair Designs

• Scoring tool

• Falling Leaves Embossing Folder by Spellbinders

• Hexagon Nesting Dies by Diamond Press

• Die Cut Machine

• Positional Stamp Tool.

Learn How to Make a Vividly Fall Colored Thank You Card Using Kaleidacolor

2022_Sept_Neva_KaliedacolorLeavesThankYouBeauty_600

By Neva Cole –

There are many Kaleidacolor pads that are in the autumn themed pallet.  Even though this card is multi-layered it comes together in a short amount of time considering all of the inked embellishments!

Skill: Intermediate

Time: 2 Hours

Directions:

2022_Sept_Neva_KaliedacolorLeavesThankYouStep1
Step 1:

Trim cream cardstock to 5” x 5” and center the overlay and stamp on the center rotation point of the Turn About Stamp.  Place on stamp platform to pick up stamp, and remove overlay.

2022_Sept_Neva_KaliedacolorLeavesThankYouStep2
Step 2:

Ink up the stamp with Kaleidacolor in Autumn Leaves with the green end of the pad and stamp the image.  Rotate the paper 90 degree to the right.

2022_Sept_Neva_KaliedacolorLeavesThankYouStep3
Step 3:

Ink up the stamp with Kaleidacolor in Desert Heat with the orange end of the pad and stamp the image.  Rotate the paper 90 degree to the right.

2022_Sept_Neva_KaliedacolorLeavesThankYouStep4
Step 4:

Ink up the stamp with Kaleidacolor in Cappuccino Delight with the brown end of the pad and stamp the image.  Rotate the paper 90 degree to the right.

2022_Sept_Neva_KaliedacolorLeavesThankYouStep5
Step 5:

Ink up the stamp with Kaleidacolor in Desert Heat with the red end of the pad and stamp the image.  Rotate the paper 90 degree to the right.  After I started the card I realized it can also be completed with two complementary Kaleidacolor pads, just by using opposite ends to ink the image.  Die cut the completed wreath with a circle die cut.

2022_Sept_Neva_KaliedacolorLeavesThankYouStep6
Step 6:

Ink the sentiment from the red end of the Kaleidacolor Desert Heat pad and stamp.

2022_Sept_Neva_KaliedacolorLeavesThankYouStep7
Step 7:

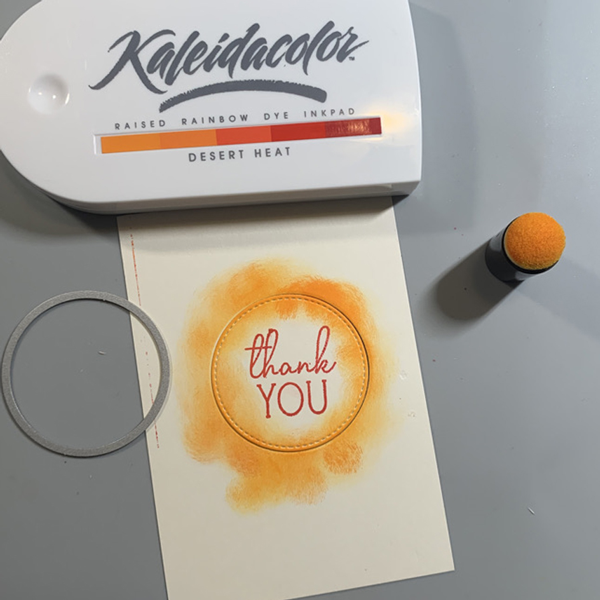
Die cut the sentiment.  The edges are then blended in with an Ink Dauber and the yellow end of the Kaleidacolor Desert Heat pad.  

2022_Sept_Neva_KaliedacolorLeavesThankYouStep8
Step 8:

More embellishment is added with included stamps from the set from various sections of all three Kaleidacolor pads.

2022_Sept_Neva_KaliedacolorLeavesThankYouStep9
Step 9:

Spritz a section of cream cardstock with Ink Potion No. 9.  This will allow the ink to spread more uniformly on the cardstock.  Generally glossy cardstock works best, but the rest of the card was regular cream cardstock, this is a good work around.

2022_Sept_Neva_KaliedacolorLeavesThankYouStep10
Step 10:

Using a 2” rubber brayer add ink liberally to the white cardstock until fairly well blended.  All three Kaleidacolor ink pads are used on one piece of cardstock with the intention to have several colors to die cut the coordinating leave dies.

2022_Sept_Neva_KaliedacolorLeavesThankYouStep11
Step 11:

Decorate the front of the 5” x 7” card front in the same way the sentiment die is inked and stamped in Step 8. 

2022_Sept_Neva_KaliedacolorLeavesThankYouStep12
Step 12:

Arrange die cuts from the brayered section of cardstock on the card base.  Use repositionable adhesive to pick up the edges of the die cuts and flip over the entire front circle wreath.  Add dimensional foam adhesive to secure die cuts in place.  (You will notice that the reverse side was the first try, however it wasn’t the best, so it is simply flipped over and the other side was used.  You only see the mistake in the demonstration step!)

2022_Sept_Neva_KaliedacolorLeavesThankYouBeauty_13
Step 13:

Adhere stamped wreath to card front.  Adhere the sentiment to the center of the stamped wreath with dimensional foam adhesive.

Art Supplies

Imagine

• Kaleidacolor–Autumn Leaves, Desert Heat, Cappuccino Delight

• Ink Potion No. 9

• Ink Dauber

Other:

• Cream  Cardstock

• Concord & 9th–Harvest Wreath Turnabout Set and Dies

• Elizabeth Craft Designs–Stitched Circles

• 2” Rubber brayer

• Temporary repositionable adhesive

• Dimension Foam adhesive

• Die Cut machine

• Stamp Platform

Create a Watercolor Sunflower Card using Stencils and Fireworks! Shimmery Craft Spray

2022-Aug-WatercolorFireworksSunflowers-600

By Neva Cole 

In today’s tutorial, I will share how I used layering sunflower stencils to create a water color look to my image.  Notice there is no stamp outline, that helps achieve a more organic look to the project.  I learned a few things along the way, and almost want to include a few blooper photos!  Instead I share the way that will give you the cleanest look avoiding the pit falls!

Skill: Beginner

Time: 2 Hours

Directions:

2022-Aug-WatercolorFireworksSunflowers-Step1

Step 1:

Trim white watercolor cardstock to 4 1/4” x 9 1/4”,  or about 1/4” on each side larger than your stencil.  this will allow you to handle your project more cleanly.  Use reposition able painters tape or washi tape to secure stencil along left side with edges matching along the upper and left hand side.  Spritz with Fireworks! in New Sprout until color depth desired is achieved.  In this close up photo freezer paper is used underneath the stencil and paper with the plasticized side up.  This allows collection of the over spray for background papers.  Carefully lift stencil to keep excess Fireworks from leaking under the stencil and adding unwanted color.

2022-Aug-WatercolorFireworksSunflowers-Step2
Step 2:

Secure next layer of layering stencil in place and spritz with Fireworks! Shimmery Craft Spray in Bamboo Leaves.  This photo shows a spray box that protects your work area from over spray.  It also shows the best distance of 12” to 18” to spray the stencil to avoid large droplets of Fireworks!. 

2022-Aug-WatercolorFireworksSunflowers-Step3

Step 3:

Clean stencils with sections of watercolor paper after each layer.  Move the watercolor paper around on the freezer wrap to pick up excess spray.  Keep color families together, as both colors of green are used on this background paper.  Clean up excess with paper towels or baby wipes. 

2022-Aug-WatercolorFireworksSunflowers-Step4
Step 4:

Continue with additional layering stencils.
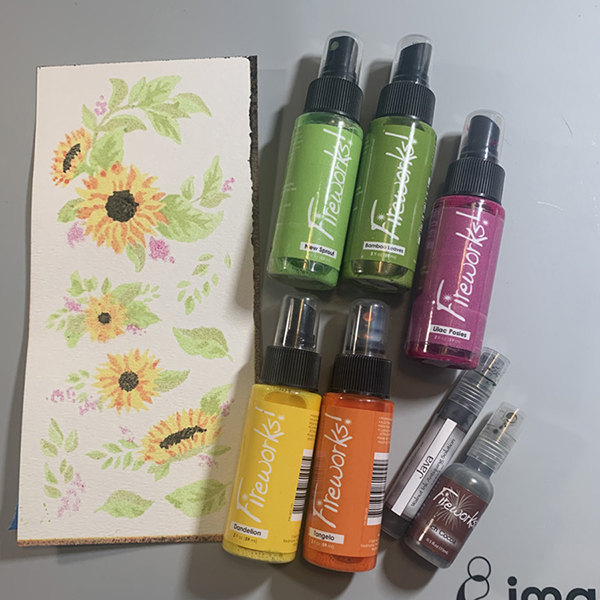
Here Dandelion is used for Stencil 3, and Tangelo for Stencil 4. 

2022-Aug-WatercolorFireworksSunflowers-Step5
Step 5:

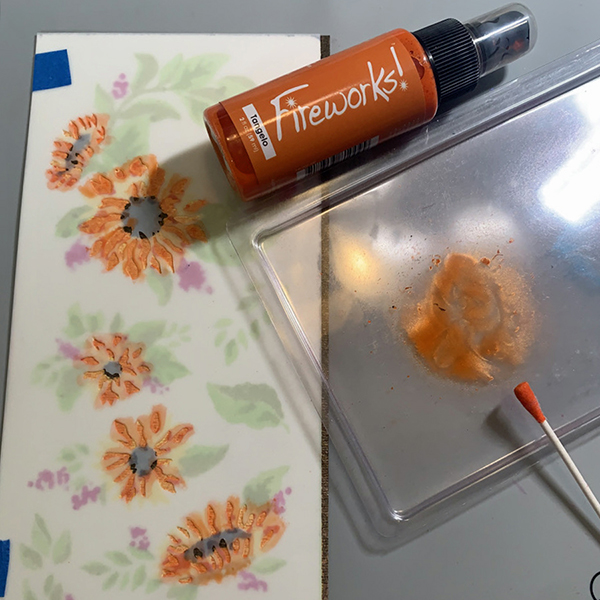
Sometimes as a designer you discover easier methods in the process of designing a project.  I was not satisfied with the color through the stencil by just spraying with the stencils that were smaller openings.  It is recommended to use this method for the rest of the layers.  Fireworks! in Tangelo is shown here sprayed on a plastic sheet.  Using a cotton swab the color is carefully dabbed through the stencil to give better color depth.  A cotton swab also prevents leakage underneath the stencil of excess color.  A lot less of the spray was used with this method!  Stencils 5 and 6 used this method to complete the look.  Stencil 5 used Fireworks! in Lilac Posies, and Stencil 6 a mixture of Fireworks! Rich Cocoa (for shimmer) and Walnut Ink in Java for a darker color. 

2022-Aug-WatercolorFireworksSunflowers-Step6
Step 6:

Here are the images from the entire stencil set.

2022-Aug-WatercolorFireworksSunflowers-Step7
Step 7:

One “blooper” photo, all the backgrounds made with the over spray and Fireworks! left on the stencils.  To be used in future projects?  The green sheet is trimmed to 4 1/4? to 5 1/2” to cover the front of the card.

2022-Aug-WatercolorFireworksSunflowers-Step8
Step 8:

Tap drop of Fireworks! in Dandelion on white watercolor paper trimmed to 3 3/4” x 5”.
Use quilted card front die to add texture to front panel.

2022-Aug-WatercolorFireworksSunflowers-Step9
Step 9:

Part of the remaining background section is stamped with Memento Luxe in Lilac Posies using a sentiment from the Sunflowers stamp set.  It is die cut with a Spellbinder die.

Step 10:

The Sunflower is die cut with the coordinating die.  The layers are adhered together with Tear It! Tape with dimension foam tape behind the card front.  

Art Supplies

 Imagine
Other:
  • White Watercolor Cardstock
  • Pink Fresh Studio Sunflowers Stencils, Coordinating Die, and Clear Stamp
  • Concord & 9th Quilted Card Front Die
  • Spellbinders Fancy Tabs
  • Dimension Foam adhesive
  • Cotton swabs
  • Die Cut machine
  • Stamp Platform

Let’s Make a Dazzling Friendship Card

Kathy_Aug_Main-600

By Kathy Pisupati –

Good morning!  Kathy here, creating art for Imagine Crafts!  Today I have a new tutorial for you.   I must admit I am in LOVE with the Delicata Golden Glitz pigment ink. There are several reasons:

• The color is AMAZING!

• When I don’t feel like using gold embossing powder this works fabulous (and is less messy!).

• It works fabulous with sentiments.

• It is easy to clean up.

So today I have a project for you that uses the Delicata Golden Glitz and some beautiful Tsukineko Brilliance Dew Drops. The card didn’t start out as I planned but I am happy with the finished result. Please let me know what you think in the comments! Let’s make a card. 

Skill Level: Intermediate
Time to Complete: Two hours

Directions:

image_Step1
Step 1:

You will need a top-folding card base measuring 4 1/4 x 5 1/2“. The rest of the panels we will create as we go. So, the first thing I wanted to play with was the Brilliance Dew Drops. I ink blended them all over a piece of Neenah Classic Crest Solar White 110lb card stock. I then found an embossing folder. I chose an older folder from Spellbinders. I am not sure if it is still available, but it was called the Large Medallion. I dug out my brayer, inked it up with some Delicata Golden Glitz, and rolled it over the RAISED area of the embossing folder. I put in my ink blended panel and ran it through my die-cutting machine. Here is where the plan changed. I pulled out my Gina K Designs Master Layout 2 to get the “perfect” rectangle. I taped the die to the panel. Now here is a tip when you have a panel that is loaded up with ink like mine, BEFORE you pull off the tape, heat it with your heat tool on LOW. Yeah….I didn’t do that and ripped a chunk out of the frame I was going to use. Oh well, moving right along……I used a rectangle die from GKD Master Layout 7 to cut the middle out. I WILL save this card! 


image_Step2

Step 2:

I had a lot of gold ink on my brayer, so I inked up a Swiss Dot embossing folder and ran another piece of white card stock through my machine.


image_Step_3

Step 3:

I then rolled the excess ink on a piece of white card stock measuring 4.25” x 5.5”. Isn’t it pretty? I HAD to incorporate it!


image_Step-4

Step 4:

Cut a piece of white card stock an 1/8” larger than the focal point and with your Sponge Dauber, ink the edges of the rectangle with the Golden Glitz.


Image_Step-5

Step 5:

Die-cut your sentiment and using the Golden Glitz ink, use Imagine Crafts sponge daubers to apply your ink to the sentiment. Cut a shadow from the vellum. Glue these together.  Using the Delicata Golden Glitz stamp the smaller, MY FRIEND, sentiment. Cut this sentiment to size. I also inked the edges of this sentiment.


Image_Step-6

Step 6:

Now we can assemble the card. The focal point is glued to the gold border and then adhered to the Swiss dot panel with Imagine On Point Glue. The sentiment is also adhered to the panel with glue. The MY FRIEND strip sentiment was popped up with foam tape. Then I added foam tape to the Swiss dot panel and attached it to the background panel.

Finally, I used Imagine Tear It! Tape and attached it to the card base. I added a few gems, and the card is done!


Supplies Used:

Imagine Crafts

Delicata Golden Glitz

Brilliance Dew Drops: Pearlescent Lavender, Pearlescent Sky Blue, Orchid and Pearlescent Purple

Imagine Craft Mat

Sponge Daubers

On Point Glue

Tear-It! Tape


Other

Gina K Designs Master Layout 2

Gina K Designs Master Layout 7

SCT Let’s Stamp Together Kit July 2022-Sentiment

Cuttlebug Swiss Dot Embossing Folder

Crafty Meraki Gems

Brayer

Neenah Classic Crest Solar White 110lb

Paper Trimmer

Die-Cutting Machine

Foam Tape