Thorny Rose – Trick or Treat Card

By Alison Heikkila

~Greetings! Alison Heikkila here. Today I have my latest video for Imagine, and I am making it part of my Halloween series. I broke out the Fireworks! Shimmery Craft Spray again (I love that stuff!) and I experimented with a technique idea I had. Did it work? You’ll have to watch the video to find out!

*Some affiliate links are used in this post. That means that if you shop through these links, I may receive a small compensation, at no cost to you. For more information, please see my Affiliates page, where I also have some coupon codes.

Skill Level: Intermediate
Time to Complete: 30-40 minutes

Supplies:
Imagine:
Fireworks! Shimmery Craft Spray in Rhubarb Stalk and Lady Bug
VersaFine Clair Ink in Nocturne
VersaMark Ink
Memento Markers in Rhubarb Stalk, Love Letter, Lady Bug, Olive Grove, Bamboo Leaves, London Fog, and Tuxedo Black
Black Embossing Powder

Other:
A Colorful Life Designs: Thorny Vines stencil– Use code AlFan10 to save 10%
Erin Lee Creative: Stay Weird Stamp Set (no longer available)
Ellen Hutson: Hocus Pocus Stamp & Die Combo
Strathmore: Smooth Bristol Cardstock
Bearly Arts Glue
White cardstock

I hope you enjoyed this! Thanks so much for stopping by. Have a spooktacular day!

Compare 4 Different Mboss Powders on Kaleidacolor Gel Plate Printed Backgrounds

By Nancy May

How familiar are you with Kaleidacolor inkpads and Mboss Embossing Powder? Let’s take a look at one of the Kaleidacolor pads I have had for many years and see how it does on the gel plate. Then we’ll play a bit and see how 4 different Mboss Embossing powders impact the same basic Gelli printed background.

~Nancy

Skill: Beginner, Intermediate

Time: undetermined

Art Supplies

Imagine:

● VersaMark Clear Embossing Ink

● Kaleidacolor – Autumn Leaves 

● Mboss – Clear, Gold, Black, White

Other:

● Gelli Arts – 5×7 Gel Plate

● Speedball Brayer, 6”

● Hero Arts – Abstract Honeycomb Bold Prints 6×6 Red Rubber Background Stamp

● Hero Arts – Bee and Flowers Wreath Stamp Set

● Tim Holtz – Tag Collection Framelits Dies 658784

● Pinkfresh Studios – Fancy Label Frames

● Whimsy Stamps – Nested Hexagon Die Set

● Heffy Doodle – Honey Word Die

● Tonic – Gold Metal Sheets

● Amazon – Cotton lace

● Amazon – Bulb pins

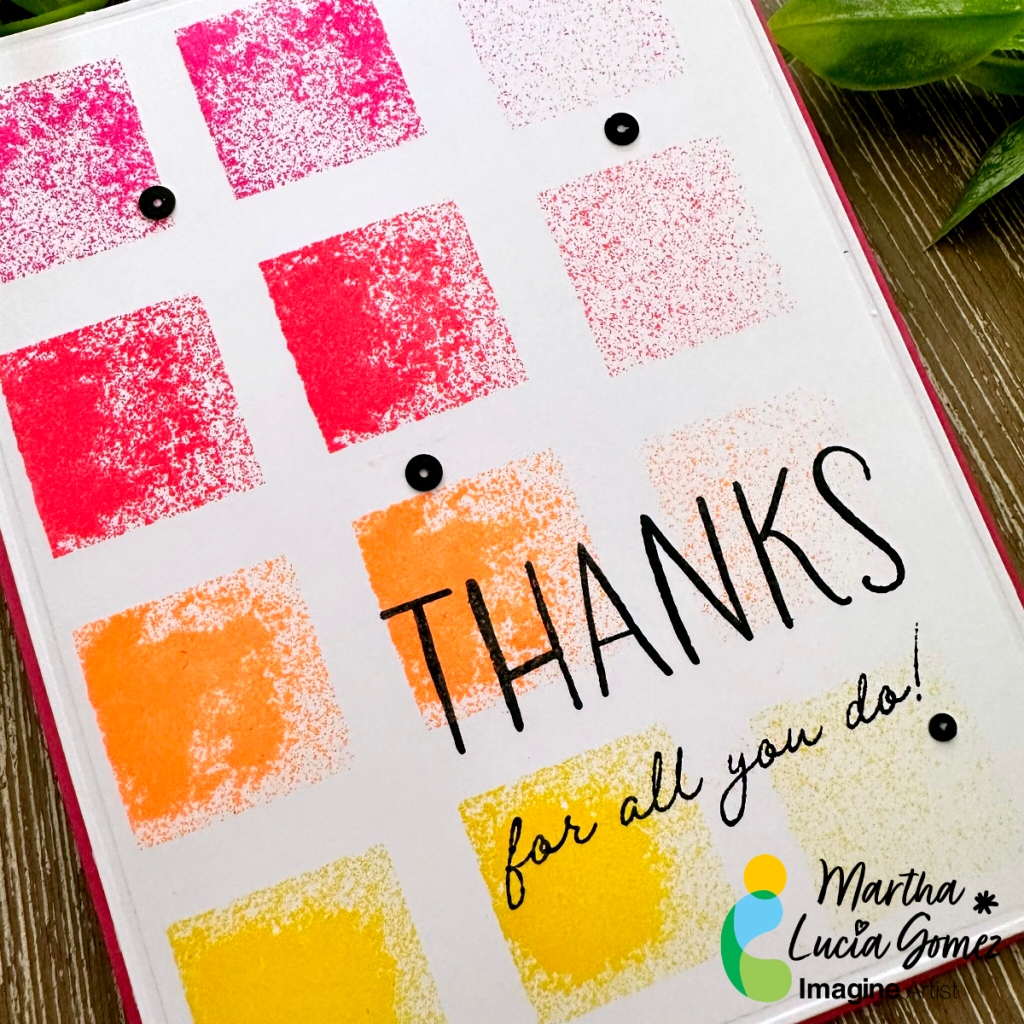
Quick and Easy Thank You Card

By Martha Lucia Gomez

Hello crafty friends! Today, I have the easiest and simple tutorial to make a unique thank you card or any type of cards. Let me share the project with you.  

Skill: Beginning
Time: 60 minutes

Directions:

To make my model, I decided to use Radian Neon 4 Warm for two reasons. The first one is because I love the colors of this set of inks and the second, because Radian Neon brings the opportunity to create textures.

Step 1:

Select the colors of inks that you want to use in small sizes pads. For this idea, you can use any of our 4 Inkpads or small presentations like the Dew Drop of other inks, like Brilliance, VersaMagic, Delicata or Memento, just to mention some.  

Step 2:

Place the entire ink pad over the cardstock in the direction that you want the colors. I press mine three times over the card under different pression to obtain different textures in each color.

Step 3:

Let the ink dry naturally or speed the process with a heat tool. If you want, you can cover the stamped blocks of ink with clear embossing powder and emboss them with the heat tool, to obtain a better texture.

Step 4:

Stamp a sentiment over the color blocks using VersaFine Clair Nocturne to add a major contrast over your card.

Step 5:

Heat embosses the sentiment with clear embossing powder and paste the decorated layer over your card base.   

As you can see this is a really simple way to use your ink pads as stamps. Depending on the pression and intensity that you apply over the ink pad or 4Ink Pad, you will obtain different looks.

Thanks for stopping by and remember, you don’t need to create complicated projects. Just use the best inks and let your creativity shine!

Art Supplies:

Imagine:

Other:

  • Stamping Tool
  • White and colored cardstock.
  • Crafty Foam Tape

Using Fireworks! Spray with Emboss Resist

By Alison Heikkila

– Hello! It’s Alison Heikkila. Today we’re going to play with some Fireworks! Sprays on an emboss resist background. It’s a great masculine card, but I prefer to call it non-gendered. By changing up the background stamp and/or the colors, you can make this card as unique as the person you’re giving it to.

Skill: Beginner-Intermediate

Time to Complete: 20 minutes

Craft Supplies:

Imagine:

Other:

• My Favorite Things: Abstract Stamp (no longer available)

• Simon Says Stamp: Clean Line XL Stamps

• Simon Says Stamp Clean Line XL Coordinating Dies

• MISTI Stamping Tool

• Neenah: Desert Storm Cardstock

• Star Burst Rhinestones in Gold & Silver

• Bearly Arts Glue

Brown 110lb Cardstock

Follow Alison here:

https://alisonheikkila.com/

https://alisonheikkila.carrd.co/

Let’s Make a Floral Happy Birthday Card

By Martha Lucia Gomez

Hello there! Today’s tutorial is about a Birthday Card using a background stamp but adding texture and color. To make this, I used VersaFine Clair Nocturne, Clear Embossing Powder and Memento Markers. 

Skill: Beginning

Time: 45 minutes

Directions:

Step 1:

Take a piece of white smooth cardstock, ink well your background stamp with VersaFine Clair Nocturne Ink and stamp your image pressing hard to obtain a crispy image. You can use any stamping tool. 

Step 2:

Cover the stamped image with Clear Embossing Power or MBoss. Melt the powder with the heat tool.

Step 3:

To enhance the details of the stamp, color it partially with Memento Markers. The VersaFine Clair in is a safe ink to work with these Markers or with any type of Alcohol Markers.

Step 4:

Combine the tones of your markers to have different shadows. In my sample I used Memento Markers in colors Angel Pink, New Sprout, Pistachio, Bamboo Leaves, Rose Bud, Desert Sand, Cantaloupe, Tangelo and Summer Sky.

Step 5:

If you want you can resize the stamped layer and paste it over a card base. You can use Tear It! Tape to paste it. 

Step 6:

In a separate piece of white cardstock stamp the birthday sentiment using the same products used to create the background. I used VersaFine Clair Nocturne and Clear Embossing Powder. 

Finalize your card pasting the sentiment with crafty foam tape.

Art Supplies:

Imagine:

• VersaFine Clair Nocturne

• Memento Markers Angel Pink, New Sprout, Pistachio, Bamboo Leaves, Rose Bud, Desert Sand, Cantaloupe, Tangelo and Summer Sky

• Clear Embossing Powder

• Craft Mat

Other:

• Background Stamps by Richard Garay Designs. 

• Stamping Tool

• Heat Tool.

Let’s Make a Shaker Ornament

By Martha Lucia Gomez

Hello there! Today’s tutorial is a shaker ornament created with embossing powders and using different colors in a single piece. To make this, I used the MBoss in Blue Icicle, Sapphire and White. To create this type of embellishments or ornaments for your cards, gifts or Christmas Trees, you can also use our traditional Embossing Powders in any color.  

Skill Level: Medium

Time to Complete: 45 minutes

Directions:

Step 1:

Apply a layer of ink to your Shaker Base or Chipboard piece directly with the ink pad of VersaMark. You can also use the small size or cube of VersaMark Ink if you are using a small piece of shaker card or chipboard. Make the emphasis on the center if it has the designed part. 

Step 2:

Cover the center of your ornament with the light color of MBoss or embossing powder. In my sample, I am using the Blue Icicle.

Step 3:

Melt the MBoss or Embossing Powder with the heat tool. Don’t worry if the powder covered some parts of the border.

Step 4:

Repeat steps 2 and 3 if you want a thick effect or want better coverage.

Step 5:

Ink the border or the chipboard ornament or shaker piece with the VersaMark Ink Pad, taking care not to cover the center of the piece. 

Step 6:

Cover the inked area with the dark color of MBoss. I am using the Sapphire.

Step 7:

Melt the powder with the heat tool. Then, add some touches of MBoss White to create more dimension over it. Melt the MBoss White or White Embossing Powder with the heat tool. 

Step 8:

Assemble your shaker card or finish the ornament by adding some sprinkles or small sequins and adding a piece of ribbon to tie it.

Voila! Our ornament is finished and can be used to decorate a card, a gift or to be handled on a Christmas Tree.

Remember that you can use this idea for any type of chipboard piece or for any occasion, not only for Christmas. 

Art Supplies:

Imagine:

• Mboss Sapphire, Blue Icicle and White

• Tear it! Tape

• Craft Mat

• VersaMark

Other:

• Shaker Dimension Set or Chipboard Piece. 

• Heat Tool

• Sequins