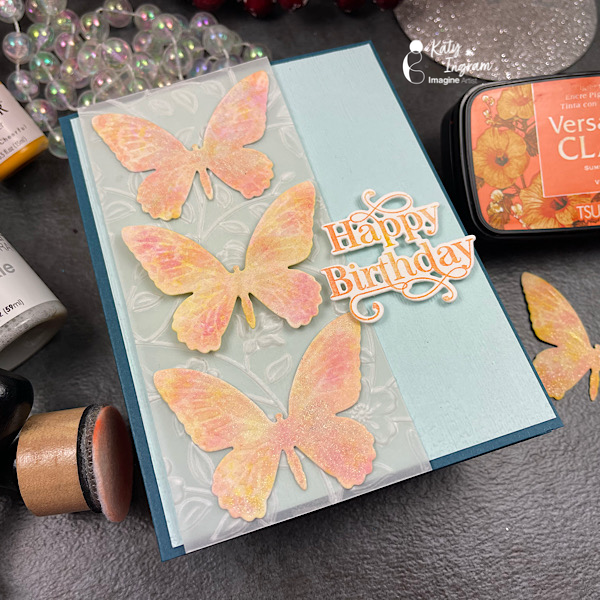
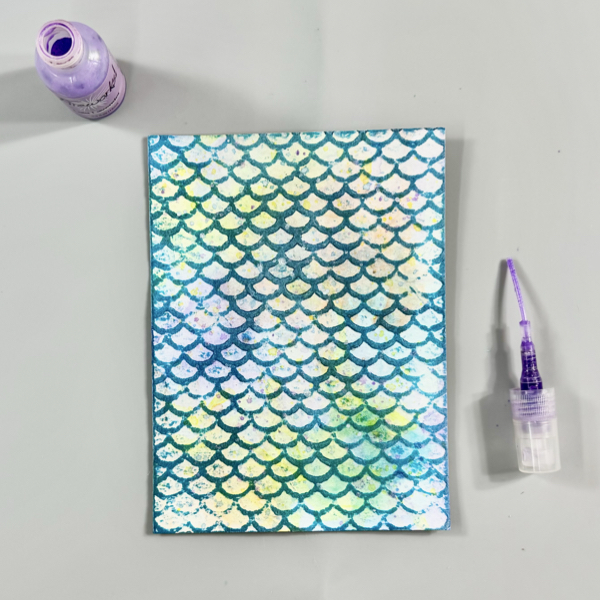
Hello Friends! Katy here with my latest video sharing a great way to use VersaFine Clair re-inkers on watercolor paper with felt pads and Isopropyl Alcohol, but I also share using an ink pad if you don’t have a re-inker. Video has all the details. Thanks for watching.
– Hi everyone! It’s Jessica here. Today I would like to share a card with a black and gold color combo. My card creations are typically full of bright colors; so I decided to change it up a bit by using a simpler color palette. Since there are only two colors on this card, I wanted to add various shimmer and glitter textures to create dimension. Let’s take a look!
Step 1: Trim Stardream Metallic 5 x 7 Onyx cardstock to 3 ¾’’ x 5’’. Paint golden stripes on the card panel with Sheer Shimmer Gold. One trick to avoid the gold shimmer from pooling on the edges is to swipe your paintbrush onto the craft mat. Another alternative is starting with a bigger piece of cardstock, then trimming the panel down to size.
Step 2: Dry the cardstock panel with a heat gun, and repeat steps 1-2 until you achieve bold, gold stripes. The Stardream Metallic Onyx cardstock has a subtle shimmer as well – it adds an elegant touch to the card base.
Step 3: Die cut roses and leaves with DCS Gold Glitter Heavyweight 12 x 12 cardstock. I find this glitter cardstock very easy to cut through. Some of the glitter cardstock I’ve used before uses adhesives to bind to the glitter, which takes a little more time to peel the die cut pieces off each other. This glitter cardstock, on the other hand, separates very easily after it’s been cut through.
Step 4: Next, adhere the die cuts to the strips background panel. I used On-Point Glue since the fine-tip nozzle is perfect for applying small amounts of glue. Then, use an acrylic block to press down on the die cut so that it completely adheres to the background.
Step 5: Finally, stamp the sentiment with Brilliance Galaxy Gold ink pad. This gold ink pad matches the Sheer Shimmer Gold so well! I added some black enamel dots to complete the card. I love the classic black and gold color combo, and I hope this card inspires you to try different kinds of gold shimmer on your project.
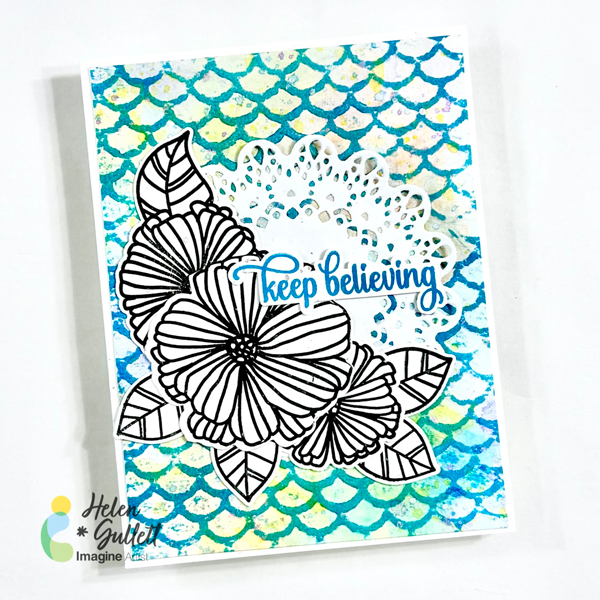
Hello crafty friends! Today we are going to make this floral mixed media card with some ink-smooshing, ink-swiping, ink-splattering, and embossing techniques.
Let’s get crafting!
Skill: Intermediate Time: 15-30 minutes
Direction:
Step 1
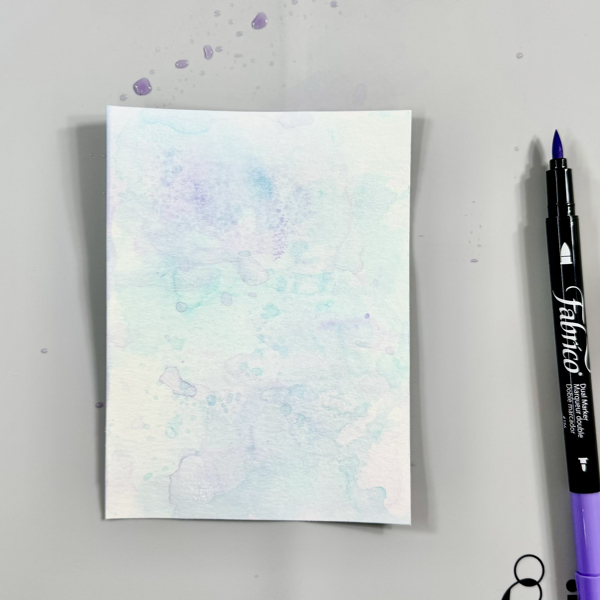
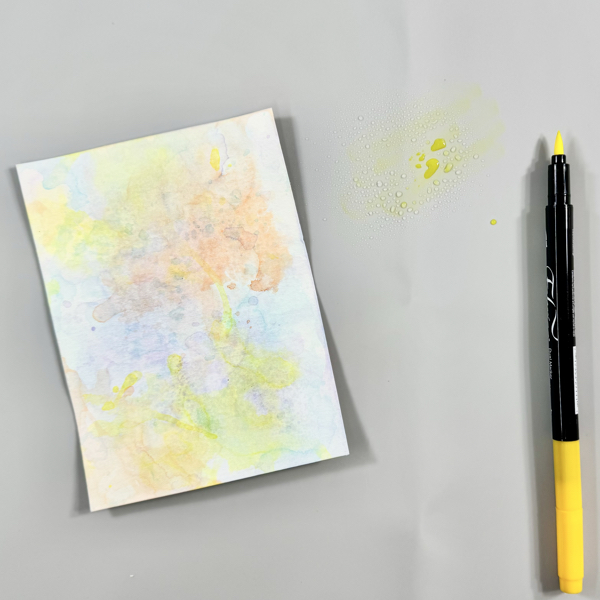
Starting with creating the watercolored background panel by cutting a piece of 140 lb watercolor cardstock into 4 ¼ inch x 5 ½ inch. To pick out the color combo, make sure you pick the colors that won’t turn into a muddy color when they are mixed together.
Scribble some of the Tropical Lagoon Fabrico Marker on the craft mat and then spray it lightly with some water. Then, smoosh the watercolor cardstock to the watercolor ink on the mat. Pick it up and dry the watercolor ink on the panel with a craft heat gun. Repeat it until you like the result.
Clean the craft mat with the Staz-On All Purpose Stamp Cleaner and paper towel.
Step 2
Scribble some of the Peony Purple Fabrico Marker on the craft mat and then spray it lightly with some water.
Then, smoosh the watercolor cardstock to the watercolor ink on the mat. Pick it up and dry the watercolor ink on the panel with a craft heat gun. Repeat it until you like the result.
Clean the craft mat with the Staz-On All Purpose Stamp Cleaner and paper towel.
Step 3
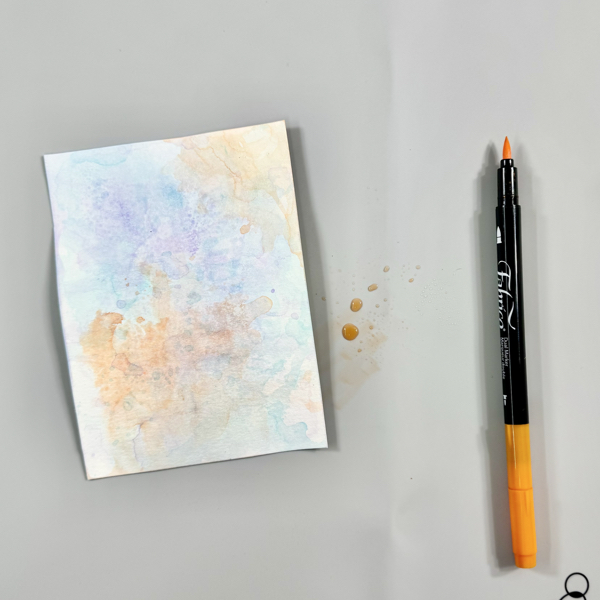
Scribble some of the Tangerine Fabrico Marker on the craft mat and then spray it lightly with some water.
Then, smoosh the watercolor cardstock to the watercolor ink on the mat. Pick it up and dry the watercolor ink on the panel with a craft heat gun. Repeat it until you like the result.
Clean the craft mat with the Staz-On All Purpose Stamp Cleaner and paper towel.
Step 4
Scribble some of the Lemon Yellow Fabrico Marker on the craft mat and then spray it lightly with some water.
Then, smoosh the watercolor cardstock to the watercolor ink on the mat. Pick it up and dry the watercolor ink on the panel with a craft heat gun. Repeat it until you like the result.
Clean the craft mat with the Staz-On All Purpose Stamp Cleaner and paper towel.
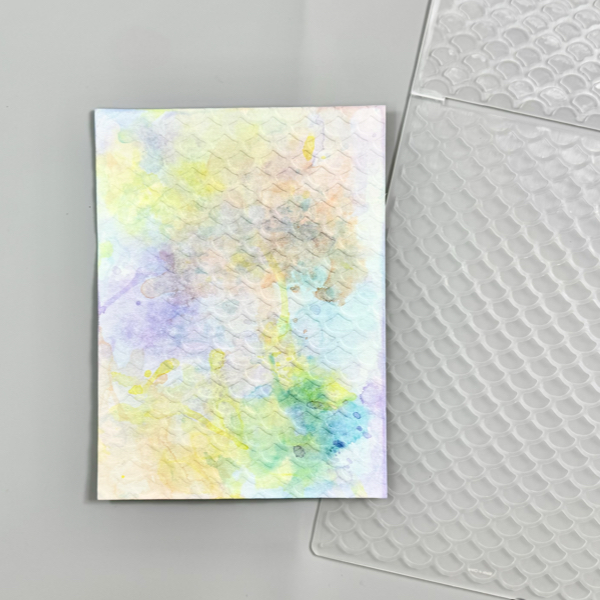
Step 5
Once the watercolored panel dried well, put it inside the embossing folder, and then run it through the machine.
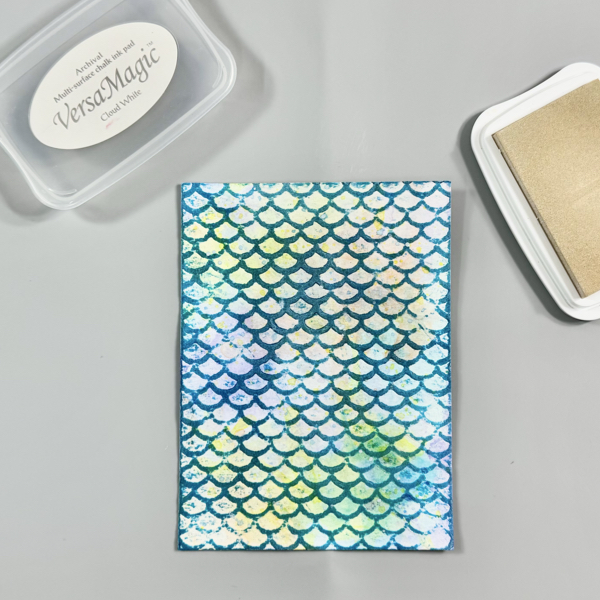
Step 6
Swipe the VersaFine Clair Warm Breeze ink directly on the embossed part of the panel.
Make sure you swipe the ink lightly and smoothly, do not press down the ink pad to the paper. The juicer (good amount of ink) ink pad, the better.
Dry the ink on the panel with a craft heat gun.
Step 7
To tone down the bright color, swipe some of the VersMagic Cloud White ink on the panel.
This is an optional step, if you prefer a more subtle color background instead of bright color.
Dry the ink on the panel with a craft heat gun.
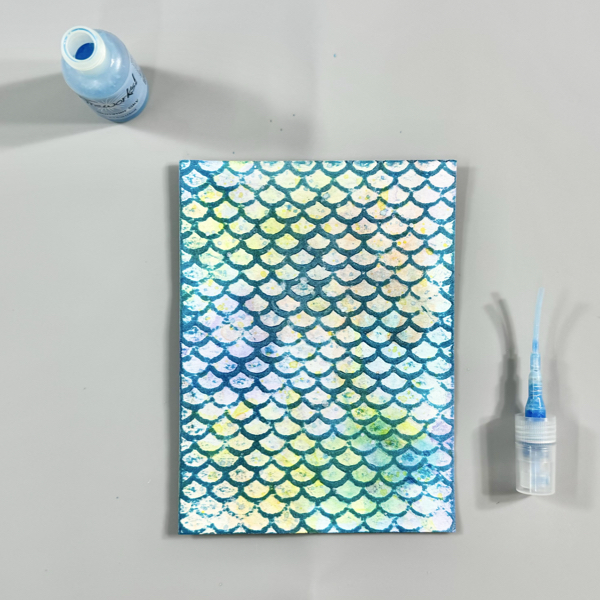
Step 8
Shake the Fireworks! Shimmery Craft Sprays bottles before you use it to make sure the ink inside mixes well.
Open the top of the spray and use it (or small round brush) to add some splatters of the Summer Sky Fireworks! Shimmery Craft Spray on the panel.
Dry the splatters of ink on the panel with a craft heat gun.
Step 9
Next, open the top of the spray and use it (or small round brush) to add some splatters of the Lulu Lavender Fireworks! Shimmery Craft Spray on the panel.
Dry the splatters of ink on the panel with a craft heat gun.
Step 10
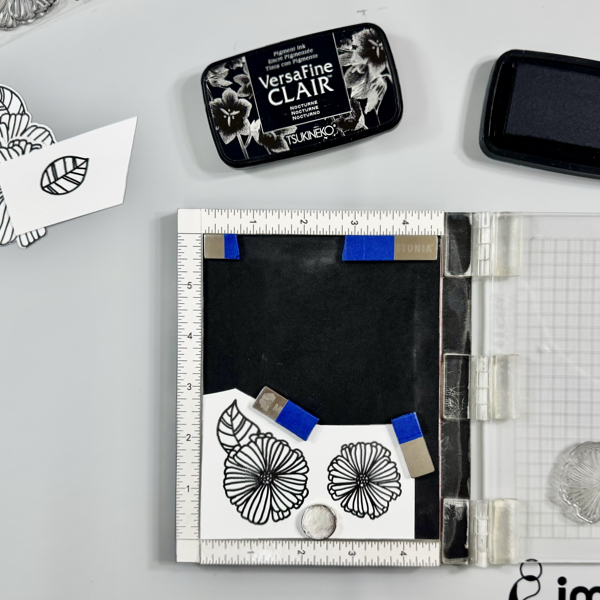
Stamp the flower and leaf images on a white cardstock using the VersaFine Clair Nocturne ink pad with a stamping tool (or acrylic stamping blocks).
Dry the stamped images with a craft heat gun.
Step 11
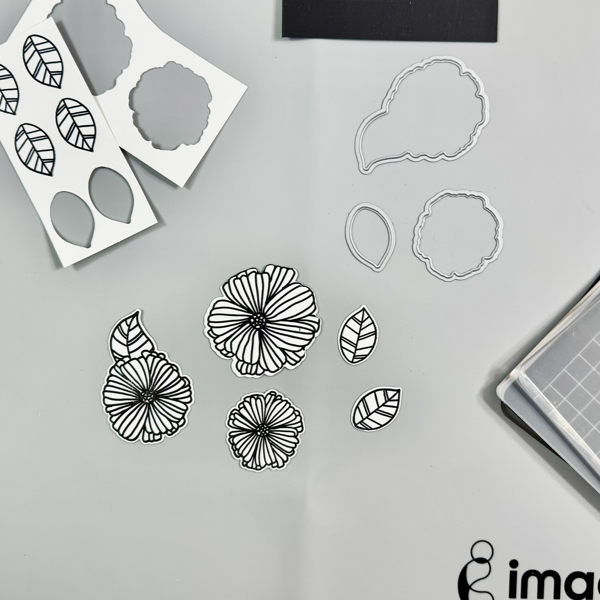
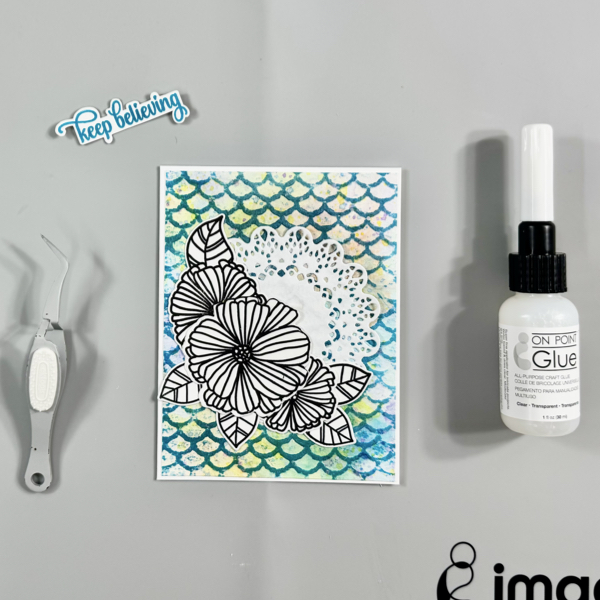
Cut all the stamped flowers and leaves with their matching die set, or you can fussy cut them using micro-tip scissors.
Step 12
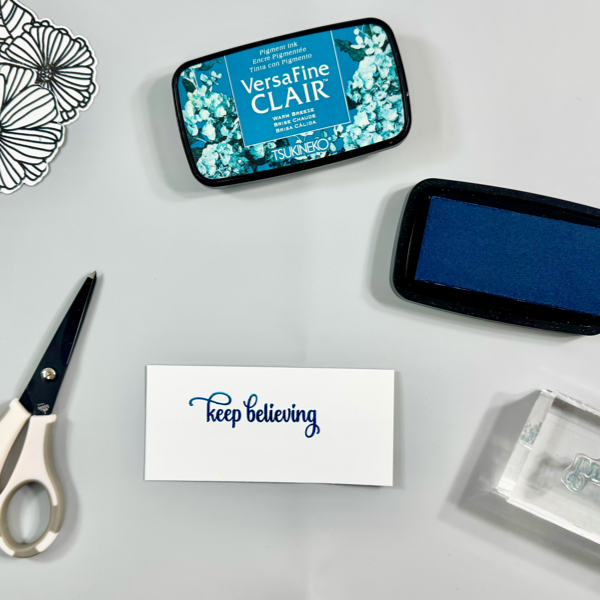
Stamp the sentiment on a white card stock using the VersaFine Clair Warm Breeze ink pad with a stamping block.
Dry the stamped sentiment word with a craft heat gun and then fussy cut it with a micro-tip scissors.
Step 13
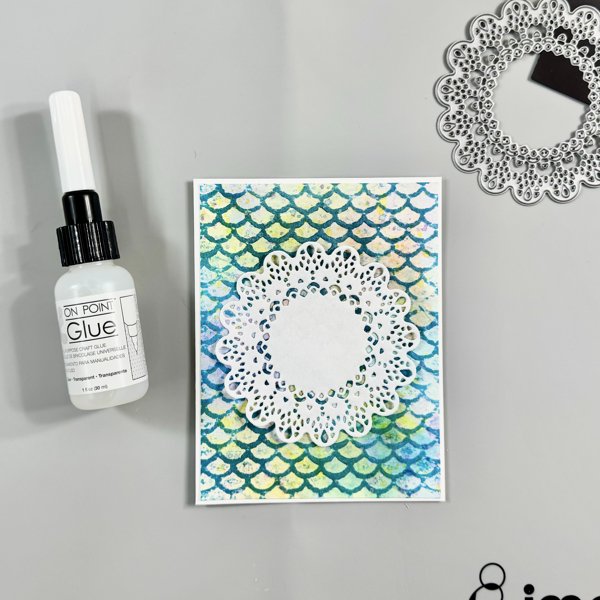
Trim the background panel into 4 inch x 5 ¼ inch using a paper trimmer.
Add the background panel to an A2 card base with the On Point Glue.
Step 14
Cut a piece of white paper (copy paper works great) with the Delicate Doily die to create your own doily paper mat.
Add the doily paper to the card with the On Point Glue.
Step 15
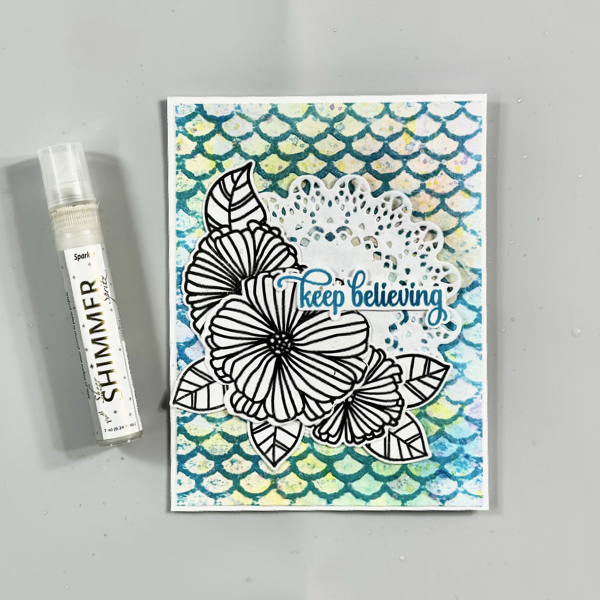
Add the flowers and leaves to the card with On Point Glue.
Then, add some of a thin foam to the sentiment with On Point Glue and add it to the card with the same glue.
Step 16
Add more shimmer to the card by spraying and splatting some of the Sheer Shimmer Spark Spray.
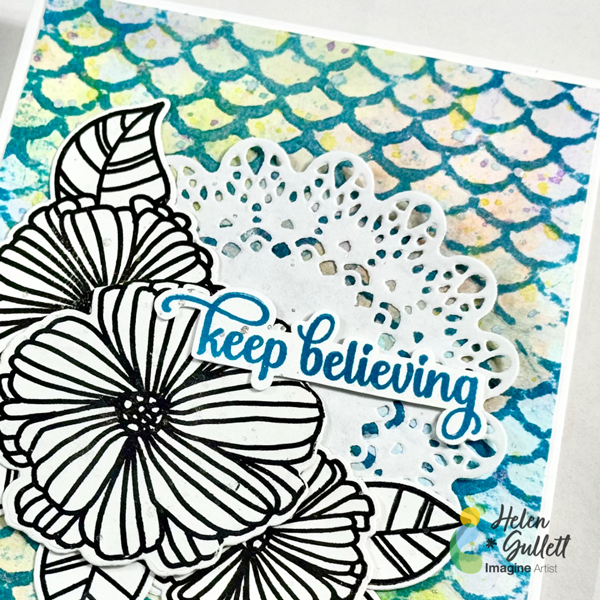
The ink-smooshing, embossing, ink-swiping, and ink-splattering techniques give an amazing texture look to the background of this card.
And those layers of doily, flowers, leaves, and sentiment add more dimension to this mixed media card.
I hope you will give this tutorial a try and play around with different colors to see the surprise you will get for your cards. Thanks so much for stopping by our blog today.
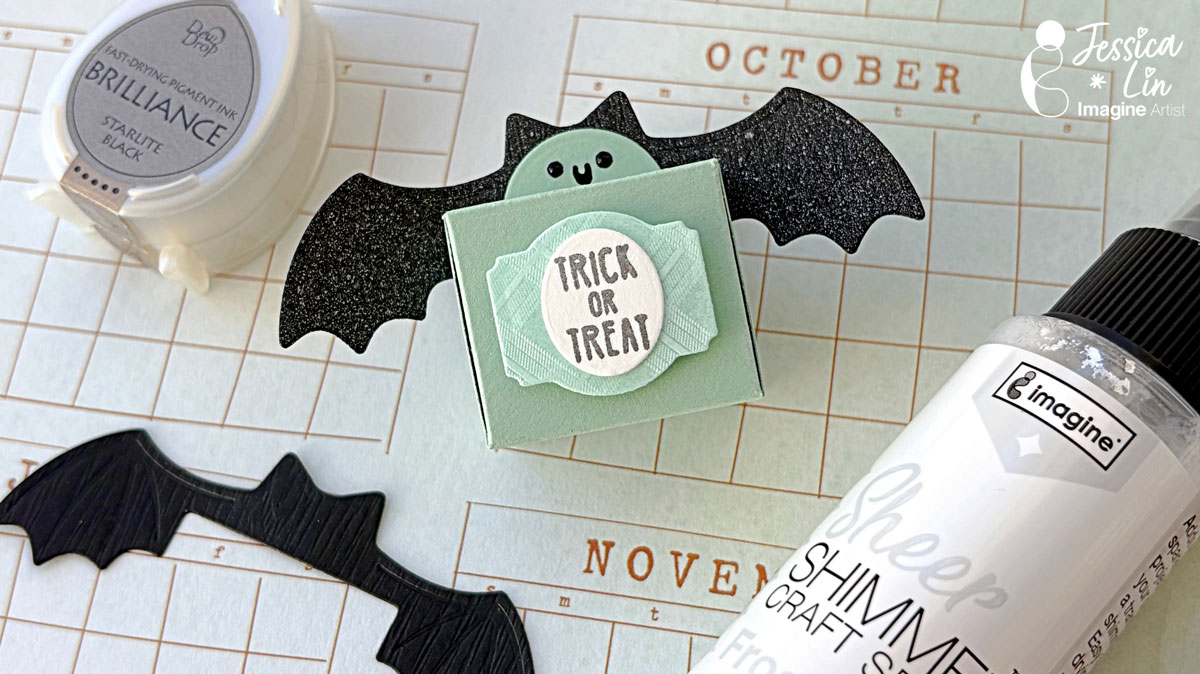
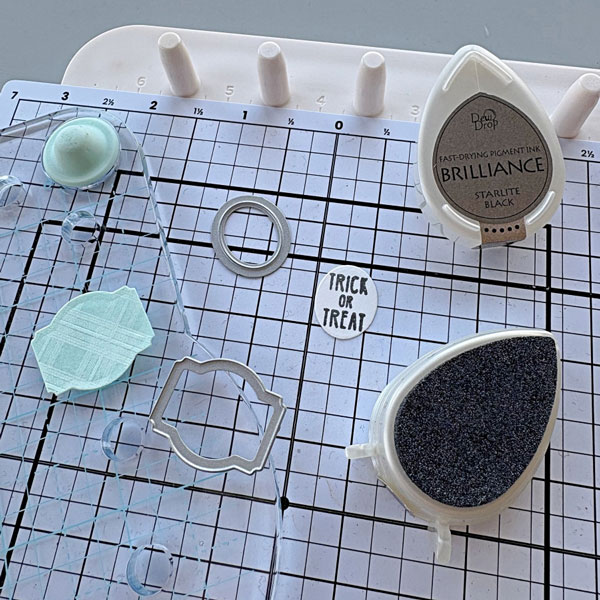
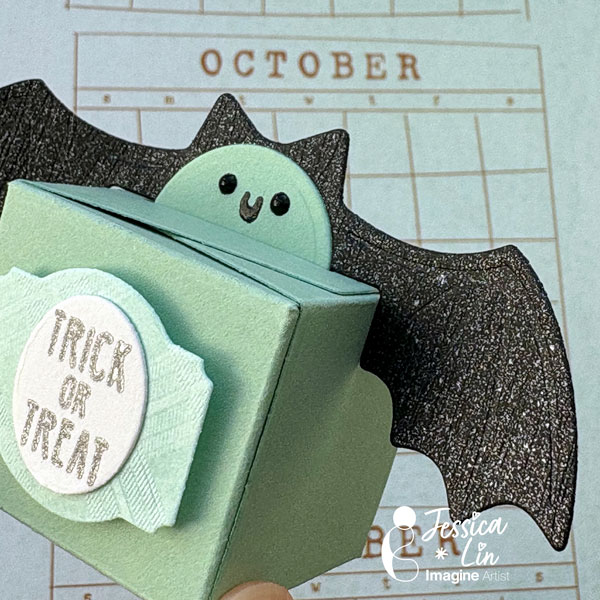
– Hi everyone! It’s Jessica here. Halloween is right around the corner and today I have a really quick & easy treat box idea for you. If you are interested in making mini treat boxes and dressing them up for Halloween, Christmas, or Easter, just keep reading!
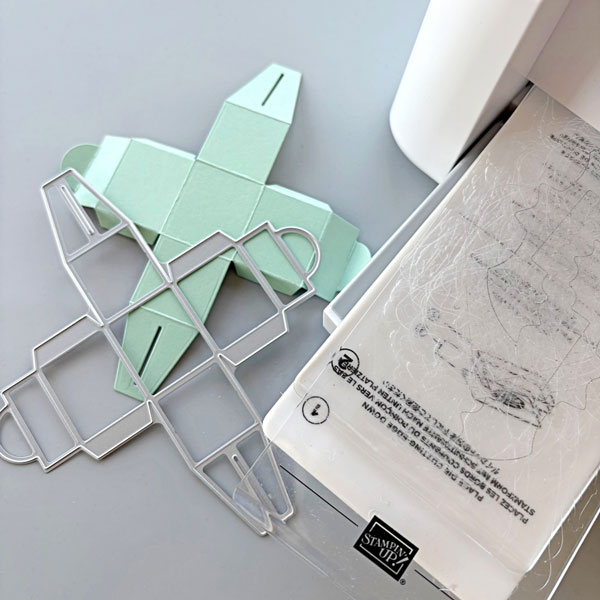
Step 1: Die cut a piece of Mint Macaron cardstock with Design a Treatbox die from Stampin’ Up. Fold along the score lines to create a mini treat box.
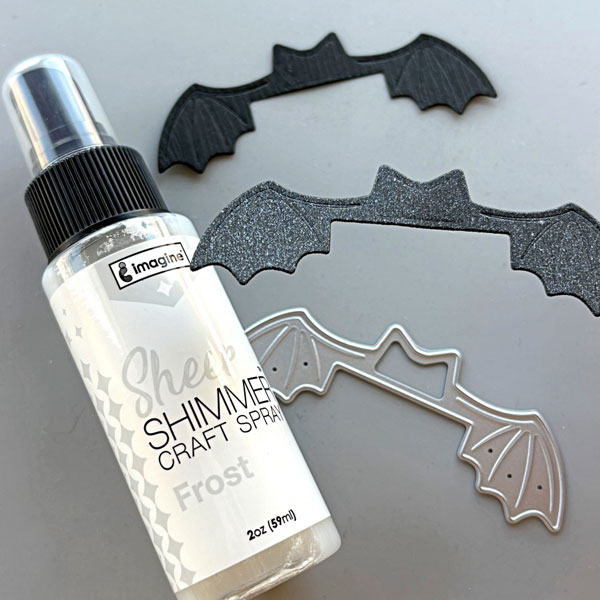
Step 2: Die cut a piece of black cardstock with the bat wing die from the same set. Then spritzed it with a generous layer of Sheer Shimmer Craft Spray in Frost. The shimmer spray really adds a whimsical touch to the bat wings! You can compare it with the die cut in the back without the Sheer Shimmer Spray. Doesn’t it look so different?
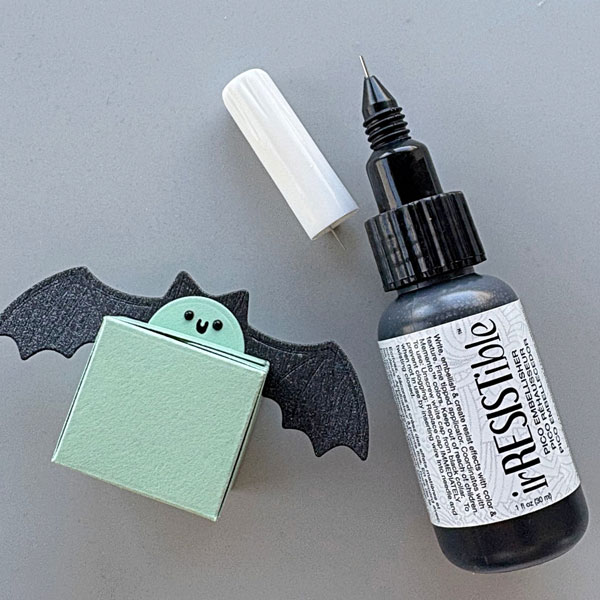
Step 3: Then I added a smiley face to the tab of the treat box with irRESISTible Pico Embellisher. The fine-tip nozzle was so easy to use to create fine details.
Step 4: Die cut the box labels with mint patterned paper and white cardstock. The “trick or treat” sentiment is from Mama Elephant’s Meowlloween Extras set. I stamped it with Brilliance Starlite Black ink pad.
Step 5: Since this is a mini treat box (holds 2 Hershey kisses), no tape or glue is required for the box assembly. Simply fold along the crease lines and hold it together with the flaps’ openings. This no-glue project is ideal for mass production and you could create many party favors in a short time!
Once the box is assembled, adhere the label dies to the front and slide the bat wings die between the top tabs. You could also create Christmas or Easter treat boxes with the other dies in this set.
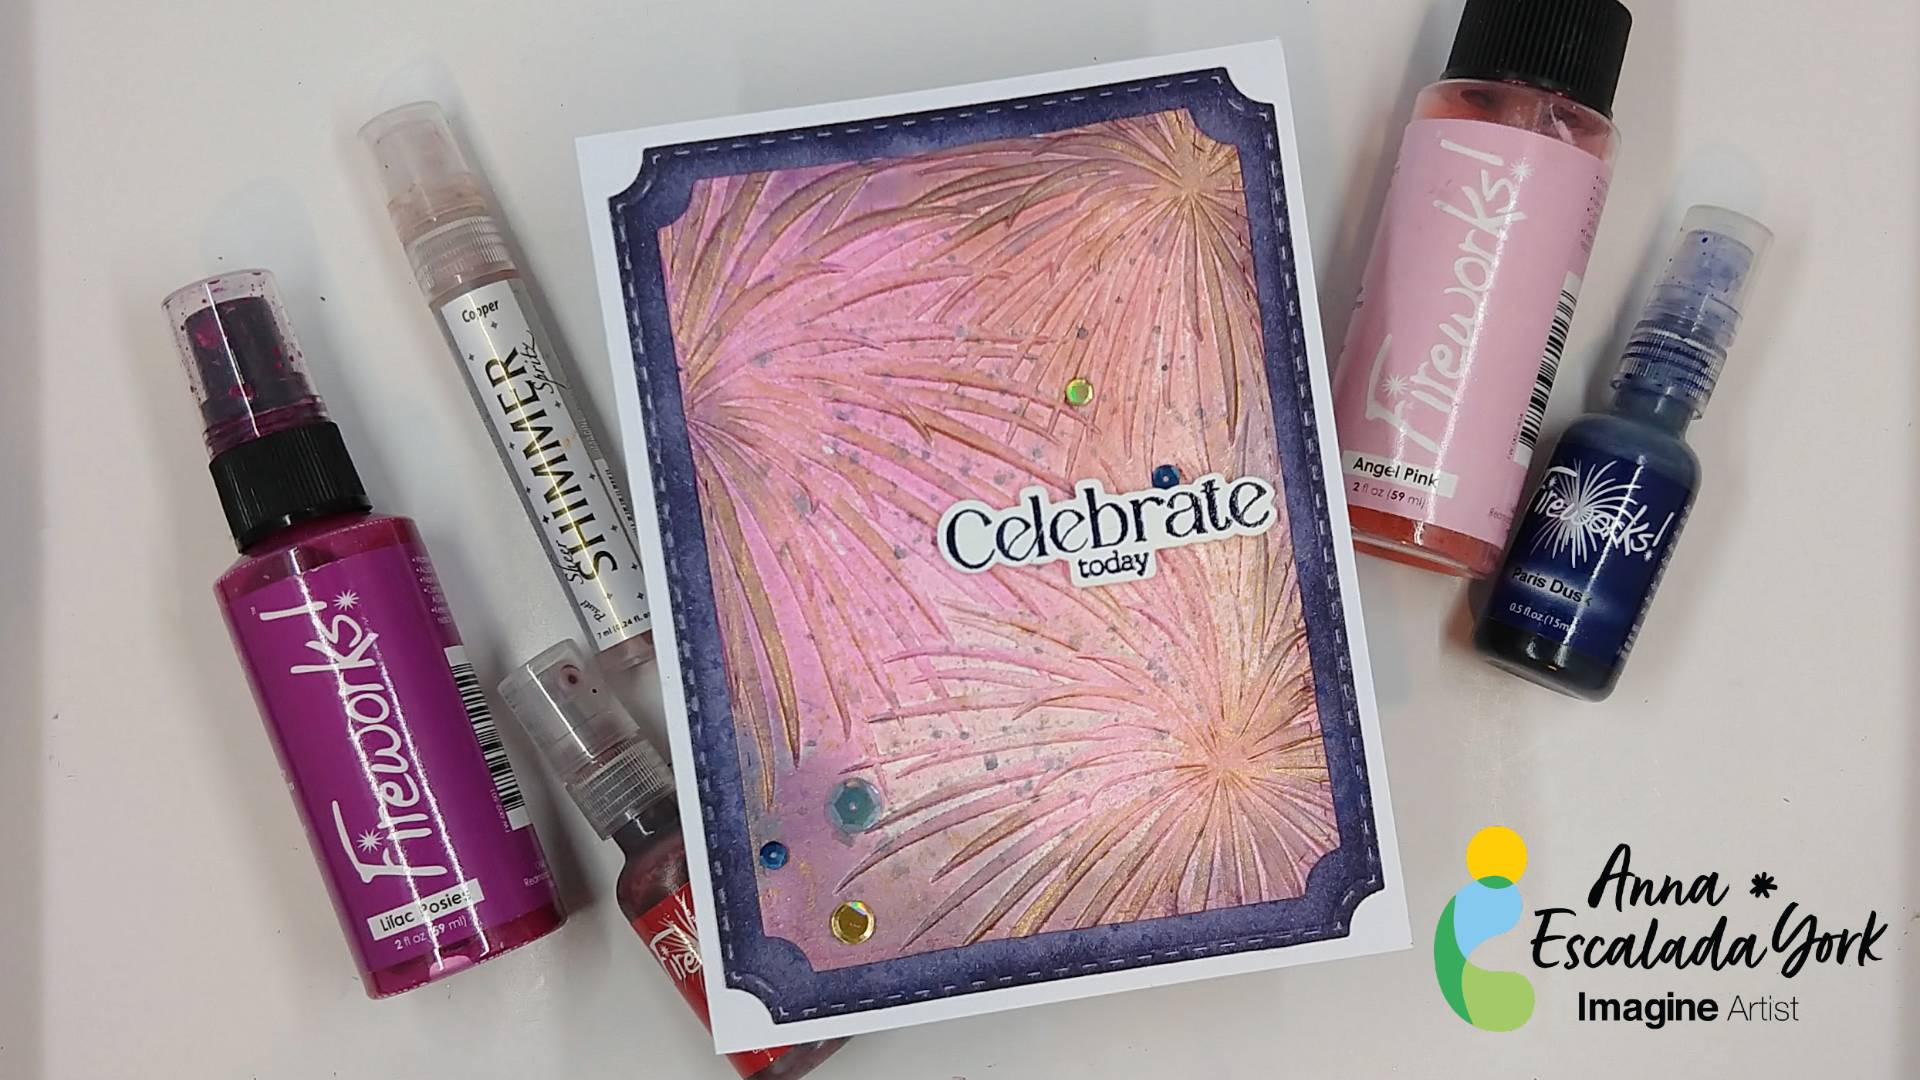
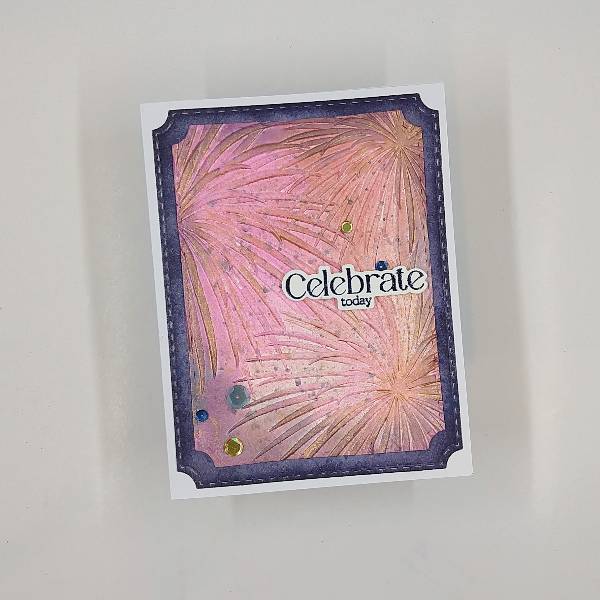
Today’s card was inspired by 4th of July celebrations, but is meant for a beloved coworker who is retiring after working at my school for over 25 years. She is one of the key people who everyone knew that they could turn to when they needed help and we will sorely miss her, but are so excited for her next adventure.
Skill: Intermediate Time: 1.5 hours
Directions:
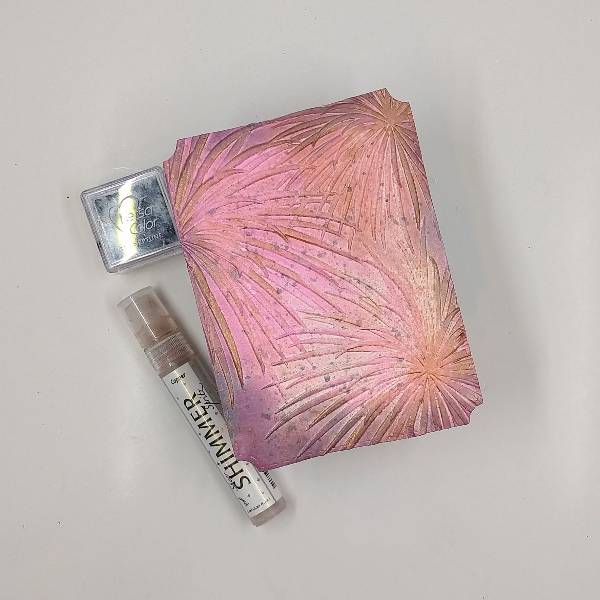
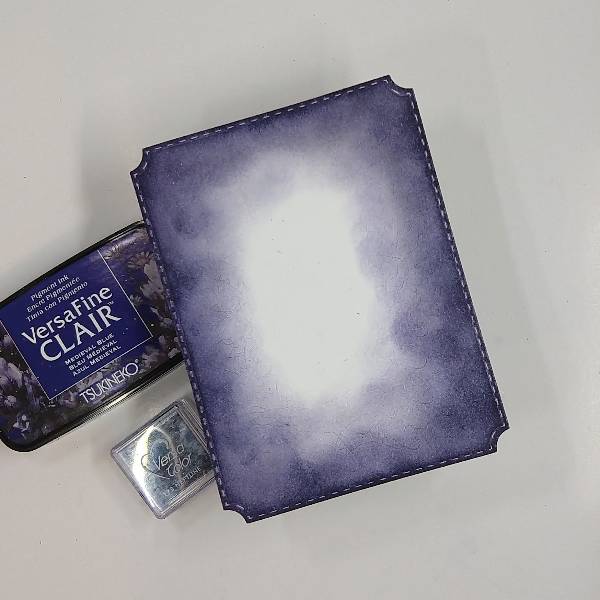
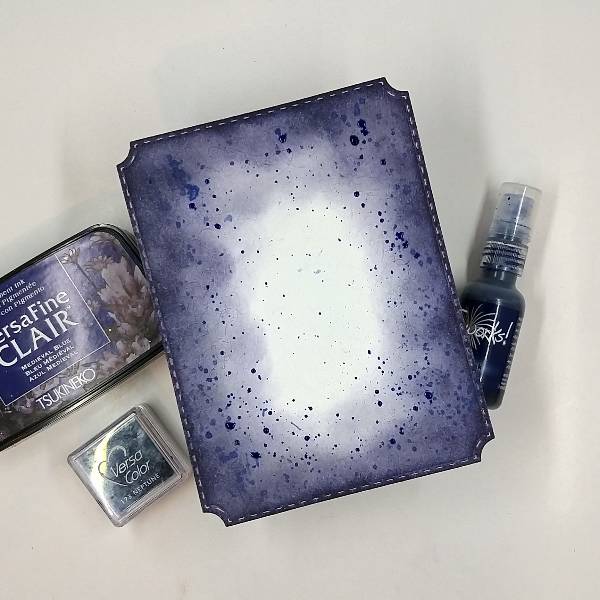
Step 1: Die cut a piece of watercolor paper with the second-largest die in an A2-sized die set. Spray Lilac Posies, Angel Pink and Rhubarb Stalk Fireworks! Craft Spray directly onto a fireworks embossing folder, trying to have the colors mix on the folder. Then add the watercolor paper panel onto the embossing folder and run the whole thing through a die cutting machine. The spray will move inside of the embossing folder when it is pressed through the machine, giving some interesting effects on your embossed panel. Allow the sprays to dry.
Step 2: Ink blend the edges of the embossed panel with Neptune VersaColor ink. Press the Neptune VersaColor ink pad onto a piece of scrap acetate and spray with water and then splatter the mix onto the panel with a thin paintbrush. Then spray the panel with Copper Shimmer Spritz. Spray more of the Copper Shimmer onto a clean piece of acetate and use the spritz to paint the raised parts of the panel (the tendrils or arms of the fireworks). Allow to dry.
Step 3: Die cut another piece of watercolor paper with the largest die in the A2-sized die set. Using a sponge dauber, ink blend the edges with more of the Neptune VersaColor ink and then the extreme edges with Medieval Blue VersaFine Clair ink.
Step 4: Splatter Paris Dusk Fireworks! Craft Spray onto the panel and allow to dry.
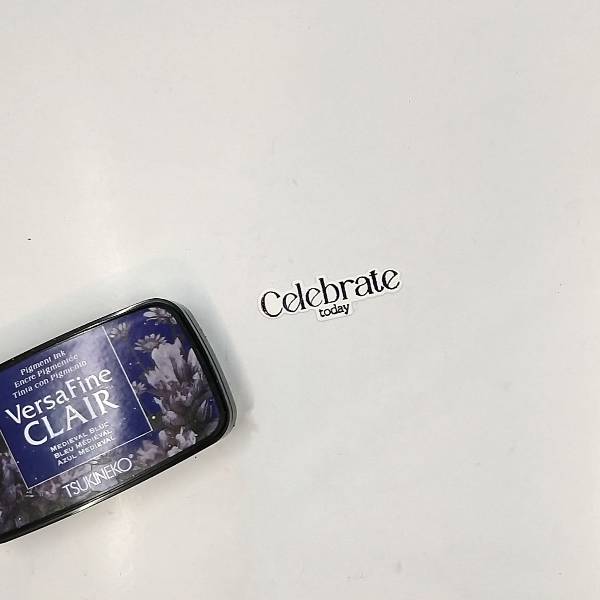
Step 5: Stamp a sentiment on a scrap of watercolor paper with Medieval Blue VersaFine Clair ink and heat emboss with clear embossing powder. Die cut the sentiment with the corresponding die.
Step 6: Glue the two panels together. Attach the sentiment with foam tape. Then glue sequins on the lower left corner and just above the sentiment. Finally, glue the whole thing onto an A2-sized white cardbase to finish the card.
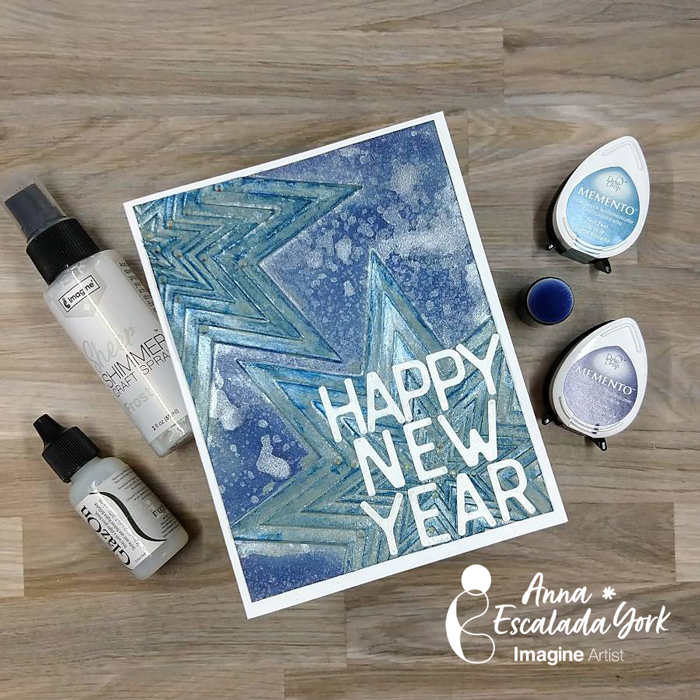
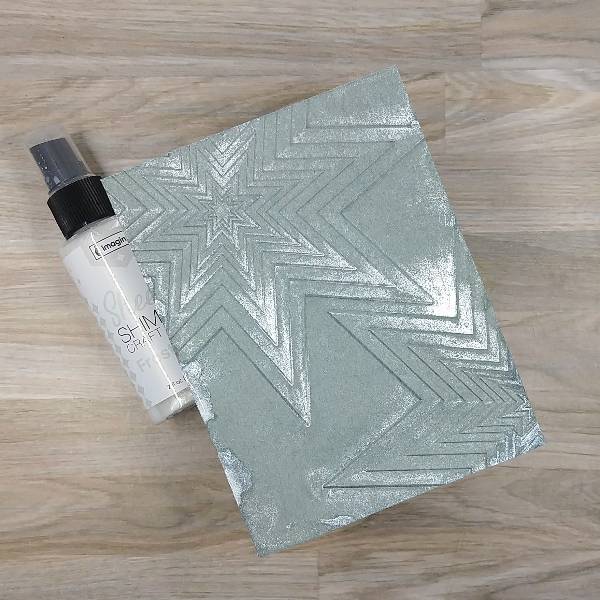
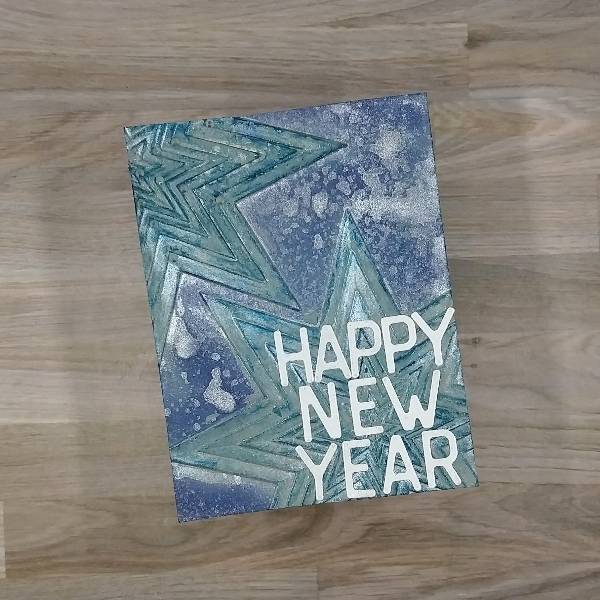
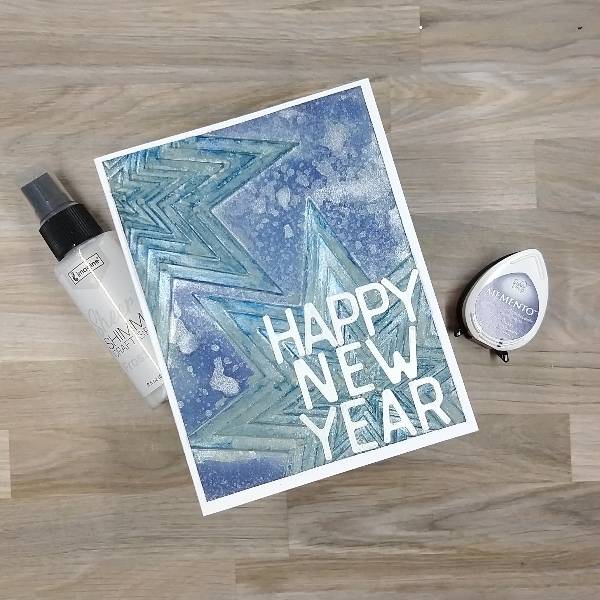
Step 1: Spray Frost Sheer Shimmer Craft Spray onto a piece of white watercolor paper and set aside to dry.
Step 2: Trim a piece of gray watercolor paper to 4” by 5.25” with a paper trimmer. Then spray the panel and the inside of an embossing folder with more of the Frost Sheer Shimmer Craft Spray, place the gray watercolor panel inside of the embossing folder and then run the embossing folder through a die cutting machine. Allow the panel to dry.
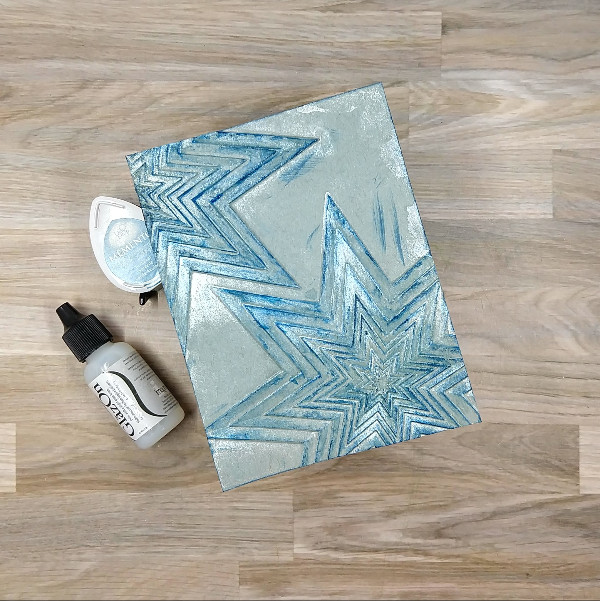
Step 3: Gently run a Teal Zeal Memento Ink pad across both of the embossed stars and around the edges of the panel. Using a small sponge dauber (or your finger), spread some shiny GlazOn onto both of the embossed stars to “lock in” the teal color.
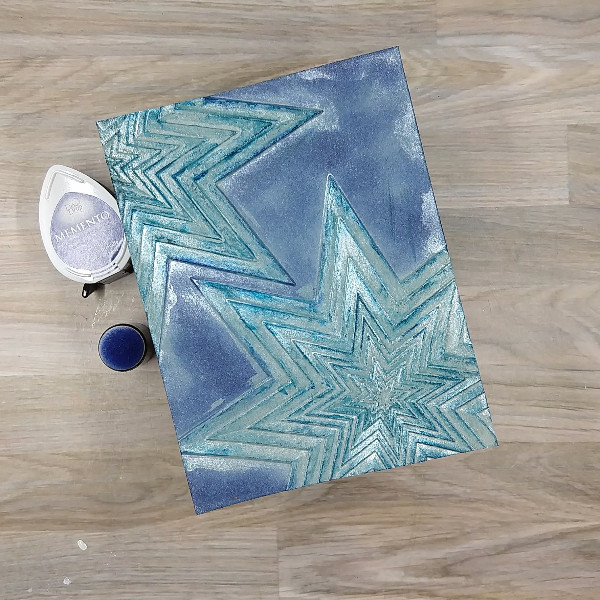
Step 4: Using a sponge dauber, ink blend Paris Dusk Memento ink around the panel (not on the stars).
Step 5: Die cut letters to form the sentiment out of the the sprayed white cardstock from step 1.
Step 6: Spray the panel with more of the Frost Sheer Shimmer Craft Spray and allow it to dry. Then glue the letters from the sentiment onto the lower right corner of the panel.
Step 7: Glue the panel onto an A2-sized white card base.
Altenew – embossing folder – Stellar Cascade Sizzix – die set – Letterboard (666859) White watercolor paper Gray watercolor paper Die cutting machine Paper trimmer Scissors Glue