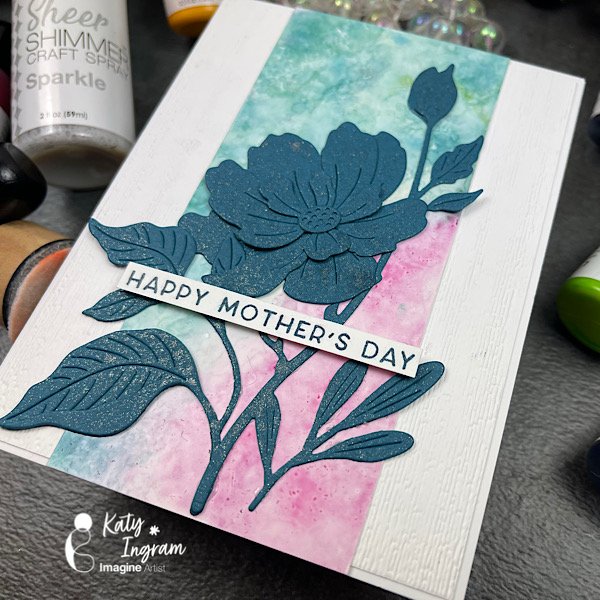
Hello Friends! Katy here with my latest video sharing a great way to use VersaFine Clair re-inkers on Craft Plastic with felt pads and Isopropyl Alcohol. Video has all the details. Thanks for watching.
Other Products Used Yupo Paper Simon Says Stamp Devine Peony Die Spellbinders Oceanside Cardstock Stampin up Subtle 3D folder The Greetery Mothers Day Stamp- To Mom with Love Stamp Set Gina K White Layering Cardstock 100 lb Accent Opaque Cardstock Felt Pads Isopropyl Alcohol
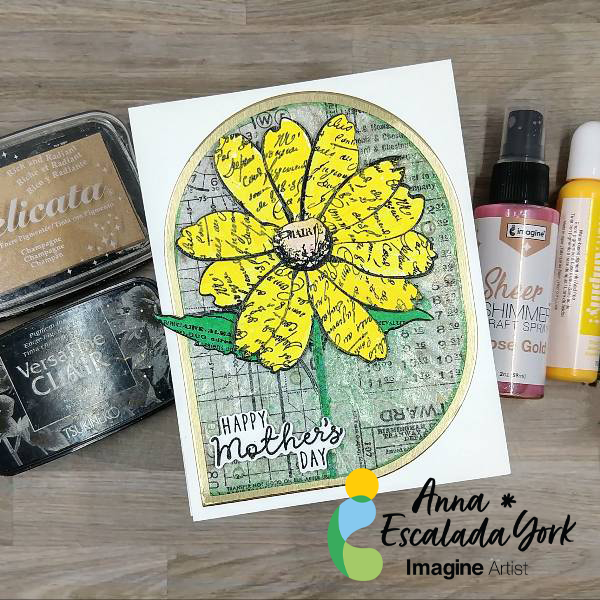
– I wanted to make a card that represents both my mom and myself. My mom’s favorite color is yellow, and I am all about the grunge and sparkle! Now I just need to be out of my craft room long enough for my kids to have to sneak in and make me a card….
Skill: Intermediate Time: 1.5 hours
Directions:
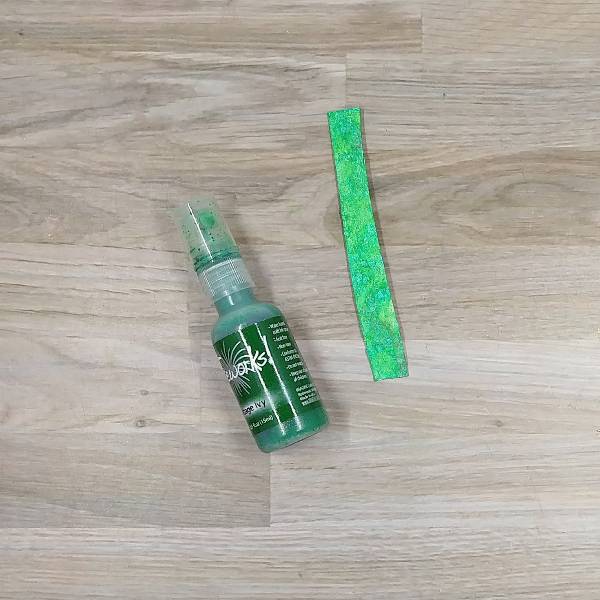
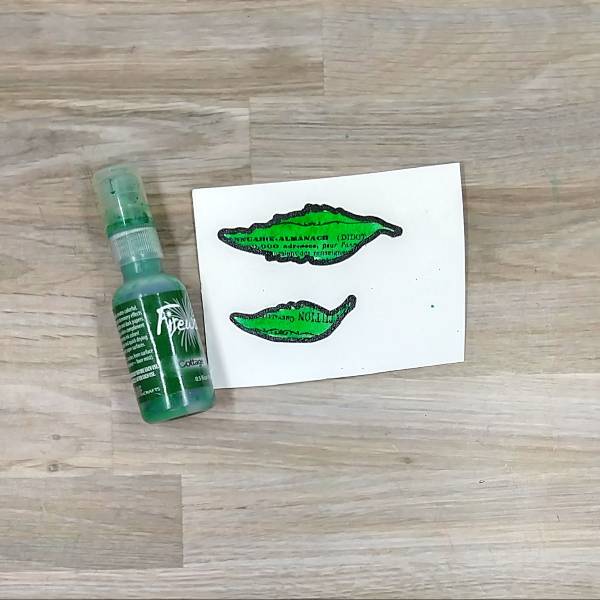
Step 1: Place a small piece of watercolor paper on some acetate and then spray both with Cottage Ivy Fireworks! Spray. Use a heat tool to dry the spray on the watercolor paper and then flip it over to watercolor smoosh the remaining Cottage Ivy Fireworks! Spray on the acetate and then dry the spray on the watercolor paper again. Repeat the watercolor smooshing once more and dry. Then die cut the watercolor paper with the stem die cut and set aside (not pictured).
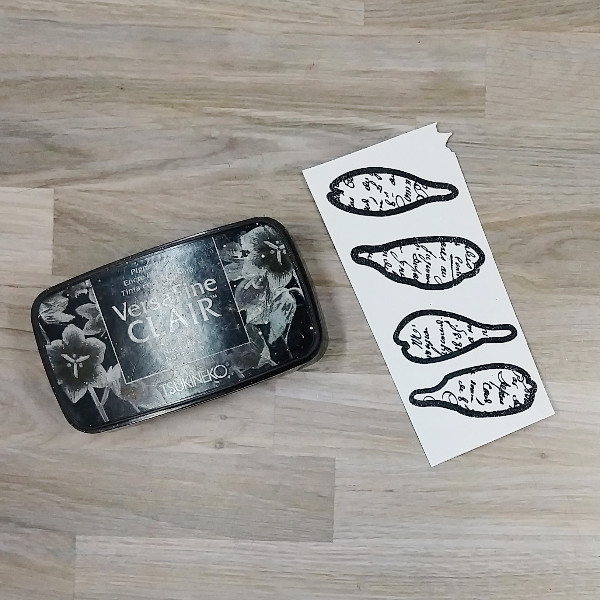
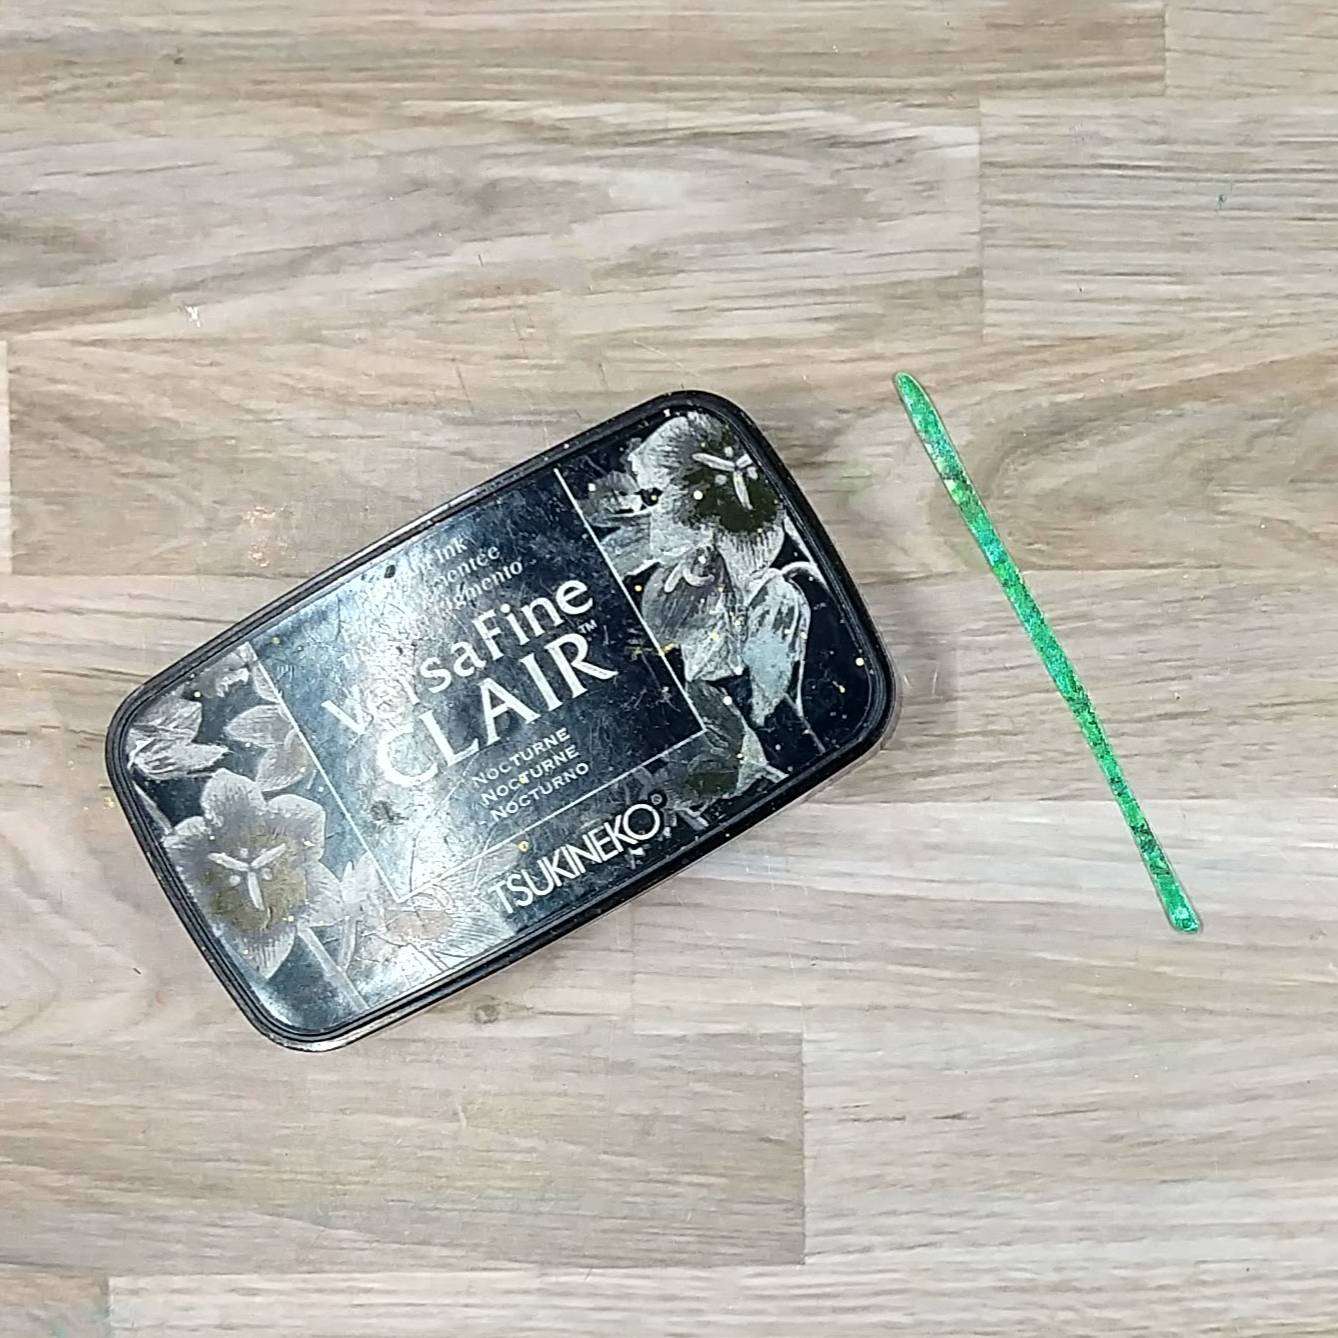
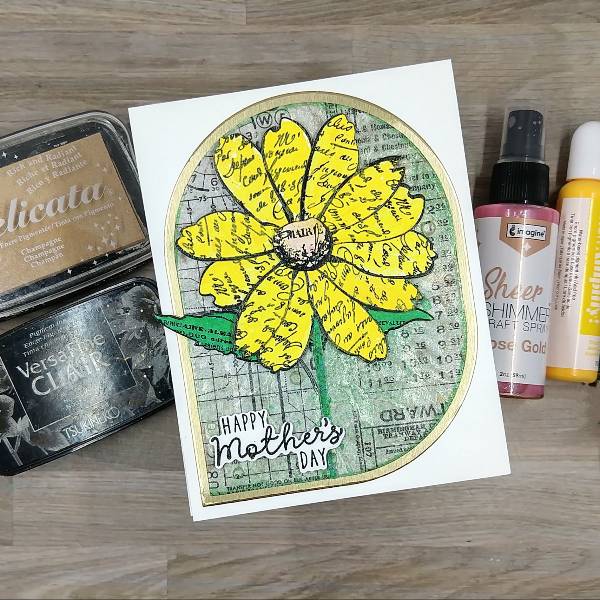
Step 2: Stamp the flower’s petals, leaves and center stamps with Nocturne VersaFine Clair ink and heat emboss with clear embossing powder. While only one set of petals is pictured here, 12 petals (3 sets of all 4 petals) and both of the leaves and the center were all stamped in the same way
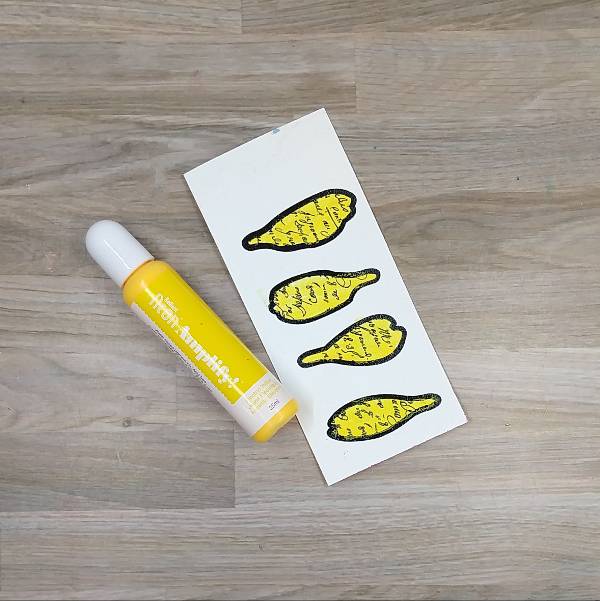
Step 3: Mix Electric Yellow Amplify! with a small amount of water to dilute the Amplify! Ink. Then use to paint the petals. Use a heat tool to dry and add texture. Die cut all of the petals.
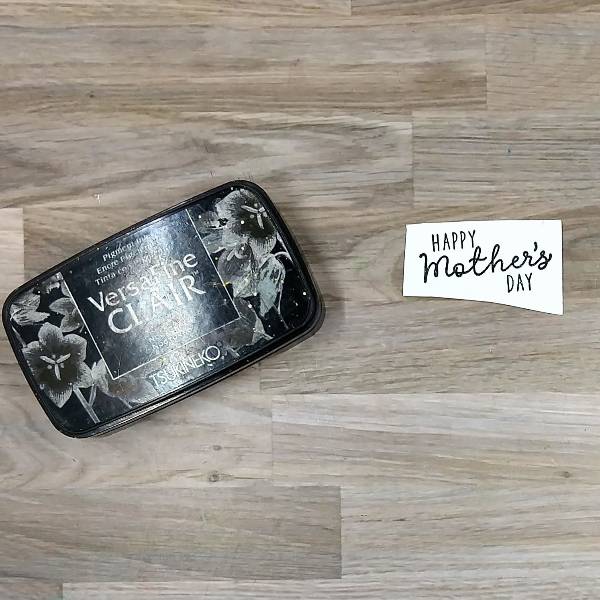
Step 4: Stamp the faux stitching texture stamp onto the stem die cut with Nocturne VersaFine Clair Ink.
Step 5: Watercolor smoosh the stamped center of the flower with the leftover mix of water and Electric Yellow Amplify! Ink. Dry with a heat tool. Then spray the center with Rose Gold Sheer Shimmer Craft Spray and set aside to dry. Then die cut the center with the corresponding die.
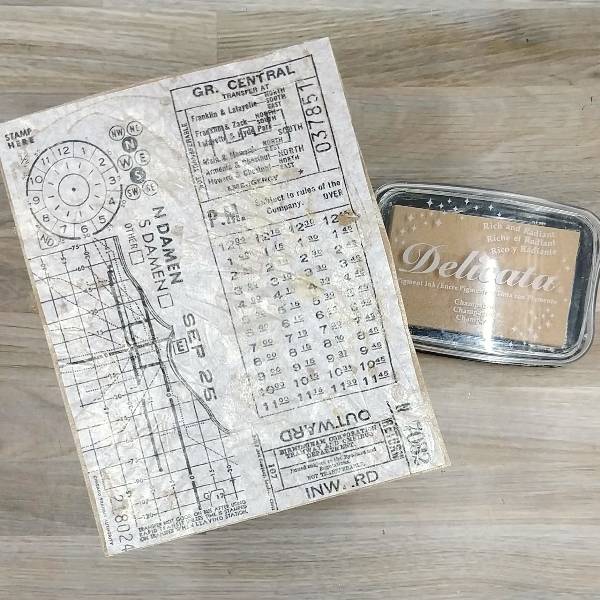
Step 6: Glue collage paper onto a panel of kraft cardstock. After the glue dried, press the Champagne Delicata ink pad onto the collage paper to add sparkle and obscure some of the collage paper’s print.
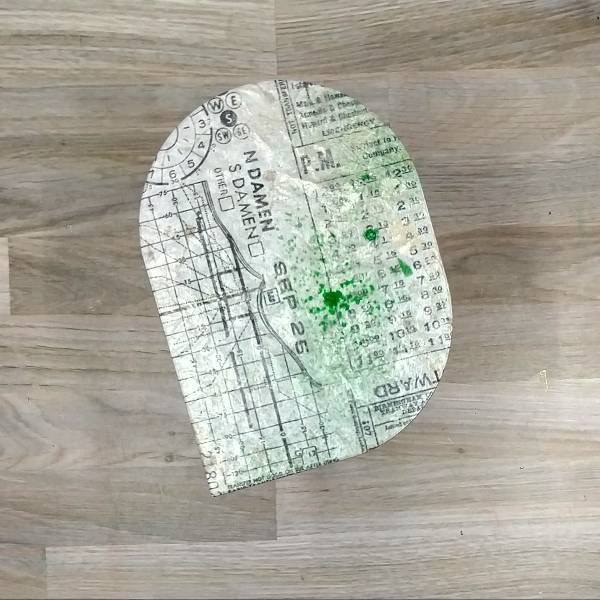
Step 7: After die cutting the collaged panel, spray part of the panel with Cottage Ivy Fireworks! spray. Set aside to dry.
Off camera, die cut a piece of gold metallic cardstock with the next size up panel die.
Step 8: Spray some more of the Cottage Ivy Fireworks! spray onto another piece of acetate and then watercolor the leaves with the green color. After the spray dried, die cut with the corresponding dies from the die set.
Step 9: Stamp the sentiment on a scrap of watercolor paper with Nocturne VersaFine Clair ink. Then heat emboss with embossing powder.
Step 10: Assemble the card. Glue the stem onto the collage panel. Glue the leaves onto the panel. Glue the petals behind the center of the flower. (If desired, use some scraps or other small pieces of cardstock to glue behind the petals to help them stay together.) Then glue the flower petals and the center of the card onto the collaged panel. Then paint the edges of the panel with more of the Cottage Ivy Fireworks! spray. Then glue the sentiment on the lower left part of the panel. Add clear gems onto the panel.
After all of the glue has dried, glue the panel onto the gold metallic panel to add a matte layer. To finish the card, the whole thing was glued onto an A2-sized white card base.
Other • Idea-ology and Tim Holtz – collage paper – Archives • Scrappy Crafts – embellishment mix – Amethyst • Simon Says Stamp – die set – Love You Mama • Simon Says Stamp – die set – Squovals • Simon Says Stamp – stamp set – Love You Mama • Spellbinders – stamp and die cutting set – Sculpted Scripted Floral • Clear Embossing Powder • Gold metallic cardstock • Kraft cardstock • Heat tool • Glue • Watercolor paper
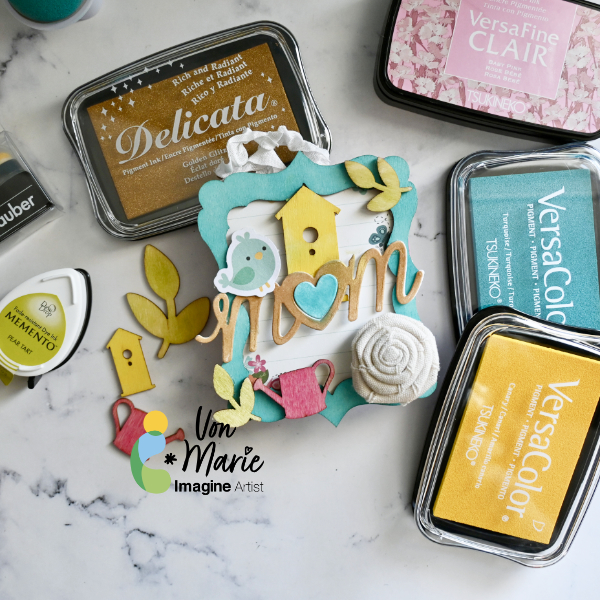
Hello everyone. Von Marie here with my latest project. I chose to make a Mother’s Day Home Decor project today. I used wood veneers and frame and some Beautiful VersaColor inks, and Delicata Golden Glitz to help me make this project fun and colorful. This project is great for a gift or for yourself as a decoration for your craft room. You can even switch it up and make it a Christmas project or anytime project. The video will have all the details. Thank you for watching.
Hi everyone! It’s Jessica here. Are you planning on making a Mother’s Day card this year? I want to share a simple sketch that you can use with any layering stencils you may have.
Let’s begin crafting!
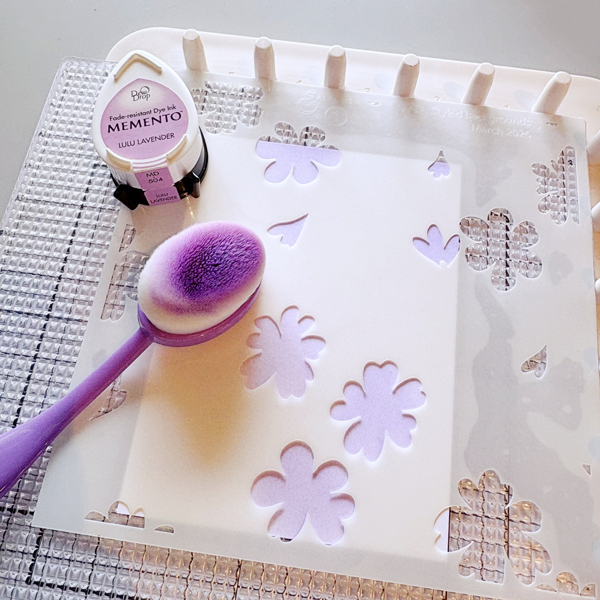
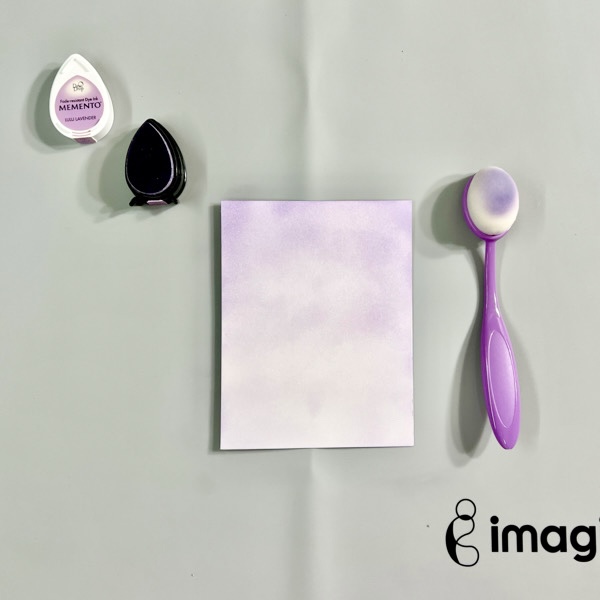
Step 1: I am using Altenew’s Styled Background layering stencil set for today’s card. Let’s start by trimming a piece of Classic Crest Solar White to 3 ½’’ x 4 ¾’’. After that, we can start ink blending stencil 1 with Memento Lulu Lavender ink.
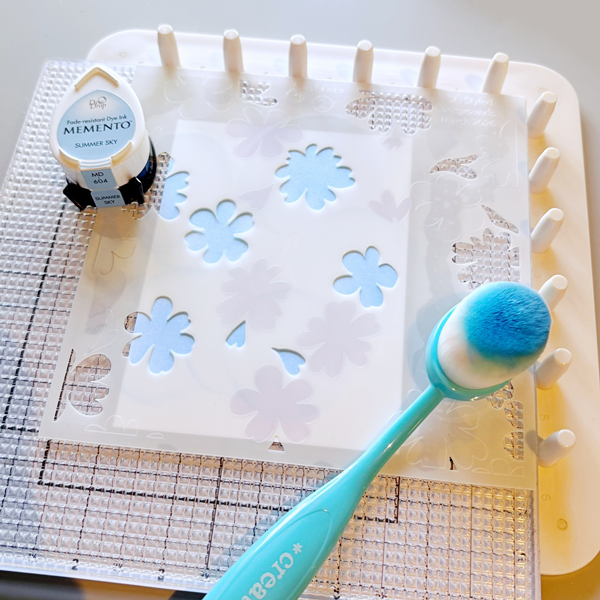
Step 2: Next, ink blend Memento Summer Sky ink with stencil 2. I really like the idea of separating the floral images into two layers; it gives us so much creative freedom and the color combination is endless!
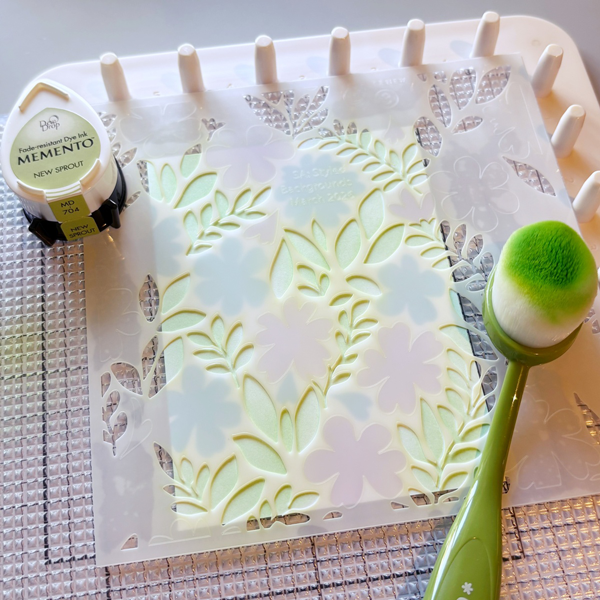
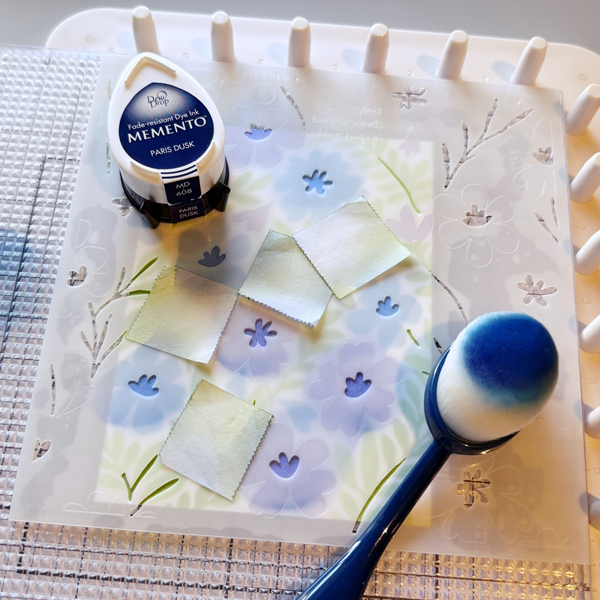
Step 3: Stencil 3 is the base layer for leaves. I used Memento New Sprout ink. It may be difficult to spot in this photo, but I created a color gradient by blending more ink in some areas and having a lighter hand for others.
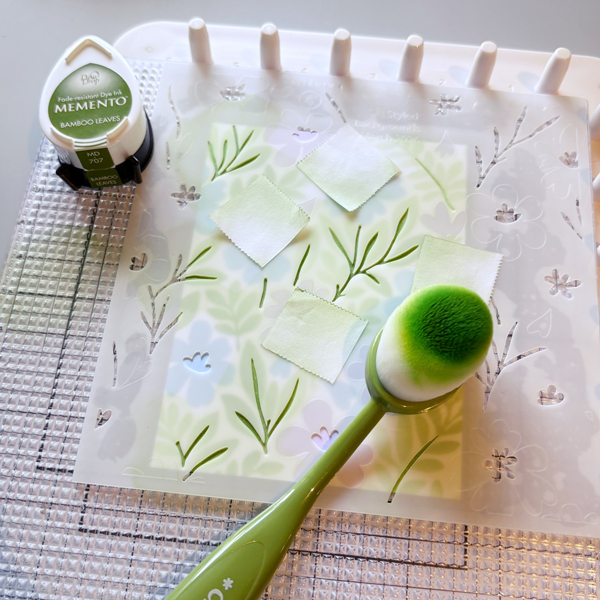
Step 4: Now that the base images are ink blended, we can start with the layering. Stencil 4 includes leaf stems, and I used Memento Bamboo Leaves ink. This stencil also contains floral centers. Since the stems and floral centers are quite close to each other, I had to mask some areas while ink blending. If you have smaller blending brushes, you could skip the masking step.
Step 5: I used Memento Paris Dusk ink to ink blend the floral centers.
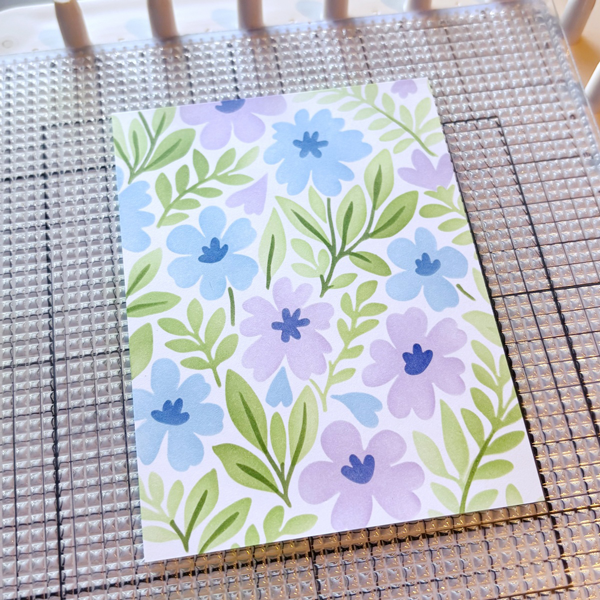
Step 6: This is what the background panel looks like after ink blending all 4 layers. I love the look of soft, pastel colors and am so pleased with the final result.
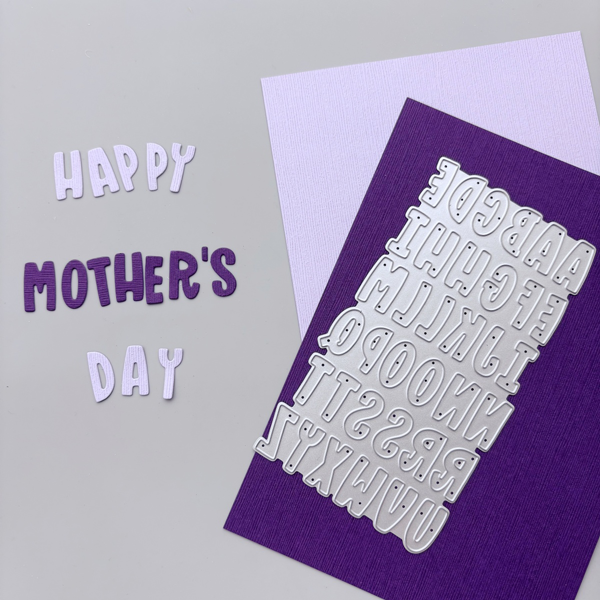
Step 7: After ink blending, we are ready to add the sentiment of the card. I chose Stampin’ Up’s Mini Alphabet die to spell out “Happy Mother’s Day”, but you could use any sentiment die you may have. I decided to die cut with CutCardStock DCS Hydrangea Purple and Plum Purple for some added contrast. These cardstock have a smooth side and a textured side; I opted for the textured side today.
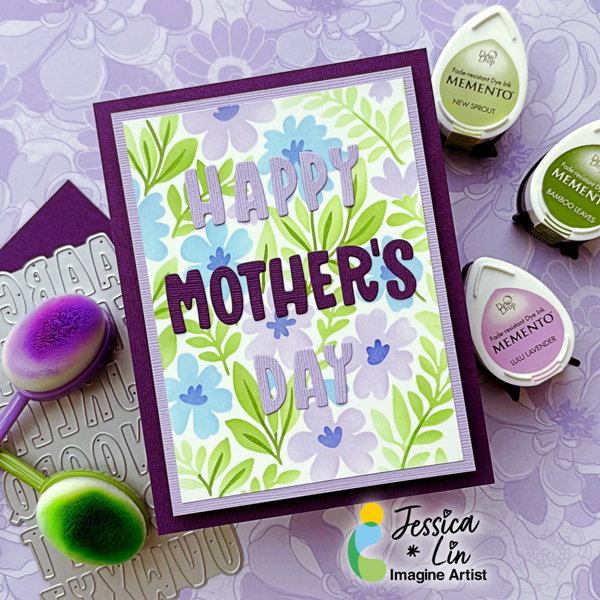
Step 8: Next, trim a piece of CutCardStock DCS Hydrangea Purple to 3 ¾’’ x 5’’ and mount the ink blended panel on top. Then adhere it to a CutCardStock DCS Plum Purple card base. Finally, apply On-Point Glue to the back of the letter die cuts and adhere them to the card panel to complete the card!
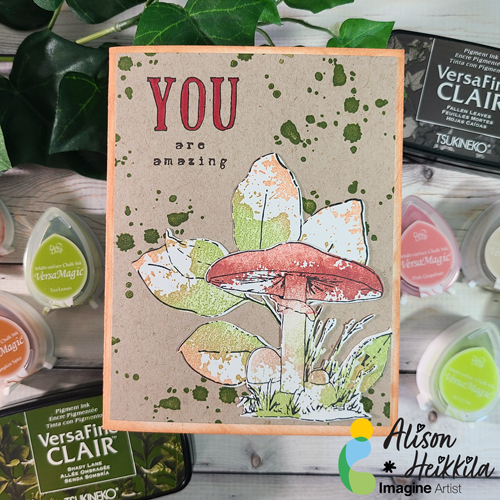
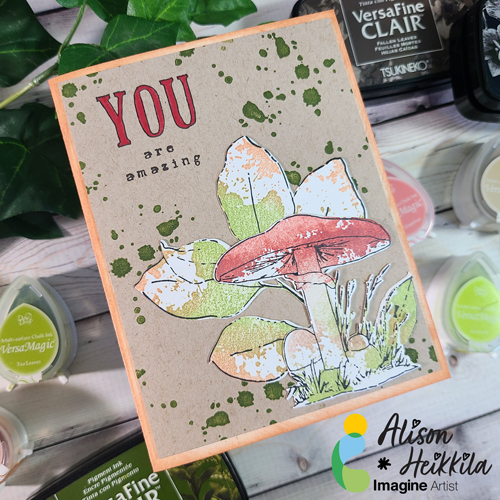
Hello! My latest project for Imagine is a Mother’s Day theme. Now, perhaps this project may be a style all moms like, but it’s definitely one that my mom loves. I wanted to show how beautiful VersaMagic inks are, and how convenient it is to have them in their Dew Drops shape. They’re beautiful and chalky, and create really nice effects.
*Some affiliate links are used in this post. That means that if you shop through these links, I may receive a small compensation, at no cost to you.
Skill Level: Intermediate Time to Complete: 20-30 minutes
I can’t wait to officially give this card to my mom. I know she’s going to love everything about it. If you haven’t played with VersaMagic Inks yet, I hope you’ll give them a try. Thanks for stopping by. Have an inspiring day!
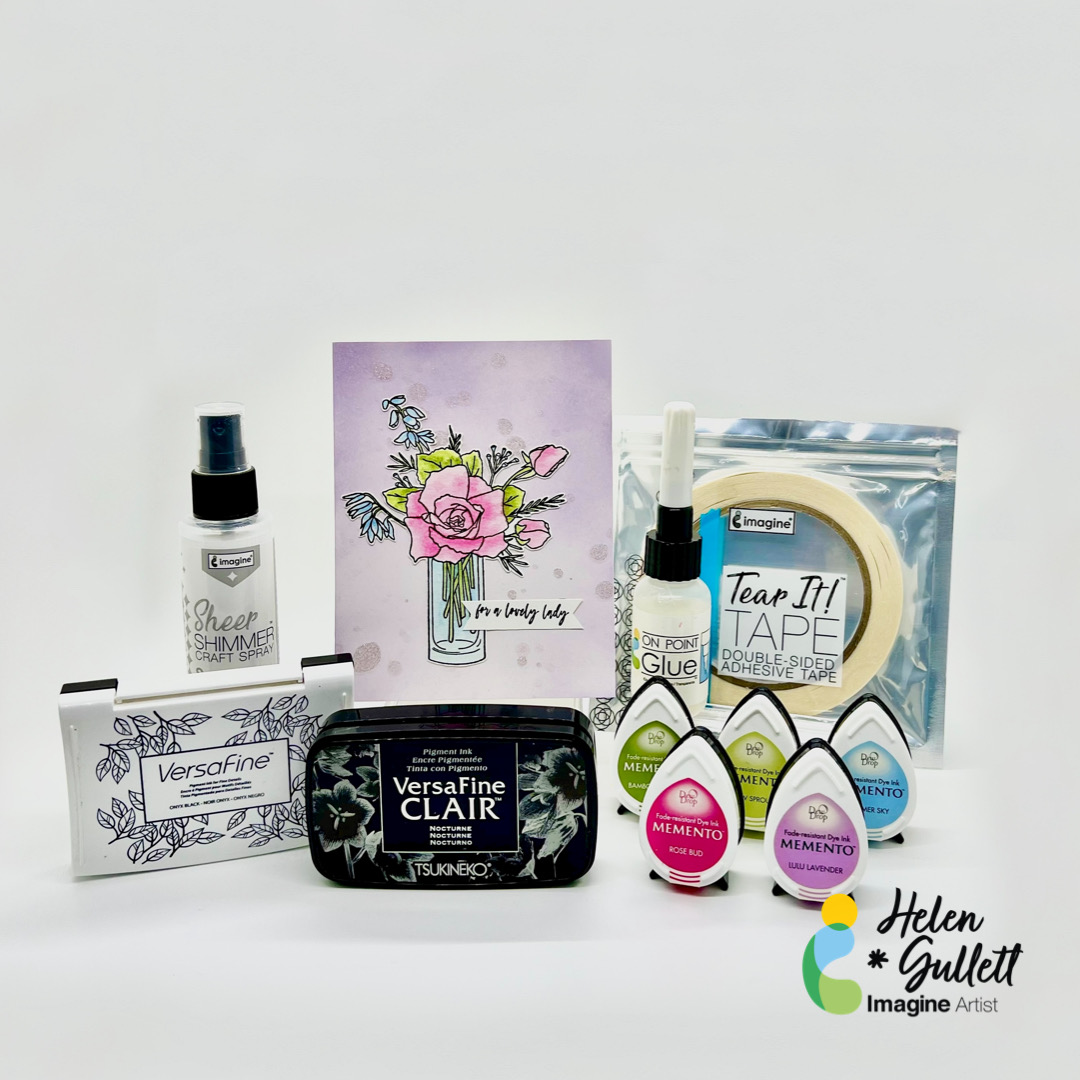
Hello crafty friends! Mother’s Day is coming up soon. Sending out a handmade card is a way to show your love to a lovely mother figure in your life. Today, I would like to share with you how to make this Mother’s Day CAS card using Imagine Crafts products and stamps.
Skill: Beginner Time: 15-20 minutes
Direction:
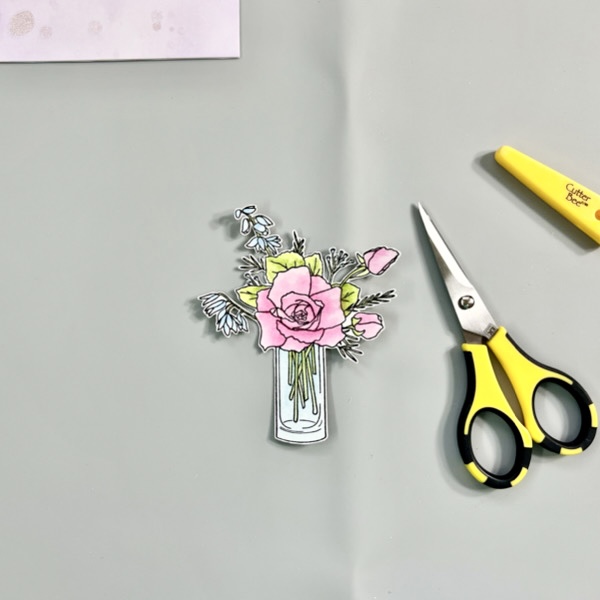
Step 1 Cut a piece of watercolor paper into 6 inch x 5 inch size. This size fits on my stamping tool. Then, stamp the image on the watercolor paper with Versafine Onyx Black ink pad.
Step 2 Dab some of the Memento DewDrop Inks (Rose Bud, Bamboo Leaves, New Sprout, and Summer Sky) on the craft mat.
Add a couple drops of water from the waterbrush on the ink to turn it into watercolor paint. Pick up the ink with the waterbrush and paint the flower and vase.
Dry the painted image with a craft heat gun.
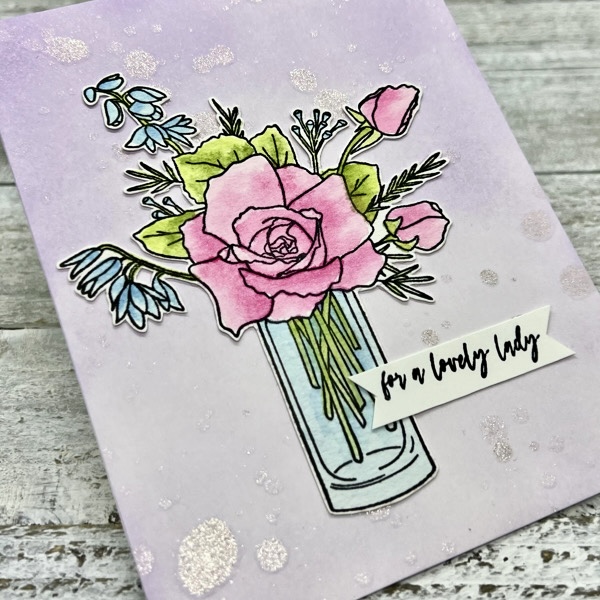
Step 3 On a piece of white cardstock, add some of the Lulu Lavender ink using the blending brush. Build up the color from darker to lighter to create the gradient look on the background.
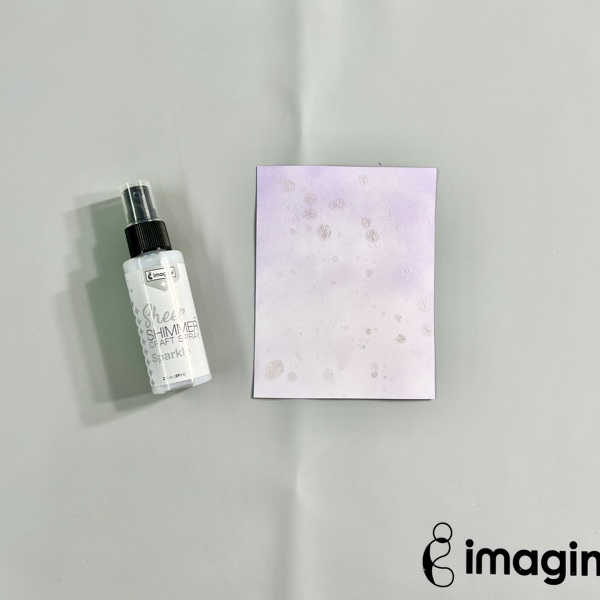
Step 4 Once done with adding color on the cardstock, lightly spray some of the Sparkle Sheer Shimmer Craft Spray. And then use a small flat brush, add some extra splatter on it for more texture.
Using a craft heat gun, dry the background panel.
Step 5 Fussy cut the flower with micro-tip scissors. Optional: you can use a die if you use a stamp set that has a matching die set.
Step 6 Stamp the sentiment on a white cardstock using the VersaFine Clair Nocturne, dry the ink with a craft heat gun, and then cut it into a sentiment banner with scissors or paper cutter.
Step 7 Add the background panel on an A2 card base using the Tear It! Tape. Add the flower and sentiment to the card using the On Point Glue.
That’s my project for today. Hopefully, you’ll like this project and give it a try. Thanks so much for stopping by our blog today. Have a wonderful day!