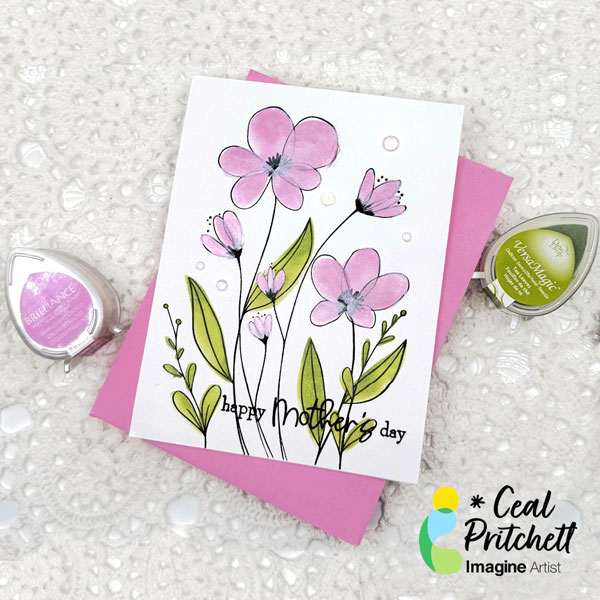
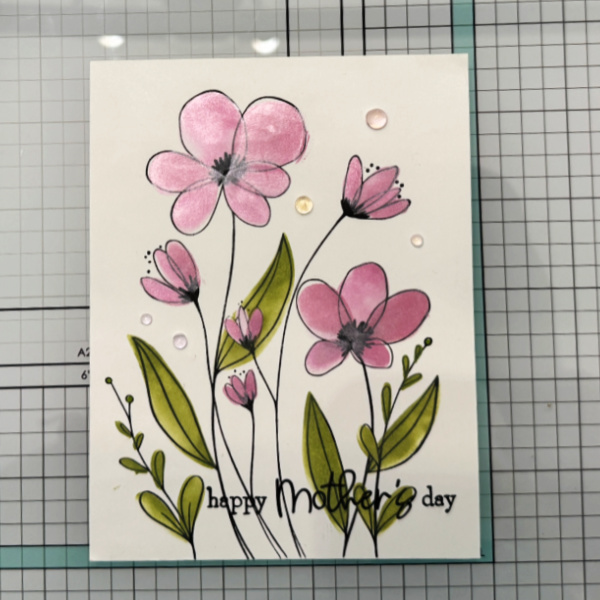
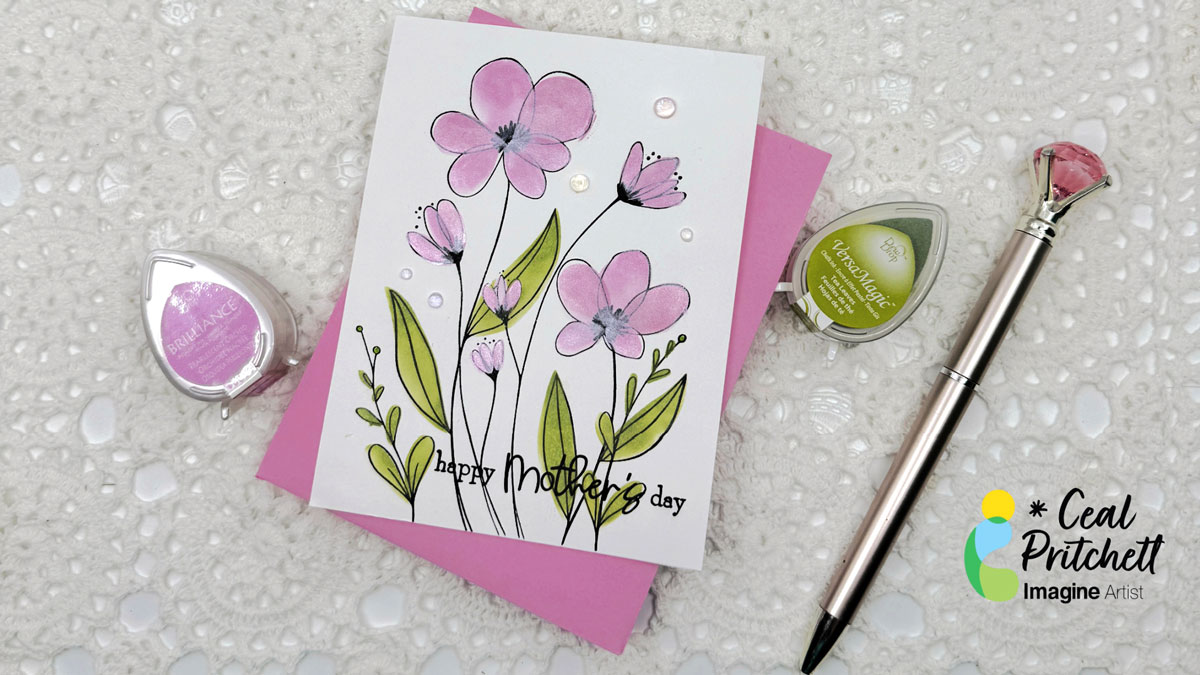
It’s Ceal, here. Today I am sharing how to make this Clean and simple Mother’s Day card using the Brilliance for shimmer and VersaMagic dew drops.
Skill: Beginner to intermediate Time: 30 mins
Directions:
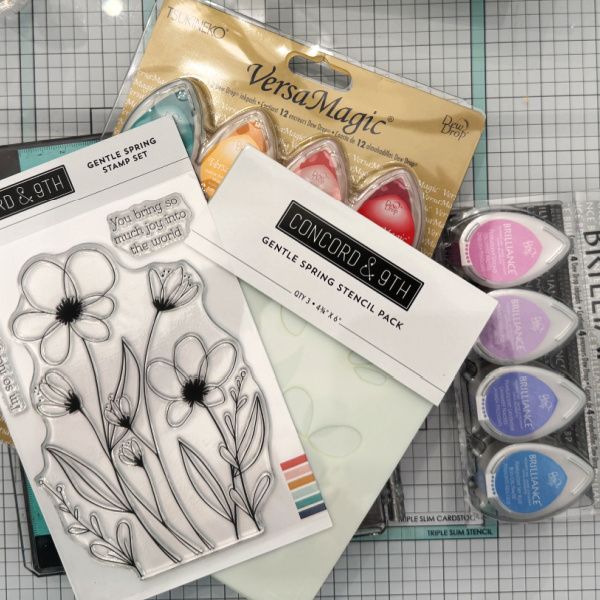
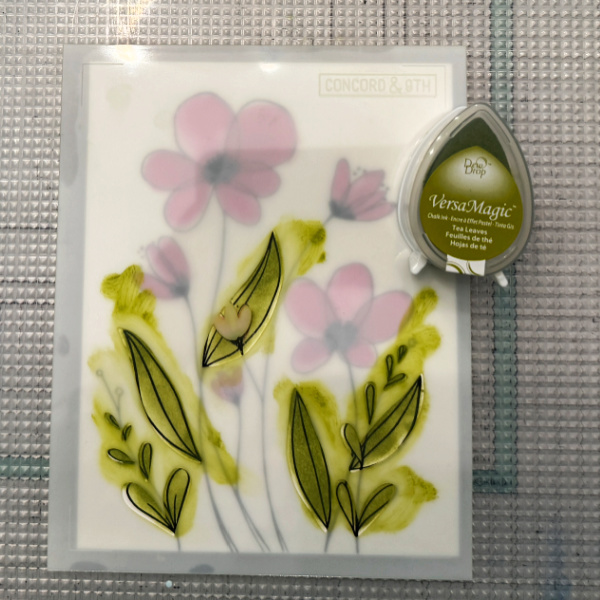
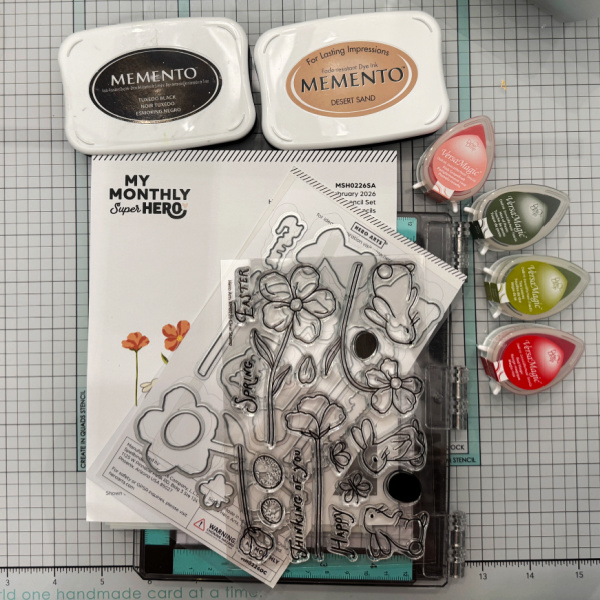
Gather your supplies. You will need a Mother’s Day stamp set or floral set as I have used here and a Mother’s Day sentiment. For inks I used a Brilliance Dew Drop and a VersaMagic Dew Drop
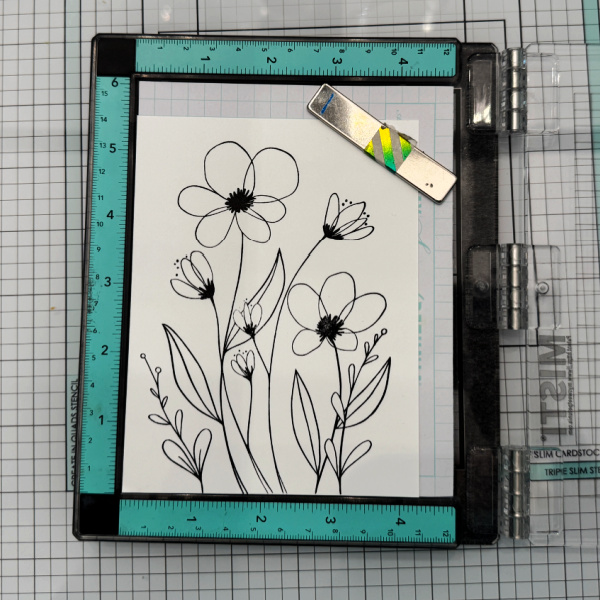
Step 1: Ink your stamp with a black ink
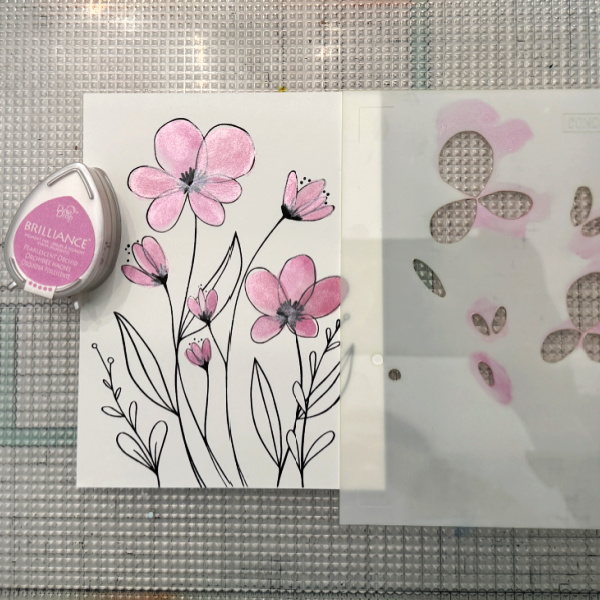
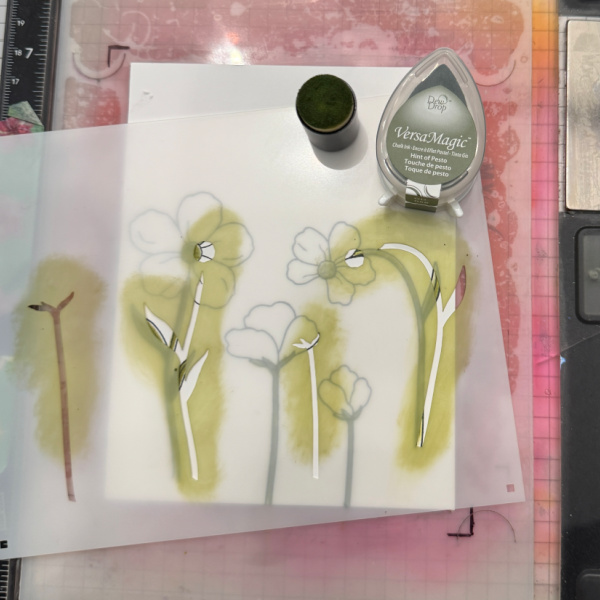
Step 2: Using the coordinating stencil and a blending brush or sponge dauber, ink blend a pearlescent pink on the flowers.
Step 3: Using the coordinating stencil and a sponge dauber or blending brus, ink blend green chalk ink on the leaves.
Step 4: Add embellishments of choice. I used some dew drops.
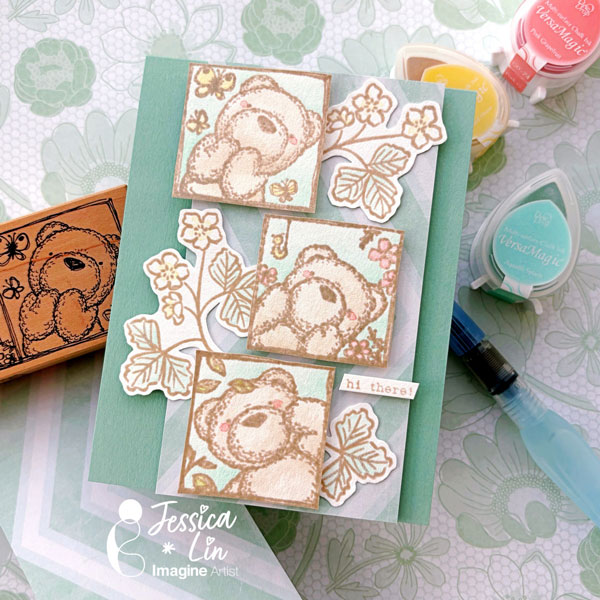
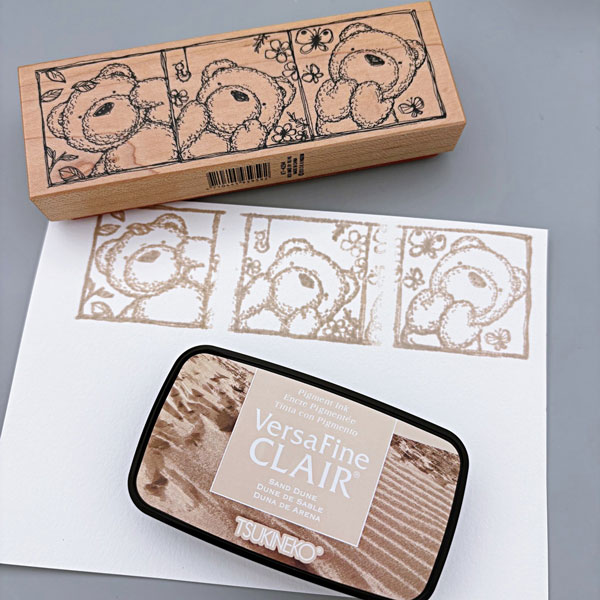
Hi everyone! It’s Jessica here. Have you ever tried using a stamp positioner to “break up” stamp images? The wooden stamp I am using today has three teddy bear designs connected together, but I was inspired to create a different sketch. Let’s get creative!
Step 1: Stamp the teddy bear designs separately on Strathmore 100% Cotton Watercolor 5×7 cardstock, inking only one square each time with VersaFine Clair Sand Dune ink.
Watercolor cardstock usually have a more textured surface, so using a stamp positioning tool would really help with re-stamping and getting a clear image. I used the We R Precision Press today since the base rods are tall enough to secure the wooden stamp in place. After stamping, I heat embossed the images with clear Mboss powder.
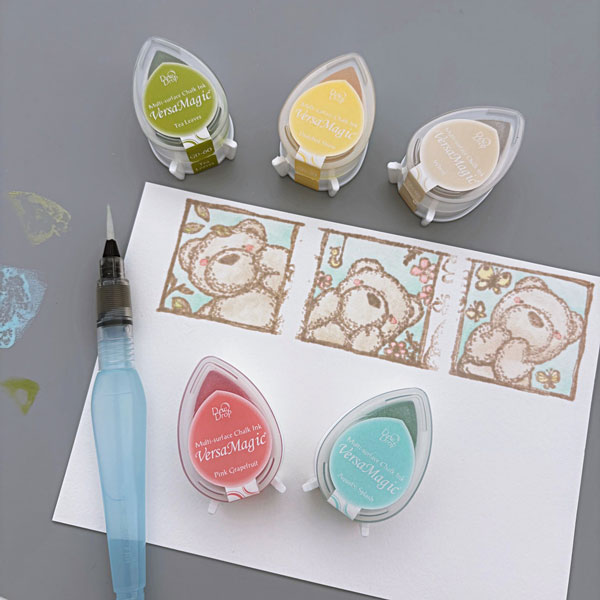
Step 2: Color the images with your choice of coloring medium. I am watercoloring with VersaMagic ink pads today. The colors I used are Wheat (for the bear), Aquatic Splash (for the sky background), and Tea Leaves, Pink Grapefruit, Thatched Straw (for the leaves, flowers, and butterflies).
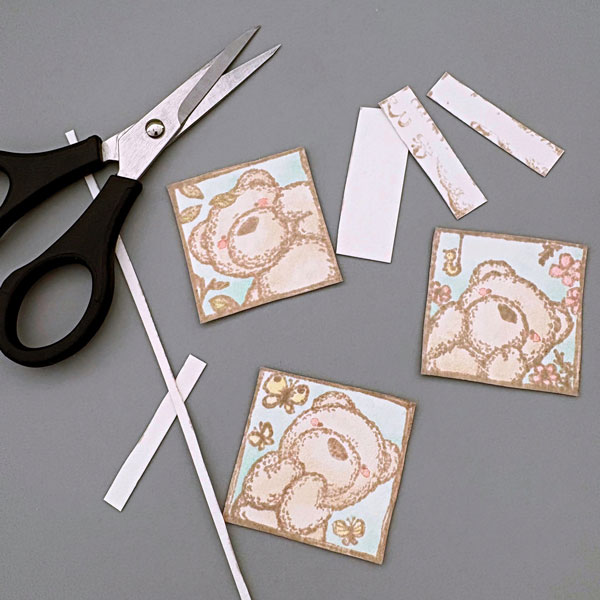
Step 3: Once the images are dry, fussy cut along the edges. After that, I swiped VersaFine Clair Sand Dune ink pad around the borders of each square so that the white core of the watercolor cardstock is not shown.
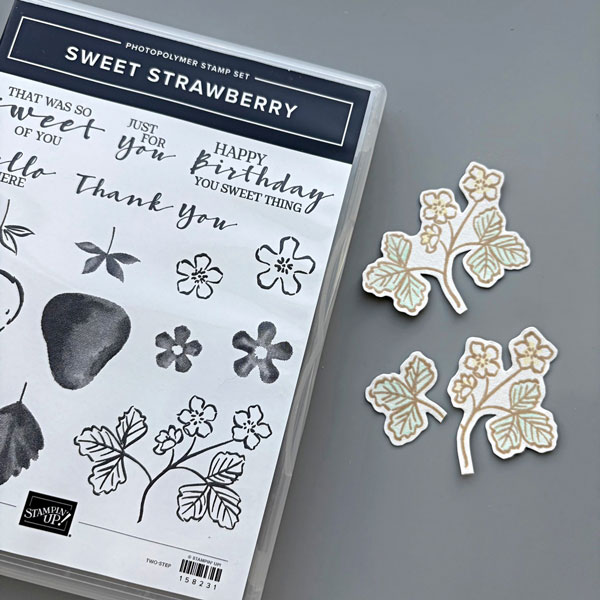
Step 4: I wanted to decorate the teddy bear frames with some florals, and the images from Stampin’ Up’s Sweet Strawberry stamp set are perfect. They are stamped and watercolored using the same supplies in steps 1 and 2. One of the floral images was even cut in half to fit around the sketch I had in mind.
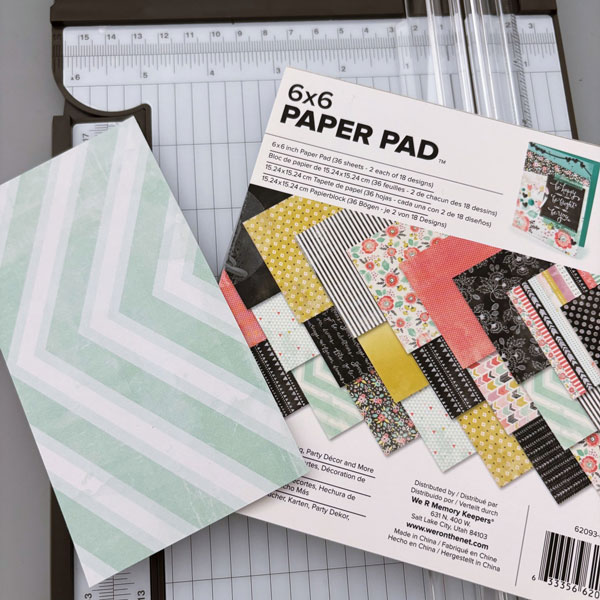
Step 5: The Chalkboard Prints 6×6 card stock pad has some beautiful geometric patterns. I trimmed the mint green chevron patterned paper to 3’’ x 5 ½’’ as the background of the card.
Step 6: Finally, I adhered all of the watercolor elements to the mint green chevron patterned paper with foam tape, and mounted the entire panel onto a Mint Macaron cardbase. I also stamped a tiny “hi there!” sentiment from Flora & Fauna’s Under the Sea stamp set. I hope you enjoyed today’s tutorial on how to create different card sketches from a large framed image stamp.
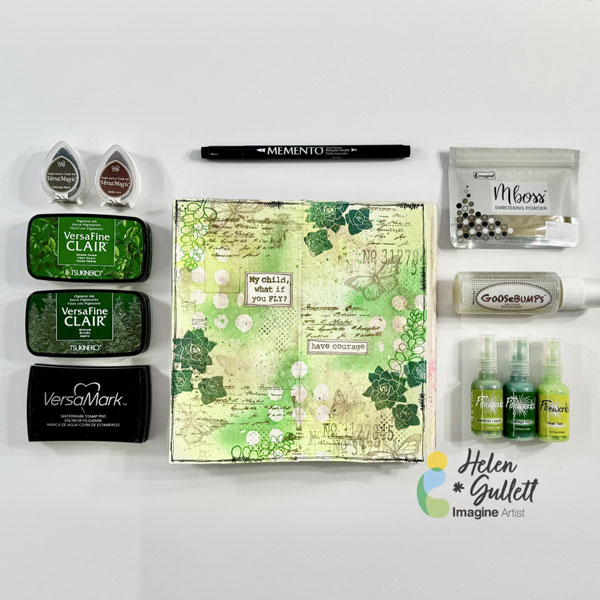
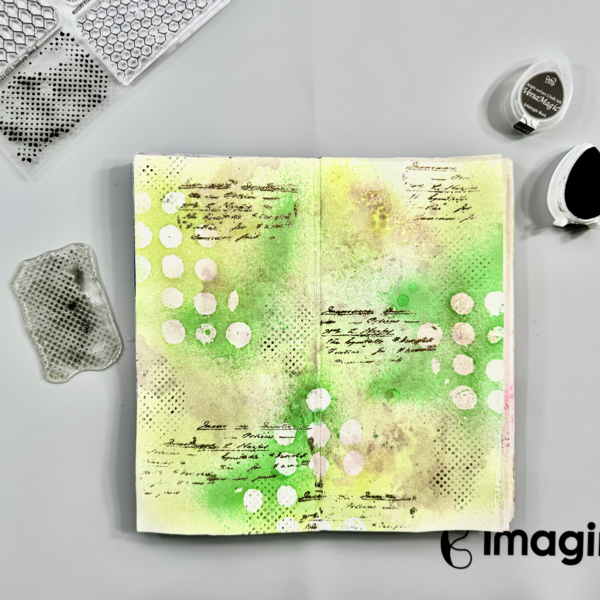
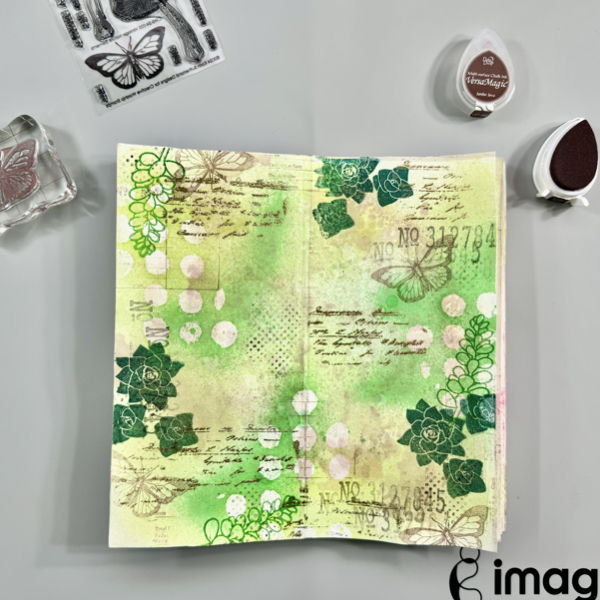
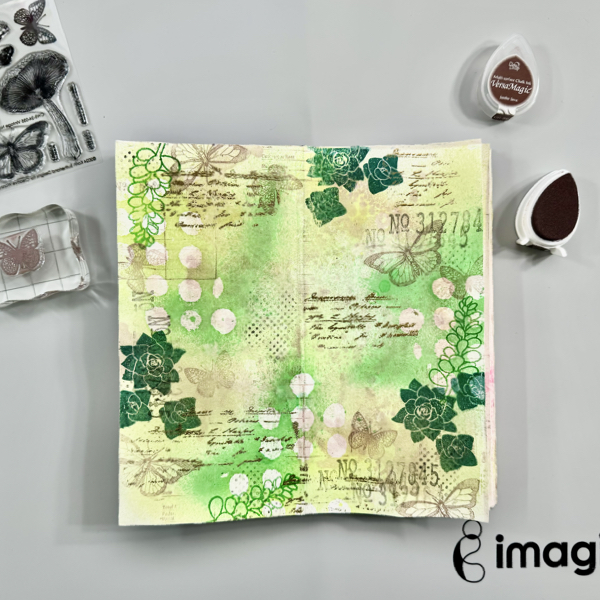
Hello crafty friends! Today, I would like to share how to make this mixed media art journal using some inks, craft sprays, embossing powder, and GooseBumps.Let’s get crafting!
Skill: Intermediate Time: 30-60 minutes
Direction:
Step 1 I used my handmade traveler journal using watercolor papers and mixed media papers. You can use any mixed media journal you have.
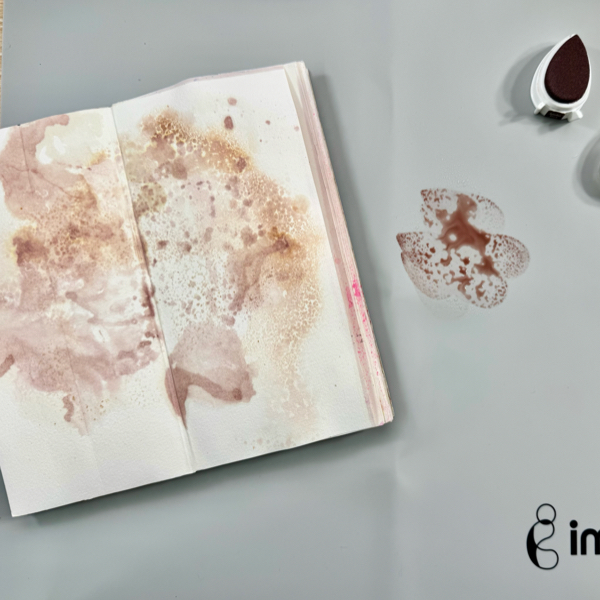
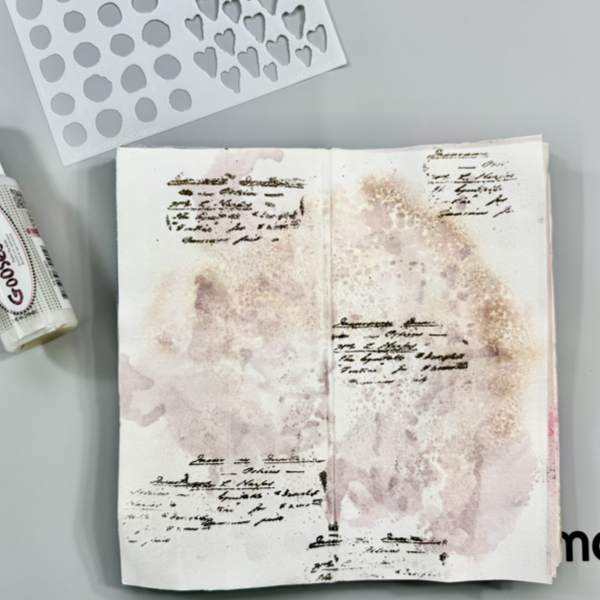
Dab some of the VersaMagic Jumbo Java ink on the craft mat and spray with some water.
Smoosh the page (or paper) to the ink and dry it with a craft heat gun. Repeat this step to create the watercolor background.
Step 2 Once the watercolored background dried well, add some of the anti-static powder to the page.
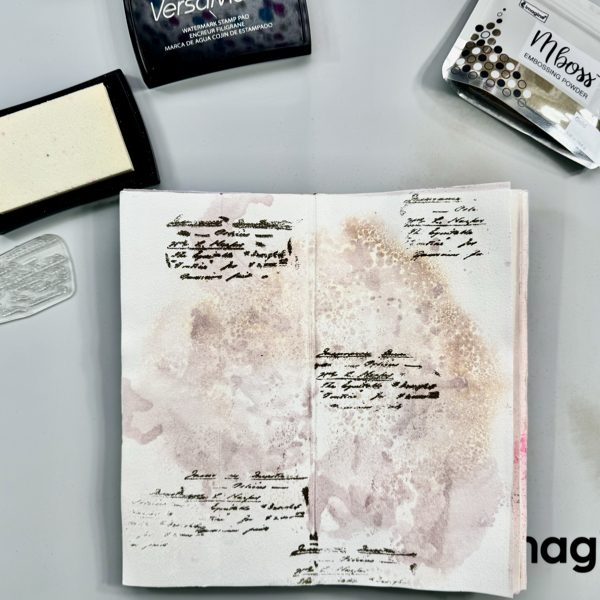
Stamp the script stamp on the page randomly with VersaMark ink and then add some of the Gold Mboss Embossing Powder to the page. Heat set the embossing powder with a craft heat gun.
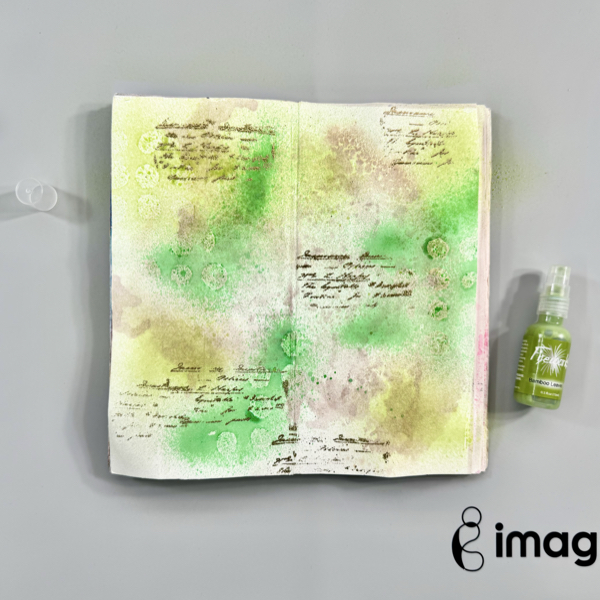
Step 3 Add the stencil to the page.
Add some of the GooseBumps Original (Dauber Top Bottle) to the page on the stencil randomly all over the page.
The best result is to let the GooseBumps texture spray dry naturally (about 2 hours) but I use a handheld fan to speed up the drying process to a few minutes. My suggestion is not to use a craft heat gun.
Step 4 Once the GooseBumps texture spray dry well, spray the Cottage Ivy Fireworks! Shimmery Craft Spray.
Dry the ink with a craft heat gun. Make sure to move the heat gun around, not stay too long at one spot to avoid melting the GooseBumps.
Dry the ink with a craft heat gun. Make sure to move the heat gun around, not stay too long at one spot to avoid melting the GooseBumps.
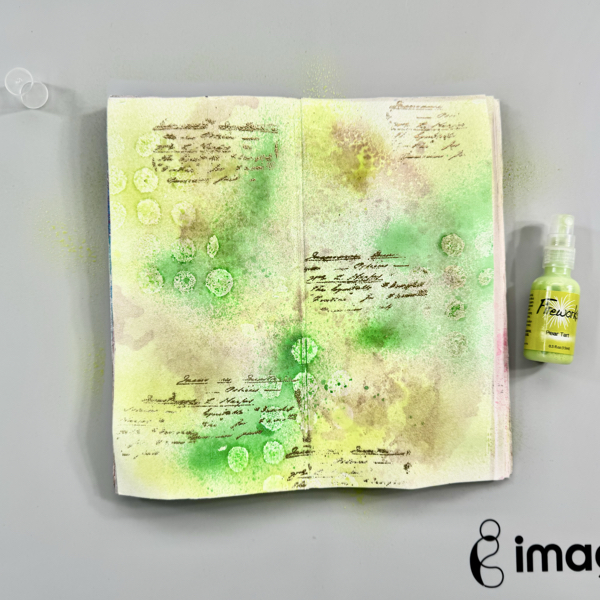
Step 6 And then, spray the Pear Tart Fireworks! Shimmery Craft Spray.
Dry the ink with a craft heat gun. Make sure to move the heat gun around, not stay too long at one spot to avoid melting the GooseBumps.
Step 7 Wipe the ink spray off using a clean slightly damp paper towel.
You can see the shapes start to pop out of the page adding fun texture to the background page.
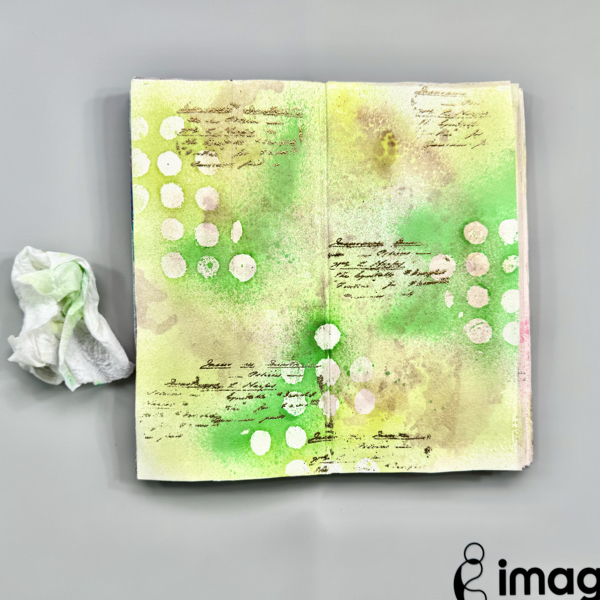
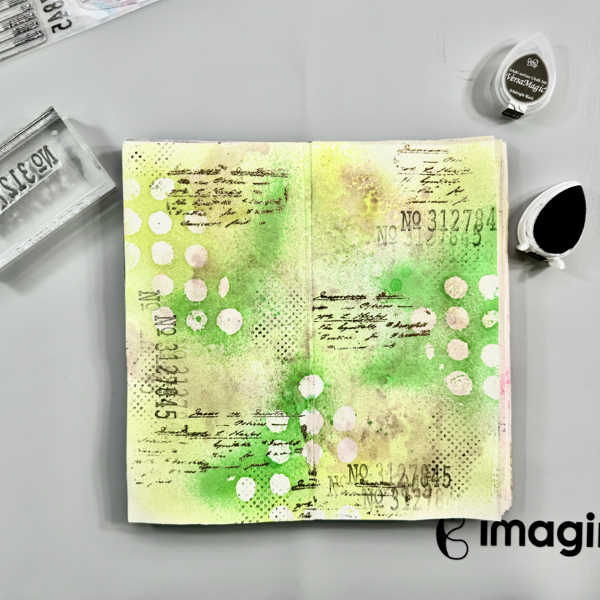
Step 8 Stamp the dots texture stamp randomly on the page with VersaMagic Midnight Black ink using first generation stamping technique.
Step 9 Stamp the numbers texture stamp randomly on the page with VersaMagic Midnight Black ink using first and second generation stamping technique.
Step 10 Stamp the old ledger texture stamp randomly on the page with VersaMagic Jumbo Java ink using second and third generation stamping technique.
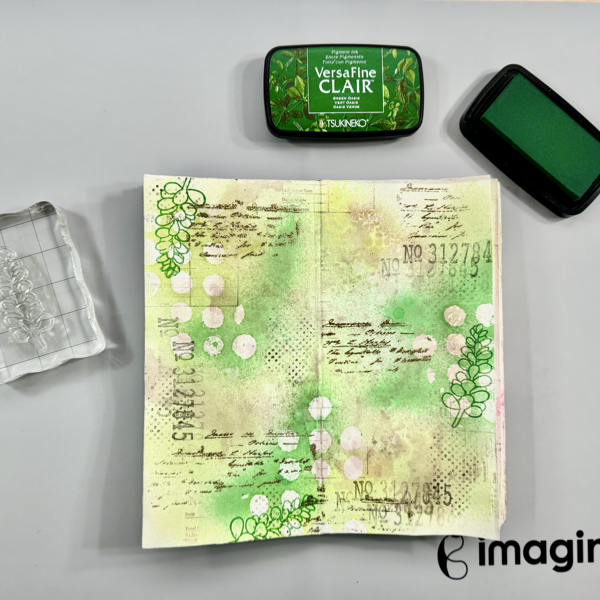
Step 11 Stamp the leaf branch stamp randomly on the page with VersaFine Clair Green Oasis.
Dry the stamped images with a craft heat gun.
Step 12 Next stamp the cactus stamps randomly on the page with VersaFine Clair Spruce ink.
Dry the stamped images with a craft heat gun.
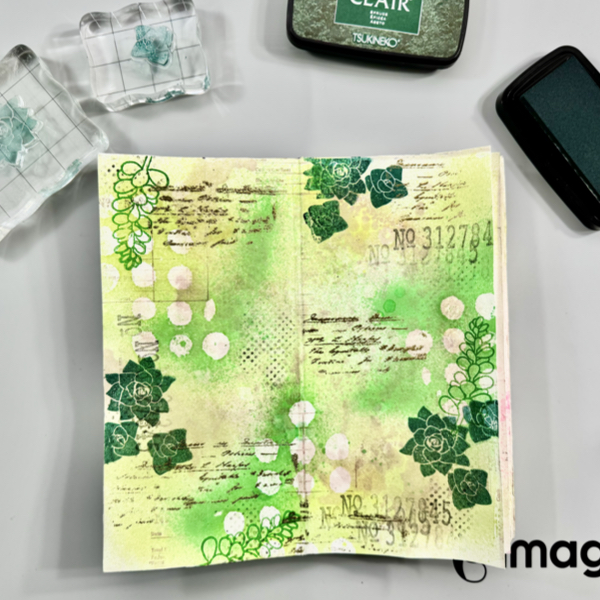
Step 13 Stamp the first butterfly stamp randomly on the page with VersaMagic Jumbo Java ink using second generation stamping technique.
Step 14 Stamp the second butterfly (smaller size) stamp randomly on the page with VersaMagic Jumbo Java ink using second generation stamping technique.
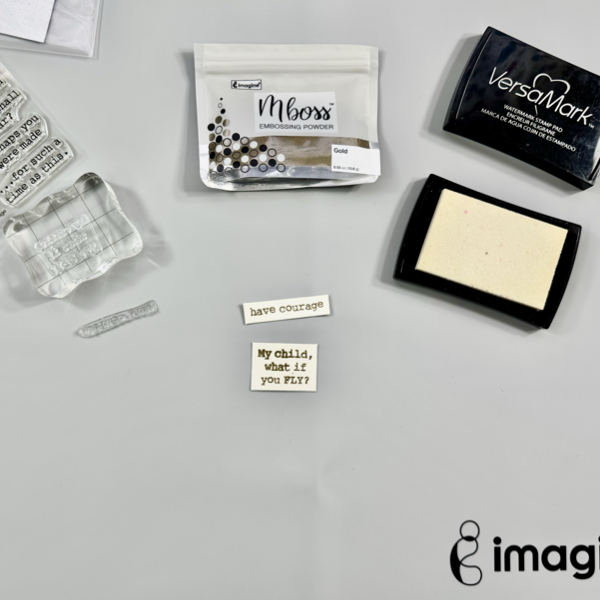
Step 15 On a white cardstock, stamp the sentiments with VersaMark Ink and then add some of the Gold Mboss Embossing Powder. Heat them with a craft heat gun.
Step 16 Trim the embossed sentiments into sentiment stripes with papercutter or scissors.
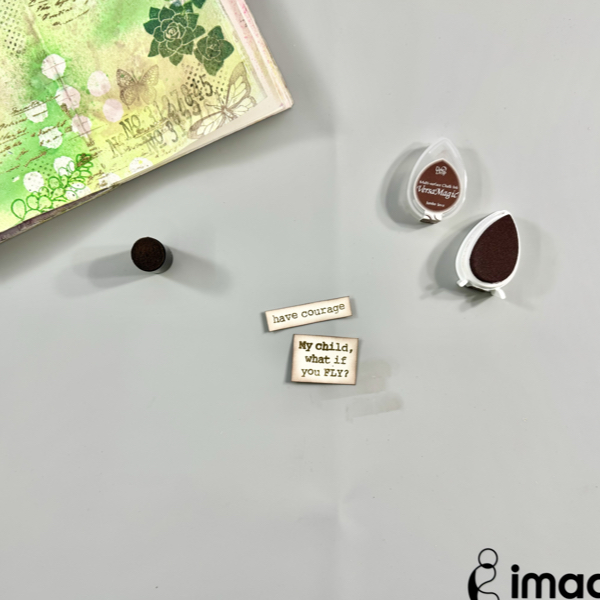
Add some of the VersaMagic Jumbo Java ink around the edges with finger sponge dauber to give them some shadow.
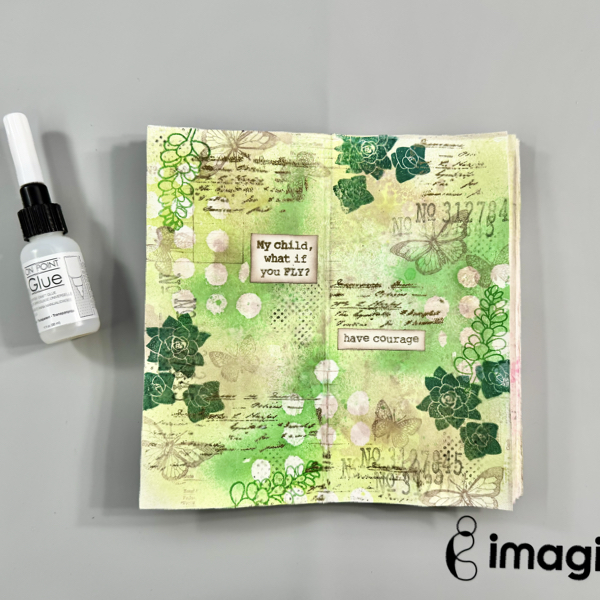
Step 17 Add the sentiments to the page with On Point Glue.
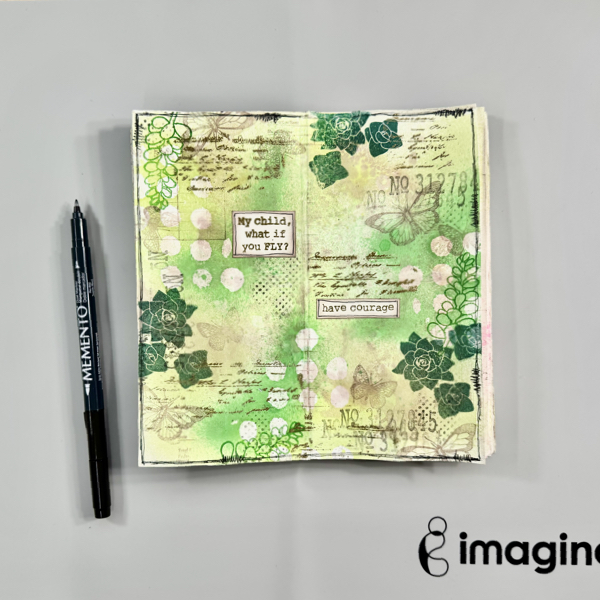
Step 18 Draw some border lines around the page and sentiment strips using the Memento Marker Tuxedo Black.
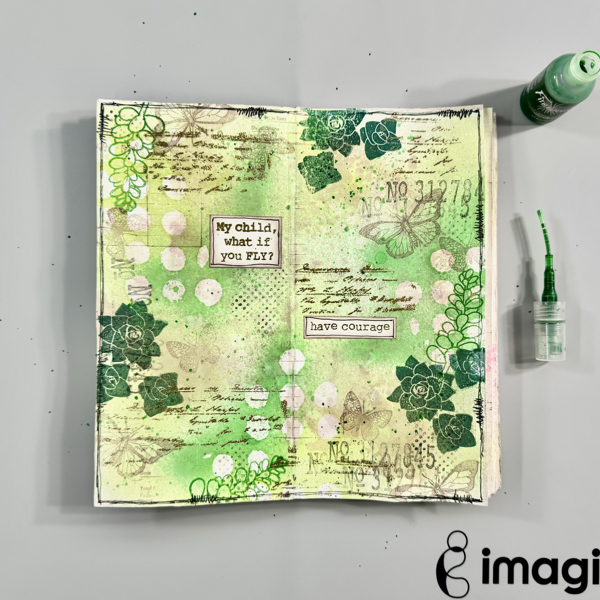
Step 19 For more texture, add some of the Cottage Ivy Fireworks! Shimmery Craft Spray to the page by tapping the sprayer tube.
Dry the whole page one more time with a craft heat gun.
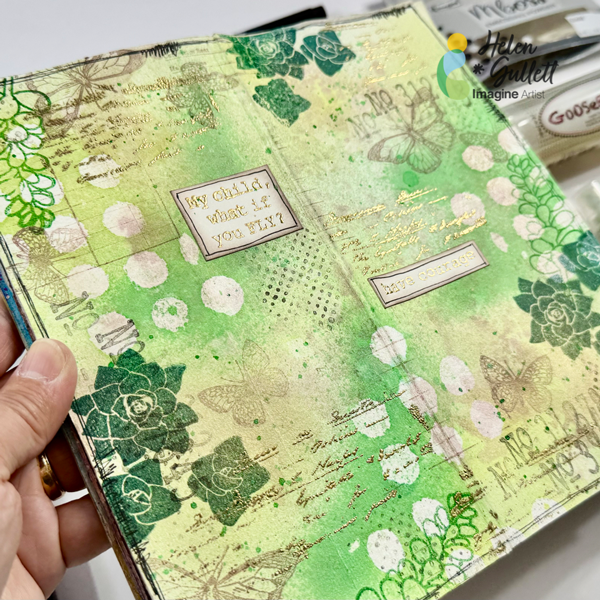
I tried to capture the shiny and shimmery on the page in this picture but it looks even more in real life.
I hope you enjoy today’s mixed media project. Thank you for visiting our blog, have a fabulous day.
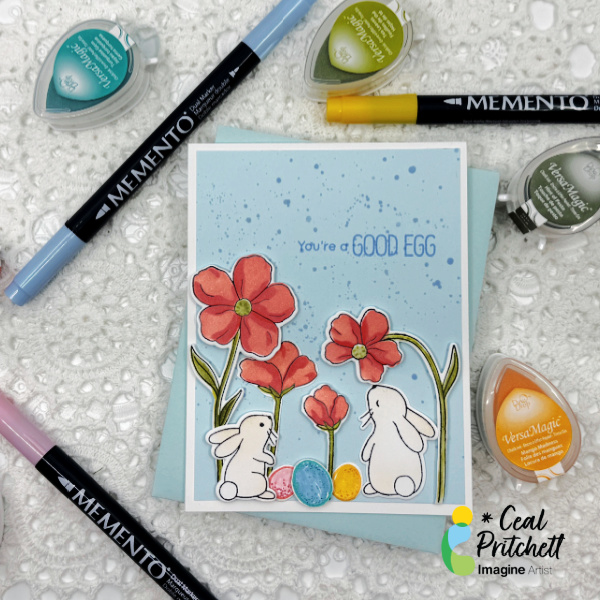
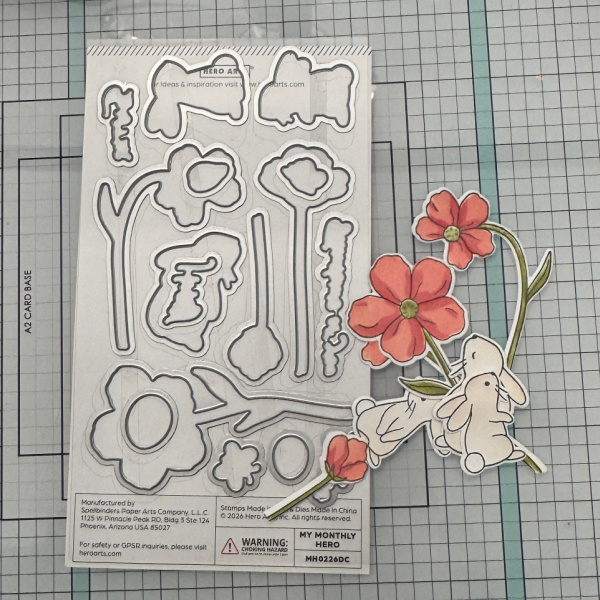
It’s Ceal, here. Today I am sharing how to make this cute Easter card. I love the elements to this card; the flowers are gorgeous, and the bunnies are super cute. You could leave off the eggs and easter sentiment and it becomes a spring card.
Skill: Intermediate to Advanced Time: 45 Minutes
Directions:
Gather your supplies. To make this card you will need a stamp set that has bunnies, eggs and flowers, along with coordinating dies. Several colors of inks, some markers and a re-inker.
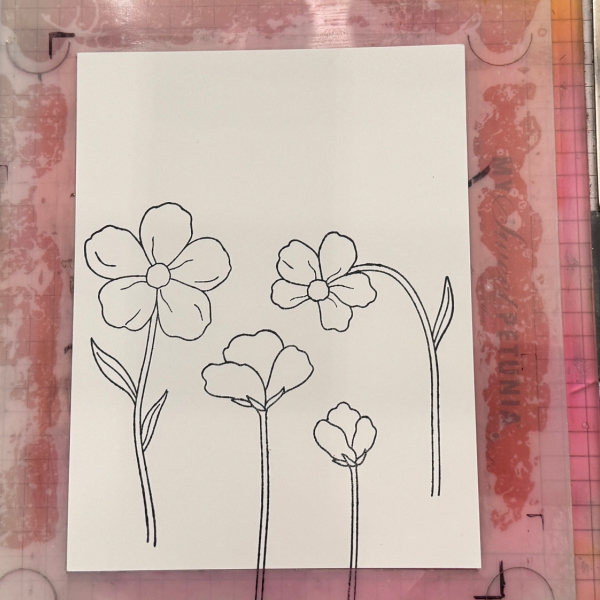
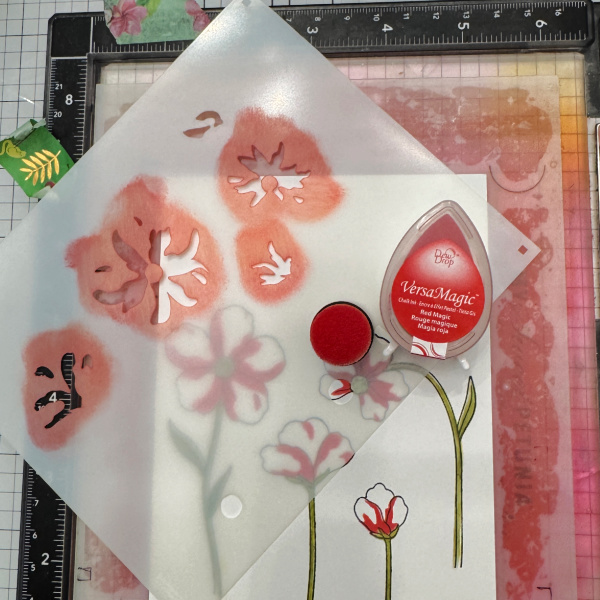
Step 1: Stamp the flowers in a black ink. I used Memento Tuxedo Black
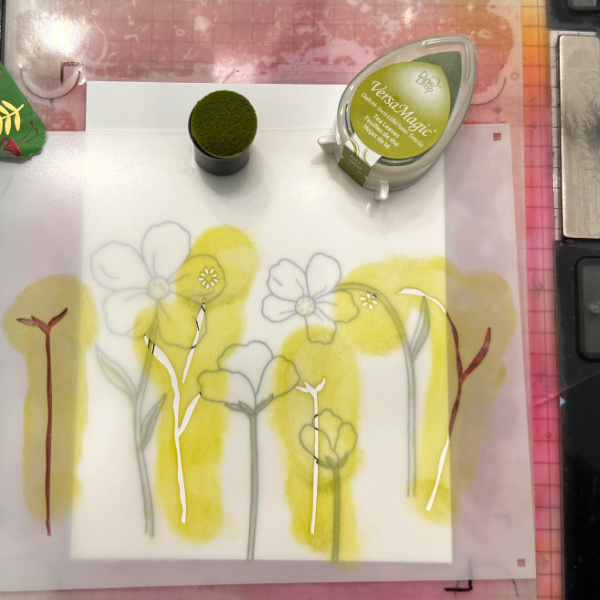
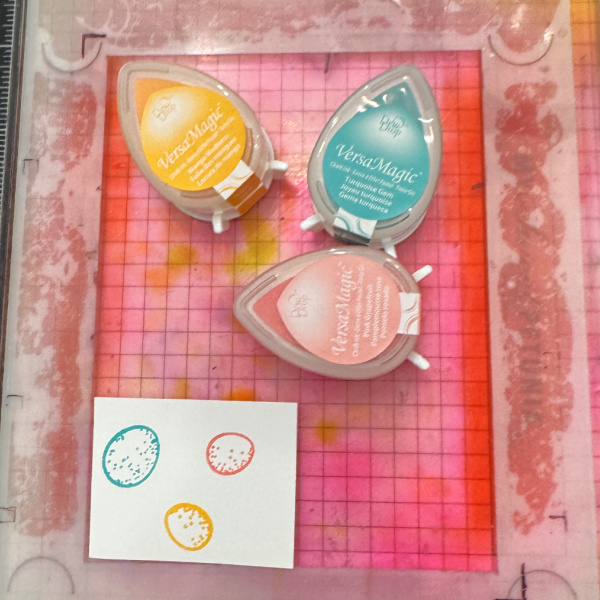
Step 2: Color the flowers using the coordinating stencils. Stencil one is a light green. I used VersaMagic Tea Leaves
Step 2a Stencil two is a darker green. I used VersaMagic Touch of Pesto
Step 2b:
Stencil three is a dark red. I used VersaMagic Red Magic.
Step 2c: Stencil four is a peachy pink. I used VersaMagic Pink Grapfruit
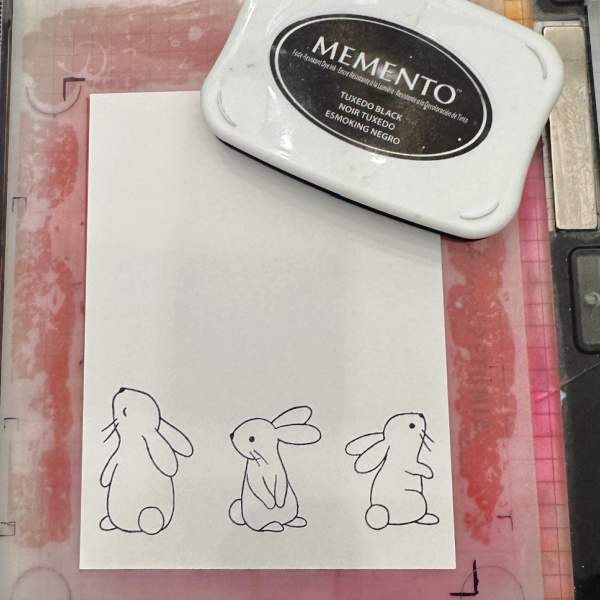
Step 3: Stamp the bunnies using a black ink. I used Memento Tuxedo Black.
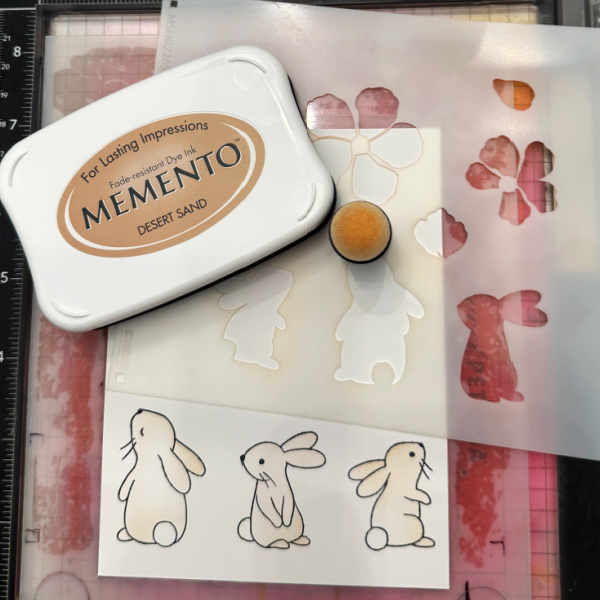
Step 4: Using the coordinating stencil color the bunnies a light brown. I used Memento Desert Sand.
Step 5: Cut a panel of light blue cardstock 5.25 x 4. Using a paint brush and a re-inker splatter the panel with a light blue ink. I used Memento Summer Sky.
Step 6: Stamp the eggs in colored inks. I used VersaMagic Mango Madness, Turquoise Gem and Pink Grapefruit.
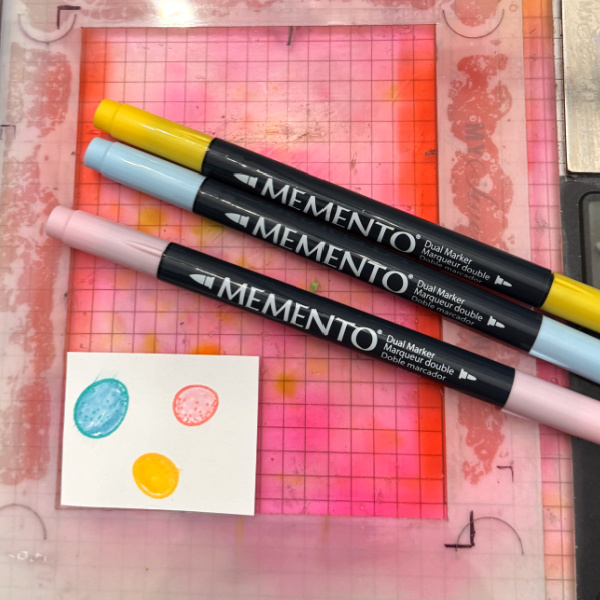
Step 7: Color in the eggs with markers. I used Memento markers in Dandelion, Summer Sky and Angel Pink
Step 8: Cut out all the elements and arrange them as you wish on the blue panel, stamp the greeting on the panel and then finish the card by adhering the panel to the base.
Craft Supplies:
Imagine Products:
• VersaMagic Dew Drops – Red Magic – Pink Grapefruit – Mango Madness – Turquoise Gem – Tea Leaves – Hint of Pesto
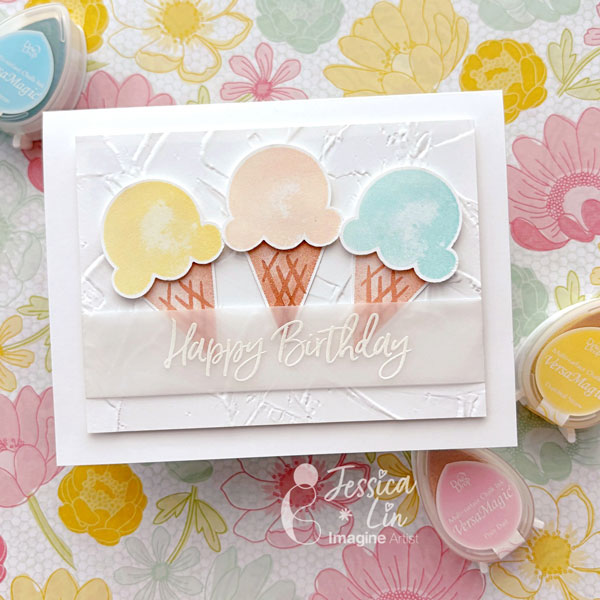
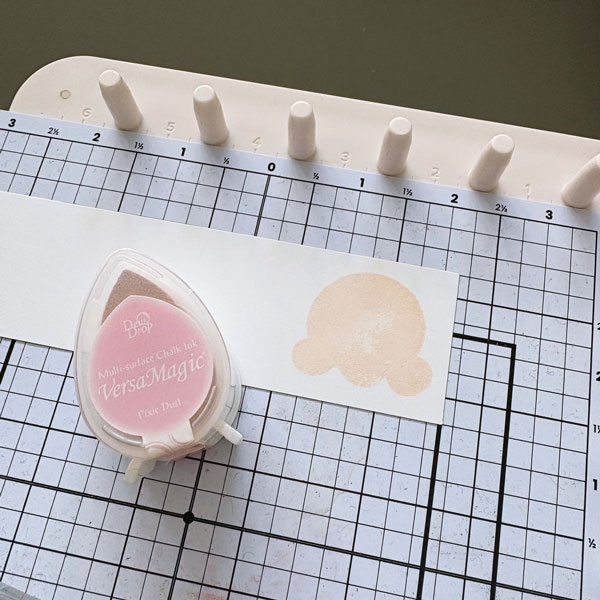
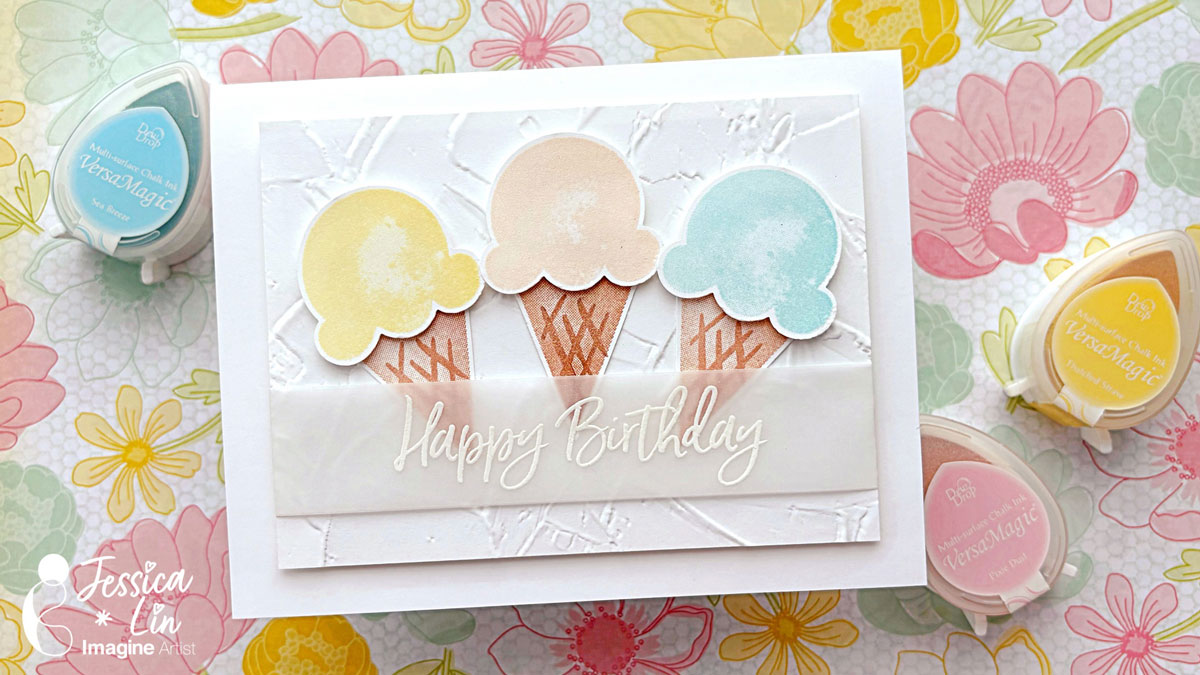
Hi everyone! It’s Jessica here. Today I am sharing a birthday card using one of my favorite ink pads – VersaMagic. They have great pastel colors that are just perfect for sorbet and ice cream images.
Step 1: The first color I chose is VersaMagic Pixie Dust – it reminds me of the classic strawberry ice cream. I used it to stamp the ice cream scoop image from Stampin’ Up’s Sweet Ice Cream set.
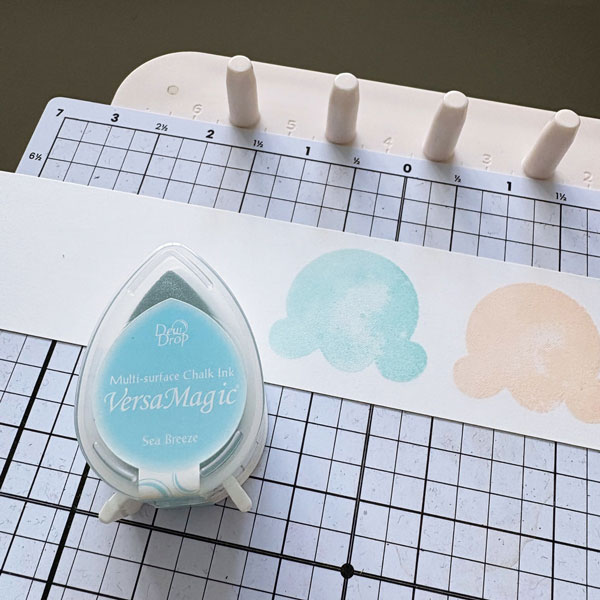
Step 2: Then I used VersaMagic Sea Breeze to stamp my second scoop of ice cream. You will notice that the ice cream image is not entirely solid. I really like the “watercolor” look it gives off.
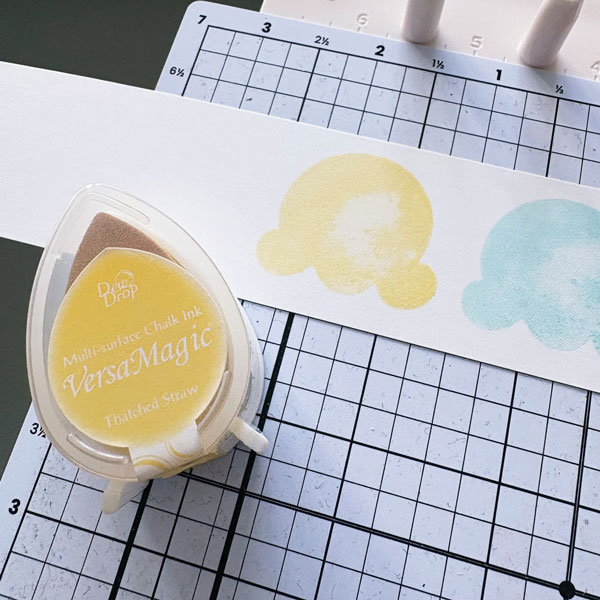
Step 3: For my last scoop of ice cream, I used VersaMagic Thatched Straw. A soft yellow like this is hard to find in the ink pad world. I have yet to find a similar hue as soft as this color.
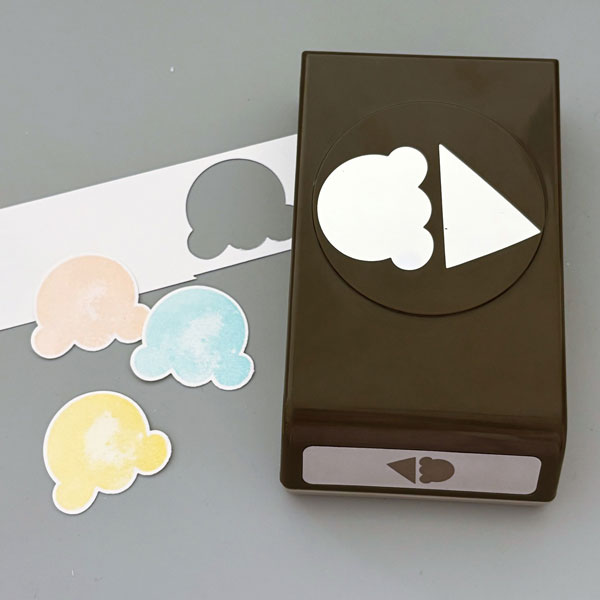
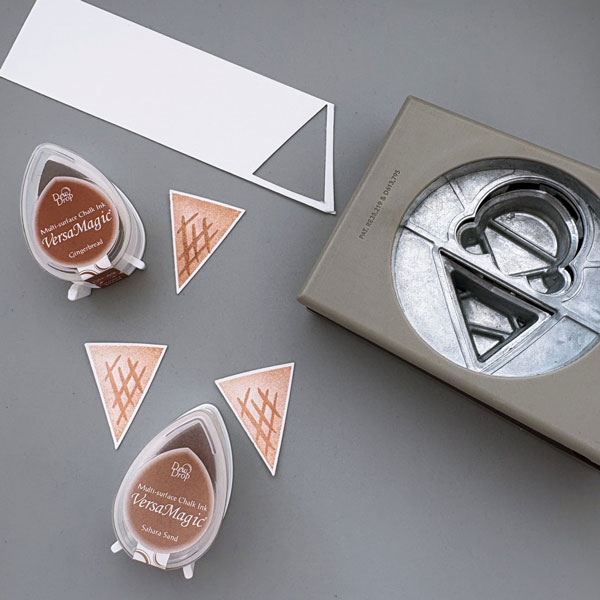
Step 4: Once the stamped images are left to dry for 5-10 minutes, I punched them out with the coordinating Ice Cream Cone Builder punch.
Step 5: For the ice cream cones, I used VersaMagic Gingerbread and Sahara Sand. The darker one on top is stamped with Gingerbread, and the two lighter ones on the bottom are stamped with Sahara Sand.
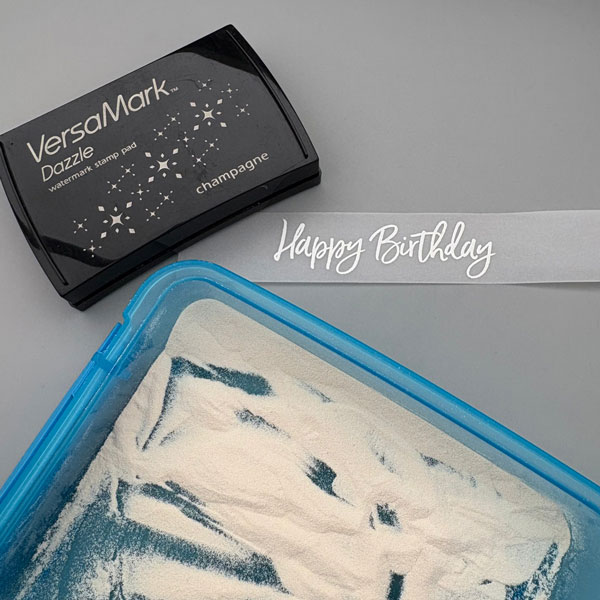
Step 6: I decided to heat emboss the sentiment on vellum to match the soft, pastel palette of the card. I stamped the “Happy Birthday” stamp with VersaMark Dazzle Champagne and heat embossed with white Mboss powder.
Step 7: To complete the card, I adhered all of the elements onto a card panel that I embossed with Stampin’ Up Painted Texture embossing folder. I hope you enjoyed today’s tutorial and have a sweet day!
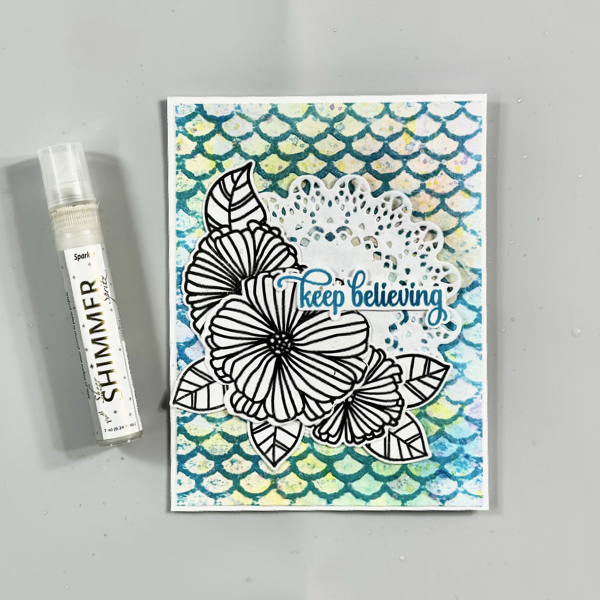
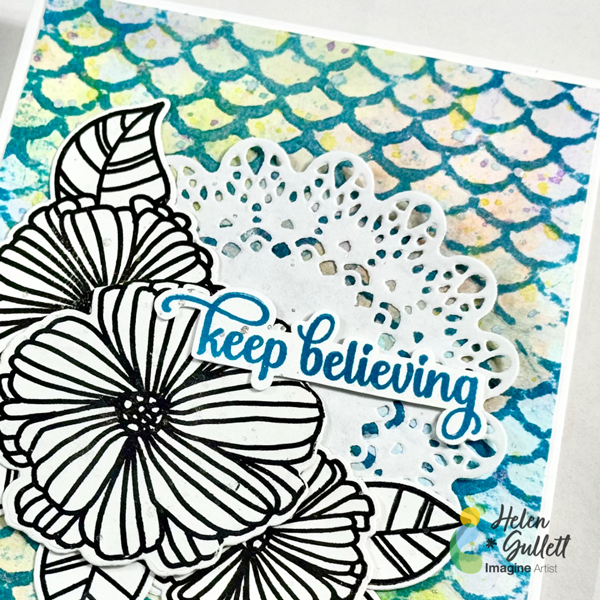
Hello crafty friends! Today we are going to make this floral mixed media card with some ink-smooshing, ink-swiping, ink-splattering, and embossing techniques.
Let’s get crafting!
Skill: Intermediate Time: 15-30 minutes
Direction:
Step 1
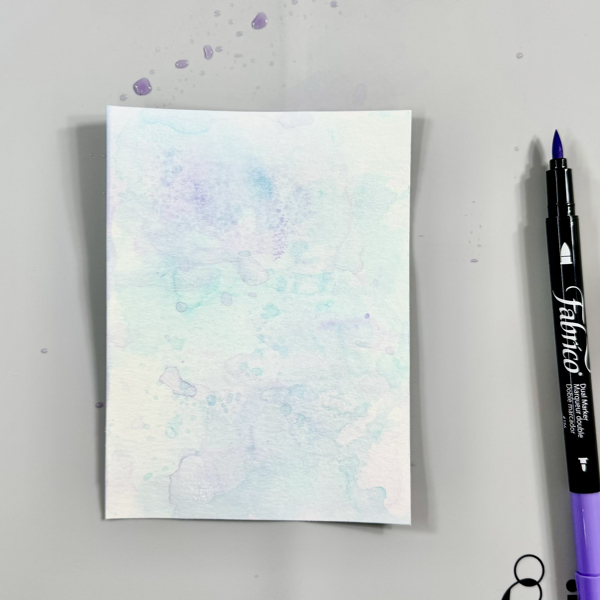
Starting with creating the watercolored background panel by cutting a piece of 140 lb watercolor cardstock into 4 ¼ inch x 5 ½ inch. To pick out the color combo, make sure you pick the colors that won’t turn into a muddy color when they are mixed together.
Scribble some of the Tropical Lagoon Fabrico Marker on the craft mat and then spray it lightly with some water. Then, smoosh the watercolor cardstock to the watercolor ink on the mat. Pick it up and dry the watercolor ink on the panel with a craft heat gun. Repeat it until you like the result.
Clean the craft mat with the Staz-On All Purpose Stamp Cleaner and paper towel.
Step 2
Scribble some of the Peony Purple Fabrico Marker on the craft mat and then spray it lightly with some water.
Then, smoosh the watercolor cardstock to the watercolor ink on the mat. Pick it up and dry the watercolor ink on the panel with a craft heat gun. Repeat it until you like the result.
Clean the craft mat with the Staz-On All Purpose Stamp Cleaner and paper towel.
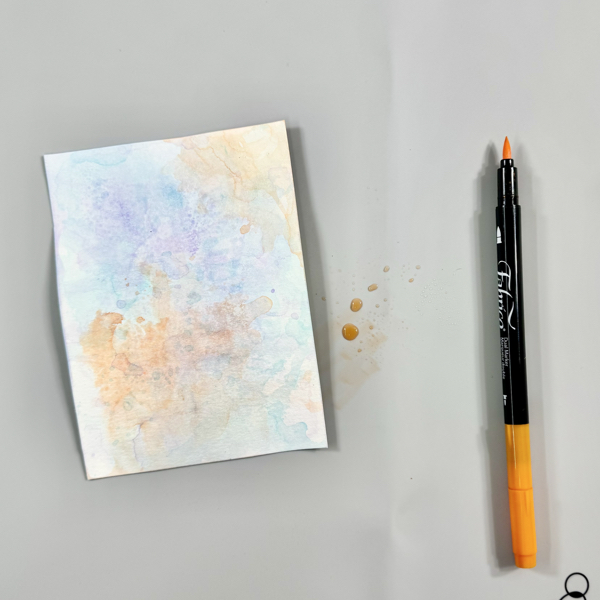
Step 3
Scribble some of the Tangerine Fabrico Marker on the craft mat and then spray it lightly with some water.
Then, smoosh the watercolor cardstock to the watercolor ink on the mat. Pick it up and dry the watercolor ink on the panel with a craft heat gun. Repeat it until you like the result.
Clean the craft mat with the Staz-On All Purpose Stamp Cleaner and paper towel.
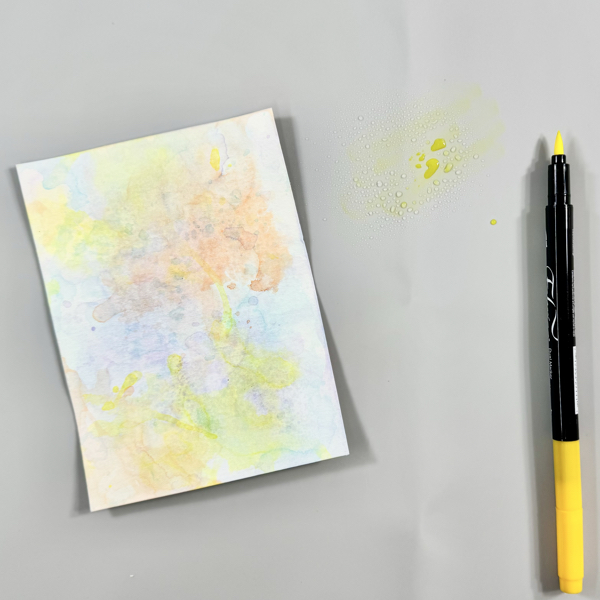
Step 4
Scribble some of the Lemon Yellow Fabrico Marker on the craft mat and then spray it lightly with some water.
Then, smoosh the watercolor cardstock to the watercolor ink on the mat. Pick it up and dry the watercolor ink on the panel with a craft heat gun. Repeat it until you like the result.
Clean the craft mat with the Staz-On All Purpose Stamp Cleaner and paper towel.
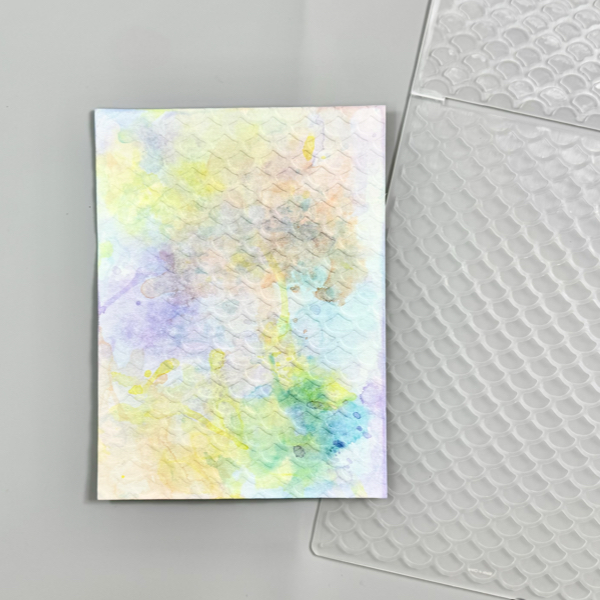
Step 5
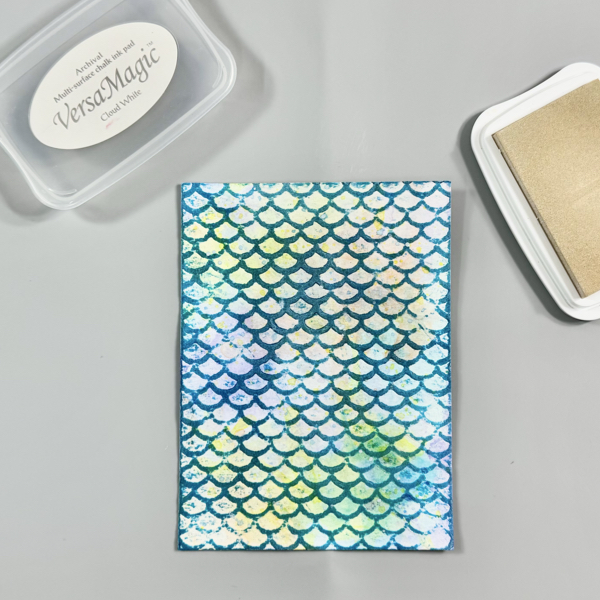
Once the watercolored panel dried well, put it inside the embossing folder, and then run it through the machine.
Step 6
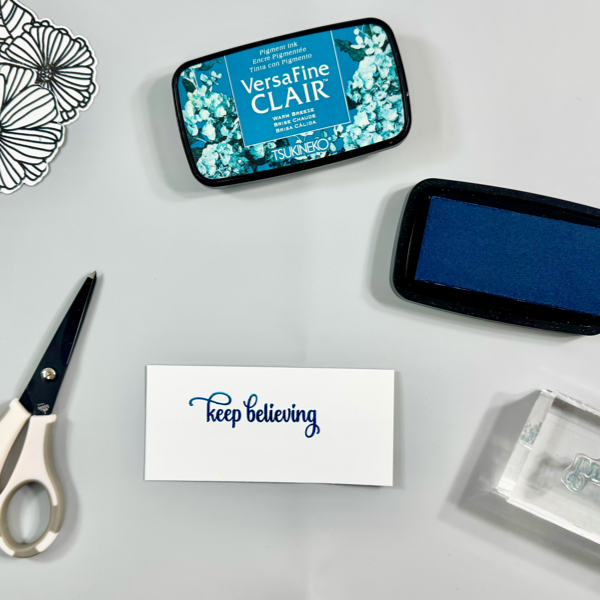
Swipe the VersaFine Clair Warm Breeze ink directly on the embossed part of the panel.
Make sure you swipe the ink lightly and smoothly, do not press down the ink pad to the paper. The juicer (good amount of ink) ink pad, the better.
Dry the ink on the panel with a craft heat gun.
Step 7
To tone down the bright color, swipe some of the VersMagic Cloud White ink on the panel.
This is an optional step, if you prefer a more subtle color background instead of bright color.
Dry the ink on the panel with a craft heat gun.
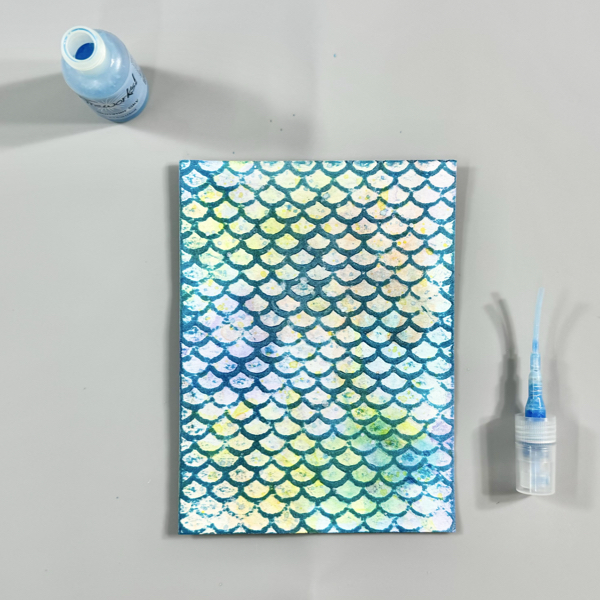
Step 8
Shake the Fireworks! Shimmery Craft Sprays bottles before you use it to make sure the ink inside mixes well.
Open the top of the spray and use it (or small round brush) to add some splatters of the Summer Sky Fireworks! Shimmery Craft Spray on the panel.
Dry the splatters of ink on the panel with a craft heat gun.
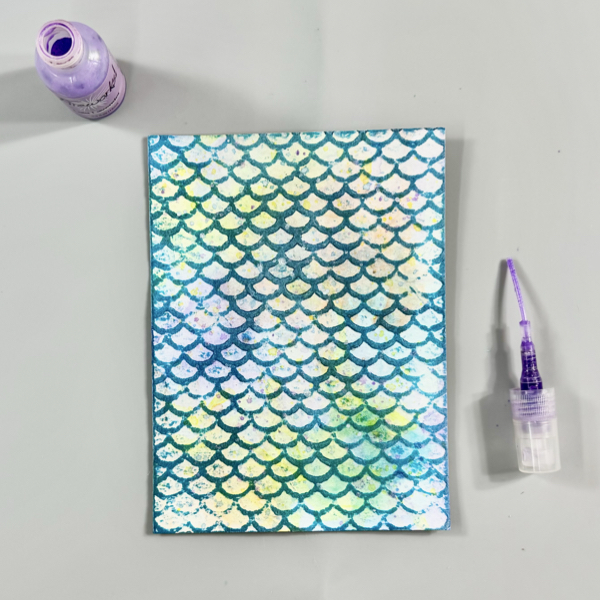
Step 9
Next, open the top of the spray and use it (or small round brush) to add some splatters of the Lulu Lavender Fireworks! Shimmery Craft Spray on the panel.
Dry the splatters of ink on the panel with a craft heat gun.
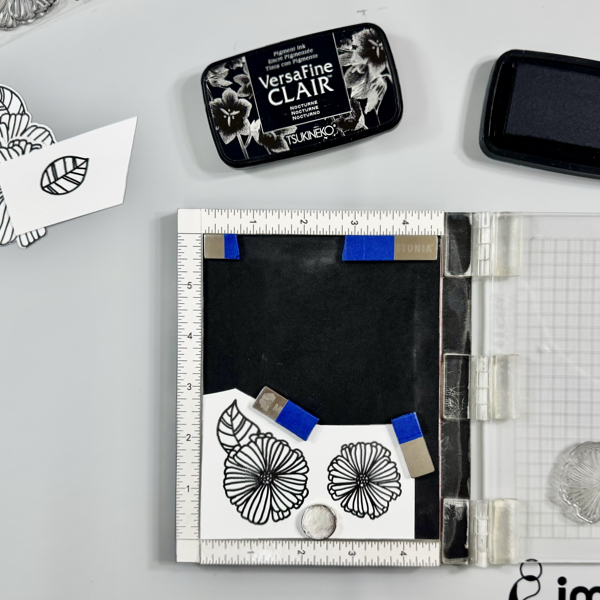
Step 10
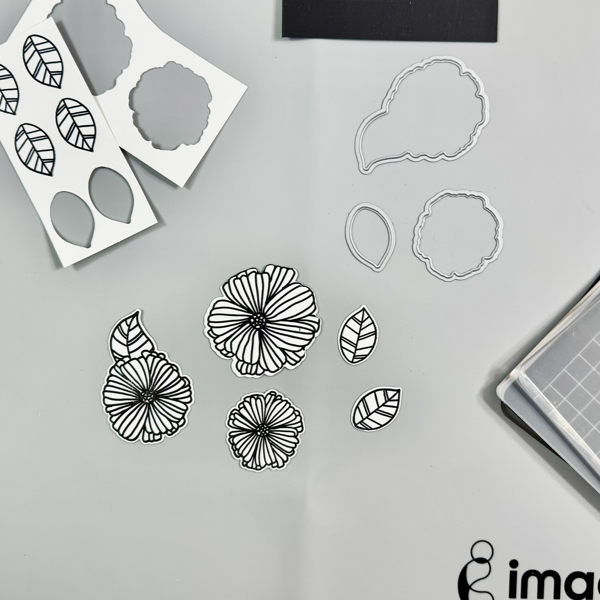
Stamp the flower and leaf images on a white cardstock using the VersaFine Clair Nocturne ink pad with a stamping tool (or acrylic stamping blocks).
Dry the stamped images with a craft heat gun.
Step 11
Cut all the stamped flowers and leaves with their matching die set, or you can fussy cut them using micro-tip scissors.
Step 12
Stamp the sentiment on a white card stock using the VersaFine Clair Warm Breeze ink pad with a stamping block.
Dry the stamped sentiment word with a craft heat gun and then fussy cut it with a micro-tip scissors.
Step 13
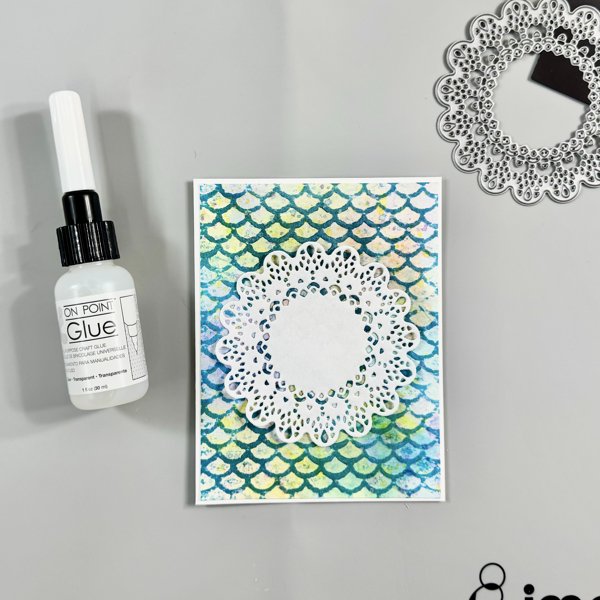
Trim the background panel into 4 inch x 5 ¼ inch using a paper trimmer.
Add the background panel to an A2 card base with the On Point Glue.
Step 14
Cut a piece of white paper (copy paper works great) with the Delicate Doily die to create your own doily paper mat.
Add the doily paper to the card with the On Point Glue.
Step 15
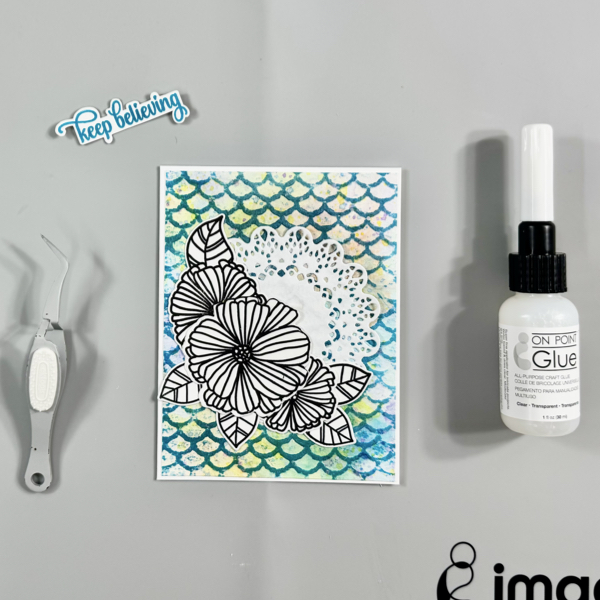
Add the flowers and leaves to the card with On Point Glue.
Then, add some of a thin foam to the sentiment with On Point Glue and add it to the card with the same glue.
Step 16
Add more shimmer to the card by spraying and splatting some of the Sheer Shimmer Spark Spray.
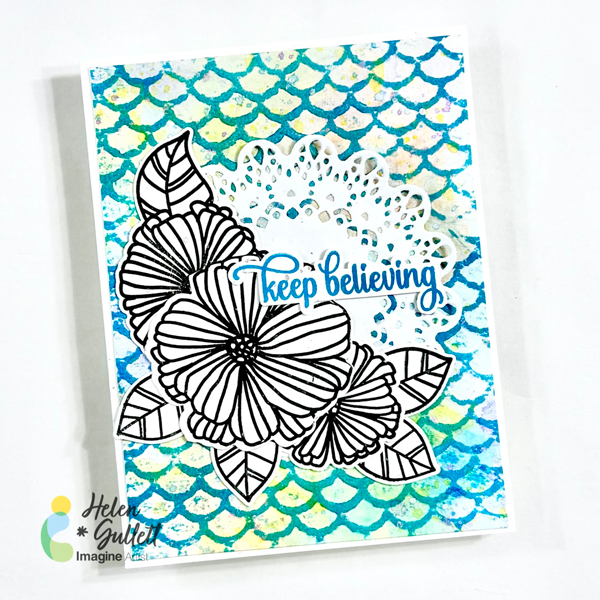
The ink-smooshing, embossing, ink-swiping, and ink-splattering techniques give an amazing texture look to the background of this card.
And those layers of doily, flowers, leaves, and sentiment add more dimension to this mixed media card.
I hope you will give this tutorial a try and play around with different colors to see the surprise you will get for your cards. Thanks so much for stopping by our blog today.