
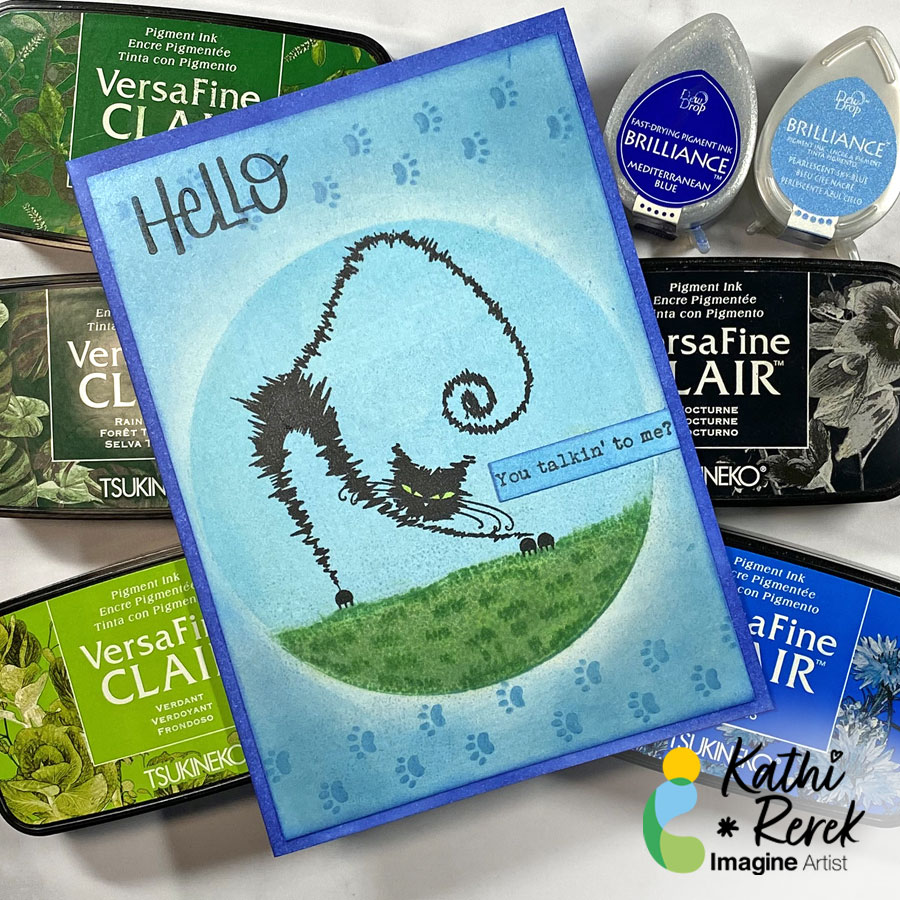
By Kathi F. Rerek
Using a Gel Press with VersaFine Clair inks is a great way to create a quick background.
Skill Level: Beginner to Intermediate
Time: 1 hour
Directions:
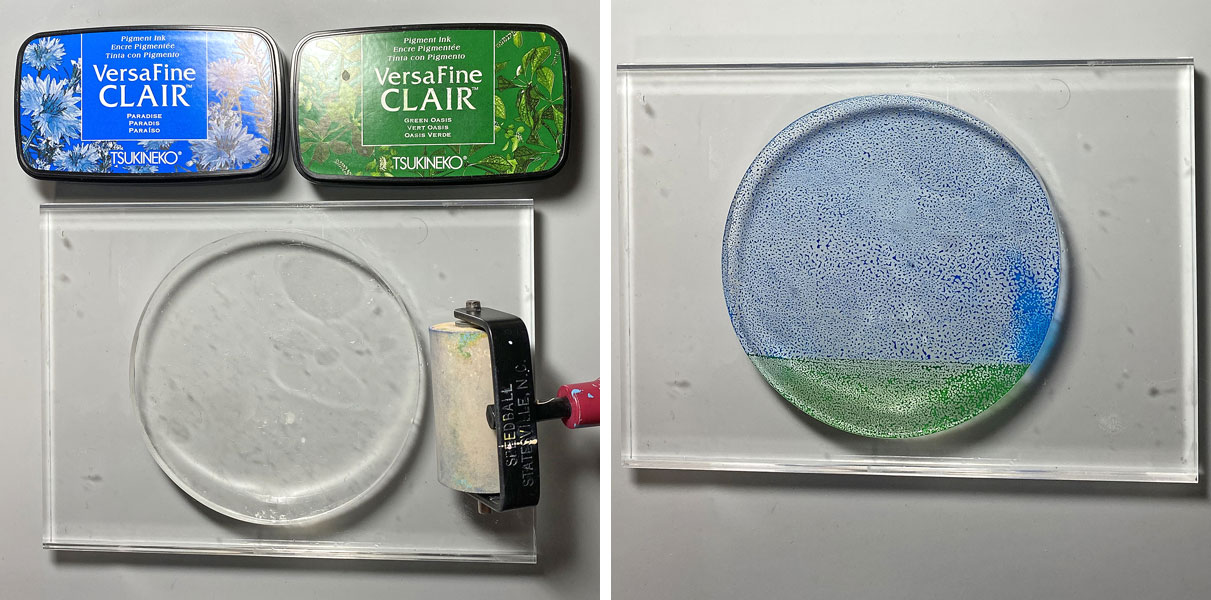
Step 1.
Use a 2” brayer to apply Paradise VersaFine Clair ink to the top part of a 4” round gel press. Clean the brayer, then use to apply Green Oasis VersaFine Clair Ink to the bottom of the gel press.
Press a 6” x 4.25” piece of mixed media paper onto the gel press and pull the print. I actually used a leftover panel from a previous gel print session that was not successful.

Step 2:
Mist the print with with 91% Isopropyl Alcohol.
Use Fantastix to apply Verdant VersaFine Clair Ink to even out the green area of the print and then apply Rain Forest VersaFine Clair Ink to add dimension.

Step 3:
Use paper towel to gently dab the sky and grassy areas of the print with Purell to further blend the ink.
Heat set.
Step 4:
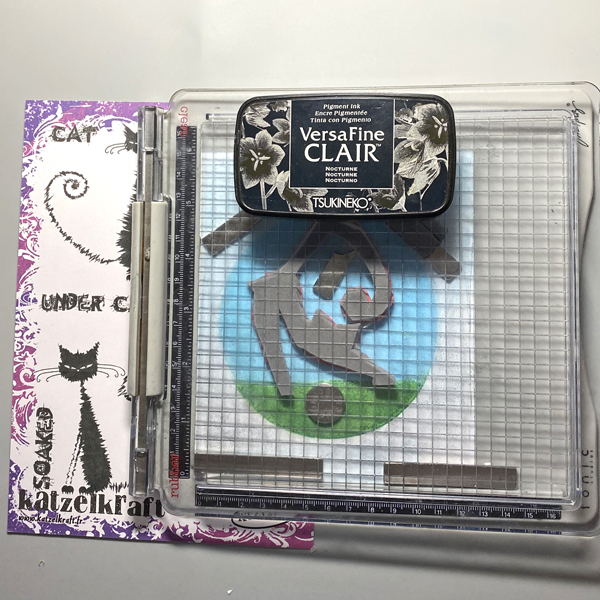
Use magnets to secure the image panel to the base of a stamping platform.
Position the stretching cat stamp from the The Furieux/Caffeinated Cats Unmounted Stamp Set facedown so that its paws are on the grass.
Ink the stamp with Nocturne VersaFine Clair Ink and stamp. Re-ink and stamp again if needed. Remove the stamp and heat set the panel.

Step 5:
The left paws were stamped slightly above the grass, so I used Fantastix and Green Oasis VersaFine Clair Ink to add a tuft of grass under his floating paws and to add detail to the lawn.

Step 6:
Use a Sponge Dauber to apply Pearlescent Sky Blue Brilliance Ink around the image circle, leaving a bit of a halo effect around the circle.

Step 7:
Tape the image panel to the back of the Pawprint Stencil so that the smallest paw prints run horizontally across the top of the image panel.
Use Sponge Daubers to apply Pearlescent Sky Blue and Mediterranean Blue Brilliance Inks over the stencil onto the image panel.
Remove and clean the stencil, then repeat the steps above to stencil the small paw prints across the bottom of the image panel.
Lift the stencil and use the Sponge Dauber to edge the panel with Mediterranean Blue Brilliance Ink. Heat set the panel.

Step 8:
Use a Sponge Dauber to apply Pearlescent Sky Blue Brilliance Ink to a strip of white cardstock. Heat set.
Secure the cardstock strip to the base of a stamping platform. Position the “You talking’ to me?” sentiment from the Whatchamacallit Unmounted Stamp Set facedown on the strip.
Ink the stamp with Nocturne VersaFine Clair Ink and stamp. Heat set.
Use scissors or a die-cut to cut the sentiment and edge it with Mediterranean Blue Brilliance Ink. Heat set.

Step 9:
Cut a piece of white cardstock to 9” x 6.25”, score at 4.5”, and fold to form a 4.5” x 6.25” card.
Use a Sponge Dauber to apply Mediterranean Blue Brilliance Ink around the the edges of the card. Heat Set.

Step 10:
Use Tear It! Tape to secure the image panel to the card front.

Step 11:
After looking at the finished card,I decided that the card needed a larger sentiment up at the top left.
Secure the entire card with magnets to the base of a stamping platform. Position the “Hello” stamp from the Holiday Quotes. Unmounted Stamp Set facedown on the upper left. Use Nocturne VersaMark Ink to stamp the sentiment. Heat set.
Supplies used:
Imagine:
- Brilliance Dew Drop Ink – Mediterranean Blue, Pearlescent Sky Blue
- Brilliance Ink Pad – Pearlescent Ice Blue
- VersaFine Clair Ink – Paradise, Green Oasis, Verdant, Rainforest, Nocturne
- Sponge Daubers
- Tear It! Tape
- Craft Mat
- Fantastix
Other Supplies:
- 140 lb. Mixed Media Paper by Strathmore
- Solar White Classic Crest Cardstock by Neenah Papers
- The Furieux/Caffeinated Cats Unmounted Stamp Set 127 by Katzelkraft
- Whatchamacallit Unmounted Stamp Set 276 by Katzelkraft
- Holiday Quotes Unmounted Stamp Set 207 by Katzelkraft
- 4” Circle Gel Press
- Paw Prints 6×6 Stencil by KaiserCraft
- Lemon Yellow Zig Clear Color Real Brush Marker by Kuretake
- 91% Isopropyl Alcohol
- Purell
- Stamping Platform
- Heat Gun by EK Success

