Create a Dog Pun Valentine’s Card 

By Jessica Lin

Skill: Beginner
Time: 30 minutes

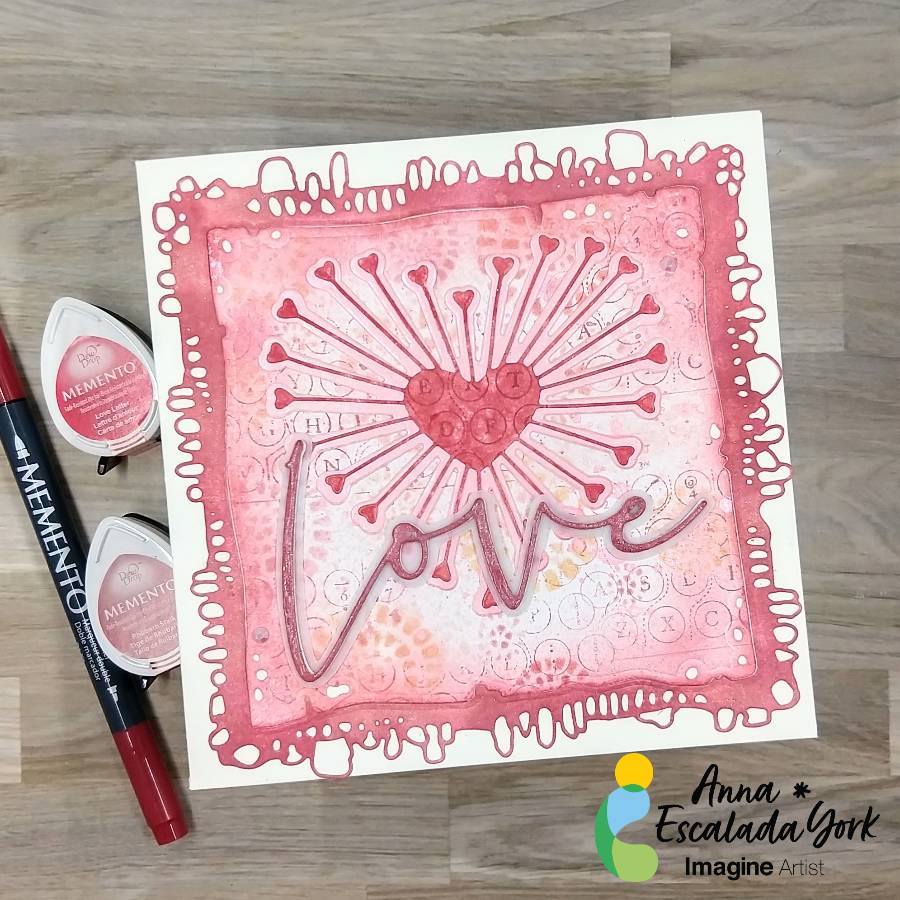
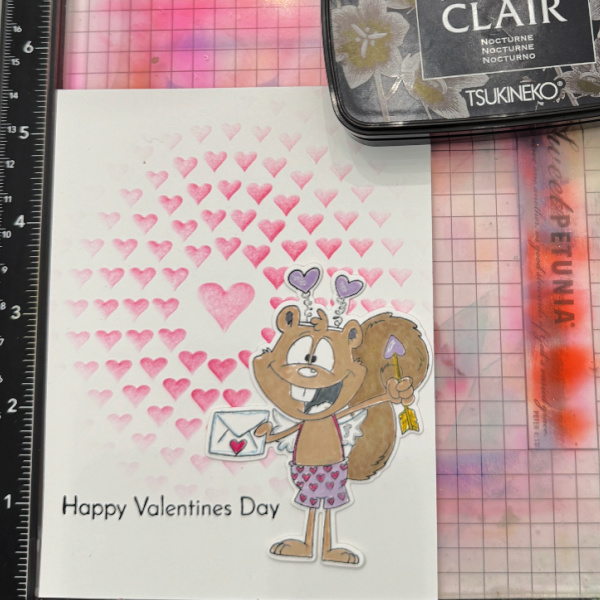
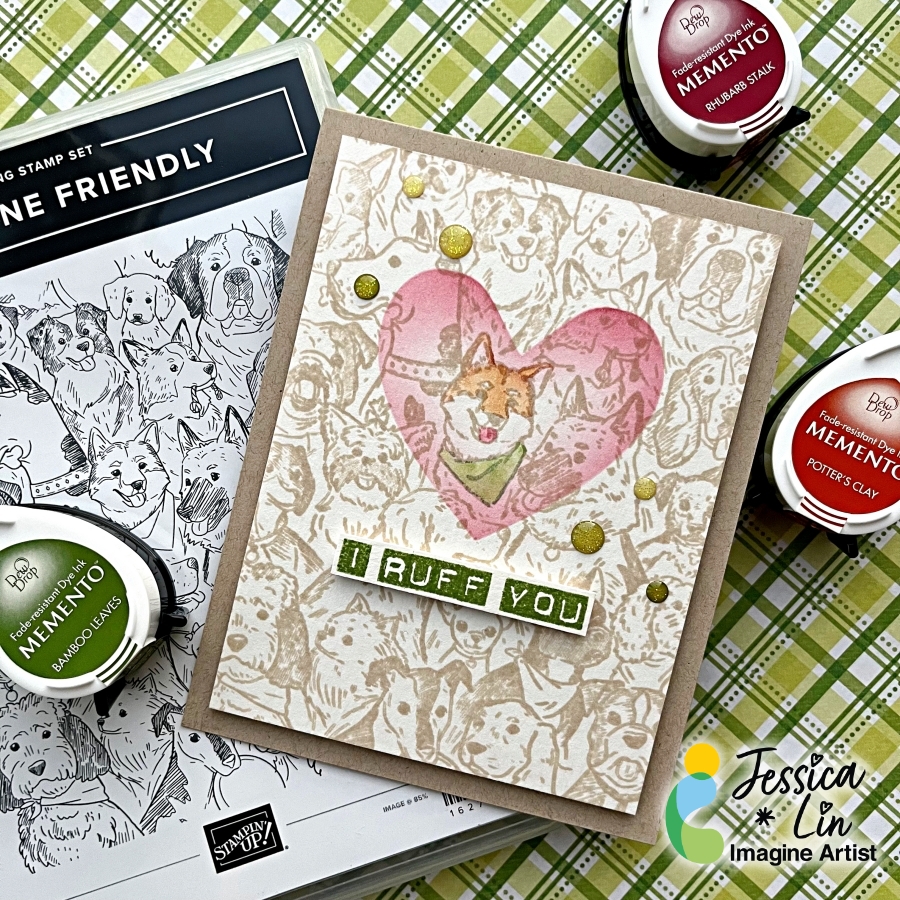
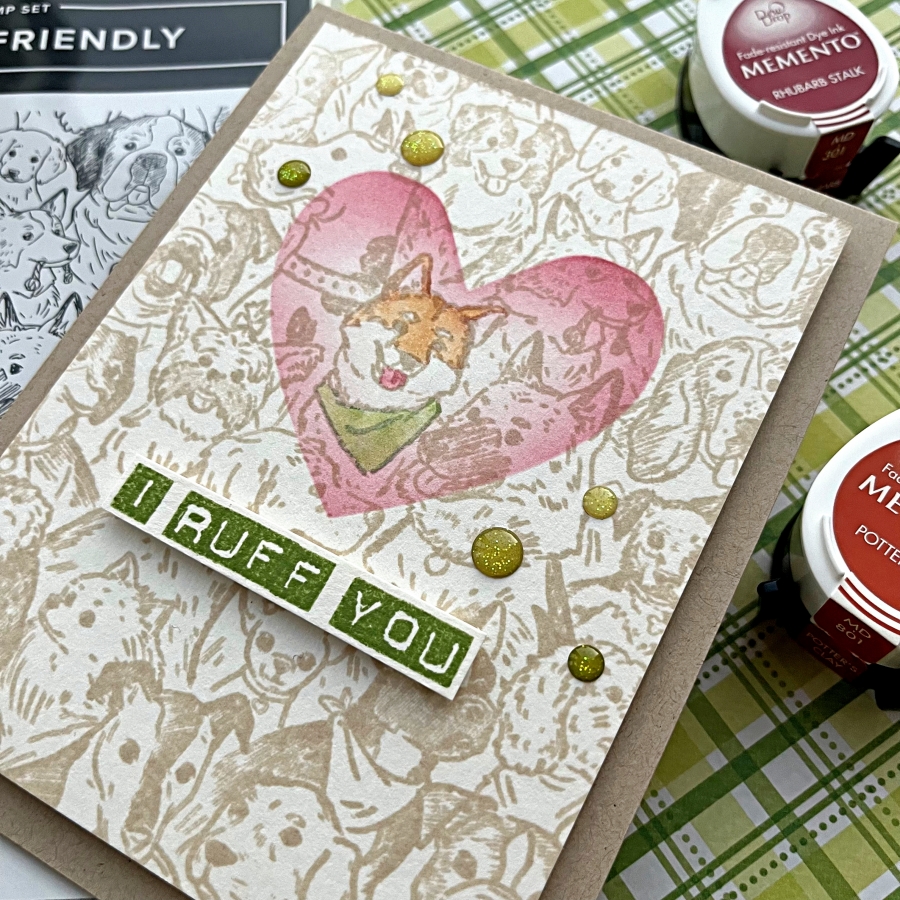
Hi everyone, it’s Jessica here. Today I have a special Valentine’s card to share with you. If you are a dog person, the background stamp we are using today is for you. It’s really unique and you could highlight any of the dogs to create personalized cards for the recipient.

Step 1:
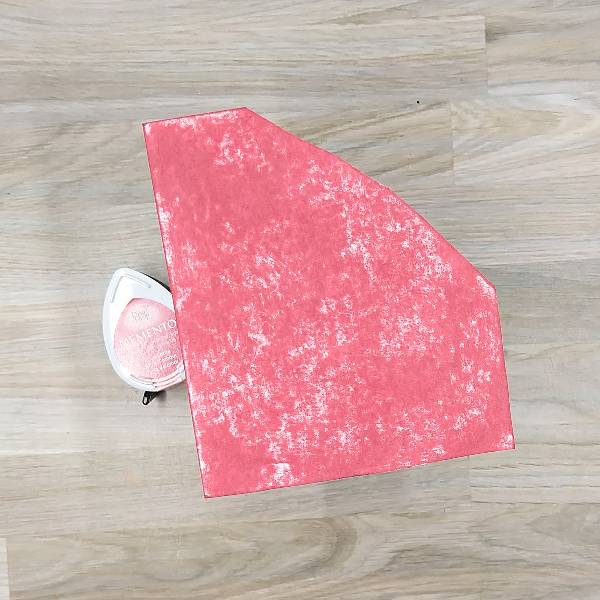
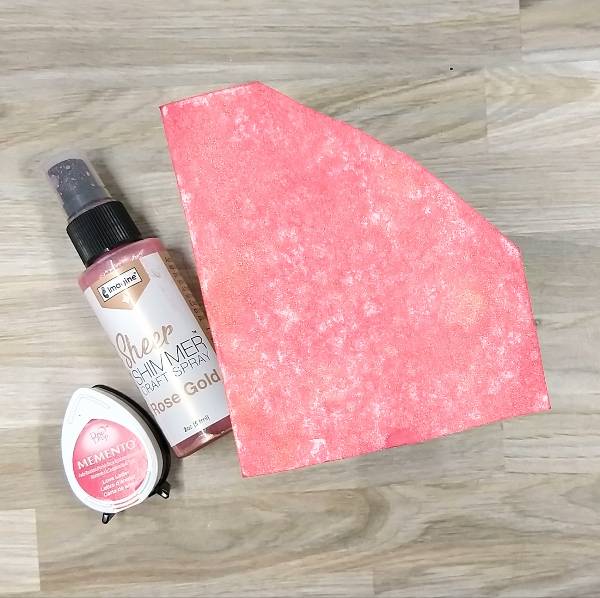
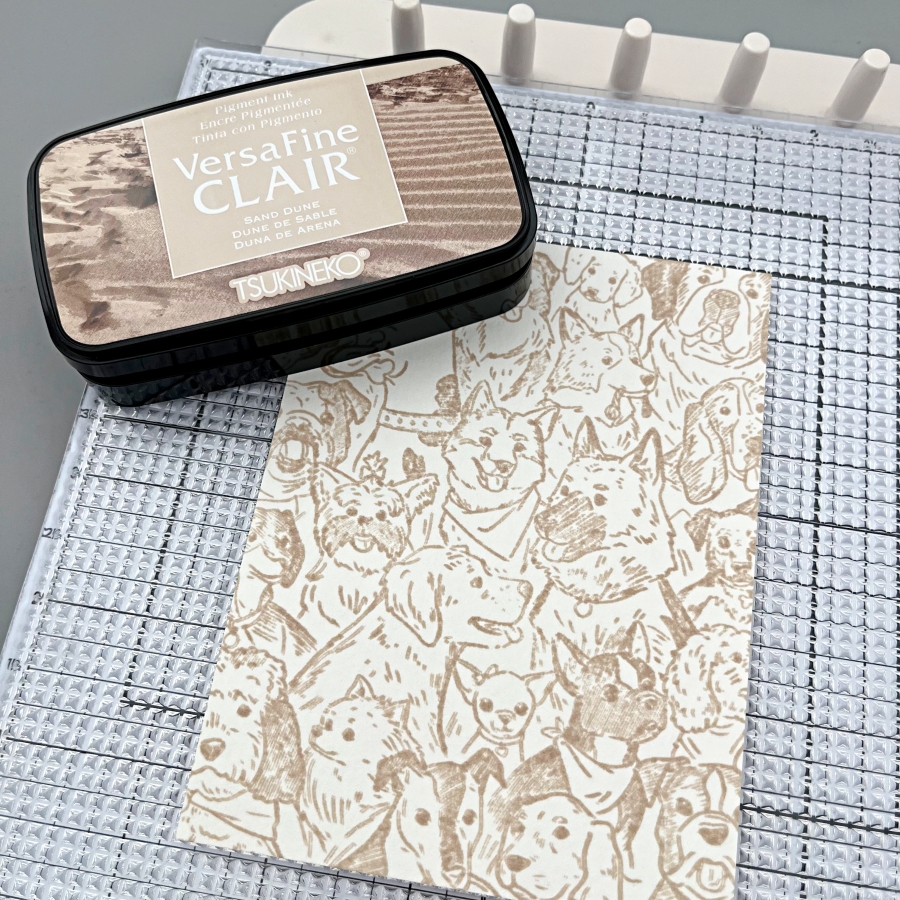
Ink up Stampin’ Up!’s Doggone Friendly background stamp with Sand Dune VersaFine Clair ink, then stamp on a piece of watercolor cardstock. I recently got a photopolymer sticky mat from Altenew and have enjoyed using it so far. It ensures the cardstock stays in place when you are stamping, which is a handy feature when you are stamping large images like background stamps.

Step 2:
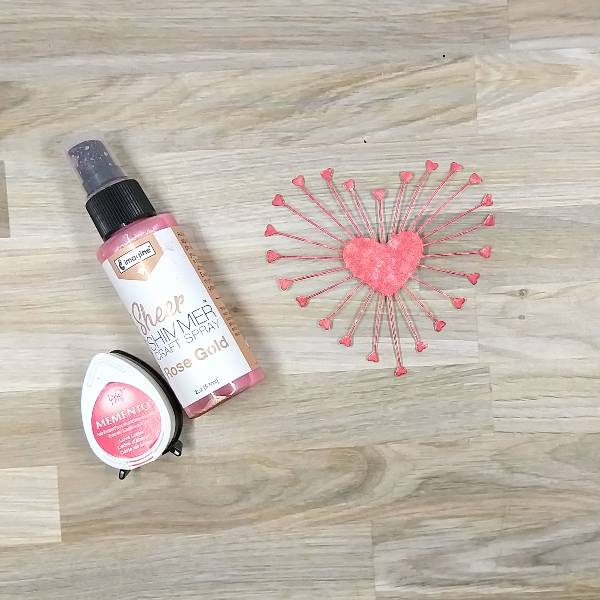
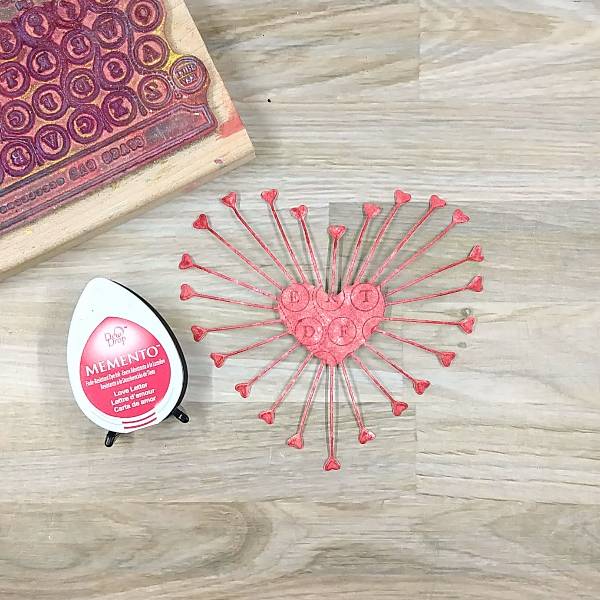
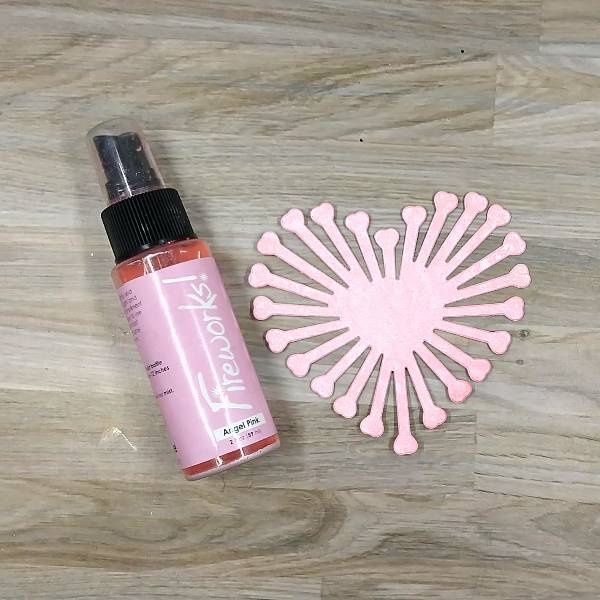
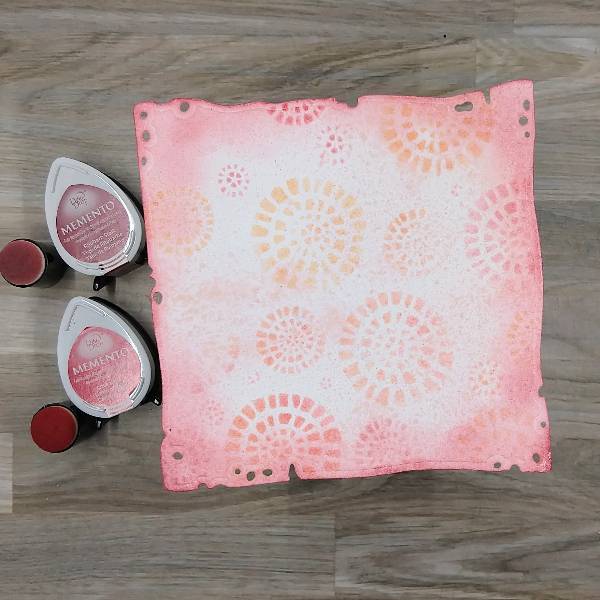
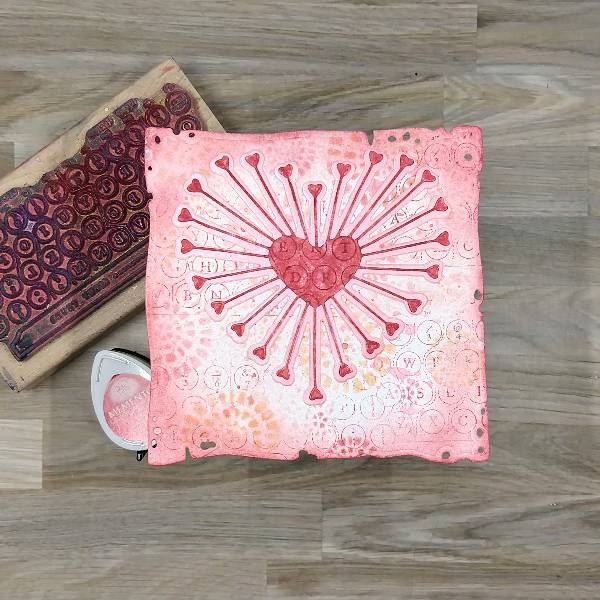
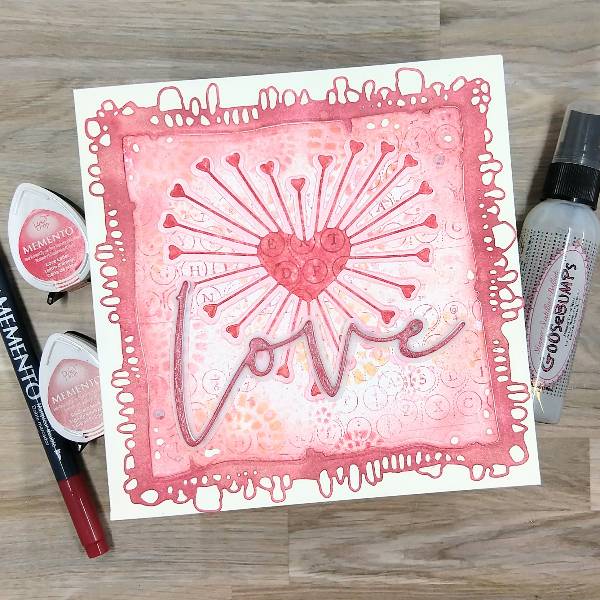
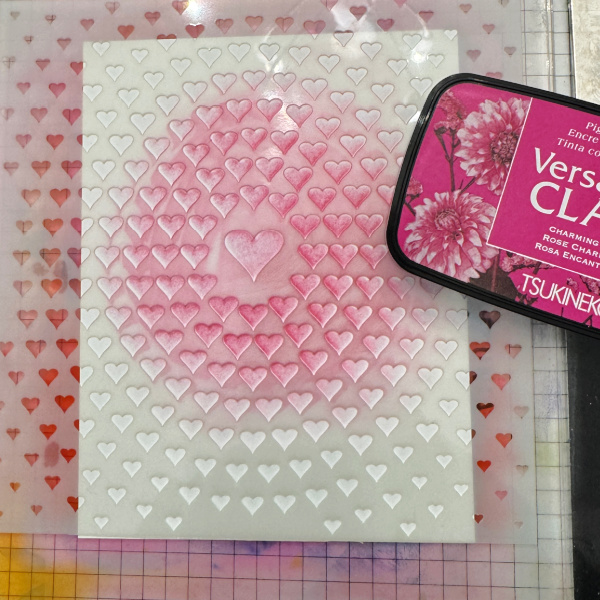
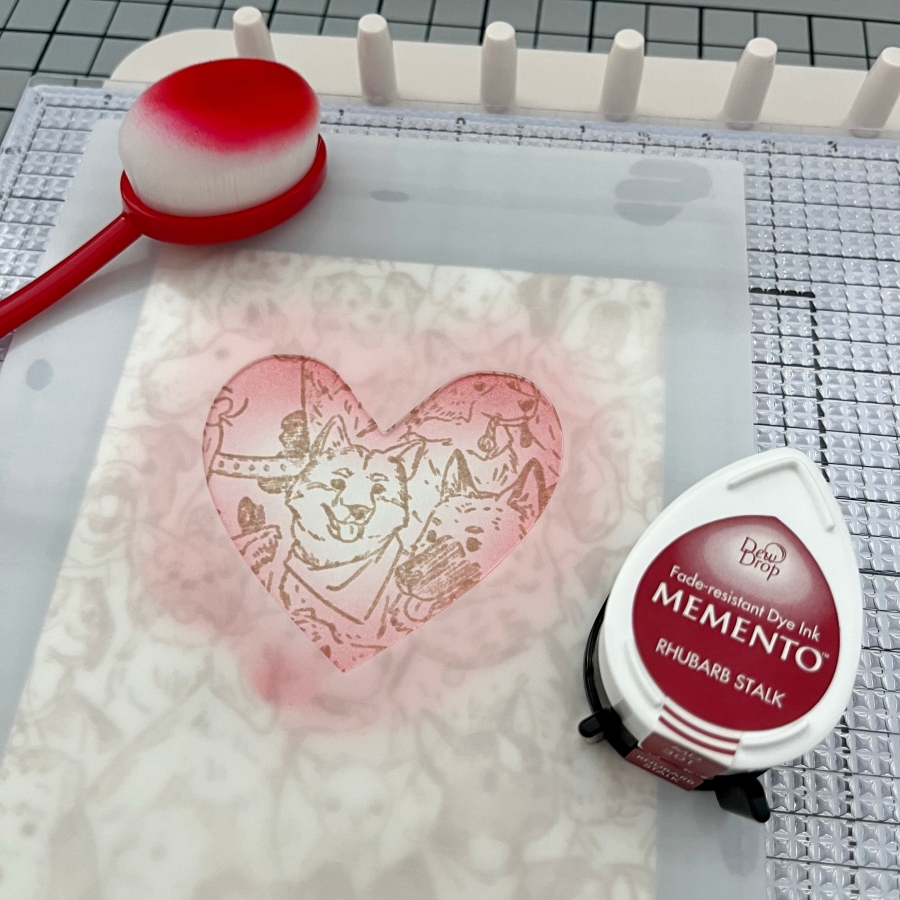
I wanted to highlight the Shiba Inu in the middle by creating a spotlight effect around him. I laid down the Spotlight Heart stencil in the center and ink blended the edges lightly with Rhubarb Stalk Memento ink. Memento inks are perfect for ink blending and since they are dye inks, the blended areas will not cover up the background stamp details.

Step 3:
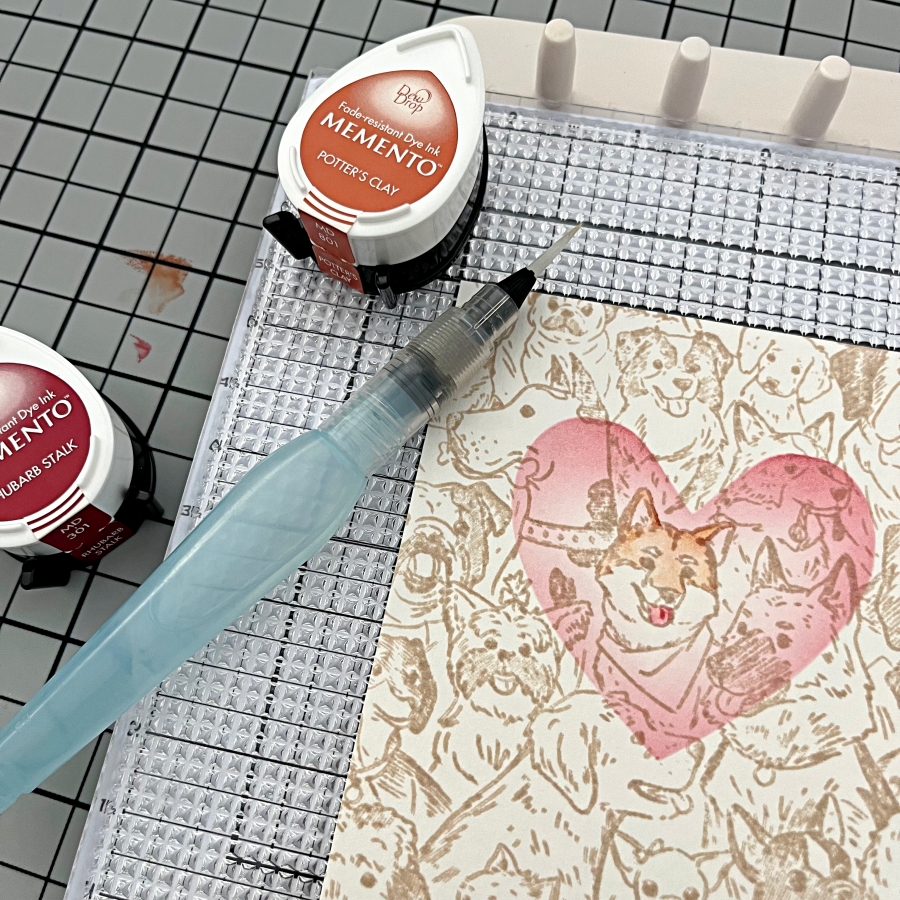
This step is completely optional, but I decided to add some simple watercoloring. I chose Potter’s Clay for his face and used Rhubarb Stalk to color his tongue. For his scarf, I used Bamboo Leaves (not pictured here).

Step 4:
Lastly, I stamped a “punny” sentiment using Bamboo Leaves Memento ink. I have used the Labeler Alphabet stamp set many times before to create custom sentiments. I thought this phrase compliments the blended heart shape nicely. Finally, I added some green enamel dots to decorate and the card is completed!

Imagine Supplies:

Other Supplies:

  • Stampin’ Up! – Stamp – Doggone Friendly
  • Waffle Flower – Stencil – Spotlight Heart
  • Stampin’ Up! – Stamp – Labeler Alphabet
  • Waterbrush
  • Blending brushes
  • Neenah – Cardstock – Desert Storm
  • Watercolor cardstock

Let’s Make a Valentine’s Day Card

By Anna Escalada York

I wanted to use some dies in my stash plus some warm colored inks to make a Valentine’s Day card for my husband.

Skill: Intermediate
Time: 1.5 hours

Directions:

Step 1:

Rub a piece of watercolor paper with a Love Letter Memento ink pad. Don’t worry too much about the consistent color across the watercolor paper.

Step 2:

Spray the same watercolor paper with Rose Gold Sheer Shimmer Craft Spray and allow to dry.

Step 3:

Die cut the colored and sprayed watercolor paper.

Step 4:

Use a background or texture stamp to to stamp the center of the die cut with ore Love Letter Memento ink. If desired, rub the small hearts around the edge with more Love Letter Memento ink as well.

Step 5:

Rub a piece of watercolor paper with Rhubarb Stalk Memento ink pad. Again, don’t worry too much about the consistent color across the watercolor paper.

Steps 6 and 7:

Die cut the Rhubarb Stalk colored watercolor paper and use a paintbrush to paint GooseBumps Shimmer Texture Spray on the die cut. Allow the GooseBumps Shimmer Texture Spray to dry (or if you are impatient like me use your heat tool to dry it quickly).

(Not pictured: Die cut two more layers of the sentiment die with scraps of cardstock and glue the three layers together for dimension. Then die cut the shadow of the sentiment with vellum and glue the sentiment onto the shadow.)

Step 8:

Spray enough Angel Pink Fireworks! Shimmery Craft Spray onto a piece of watercolor paper to totally color the paper and allow to dry.

Step 9:

Die cut the sprayed watercolor paper. Glue the two layers of die cut hearts together.

Step 10:

Tape an outer and inner frames together with tape and use them both together to die cut more watercolor paper.

Step 11:

Ink blend the die cut frame with Rhubarb Stalk Memento Ink using a sponge dauber.

Step 12:

Spray the internal part of the die cut with Rose Gold Sheer Shimmer Craft Spray and allow to dry.

Step 13:

Use Love Letter and Rhubarb Stalk Memento Ink to ink blend through a stencil. Then ink blend around the edges of the die cut with more Rhubarb Stalk Memento Ink.

Step 14 and 15:

Use the same texture stamp used to stamp the red heart, stamp the background (internal part) of the card base with more of the Love Letter Memento Ink multiple times to add some more interest to the background.

Step 16:

Arrange the card and glue it onto a 6” x 6” card base. Start out by gluing the sentiment onto the internal part of the cardpanel (over the die cut heart). Then glue the frame onto the card base and nestle the internal part of the card onto the card. Add sequins on the lower left and upper right parts of the card.

Art Supplies

Imagine

• Fireworks! Shimmery Craft Spray – Angel Pink
• GooseBumps Texture Spray – Shimmer
• Memento Dual Marker – Rhubarb Stalk
• Memento Dye Ink – Love Letter, Rhubarb Stalk
• Sheer Shimmer Craft Spray – Rose Gold
• Sponge daubers

Other

• AALL & Create – die set – Nature’s Doily
• Brutus Monroe – die set – Heart Petals
• Scrappy Tails – rhinestones – white rhinestones
• Stampers Anonymous – woodblock stamp – U3-2603 (typewriter stamp)
• Stencil in my stash
• Watercolor paper
• Scrap cardstock
• Vellum
• Die cutting machine
• Paint brush
• Scissors

Glue

I Love Mew – A Valentine’s Day Card

By Kathi Rerek

Here’s a punny Valentine’s Day card that showcases the blending of the new Baby Pink VersaFine Clair Ink with the Charming Pink VersaFine Clair Ink.  I also used Purell to create a fun ghosting technique!

Skill Level: Beginner
Time: 45 minutes

Instructions:

Steps 1A and B:

Use a make-up brush to apply Baby Pink VersaFine Clair Ink to a piece of white cardstock. Start at the top of the panel and work downwards.  The make-up brush creates soft textured look on the cardstock. Continue to brush downwards until the brush doesn’t put ink onto the cardstock (1A)

Use the same make-up brush to apply Charming Pink VersaFine Clair Ink from the base of the cardstock panel, blending as you go. (1B)

Steps 2A and B:

Place the Staggered Hearts stencil over the inked panel. (2A)

Add Purell to a dry baby wipe until it’s saturated then use the wipe to apply the Purell over the stencil onto the cardstock. The Purell will lift the VersaFine Clair Ink, creating ghosted hearts on the background. Heat setting will accentuate the ghosted effect while setting the ink. (2B)

Step 3:

Place the inked cardstock panel onto a stamping platform. Use Nocturne VersaFine Clair Ink to stamp the cat. Re-ink and stamp again if necessary for a crisp image.  Remove the image panel and use a paint brush dipped and the ink pad to do any necessary touch ups to the image. Heat set.

Step 4:

Use Prismacolor markers to color the cat’s eyes, taking care to avoid the black ink and contaminate your markers. Use a white gel pen to add highlights to the cat’s eyes.  No photos. Sorry.

Step 5:

Use alphabet dies and a speech bubble die to cut black cardstock. Use a flag and a heart die to to cut to cut extra inked cardstock from Step 1. Smoosh the heart die-cut onto the Charming Pink VersaFine Clair inkpad. Trim the ends off of the flag die-cut and edge with Charming Pink VersaFine Clair Ink. Adhere the letter die-cuts and the heart to the pink strip, then adhere to the black speech bubble die-cut.

Step 6:

Use Nocturne VersaFine Clair Ink to stamp the cat onto the scrap of repositionable sticker paper. Fussy-cut the sticker paper along the bottom and place it over its counterpart as a mask. Place a strip of repositionable Scotch Tape across the image panel. Use a Sponge Dauber to apply Charming Pink VersaFine Clair Ink over the tape and the masked cat paws to the bottom of the image panel.

Remove the tape and the mask over the cat. Use Use a Sponge Dauber to edge the image panel with Charming Pink VersaFine Clair Ink.

Step 7:

Use a Sponge Dauber to apply Baby Pink VersaFine Clair Ink to the outside .5” perimeter of  an A2 card. Heat set.

Step 8:

Cut a panel of black cardstock to 4” x 5.25”. Use Tear It! Tape to mat the image panel with the black cardstock, adhere the matted image panel to the card, and adhere the speech bubble die-cut as shown. Use the sentiment sticker to finish the card.

Finished Card

Imagine Crafts Supplies:

Other Supplies:

  • Solar White Classic Crest Cardstock by Neenah Papers
  • Raven Textured Cardstock by Bazzill Basics
  • What’s Meow Clear Stamp Set by Funky Fossil Designs
  • Staggered Hearts Stencil by My Favorite Things
  • Speech Bubble Die-namics Die Set by My Favorite Things
  • Upper and Lower Case Thinlits Die Sets by Tim Holtz for Sizzix
  • Occasions Small Talk Idea-ology Stickers by Tim Holtz for Advantus
  • Flag Dies: Source Unknown
  • Make-up Brushes
  • Dried Out Baby Wipes
  • Purell
  • Spanish Orange and Yellow Orange Prismacolor Markers
  • Repositionable Sticker Paper by Avery
  • Repositionable Scotch Tape by 3M
  • Low-Tack Tape
  • Magnetic Glass Craft Mat by Glassboard Studio
  • Misti Stamping Platform by My Sweet Petunia
  • Big Shot by Sizzix

Cute Valentines Day Card

By Ceal Pritchett

Hello crafty friends!
It’s Ceal, here. Today I am sharing a Clean & Simple Valentines card.

Skill Level: Beginner to Intermediate
Time: 30 to 45 Minutes

Directions:
Gather you supplies. You will need a stencil, valentines stamp, pink or any color ink, markers and black ink.

Step 1:
Stamp your image with black ink ,I used Memento Tuxedo Black.

Step 2:
Color the image with markers and then cut out with coordinating die.

Step 3:
Place a white panel cut to 4.25 x 5.5 down on a grip mat or other sticky surface. Lay stencil over it and add color with a sponge or blending brush starting in the center and gradually getting lighter toward the edge.

Step 4:
Add the panel to a card base and stamp the sentiment using VersaFine Clair Nocturne. Add foam tape to op up the image.

Supplies:

Imagine Products:
• Memento -Tuxedo Black
• VersaFine Clair -Nocturne and Charming Pink
• Memento Markers -Toffee Crunch, Desert Sand, Gray Flannel, Dandelion, Lulu Lavender, Rose Bud and Summer sky
• Sponge Dauber
• On Point Glue

Other products:

• 120 and 80lb Neenah Classic Crest Solar White Cardstock
• MISTI 2.0 -My Sweet Petunia
• Cupid Clarence Stamp Set  -The Rabbit Hole Designs
• Cupid Clarence die -The Rabbit Hole Designs
• Heart Stencil -The Rabbit Hole Designs (retired)

Stunning Monochromic Winter Snowflake Card

By Jessica Lin

Skill: Advanced
Time: 45 minutes

Hi everyone, it’s Jessica here. Have you seen the latest addition of colors for the VersaFine Clair ink line? I am a big fan of the VCF inks and am swooning over the new pastel colors. There are some really gorgeous shades of purples and blues, which are perfect for today’s wintery themed card. Let’s get started!

Step 1:
Emboss a piece of purple cardstock with Stampin’ Up!’s Whimsical Woodland embossing folder. This is one of my favorite embossing folders to use to create any christmas or winter themed cards. It looks great on both white and colored cardstock.

Step 2:
Ink blend the edges of the embossed panel with Lilac Bloom VersaFine Clair ink. I like to dab off excess ink on my craft mat before blending onto the cardstock so that there would be no harsh lines. I also tried to ink blend in a circular motion to create a spotlight effect.

Step 3:
Then ink blend Very Peri VersaFine Clair ink to create a color gradient. This beautiful dusty blue complements Lilac Bloom nicely. I just love the blended look of these two colors.

Step 4:
I ink blended a small amount of Nocturne VersaFine Clair ink to add a dramatic feel to this forest scene.

Step 5:
Using the same VersaFine Clair inks (Lilac Bloom and Very Peri), ink blend the center of a square piece of cardstock. Then die cut a large snowflake with Hero Art’s Snowflake die. If your snowflake die does not have thin, intricate lines, you could die cut the shape before ink blending.

Step 6:
Spritz a generous layer of Sheer Shimmer Spray in Sparkle to add a shimmery look to the snowflake die cut. Make sure you shake well before spritzing! I spritzed several layers, letting one layer dry briefly before applying the next, to get a thick coat of shimmer. The photos don’t do it justice! I wish you could see the amount of sparkle in person.

Step 7:
I also splattered on some white acrylic paint droplets to the embossed background by flicking the paint brush. After that is dry, I adhered the snowflake onto a strip of white cardstock and mounted the center piece onto the background with foam tape. For some finishing touches, I adhered a couple of rhinestones as well using On Point Glue.

Step 8:
To complete the card, I stamped the sentiment using the Silvery Shimmer Delicata ink pad. This sentiment stamp is from My Favorite Things’ Hand Lettered Holiday set.

Imagine Supplies:

Other Supplies:

  • Stampin’ Up! – Embossing Folder – Whimsical Woodland
  • Hero Arts – Die – Snowflake
  • My Favorite Things – Stamps – Hand Lettered Holiday
  • Die Cutting Machine
  • Blending brushes
  • Stampin’ Up! – Cardstock – Wisteria Wonder

Let’s Make a Happy New Year’s Card

By Ceil Pritchett

Hello crafty friends!
It’s Ceal, here. Today I am sharing a New Year’s card with yo.

Skill Level: Intermediate
Time: 45 mins

Directions: Gather your supplies. You will need an embossing folder, two different colors of dark ink, metallic ink, shimmer spray, number dies, and glitter paper.

Step 1:
Blend the two dark inks together on a panel cut to 4x 5.25 to give the appearance of a night sky.

Step 2:
Run the blended panel through the die cutting machine with a 3D embossing folder.

Step 3:
Rub a metallic ink pad over the raised areas of the panel.

Step 4:
Spray a shimmer spray over the panel to give it more sparkle.

Step 5:
Cut the number 2 and 5 out of glitter paper.

Step 6:
Add number to the panel and adhere the panel to the card base. Stamp the sentiment on panel.

Supplies:

Imagine products:

VersaFine Clair – Medieval Blue, Twilight
Delicata – Silvery Shimmer
Sheer Shimmer Spritz – Silver
On Point Glue

Other products:

Fireworks embossing folder – Altenew
Fancy Die Number 2 – Hero Arts
Fancy Die Number 5 – Hero Arts
Happy New Year Stamp – Taylored Expressions
Glitter paper – Altenew