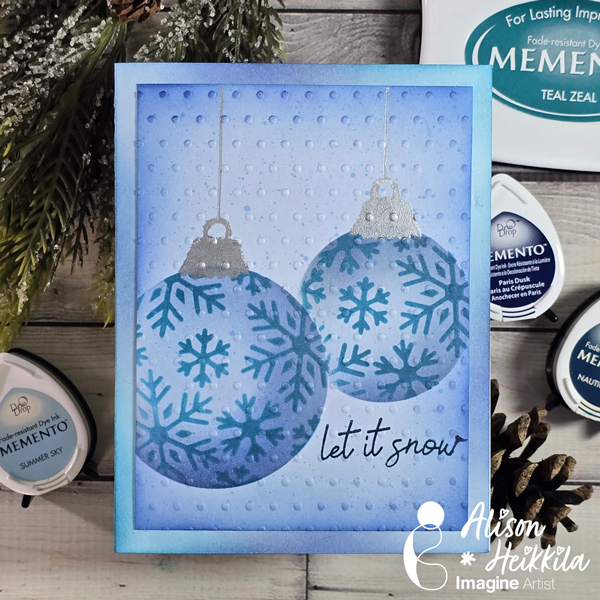
Hello! Alison Heikkila here. For my latest video for Imagine, we’re making a holiday card with snowflake ornaments. This is a great card for beginners, or for someone who likes to batch many cards. You can feel free to change up the colors as you like, but I love making cards with a limited palette from time to time.
Skill Level: Beginner Time to Complete: 15-20 Minutes
*Some affiliate links are used in this post. That means that if you shop through these links, I may receive a small compensation, at no cost to you.
Here is the YouTube video. If it doesn’t play properly, please click HERE.
I love the dimension we created by ink blending our colors a certain way. This is a really fun stencil set, and you can really play with different colors as much as you like. I’ll have another video for Imagine soon. Thanks so much for stopping by. Have an inspiring day!
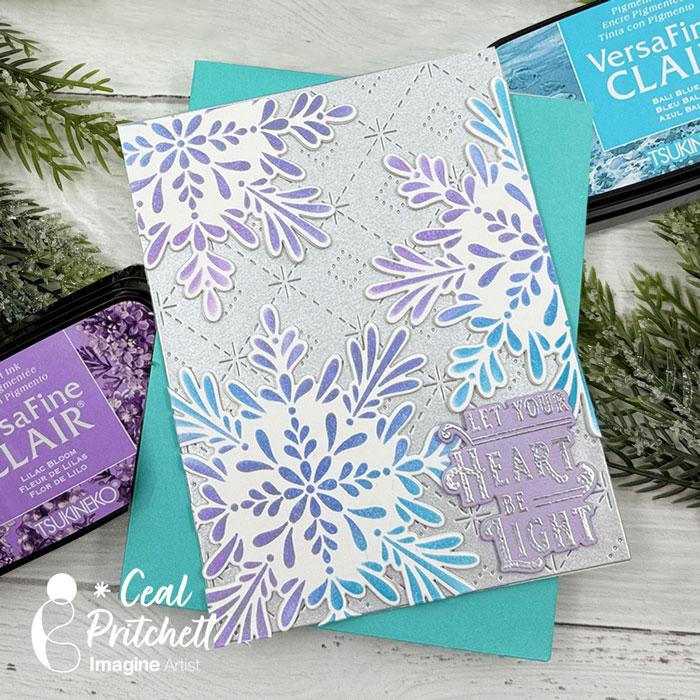
Hello Crafty Friends. Today, I am sharing how to add dimension to your card using diecuts and VersaFine Clair Inks.
Skill Level: Beginner to Intermediate Time: 30 to 45 Minutes
Directions:
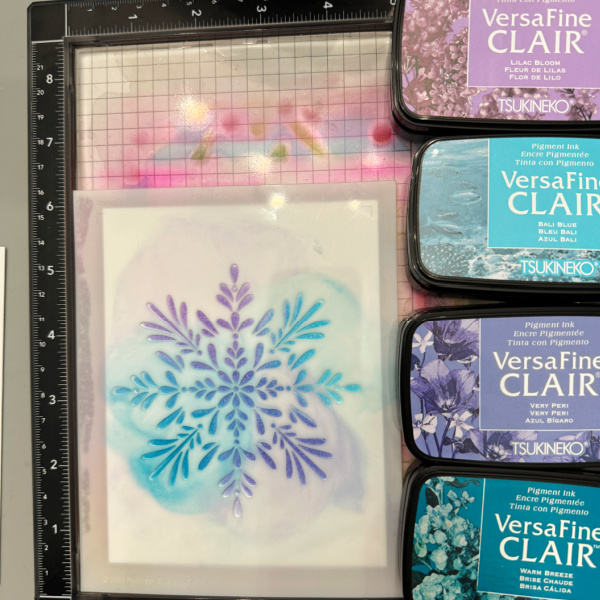
Step 1: Gather your supplies. You will need several colors of ink, a stencil, a background cover plate, and die cuts for your stenciled image. You will also need VersaMark ink and some clear embossing powder.
Step 2: Using a grip mat or another sticky mat, lay your panel on the mat and cover with the stencil. Use several colors of ink to color the snowflake. Repeat this process 3 times.
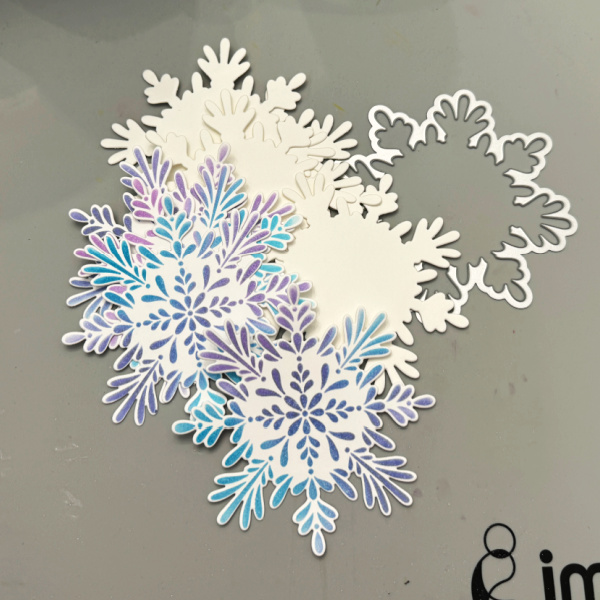
Step 3: Using the coordinating die, cut out all of the snowflakes you colored along with 6 others out of a heavyweight cardstock. Add the ones cut out of the heavyweight cardstock to the colored ones. This will give you dimension for the snowflakes and will still go through the mail without extra postage.
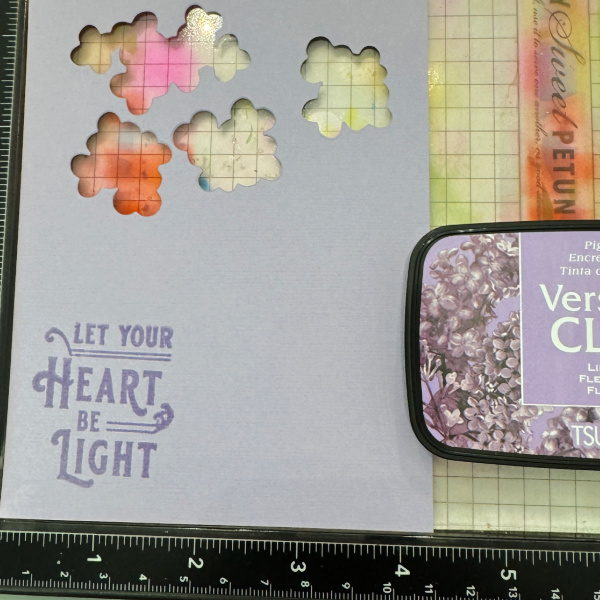
Step 4: Stamp the sentiment in purple ink and emboss it with clear powder. For my sample I decided to go with embossing it with silver powder on purple cardstock.
Create a background by using a cover plate die.
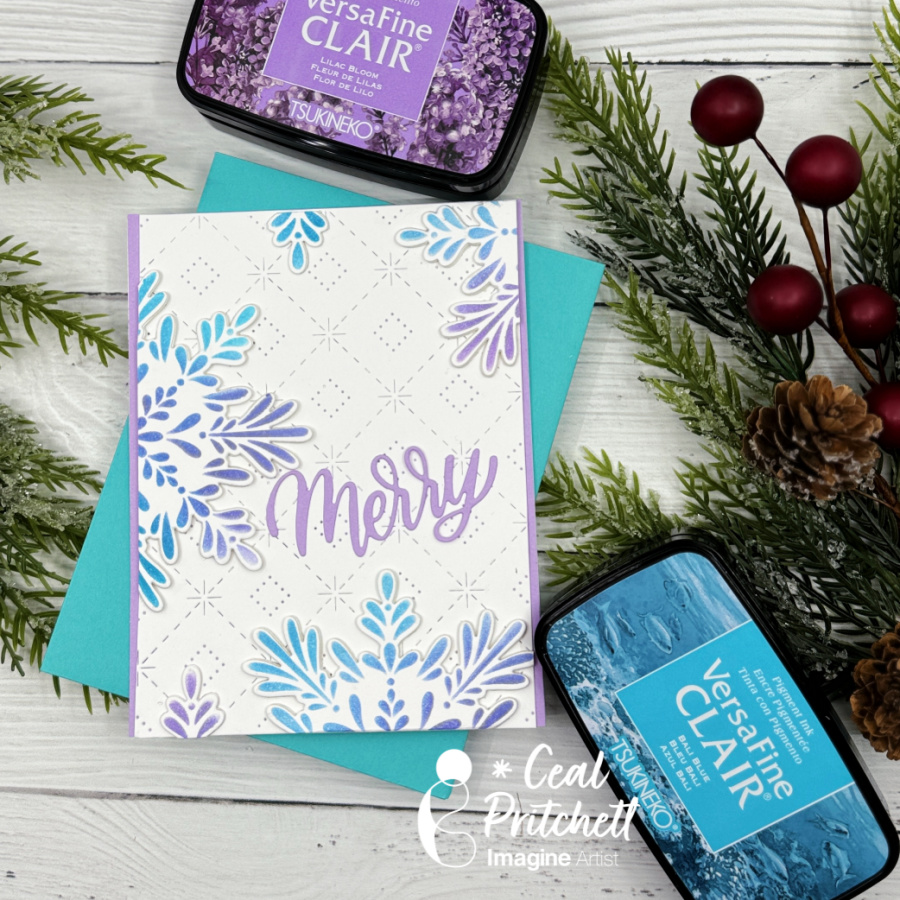
Assemble your card.
I created a second card with the left-over pieces.
Craft Supplies:
Imagine products: VersaFine Clair – Bali Blue, Warm Breeze, Lilac Bloom and Very Peri VersaMark On Point Glue
Other products: Neenah Classic Crest Solar White 120lb – CutCardStock Neenah Classic Crest Solar White 80lb – CutCardStock Stardream Silver Metallic 105lb – CutCardStock Radiating Snowflake Stencil – PinkFresh Studio Radiating Snowflake Die – PinkFresh Studio Holiday Greeting Sentiments – PinkFresh Studio Cover plate die – PinkFresh Studio Merry Die – Kristina Werner C9
Skill Level: Beginner to Intermediate Time: 1 hour
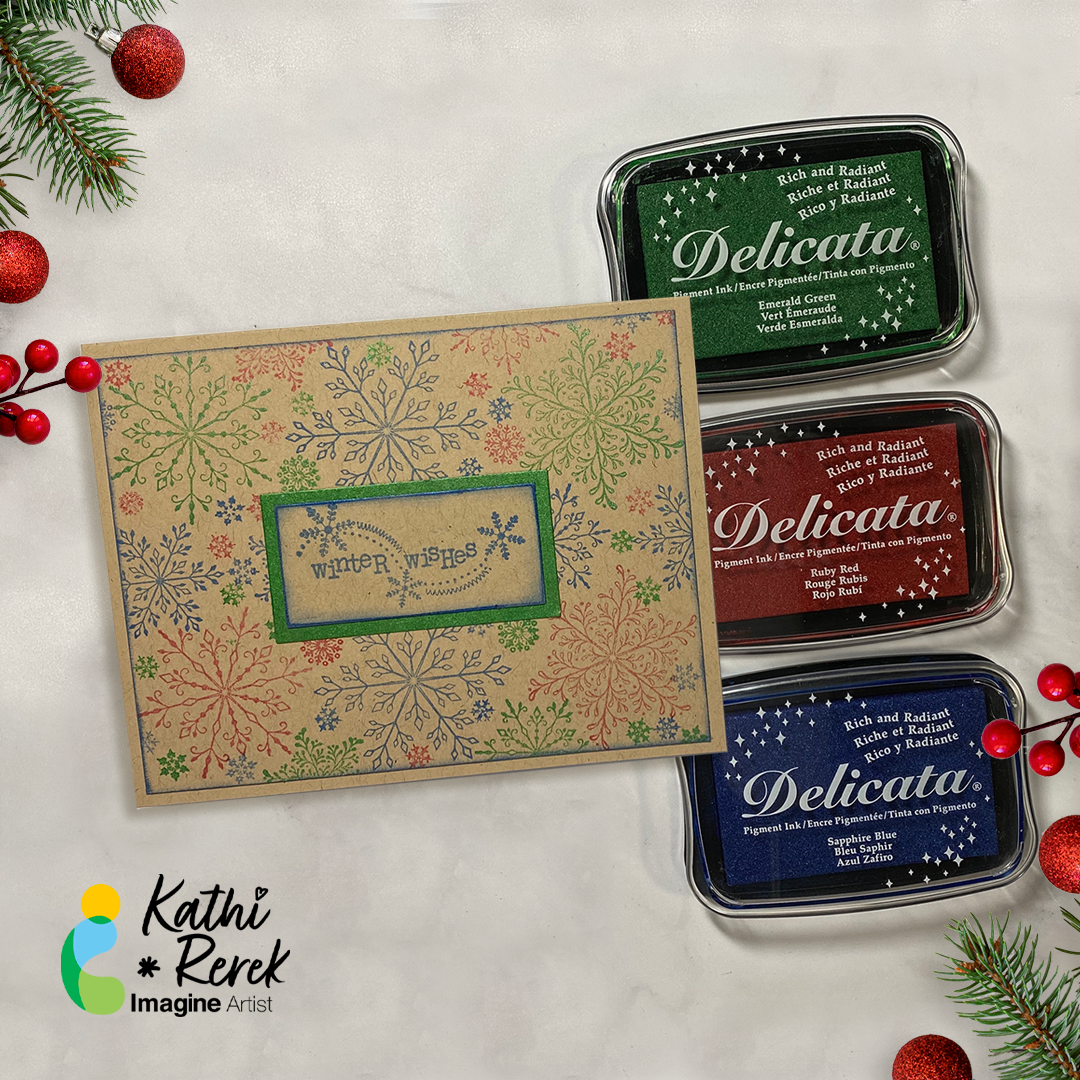
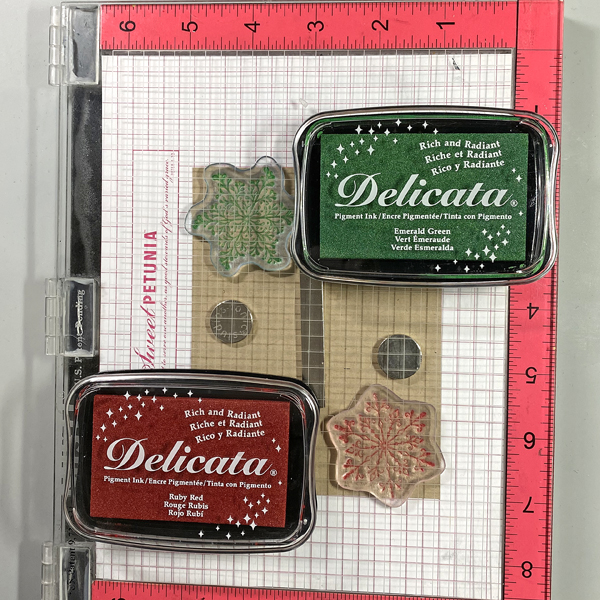
Step 1: Use magnets to secure a 4” x 5.25” piece of Kraft cardstock onto the base of a stamping platform.
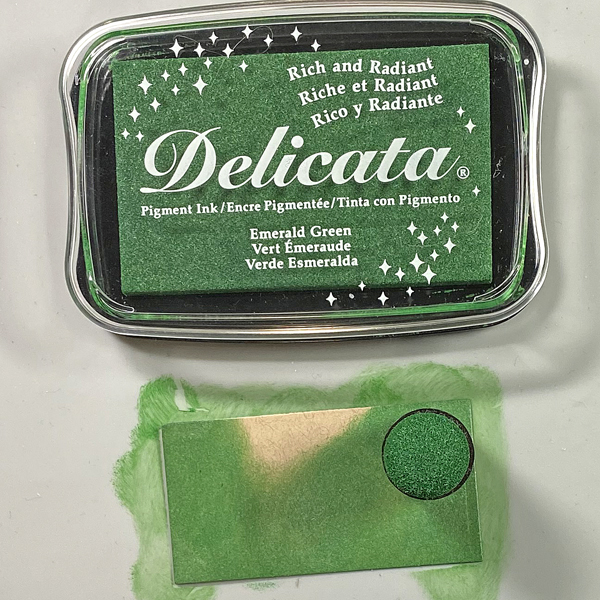
Position two snowflakes from the Snowflakes Large Clear Polymer Stamp Set so that one is facedown at the top left of the image panel and the other one is at the bottom right of the image panel. Ink the snowflake stamps with Emerald Green and Ruby Red Delicata Ink and stamp. Re-ink and stamp again if necessary to create good images. Clean and dry both stamps.
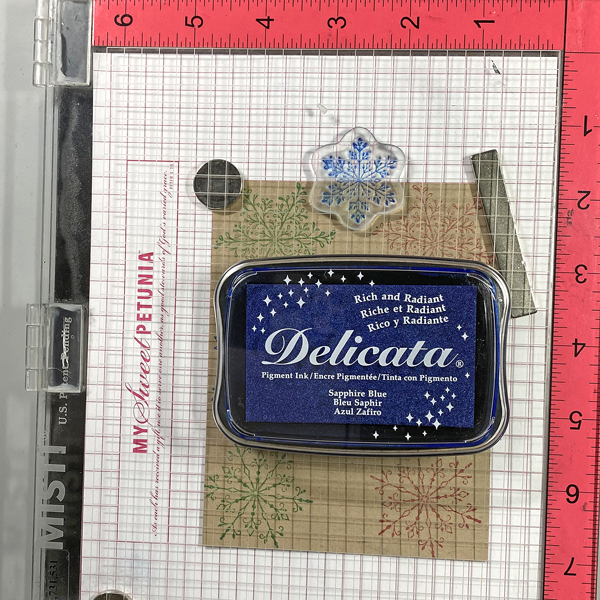
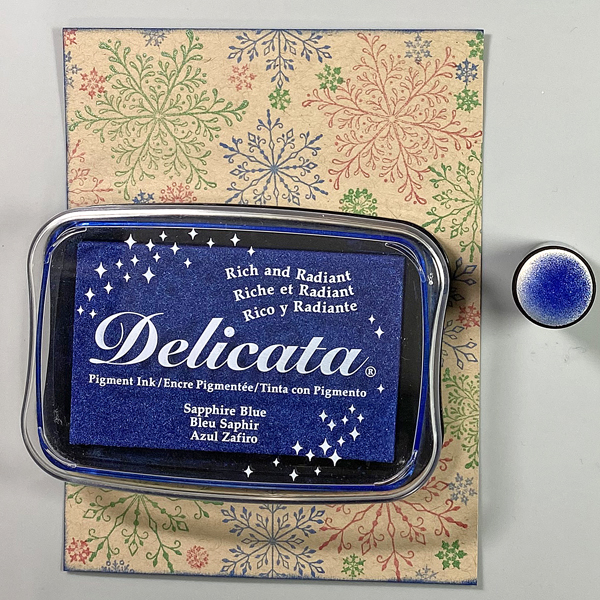
Step 2: Position the third snowflake stamp from the stamp set facedown between the stamped snowflakes on the image panel. Ink the stamp with Sapphire Blue Delicata Ink and stamp. Re-ink and stamp again if necessary to create a good impression. Clean and dry the stamp. Reposition the same stamp facedown on the other side of the image. Ink the stamp with Sapphire Blue Delicata Ink. Clean and dry the stamp.
Step 3: Position one of the snowflake stamps from the Snowflakes Small Clear Polymer Stamp Set facedown in the center top of the image panel. ink the stamp with Sapphire Blue Delicata Ink and stamp. Re-ink and stamp again if necessary to create a good impression. Clean and dry the stamp.
Continue the process of stamping snowflakes from the Snowflakes Small and the Snowflakes Clear Stamp sets with all three colors of Delicata Inks, taking care to clean and dry the stamps between colors. Heat set the image panel.
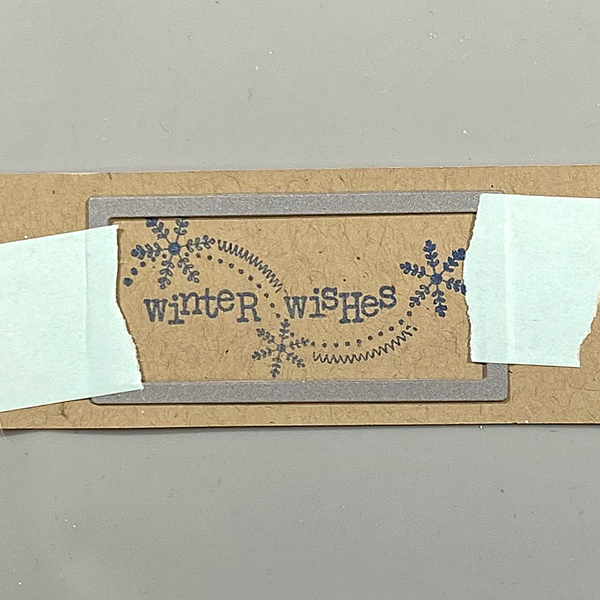
Step 4: Ink the sentiment stamp with Sapphire Blue Delicata ink and stamp onto a piece of Kraft cardstock.
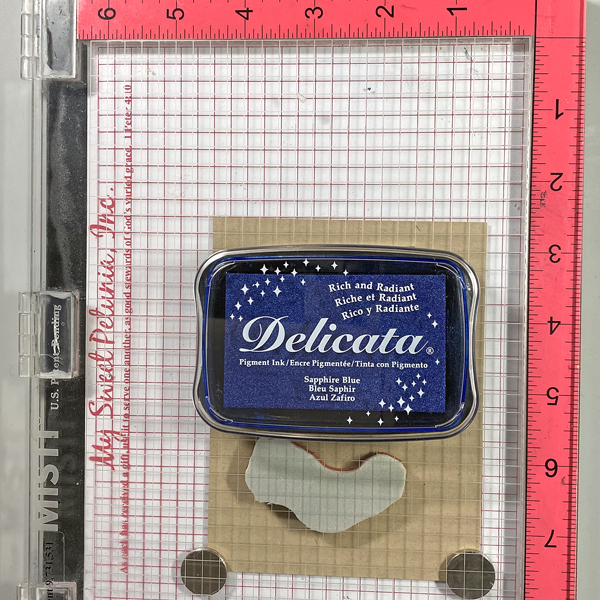
Step 5: Use low-tack tape to secure a rectangle die to the sentiment strip. Run the sentiment strip through a die-cutting machine. Use a slightly larger rectangle die to cut a Kraft cardstock.
Step 6: Use a sponge dauber to apply Emerald Green Delicata Ink to the die-cut. Heat set.
Step 7: Use a Sponge Dauber to edge the snowflake stamped image panel. Heat set.
Step 8: Use Tear It! Tape to adhere the image panel to a Kraft A2 Card. Use Tear-It Tape to adhere the sentiment to finish the card.
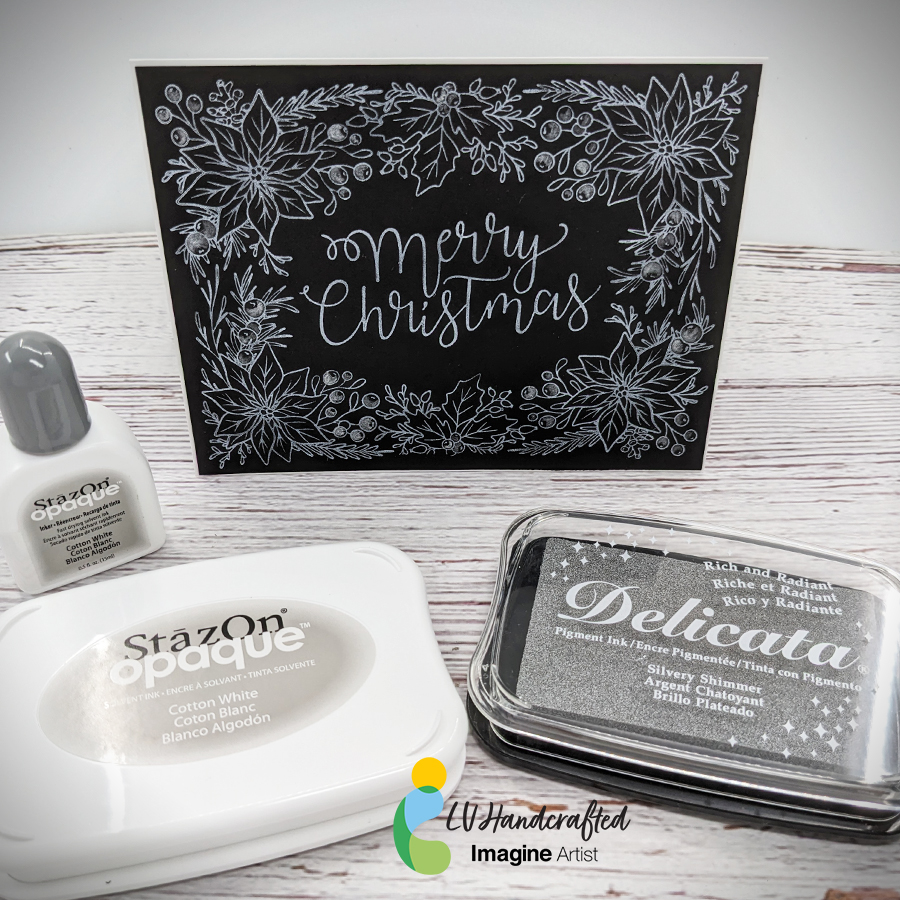
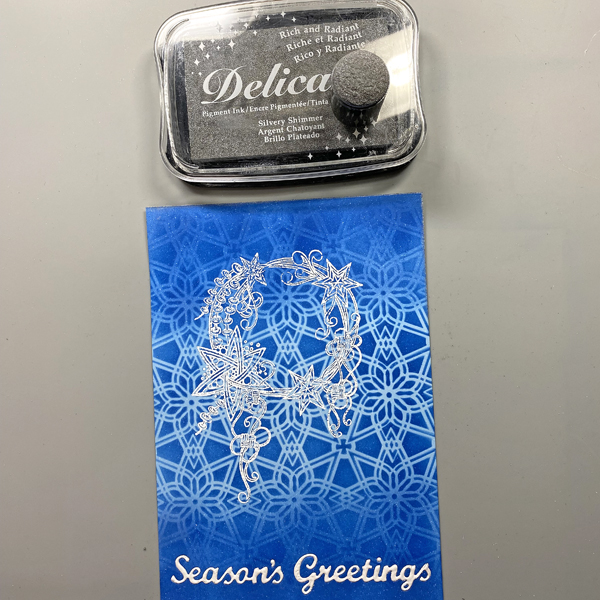
Hello friends! This is Linh (or LV Handcrafted on all the socials). I’m back again with more BetterPress fun! This time I’m using StazOn Opaque ink in Cotton White and Delicata Silvery Shimmer ink. The StazOn Opaque ink is wonderful because it’s a solvent based pigment ink that you can use on dark or black cardstock. Look how bright and white that is! It works beautifully with this BetterPress plate and makes a very beautiful holiday card.
To elevate the design a little bit, I smooshed some Delicata ink onto an acrylic block, watered it down a smidge and painted with it. I did a little partial coloring of the holly berries to add a little contrast to the design. The shimmer is subtle but beautiful and perfect for that extra special touch during the holidays.
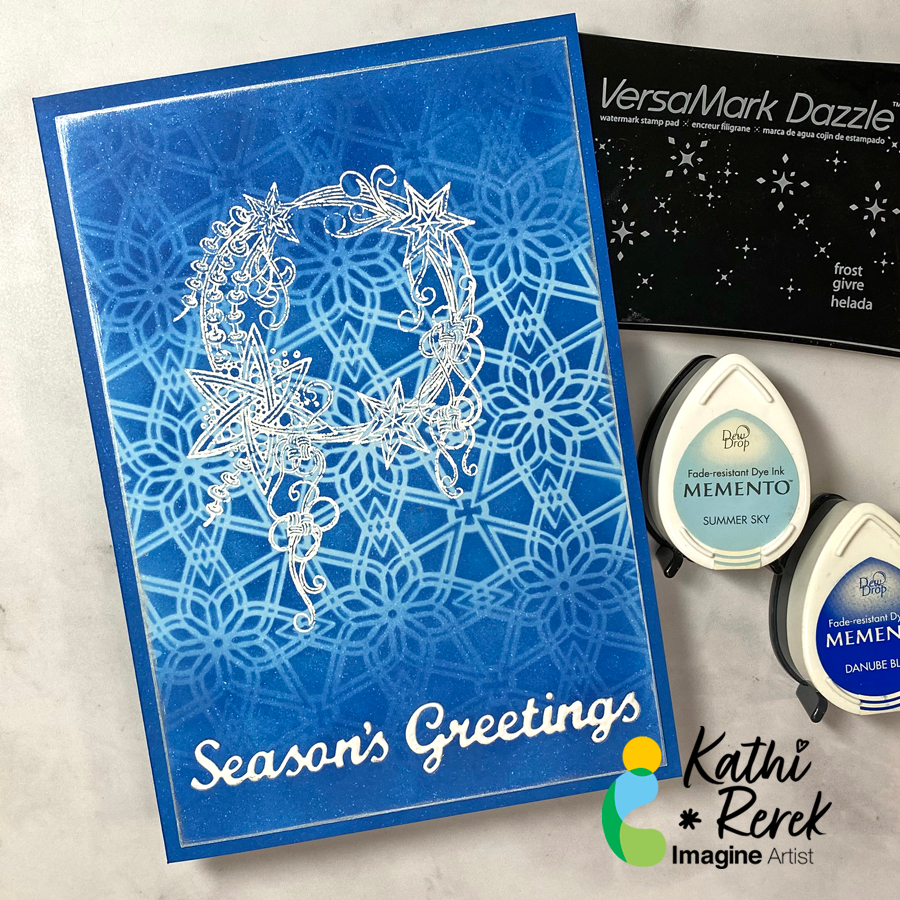
Here’s a dramatic, yet quick and easy Season’s Greeting’s Card
Skill Level: Beginner to Intermediate Time: 1 hour
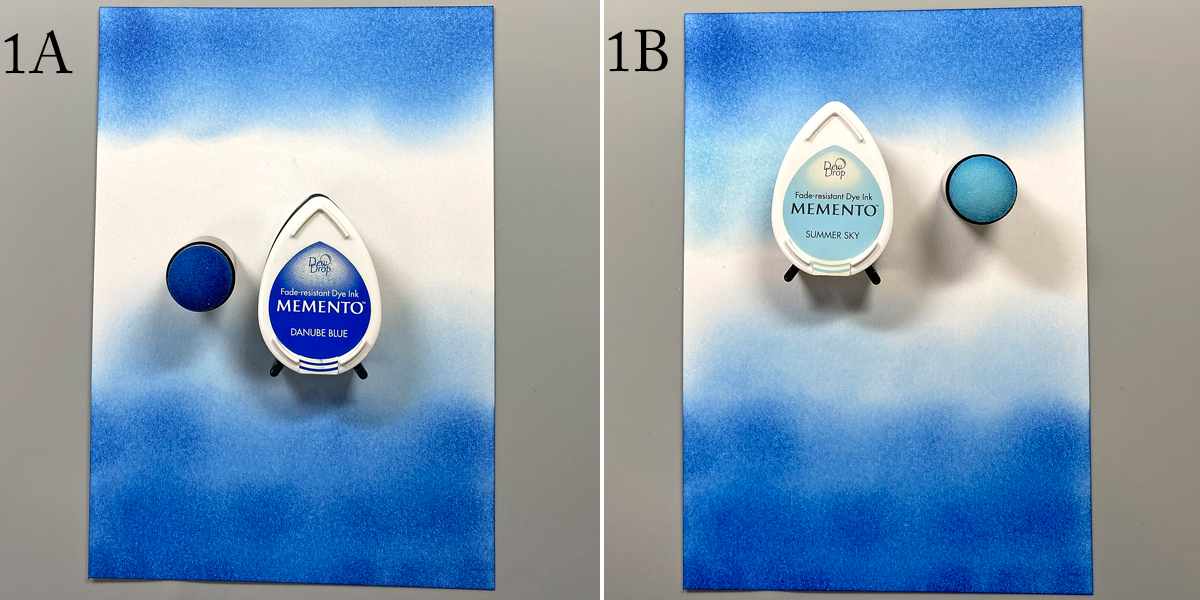
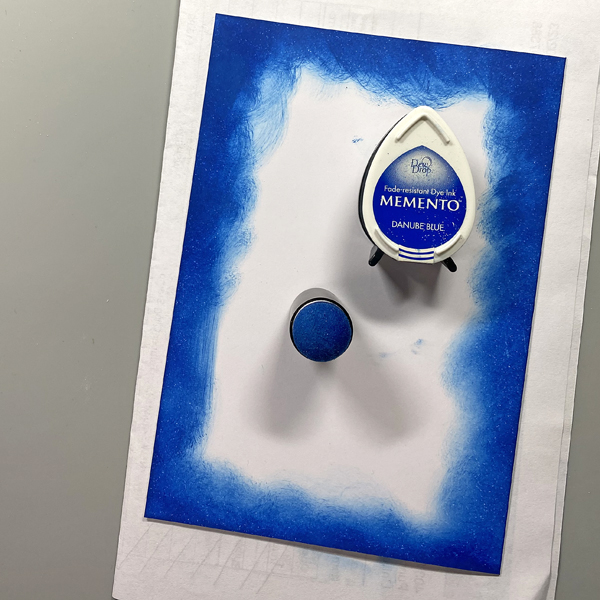
Step 1. Use a Sponge Dauber to apply Danube Blue Memento Ink to the top and bottom of piece of white cardstock. Use another Sponge Dauber to apply Summer Sky Memento Ink to the center of the cardstock, taking care to blend the blues where they meet.
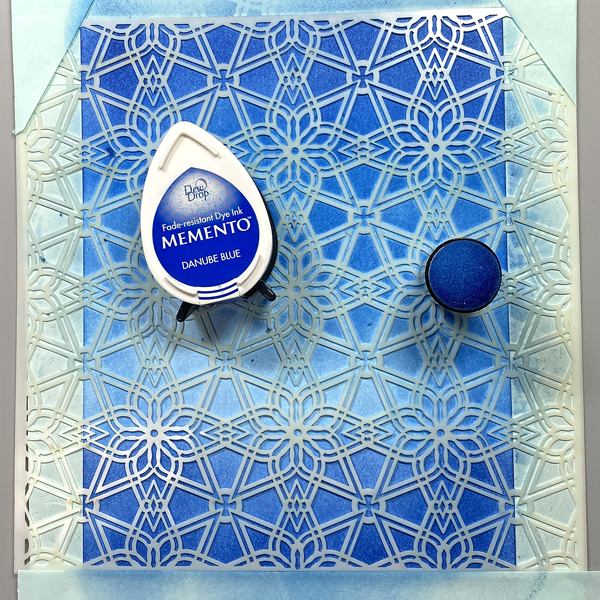
Step 2: Use low-tack tape to secure the Florastella Stencil to the inked cardstock. Sponge Danube Blue Memento Ink over the stencil onto the cardstock.
Remove the stencil and rub a used dryer sheet onto the image panel.
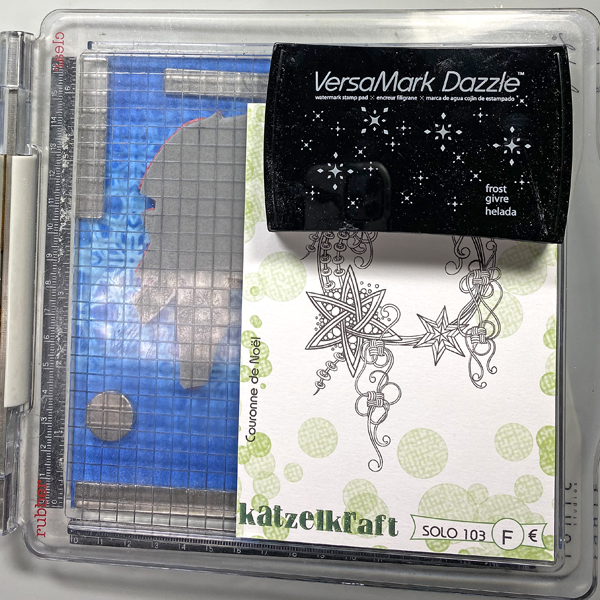
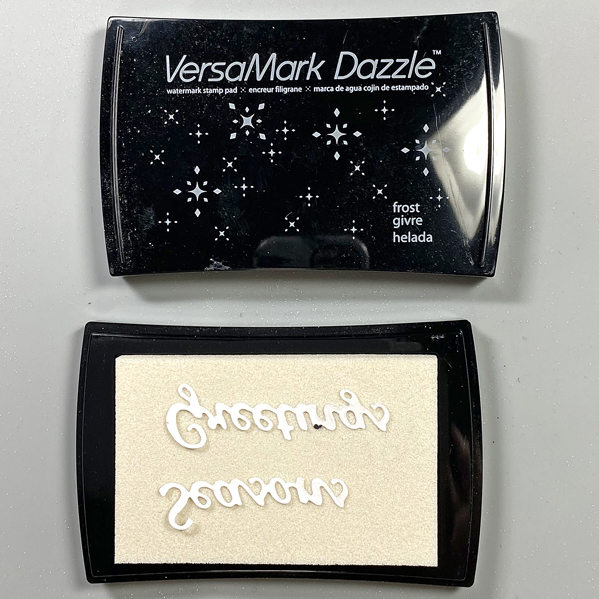
Step 3: Use magnets to secure the image panel to the base of a stamping platform. Position the Christmas Crown stamp facedown where desired. Ink the stamp with Frost VersaMark Dazzle Ink and stamp. Re-ink and stamp again to ensure a good impression. Remove the image panel from the stamping platform.
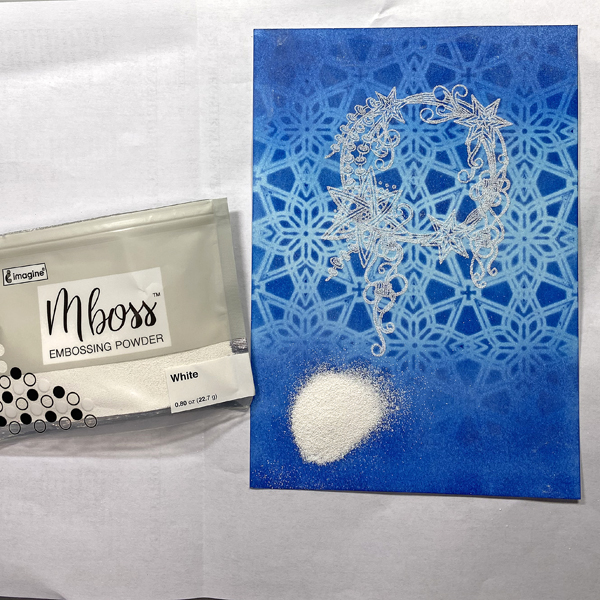
Step 4: Place the image panel onto a sheet of folded copier paper. Pour White Mboss Embossing Powder onto the image panel. Pour the excess powder onto the copier paper, then pour it back into its packet. Tap off any stray powder and heat set the image. Set aside.
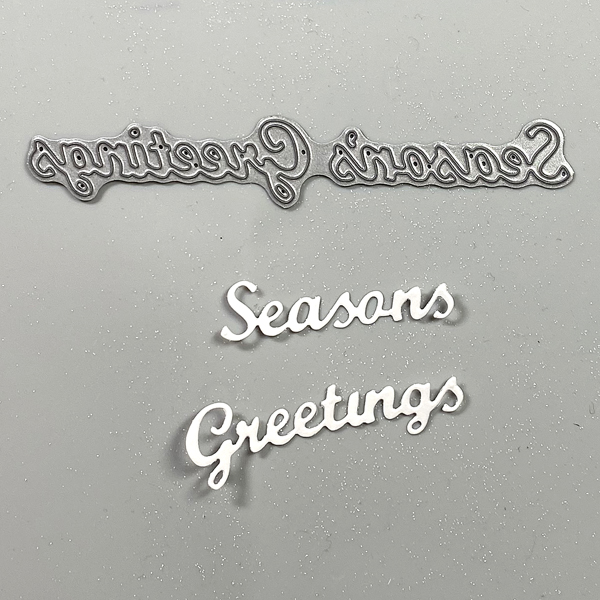
Step 5: Use a “Season’s Greetings” cutting die to cut white cardstock.
Step 6: Press the die-cut words face-down onto the Frost VersaMark Dazzle Inkpad.
Place the inked die-cut words onto the folded up copier paper, pour White Mboss Embossing Powder over the words, then use tweezers to remove them from the embossing powder. (Photo not shown.)
Pour the excess powder onto the copier paper, then pour it back into its packet.
Heat set the sentiment words to melt the embossing powder.
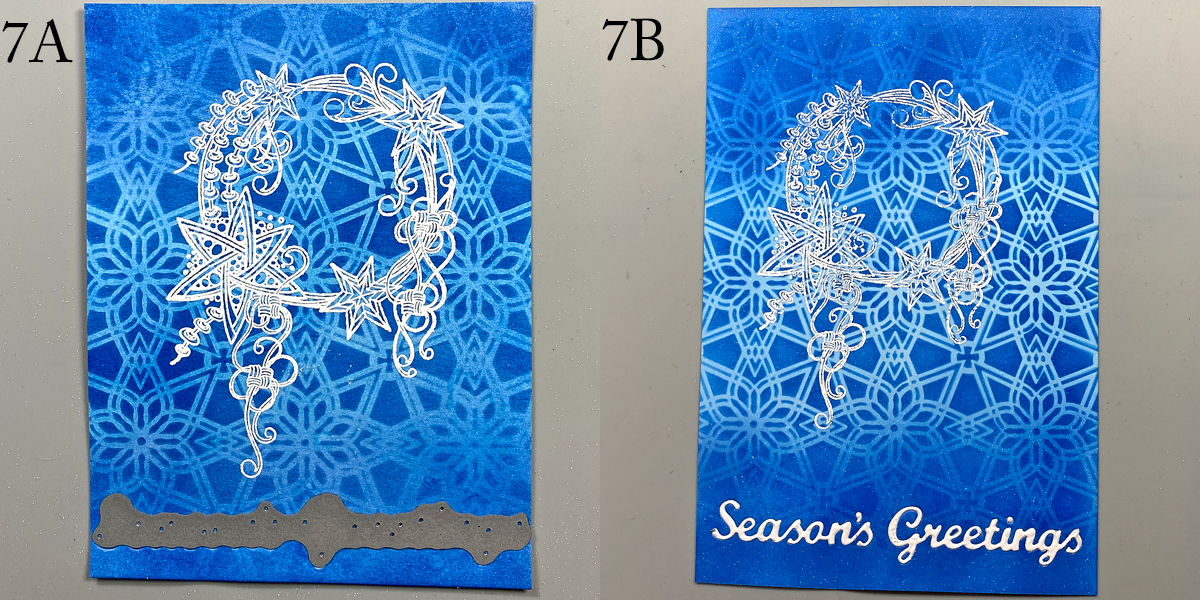
Step 7: Place the “Season’s Greetings” dies facedown towards the bottom of the image panel and run through the machine to cut.
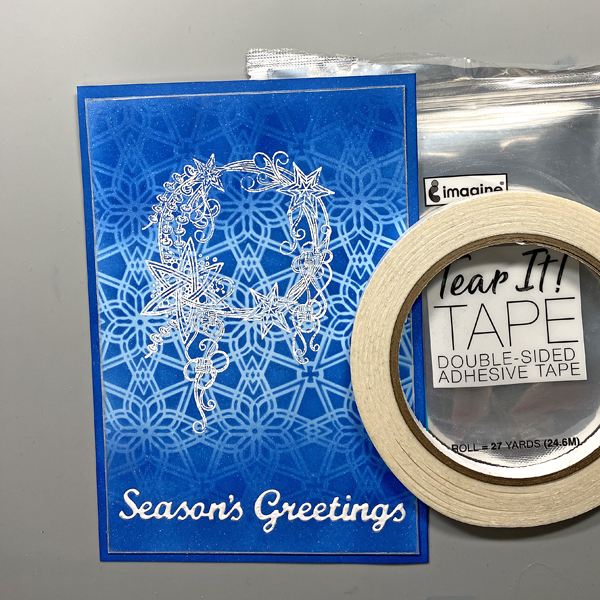
Use Tear-It Tape on the back of the image panel to cover the die-cut area. (Photo not shown)
Inset the embossed sentiments into the apertures.
Step 8: Use a Sponge Dauber to apply Silvery Shimmer Delicata Ink to the edges of the image panel. Heat set. Use another Sponge Dauber to edge the image panel with White Shimmer Delicata Ink. Heat set.
Step 9: Cut white cardstock to 9” x 6.5”. Score at 4.5” and fold to form a 4.5” x 6.5” card. Place a piece of scrap paper into the card. Use a Sponge Dauber to apply Danube Blue Memento ink to the periphery of the card.
Step 10: Use Tear It! Tape to adhere the image panel to the front of the card .
– Let’s make a festive and fun Christmas card with ink, stamps, stencils, and minimal coloring.
Skill Level: Beginner to Intermediate Time: 1 hour
Step 1.
Use a stamping platform and Nocturne VersaFine Clair ink, stamp the penguin from the Penguin Clear Stamp Set onto a panel 6” x 8” panel of Mixed Media cardstock. Re-ink and stamp a second time to ensure a good impression. Keep the image panel secured to the base of the stamping platform. Remove and clean the stamp.
Step 2:
Position the the penguin from the Frost Clear Stamp Set to the right of the previously stamped penguin. Ink the stamp with Nocturne VersaFine Clair Ink and stamp. Re-ink and stamp if necessary to ensure a good impression. Remove the image panel from the platform. Remove and clean the stamp.
Step 3:
Place a piece of repositionable sticker paper on the base of the stamping platform. Place both penguins facedown onto the sticker paper. Ink the stamps with Nocturne VersaFine Clair Ink and stamp. Remove the stamps and the sticker paper sheet from the platform. Heat set the image panel.
Step 4:
Fussy-cut the sticker paper versions of the penguins and place atop their counterparts on the image panel to mask them.
Step 5:
Position the Snow Globe stencil so that the opening is framing the penguins. Use low-tack tape to secure the stencil to the image panel and to cover the base of the image panel. Use a Sponge Dauber to apply Summer Sky Memento ink heavily around the edges of the Snow Globe fading inward over the masked penguins.
Step 6:
Keeping the Snow Globe stencil in place, remove some of the tape from below the globe area. Position the Snow Globe’s Base stencil below the snow globe on the image panel. Secure it with low-tack tape.
Position the circle mask, included with the Snow Globe stencil set, so that it covers the penguins. Secure it with low-tack tape as shown.
Use a Sponge Dauber to apply Rhubarb Stalk Memento ink along the top, bottom, and both sides of the Snow Globe Base stencil. Use the same Sponge Dauber to apply and blend Lady Bug Memento from the edges towards the center of the Snow Globe Base. When happy with the blending and coverage, remove, clean, and dry the Snow Globe stencil, Snow Globe Base stencil, and the circle mask. Use Scarlet Red and Red Chalk pencils to add dimension and detail to the Snow Globe base. Use a white chalk pencil to add a highlight.
Step 7:
Place low-tack tape horizontally across the inked Snow Globe Base. Place the circle mask over the inked Snow Globe and masked penguins on the image panel. Use low-tack tape to secure the circle mask in place.
Use a Sponge Dauber to apply New Sprout Memento ink to the top part of the image panel as shown.
Step 8:
Place the Holly Background stencil over the circle mask onto the image panel. Secure the stencil in place with low-tack tape. Use a Sponge Dauber to apply Oasis VersaFine Clair ink over the stencil’s holly leaves onto the image panel. Use a paper towel to remove as much ink as possible from the stencil.
Use a Fantastix to apply Tulip Red VersaFine Clair ink over the stencil’s holly berries onto the image panel. Remove, clean, and dry the stencils and the circle mask. Heat set the image panel.
Step 9:
Use the stenciled leaves and berries as a guide to re-position the Holly Background stencil onto the image panel. Secure with low-tack tape. Place the Snow Globe stencil over top so that the globe aperture is framing the snow globe on the image panel. Secure with low-tack tape.
Use a Fantastix to lightly apply green ink from the Fresh Greens Kaleidacolor inkpad (the second pad from the left) over the stencil’s holly leaves onto the snow globe on the image panel. Use another Fantastix to apply Lady Bug Memento ink over the stencil’s holly berries onto the image panel.
Remove, clean, and dry the stencils.
Step 10:
Place low-tack tape horizontally on the line separating the snow globe from the holly leaf background.
Use a Sponge Dauber to apply Acorn VersaFine Clair ink to the image panel. Use black chalk pencils to add shading and horizontal lines. Smudge the chalk slightly.
Step 11:
Smoosh Sparkle Sheer Shimmer Stix onto the craft mat. Use a paintbrush to apply to the ground under the penguins to make it look icy.
Step 12:
Apply Sparkle Sheer Shimmer Stix onto the craft mat. Add a drop of New Sprout Memento Inker to the sparkly puddle. Mix with a paintbrush, then use the brush to make the penguins’ eyes green. Clean the craft mat.
Apply Sparkle Sheer Shimmer Stix onto the craft mat. Add a drop of Danube Blue Memento Inker to the sparkly puddle. Mix with a paintbrush, then use the brush to add an outline to the white areas of the penguins’ bellies. Clean the craft mat.
Step 13:
Apply Frost Shimmer Stix to the craft mat. Use a paint brush to add white to the beak of the compass penguin (on the left). Clean the craft mat.
Step 14:
Place the Snow Globe stencil back over the image panel. Cover the remainder of the background with a ruler or tape. Add a drop or two of Moonlight White Brilliance Inker to the craft mat. Spray with 91% Isopropyl Alcohol. Mix with a paint brush and splatter the penguins to add a snowy touch. Remove and clean the stencil. Clean the craft mat. Use a white chalk pencil to add highlights to the right and left side of the snow globe.
Step 15:
Use Tulip Red VersaFine ink to stamp the “Merry Christmas” stencil onto white cardstock. Use a sentiment cutting die to cut the sentiment.
Use a fancy tag cutting die to cut green cardstock. Adhere the sentiment to the green die-cut. Adhere the matted sentiment to the image panel as shown. Enhance the sentiment with rhinestones.
Step 16:
Trim the image panel to 4.625” x 6.625”. Cut a piece of black cardstock to 4.75” x 6.75”. Use Tear-It!Tape to adhere the image panel to the black mat. Use Tear-It! Tape to adhere the matted image panel to a 5” x 7” green card.