See How to Use Inkers for a Mixed Media Tag

by Jowilna Nolte

See How to Use Inkers for a Mixed Media Tag

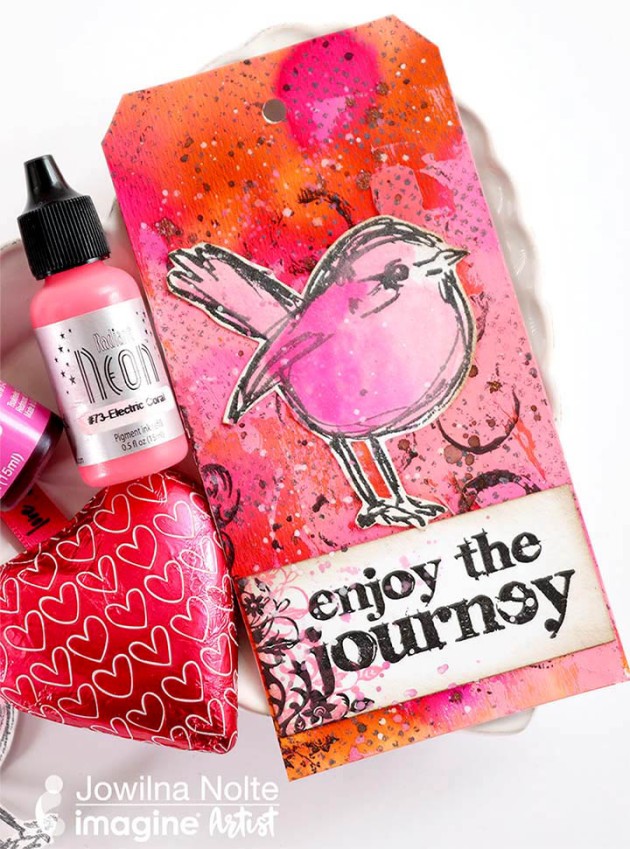
This month’s color, Coral offers so many possibilities. I pulled out all my products in those shades and created a bright and beautiful gift tag perfect for tying around a gift. I love making tags instead of cards – so quick and easy and just the right size to experiments and create some fun effects.

Skill: Beginner
Time: 30 minutes

Directions


Step 1

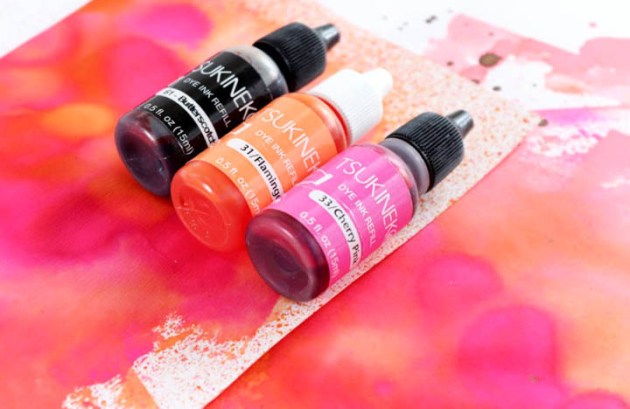
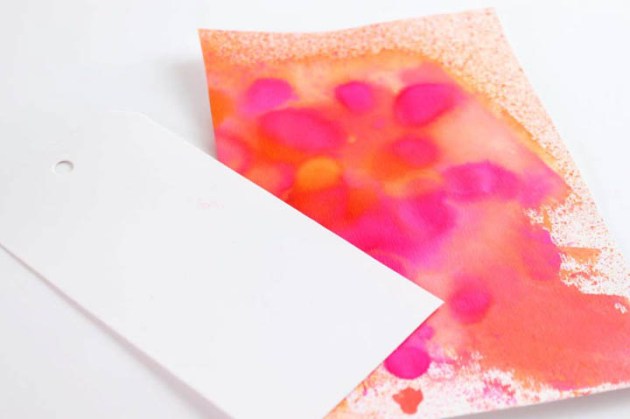
Add a few drops of dye ink refill ink onto watercolor paper and mist with water. Keep adding drops of ink and mist with water until you are happy with the look.


Step 2

Use a tag template and cut your colored paper into a tag shape.


Step 3

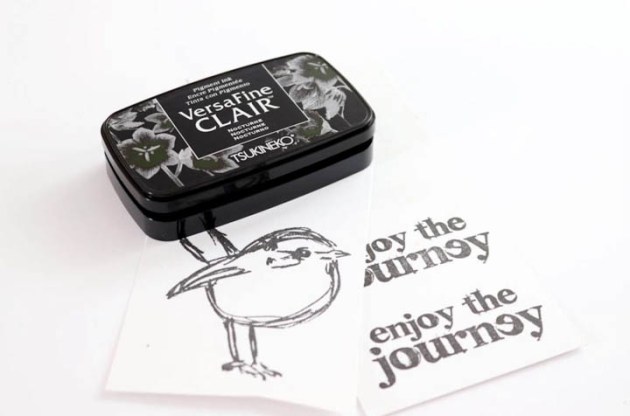
Stamp birds and sentiment onto smooth white cardstock using VersaFine Clair Nocturne ink.


Step 4

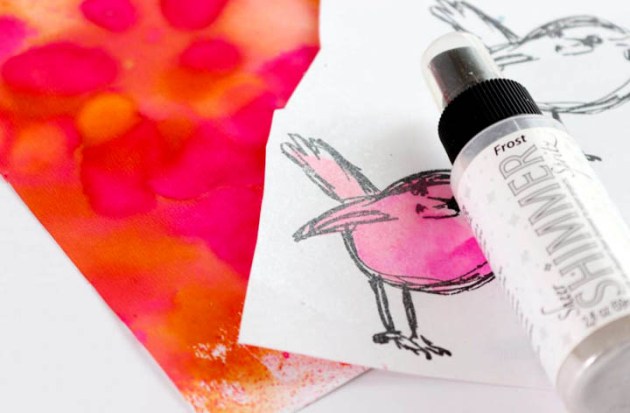
Add a few drops of re-inker ink onto your craft mat. Mist water next to the ink. Pick up a small amount of water and mix with the ink and then paint your bird images.


Step 5

Mist your tag and painted birds using Shimmer Spray in Frost. It gives the end product a beautiful shimmer.


Step 6

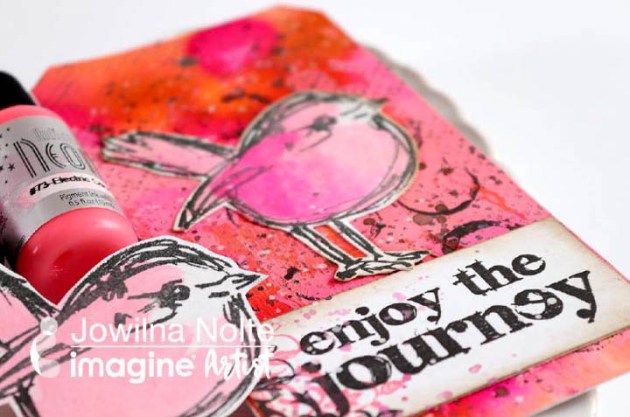
Trim your sentiment strip and adhere it to the bottom of your tag. Adhere to the painted birdie above the sentiment. Add additional stamped detail to the left of the tag and the background. Use inks to add splatters over the tag for some interest.

Supplies

Imagine

Other

  • Watercolor paper
  • Cardstock – white
  • Stampers Anonymous – stamp
  • Paint brush
  • Watercolor paint

See How to Create Beautiful Coral Themed Jewelry Charms

by Roni Johnson

See How to Create Beautiful Coral Themed Jewelry Charms

I was so excited when I found out the color of the month was Pantone’s Color of the Year for 2019 – Living Coral. Why? Well, this color brings to mind summer, the beach and warm temps, something that I’m all for at the moment. I used the Coral Ultimate Pigment Refill on SHEET Metal circle charms as my jumping off point. I decided it would be fun to add a bit of blue sky using the Versa Magic Ink Sea Breeze and the sparkle of the water with irRESISTible Pico Embellisher – Shimmer to these Charming Coral pieces as well.

Skill: Intermediate
Time: 1 hour

Directions


Step 1

Pounce VersaMagic pigment ink in SeaBreeze and VersaColor inker in Coral (see link below) onto the circle pieces. Sprinkle the charm with clear embossing powder; shake off excess and return it to the jar. Heat the embossing powder to melt.


Step 2

Use a Sponge Dauber to apply Jet Black StazOn ink around the edge of the charm.


Step 3

Stamp desired texture onto the charms using Jet Black StazOn ink.


Step 4

Glue shell charm to small circle using On Point Glue. Cover each charm with a layer of Shimmer irRESISTible Pico Embellisher and let dry.


Step 5

Use jewelry tools to secure both charms to the other; add additional charms or beads as desired. Thread charms onto a ball chain necklace.

BONUS!!

I had so much fun making the first set of charms I just kept going. This time I decided to ink up a few fender washers. These charms were made using the same technique as above using steps 1-3. Antiqued copper charms and findings to finish off the washers.

Supplies

Imagine
Other
  • Just For Fun Rubber Stamps – Crackle Stamp
  • Jewelry Findings
  • Jewelry Tools
  • Aleene’s Platinum Bond – Glass & Bead

Use a Beautiful Coral Color on These Cute Panda Birthday Cards

by Elina Stromberg

Use a Beautiful Coral Color on These Cute Panda Birthday Cards

Since 2000, the Pantone Color Institute declares a particular color “Color of the Year”. It is chosen in a secret meeting of representatives from various nations’ color standards groups, and the result of the meeting is communicated in Pantone View, which fashion designers and other consumer-oriented companies purchase and use as guidance for their future product designs.

This year the Pantone Color of the Year is “Living Coral”. It is described as “an animating and life-affirming coral hue with a golden undertone that energizes and enlivens with a softer edge”. Lovely! To celebrate this newly released Color of the Year “Living Coral” is also the color of the month for Imagine AIR’s. I must admit that coral is very rarely seen on my crafting projects, but I was quite surprised how yummy this rich red color looked on my card creation. Especially when contrasted with simple light grey hues!

Skill: Beginner/Intermediate
Time: 1 hour

Directions


Step 1

Layer two stencils on the card background: Place the patterned stencil on the background paper and a circle stencil on top. Secure on your crafting mat with masking tape. Apply ‘Electric Coral’ Radiant Neon ink through the stencil with a sponge dauber. Remove both stencils.


Step 2

Place the inked background paper on a sheet of printing paper. Pour clear embossing powder over the stenciled and inked area. Pour any extra embossing powder onto the printing paper and funnel the extra powder back into its container. Heat the embossing powder with a heating tool until completely melted. Trim the decorated paper to size and mat on a piece of coral colored cardstock.


Step 3

Stamp the panda image and sentiment text with black ink on white paper. Cut out and glue on the card front. Attach card on white card base using double-sided tape. When the card was finished the stencil still had still coral ink on it, so I decided to use it for another fun card background: I misted the inked part of the stencil gently with water, placed it upside down on a piece of grey patterned paper, and transferred the ink on the paper by rolling the stencil background with a brayer.


Step 4

Then I removed the stencil, let the ink dry, and dabbed a thin layer of coral ink on the pattern. Then I repeated the mounting on coral cardstock and used a different panda image for this card. I think this reverse version of the stencil pattern looks very nice, too!

Supplies

Imagine
Other
  • Light grey patterned paper
  • Coral cardstock
  • White paper
  • White card base
  • Heat gun
  • Brayer
  • Water mister
  • Stamps: Stampin’Up: Party Pandas
  • Stencils: Circle stencil
  • TCW: Botanical Garden (6”x6”)
  • Scissors
  • Glue
  • Double-sided tape

See How VersaFine Ink Can Be Used with Copic Markers and Stenciling

by Melissa Andrew

Today, I share how to use VersaFine Clair in multiple ways! This fabulous pigment ink allows for crisp clean stamping, stenciling, and layering. It works wonderfully for embossing sentiments “I am So Sorry” on vellum for sympathy cards and can be used under mediums such as Creative Medium. I stamped a teddy bear image with Memento ink and used Copic Markers for coloring, however, VersaFine can layer on top of the Copic coloring. See how I use VersaFine carefully with Alcohol Markers.

Skill: Intermediate
Time: 30 minutes

Directions

Supplies

Imagine
Other
  • Whimsy Stamps – Hugs Bunny Clear stamp set
  • Copic markers
  • Cardstock – white, blue
  • Bristol Smooth cardstock
  • Vellum
  • Paper Trimmer
  • Heat Tool
  • Stencil

Learn How To Make Your Own Beads Using Light Weight Clay

by Kyriakos Pachadiroglou

Make bead pearls out of lightweight clay to use in jewelry pieces. The pearls have a marble-like effect that was made using the Radiant Neon Electric Coral ink pad and the help of Imagine Craft Mat. The intense of the coral color can lighter or darker by allowing the clay to absorb the relative amount of ink when it is rolled on the Craft Mat.

Skill: Beginner
Time: 45 minutes + drying time

Directions


Step 1

Heavily stamp with the Radiant Neon in Electric Coral ink pad on Imagine’s Craft Mat.


Step 2

Roll on the inked surface a piece of lightweight clay formed into cord-like shape. Form a ball/large pearl in your palms. Continue making more large pearls.


Step 3

When you finish forming the pearls, and before the clay dries, use a piercing tool to open holes through the pearls. Make sure that they are well opened to allow easy access to the cord.


Step 4

When the clay dries, pass the pearls and the metallic beads in alternate order on the waxed cord. Add end clasps and lobster hook at the ends of the cord.


Step 5

For the earrings pass a bead and a pearl in flat head jewelry pin and using the round nose pliers attached on the earring hook.

Supplies

Imagine
Other
  • Lightweight clay
  • Jump rings, lobster hook
  • Earring hooks
  • Metallic beads
  • Waxed cord
  • Piercing tool
  • Pliers

How To Make A CAS Layered Card

by Nadine Carlier

CAS Layered Card by Nadine Carlier IC

Brillance Pearlescent Coral was the perfect ink for the delicate flowers on my CAS layered card. Watch my video below to see how easy it was to create. Enjoy!

Skill: Beginner
Time: 15 minutes

Supplies

Imagine
Other
  • Gina K Designs Watercolor Flowers Stamp Set
  • Misti
  • String
  • Gemstones
  • Cardstock – White, Gray, Pink

Visit our YouTube Channel for more inspirational videos and subscribe to get updates when we post new videos.