Learn How to Create this Dynamic Looking Ruffle Necklace

by Kyriakos Pachadiroglou

Learn How to Create this Dynamic Looking Ruffle Necklace

In today’s tutorial, I crafted this lightweight ruffle necklace with Sheet Metal pieces and irRESISTible in Cottage Ivy. This necklace can be given as a gift or added to your collection of handmade jewelry.

Time: 1 hour
Skill: Beginner to Intermediate

Directions


Step 1

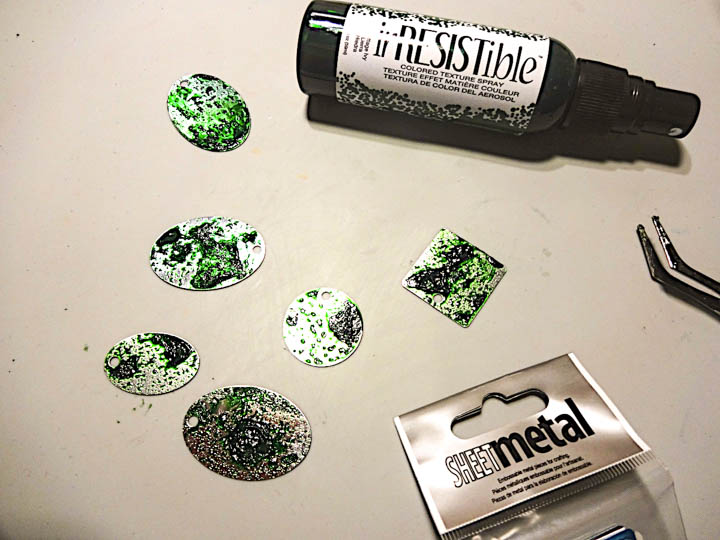
Spray the Sheet Metal pieces with the Irresistible Cottage Ivy color and let them dry. Irresistibles is an acrylic based gel that will adhere to the metal. Allow moderate dry time. Be sure to clean the nozzle after each use.


Step 2

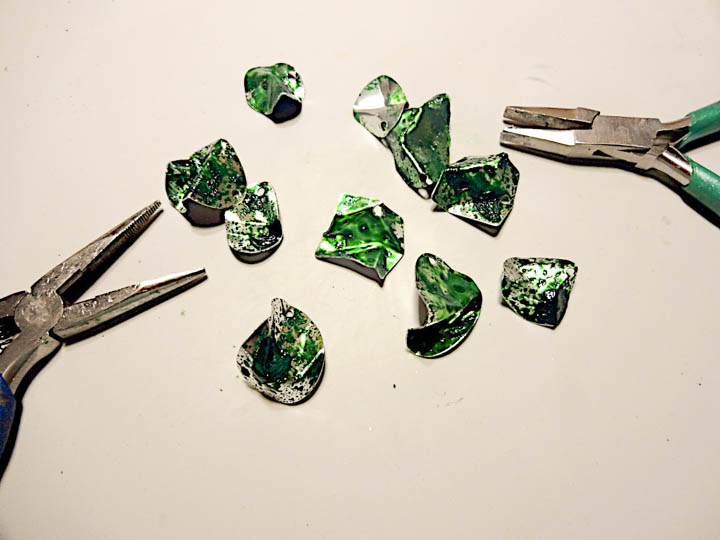
Use pliers to bend and shape the Sheet Metal pieces to any shape avoiding breaking them.


Step 3

Imagine’s Sheet Metal comes with one hole punched at the top. To create the chain, open additional holes to allow jump rings connections. Sheet Metal is durable yet soft enough to punch holes easily.


Step 4

Start connecting the Sheet Metal pieces with jump rings and when you achieve the desired result, add the chain and the ending hooks.

Supplies

Imagine
Other
  • Jewelry chain, jump rings and hooks
  • Pliers
  • Piercing tool (or round hole punch)

Learn How To Make A 3D Cube Jewelry Element Using StazOn Pigment

by Kyriakos Pachadiroglou

Learn How To Make A 3D Cube Jewelry Element Using Stazon Pigment

“In geometry, a cube is a three-dimensional solid object”, according to Wikipedia, and that’s exactly what I was aiming for in creating a unique jewelry piece. The perfectly flat and square Sheet metal pieces were the best option to build a cube that would make a modern, out of the ordinary, piece of jewelry. The shiny surface of the Sheet metal was slightly moderated by pressing the metal pieces on the StazOn Pigment ink pad surface that gave a patterned result. Adding stamped designs using VersaMark and black Mboss embossing powder to the sides of the cube created a lovely contrast between the silver, white and black colors in the piece.

Skill: Intermediate
Time: 1.5 hours

Directions


Step 1

Press the Sheet Metal shapes on the StazOn Pigment Inkpad in Snowflake and remove carefully to avoid sliding on the surface. Let them dry (it really doesn’t take long).


Step 2

Align the Sheet Metal shapes on a stamping platform with the butterfly stamp. Make sure the corners with holes meet. Cover with the VersaMark Watermark inkpad and press.


Step 3

Cover with the Mboss Embossing Powder in Black and heat set. Let cool before touching.


Step 4

Align the metal pieces with the stamped side downwards and apply hot glue on the joint edges. Quickly fold to create an L shape.


Step 5

Continue adding metal pieces by gluing on the un-decorated side of them. There should be corners with 3 holes lined up together on opposing corners of the cube.


Step 6

Cut 16 inches long pieces of the cord and pass them through the holes.


Step 7

Add beads on both sides.


Step 8

Set jewelry clasps and align length.

Supplies

Imagine
Other
  • Waxed cord
  • Jewelry beads
  • Jewelry peices – clasps, jump rings, caps
  • Jewelry Pliers
  • Heat tool
  • Hot glue gun and glue
  • Stamping platform (optional)
  • Kaiserkraft – Tigerlily stamps

Learn How to Color Metal for a Jewelry Making Project

by Kyriakos Pachadiroglou

Learn How to Color Metal for a Jewelry Making Project

The sun turned into a square! Capture the colors of the sun on faux enamel jewelry piece with a marbled pattern. Decorate the Imagine’s Sheet Metal in the squares shapes with a mix of irRESISTible colors and create a marble design that is covered with clear Mboss embossing powder to protect and give the impression of enamel.

Skill: Beginner
Time: 1 hour

Directions


Step 1

Cover the square Sheet Metal shapes with the irRESISTible in Gold, mixing the gel with a bamboo skewer or toothpick.


Step 2

Add drops of the irRESISTible in Tangelo and mix in circular motions with a bamboo skewer. Let the paint dry well.


Step 3

Press the square shapes on the VersaMark inkpad, cover with Mboss embossing powder and heat set.


Step 4

Turn over to the other side of the Sheet Metal shapes, cover with StazOn Sunflower Yellow.


Step 5

Cover with GlazOn Vintage to secure the color. This is very important to use GlazOn in between uses because StazOn solvent qualities react with other layers of StazOn. In other words, you will erase or lift the color you just laid down.


Step 6

Cut 20-inch long cord pieces, pass it through a jump ring and inside the Sheet Metal shape hole. Add a gold colored bead.


Step 7

Continue with the rest of the pieces and secure all the cords together with a jump ring creating a stop.


Step 8

Cut 20-inch long cord pieces, pass them between the shapes and the previous stop jump ring. Braid the cords and secure all the edges with jewelry caps and clasps.

Supplies

Imagine
Other
  • Bamboo skewers
  • Heat tool
  • Black waxed cord
  • Jewelry clasps, jump rings, lobster locks

Learn How To Color Jewelry Charms With Embossing Powder

by Kyriakos Pachadirolgou

Learn How To Color Jewelry Charms With Embossing Powder

With summer being just around the corner, be ready by making a sea-themed bracelet for your vacation swag. Use the Mboss embossing powders to cover metallic charms, such as starfish, seahorses, and anchors, to add color to them. This tecnique is simple and not too demanding to make; match it to your color palette of choice and add even more Mboss-ed charms.

Skill: Advanced
Time: 1 hour

Directions


Step 1

Press the metallic sea-themed charms on the VersaMark watermark ink pad, cover with the different colors of Mboss embossing powders and heat set. The VersaMark is a tacky ink and will stick to the metal charms long enough to receive the embossing powder.


Step 2

Cut 3 x 10 inch long pieces of the wax cord (you will adjust the length of the bracelet later) and secure them at one edge.


Step 3

Add just a small drop of On Point Glue to the other edge of the cords to keep them from fringing.


Step 4

Start adding beads and the charms you covered with Mboss Embossing Powder in step one to each of the three cords.


Step 5

When you have about 2 inches of the cords filled with beads and charms, place all cords through a large hole bead. This will give your bracelet some nice structure, but it is an optional step. Repeat steps four and five until you have around 7 inches of bracelet.


Step 6

Continue adding beads and charms and at 7 inches long secure the edges and add the closing caps. Adding a chain to once cap will make the the length of the bracelet adjustable. Add the hook to the other cap.

Never made jewelry before? Click here to see a post about some basics of jewelry making.

Supplies

Imagine
Other
  • Heat tool
  • Glass and metallic beads
  • Sea themed metallic charms
  • Jewelry clasps, hooks, lobster locks, chain
  • Waxed purple cord
  • Pliers

See How to Create Beautiful Coral Themed Jewelry Charms

by Roni Johnson

See How to Create Beautiful Coral Themed Jewelry Charms

I was so excited when I found out the color of the month was Pantone’s Color of the Year for 2019 – Living Coral. Why? Well, this color brings to mind summer, the beach and warm temps, something that I’m all for at the moment. I used the Coral Ultimate Pigment Refill on SHEET Metal circle charms as my jumping off point. I decided it would be fun to add a bit of blue sky using the Versa Magic Ink Sea Breeze and the sparkle of the water with irRESISTible Pico Embellisher – Shimmer to these Charming Coral pieces as well.

Skill: Intermediate
Time: 1 hour

Directions


Step 1

Pounce VersaMagic pigment ink in SeaBreeze and VersaColor inker in Coral (see link below) onto the circle pieces. Sprinkle the charm with clear embossing powder; shake off excess and return it to the jar. Heat the embossing powder to melt.


Step 2

Use a Sponge Dauber to apply Jet Black StazOn ink around the edge of the charm.


Step 3

Stamp desired texture onto the charms using Jet Black StazOn ink.


Step 4

Glue shell charm to small circle using On Point Glue. Cover each charm with a layer of Shimmer irRESISTible Pico Embellisher and let dry.


Step 5

Use jewelry tools to secure both charms to the other; add additional charms or beads as desired. Thread charms onto a ball chain necklace.

BONUS!!

I had so much fun making the first set of charms I just kept going. This time I decided to ink up a few fender washers. These charms were made using the same technique as above using steps 1-3. Antiqued copper charms and findings to finish off the washers.

Supplies

Imagine
Other
  • Just For Fun Rubber Stamps – Crackle Stamp
  • Jewelry Findings
  • Jewelry Tools
  • Aleene’s Platinum Bond – Glass & Bead

Learn How To Make Your Own Beads Using Light Weight Clay

by Kyriakos Pachadiroglou

Make bead pearls out of lightweight clay to use in jewelry pieces. The pearls have a marble-like effect that was made using the Radiant Neon Electric Coral ink pad and the help of Imagine Craft Mat. The intense of the coral color can lighter or darker by allowing the clay to absorb the relative amount of ink when it is rolled on the Craft Mat.

Skill: Beginner
Time: 45 minutes + drying time

Directions


Step 1

Heavily stamp with the Radiant Neon in Electric Coral ink pad on Imagine’s Craft Mat.


Step 2

Roll on the inked surface a piece of lightweight clay formed into cord-like shape. Form a ball/large pearl in your palms. Continue making more large pearls.


Step 3

When you finish forming the pearls, and before the clay dries, use a piercing tool to open holes through the pearls. Make sure that they are well opened to allow easy access to the cord.


Step 4

When the clay dries, pass the pearls and the metallic beads in alternate order on the waxed cord. Add end clasps and lobster hook at the ends of the cord.


Step 5

For the earrings pass a bead and a pearl in flat head jewelry pin and using the round nose pliers attached on the earring hook.

Supplies

Imagine
Other
  • Lightweight clay
  • Jump rings, lobster hook
  • Earring hooks
  • Metallic beads
  • Waxed cord
  • Piercing tool
  • Pliers