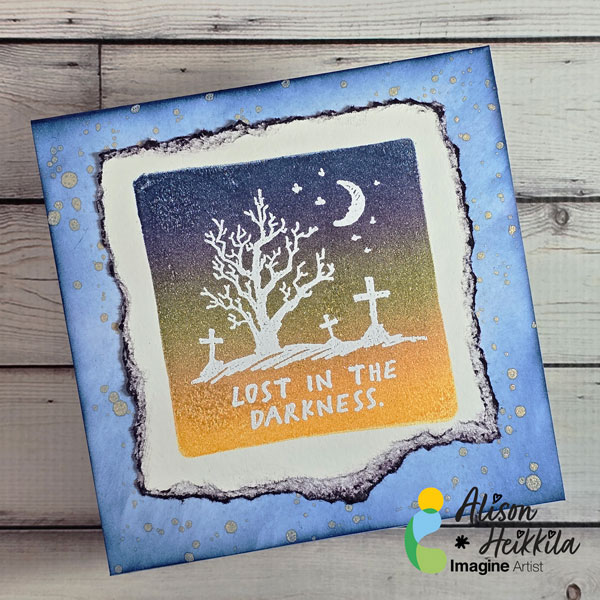
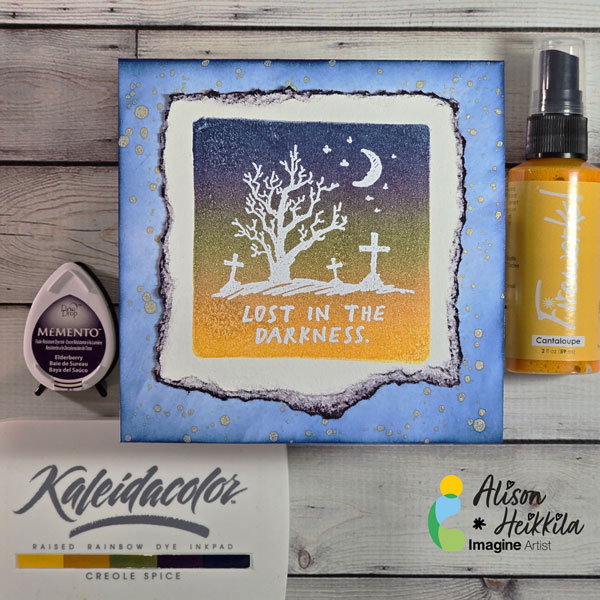
Gold-Embossed Ombre Effect Congrats Card

By LVHandcrafted

Hello friends! This is Linh (or LV Handcrafted on all the socials). This is a fun way to create your own heat embossed ombre effect. I used Delicata ink, which is a pigment ink and remains sticky for period of time to swipe across a white cardstock panel. I made a very solid swatch of ink. Before the ink dried, I covered one end (the bottom) with Mboss powder in gold. I aimed for about 25% of the way up with solid coverage. Then I tipped the panel so the letter “C” is at the bottom and the letter “S” is at the top. Then spooned more Mboss powder from one and and further tipped the panel so it runs down the panel to create that graduated, ombre effect. 

When I make panels like this, I really want the panel and the effect to shine, so I like to keep the rest of the card really simple. These word dies are wonderful because they are so big, they nearly take up the entire card. And with a panel this beautiful, I save everything and made a second card using the negative effect of the word die. 

NOTE: In the video, you will actually see me create a smaller panel that I decided against using. I used a Sakura glue pen to draw a design over the Delicata-inked panel and then poured Mboss powder over it. The glue pen lets you draw or write anything you want and have that lovely embossed effect.

Skill: Intermediate

Time: 15 minutes

Supplies Used

Imagine:

• Mboss Powder in Gold

• Delicata Ink in Pink Shimmer

• On Point Glue

Other Products Used

• Spellbinders Congrats Die

• Hammermill 100lb white card stock (card base)

Create a Double Embossed Wedding/Anniversary Card

By Katy Ingram

Hello Friends! Katy here and today I am excited to share this really cool background technique.

In today’s video tutorial I am sharing how I use a 3D embossing folder and iridescent opaque Mboss embossing powder to create a wedding or anniversary card. The colors I chose definitely give me a beachy vibe and I am loving it!

Katy

Skill: Intermediate, Advanced

Time: 15-20 minutes

Art Supplies

Imagine Products

• Memento Ink: Summer Sky, Teal Zeal and Nautical Blue

• VersaFine Clair: Warm Breeze

• VersaMark Ink

• Mboss Embossing Powder –  Iridescent Opaque

• On Point Glue

• Tear It! Tape

Other Products Used

Tim Holtz/Sizzix 3D Embossing Folder Doily

White Card Stock

Kitchen Sponge

Kraft/Oatmeal Card Stock- Card Base

White Card Stock- Layering

Pearl Vellum (foliage)

The Greetery Pretty Postmarks (text stamping)

The Greetery Lovely Silhouettes Die (Love)

Spellbinders Mini Everyday Sentiments Hot Foil Plate (always and forever)

Spellbinders Hot Foil Skybright

Kat Scrappiness Leaf Dies

Pinkfresh Studio Leafy Branch Die

May Arts Twine – Ivory

Get Messy With Embossing – St. Patty’s Day Card

By LV Handcrafted –

Hello friends! This is Linh (or LV Handcrafted on all the socials). I’ve made this St. Patrick’s Day card featuring some messy embossing techniques. Embossing powders aren’t just for stamped images. They are fun for creating a distressed, mixed media effect as well! 

Here I’ve swiped clear VersaMark ink on the border of black cardstock and embossed with gold. In my video, you’ll also see me use gum arabic and water to create a splatter effect and emboss with gold as well. (There’s some beautiful gold splatter beneath the leprechaun).

Skill: Advance

Time: 45 minutes

Supplies Used:

Imagine:

• VersaColor Green Tea

• VersaMark

• StazOn

• Mboss Gold Powder

Other Products Used

• Creative Crafts Double Gatefold Die Set

• Creative Crafts Nested Oval Dies

• Tonic Studios Handmade Cotton Paper

• Astrobright 80lb Black Cardstock

• Artful Angel Leaping Leprechaun Stamp Set

• Hammermill 100lb white card stock (card base)

• Ohuhu Alcohol Markers

Create a Dramatic Anniversary Card with Multi Layers of Metallic Shimmer

2022-Jan-Neva-Anniversary_blog

By Neva Cole –

Today’s tutorial will demonstrate how to create multi layers of texture for a dramatic Anniversary Card.  StazOn, Delicata, and Mboss will add amazing levels of metallic shimmer.

Skill:  Beginner

Time:  1 Hour

Directions:

Step 1
Trim white piece of sturdy cardstock to 4 1/8” x 5 3/8”.  I used the backing of a paper pack, that had one shiny white side.  First, I pressure embossed with Sizzix 3-D Textured Impressions Doodle Triangles.  A makeup sponge was used to spread StazOn Metallic inks from re-inkers in Platinum, Silver and Gold randomly around the surface of the card front.  StazOn dries on the sponge and makes it a one-time use tool. StazOn Jet Black ink is gently tapped over the raised portions of the card panel.  Set aside to dry or heat with a heat gun.
Step 2
Using a stamp from my stash (manufacturer unknown) small hearts were stamped randomly in VersaMark ink and heat embossed in Mboss in Valentine.
Step 3
Memento Luxe in Tuxedo Black is used to stamp Taylored Expressions Simple Strips Background sentiments followed by heat embossing with black embossing powder.  The matching die is used to die cut the entire set and five sentiments are selected for the front of the card.
Step 4
Each sentiment strip is inked with Delicata in Silvery Shimmer, Golden Glitz or Ruby Red with an Ink Dauber.  Since the sentiment is embossed, the ink will not change the color.
Step 5
The sentiment strips are backed with white cardstock with the matching backer die.  The edges are inked with Memento Tuxedo Black and an ink blusher to add definition.
Step 6
A Scribble Heart die by Impression Obsession is die cut from white cardstock.  The die is then inked with Versa Mark ink and heat embossed with Mboss in Valentine.
Step 7
A white card base is trimmed to 5 ½” x 8 ½”.  The edges are inked with Memento Tuxedo Black and an ink blusher.
Step 8
The card base is adhered to textured front with TearIt! Tape.  The Heart is adhered with On Point Glue.  The sentiment strips are adhered with dimension foam tape.  A striking masculine anniversary card goal achieved!

Art Supplies

Imagine
Other
  • Sizzix 3-D Textured Impressions Doodle Triangles
  • Make up sponge
  • Background heart stamp (manufacturer unknown)
  • Taylored Expressions Simple Strips Background Sentiments, Die, and Backer Die
  • Impression Obsession Scribble Heart die
  • Dimensional foam adhesive
  • Black and White cardstock
Neva Cole http://snippetscrafter.blogspot.com/ n.cole@windward-performance.com

Learn How to Make an Astrological Card

Astrological-Chart-Card-1200

By Alison Heikkila –

Hello! It’s time for my newest post for Imagine, as an official part of the 2022 Design Team. After the hustle and bustle of the holidays, many of us are wiped out, or even burnt out from making cards and gifts all season. Because of that, I decided to come up with a fast card that doesn’t take a ton of effort, but looks like it did because of the layering.

Skill Level: Beginner
Time: 15 to 20 Minutes

Directions:

Astrological Chart Card 2

Step 1:

Adhere your 3″ x 5″ Gel Press to an acrylic block. While you can adhere it to your work surface, but if it’s attached to a block, you can control where it goes on your printing plate.


Astrological Chart Card 3

Step 2:

Apply Versa Fine Clair Ink in Twilight to the Gel Press Plate. I applied it in rows, but you can do it however you like.

Step 3:

Squeeze on a bit of Silvery Shimmer Delicata reinker. You don’t need too much.


Astrological Chart Card 4

Step 4:

Using a brayer, roll the colors together. Try not to overmix them.


Astrological Chart Card 5

Step 5:

While the inks are still wet, flip the Gel Press Plate on to the printing plate. Since it’s on an acrylic block, you can place the Gel Plate wherever you want easily. Press the Gel Press into the printing plate firmly.

Step 6:

Flip the Gel Press back over, and lay a piece of copy paper on top. This will create your print. Press the paper firmly and evenly all over the plate to get a good transfer.


Astrological Chart Card 6

Step 7:

Carefully peel back the paper to reveal your print. You can place the paper back down before you peel up the entire thing if you feel that you need to transfer the ink more.


Astrological Chart Card 7

Step 8:

After I made 3 more prints, I chose the one I wanted to use on my card. I went with my first print, which is the upper right. I tore the edges around the print instead of trimming it smoothly.


Astrological Chart Card 8

Step 9:

Using an edger die, trim a piece of navy colored cardstock to create a mat around your print.

Step 10:

Using Silvery Shimmer Delicata Ink, ink up the edges of the die cut mat.


Astrological Chart Card 9

Step 11:

On a gray card base, ink the right side with VersaMark ink. Try to not make it even, so that it has a more organic feel.

Step 12:

Sprinkle Mboss in Shimmering Night Sky on to the wet ink. Shake off excess, and heat set with a heat tool.


Astrological Chart Card 10

Step 13:

Adhere your layers. I added a stamped and die cut sentiment, as well as some jewels. For the jewels, I used On Point Glue.


Astrological Chart Card 11 600

The finished card has lots of shine and cool texture. Using your inks and reinkers on a Gel Press Plate gives you the ability to mix colors from different lines and get beautiful, soft effects.


Astrological Chart Card 13 600

Again, using all of these layers may make it seem that this card took a lot of time, but it really didn’t because making the print is such a fast process. And you can choose to use a larger Gel Press Plate to cut down on some of the layers.


Art Supplies:

Imagine:

• VersaFine Clair Ink in Twilight
• Delicata Ink Pad & Reinker in Silvery Shimmer
• VersaMark Ink Pad
• MBoss in Shimmering Night Sky
• On Point Glue
• Craft Mat

Other:

• Gel Press: 3″ x 5″ Plate
• Carabelle Studio: Zodiac Printing Plate
• Speedball: Brayer
• Stampendous: Deckle Die Set, Slim Acrylic Handle
• Pinkfresh Studios: Perfect Sentiments stamp & die set
• Doodles Paper Playground: Silver Starburst Rhinestones
• Gray card base, white copy paper, navy cardstock
• Heat Tool

Create Fall Inspired Cards With VersaFine Clair Inks

November_2021_Katy-Ingram_Fall-Inspired_700x700

By Katy Ingram –

Hello and welcome! Katy here with a new video. Many of you may have noticed from my last couple videos that I use VersaFine Clair Inks a lot and that I love to ink blend with them. Today’s video is no exception. I used two VersaFine Clair Inks that blend beautifully and create the most amazing burnt orange color that is perfect for Fall. In the video I also talk a bit about how to have better success with your ink blending by using Hot Pressed Watercolor Paper and I also show you a simple way to create sentiment strips that are fool proof. I hope you find these tips helpful and I hope you enjoy the video. Thanks so much for watching.

Thanks For Watching.

Skill: Intermediate, Advanced
Time: 30 minutes

Art Supplies:

Imagine

• Delicata Golden Glitz

• Versafine Clair Inks Cheerful, Glamorous and Chianti.

• On Point Glue

• Sheer Shimmer Spritz in Gold

Other Products Used:

• Gina Marie Designs Tribal Stitched Nested Rectangle Dies
• Honey Bee Large Thanks Die set
• Concord & 9th Lace Leaf Stamp & Die Set
• The Greetery Sentiment Suite Thank You stamp set
• Waffle Flower Oversized Hugs Stamp Set
• Altenew Leaf Burst Stencil
• Strathmore 500 Series Hot Pressed Watercolor Paper.
• Gina K Designs Dark Chocolate Cardstock