Get Messy With Embossing – St. Patty’s Day Card

By LV Handcrafted –

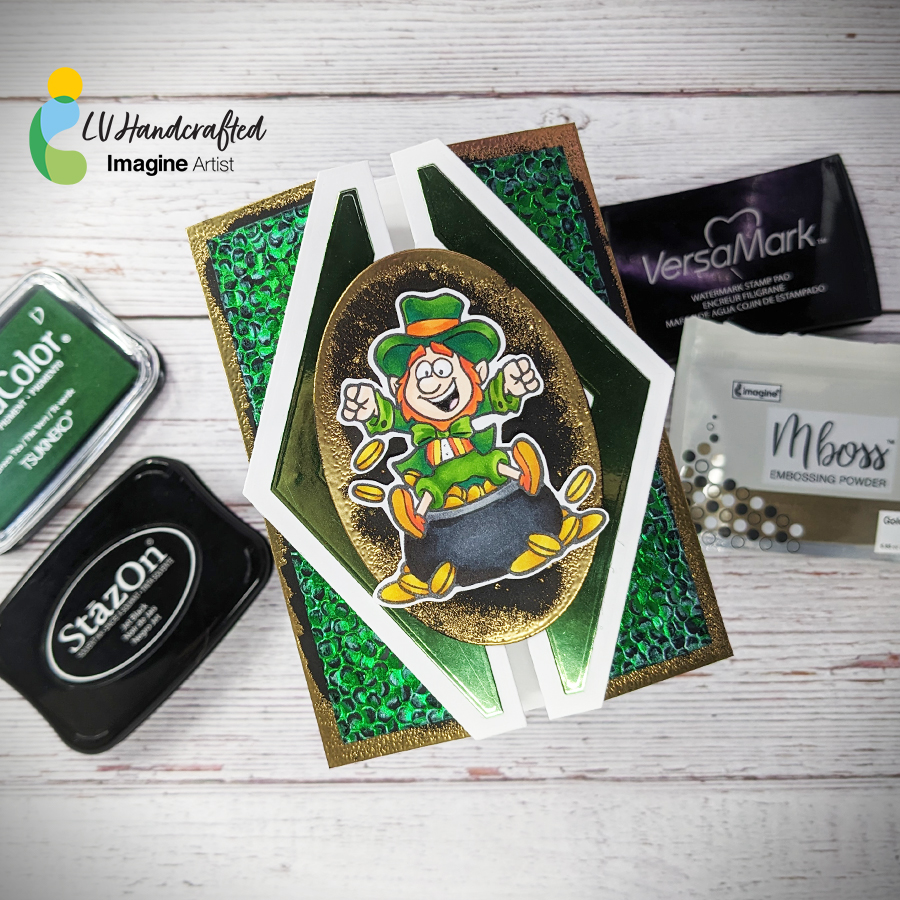
Hello friends! This is Linh (or LV Handcrafted on all the socials). I’ve made this St. Patrick’s Day card featuring some messy embossing techniques. Embossing powders aren’t just for stamped images. They are fun for creating a distressed, mixed media effect as well! 

Here I’ve swiped clear VersaMark ink on the border of black cardstock and embossed with gold. In my video, you’ll also see me use gum arabic and water to create a splatter effect and emboss with gold as well. (There’s some beautiful gold splatter beneath the leprechaun).

Skill: Advance

Time: 45 minutes

Supplies Used:

Imagine:

• VersaColor Green Tea

• VersaMark

• StazOn

• Mboss Gold Powder

Other Products Used

• Creative Crafts Double Gatefold Die Set

• Creative Crafts Nested Oval Dies

• Tonic Studios Handmade Cotton Paper

• Astrobright 80lb Black Cardstock

• Artful Angel Leaping Leprechaun Stamp Set

• Hammermill 100lb white card stock (card base)

• Ohuhu Alcohol Markers

Create a Fun St.Patrick’s Day Card with Fireworks Spray, a Delicata Reinker and Shaving Cream.

By Katy Ingram

Hello my friends! Katy here and today we are going to create a fun St. Patrick’s Day card. In the video tutorial, I show you how to use your Fireworks Sprays and a Delicata Reinker with some shaving cream to create some cool backgrounds. Once the backgrounds are complete, we will use one of them to create a card. I hope you enjoy it.


Art Supplies

Imagine

Fireworks Spray – Pear Tart

Fireworks Spray – Bamboo Leaves

Delicata Reinker  – Emerald Green

Stazon Pigment Ink Pad – Shamrock Green

VersaMark

Mboss Embossing Powder – Gold

Tear it! Tape

Imagine Craft Mat


Other

Kat Scrappiness  – Condensed Uppercase Alphabet Die set

Simon Says Stamp- Lucky Stamp Set

Tim Holtz – Gold Kraftstock

Shaving Cream – Any brand

Stampin Up – Tufted 3D embossing folder

Neenah – Classic Crest Solar White 110 lb Card stock

Double Sided Foam Tape – Any Brand

See How to Make a Set of Gorgeous Green St. Patrick’s Day Cards

by Lisa Mensing

In this video, I showcase the various greens available in the Memento dye inkpads for Shamrock stamps. In addition, I’m sharing a few tips on heat embossing images using Mboss in New Years Eve (beautiful sparkle black powder) plus a quick and simple heat embossed border on St. Patrick’s Day cards. Enjoy!

Skill: Intermediate to Advanced
Time: varies

Supplies

Imagine 
Other
  • Whimsy Stamps – Shamrock Swirl Clear Stamps  
  • Duck Brand Permanent Foam Mounting Tape, Double-Sided
  • Classic Crest Super Smooth Solar White 80# Cover 8.5″x11″
  • “Blending Buddy” White Bristle Blending Brush – Trinity Stamps

Create a Rainbow Themed St Patricks Day Card

st patricks day card with memento ink and delicata
by Annie Collins

This St Patricks Day card has a fun look with spring-themed rainbow stripes and gold elements. See how Delicata and Memento ink work together for this lucky card.

Skill: Intermediate
Time: 20 minutes

Directions

Supplies

Imagine
Other
  • Heidi Swapp Design: Strips Stencil
  • CC Designs: Lucky Clover Stamp
  • CC Designs: Lucky Rainbow Sentiments: You are the Pot of Gold at the end of my Rainbow
  • Darice: Gold Sequins
  • Recollections Brand 110lb: White Cardstock
  • Acrylic Block
  • Jewel picker up
  • Trimmer


Create an “Irish for a Day” Card for St Patrick’s Day

by Jowilna Nolte

Create an "Irish for a Day" Card for St Patrick's Day using Tsukineko's VersaMagic and Brilliance DewDrops.

Are you feeling lucky? At least for a day you can be Irish and take your inspiration from the many shades of greens available in the Tsukineko and Imagine stable. Today’s card features some of my favorite greens for an interesting and less grass green version of this famous holiday. Take a look at how I created this fun effect.

Skill: Intermediate
Time: 1 hour

Directions


Step 1

On a large background stamp using VersaMagic in Aloe Vera, apply the ink in a tapping motion across certain sections over the stamp only.


Step 2

Add a second green ink over the remainder of the ink surface. I used Brilliance in Pearlescent Thyme to add some sparkle and shimmer.


Step 3

Carefully lay the cardstock piece onto the surface of the stamp and apply pressure by rubbing your palm over the surface. This is a lot easier to transfer the image onto the cardstock due to the nature of this stamp size and design. Remove to reveal the image.


Step 4

Use a small soft paint brush and All-Purpose Ink in Spring Green to add green paint splats. Add additional Walnut Ink splats onto the background as well.


Step 5

Cut out flowers and a cloverleaf from patterned paper and adhere to the stamped panel. Add a typed sentiment over the stem of the cloverleaf. Ad diamanté to finish off the card. Sew around the edges for texture and detail.

Supplies

Imagine
Other
  • Cardstock – White
  • Carabelle Studio – stamps
  • Sewing machine
  • Kaisercraft Paper
  • Simple Stories –  Washi Tape

Embossed Celtic Knot Card

by Roni Johnson


Happy St Patrick’s Day! On this day, many are wearing green, eating corned beef and (if you are of drinking age) having a green beer! I decided to make a card featuring a Celtic knot, texture, 4-leaf clovers and a gold ribbon. It is so much fun to experiment with the supplies I had on hand which is exactly what I did to create this highly textured card. I had never heated the Creative Medium but I thought it would be worth a shot to see how it performed under high heat. As you can see from the photo it looks amazing and bubbles through the embossing powders to create a lovely hammered texture look. Perfect for Gold Embossing!

Skill: Intermediate
Time: 1.5 hours + cool-down time

Directions

Step 1

Tape black cardstock panel to work surface. Position stencil and tape in place. Use a spatula to spread Gold Creative Medium over the entire card panel.

Step 2

Carefully peel off the stencil. Wash the excess Creative Medium off immediately (very important).

Step 3

Sprinkle Verdigris and Gold Embossing Powders over the Creative Medium. Shake off excess.

Step 4

Heat the embossing powder and Creative Medium until the embossing powders melt and the Creative Medium begins to bubble up. You may continue to heat until satisfied with the texture. Set aside to cool. Do not touch until cool!  The Embossing Powder and Creative Medium will be extremely hot at this point.

Step 5

Die-cut pieces to be added to the card.

Step 6

Use Sponge Dauber to color the clover with Pear Tart, Bamboo Stalk, and Ivy Cottage Memento Ink. Sponge Delicata Golden Glitz on the leafy branches. Bend the small hearts in half and affix to the darker clover pieces using On Point Glue.


Step 7

Bend the small hearts in half and affix to the darker clover pieces using On Point Glue.  Mount bubble embossed panel on a plain black card. To finish the overall design, affix the ribbon to the card using Tear It Tape and glue on die-cuts on the embossed panel using On Point Glue.

Supplies

Imagine
Other
  • ClubScrap.com – Stencil
  • Ribbon
  • Die cuts
  • Cardstock – black, copper

Save