Letterpress Technique with Embossing Folders and Memento Dye Inks

Letterpress Technique with Embossing Folders and Memento Dye Inks

by Lisa Mensing

In this video, Lisa shares how to use everyday embossing folders to create fun Halloween backgrounds by using the letterpress technique with several different styles plus she shares a few tips along the way.

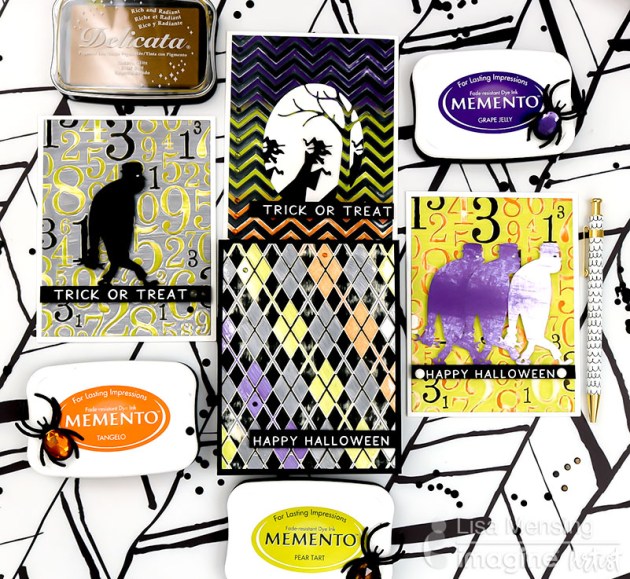
Use Memento dye inks with direct-to-paper techniques to create a distressed look across several card backgrounds such as a numbers theme, an Argyle plaid theme, and a chevron style. These matching trick or treat cards are perfect to pair with candy and gifts for Fall!

Skill: Advanced
Time: 10 minutes per card

Directions

Art Supplies

Other

  • EK Success POWDER TOOL Applicator 54-04002
  • Sirio Ultra Black | Cardstock Warehouse Paper Company Inc
  • CLASSIC CREST Avalanche White Card Stock – 8 1/2 x 11 in 100 lb Cover Smooth 250 per Package
  • Wagner HT400 Precision Heat Tool-0503038 
  • Hero Arts Nesting RECTANGLE DIES DI198
  • Journey Platinum Machine w/Plates
  • Embossing Folder – Take a Number
  • Darice Argyle Embossing Folder, 5-Inch by 7-Inch
  • Darice 1218-96 Embossing Folder, 5 by 7-Inch, Chevron
  • Copic Sketch Marker – Special Black 110
  • Whimsy Stamps – NEW Monster Parade Die Set 
  • FaBOOlous Sentiments – 4×6 Stamp Set

Create Beautiful Designs with Gold Rinea Foil and StazOn Ink

by Iris Rodriguez

This month we have the fun challenge to make projects using Rinea foils. There are so many fun things you can do with these foils; you can stamp on it, paint, use with mediums or create 3D decorative projects. I like how the gold foil and black look together. For my card, I used Imagine’s GlazOn to seal the foil; it protects the foil and acts as a primer, which allows the ink to better adhere. I stenciled in my design with StazOn ink.

Skill: Beginner
Time: 30 minutes

Directions


Step 1

Seal the Gold Rinea foil with Light Gloss or Glossy GlazOn. It protects the foil and acts as a primer, which allows the ink to better adhere. Allow the GlazOn to dry, it dries very fast.


Step 2

Determine the size of your sentiment. I stamped the sentiment with individual alphabet stamps. If you’re doing the same, stamp the whole on a scratch piece of paper to determine the size. Rip apart a scratch piece of paper to a size that will fit the height of the sentiment, plus a little space above and below it. Place the paper about 2/3 down from the top of the foil. The paper will protect the area where the sentiment will be stamped.


Step 3

Using an InkBlusher and Jet Black StazOn ink, stencil the design onto the foil.


Step 4

Stamp the sentiment. Assemble the card. I hope you enjoyed this project and will give it a try. You can count on us to keep bringing you card making and mixed media project ideas, keep visiting the Imagine blog.

Supplies

Imagine
Other
  • Rinea Foils – Glossy Ebony and Gold Pack
  • Cardstock paper-Black
  • Crafter’s Workshop stencils- Numbers – (6×6 inches)
  • Alphabet stamps