Make a Birthday Card Using Multiple Stencils

By Alison Heikkila –

Hello! Since birthdays happen all year, it’s good to have a big stash of birthday cards at the ready for whenever you need one. Since I love to use stencils, I thought I would use a bunch of them together with many colors of Memento Inks from Imagine.

*Some affiliate links are used in this post. That means that if you shop through these links, I may receive a small compensation, at no cost to you. For more information, please see my Affiliates page, where I also have some coupon codes.

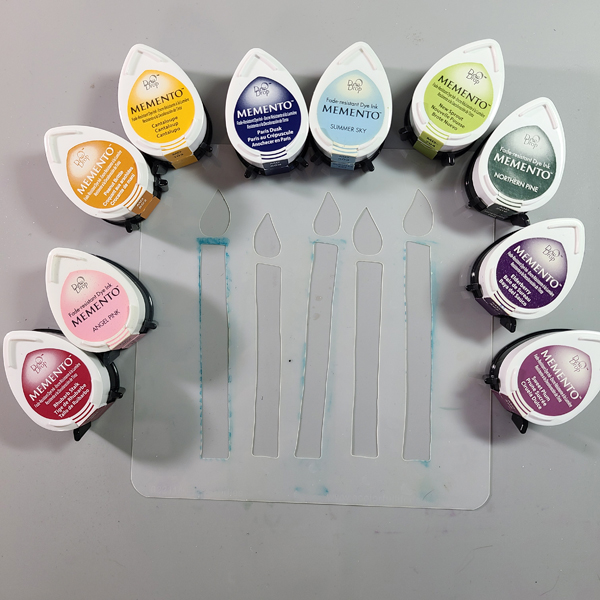
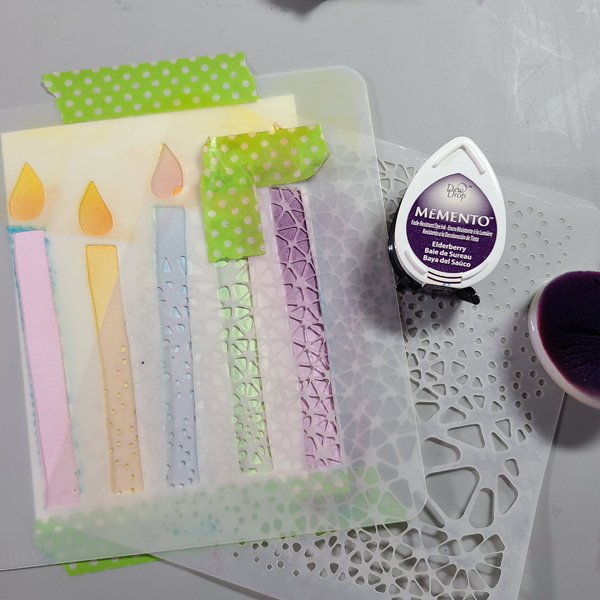
I chose a light color and a dark color Memento Ink for each candle of the Big Candle stencil. 

Step 1:

Step 1: Use washi or low tack tape to stick down your cardstock and stencil. Mask off any areas that you don’t want your first color of ink on. I masked off the second candle and the flames. 
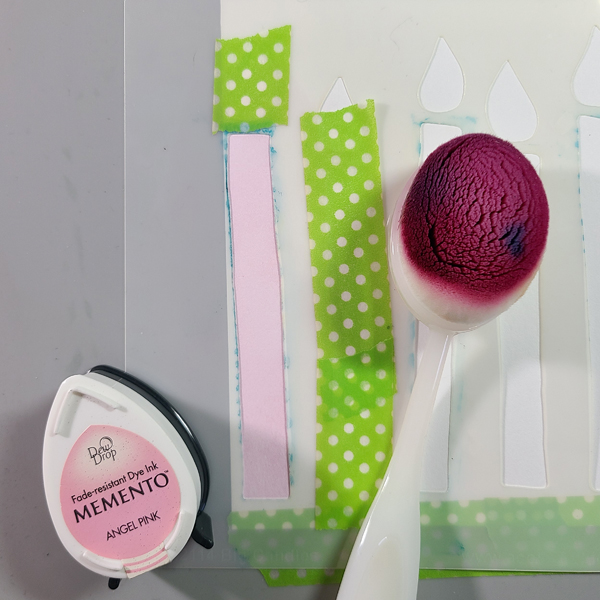
Step 2:

Ink the candles with the lighter color from the pairs you chose. Be sure to mask off the areas that you don’t want your ink to go.
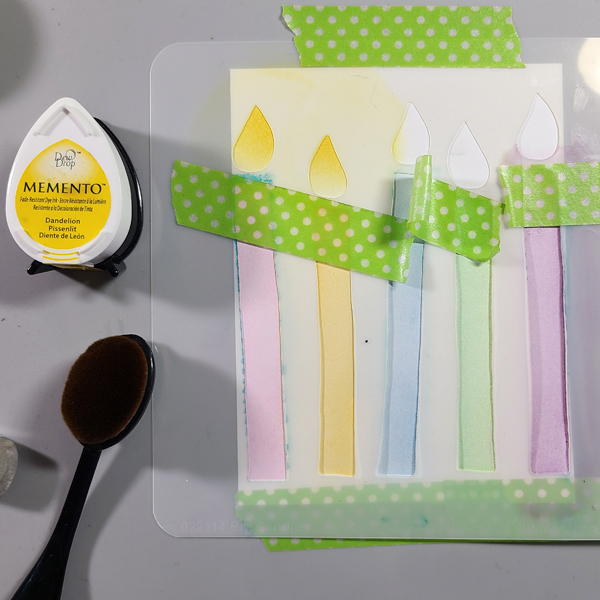
Step 3:

Mask off the candles so that you can ink the flames. I used Dandelion on the entire flame, and then Tangelo on the lower area of the flame.

Step 4:

Choose the stencils you want to decorate each candle with and ink with the darker shades you chose. You must keep the original candle stencil in place so that you only ink the candle. Slip the patterned stencil under the candle stencil to make inking easy. Be sure to mask off the other areas again! 

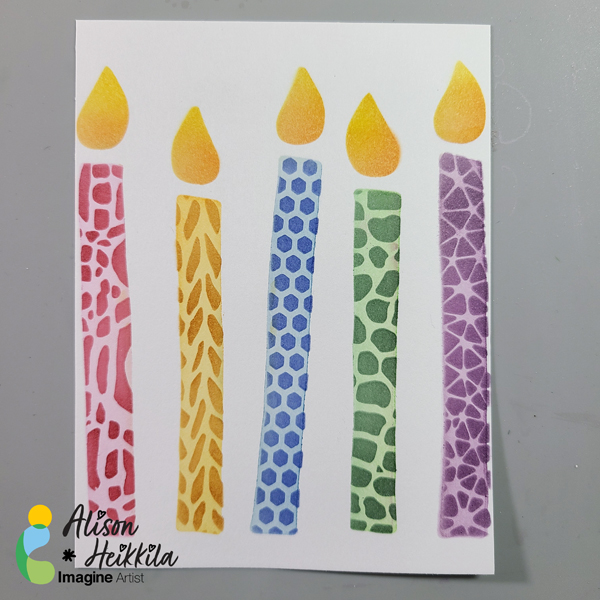
This is what the completed candles look like. You can stop here, if you want, but I kept going to make it even more festive!

Step 5:

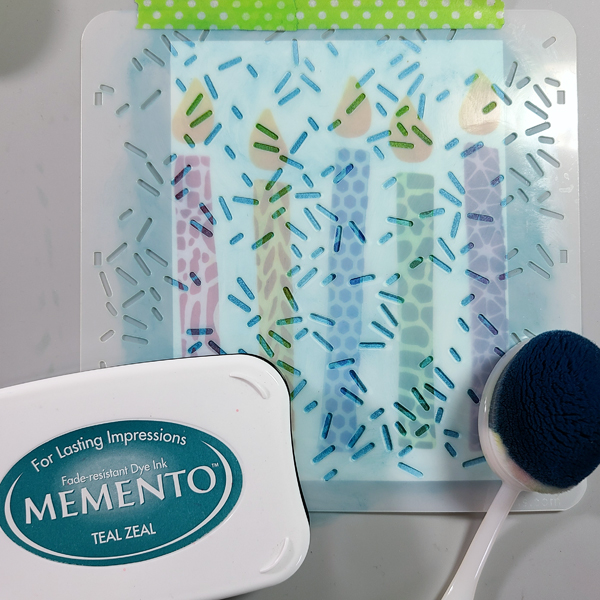
Ink a stencil that looks like confetti or sprinkles on top of the entire panel.

Step 6:

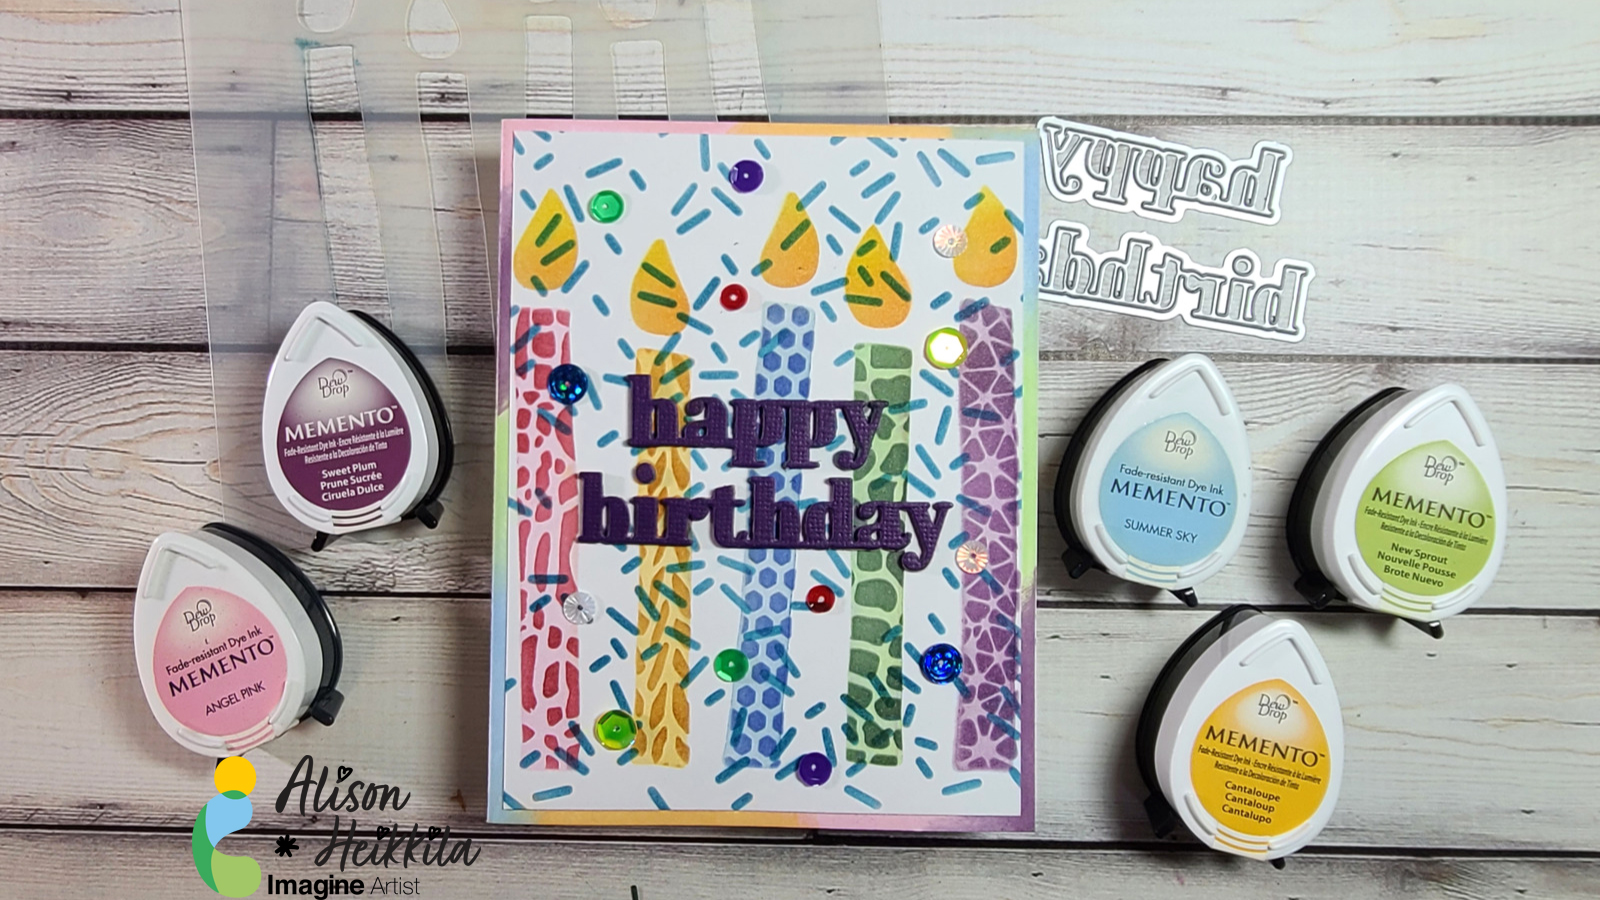
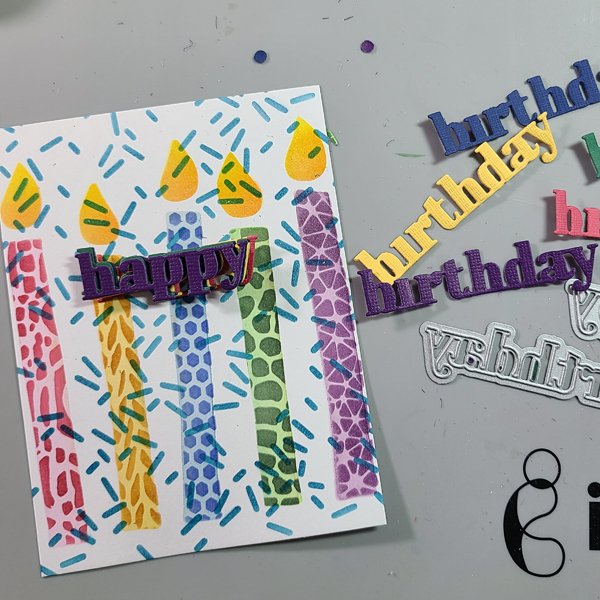
Die cut your sentiment. First, I was only going to die cut my “happy birthday” out of purple, but I decided to cut one sentiment out of each main candle color so that I can have a stacked, 3D embellishment. You can glue these together with On Point Glue. 

Step 7:

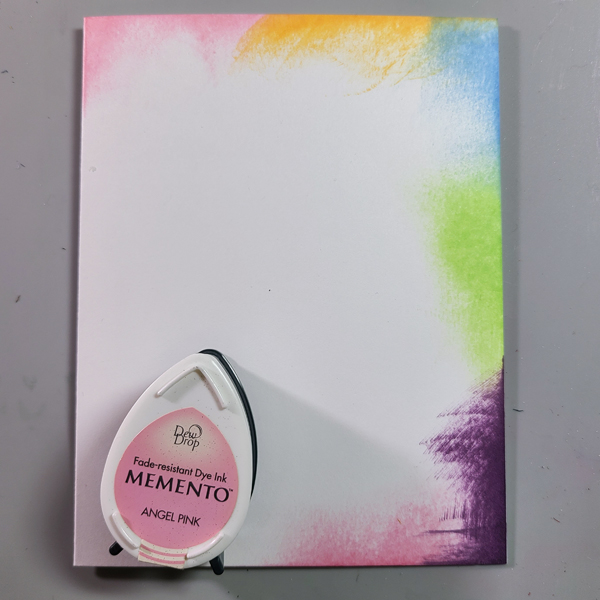
Ink your card base using the lighter colors of Memento Ink, directly from the pad. I worked my way around my palette of colors two times. 

Step 8:

Glue the card front and sentiment on to the card base. Optional: Add sequins or rhinestones to the card front with On Point Glue. 

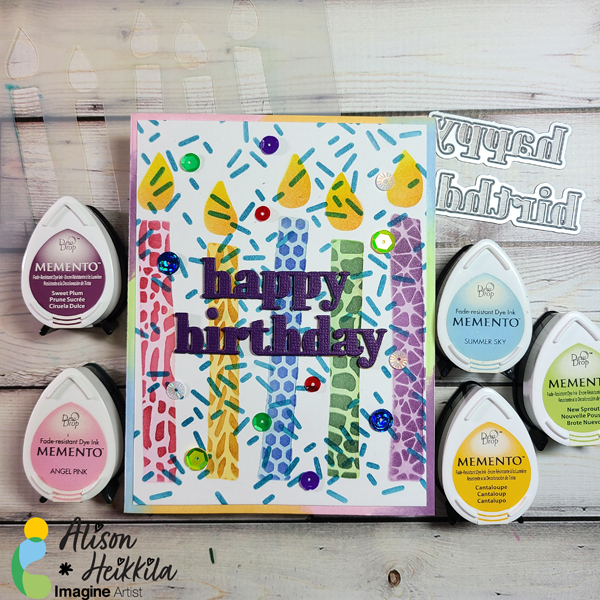
Here is the finished card! I love how happy it is, and it can easily work for anyone. It’s fun to work with so many colors and so many patterns of stencils, all on one project. I hope that you break out some of your stencils and try this technique! Thanks for stopping by. Have an inspiring day!

Supplies Used:

Imagine:

Memento Ink: Angel Pink, Rhubarb Stalk, Cantaloupe, Peanut Brittle, Summer Sky, Paris Dusk, New Sprout, Northern Pine, Sweet Plum, Elderberry, Dandelion, Tangelo, Teal Zeal

On Point Glue

Other:

A Colorful Life Designs: Big Candles, Milky Way, Cozy Knit, Primative Batik, Crocodile, Teeny Honeycomb, Layered Party 1

Simon Says Stamp: Happy Birthday Die

The Rabbit Hole Designs: Cotton Tail Blending Brushes

Sequins

Washi/Low Tack Tape

White Cardstock

Learn to Decorate a Candle with Your Holiday Stamps

by Neva Cole

Learn to Decorate a Candle with Your Holiday Stamps. StazOn - Forest Green, Blazing Red, Jet Black, Royal Purple, Azure

This project originally started out as the Evergreen challenge but then morphed into much more than that! Very simple and quick to create, and a great hostess gift as well. You can use regular candles, or the LED wax version.

The tall Christmas Tree pillar candle is the real deal wax candle. The images are stamped on white tissue paper in StazOn Forest Green and Blazing Red and then gently fussy cut. (Note, you will want extra paper or a Craft Mat under the tissue paper as the ink WILL bleed through.)

Place the image in desired position and gently heat with a heat gun. Smooth the tissue paper down into the melted wax and smooth edges of wax with fingers. The tissue paper becomes translucent in the melted wax.

The snowman and angel candles are both the LED versions. The snowmen were stamped in StazOn Jet Black and colored with Fabrico markers. The images were die cut with a layer of cardstock underneath to cut the tissue more cleanly. The images may be reversed when applying to the candle as the color is equally vibrant on both sides. The angels are stamped in StazOn Royal Purple and Azure. All three candles are finished with decorative trim or ribbons with bows.

Learn to Decorate a Candle with Your Holiday Stamps

Supplies

Imagine
  • StazOn – Forest Green, Blazing Red, Jet Black, Royal Purple, Azure
  • Fabrico Markers – Truffle, Bubble Gum, Coal Gray, Tangerine, Pea Pod, Poppy Red
Other
  • Wax or LED candles
  • DeNami Designs—Small Tree, Small Tree Swirl
  • Hampton Arts—Let It Snow Snowmen stamp
  • A Stamp In the Hand—Angel Parade
  • Heat tool
  • Tissue paper
  • Ribbons

Bright Beginnings with All-Purpose Ink

by Elina Stromberg

Imagine Artist Elina Stromberg focuses on bright beginnings in 2017 with a candle set made with Tsukineko’s All Purpose ink and Fantastix.

A new year has started. Let it be filled with love, joy, happiness and sweet memories. To celebrate, I decorated two candles with flowers and a golden 2017 then lit the candles on the New Years Eve to give 2017 a beautiful bright beginning. Candles can easily be decorated with tissue paper. The images are either stamped or hand drawn on thin tissue paper and then attached on the candle with a heat tool. Now I can light them whenever a sweet memory is created this year!

Directions

Imagine Artist Elina Stromberg focuses on bright beginnings in 2017 with a candle set made with Tsukineko’s All Purpose ink and Fantastix. She creates a mask with post-its in this photo.

Step 1

Cut a strip of tissue paper with the length equaling the candle circumference. and the width enough to fit the images.

Step 2

Stamp flower images on post-it notes and cut out to create a stamping mask.

Step 3

Stamp a flower garland onto white tissue paper using Onyx Black VersaFine ink and your masks created in step 2. Place a post-it note mask on the stamped flower to layer the images; images stamped over the mask appear on the background of the protected image. Stamp year on a separate piece of tissue paper using Golden Glitz Delicata ink.

Imagine Artist Elina Stromberg focuses on bright beginnings in 2017 with a candle set made with Tsukineko’s All Purpose ink and Fantastix. Color the flowers with All Purpose ink.
Step 4

Paint flowers and leaves with All-Purpose Inks, using Fantastix brushes.

Imagine Artist Elina Stromberg focuses on bright beginnings in 2017 with a candle set made with Tsukineko’s All Purpose ink and Fantastix.

Step 5

Fussy cut around the layered flower image, leaving a thin border around the flowers. Closed areas between flowers can be left uncut.

Imagine Artist Elina Stromberg focuses on bright beginnings in 2017 with a candle set made with Tsukineko’s All Purpose ink and Fantastix. Use a heat tool to set the image.

Step 6

Place stamped tissue paper on the candle. Heat gently with the heat gun until the candle starts to melt. Melted paraffin wax adheres the tissue paper on the candle, and white tissue paper areas become invisible. Start with the stamped flowers and finish the project with attaching gold colored 2017.

Imagine Artist Elina Stromberg focuses on bright beginnings in 2017 with a candle set made with Tsukineko’s All Purpose ink and Fantastix.

Supplies

Imagine
Other
  • White tissue paper
  • Candle(s)
  • Post-it notes
  • Altenew – Flower stamps
  • Acrylic stamping block
  • Stampers Anonymous – Number stamps
  • Heat gun
  • Scissors

Save

Save

Save

Save

Save