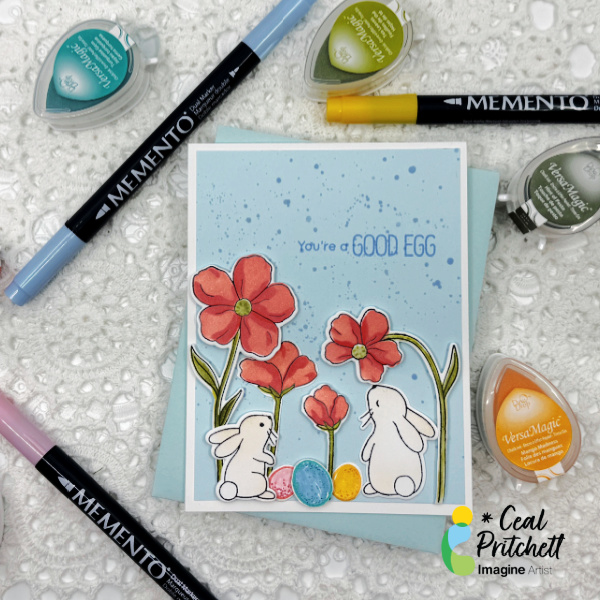
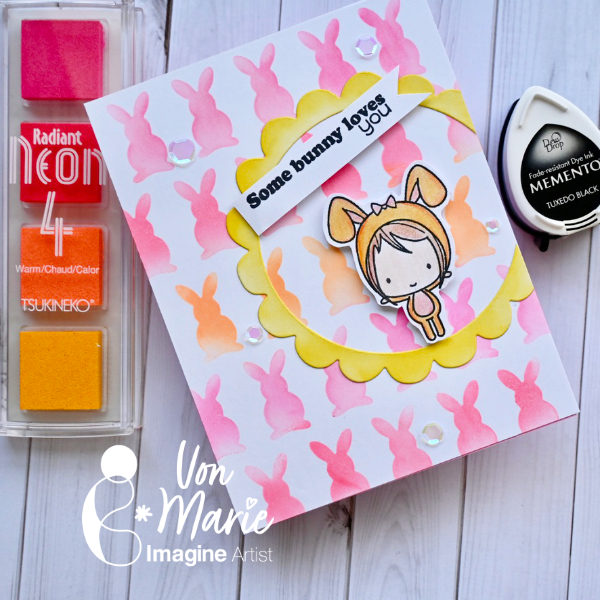
It’s Ceal, here. Today I am sharing how to make this cute Easter card. I love the elements to this card; the flowers are gorgeous, and the bunnies are super cute. You could leave off the eggs and easter sentiment and it becomes a spring card.
Skill: Intermediate to Advanced Time: 45 Minutes
Directions:
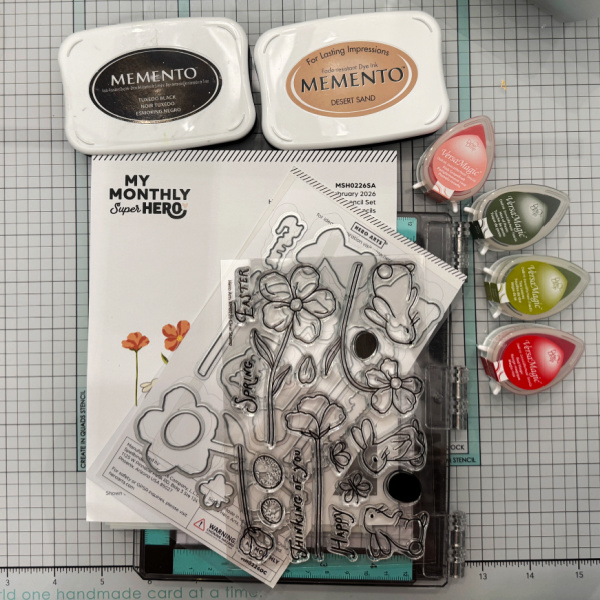
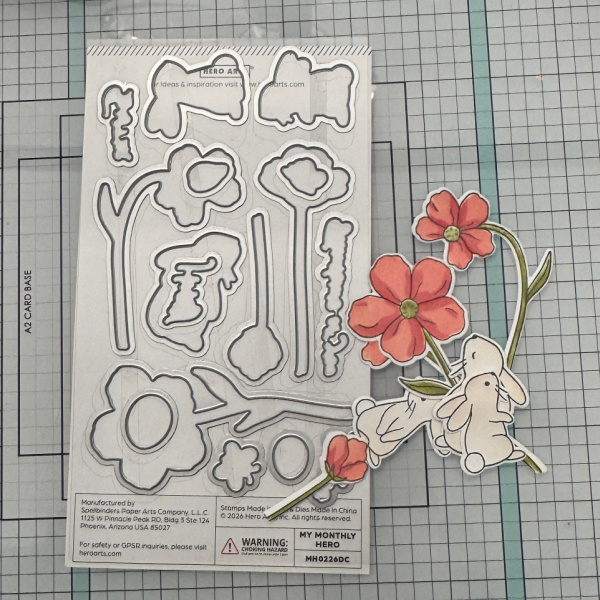
Gather your supplies. To make this card you will need a stamp set that has bunnies, eggs and flowers, along with coordinating dies. Several colors of inks, some markers and a re-inker.
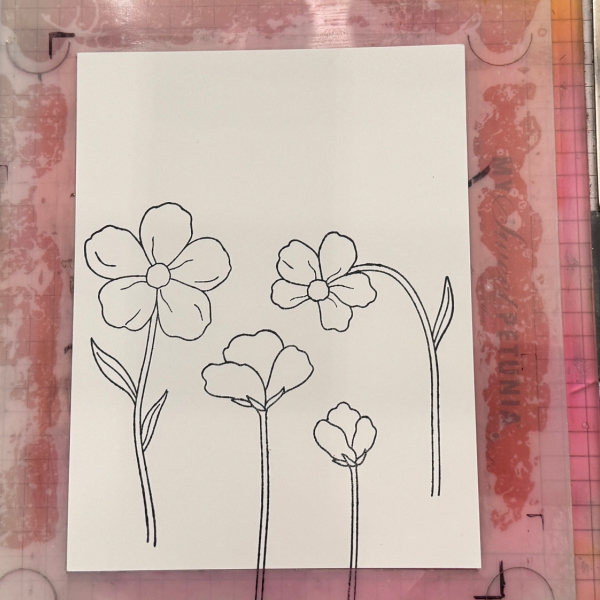
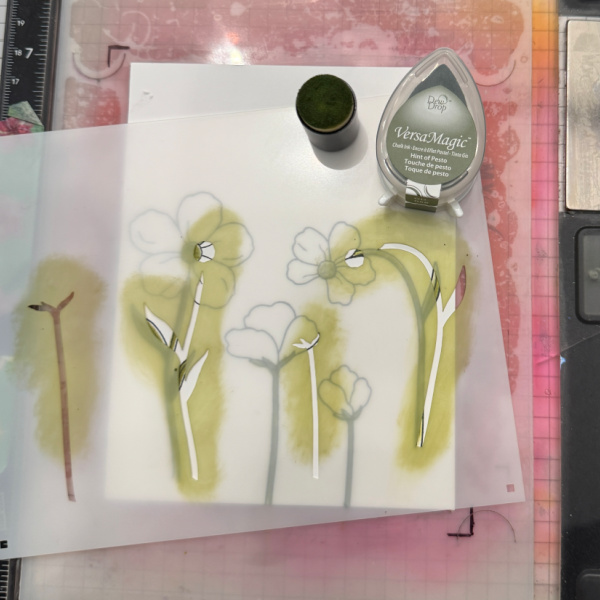
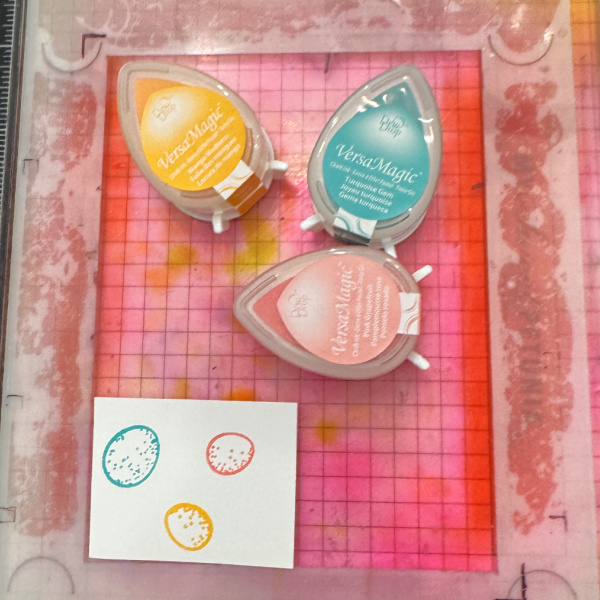
Step 1: Stamp the flowers in a black ink. I used Memento Tuxedo Black
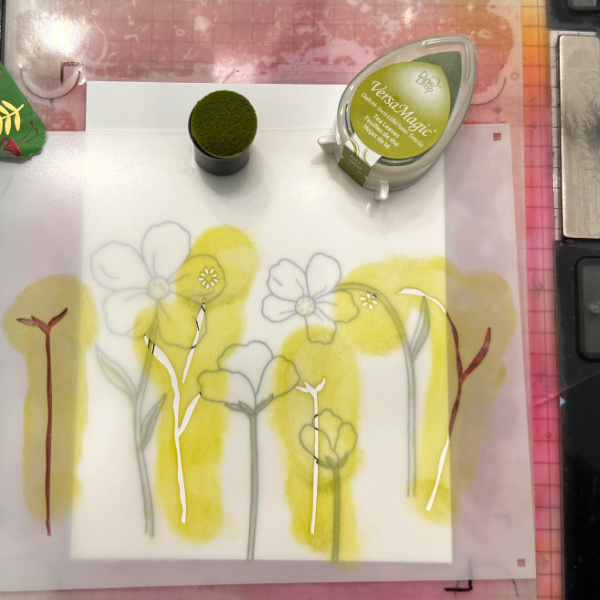
Step 2: Color the flowers using the coordinating stencils. Stencil one is a light green. I used VersaMagic Tea Leaves
Step 2a Stencil two is a darker green. I used VersaMagic Touch of Pesto
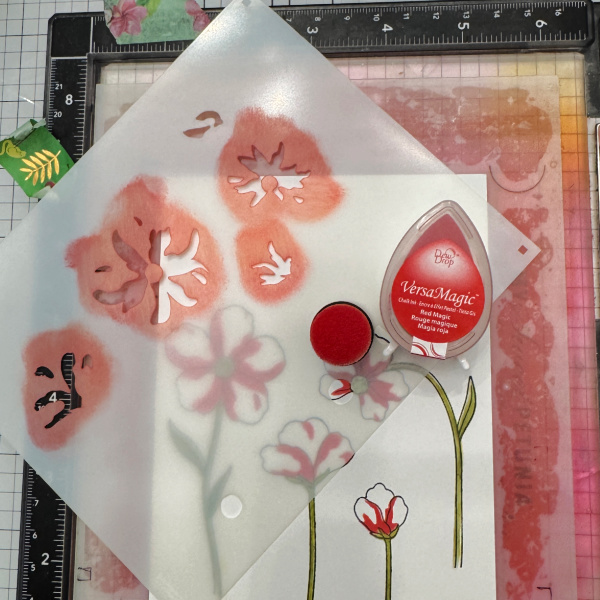
Step 2b:
Stencil three is a dark red. I used VersaMagic Red Magic.
Step 2c: Stencil four is a peachy pink. I used VersaMagic Pink Grapfruit
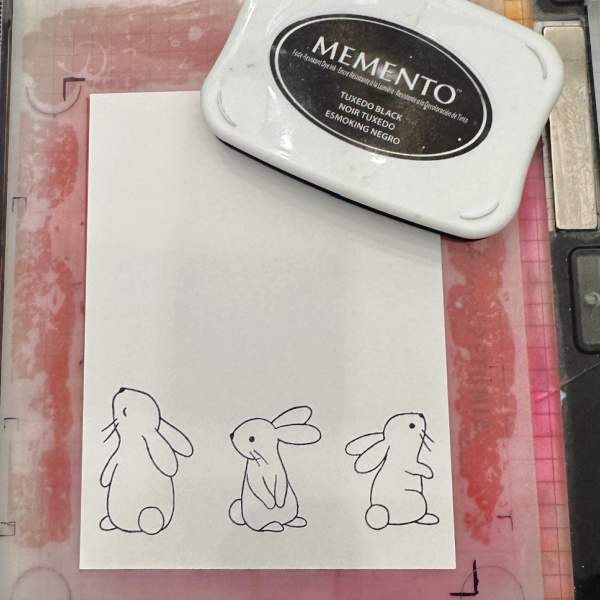
Step 3: Stamp the bunnies using a black ink. I used Memento Tuxedo Black.
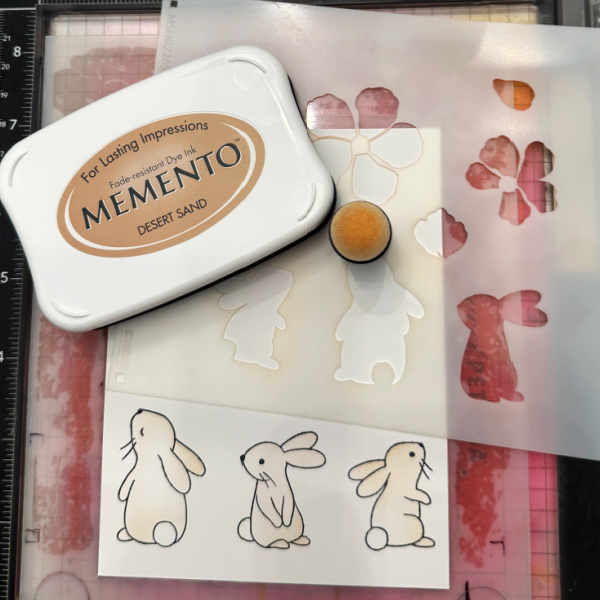
Step 4: Using the coordinating stencil color the bunnies a light brown. I used Memento Desert Sand.
Step 5: Cut a panel of light blue cardstock 5.25 x 4. Using a paint brush and a re-inker splatter the panel with a light blue ink. I used Memento Summer Sky.
Step 6: Stamp the eggs in colored inks. I used VersaMagic Mango Madness, Turquoise Gem and Pink Grapefruit.
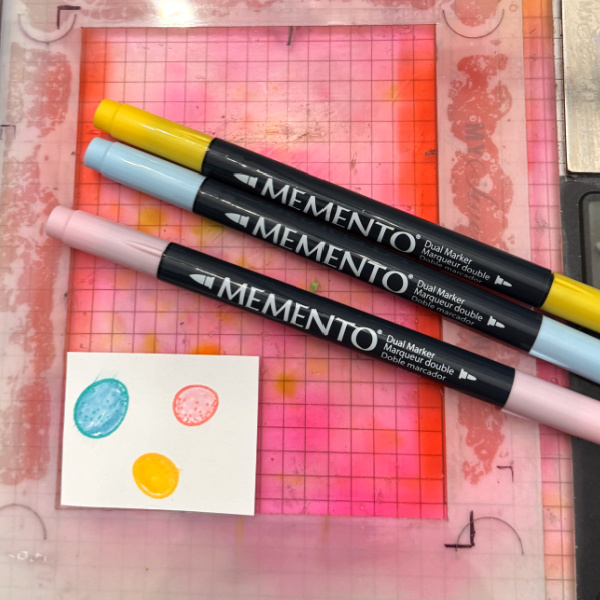
Step 7: Color in the eggs with markers. I used Memento markers in Dandelion, Summer Sky and Angel Pink
Step 8: Cut out all the elements and arrange them as you wish on the blue panel, stamp the greeting on the panel and then finish the card by adhering the panel to the base.
Craft Supplies:
Imagine Products:
• VersaMagic Dew Drops – Red Magic – Pink Grapefruit – Mango Madness – Turquoise Gem – Tea Leaves – Hint of Pesto
Hello everyone. Von Marie here and I have my latest video sharing an Easter card today. So much fun and we will use lots of fun TSUKINEKO inks to help us stencil and easily make this cute Easter Bunny Card. The video will have more details.
In today’s blog post, I will show you how to add some patterned paper to a card to spotlight a part of the image.
Skill: Intermediate Time: 1.5 hours
Directions:
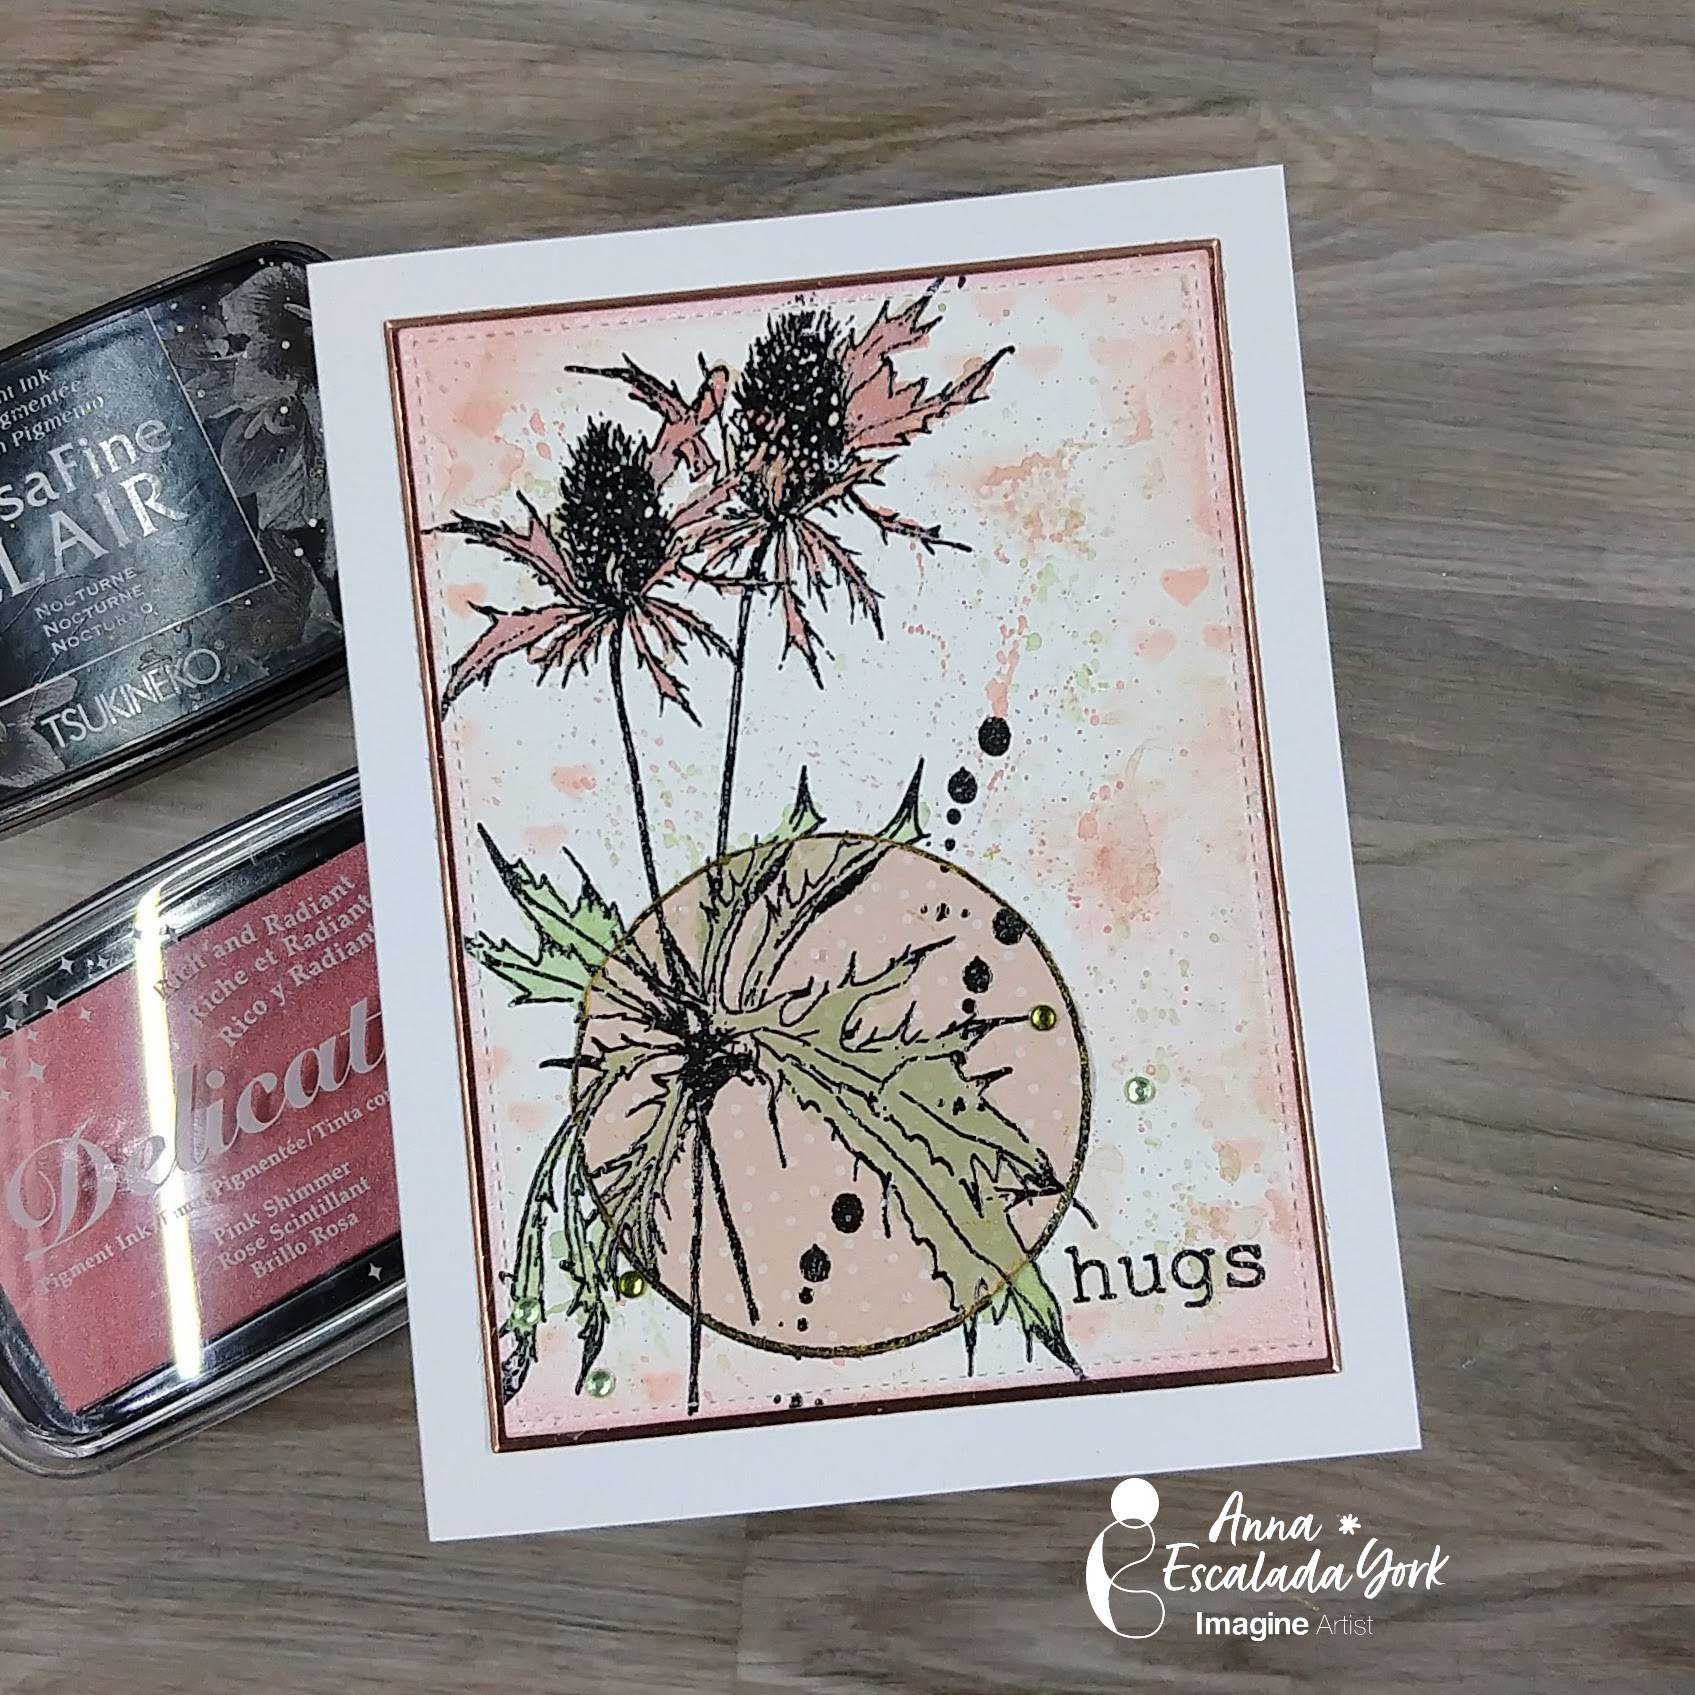
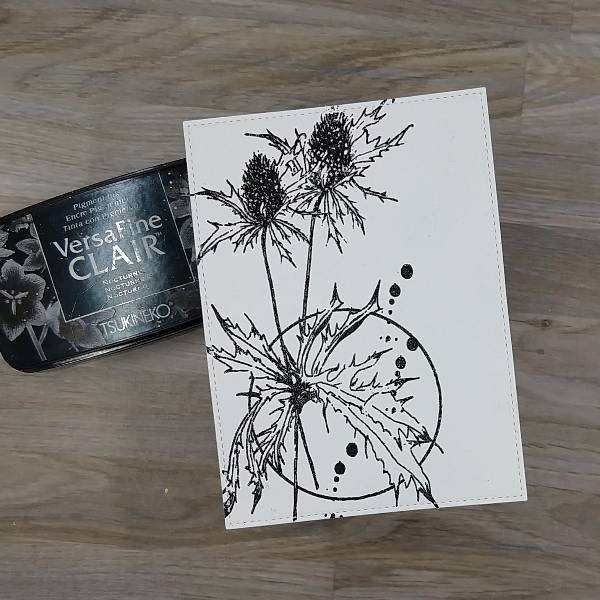
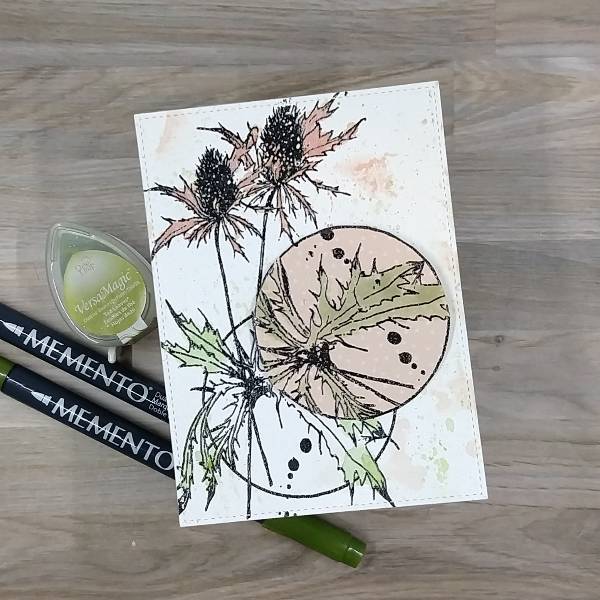
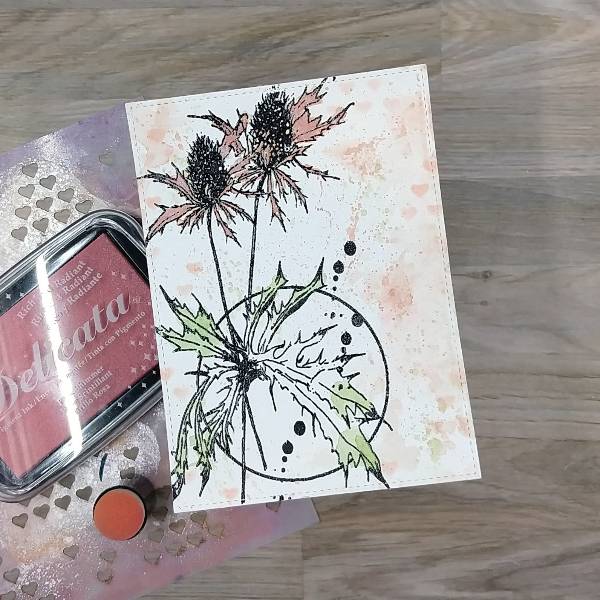
Step 1: Using a stamping platform, stamp the floral image with Nocturne VersaFine Clair ink onto a piece of watercolor paper. (I used a pre-die cut panel.) Optional step: Heat emboss with a clear embossing powder. I did this because I didn’t want to wait for the VersaFine Clair ink to dry, as well as add some subtle shine.
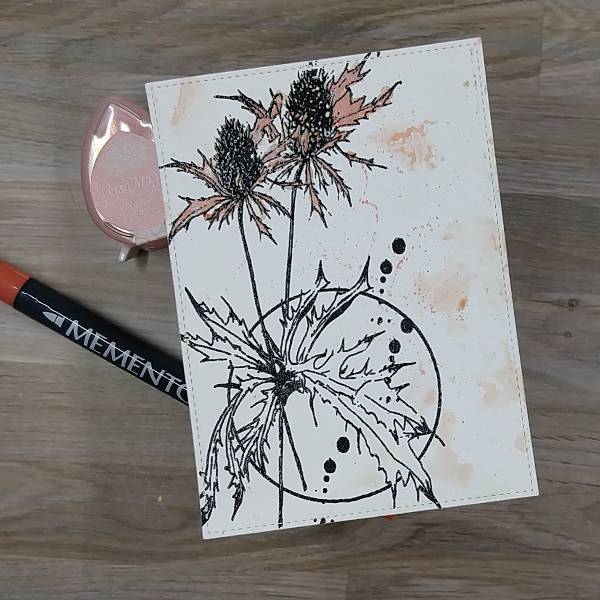
Step 2: Mix some Pink Grapefruit VersaMagic Chalk Ink with a Morocco Memento marker by pressing the ink pad and coloring a piece of scrap acetate and spraying both with water before mixing the colors to create a coral watercolor. Watercolor the petals of the floral image. Using the remainder of the watercolor to splatter the watercolor panel and smoosh the panel as well to add color around the panel. It was set aside to dry.
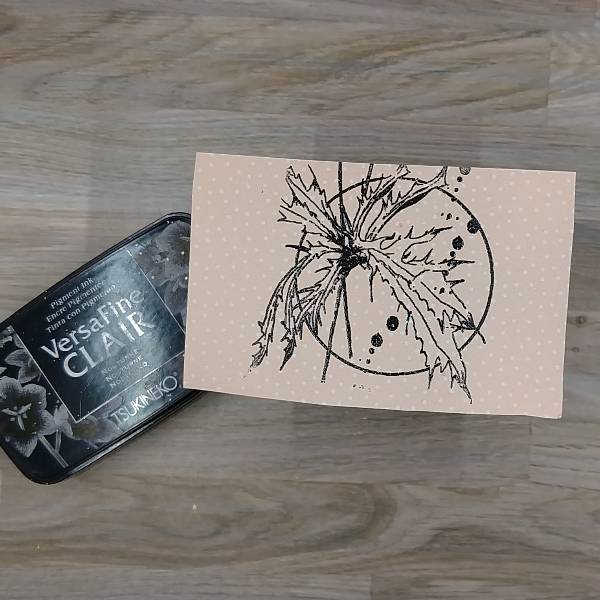
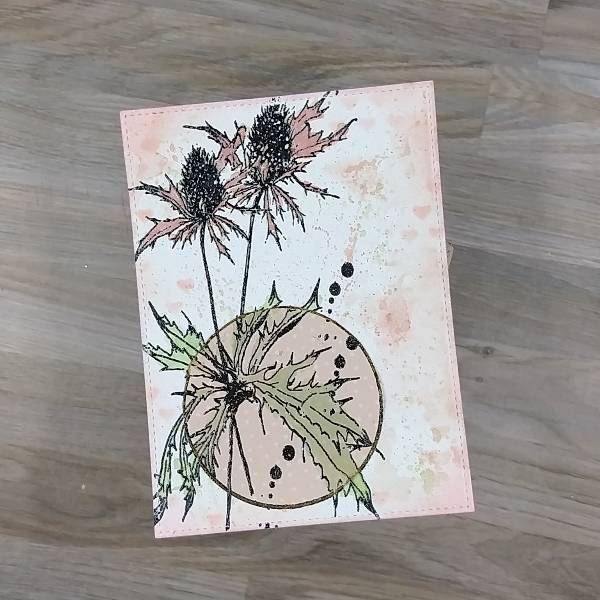
Step 3: Stamp the bottom part of the stamp onto a piece of dusty pink patterned paper with more Nocturne VersaFine Clair ink. Optional step: Heat emboss the image with more clear embossing powder.
Step 4: Cut the patterned paper image along the circular edge.
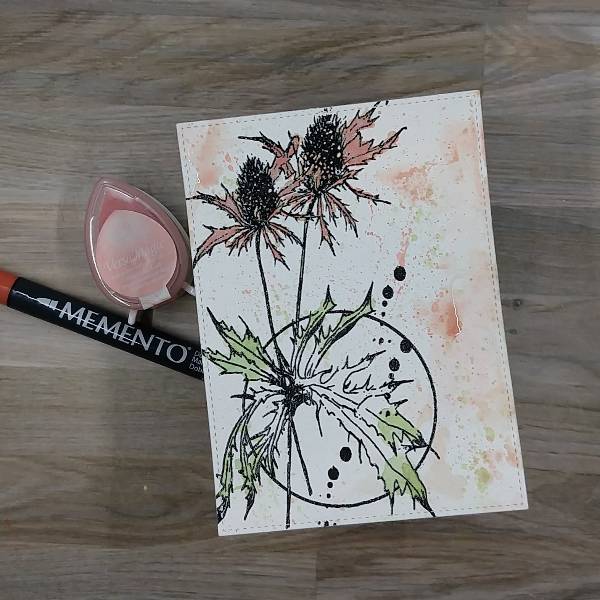
Step 5: Create green watercolor by pressing Tea Leaves VersaMagic Chalk Ink onto a piece of acetate Create green watercolor by pressing Tea Leaves VersaMagic Chalk Ink onto a piece of acetate as well as scribbling the acetate with both Cottage Ivy and Bamboo Leaves Memento marker and spraying all of the areas of color with water before mixing them together. Watercolor the edges of the leaves with the watercolor. (You won’t need to color the central parts of the leaves as they will be covered soon.) Again, splatter the card and watercolor smoosh the panel with the acetate to add green blobs around the watercolor panel. Again, set aside to dry.
Step 6: Watercolor the leaves on the patterned paper with the same mix of greens created using the Tea Leaves VersaMagic Chalk ink as well as Collage Ivy and Bamboo Leaves Memento marker mixed with water. Set this aside to dry.
Step 7: I decided to add a little more intensity to the coral colors on the petals and on the watercolor panel by adding more Pink Grapefruit VersaMagic Chalk ink and Morocco Memento marker added to the scrap of acetate and again mixed with water before painting the petals. The remaining coral-colored watercolor was again smooshed onto the watercolor panel. Set the panel aside to dry again.
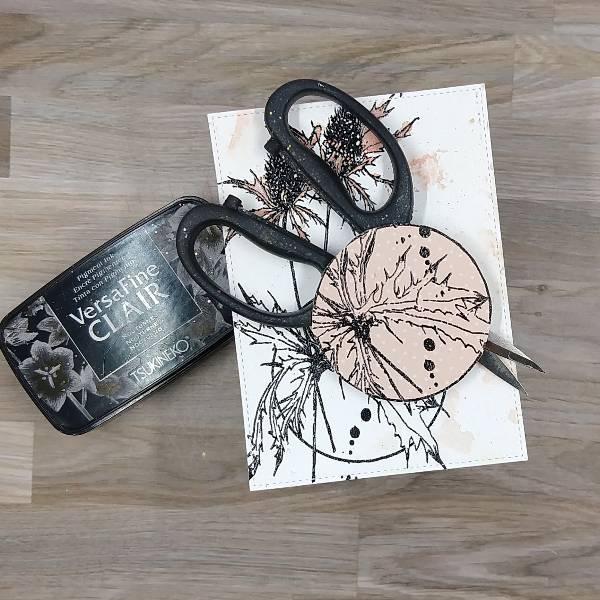
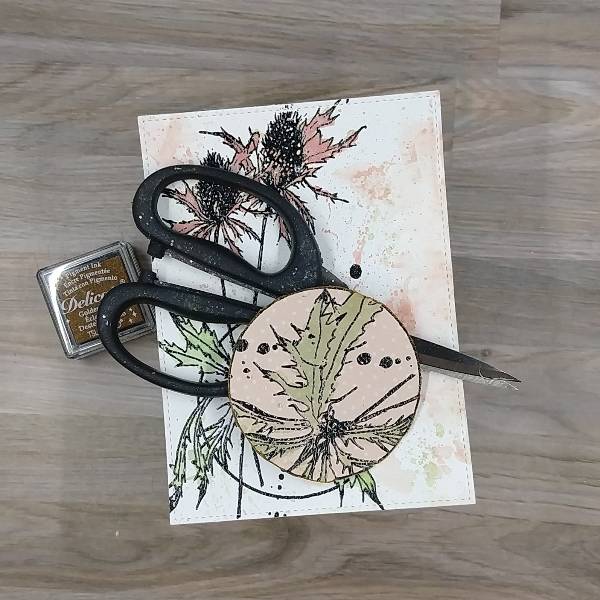
Step 8: Distress the edges of the patterned paper circle by rubbing the sharp part of a pair of scissors’ blade around the circle. Then rub the distressed edge of the circle with Golden Glitz Delicata.
Step 9: Using a sponge dauber, ink blend Pink Shimmer Delicata ink through a heart stencil in my stash on random parts of the watercolor paper. Not pictured: Ink blend the edges of the panel with more of the Pink Shimmer Delicata ink.
Step 10: Glue the patterned paper circle onto the stamped image, making sure that the patterned paper circle lines up with the rest of the stamped image.
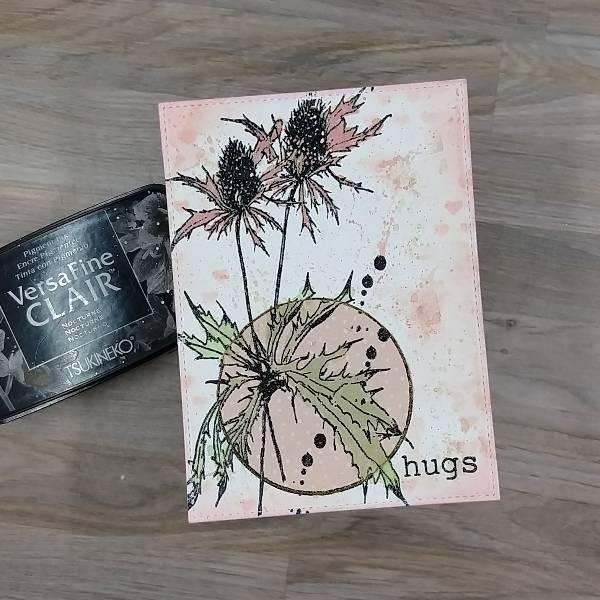
Step 11: Stamp the sentiment on the lower right corner of the watercolor panel with more Nocturne VersaFine Clair ink. Optional step: Heat emboss the image with more clear embossing powder.
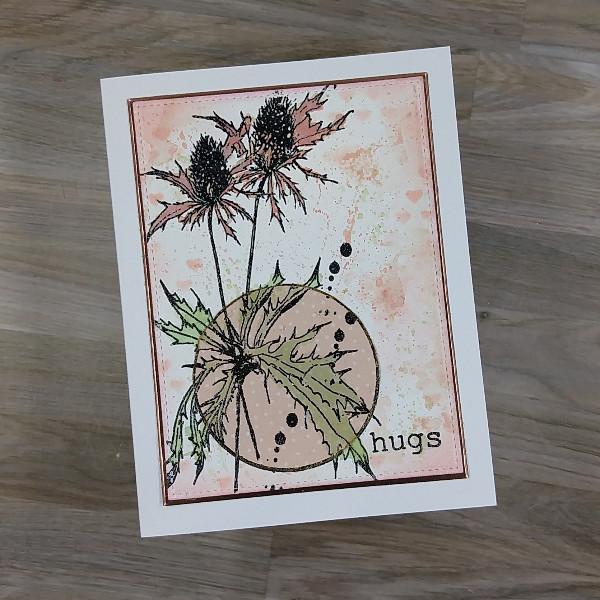
Step 12: Using a slightly larger die than the watercolor panel, die cut a piece of rose gold cardstock. Glue the two panels together, and glue both onto an A2-sized white card base.
Step 13: Add green gem stickers around the circle of patterned paper to finish the card.
Other AALL & Create – stamp set – Flower Journey Gina K Designs – dies- Master Layout 2 die set Honey Bee Stamps – gem stickers Memory Box – stamp set – Big and Little Words Sizzix- cardstock – Rose Gold Opulent cardstock Heart stencil in my stash Clear embossing powder in my stash Watercolor paper Scissors Small paint brush Stamp positioner Glue
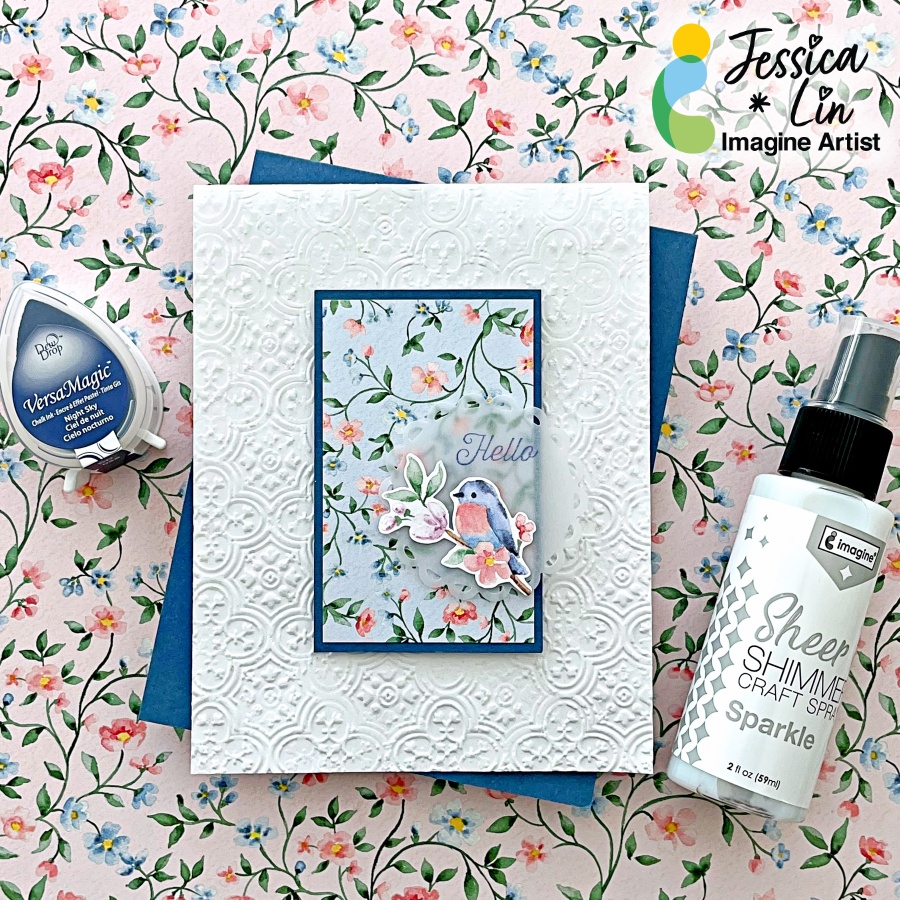
Let’s create a simple Easter card using some pretty patterned paper! The pastel colors and floral designs are too pretty to cover up! So I decided to stamp the sentiment on a piece of vellum. Stamping on vellum is tricky; but the VersaMagic ink pads work wonderfully. They don’t bead up and dry beautifully without fuzzy edges. Keep reading to see the final result!
Skill: Intermediate Time: 30 minutes
Directions:
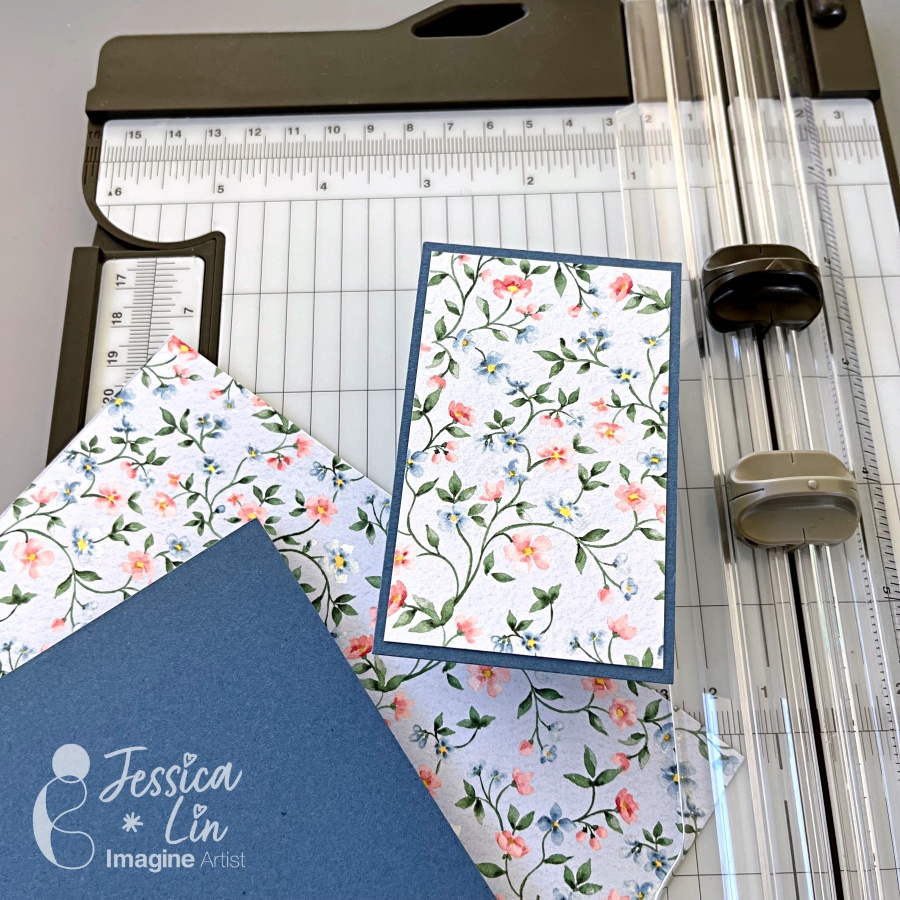
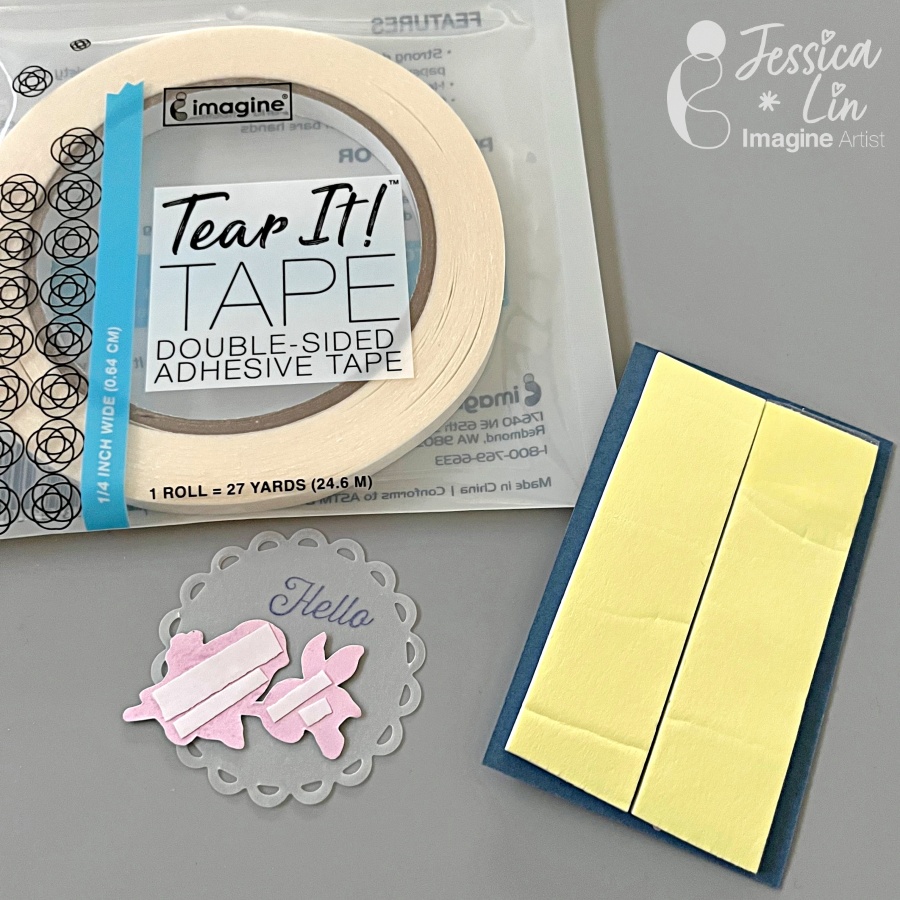
Step 1: Trim a piece of patterned paper to 3 3/16’’ x 1 15/16’’ and a piece of matching cardstock to 3 6/16’’ x 2 2/16’’. I used Flight & Airy paper pack which coordinates with Misty Moonlight cardstock. Adhere the two pieces together with Tear It! Tape.
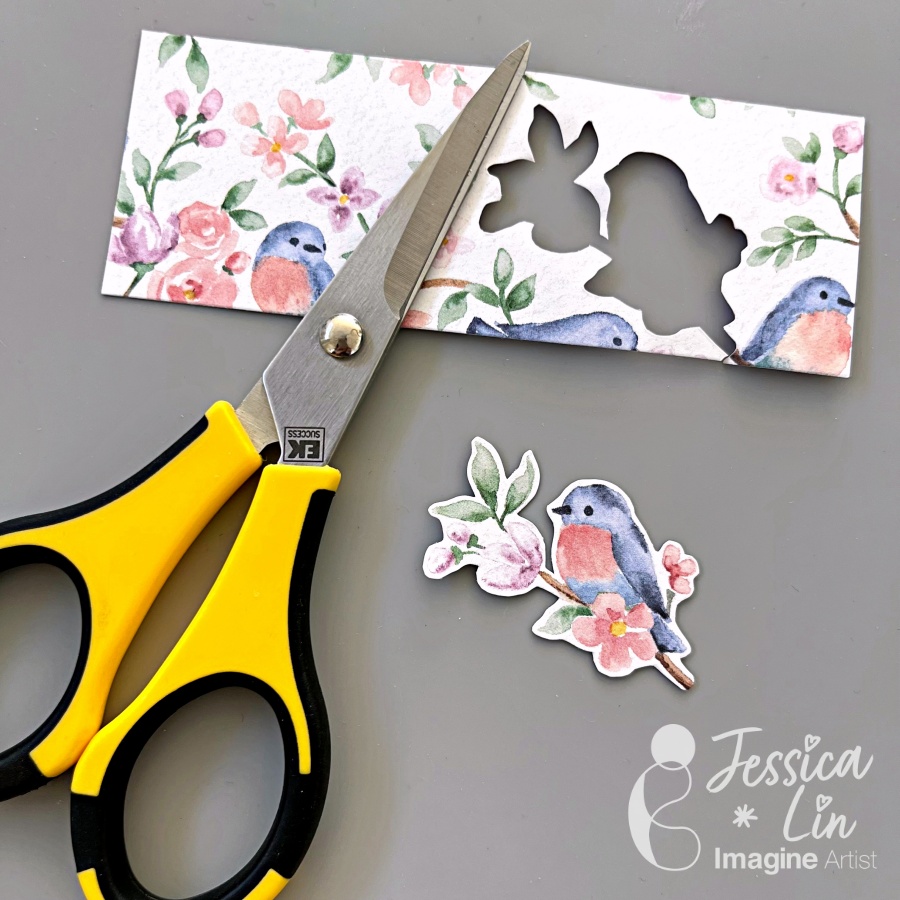
Step 2: Use stamps or, in my case, patterned paper to create a focal image. Fussy cut around the image with a pair of paper snips. These scissors are sharp and my favorite for fussy cutting!
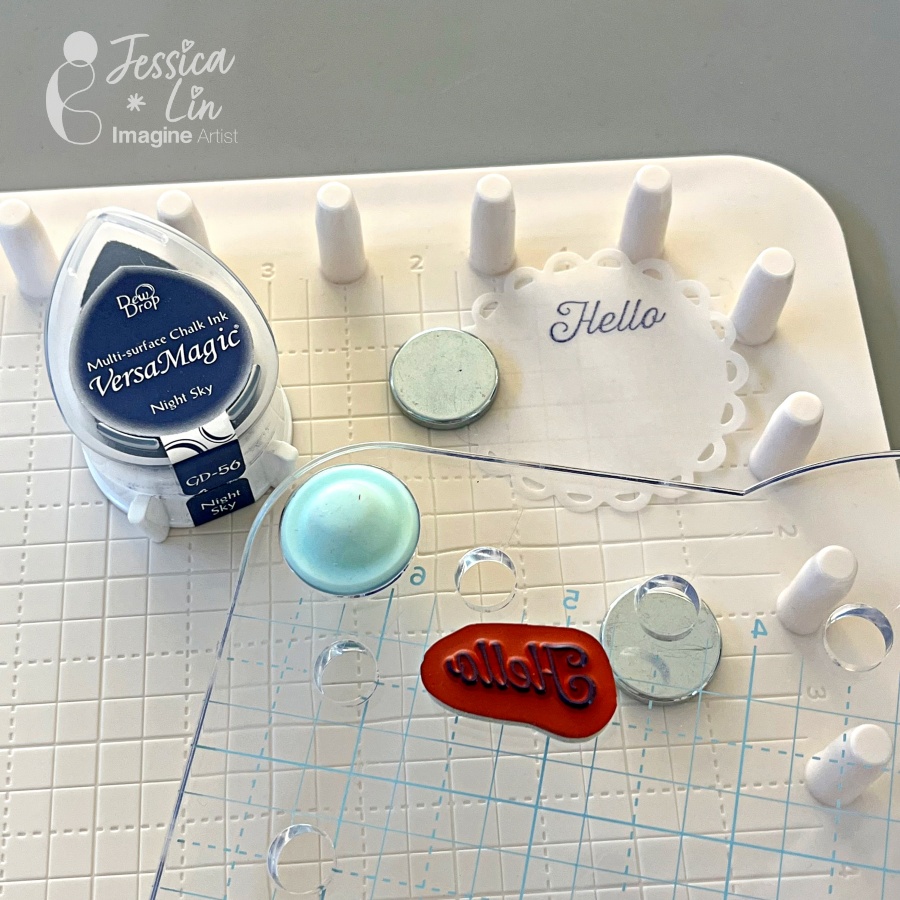
Step 3: Die cut a piece of vellum with a circular die of your choice. I used Spellbinders Lacey Circle dies with the Stampin’ Up! Mini Cut and Emboss Machine.
Step 4: Stamp a small sentiment using VersaMagic Night Sky ink pad. The image is crisp and clear after stamping, so I didn’t need to restamp with the We R Precision Press.
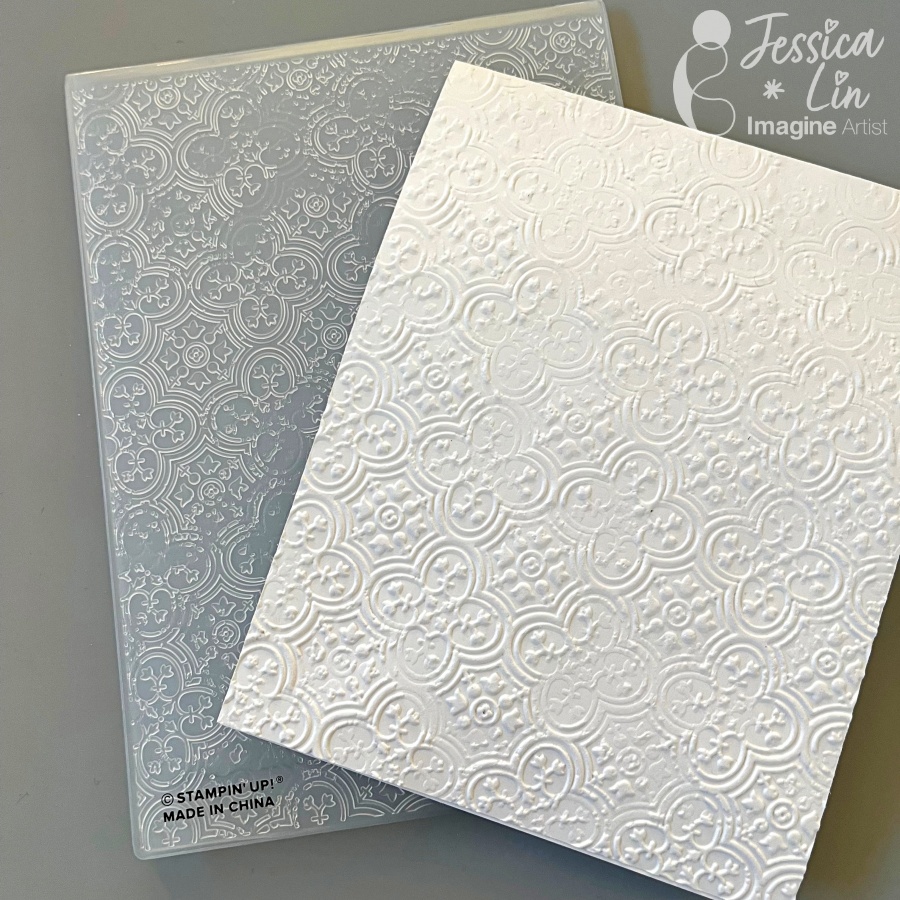
Step 5: Emboss the card front with any embossing folder to add interest to the background. The Distressed Tile embossing folder is simply gorgeous!
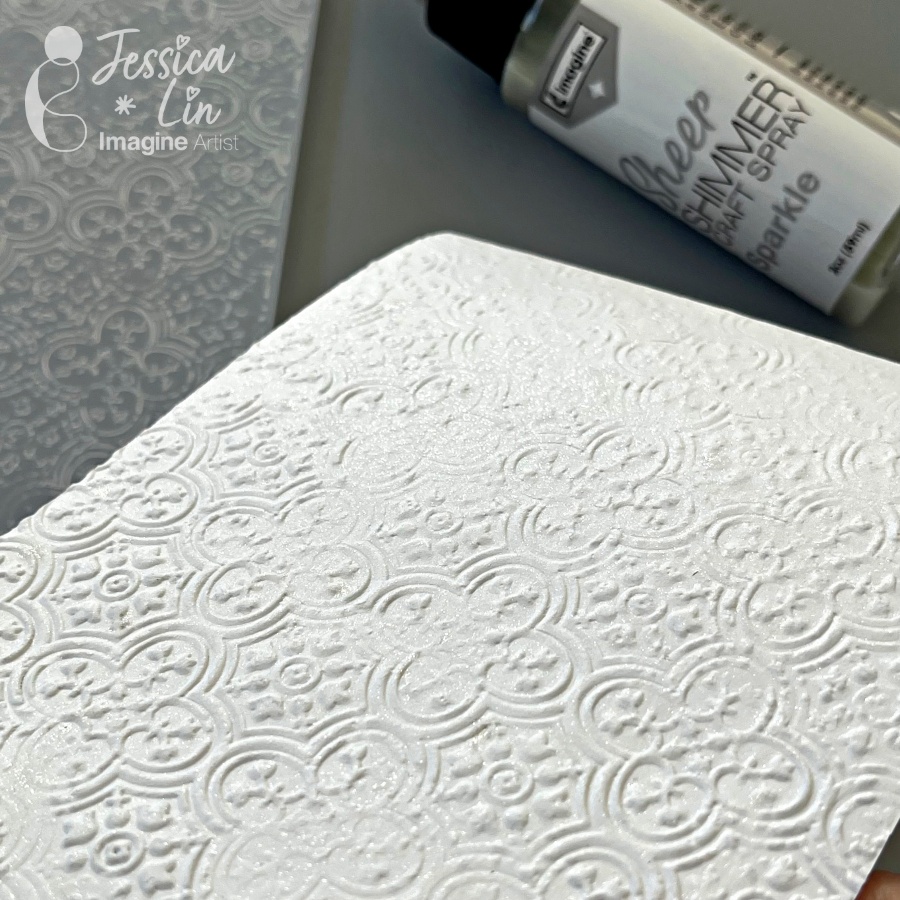
Step 6: To add a wow factor, lightly spray the whole panel with Sheer Shimmer in Sparkle. It adds just the right amount of glitter mist to elevate your project.
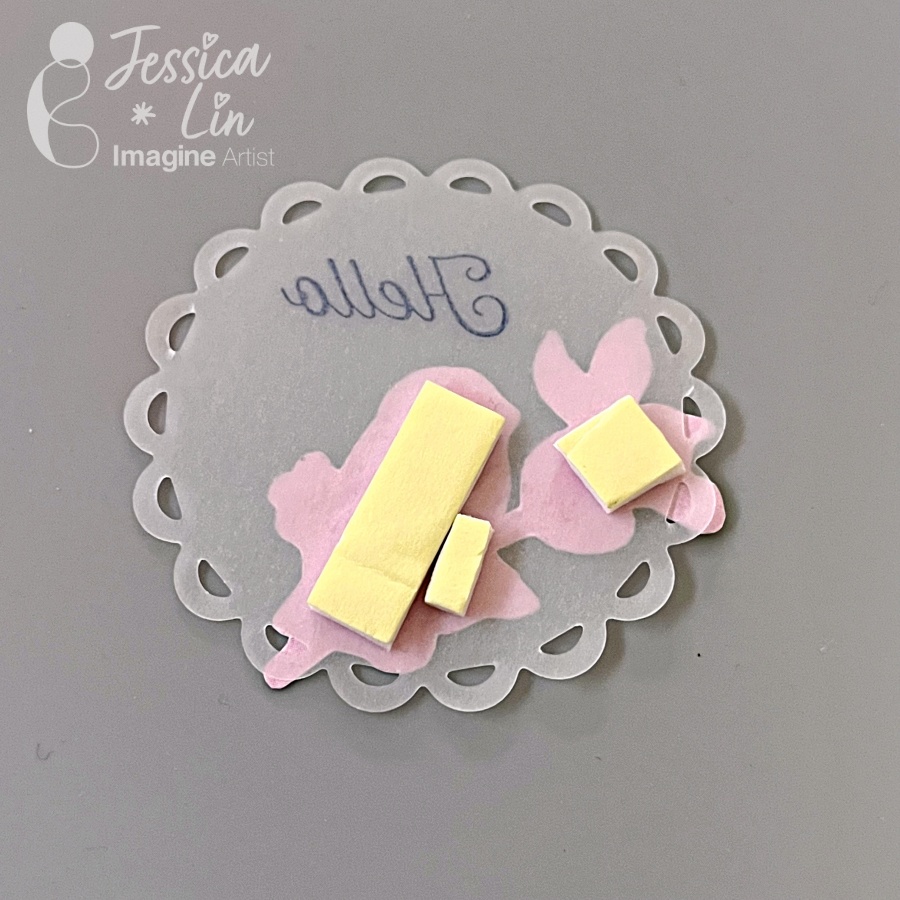
Step 7: It’s time to assemble everything together! Apply Tear It! Tape and foam tape to the back and adhere them to the embossed card front. When adhering vellum pieces to your project, remember to only apply tape and/or glue in areas where it would be hidden. Otherwise the adhesive will show through the translucent vellum paper.
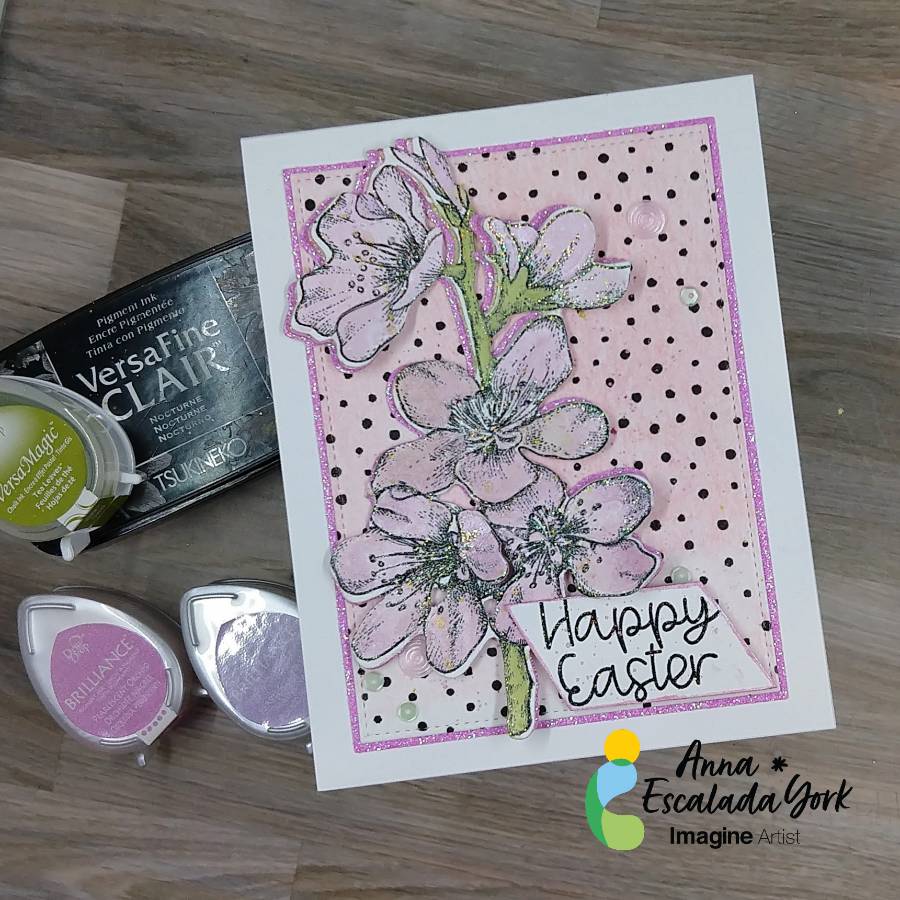
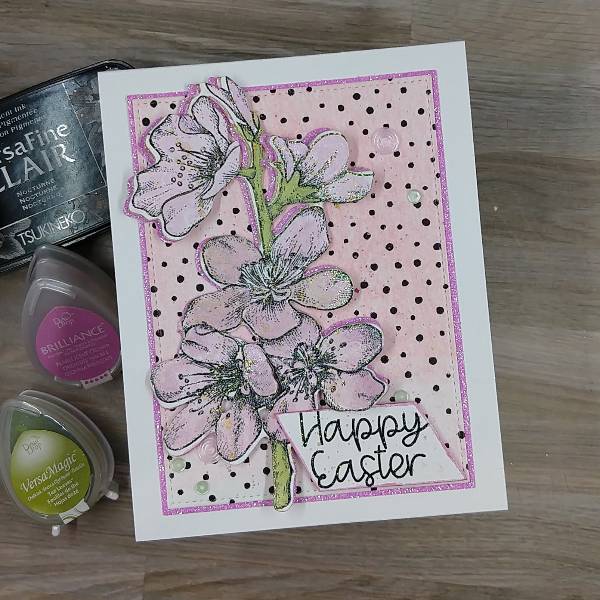
– In today’s tutorial, I will show you how to use Brilliance Pigment Ink and VersaMagic Chalk Ink to watercolor an image. This is a wonderful way to stretch your supplies and possibly try a new technique. In addition, I will share some mistakes I made along the way while making this card.
Skill: Intermediate Time: 1.5 hours
Directions:
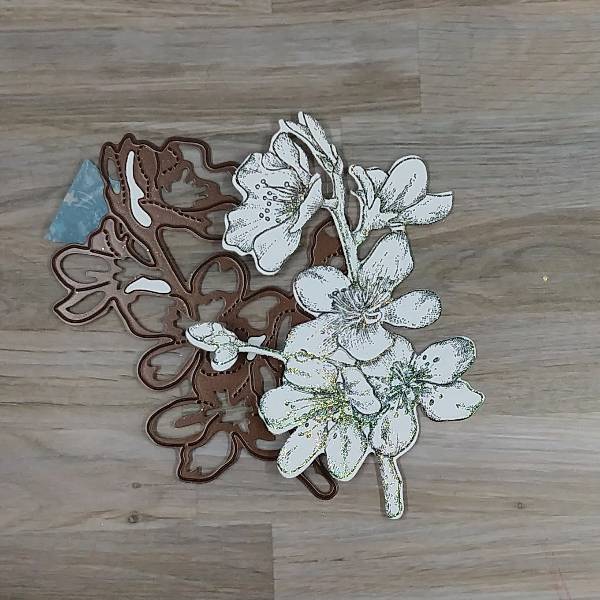
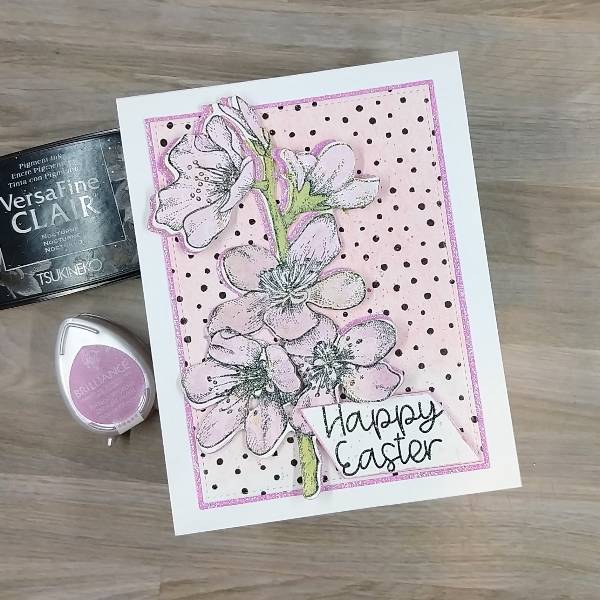
Step 1: Using a stamping platform, stamp the floral image with Nocturne VersaFine Clair ink. Optional step: Heat emboss with a clear or holographic embossing powder. I did this because I didn’t want to wait for the VersaFine Clair ink to dry.
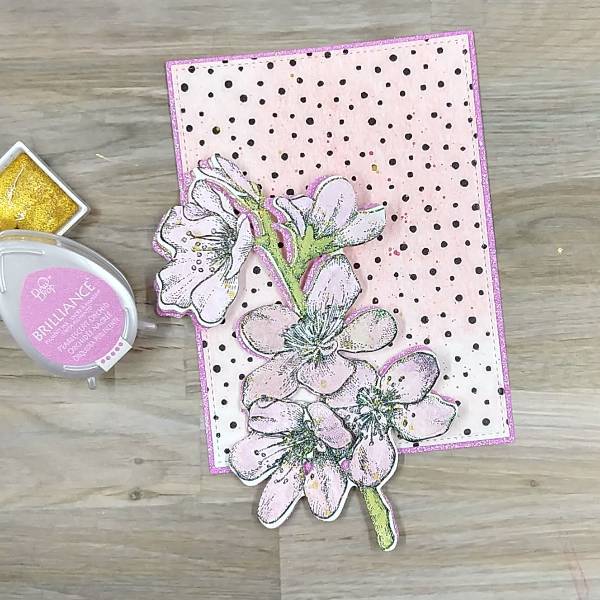
Step 2: Die cut the floral image with the corresponding die. I was “off” in the die cutting and so some of the stamped image was cut off. You can mostly see this on the singular bud on the left side of the image. Not shown: Using the same die to die cut a piece of pink glitter cardstock.
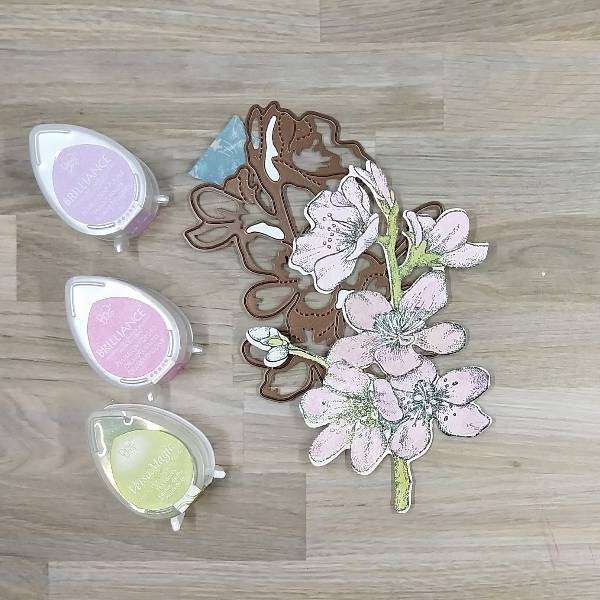
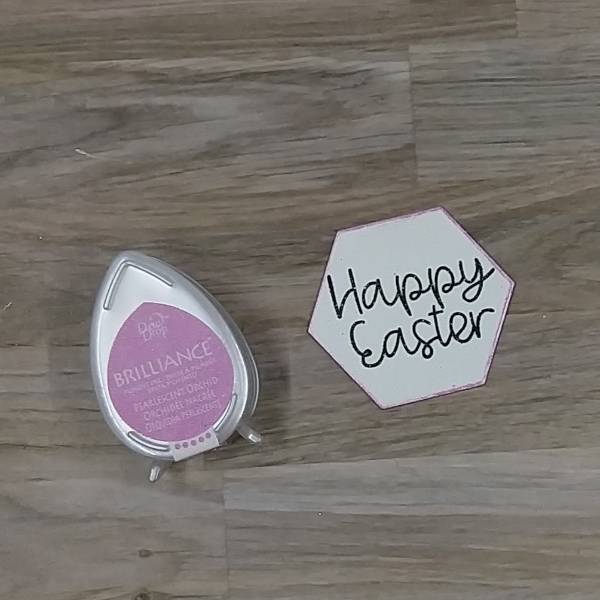
Step 3: Press the Pearlescent Orchid Brilliance Dew Drop pad onto a piece of acetate packaging and spray with Sparkle Sheer Shimmer Spray. On another part of the same acetate packaging (or possibly a palette or other non-porous surface, press the Pearlescent Purple Brilliance Dew Drop pad onto the surface and spray with more of the Sparkle Sheer Shimmer Spray. You should have two areas of color that you can mix with the spray to use as a watercolor.
Paint each flower or bud with a single layer of Pearlescent Orchid Brilliance Ink mixed with the Sparkle Sheer Shimmer Spray. Let the watercolor dry. Add some Pearlescent Purple Brilliance Ink mixed with the Sparkle Sheer Shimmer Spray to the edges of the petals to add some dimension and interest.
Repeated the process for the stems. Press the Tea Leaves VersaMagic Chalk Ink pad onto a piece of acetate and Spray the ink with more of the Sparkle Sheer Shimmer Spray. Use a paintbrush to paint the stem green. Let dry. If desired, repeat the process to amplify the intensity of the green watercolor. Let dry.
Not pictured: Gluing the pink glitter cardstock die cut behind the flower so that it can be seen on the left side of the floral image.
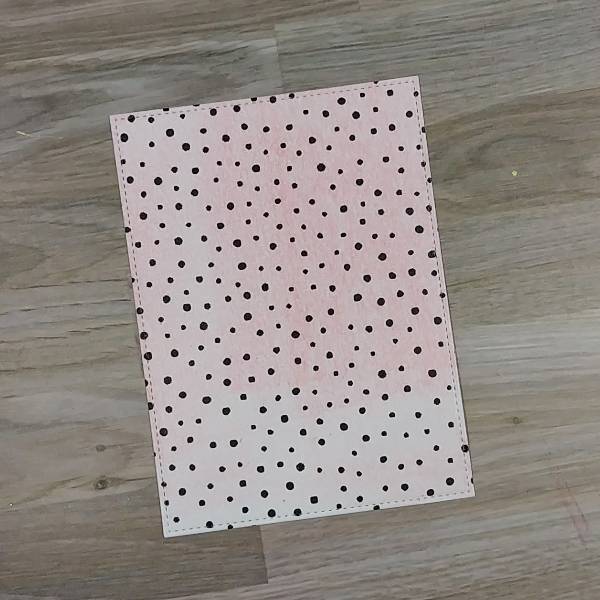
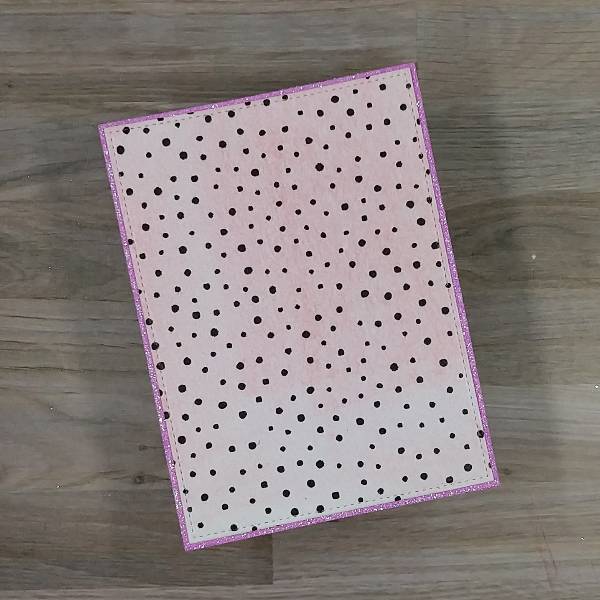
Step 4: Place a piece of wide washi tape over a piece of cardstock for the background panel before die cutting that cardstock. (I used a leftover piece of cardstock that had some leftover pink gel press printing on it so that you can see a little of the pink through the washi tape). Don’t have washi tape? Use a piece of patterned paper.
Step 5: The die cut set that was used to make the panel allows for two layers if desired. To make the matte layer, use a slightly larger die to die cut a piece of pink glitter cardstock and then glue the two panels together. Set them aside to dry.
Step 6: Press more of the Pearlescent Orchid Brilliance Ink Dew Drop onto the acetate packaging and spray more of the Sparkle Sheer Shimmer Spray onto the ink to create more watercolor and splatter both the floral image and the background with the orchid colored watercolor. To splatter, extend your finger parallel to the paper and tap a brush that has the Orchid watercolor on it multiple times. To create a more uniform splatter, move the paint brush or the paper around so that the splatter is added to a variety of places.
Spray more of the Sparkle Sheer Shimmer Spray (or water) into the gold watercolor pan and then tap the paintbrush across the floral image and panel a second time. Let dry.
As you can see in the picture, between step 3 and now, the singular bud on the left was trimmed from both the stamped layer and the pink glitter cardstock so the die cutting mistake was eliminated.
Step 7: Stamp the sentiment with Nocturne VersaFine Clair ink. Optional step: Heat emboss the ink with holographic embossing powder to eliminate drying time. (I originally was going to use this die cut sentiment, but later realized that it wouldn’t fit. I also forgot to take pictures of the sentiment I trimmed with my paper cutter and ended up adding to the card. So please use your imagination.)
Step 8: On the sentiment that you see on the finished card, I trimmed the sentiment with my paper trimmer. The one picture above was die cut with a hexagon die. Regardless of how you end up shaping your sentiment (using a trimmer or a die), press the edges of the sentiment into the Pearlescent Orchid Brilliance Dew Drop pad to add color to the edges. Set aside to dry.
Steps 9 and 10: Time to glue! Glue the flower on the left third of the background panel. Then glue the panel onto an A2-sized white card base.
For step 10, attach foam tape behind the sentiment except on the upper left corner (since that will be overlapping with the floral image. Attach the sentiment to the lower right corner of the panel.
Step 11: Add pink and green sequins onto the card–on the lower left corner, close to the sentiment, and on the upper right corner of the card panel.
Hi there friends and fellow crafters. LeeAnn here with a fun Turnabout Stamping Project anyone can do. This is for all levels. With this stamp set you will start with a single piece of cardstock cut to 6″ x 6″ set up your stamp, ink up the full stamp in one color, turn your paper 1 turn to the right or left, and then ink in 2nd color, turn 1 turn again same direction as before and ink in next color, then one final turn in same direction, ink up again. Once dry cut panel to 4″ x 5.25″, apply to a card base that is 4.25 x 5.5″, I prefer top folding for this. Add your sentiment, some jewels and your project is complete.