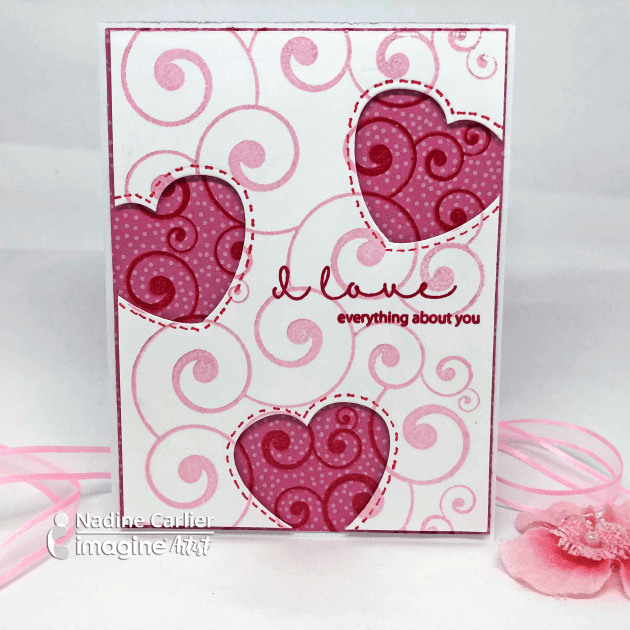
The new Imagine Craft Mat is great for creating all kinds of backgrounds for cards. This one was created using Memento Dewdrop Inks and the grid side of the craft mat. Watch my video below to see how I did it. Enjoy!
Skill: Beginner Time: 15 minutes
Supplies
Imagine
Memento Ink – Angel Pink, Lady Bug, Lilac Posies, Lulu Lavander, Rhubarb Stalk, Rose Bud
This project is all about making something out of nothing. At least, nothing as in a piece of corrugated cardboard from a discarded box and lined paper from an old notebook. These reuse items, paired with a few Imagine Fireworks sprays, create a beautiful notebook that would be a great gift for friends or family. In the tip video, I will show you how to use Fireworks sprays with a liquid varnish to create a permanent finish. This is a helpful tip especially if you are into Mixed Media.
Skill: Intermediate Time:2 hours
Directions
Step 1
Start by drawing a heart shape (approximately 4 1/4” x 4” in size) onto a piece of corrugated cardboard. Cut out shape.
Step 2
Trace the heart onto a piece of heavy weight cardstock and cut out.
Step 3
Line up the corrugated and cardstock heart shapes and punch a hole in the upper left hand corner.
Step 4
Tear off sections from top layer of paper on the corrugated heart, exposing he corrugated layer underneath.
Step 5
Paint a layer of Gesso over the front and back sides of the corrugated heart. Lay a stencil down over the corrugated heart and apply modeling paste. Only apply in small sections around the heart.
Step 6
On your craft mat, mix Rhubarb Stalk Fireworks with a liquid varnish (2 parts fireworks to 1 part varnish).
Step 7
With a paint brush, add puddles of the Fireworks/varnish mixture to the top of the corrugated heart. Add/spray water onto the puddles of Fireworks mixture. Allow the mixture to run and drip down the heart. Blot with a paper towel to stop run. Add more Fireworks mixture and repeat, as needed. Allow to dry in between layers.
Step 8
Repeat inking with Desert Sand Fireworks. Once the Fireworks mixture is completely dry, seal with a coat of liquid varnish. Stamp a script stamp randomly across the corrugated heart with Jet Black StazOn ink.
Step 9
Add splatters to the heart with some watered down black acrylic paint.
Step 10
Spray a few resin roses with Rhubarb Stalk Fireworks and heat set. Repeat, a needed. Fireworks can also be applied with a paint brush, if preferred.
Step 11
Once the Fireworks ink (on the resin roses) is completely dry, edge the roses with Jet Black StazOn inkpad and a dauber.
Step 12
Edge the circumference of the corrugated heart with StazOn and a dauber as well. Deconstruct twine into individual threads and shred the fibers to create a “bed” for the resin hearts to sit on. Adhere the shreds of twine down into the upper left corner of the heart (be sure not to cover the punched hole). Then adhere the roses over the shredded twine.
Step 13
Stamp a title word onto the upper center portion of the heart with Jet Black StazOn ink. Trace the heart shape onto lined paper and cut out. To keep the paper from moving, staple about 4 to 5 sheets together prior to cutting. Repeat for more sheets, as needed (keep in mind the size of book binder ring that you are using). Line up the 3 booklet elements (front = corrugated heart piece, center = lined paper, back = cardstock heart) and attach a book binder ring. Finished!
Make a layered dimensional love frame using a 5 x 7 deep picture frame and a bold red colored heart painted with All-Purpose Ink Poppy Red. This project centers around a simple concept—create layers of hearts and floating like sense with a background that allows light to pass through too. The Vertigo sheets create a blur effect without dominating the picture. The bold red heart stands out from all decorations used, enhancing the purpose of the frame.
Skill: Intermediate Time: 1 hour
Directions
Step 1
Make the hearts with a heart shaped mold and paper clay. After you cast the heart and let dry fully, color with the All-Purpose in Ink Poppy Red color. All-Purpose Ink works beautifully on all types of surfaces such as fabric and wood, so it is a natural fit for the paper clay.
Step 2
Cut a 2 ½ x 7-inch long piece of the white cardstock and fold in a border about ½ inches on the short edges. Adjust the folding to the inner dimension of your frame if different.
Step 3
Stamp the Valentine theme words from the stamp set with the VersaFine Clair Nocturne.
Step 4
Die cut Vertigo sheets in heart shapes (or cut with scissors).
Step 5
Place Tear It! Tape on the folded edges of the cardstock piece at the non-stamped side.
Step 6
Set the cardstock piece in the frame with the Tear It! Tape previously placed on the top and bottom sides of the frame.
Step 7
Glue the red heart in place as shown in the photo above.
Step 8
Twist pieces of wire (as springs) to use holders for the Vertigo hearts.
Step 9
Glue on the side to the inner bottom of the frame and place the Vertigo heart.
Step 10
Stamp the cupid design with the VersaFine Clair Nocturne on a piece of Vertigo sheet and set it on a heart inside the frame.
In today’s video, I share a mixed media Valentine’s card using the fantastic new dies from Imagine, Dewlets! These adorable dies can be used to create a multitude of wonderful designs. I share how to create hearts using the Memento Dew Drop ink pads in combination with the Dewlets. Also, learn to create a fun watercolored background using the same Memento Inks.
Not only are the Dewlet dies great to use with DewDrop ink pads they also make perfect hearts. Watch my video below to see how I created the hearts with the Dewlet dies and how I used Delicata and VersaFine Clair for the stamped images. Enjoy!