Mythbuster: Creative Medium is Only Good for Mixed Media Projects

by Steph Ackerman

Mythbuster: Creative Medium is Only Good for Mixed Media Projects

When people think of heavy acrylic pastes like Creative Medium, they tend to assume it can only be used on mixed media projects. I would like to bust that myth by showing you that Creative Medium is also an excellent product to use in card making. Placing a light layer of Creative Medium on your paper can transform the look and feel of your cards. 

Skill: Beginner or Intermediate
Time: 1 hour

Directions


Step 1

Creative Medium can be used to transform any paper. Here I used Creative Medium in Gold Metallic to add a gold shimmer to patterned paper.  


Step 2

Use a palette knife to spread a light layer of Creative Medium on paper then place the paper aside to dry. Creative Medium will not wrinkle your paper and will dry flat.


Step 3

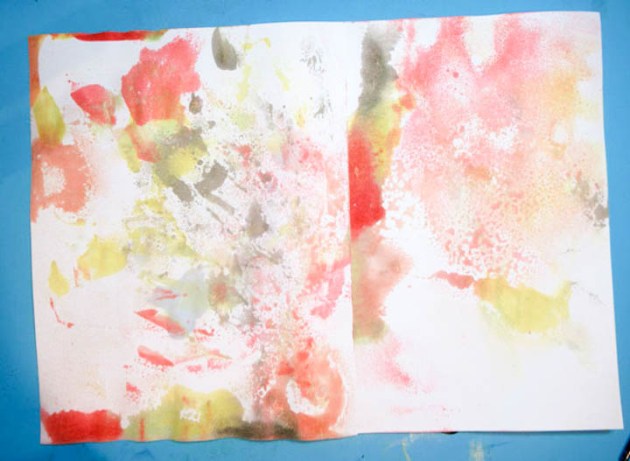
I used 3 different colors of Creative Medium in Gold, Iridescent Blue and Silver on assorted papers which consisted of stripes, small prints, and large prints, light and dark papers. Again, a light layer is all that is needed for your papers to achieve amazing results. Let the papers dry thoroughly before continuing. 


Step 4

On the Silver Creative Medium backgrounds, I used an assortment of techniques. I used a brick stencil and spritzed over it with Fireworks Shimmery Craft Spray in Lilac Posies. On another, I used a large script stamp with VersaFine Clair ink in Nocturne. On another, I used the Scor-Pal to create the grid effect. As you can see Creative Medium works with dye ink sprays, stamping and scoring and it doesn’t affect the initial application. 
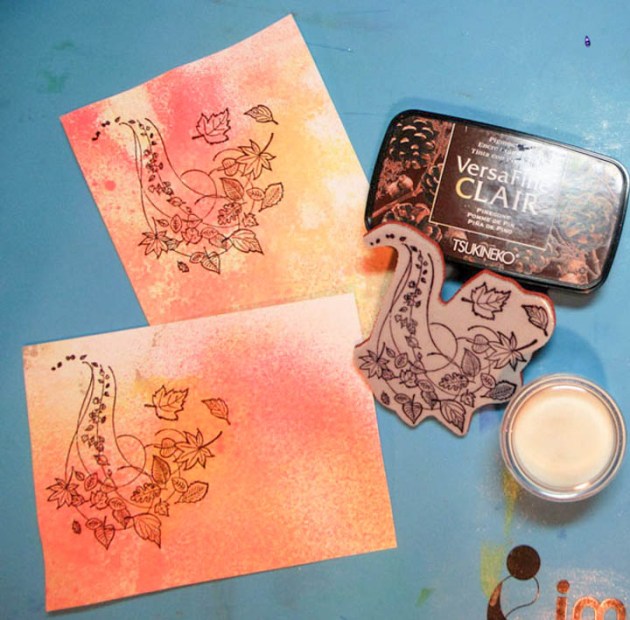

Step 5

On the Gold Creative Medium backgrounds, I used a large brick background stamp with VersaFine Clair ink in Fallen Leaves, embossed snowflakes and lightly inked with Bahama Blue ink and, I used a star stencil with Silver Creative Medium. Each of these show again how you can completely transform your cardstock. 


Step 6

Finally, I experimented with the Creative Medium in Iridescent Blue backgrounds. I used a Thank You embossing folder, then lightly inked with Memento Potter’s Clay. And the second one, I used Rose Bud with a floral stencil. So if you have cardstock or scrapbook paper you don’t particularly like or has an out-dated look, consider using Creative Medium to change it up and add some new life to them! Enjoy!

Supplies

Imagine 
Other 
  • Embossing Folders – Cuttlebug, Sizzix
  • Scoring Tool – Scor-Pal
  • Stamps – Just For Fun Rubber Stamps (script); Joy Clair (Brick)
  • Stencils – The Crafter’s Workshop

Create Paper Poinsettias with Memento Ink and Dewlets

by Steph Ackerman

Create Paper Poinsettias with Memento Ink and Dewlets

Dewlet Etched Metal Dies are perfect to use with Dew Drop Inkpads. Simply stamp the droplet shapes then align and cut the dies using any die cut machine. There are many options with the shape to play and experiment. Once I started playing with the dies, I found myself creating two very different cards. Simply by flipping the droplet shapes allows you to create poinsettias, leaves, and even dragonflies.

Skill: Intermediate
Time: 1 hour

Directions


Step 1

Stamp each stamp pad onto white cardstock. Punch out the petals by using the Dewlet dies and a die cut machine.


Step 2

Ink around each petal for dimension, then use a stylus to give the petals dimension.


Step 3

Create the background by inking a large background stamp with white ink then emboss with clear embossing powder to create a tone-on-tone effect. Using a jumbo dauber, ink around the panel with Memento in Love Letter, then edge with Brilliance in Thyme.


Step 4

Adhere the stamped panel to a kraft card. Create the poinsettia by assembling the petals on the card. Place two leaves behind the poinsettia. Use irRESISTible Pico Embellisher in Lady Bug to add dimension to the poinsettia petals. Stamp a sentiment with VersaFine Clair in Pinecone, edge with Memento in Love Letter and mat with cardstock. Add to the card with foam adhesives.


Step 5

Add drops of irRESISTIble Pico Embellisher in Lady Bug on opposite corners of the card.


Step 6

For the dragonfly card, create a kraft card and add a panel of striped paper. Using Brilliance in Sky Blue ink, stamp onto white cardstock. Emboss with Embossing Powder in Clear and heat set. Die cut each and emboss with an embossing folder. Use On Point Glue to adhere the tips of 4 petals to the card creating a dragonfly. Use On Point Glue to adhere a row of dew drops for the body. Add drops of Shimmer irRESISTIble to the corners. Stamp phrase with Pinecone Ink. Cut into a pennant shape, made with cardstock. Add to card with foam adhesives.

Supplies

Imagine
Other
  • Cardstock – White, Kraft
  • Authentique – pattern paper
  • Joy Clair – Christmas sentiment stamp
  • Just For Fun Rubber Stamps background
  • Unity Stamp Co. phrase
  • Cuttlebug
  • The Robin’s Nest – Dew Drop embellishments
  • Die cut machine

Learn How to Decorate Your Own Holiday Ornaments

by Steph Ackerman

Learn How to Decorate Your Own Holiday Ornaments

As we get closer to the holidays, it’s always fun to do handmade projects or get the kids involved with decorating the Christmas tree. This year, why not create Christmas ornaments for friends and family members. All you need are a set of glass ornaments and a selection of amazing colors of StazOn Studio Glaze to complete this project.

Skill: Beginner
Time: 1 hour + drying time

Directions


Step 1

Remove the hanger from each ornament and put aside. Holding the ornament with 2 fingers, start by creating a zig-zag pattern using StazOn Studio Glaze in Gold.


Step 2

Add dots of color using StazOn Studio Glaze in St. Valentine, Silver, and Orange Zest. Continue adding dots of color around the ornament.


Step 3

Place another ornament on a dowel or craft stick and add StazOn Studio Glaze in St. Valentine, Emerald City, and Orange Zest in random patterns. Use a finger to mix the colors together creating a swirly pattern.


Step 4

Add rings of color on another ornament and mix them together creating another swirly pattern.


Step 5

Continue painting the ornaments with Studio Glaze until you have decorated all the ornaments you need.


Step 6

Using the RInea 3D Hyacinth die set, die cut assorted colors of Rinea Foils. Add Tear It Tape to the bottom edge of the die.


Step 7

Put the hanger back in each ornament. Remove the backing from the Tear It Tape, then wrap the foil around the ornament top.


Step 8

Use a craft pick to curl the foil strips and continue decorating as you wish.


Supplies

Imagine
Other

See How to Create a Gingerbread House with Rinea Paper and StazOn Studio Glaze

by Steph Ackerman

See How to Create a Gingerbread House with Rinea Paper and StazOn Studio Glaze

The holidays are almost here and there is nothing as iconic for Christmas as a gingerbread house during the holidays. When the kids have outgrown this tradition, it is still possible to recreate the fun by using your craft supplies. In today’s project, I used StazOn Studio Glaze to fill in some of the details of this gingerbread die.

Skill: Intermediate
Time: 1 hour

Directions

 Gingerbread House from Rinea's Glossy Mocha/Gold Foil
Step 1

Using Spellbinders dies which includes two layered pieces, die cut the Gingerbread House from Rinea’s Glossy Mocha/Gold Foil. Die cut the second Gingerbread House base piece from Rinea’s Glossy Copper/Gold Foil. Use On Point Glue to adhere the layers together.

StazOn Studio Glaze in Valentine
Step 2

Using StazOn Studio Glaze in Valentine, add color to the candy dots in the Gingerbread House.

color using assorted StazOn Studio Glaze colors
Step 3

Continue adding color using assorted StazOn Studio Glaze colors between the die cut elements of the Gingerbread House. Allow each color to dry before moving onto the next color.

VersaFine Clair in Fallen Leaves
Step 4

Cut cardstock and pattern paper to fit a 5″ x 6 1/2″ card base. Die cut large ovals from cardstock and pattern paper. Ink the edges with VersaMagic in Gingerbread, then adhere to the card. Stamp the phrase with VersaFine Clair in Fallen Leaves, cut to fit and mat with cardstock.

 Gingerbread House for Christmas card
Step 5

Adhere the Gingerbread House and phrase to the card with foam adhesives for dimension. Finish the card with any additional personal touches!

Supplies

Imagine

Other

  • Rinea Foiled Papers – Earth Tones Foiled Paper Variety Pack
  • Bazzill Cardstock – brown, white
  • Graphic 45 – Pattern Paper
  • Spellbinders Dies
  • Hero Arts Stamp
  • Foam Adhesives

“Wishing You a Merry Christmas” Treat Bags

by Steph Ackerman

"Wishing You a Merry Christmas" Treat Bags

As we near the holidays and time gets more elusive, consider creating your holiday projects in assembly-line style.  In this fashion, you can create your projects in stages and not get overwhelmed.  I love creating colorful gift bags, placing little goodies inside and giving them to friends and neighbors during the holidays.  A large background stamp inked with Onyx Black sets the stage for the addition of colorful images using Memento Markers.  Not only are gift bags fun to make, but they can also easily be customized using the wide assortment of inks and markers available from Imagine.

Skill: Intermediate
Time: 1 hour

Directions


Step 1

Ink background stamps with VersaFine Onyx Black Ink. Stamp onto gift bags. If the stamp is not wide enough to cover the gift bag, reink a portion of the stamp and stamp it again on the gift bags.


Step 2

Fold down the tops of the gift bags and ink the edges with VersaMagic Red Magic Ink.


Step 3

Stamp images with VersaFine Onyx Black Ink and use the coordinating dies to die cut the images. Using assorted Memento Markers, color the images. Die cut a larger green circle and adhere to each bag. Adhere the trucks and packages across the center of each bag. Stamp the phrases with VersaFine Onyx Black Ink and VersaMagic Red Magic. Mat the phrases with cardstock and adhere above the trucks.


Step 4

Fill the bags with assorted goodies. Punch holes in the tops and tie closed with twine.

Supplies

Imagine
  • VersaFine Inkpad – Onyx Black
  • VersaMagic – Red Magic
  • Memento Markers – Angel Pink, Bahama Blue, Cantaloupe, Dandelion, Desert Sand, Lady Bug, London Fog, Pear Tart, Rich Cocoa, Rhubarb Stalk, Summer Sky, Tuxedo Black
Other
  • Just For Fun Rubber Stamps – Background
  • Stampendous – Truck and Packages stamps and dies
  • Whisker Graphics Bags
  • Twine
  • Spellbinders – Circle dies
  • Cardstock – White, Green

Prepare for Thanksgiving with a Cardmaking Tutorial

by Steph Ackerman

Prepare for Thanksgiving with a Cardmaking Tutorial

It’s October but before you know it you will be packing away the costumes and preparing for Thanksgiving. Why not be ready by delving into the colors, signs, and beauty of the season. Selecting 4 – 5 colors of Fireworks Shimmery Craft Sprays you can easily achieve amazing color combinations that set the stage for your projects. See how quickly and easily these Fall cards go together using backgrounds created with Fireworks Sprays.

Skill: Intermediate
Time: 1 hour

Directions


Step 1

Spritz assorted colors of Fireworks! Shimmery Craft Spray on the craft mat. Be sure not to mix the colors – spritz them about the mat.


Step 2

Drag white cardstock across the craft mat. Spritz additional Fireworks on craft mat if necessary until the cardstock is covered.


Step 3

Allow the cardstock to dry, then spritz with Dandelion Fireworks adding color to the white spaces.


Step 4

Cut cardstock into 2 panels, each 4″ x 5″. Stamp leaf flourishes on both panels with VersaFine Clair in Pinecone. Add clear embossing powder and heat set.


Step 5

Ink the edges of the panels with Brilliance Pearl Beige Ink, then mat with brown cardstock. Add the panels to the cards. Add color to some of the leaves using Memento Markers.


Step 6

Stamp Happy Thanksgiving on leftover strips of the cardstock with VersaFine Pinecone Ink. Add Clear Embossing Powder and heat set. Mat with cardstock.


Step 7

Adhere Happy Thanksgiving to the vertical card with foam adhesives. Cut apart Happy Thanksgiving for the horizontal card and adhere with foam adhesives.


Supplies

Imagine
Other
  • Stamps – So Suzy/Crackerbox Stamps
  • Cardstock – brown, white
  • Foam adhesives