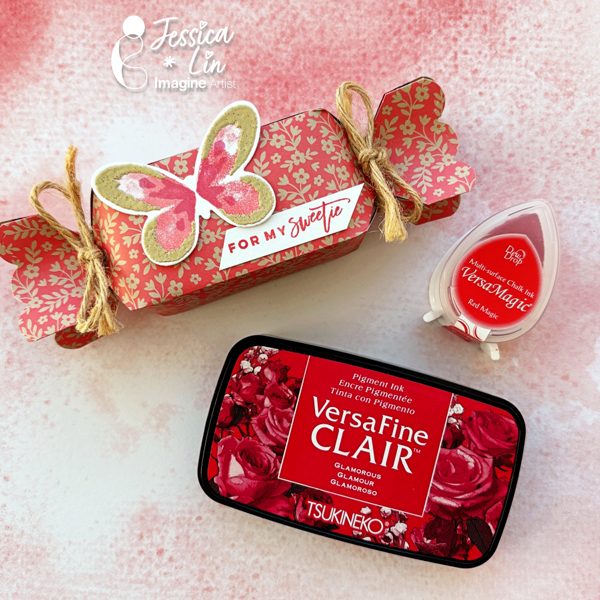
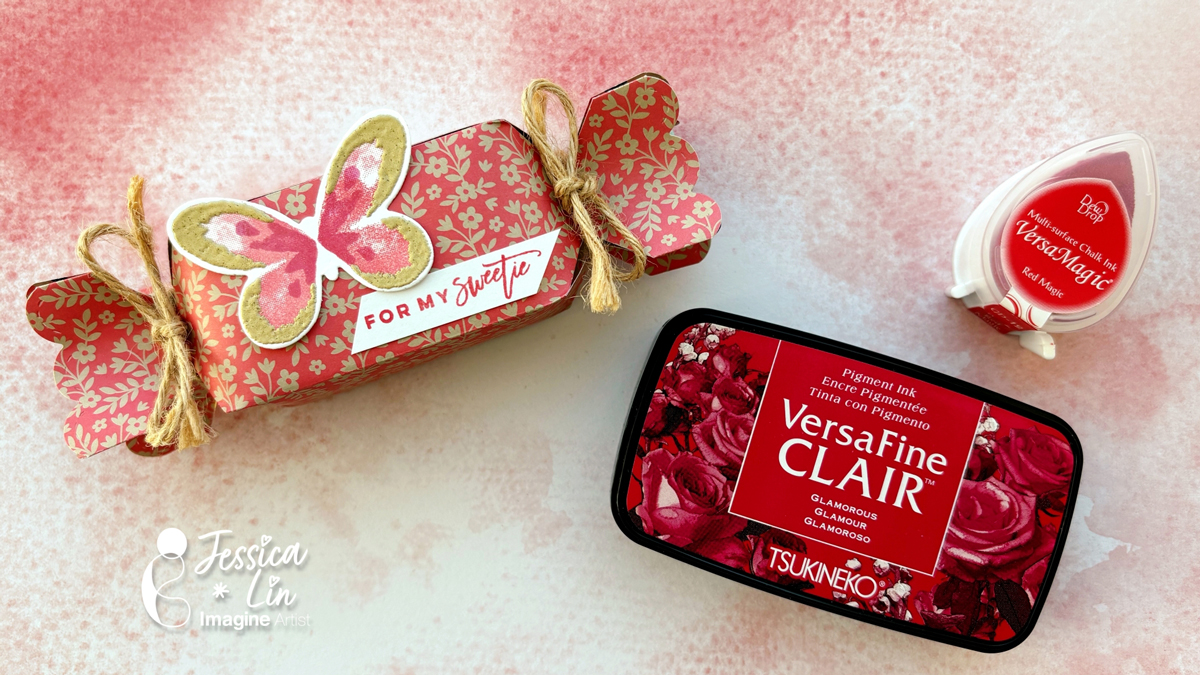
Hi everyone! It’s Jessica here. Today I am sharing a candy box idea that is fitting for all occasions. However, the candy box die I am using today is versatile and you could dress up the box for Halloween treats, too!
Directions:
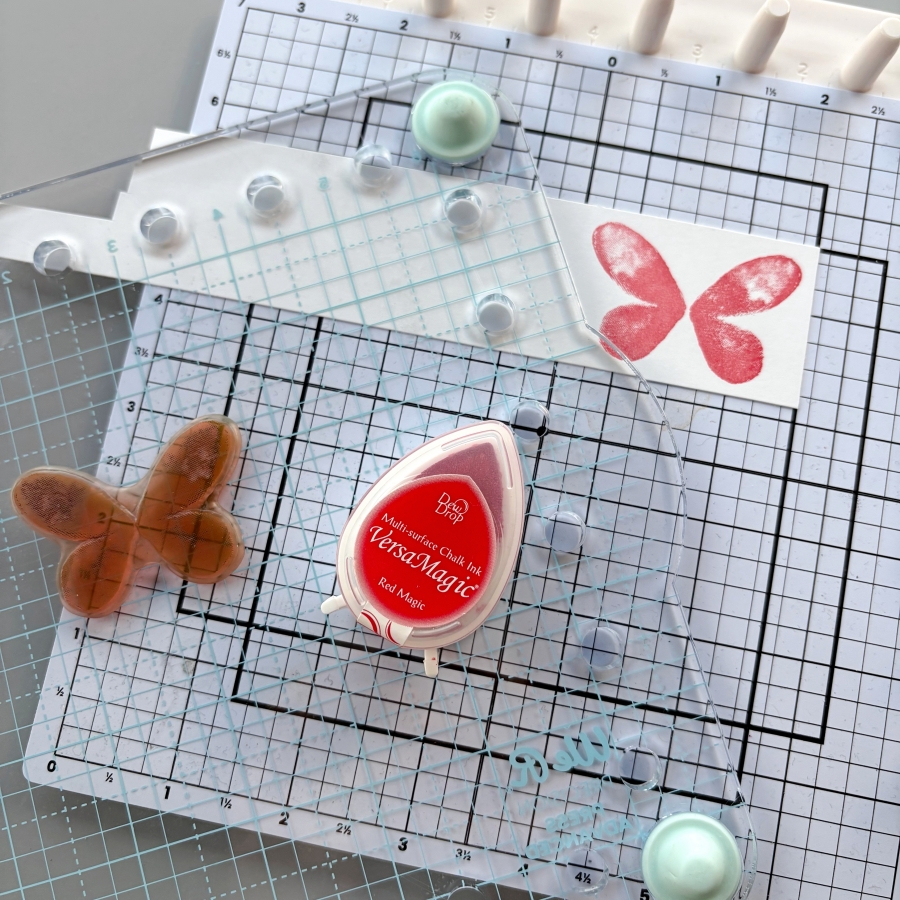
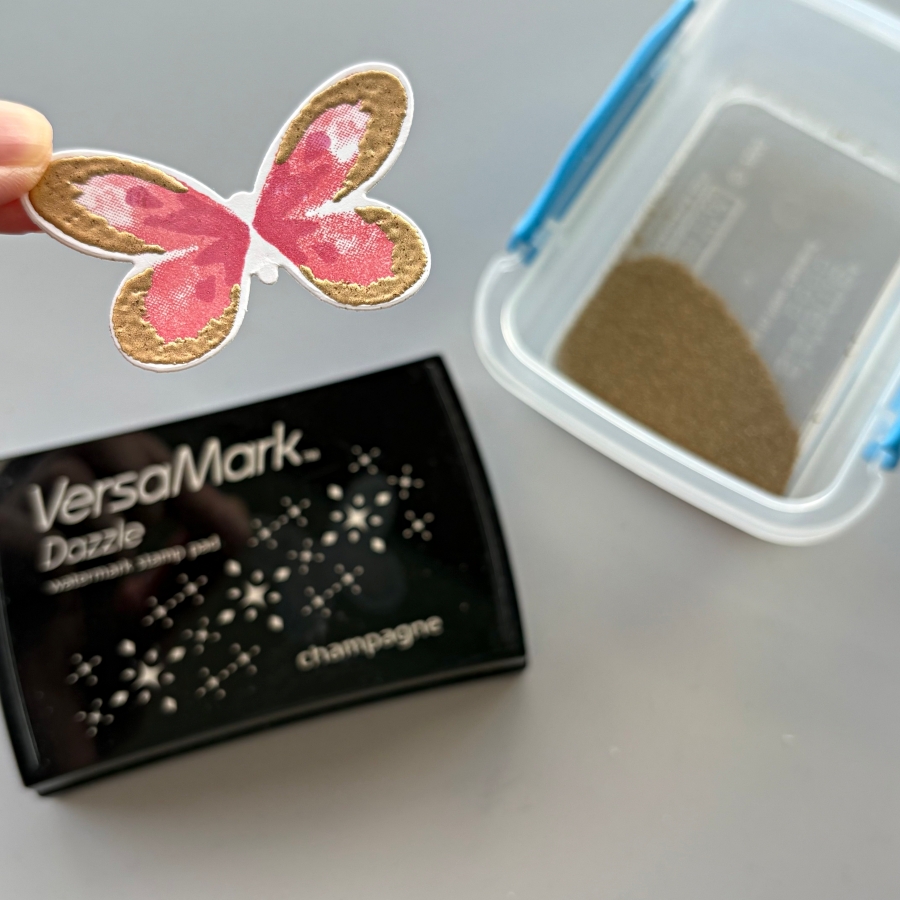
Step 1: Stamp the small butterfly base image from Stampin’ Up’s Watercolor Wings set with VersaMagic Red Magic ink pad.
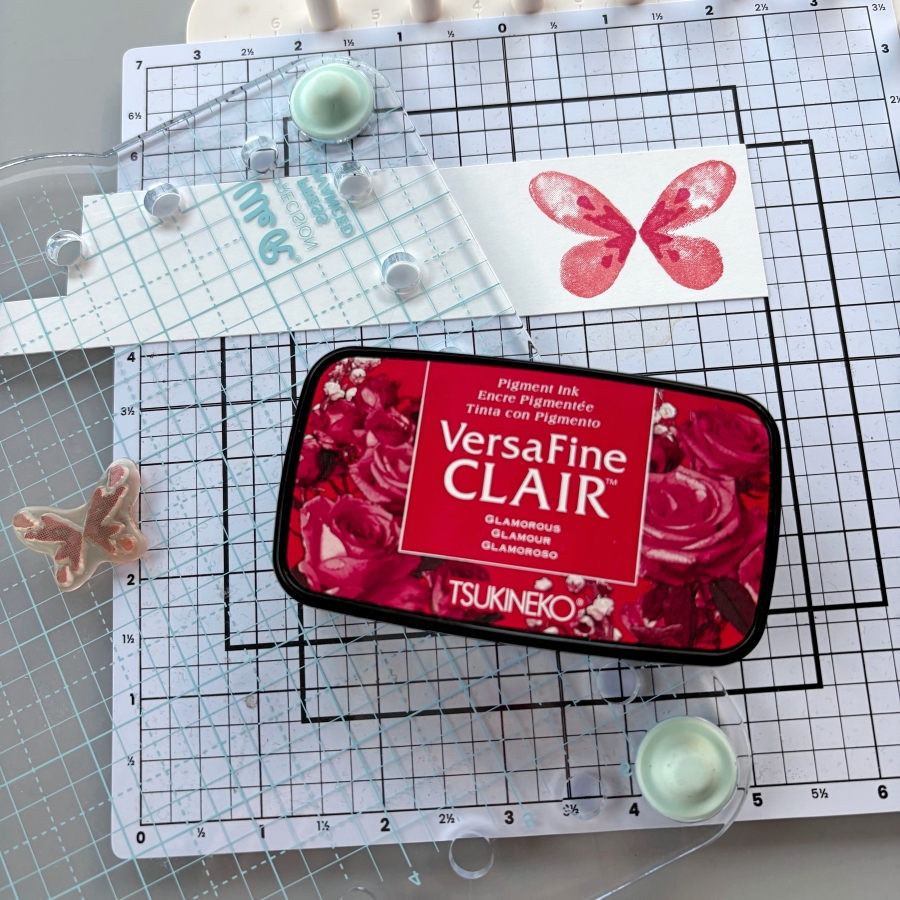
Step 2: For the second layer of the butterfly stamp, I used VersaFine Clair Glamorous ink pad. I think these two shades of red complement each other very well.
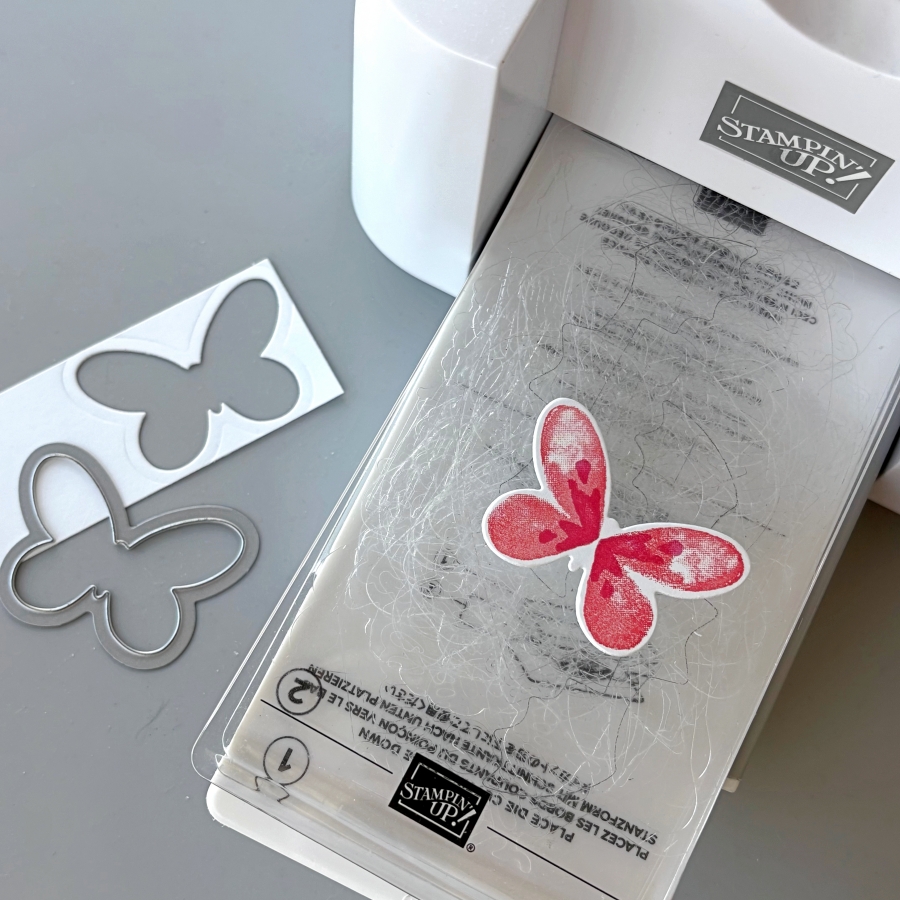
Step 3: Die cut the butterfly with the coordinating Butterflies Thinlits dies.
Step 4: Stamp the third layer with VersaMark ink pad and heat emboss with gold embossing powder.
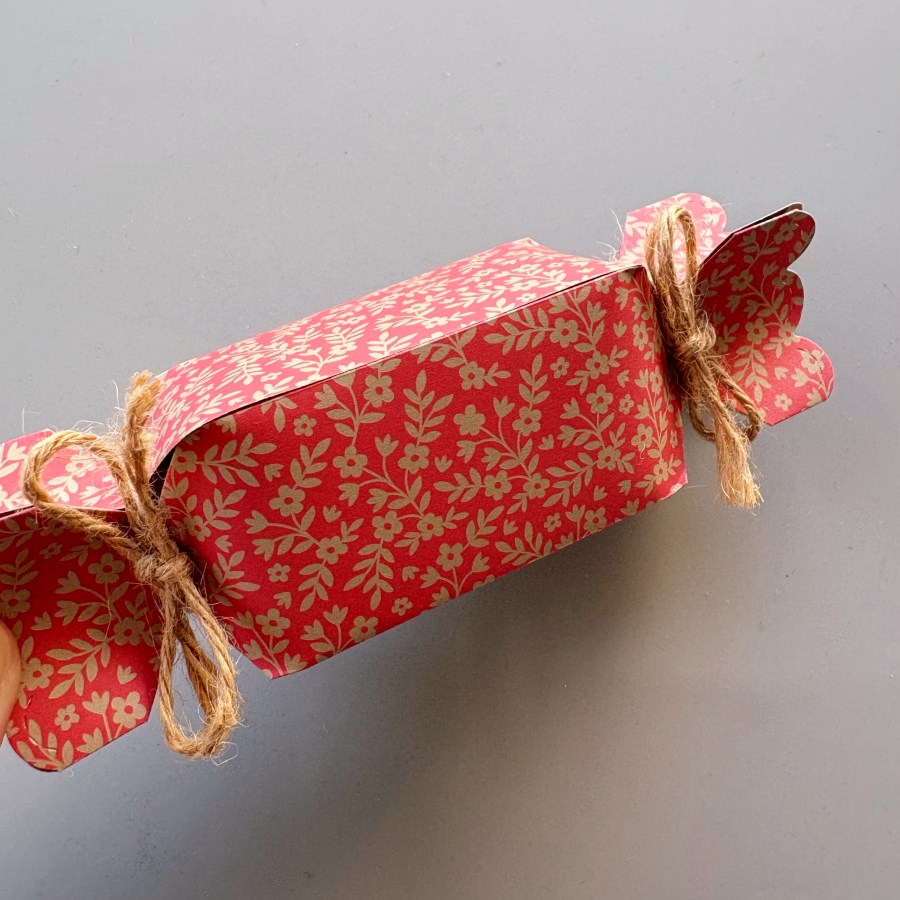
Step 5: Die cut two pieces of patterned paper using Lawn Fawn’s Candy Box die. Then adhere the sides of the boxes together with Tear-It Tape, while leaving the ends open. After filling the box with treats (chocolates like Ferrero Rocher and Lindt are perfect!), tie the ends of the candy box with pieces of twine.
Step 6: Stamp a sentiment with VersaMagic Red Magic ink and this simple treat box is complete! Imagine
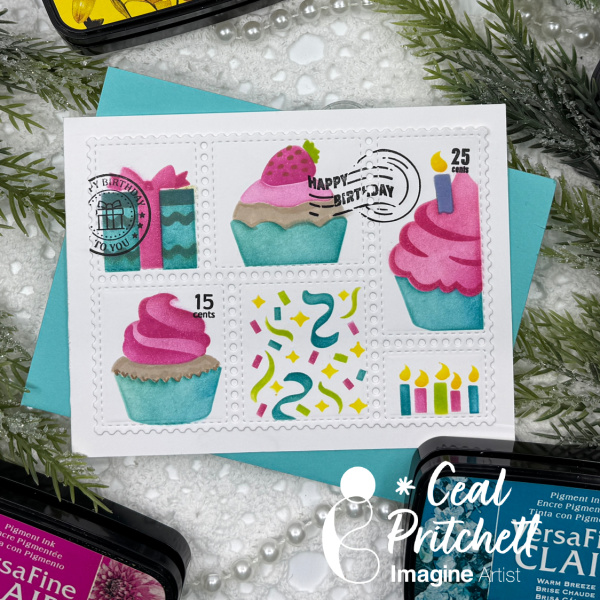
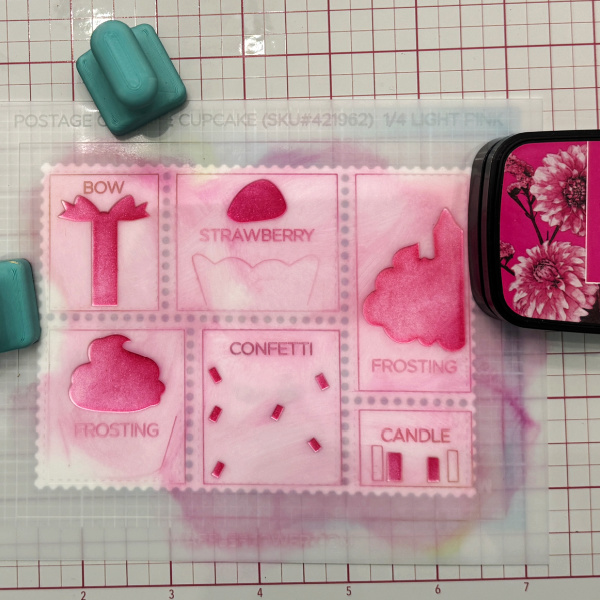
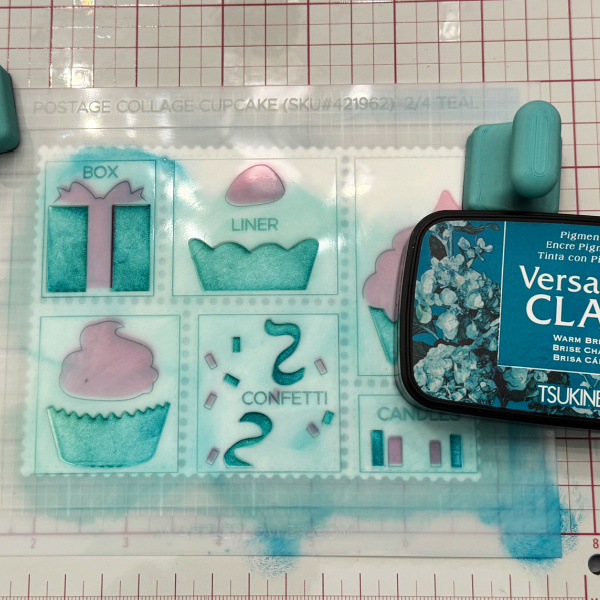
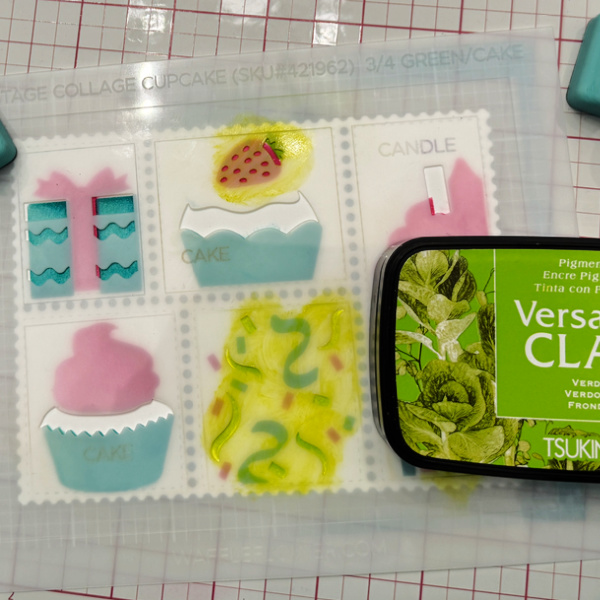
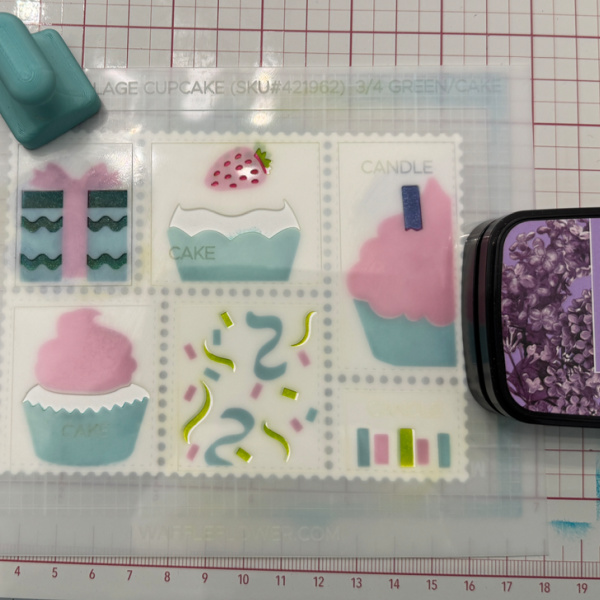
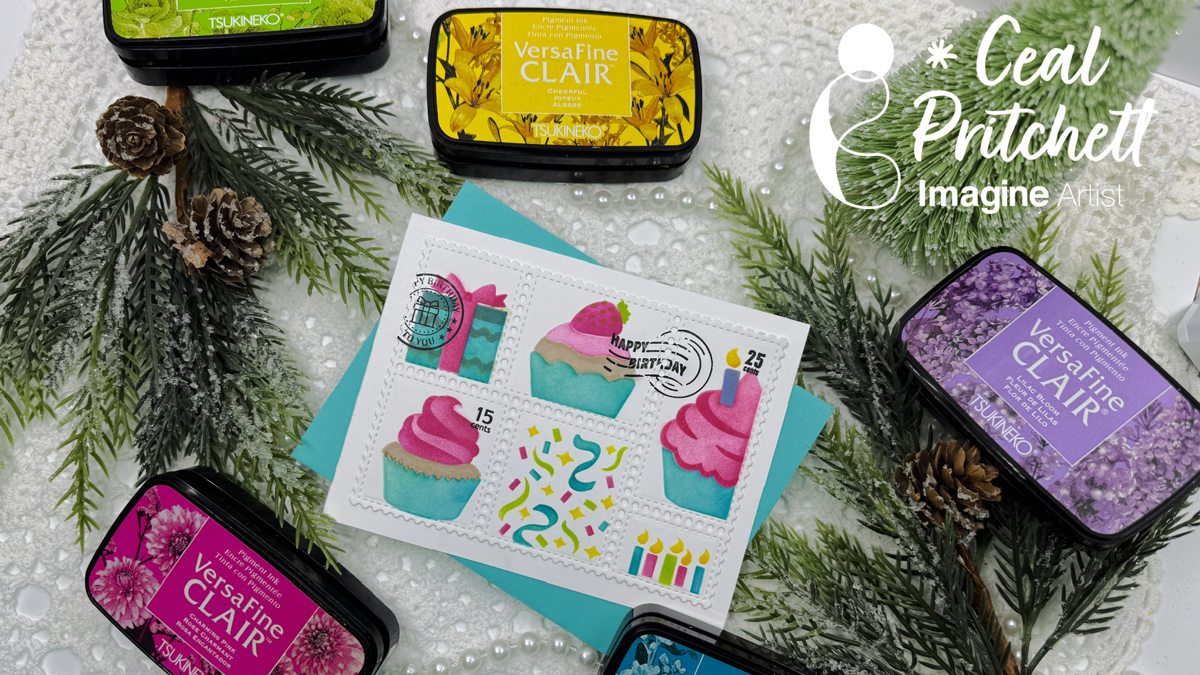
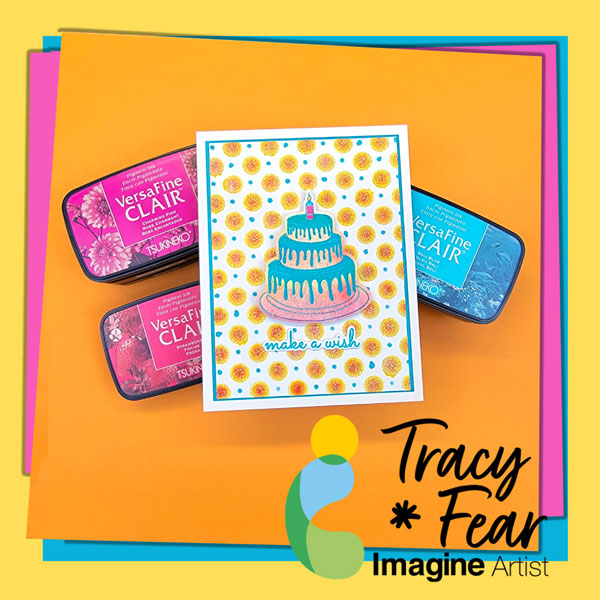
It’s Ceal, back to share with you. Today I am sharing a birthday card using some postage stencils which are all the rage lately.
Skill: Beginner Time: 30 minutes
Directions:
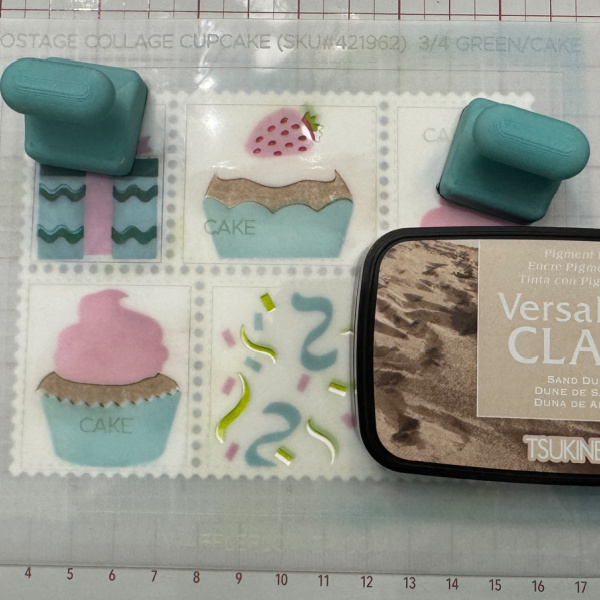
Gather your supplies. For this project you will need several colors of inks, postage stencils and a postage die.
Step 1: Using VersaFine Clair Charming Pink, ink the first layering stencil.
Step 2: Using VersaFine Clair Warm Breeze, ink up the second layering stencil.
Step 3: Using VersaFine Clair Verdant, ink the strawberry, the candles and the streamers.
Step 4: Using VersaFine Clair Lilac, ink the candle and over the present.
Step 5: Using VersaFine Clair Sand Dune, ink the cake portion.
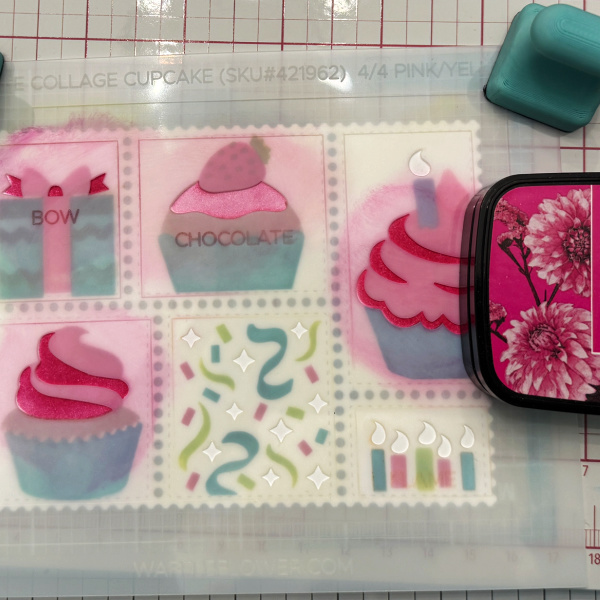
Step 6: Using VersaFine Clair Charming Pink, ink over the cake frosting again with a heavy hand, the cupcake up top I inked with what ink was left on the brush.
Step 7: Using VersaFine Clair Cheerful, ink over the candle flames and streamers.
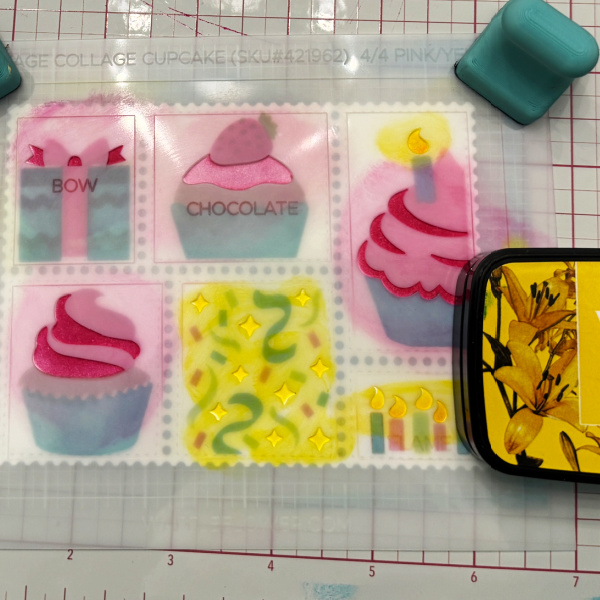
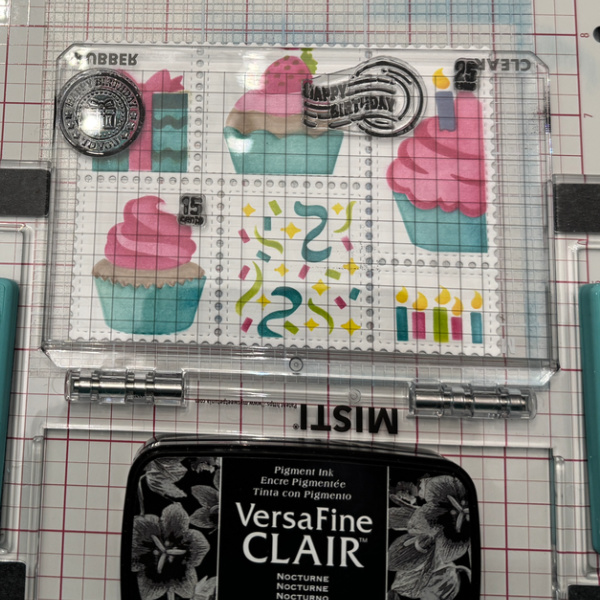
Step 8: Stamp sentiment and postage with VersaFine Clair Nocturne.
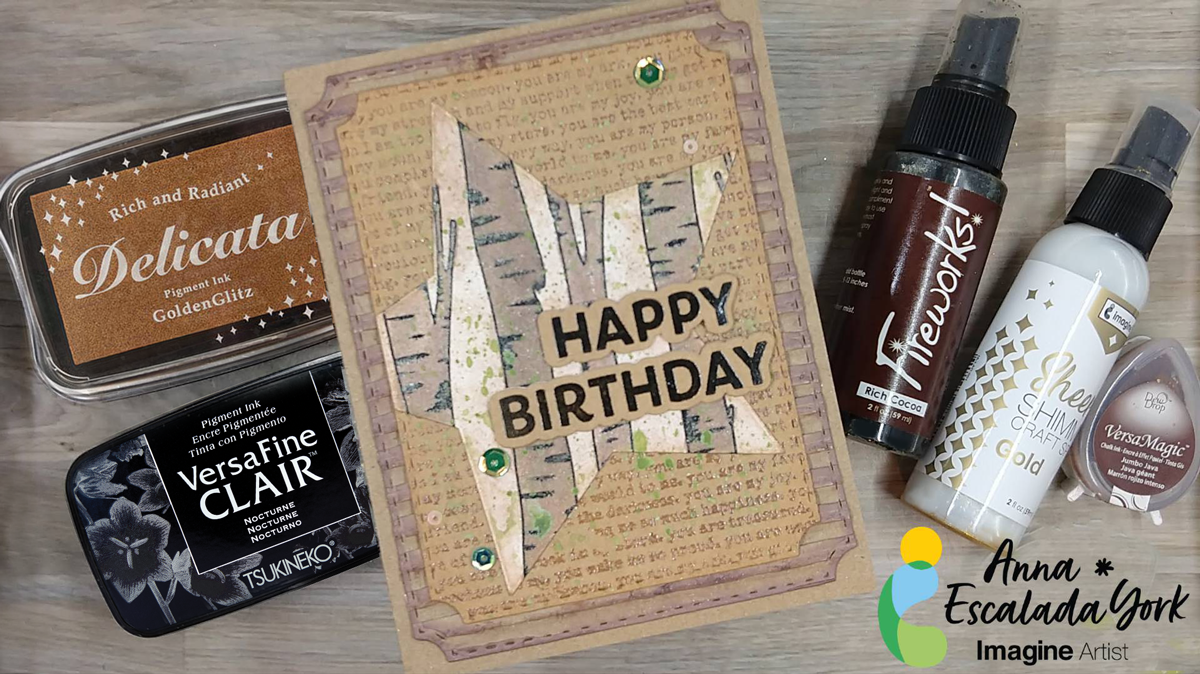
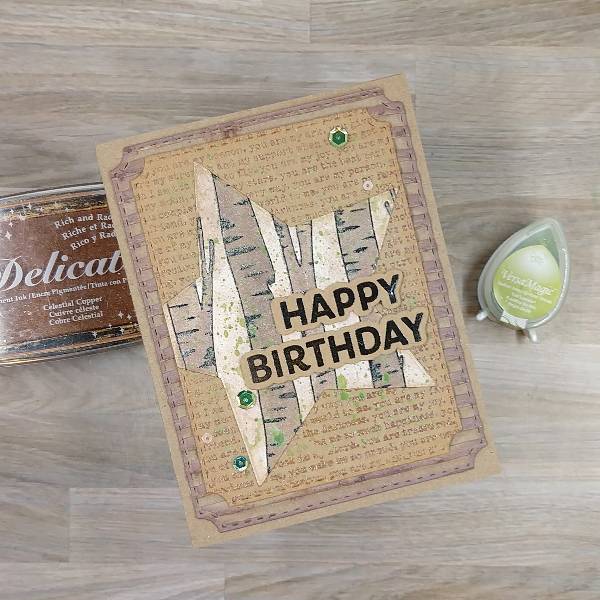
I wanted to use my husband’s birthday to make him a personalized birthday card. He loves to be in nature and loves it when I use recycled materials (mostly because then we don’t have to buy new things). I also added a background that expresses how I feel about him.
Skill Level: Intermediate Time: 2 hours
Directions:
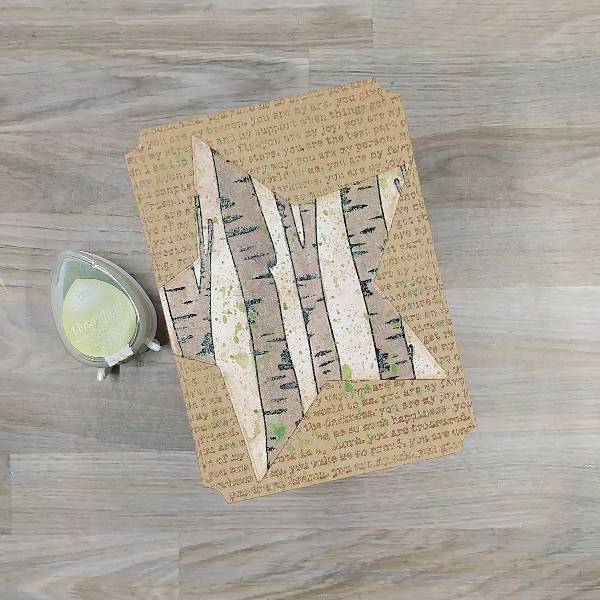
Step 1: Stamp a piece of kraft cardstock with a text-based background stamp with Jumbo Java VersaMagic Chalk Ink. Heat emboss with clear embossing powder. Die cut the panel with the second-largest die from a nested A2-sized nested die set.
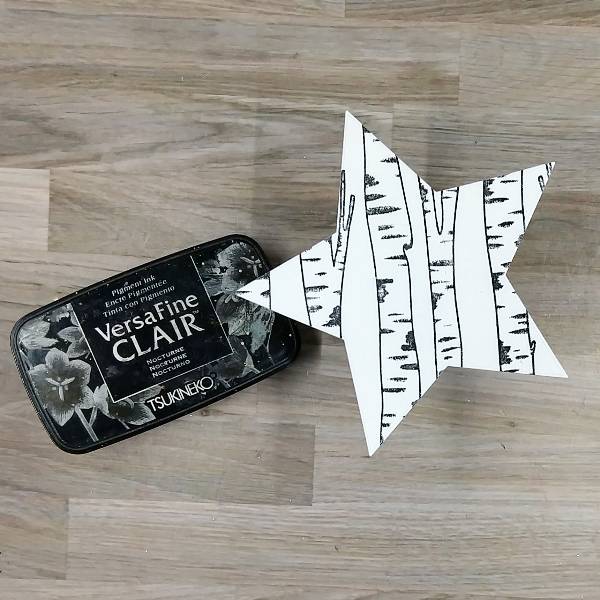
Step 2: Stamp a large tree stamp set on a piece of watercolor paper with Nocturne VersaFine Clair ink. Heat emboss with clear embossing powder. Die cut with a mid-sized star die from a nested star die set.
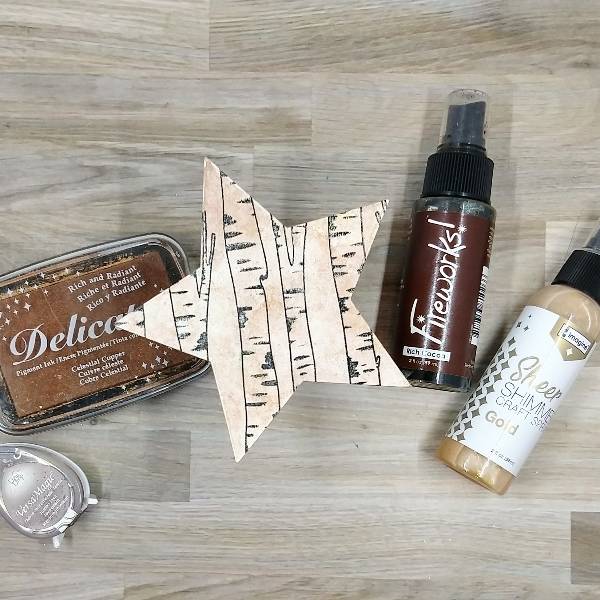
Step 3: Lightly spray Rich Cocoa Fireworks! Craft Spray and Gold Sheer Shimmer Craft Spray onto the watercolor stamped star. Blot a little of the spray off with a paper towel and allow to dry. Then Then press Celestial Copper Delicata ink onto a piece of acetate packaging and spray with water. Watercolor smoosh the star by pressing the liquid copper onto the panel. Then repeat the watercolor smooshing with Jumbo Java VersaMagic Chalk Ink mixed with water on the acetate. Let the panel dry again.
Step 4: Mix some of the remaining Jumbo Java VersaMagic Chalk Ink and water with more of the Rich Cocoa Fireworks! Craft Spray to make a darker brown watercolor. Paint the trees with the watercolor. Allow to dry. Apply a second coat of watercolor to a few trees to add interest and darker trees. Allow to dry a second time.
Step 5: Stamp a sentiment on kraft cardstock with Nocturne VersaFine Clair ink. Then heat emboss with more clear embossing powder. Then die cut with the corresponding dies.
Optional: Die cut 2 more die cut layers for each of the sentiment (3 layers total for each of the dies–1 that is the stamped kraft layer, and two scrap layers). Glue the layers together and set aside to dry.
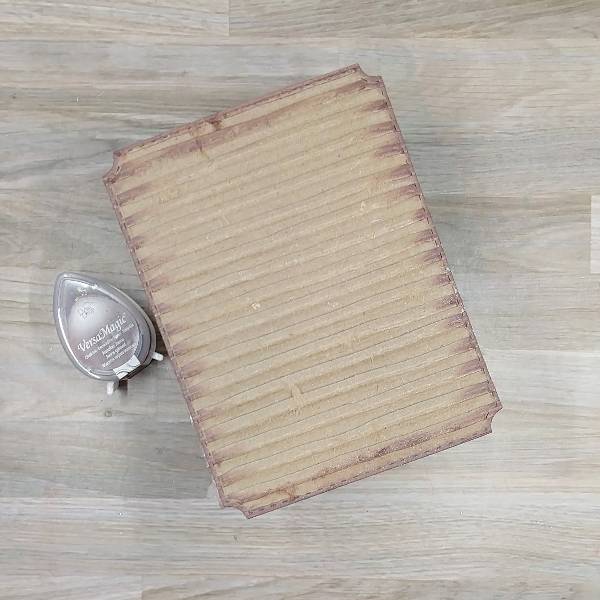
Step 6: Die cut a piece of corrugated cardboard with the largest die from an A2-sized nesting panel die set. Then brush the edges of the panel with Jumbo Java VersaMagic Chalk Ink.
Step 7: Use a sponge dauber to ink blend the edges of the star with Celestial Copper Delicata ink. Glue the die cut star onto the smaller, stamped panel. Trim the overhanging left part of the star. Then press Tea Leaves VersaMagic Chalk Ink onto acetate packaging and spray with water.
Splatter the Tea Leaves-colored watercolor onto the panel. Add a couple of watercolor smooshed areas to add interest (or to cover areas where you want splatters but the splatters are not doing what you want). Allow to dry.
Step 8: Brush the edges of the smaller, stamped panel with the Celestial Copper Delicata ink pad.
Step 9: Assemble the card. Glue the two panels together. Glue the sentiment strips onto the panel. Then add sequins on the lower left and upper right parts of the card. Then glue the whole thing onto an A2-sized kraft card base.
Other • Altenew – die set – Wings & Petals (for the sentiment) • Altenew – stamp set – Wings & Petals (for the sentiment) • Catherine Pooler – sequin mix – Wintergreen • Pink and Main – die set – Notched Corners • Simon Hurley create – background stamp – Timber! • Simon Says Stamp – die set – Nested Stars Wafer Dies • Simon Says Stamp – background stamp – You Are • Kraft cardstock • Watercolor paper • Corrugated cardboard • Clear Embossing Powder
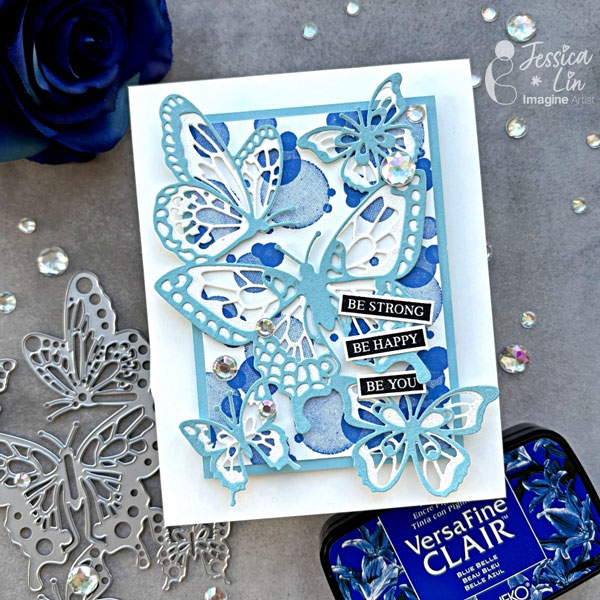
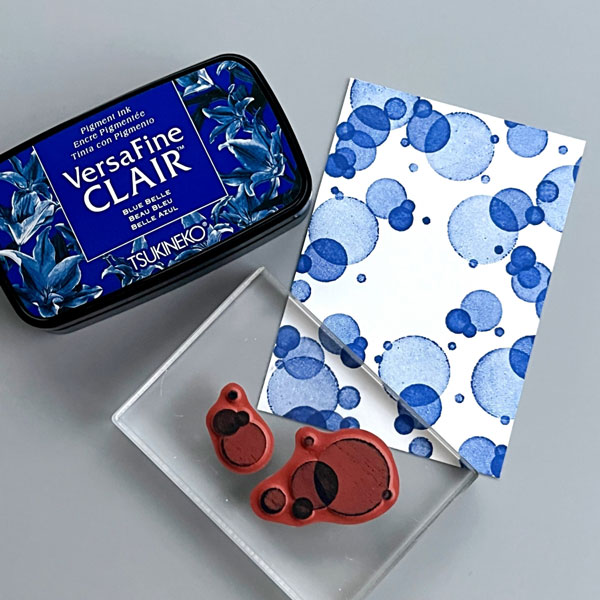
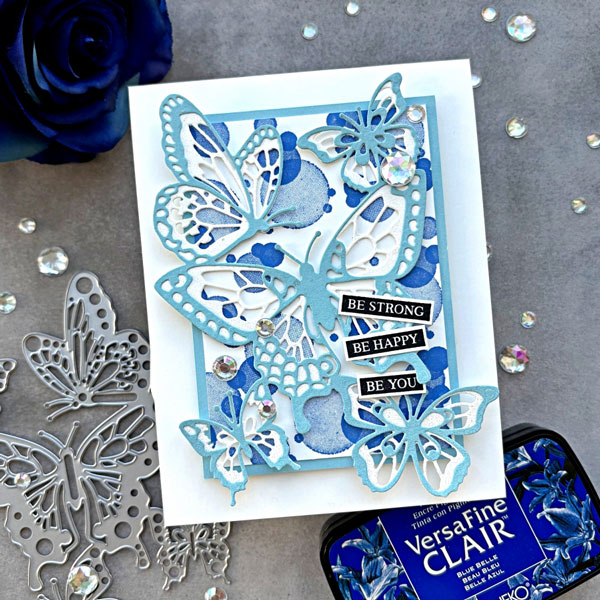
Hi everyone! It’s Jessica here. Today I will be creating a butterfly card with bright blue colors. If you are looking for monochromic card ideas, just keep reading!
Step 1: Stamp a bokeh background using Stampin’ Up’s Beauty Abounds stamp set. The stamp uses a unique technology to create light and dark shades even though I am only stamping with VersaFine Clair Blue Belle ink. I also tried to use splatter stamps to create a different background and that worked well, too.
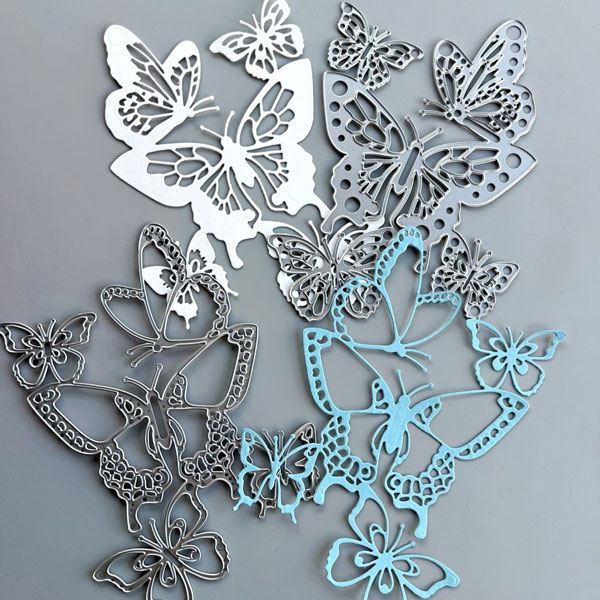
Step 2: Die cut the bottom butterfly layer with white cardstock and the top layer with light blue cardstock. Then adhere the top layer to the bottom layer. Since this is an intricate design with fine lines, I adhered Stick It adhesive to the blue cardstock before die cutting. This way, the blue top layer becomes a peel and stick. Alternatively, you could use glue with fine-tip nozzles, like the On Point Glue.
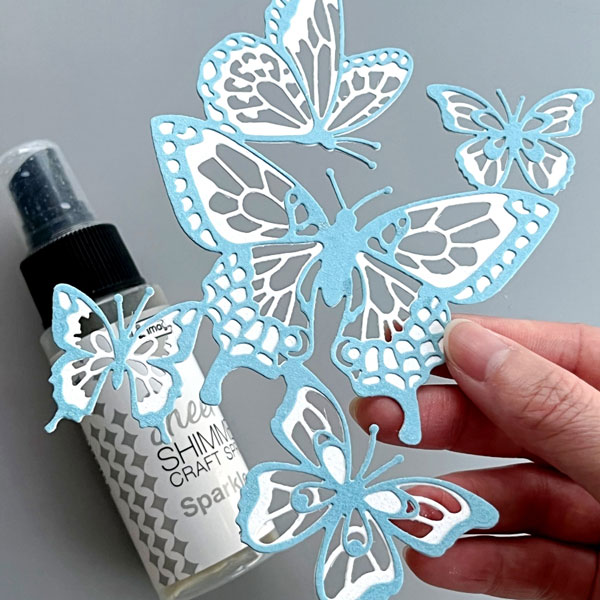
Step 3: Then I spritzed a generous layer of Sheer Shimmer Craft Spray in Sparkle to create a subtle metallic shine on the butterfly die cut.
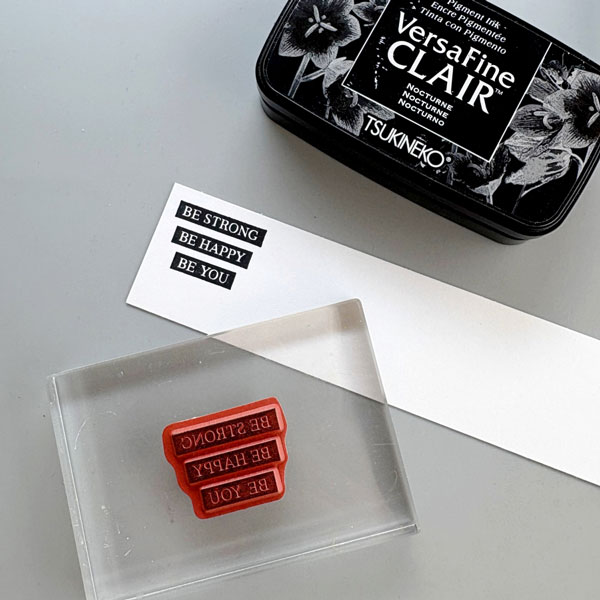
Step 4: Stamp the sentiment with VersaFine Clair Nocturne ink pad. This stamp is from Stampin’ Up’s Rooted in Nature set. I decided to cut around each word to create the tape label look.
Step 5: Apply On Point Glue to the butterfly die cut, avoiding the overhang areas, and adhere to the bokeh background. Then mount the bokeh background to the card base with foam tape. Finally, adhere the sentiment with Tear-It Tape and embellish with some rhinestones, and the card is complete!
Art Supplies • Die cutting machine • 100lb white paper • A2 Card Base • Foam Strips • Dies • Orange-tone iridescent sparkle paste • Stencils • Glue
Other Products Used • Simon Hurley Astro Paste in Phoenix Feather • Clear Embossing Powder • Simon Hurley Polka Dot Assortment Layering Stencil • Simon Hurley Birthday Party Stamps and coordinating dies • PVA Adhesive • Foam Tape
ALTERNATIVE PRODUCTS THAT CAN BE USED TO RECREATE SOMETHING SIMILAR
Any Inks, any combination of dies!
To learn how to create your own Birthday card, click here!
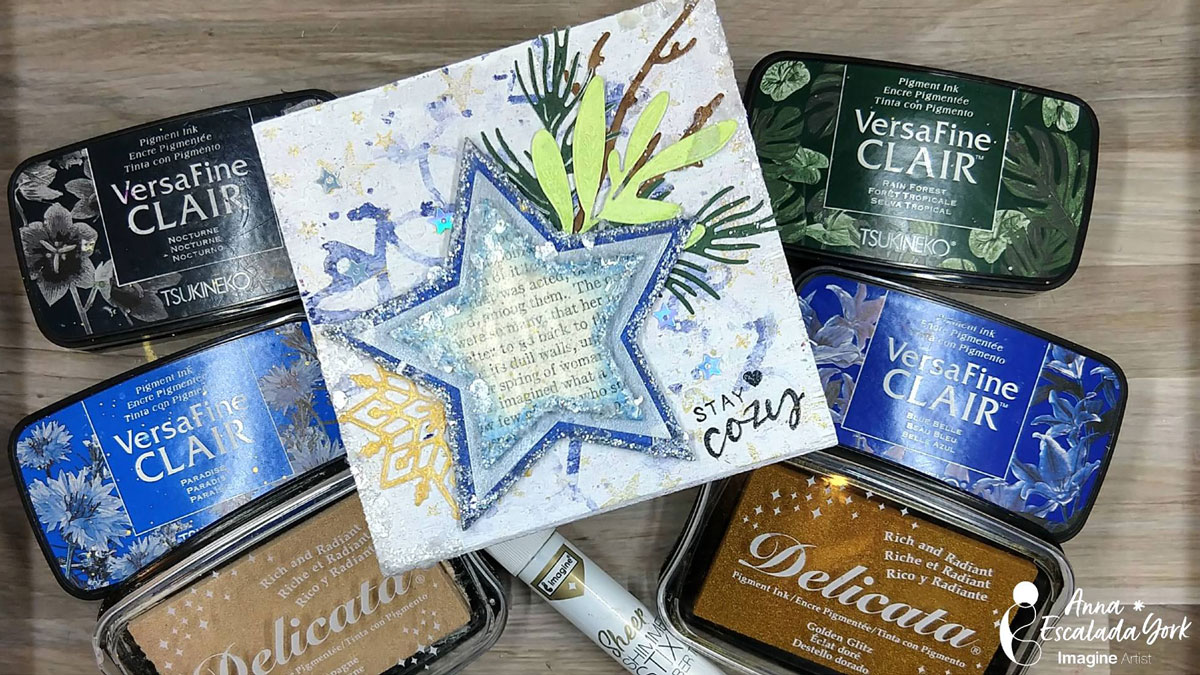
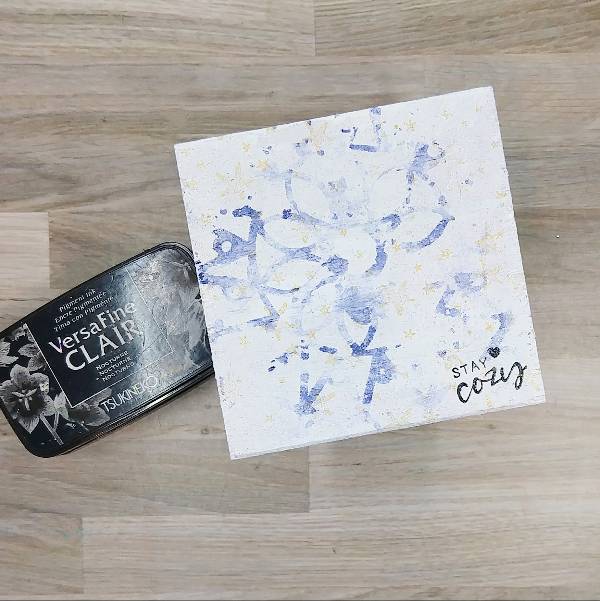
It was time to reuse a small piece of wood to create a small piece of winter decor to add a little fun to a bookshelf. The stars feature wintery colors (blues and white) surrounded by some winter greenery, a snowflake and sparkly elements.
Skill: Intermediate Time: 2 hours (active time) + dry time
Directions
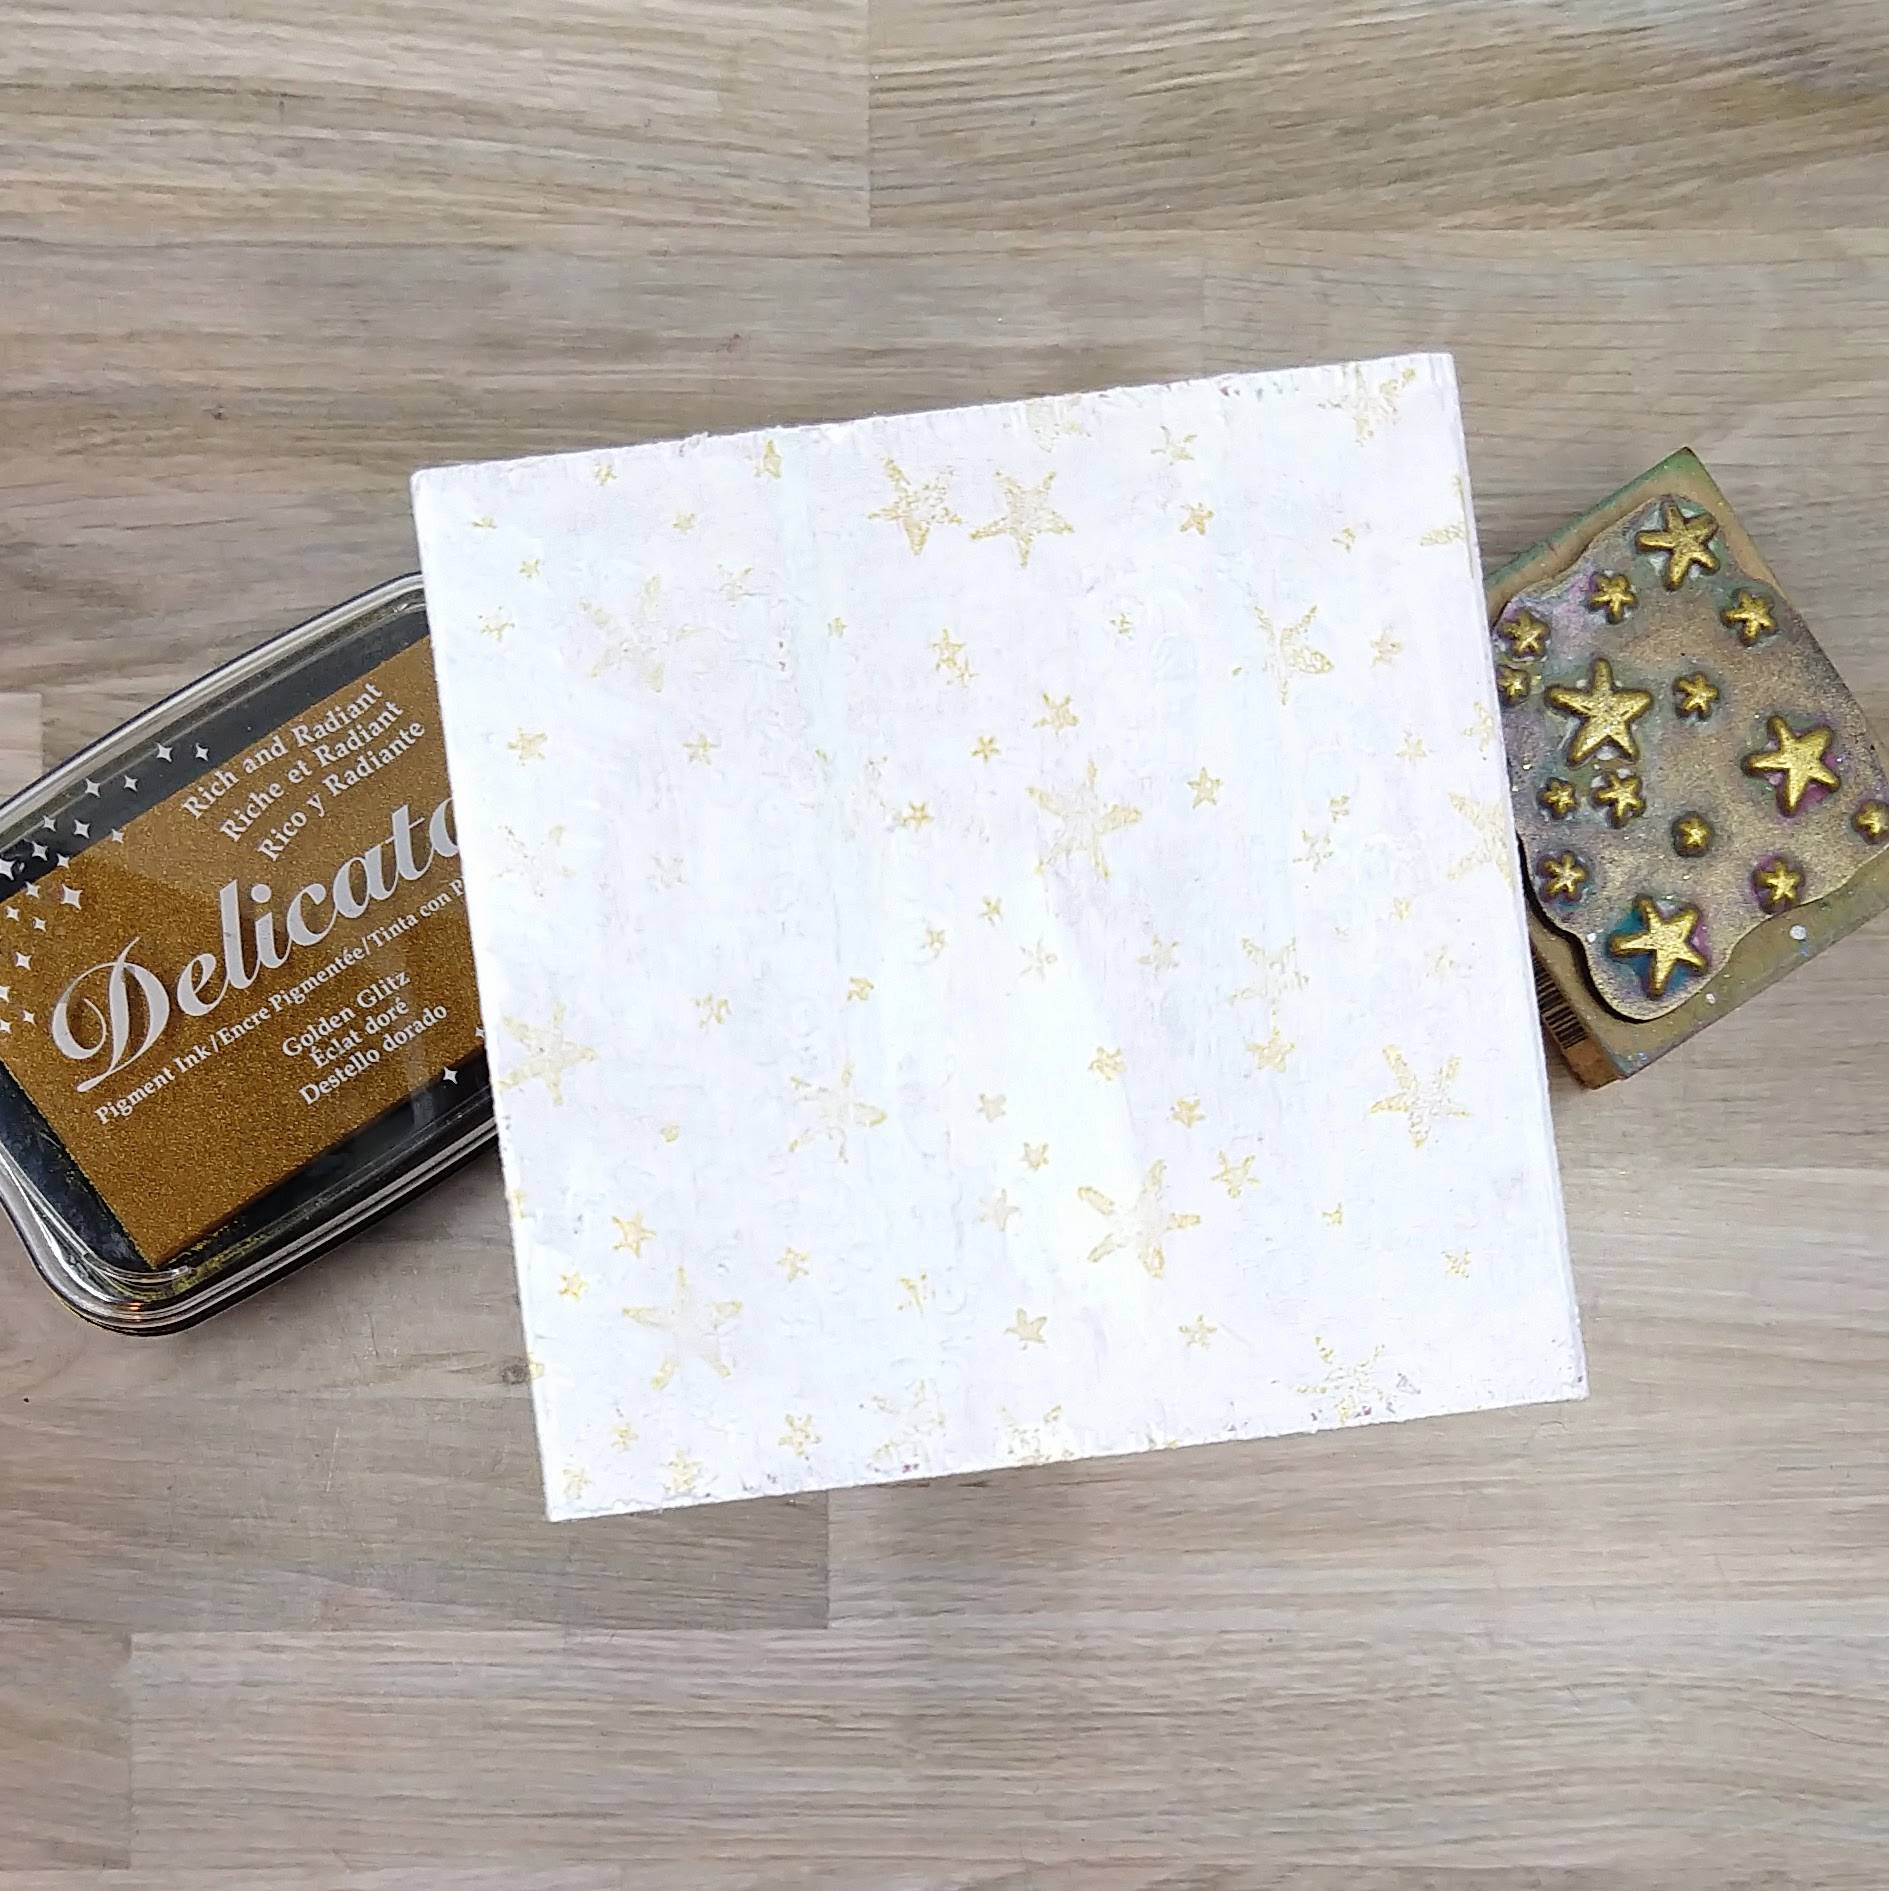
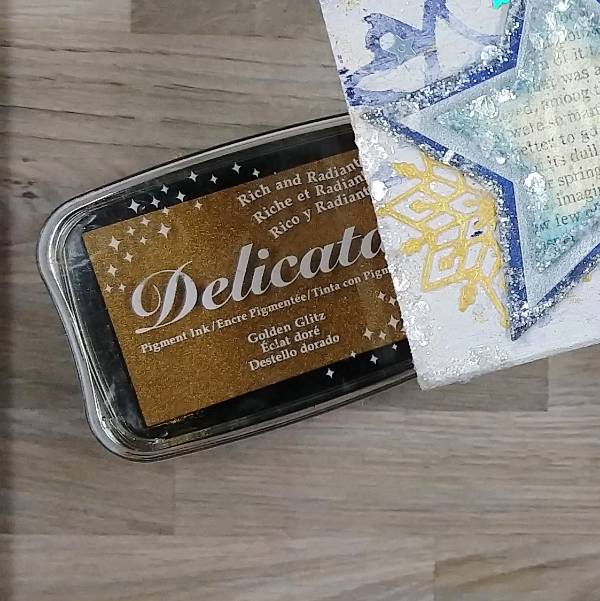
Step 1: Cover the wood block with a layer of Gesso. Allow to dry. Then stamp the block repeatedly with Golden Glitz Delicata Ink on a small woodblock star stamp.
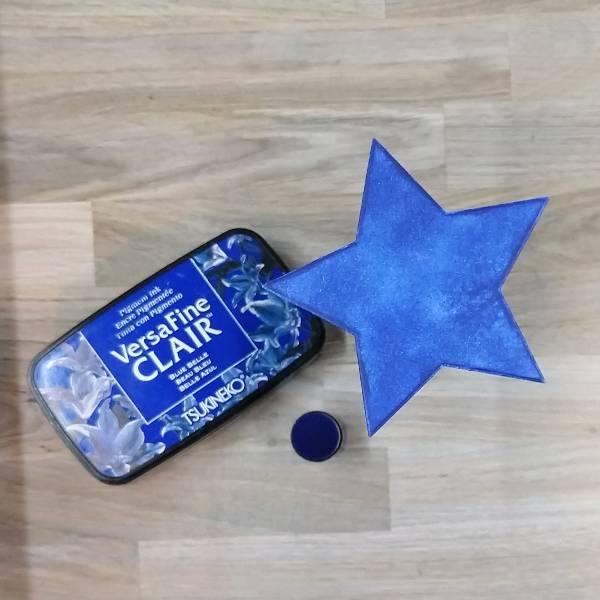
Step 2: Ink blend a piece of die cut watercolor paper with Blue Belle VersaFine Clair Ink using an ink dauber.
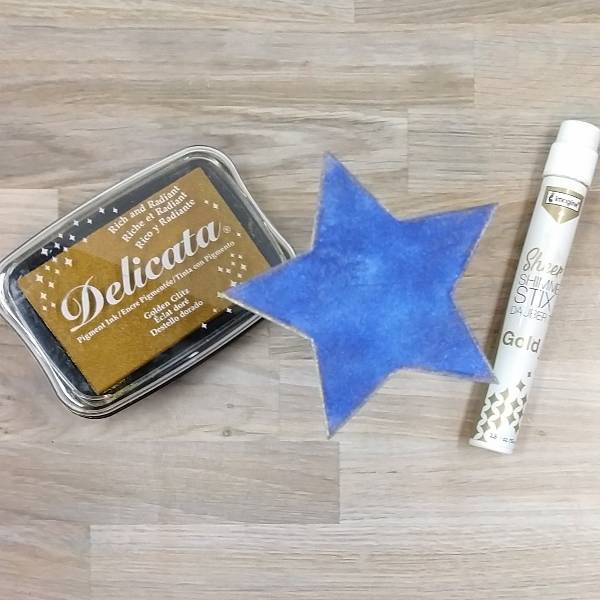
Step 3: Press the dauber of a Gold Sheer Shimmer Stix Dauber Top stick along the edges of the blue die cut star. After drying, press the edge of the Golden Glitz Delicata Ink pad along the edges to enhance the gold border of the star.
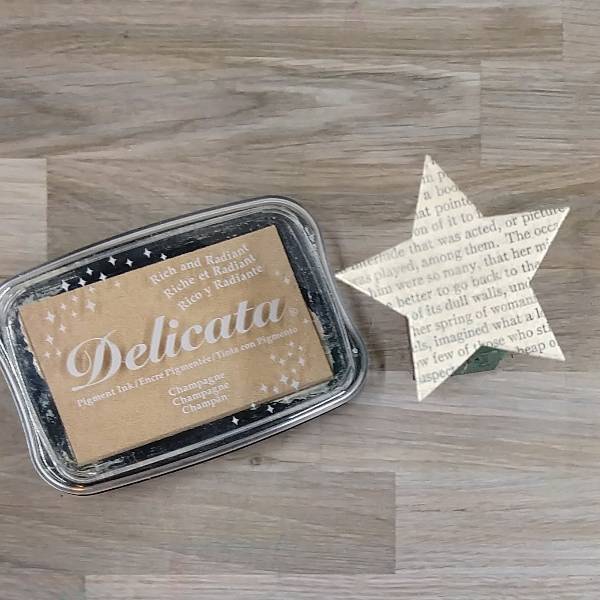
Step 4: Glue a book page onto a scrap of cardstock. After the glue has dried, die cut the glued page with a smaller star. Then press a Champagne Delicata ink pad directly onto the die cut book page to obscure some of the words on the page and add sparkle.
Not pictured: Die cut a piece of sparkly vellum. This die-cut star should be in between the other two in size.
Step 5: Ink blend the sides of the star with Paradise VersaFine Clair Ink with a sponge dauber.
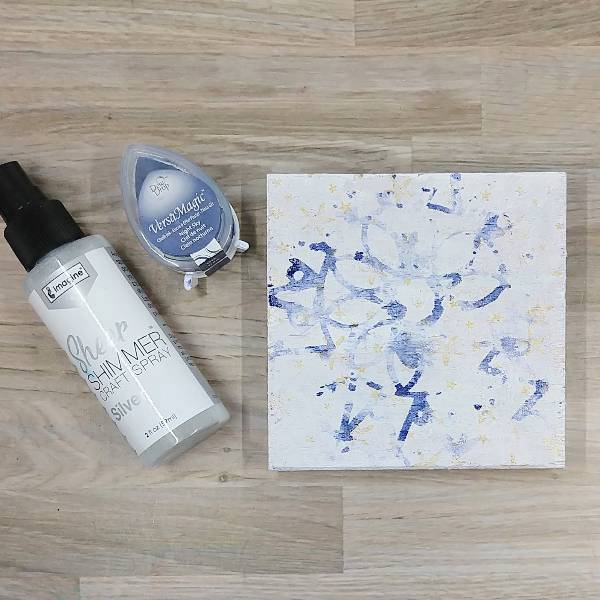
Step 6: Press a stencil into a Night Sky VersaMagic Chalk Ink pad. Then spray the stencil with Silver Sheer Shimmer Craft Spray. Press the inky side of the stencil onto the wood block. Keep the stencil in place by placing something heavy (such as a large wood stamp or book) on top of both and allow the ink to dry. Then remove the stencil.
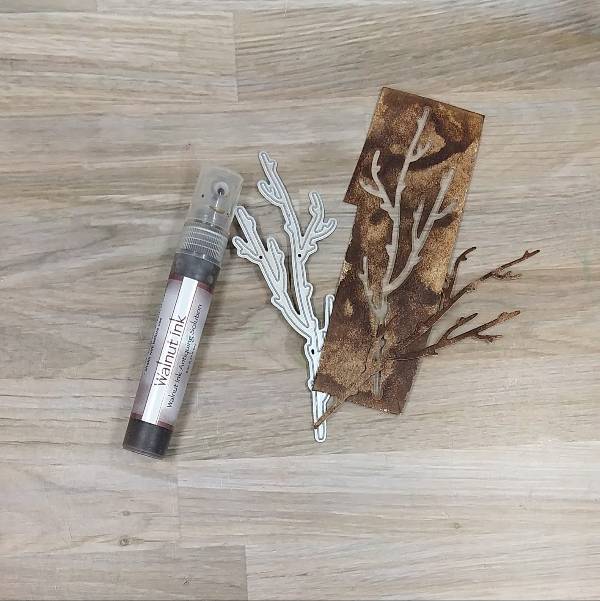
Step 7: Spray Walnut Ink Antiquing Solution (in Walnut Ink color) onto a small piece of watercolor paper. After it dried, die cut with a branch die cut.
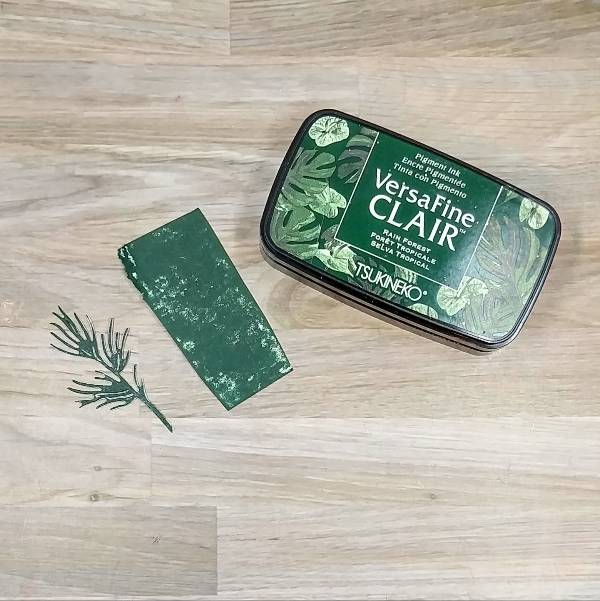
Step 8: Color the greenery. Press a Rain Forest VersaFine Clair Ink pad onto a piece of water color paper. After the ink dries, die cut two pieces of evergreen needles.
Not pictured: Spray New Sprout Fireworks! Craft Spray onto another piece of watercolor paper. After the spray dried, die cut the watercolor paper with a mistletoe die.
Step 9: Add a sentiment on the lower right corner of the block with Nocturne VersaFine Clair ink and heat emboss with clear embossing powder.
Step 10: (My camera lost the picture of this step. I wanted you to at least see the gold snowflake on the finished project.)
Press Golden Glitz Delicata Ink onto another piece of watercolor paper. Then heat emboss with clear embossing powder. Die cut the paper with a small snowflake die. (The whole snowflake was tucked behind the star in the next step.
Step 11: Assemble the project. Glue the die cut snowflake in the lower left corner of the block and the greenery (branch, mistletoe and pine needles) in the upper right corner. Add glue along the edges of both the large, dark blue and small book page stars and add glitter. Allow to dry. Then add glue along the upper right and lower left corner of the block and add more glitter. Allow the glue to dry.
Layer the three layers of star die cuts. Glue the medium onto the large dark blue star. Then attach the small book page layer onto the vellum layer with foam tape. After the glue dries, attach the layered star onto the block with more foam tape. Glue star embellishments in the upper left and lower right corners of the block to finish the project.
• Altenew – foam tape – Instant Dimension Foam Tape Golden – • Gesso Semi-Opaque Acrylic Primer • Simon Says Stamp – die set – Nested Stars Wafer Dies • Simon Says Stamp – embellishment mix – North Star • The Crafter’s Workshop – stencil – Stained Glass (TCW 462S) • Unity Stamp Company – stamp set – …shake your flakes (December Unity Sentiment Kit 2022) • Woodblock star stamp in my stash • Small branch die • Evergreen needles die • Mistletoe die • Small snowflake die • Clear Embossing Powder