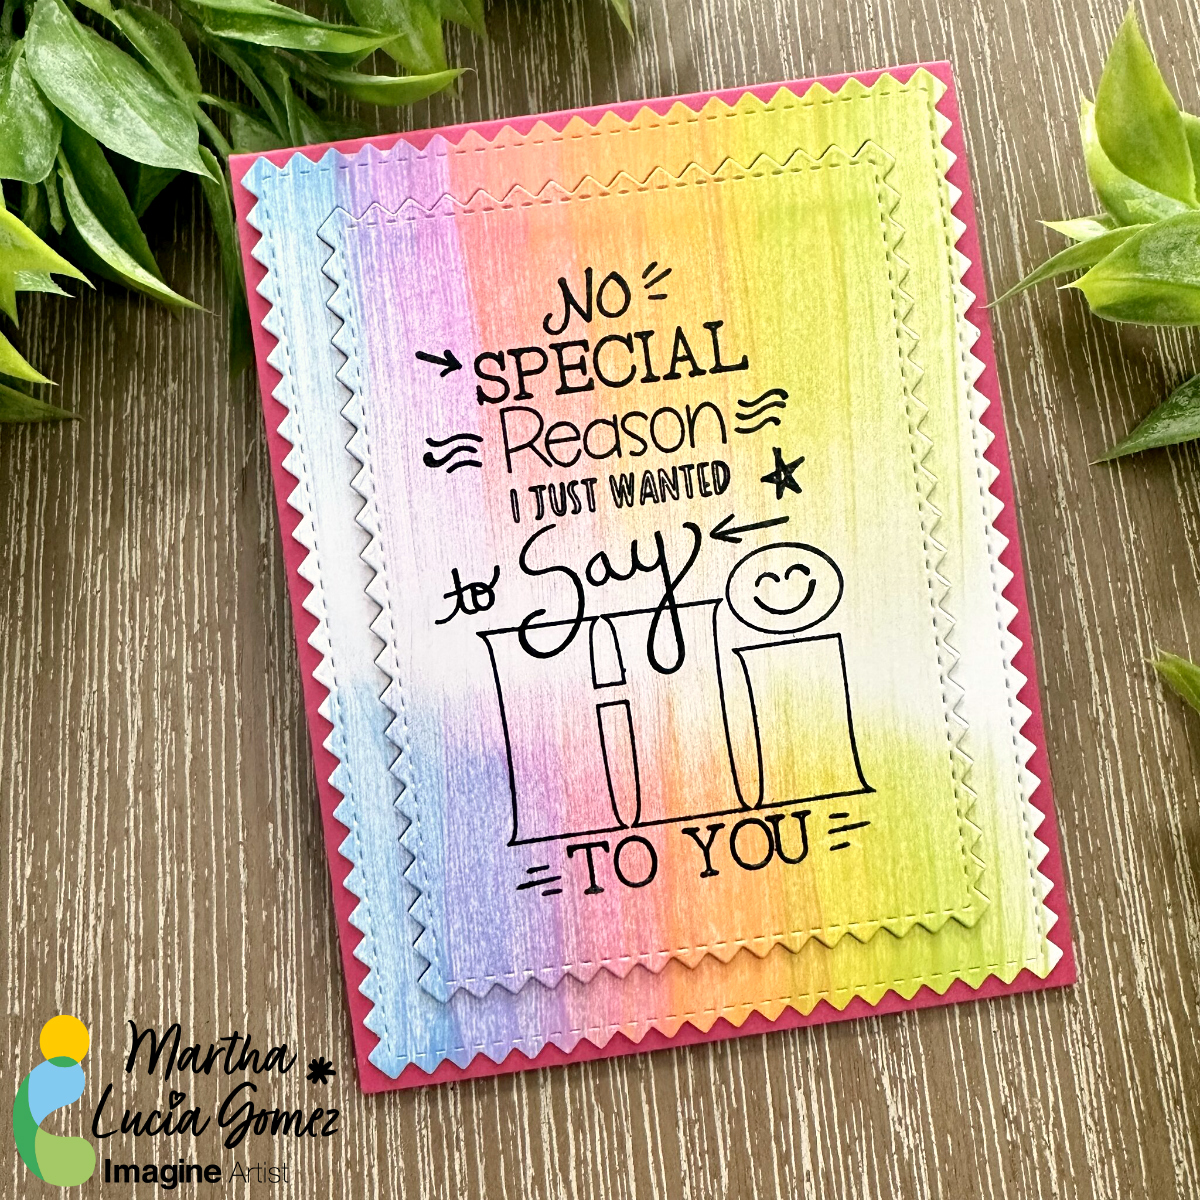
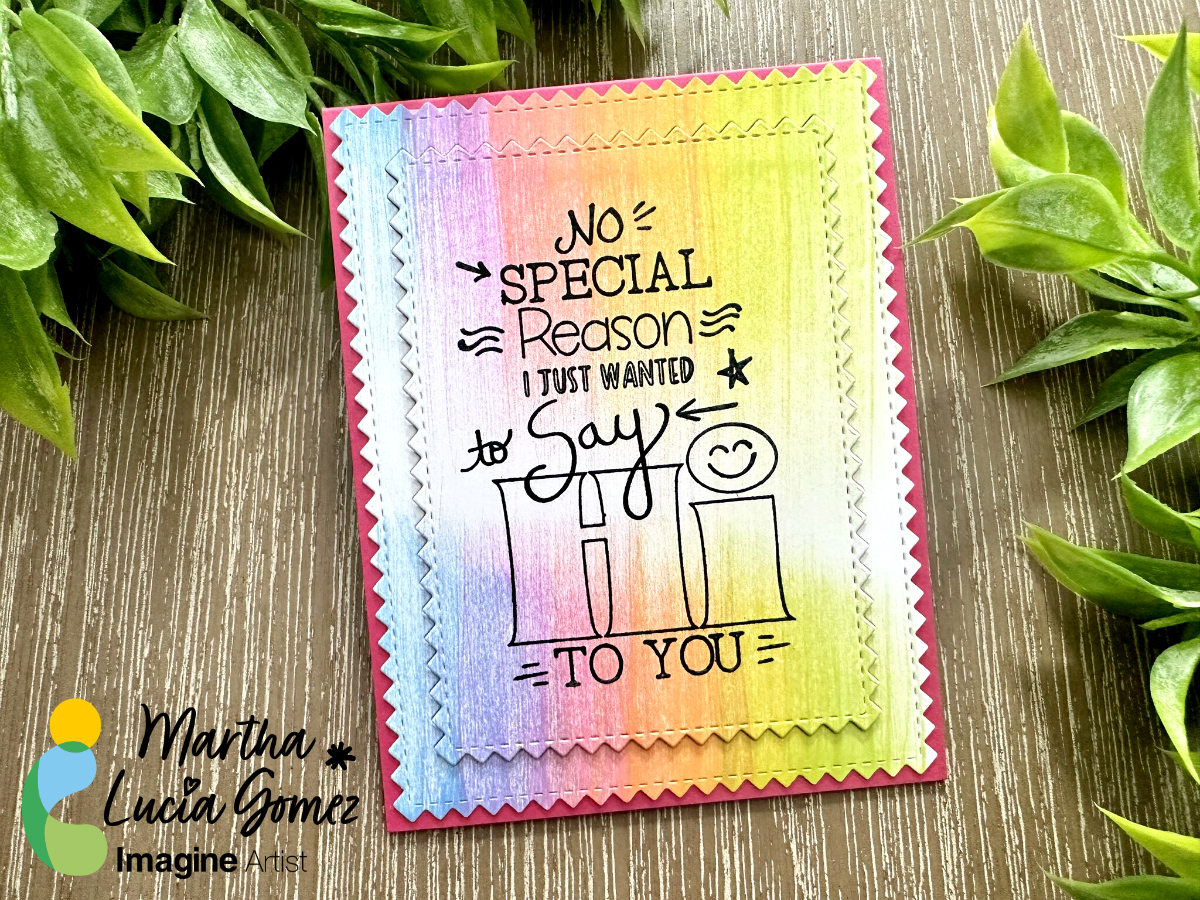
Hello crafty friends! Today, I have a new tutorial to create backgrounds. On this opportunity I am using the Swipe Ink Technique. Basically, you swipe the ink pad over your cardstock but this time we are using Kaleidacolor Inks that has 5 different colors in one single ink pad or swipe.
Skill: Intermedia Time: 60 minutes
Directions:
Step 1:
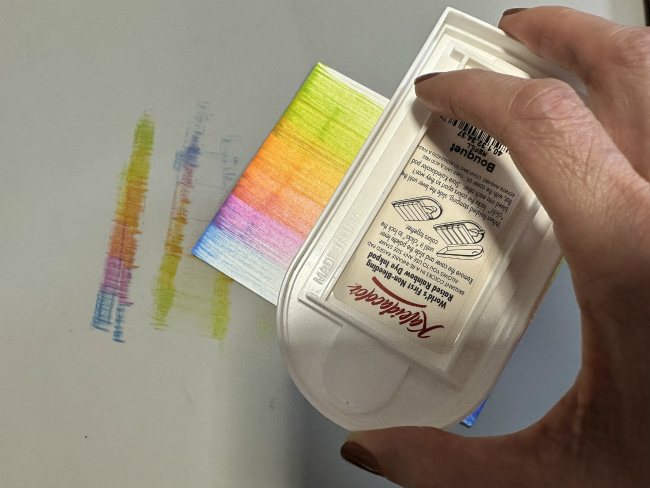
Pick your favorite Kaleidacolor Ink Pad. To make my project, I selected the Bouquet and white smooth cardstock.
Step 2:
Active your swipe putting together all the colors of your ink pad. Place the cardstock over the mat and softly swipe the ink over the paper without up your hand. If you want, you can go from up to down in a single swipe or in any direction. In my sample, I stopped in the middle and turn around the cardstock to repeat the process and have the center of the cardstock clean or without color.
Let the ink dry naturally before continuing with the next steps or repeat the process to create your own layout.
Step 3:
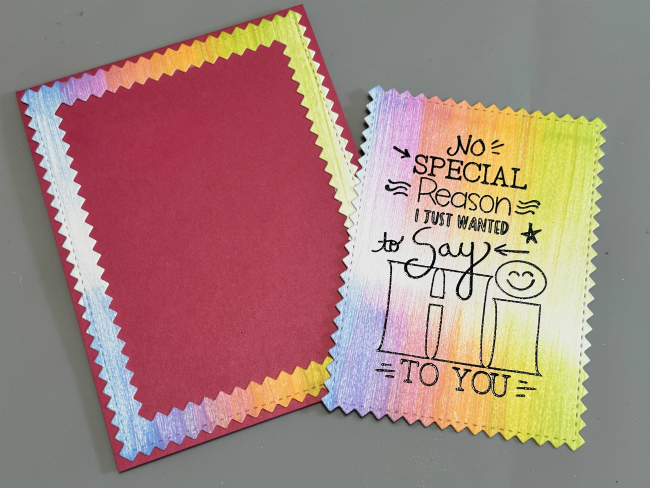
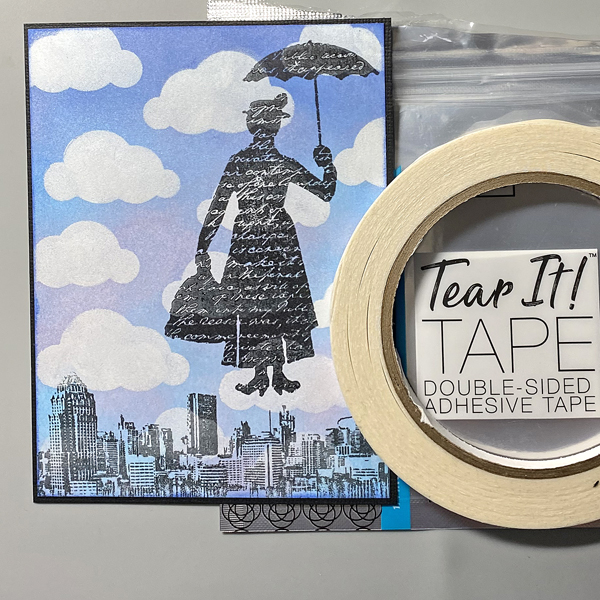
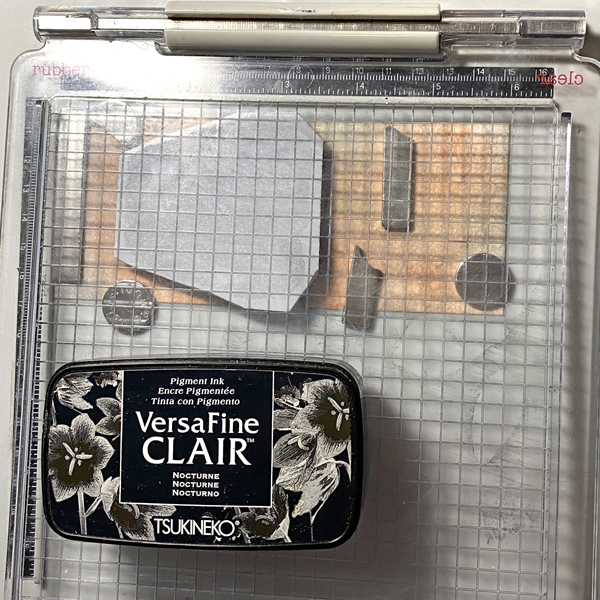
When the inked cardstock is totally dry, you can resize it or die cut It. Also, you can stamp over it, just like I made. I stamped a larger image over the center of the inked panel with VersaFine Clair Nocturne and heat embossed it with clear embossing powder. Then, I resized the layer with Zig Zag Stitched Rectangles.
Step 4:
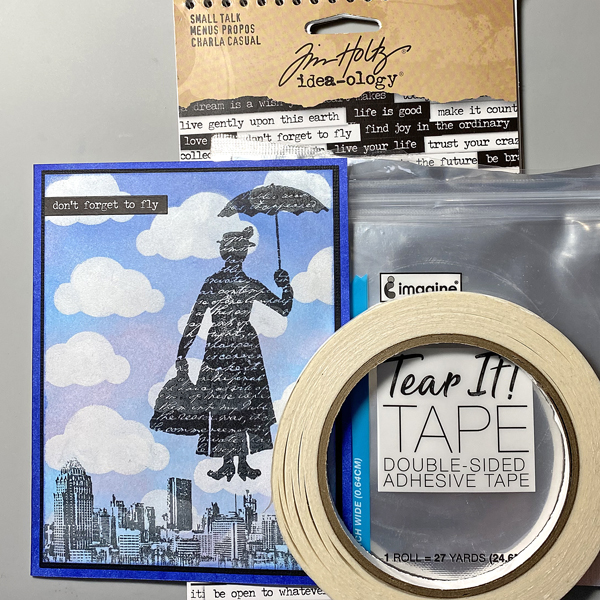
To add more interest to the card, I pasted the large frame with Tear It! Tape over the card base. Then, I pasted the small rectangle with crafty foam tape to have more dimension.
Thanks for stopping by and remember, you don’t need to create complicated projects. Just use the best inks and let your creativity shine!
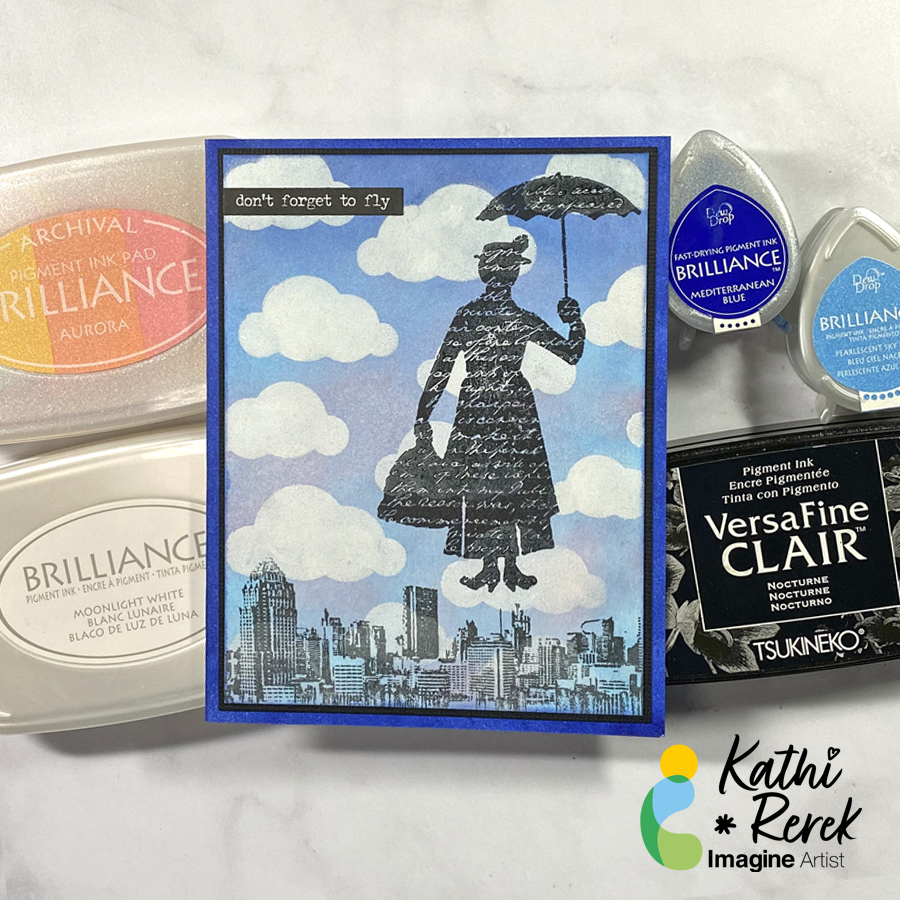
Intro: Brilliance inks blend beautifully and the pearlescent ones create a beautiful shimmer that enhances magical scenes like this one.
Skill Level: Beginner to Intermediate
Time: 1 hour
Directions:
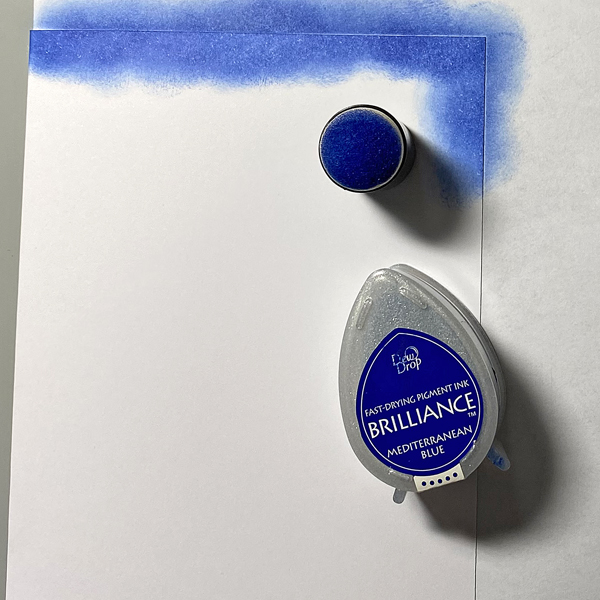
Step 1.
Use a Sponge Dauber to apply Mediterranean Blue Brilliance ink horizontally across the top of a 4” x 5.25” panel of white cardstock. Use a Sponge Dauber to apply Pearlescent Sky Blue Brilliance ink below the darker blue. Use both daubers to create a blended shimmery sky.
Use a Sponge Dauber to apply the Pearlescent Coral Brilliance ink from the Aurora 3-Color Brilliance Ink Pad. Sorry that there’s no photo!
Step 2:
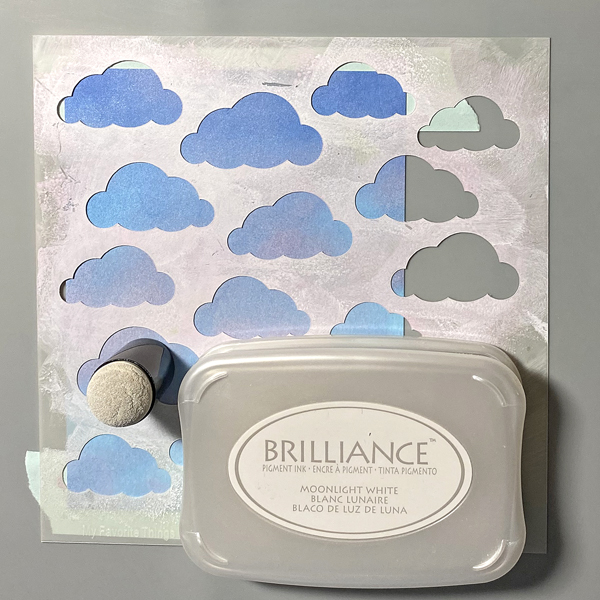
Tape the image panel to the back of the Clouds Stencil.
Using a Sponge Dauber, apply Moonlight White Brilliance ink over the stencil onto the image panel.
Remove the stencil and heat set the ink.
Step 3:
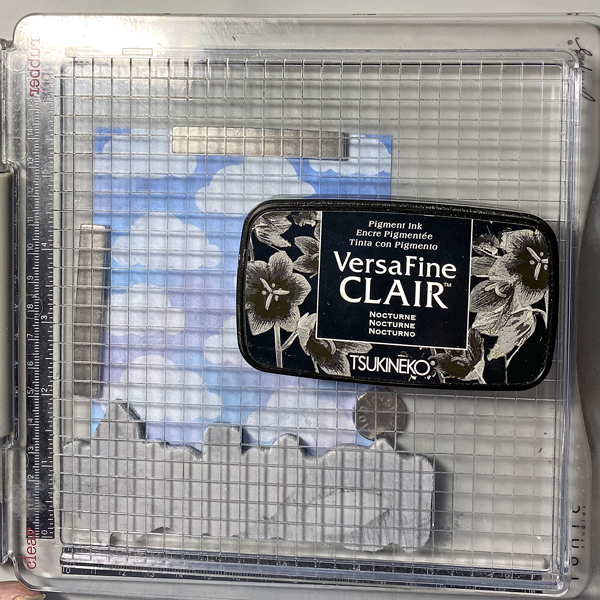
Use magnets to secure the ink-sponged panel approximately .5” from the right edge and 1” from the bottom of the stamping platform.
Position the Cityscape Reflections Stamp facedown along the bottom of the stamping platform.
Ink the stamp with Nocturne VersaFine Clair Ink and stamp. Re-ink and stamp again if needed. Remove the stamp and heat set the panel.
Step 4:
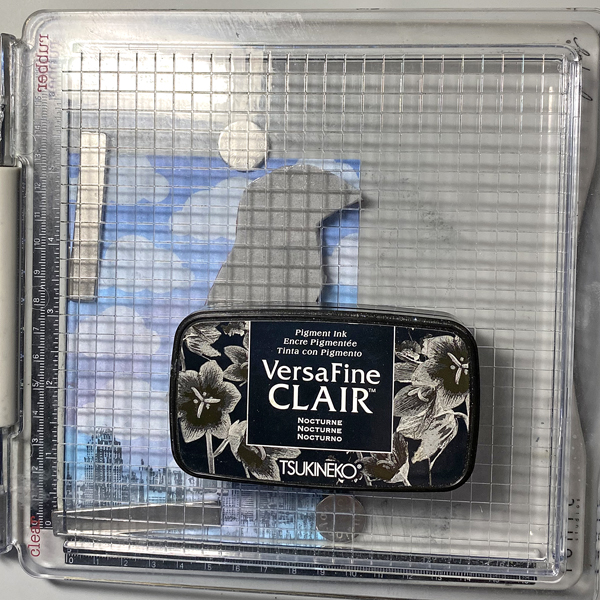
Move the image panel so that it’s flush the right and bottom edges of the stamping platform. Secure with magnets.
Position the Silhouette Lady with Umbrella Stamp facedown along the right edge above the cityscape.
Ink the stamp with Nocturne VersaFine Clair Ink and stamp. Re-ink and stamp again if needed. Remove the stamp and heat set the panel.
Step 5:
Trim the image panel to 3 7/8” x 5 1/8”.
Use a Sponge Dauber and Mediterranean Blue Brilliance Ink to edge the image panel.
Step 6:
Cut a piece of Raven cardstock to 4” x 5.25”.
Use Tear It! Tape to adhere the image panel to the black cardstock.
Step 7:
Create an A2 Card from White cardstock.
Use a Sponge Dauber to apply Mediterranean Blue Brilliance Ink to the outer .5” of the folded card. Heat set.
Step 8:
Use Tear It! Tape to adhere the image panel to the card.
Hello crafty friends! Today, I have the easiest and simple tutorial to make a unique thank you card or any type of cards. Let me share the project with you.
Skill: Beginning Time: 60 minutes
Directions:
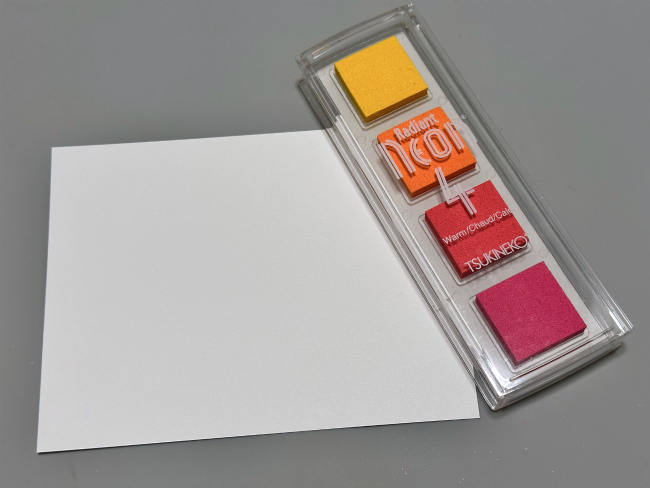
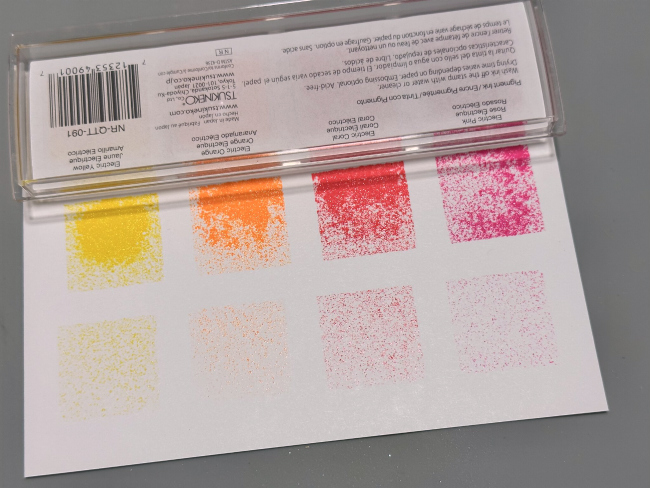
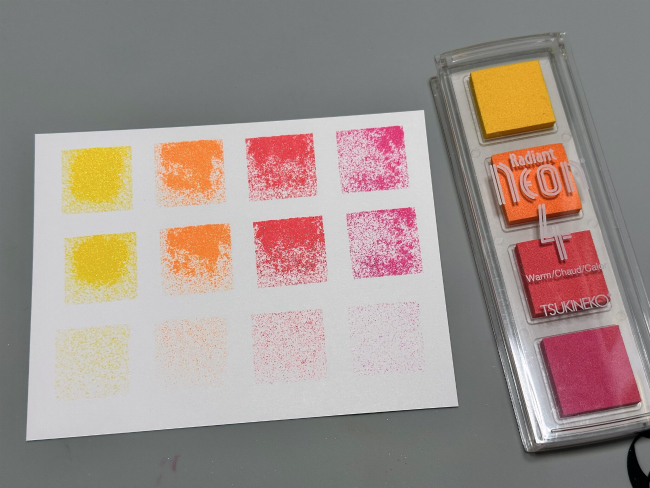
To make my model, I decided to use Radian Neon 4 Warm for two reasons. The first one is because I love the colors of this set of inks and the second, because Radian Neon brings the opportunity to create textures.
Step 1:
Select the colors of inks that you want to use in small sizes pads. For this idea, you can use any of our 4 Inkpads or small presentations like the Dew Drop of other inks, like Brilliance, VersaMagic, Delicata or Memento, just to mention some.
Step 2:
Place the entire ink pad over the cardstock in the direction that you want the colors. I press mine three times over the card under different pression to obtain different textures in each color.
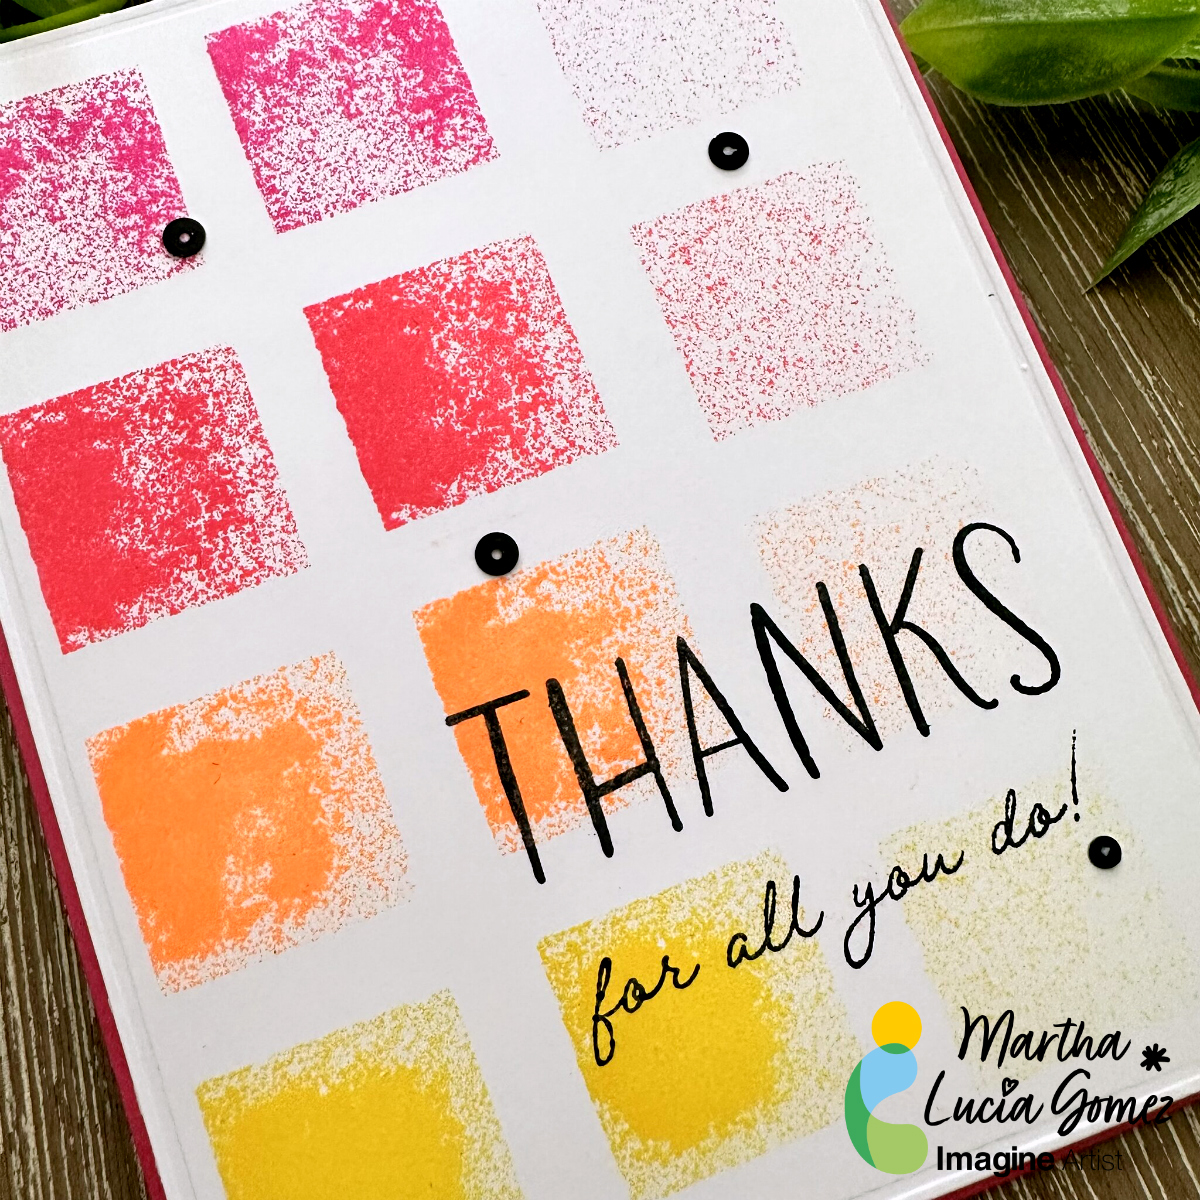
Step 3:
Let the ink dry naturally or speed the process with a heat tool. If you want, you can cover the stamped blocks of ink with clear embossing powder and emboss them with the heat tool, to obtain a better texture.
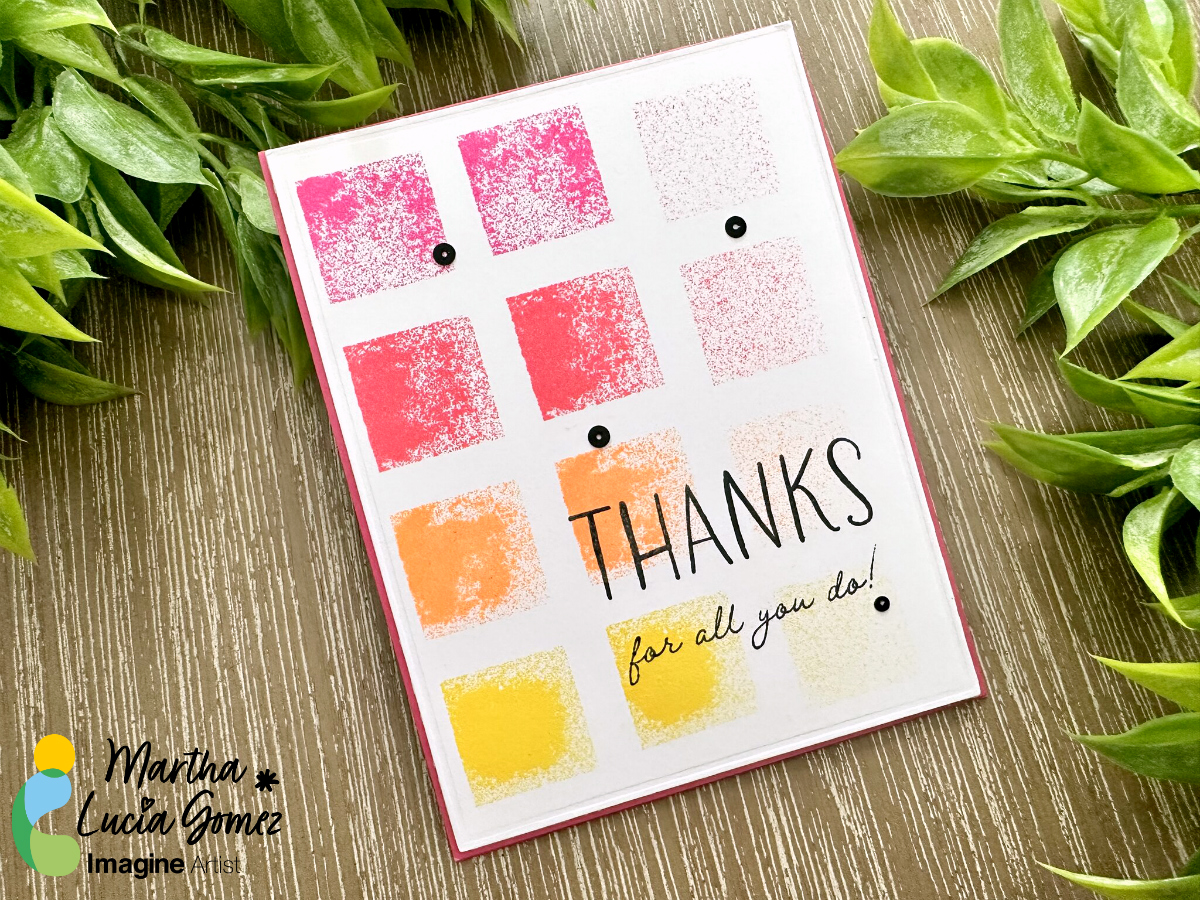
Step 4:
Stamp a sentiment over the color blocks using VersaFine Clair Nocturne to add a major contrast over your card.
Step 5:
Heat embosses the sentiment with clear embossing powder and paste the decorated layer over your card base.
As you can see this is a really simple way to use your ink pads as stamps. Depending on the pression and intensity that you apply over the ink pad or 4Ink Pad, you will obtain different looks.
Thanks for stopping by and remember, you don’t need to create complicated projects. Just use the best inks and let your creativity shine!
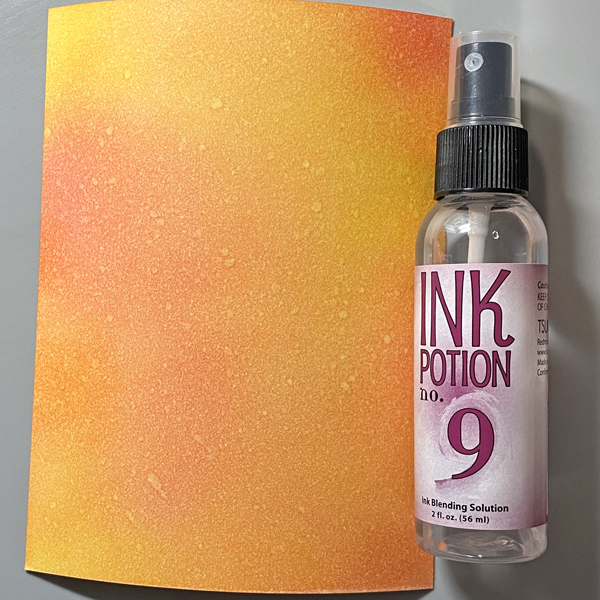
Sponge Dandelion Memento randomly over a 4” panel of Bristol paper or other hydrophilic paper. Repeat with Canteloupe, Tangelo, and Rose Bud until the panel is covered with colors and the inks are blended.
Step 2:
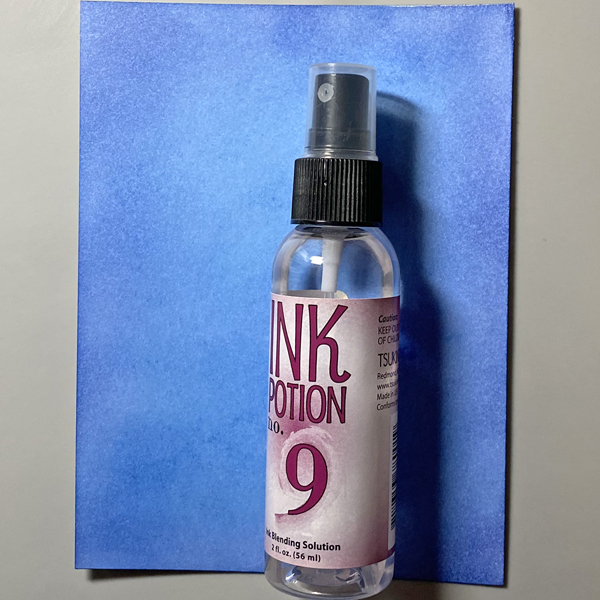
Spray the panel with Ink Potion No. 9. Let the solution sit for a minute. Heat set.
Step 3:
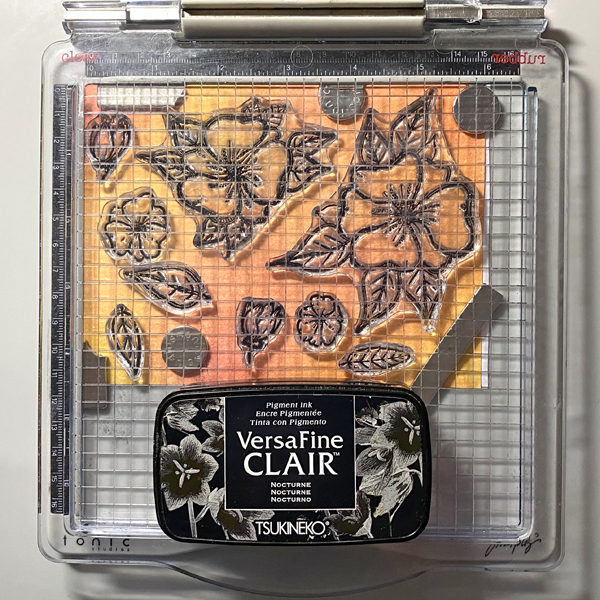
Use magnets to secure the ink-sponged panel to a stamping platform. Arrange the flower and leaf clear stamps from the Florals Set 1 facedown on the panel. Ink the stamps with Nocturne VersaFine Ink and stamp. Heat set the panel.
Step 4:
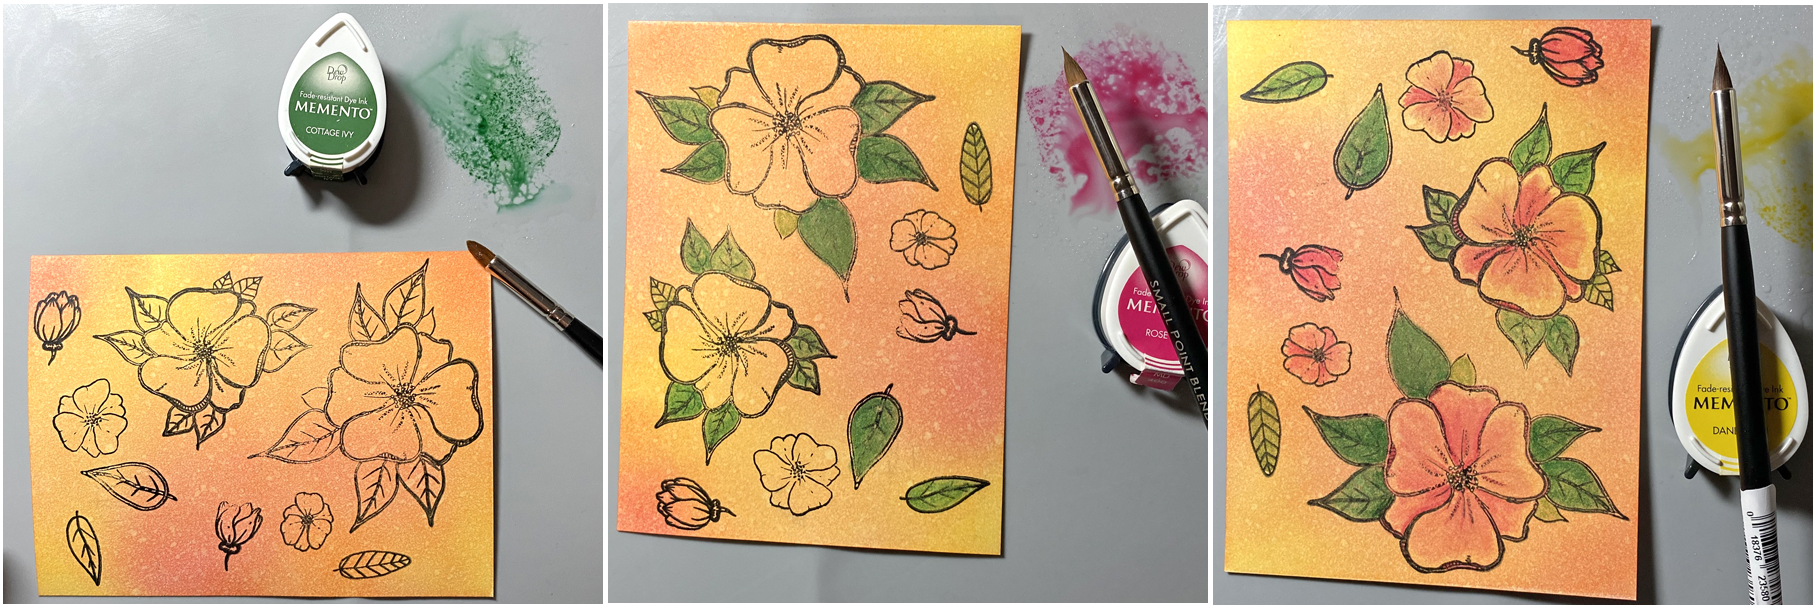
Smoosh the Cottage Ivy Memento Dew Drop Ink Pad onto the craft mat. Mist with water. Use a paint brush to apply diluted green ink to the leaves. Repeat this process with New Sprout and Bamboo Leaves Memento Ink to color the other leaves.
Smoosh the Rose Bud Memento Dew Drop Ink Pad onto the craft mat. Mist with water. Use a paint brush to apply the ink to the flowers. Repeat this process with Dandelion Memento ink pads.
Heat set the panel thoroughly.
Step 5:
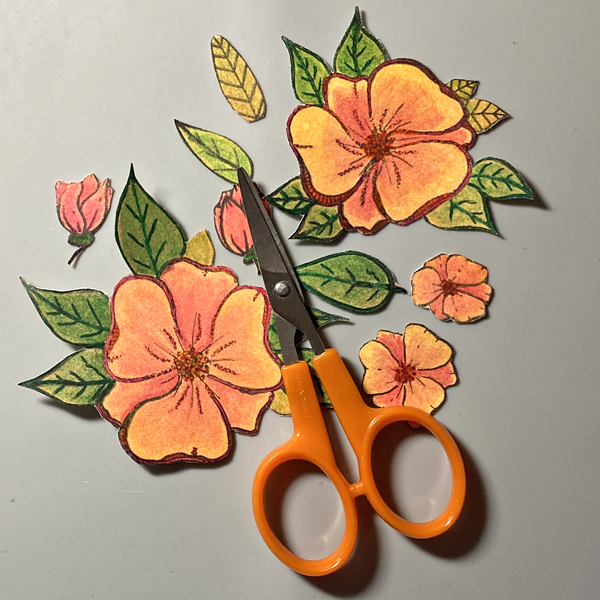
Fussy-cut the flowers and the leaves. Edge with a dark marker.
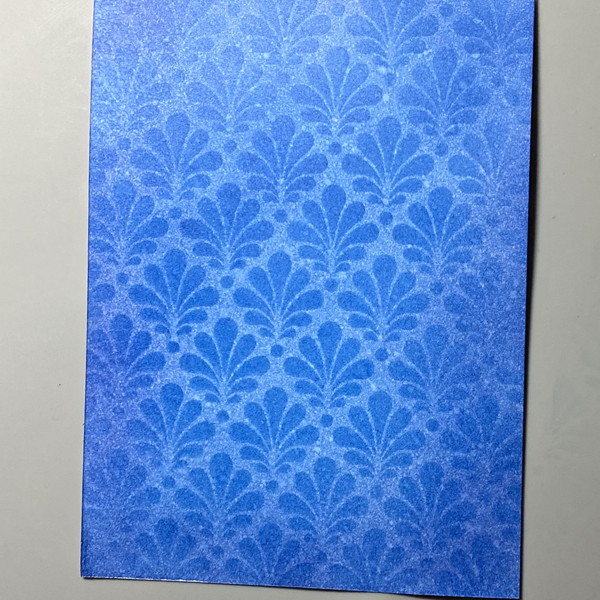
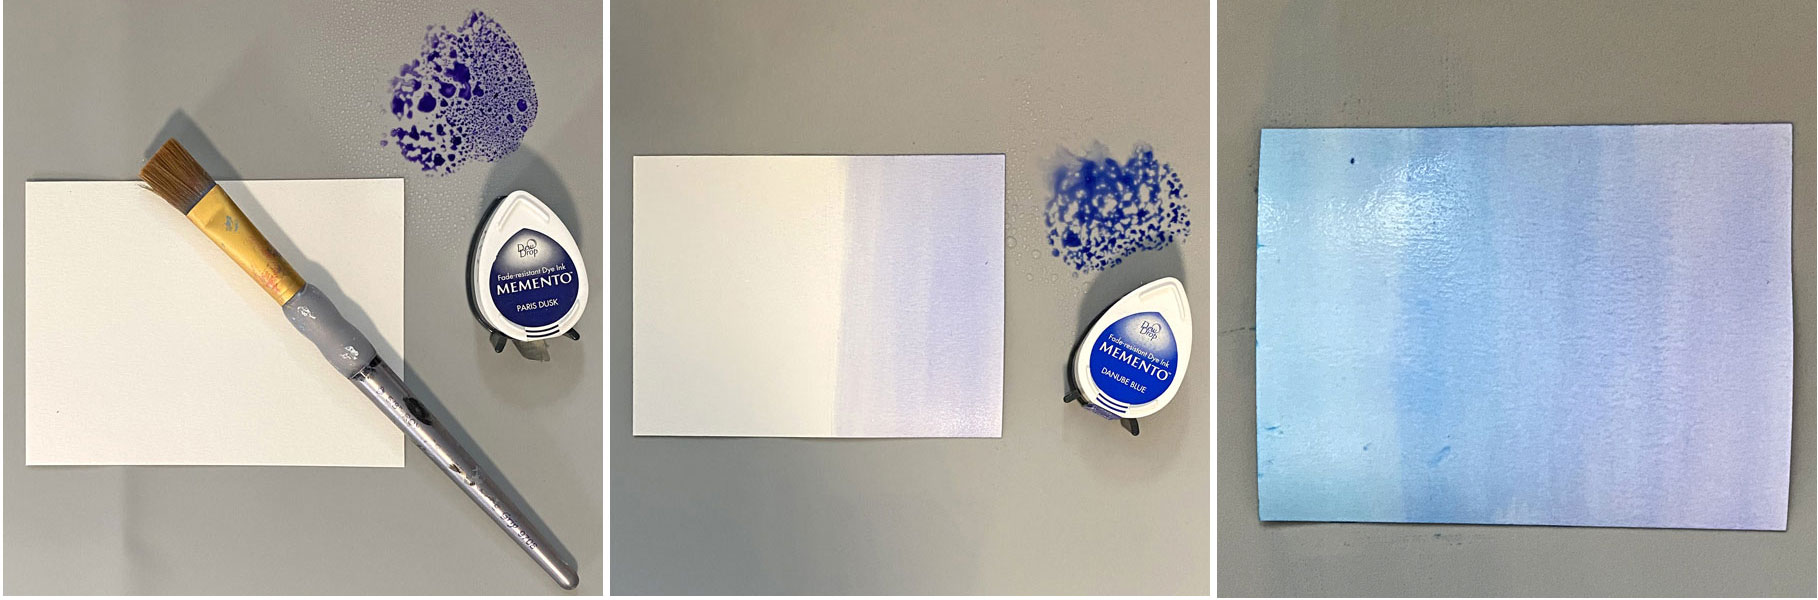
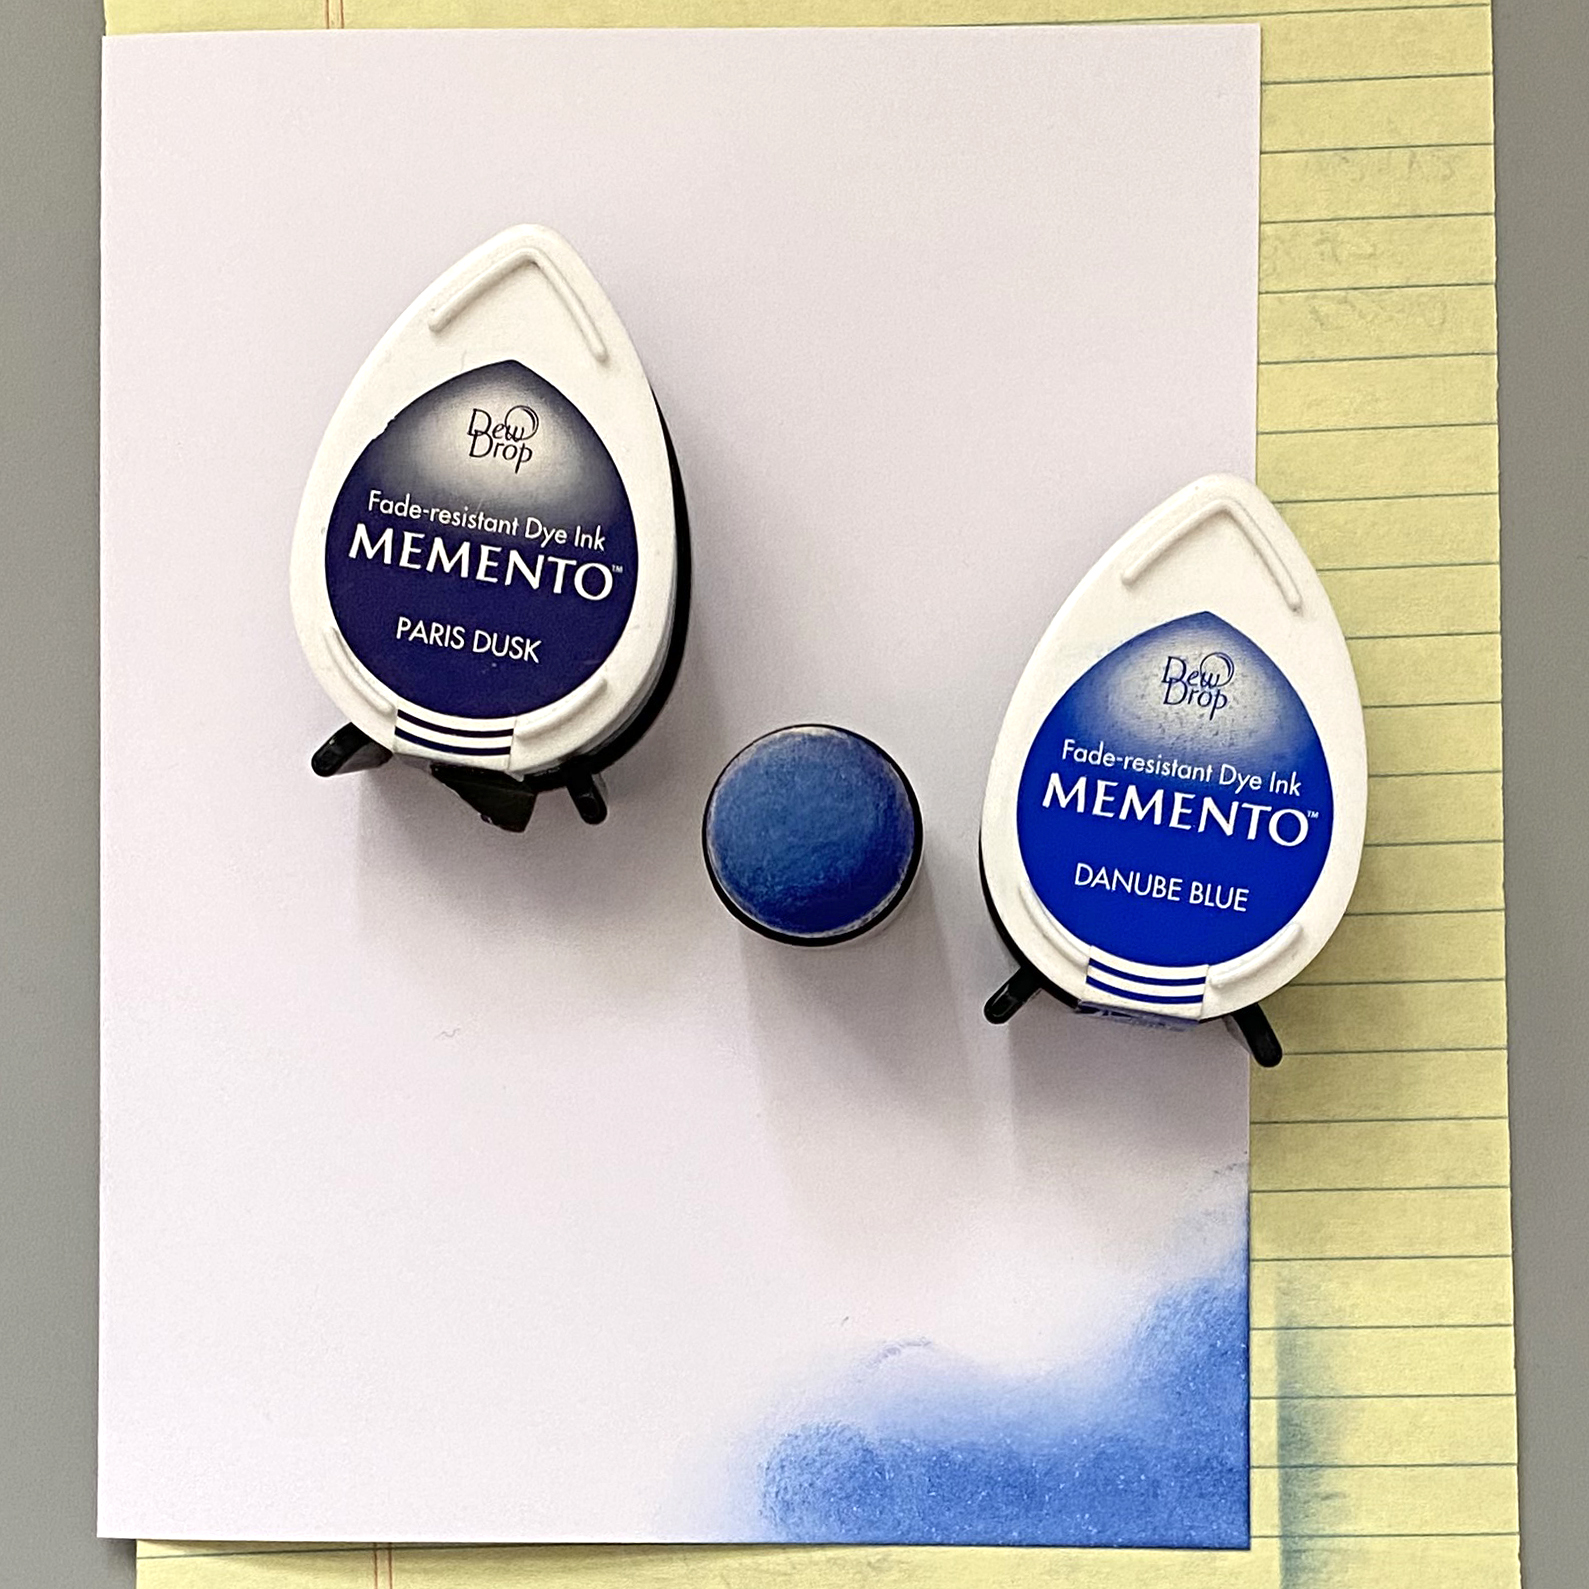
Step 6:
Sponge a 4.5 x 6” panel of Bristol paper with Blue Danube and Paris Dusk Memento Ink onto the panel to create a blended blue background panel.
Step 7:
Spray the panel with Ink Potion No. 9. Let the solution sit for a minute. Heat set.
Step 8:
Use removable tape to secure the inked panel to the back of the Ornate Stencil.
Sponge Blue Danube Ink over the stencil onto the panel.
Remove the stencil and heat set the ink.
Trim the panel to 4.25”. Add the washi tapes to the bottom of the panel as shown.
Edge the entire panel with Nocturne VersaFine Clair and heat set.
Step 9:
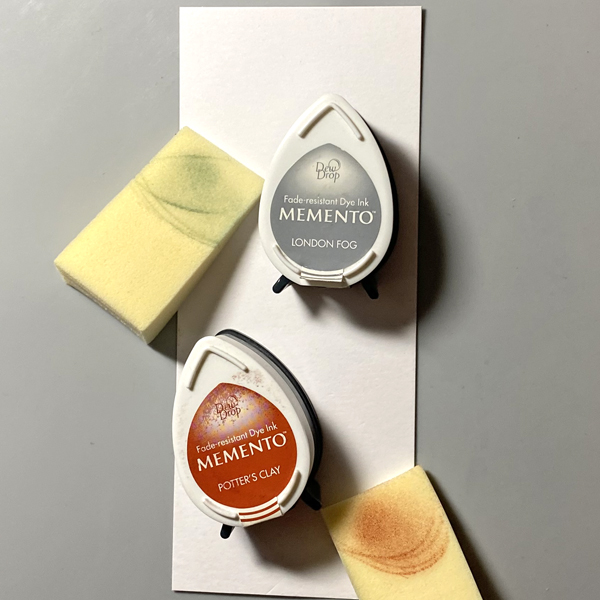
Sponge a 2.5” strip of Bristol paper with Potters Clay and London Fog Memento Ink onto the strip until it is covered with blended ink.
Step 10:
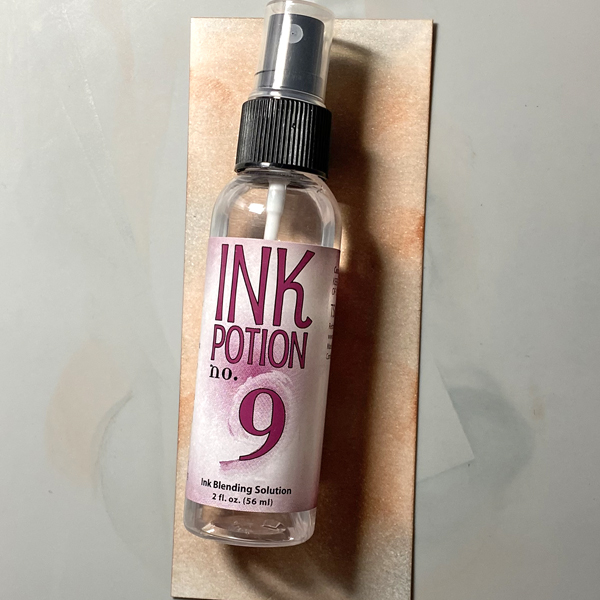
Spray the panel with Ink Potion No. 9. Let the solution sit for a minute. Heat set.
Step 11:
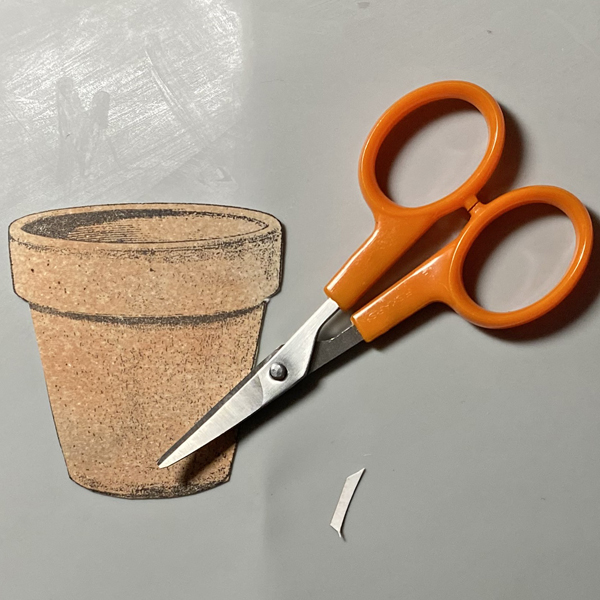
Secure the strip onto the Stamping Platform. Position the Terracotta Pot Eclectic Rubber Stamp facedown on the strip. Ink the stamps with Nocturne VersaFine Ink and stamp. Heat set the panel.
Step 12:
Fussy-cut the planter.
Step 13:
Smoosh the Potter’s Clay Memento Dew Drop Ink Pad onto the craft mat. Mist with water. Use a paint brush to shade the planter.
Edge the planter with a black marker. Heat set the planter.
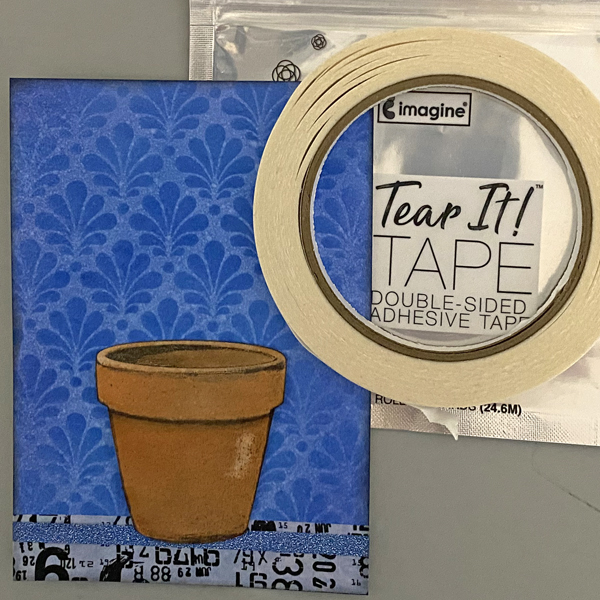
Step 14:
Use Tear It! Tape to adhere the Terracotta pot to the image panel.
Step 15:
Use foam adhesive to adhere the flowers to the card front. Add the sentiment sticker to the top left.
Step 16:
Cut a piece of Raven cardstock to 9” x 6.25”, score at 4”, and fold to form a card.
Use Tear It! Tape to adhere the image panel to the card.
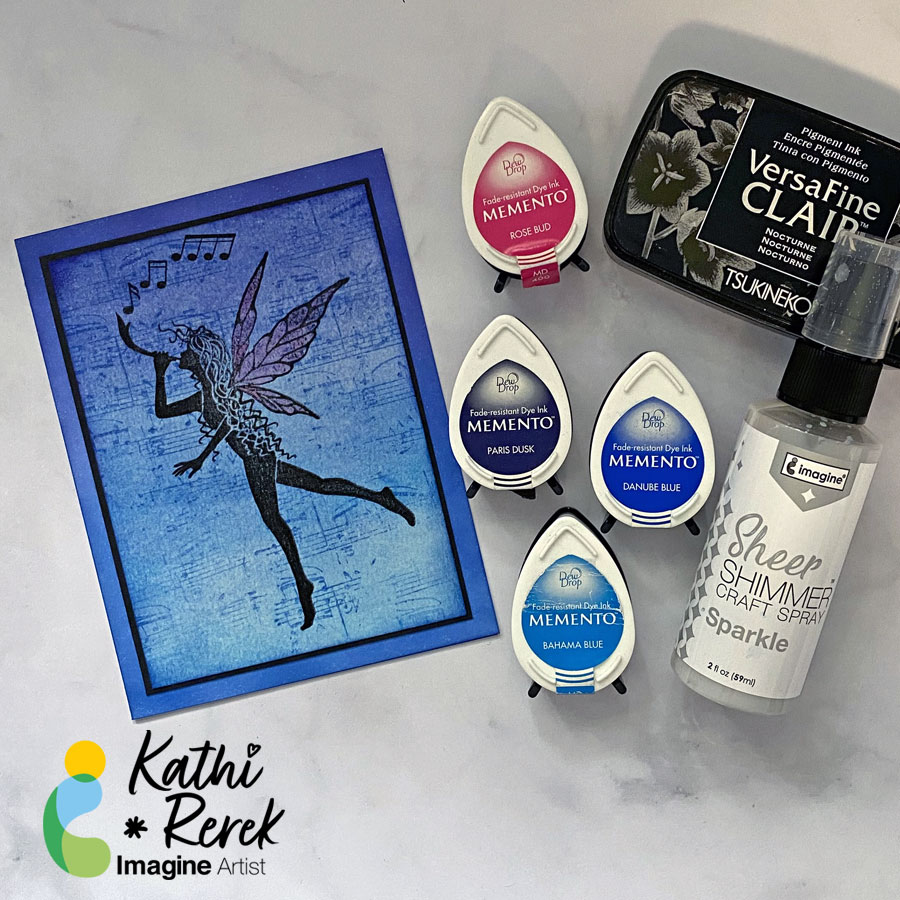
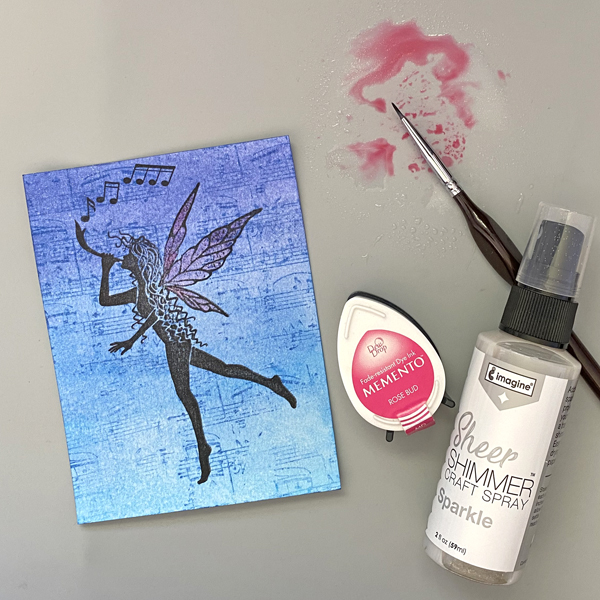
Greetings! It’s Kathi here to show you how to create fairy card with a magical shimmer using Memento Inks and Sheer Shimmer Sparkle Spray.
Skill Level: Beginner to Intermediate
Time: 1.5 hours
Instructions:
Step 1:
Smoosh Paris Dusk Memento Dew Drop Ink onto the craft mat. Mist with water and use a paint brush to apply diluted ink to the right edge of a 5.25” x 4” panel of watercolor paper.
Repeat with Blue Danube and then with Bahama Blue Memento Dew Drop Ink Pads until the entire panel is inked. Heat set the panel.
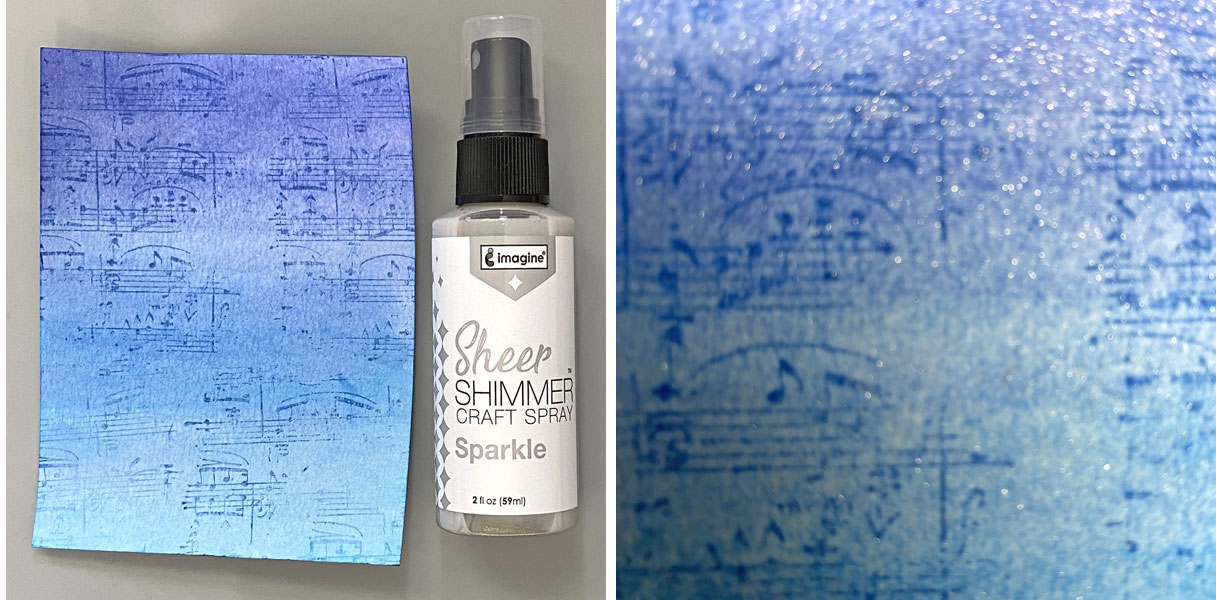
Step 2:
Ink the Sheet Music Texture Red Rubber Cling Stamp with Blue Danube Dew Drop Ink and randomly stamp onto the panel.
Step 3:
Spray the panel with Sheer Shimmer Sparkle Spray. Heat Set and admire the sparkle!
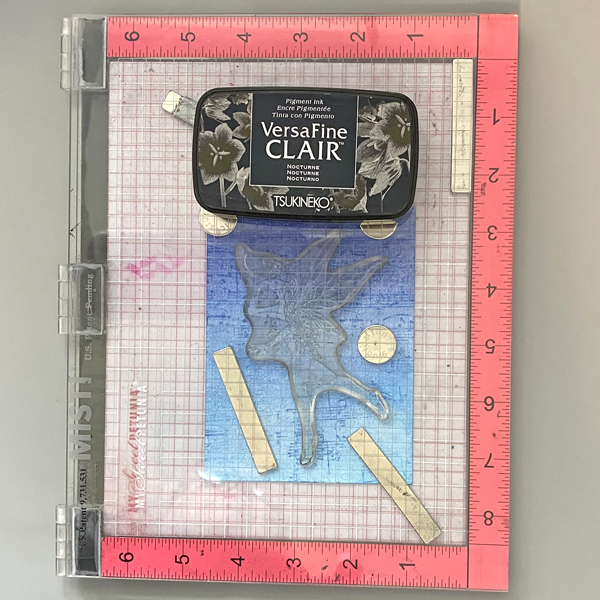
Step 4:
Using a stamping platform, position the Trinity Fairy Clear Stamp onto the image panel. Ink with Nocturne VersaFine Clair Ink and stamp. You might need to re-ink and stamp to achieve a clear impression.
Remove the panel from the stamping platform and heat set.
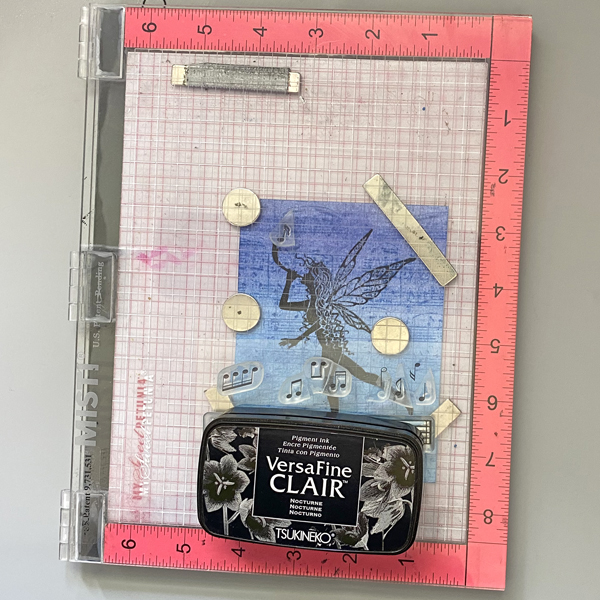
Step 5:
Place the image panel back onto the stamping platform. Position one of the notes from the Music Notes Small Clear Step Set facedown above the fairy’s horn. Ink the stamp with Nocturne VersaFine Clair Ink and stamp.
Remove the note stamp from the stamping platform. Place another note stamp from the same set, slightly to the right of the previously stamped note. Ink and stamp with Nocturne VersaFine Clair Ink and stamp.
Remove the second note stamp from the stamping platform. Place the four notes stamp to the right of the other notes. Ink the stamp with Nocturne VersaFine Clair Ink and stamp.
Heat Set the notes.
Step 6:
Smoosh the Rose Bud Memento Dewdrop Ink pad onto the craft mat. Mist with Sheer Shimmer Sparkle Spray.
Use a paint brush to apply the shimmery pink ink to the fairy’s wings. Heat set.
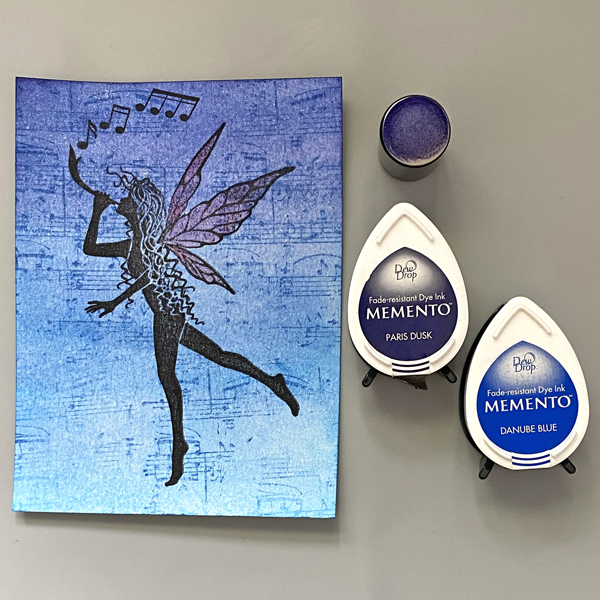
Step 7:
Trim the image panel to 3 5/8” x 4 7/8”.
Use a Sponge Dauber and Paris Dusk Memento Ink to edge the top part of the image panel. Use the Sponge Dauber and Blue Danube Memento Ink to edge the bottom part of the image panel.
Step 8:
Create an A2 card from white cardstock. Insert a piece of scrap paper into the card.
Use Sponge Daubers to ink the periphery of the white card with Paris Dusk and Blue Danube Memento Inks.
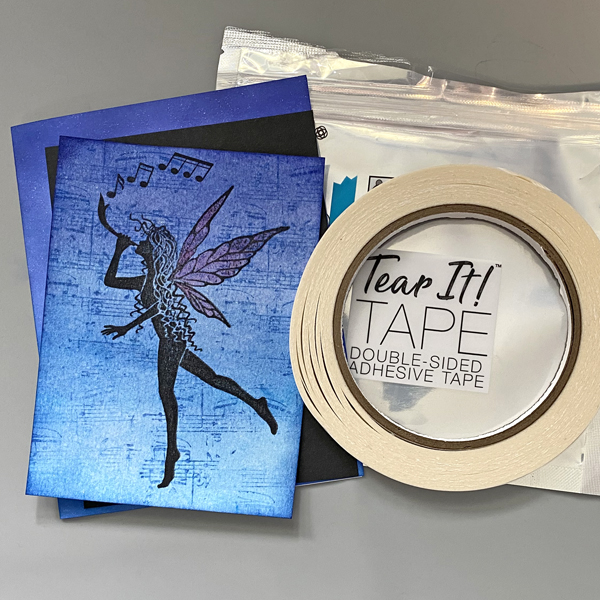
Step 9:
Cut a piece of black cardstock to 3 3/4” x 5”.
Use Tear It! Tape to mat the image panel with the black cardstock panel, then use the tape to adhere the matted panel to the inked card.
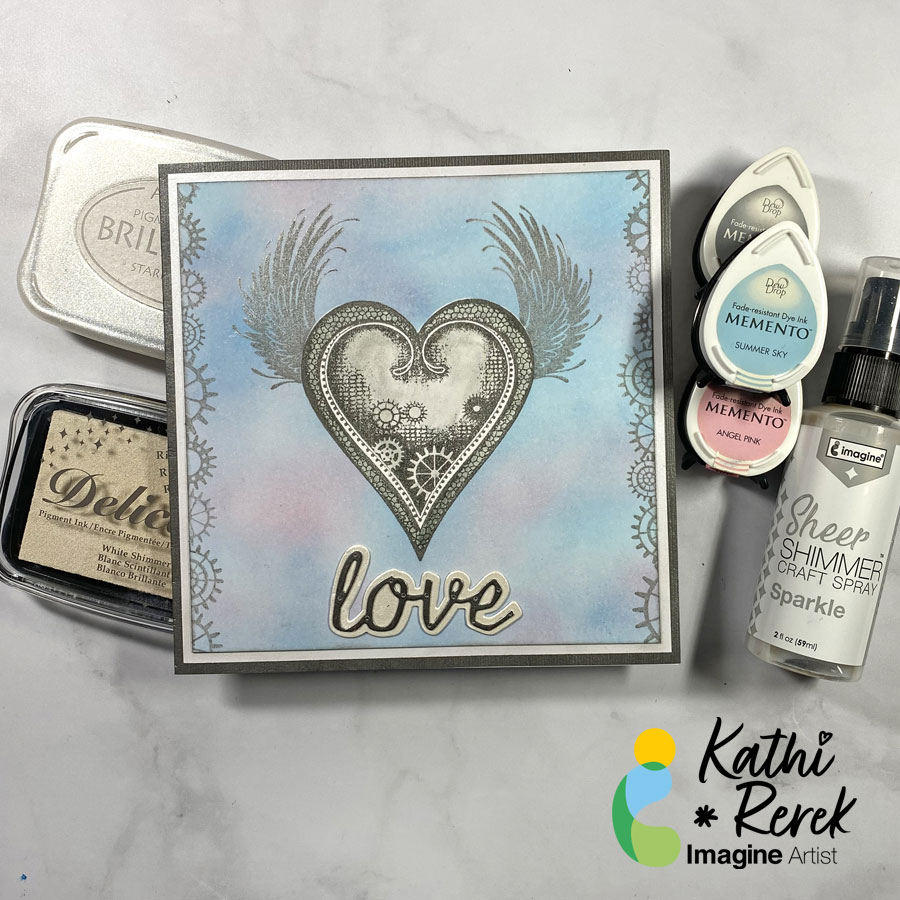
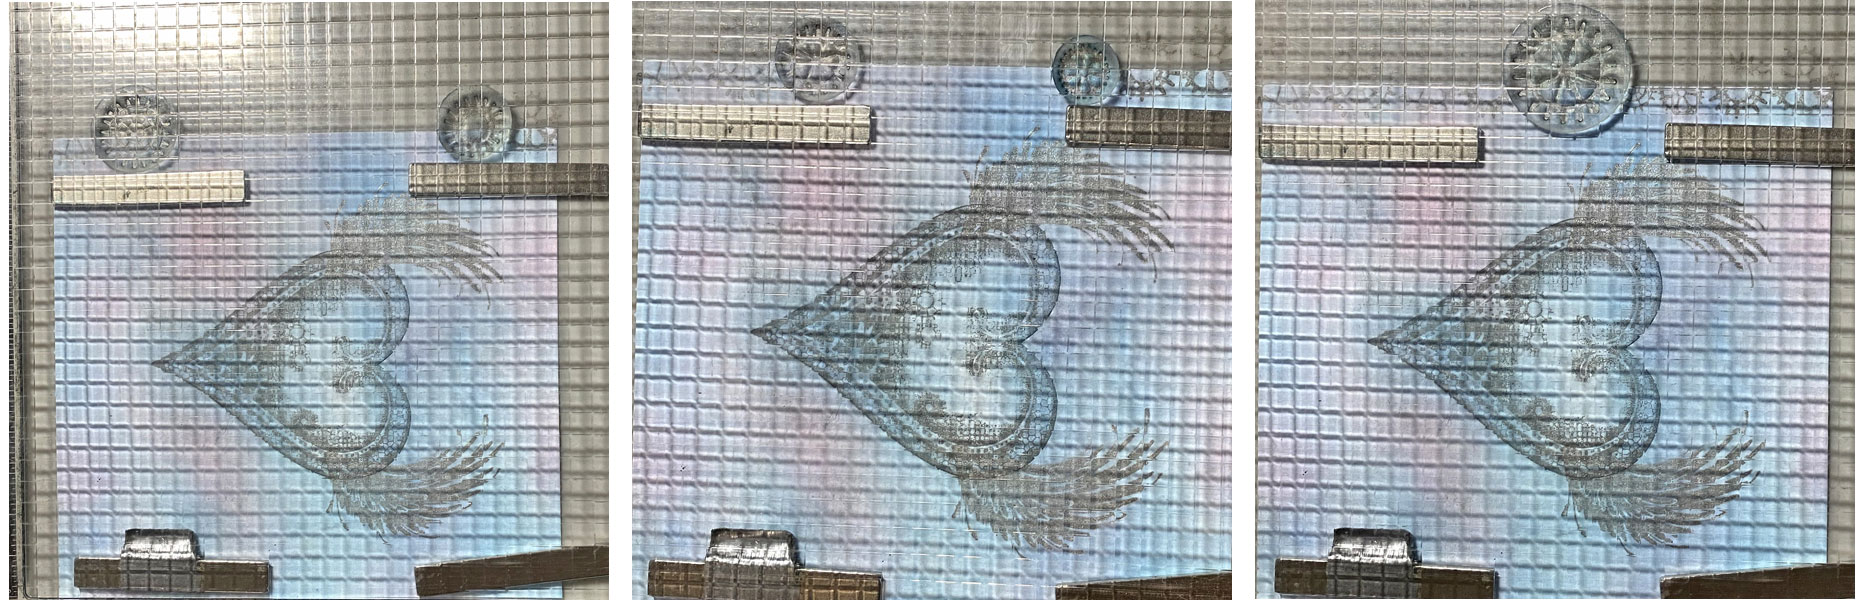
It’s Spring and love is in the air. Let’s combine the metallic look of Brilliance ink, the shimmer of Delicata Ink, pastel colors, and Steampunk imagery to create a Steampunk Love card.
Skill Level: Beginner to Intermediate
Time: 1 hour
Directions:
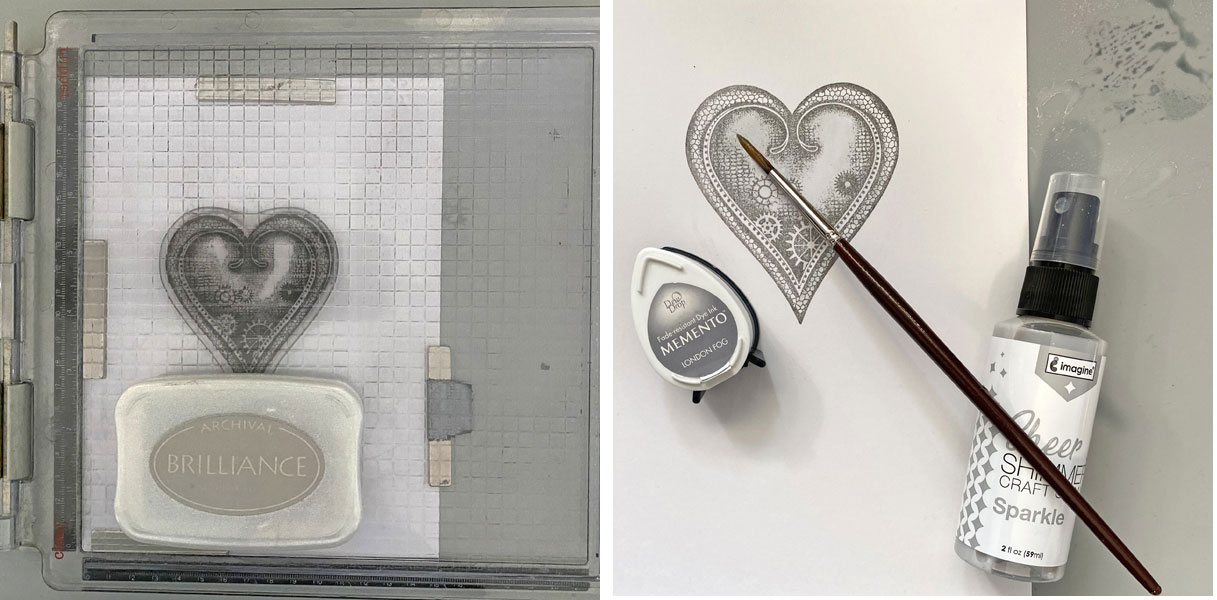
Step 1:
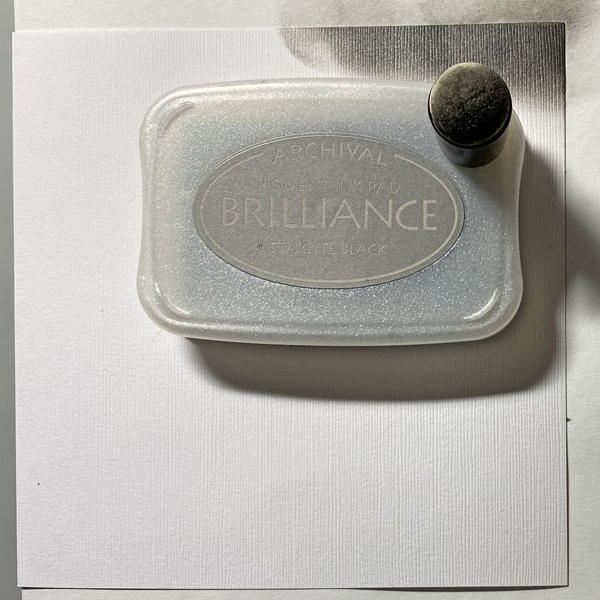
Use a stamping platform and Starlite Black Brilliance ink to stamp the Steampunk Heart twice – once onto a 6” x 8” piece of Mixed Media paper and a second time onto Repositionable Label paper. Heat set the Mixed Media paper panel.
Smoosh London Fog Memento ink onto craft mat. Spritz it with Sheer Shimmer Sparkle Craft Spray.
Use a paint brush to color the center of the heart.
Step 2:
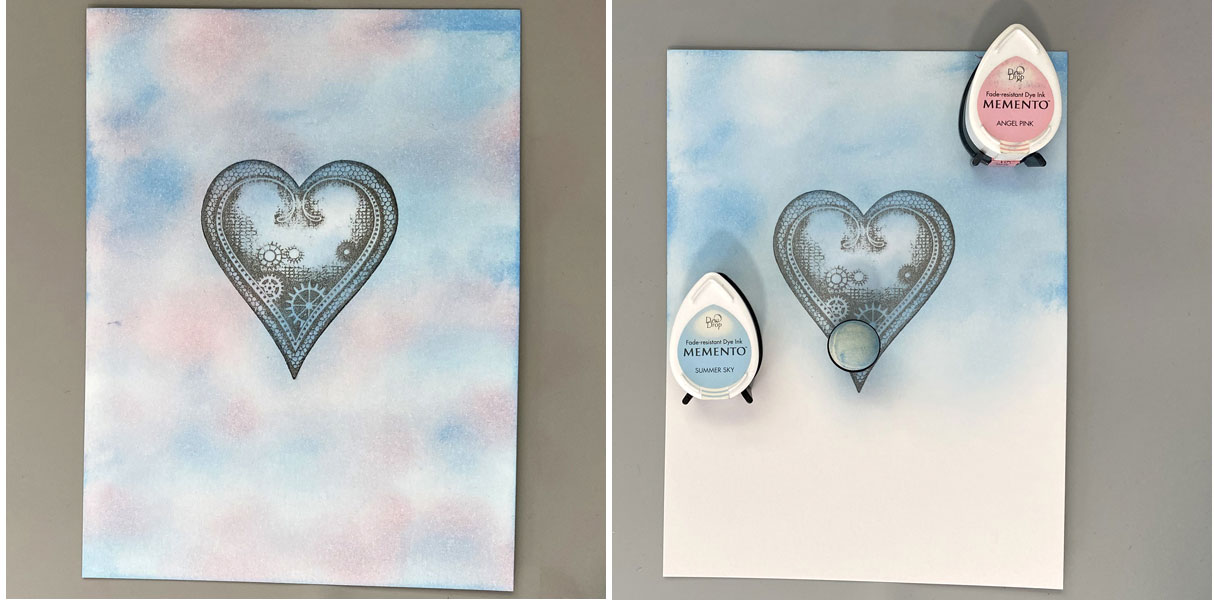
Fussy-cut the label paper heart and place it atop its counterpart on the image panel.
Step 3:
Use a Sponge Dauber to sponge Summer Sky Memento Ink horizontally across the image panel. Don’t worry about leaving white areas.
Use a Sponge Dauber to sponge Angel Pink Memento Ink onto the white areas of the image panel. You’ve now created a stormy sky!
Step 4:
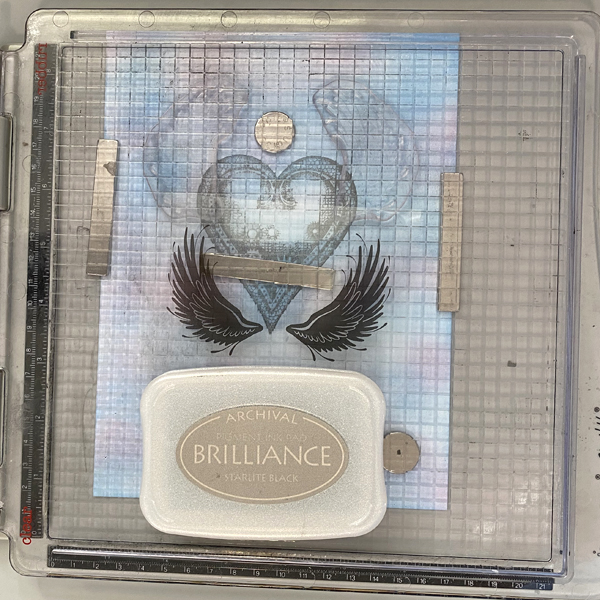
Use a stamping platform to position the wing stamps facedown on the masked steampunk heart.
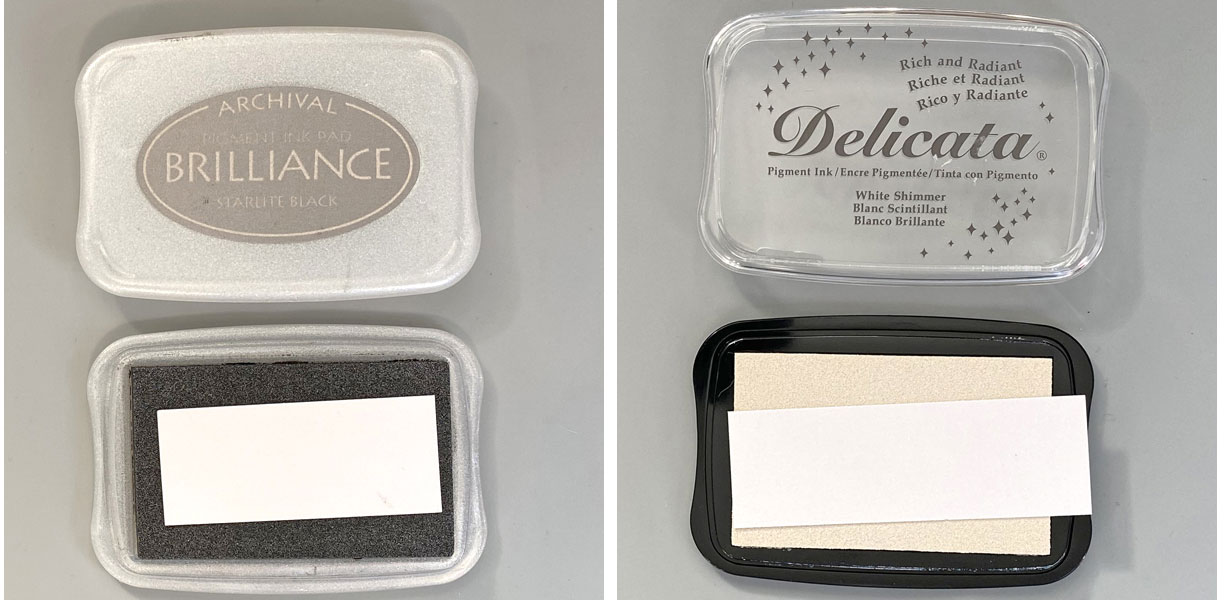
Ink with Starlite Black Brilliance Ink and stamp. Repeat if necessary to attain a clean image. Wipe remaining ink off of the stamp. Heat set the image panel.
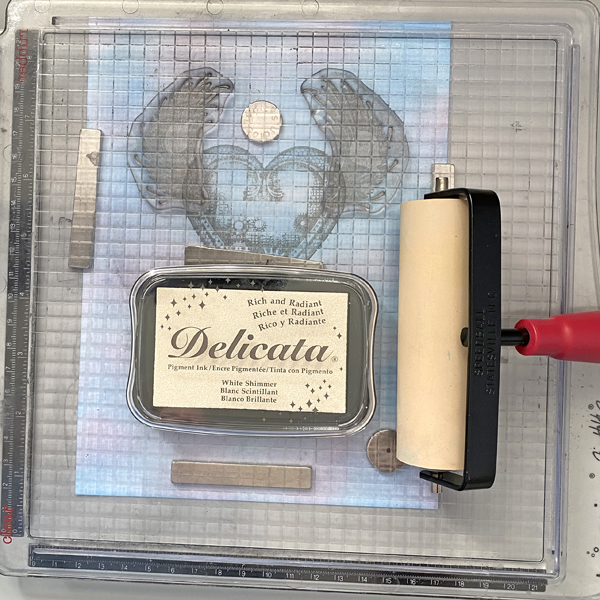
Step 5:
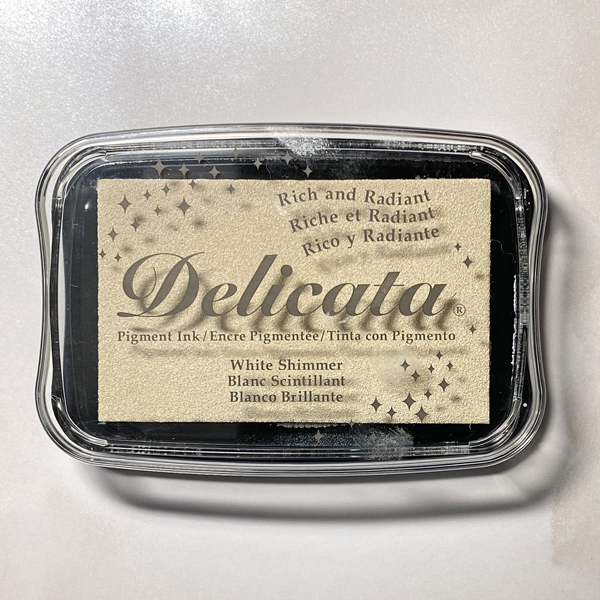
Use a brayer to apply White Shimmer Delicata Ink to the wing stamps. Stamp.
Step 6:
Smoosh a 1” wide strip of white cardstock onto the Starlite Black Brilliance Pad. Smoosh a second 2” wide strip of white cardstock onto the White Shimmer Delicata Ink Pad.
Heat set both panels.
Step 7:
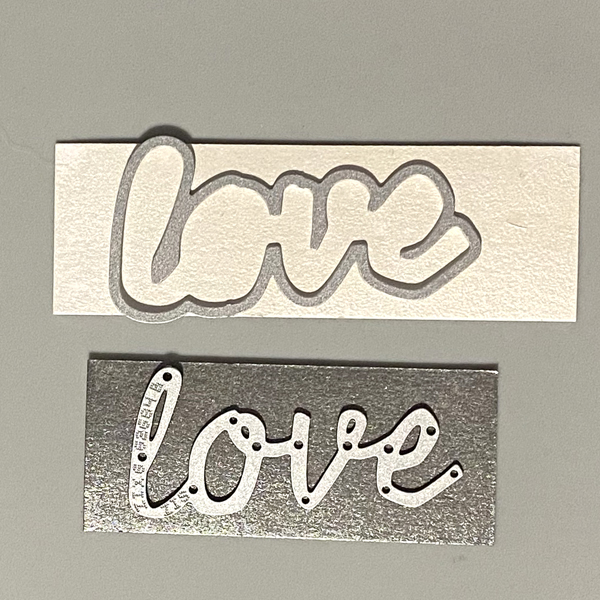
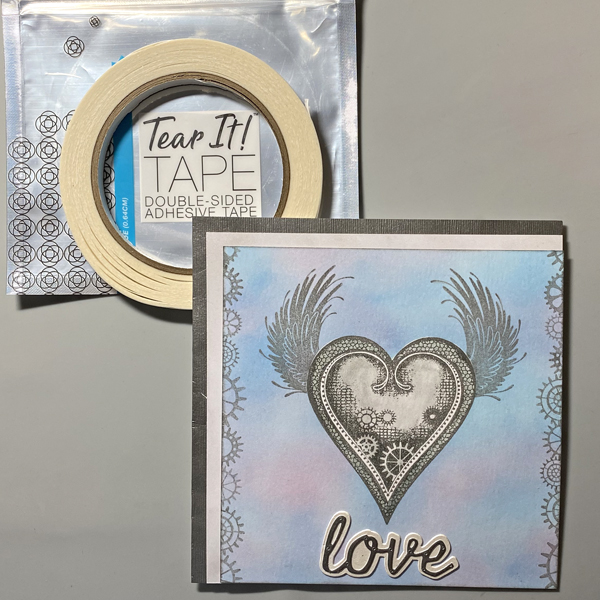
Apply Tear-It! Tape to the backs of both panels.
Use the “love” Shadow die to cut the White Shimmer Delicata inked cardstock.
Use the “love” die to cut the Starlite Black Brilliance inked cardstock.
Adhere the Starlite Black “love” die-cut to atop the White Shimmer Delicata “love” shadow die. Set aside.
Step 8:
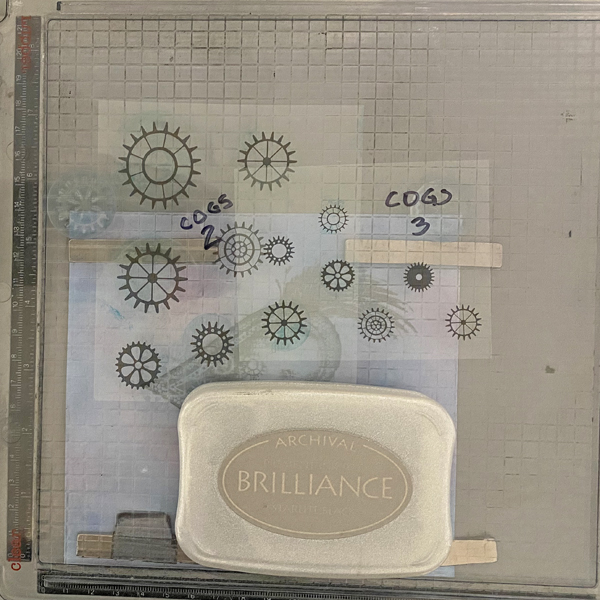
Position the stamped image panel so that it’s horizontal on the stamping platform so that different cogs will be stamped along the edges of the image panel.
Step 9:
Position cog stamps from both Cogs Clear Stamp Set 2 and Cogs Clear Stamp Set 2, facedown on the left and right of what is now the top of the image panel. Ink the stamps with Starlite Black Brilliance Ink, stamp, and heat set. Remove and clean the cog stamps.
Position two different cog stamps from the same set facedown towards the center top edge of the image panel. Ink the stamps with Starlite Black Brilliance Ink, stamp, and heat set. Remove and clean the cog stamps.
Position a large cog stamp facedown in the center of the cogs. Ink the stamp with Starlite Black Brilliance ink, stamp, and set. Remove and clean the cog stamps.
Step 10:
Flip the image panel so that the clean edge is at the top of the platform. Repeat Step 9 to complete a second cog border.
Trim the image panel to 5.5” square and edge with Starlite Black Brilliance Ink. Heat set the entire panel.
Step 11:
Use White Shimmer Delicata Ink to sponge a piece of 5.75” square white cardstock. Heat set.
Step 12:
Cut a piece of 12×12 Avalanche cardstock to 6” x 12”, score, and fold to form a 6” square card.
Place a piece of scrap paper into the card. Use a Sponge Dauber to apply Starlite Brilliance Ink to the outer .25” edges of the card. Heat set.
Step 13:
Use Tear It! Tape to adhere the shimmery white 5.75” square to the card.