Use Rose Gold Ink to Color a Beautiful Floral Pattern

by Martha Lucia Gomez

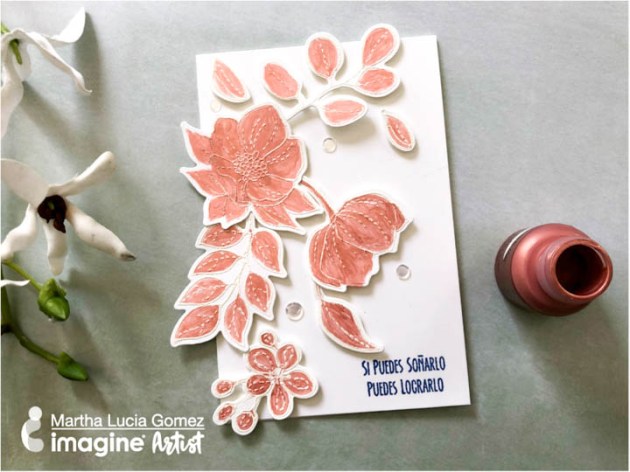
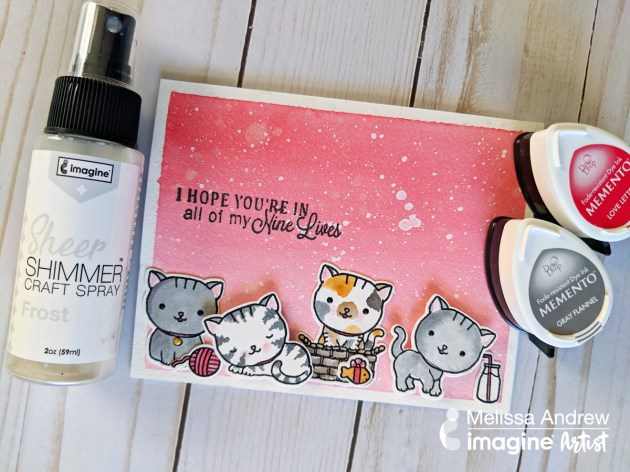
Hello dear friends! Today, I have a very special card that I made just using the new All-Purpose Ink in Rose Gold from Tsukineko. All-Purpose ink comes in a variety of colors including metallics which is perfect for this project. Rose Gold is a trending color and can easily use it in all my creations and thanks to Imagine we have many options to use. Take a look at my card:

Skill: Intermediate
Time: 30 minutes

Directions


Step 1

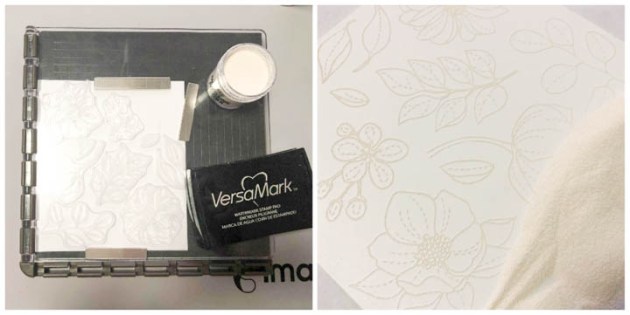
To create my card, I used whisper white card stock, embossing powder and VersaMark ink. I stamped the flowers over whisper white card stock too using VersaMark and White Embossing Powder. I melted the powder with the heat tool and then started my painted or coloring process with All-Purpose Ink Rose Gold.


Step 2

To color the flowers I used a paintbrush but you can also use Fantastix to have the same result. I cut my card in regular size but after finish it, I changed my mind and decided to reduce the width of the card and show off some of the flowers that I used. After coloring the flowers and leaves, I cut all of them with my scissors and arranged them on the left side of the card. During this process, I changed my mind on how I used some parts of the flowers on the left side.
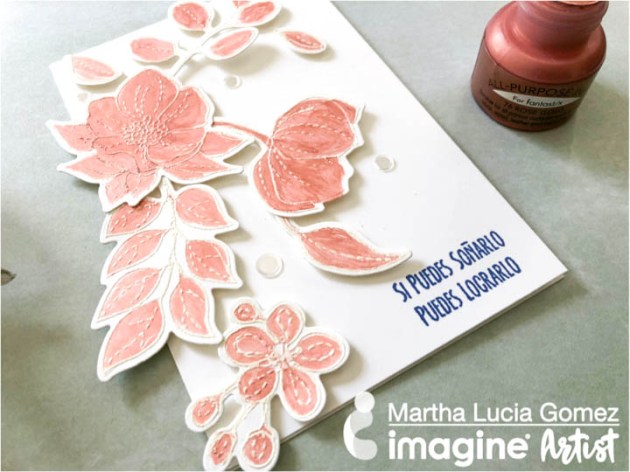

Step 3

To have the card on normal size, I just cut the right side border about 3/4″ of an inch. I pasted all the flowers with double-sided foam tape and added white sequins with On Point Glue. To finalize the card, I stamped with Memento Paris Dusk a Spanish sentiment from the stamp set Vive Ama Sueña from Latina Crafter. Simple, easy and beautiful!

Supplies

Imagine
Other
  • Whisper White Card Stock
  • Sequins
  • Double Sided Foam Tape
  • Even More Spring Flowers Stamp Set from Simon Says
  • Misti Stamping Tool
  • Scissors
  • Paintbrush

Make It Happen with this Beautiful Art Journal Design

by Lori Warren

Make It Happen with this Beautiful Art Journal Design

Who wants to “Make things happen” in 2019?  I sure do and that is what inspired me to make this 4” x 6” Art Journal page featuring a variety of Imagine products. The tutorial includes how to use your Craft Mat to create a watercolor background effect with irRESISTible sprays as well as how to create a watercolor palette for detail coloring with Memento inks.

Skill: Beginner
Time: 1 hour

Directions


Step 1

Apply VersaFine Clair (Medieval Blue & Teal Zeal) to a 4” x 6” Art Journal panel with Jumbo Daubers.


Step 2

Spray panel with Ink Potion No. 9 and encourage the ink to blend.


Step 3

Spray Teal Zeal irRESISTible Texture Spray directly onto your Craft Mat.


Step 4

Lay the panel, facedown, into the wet ink and lift. Set aside and allow to dry.


Step 5

Spray Teal Zeal irRESISTible ink directly onto the panel in a few key areas. Allow to dry.


Step 6

With VersaFine Clair in Nocturne, randomly stamp script across the panel.


Step 7

Spray Art Journal Panel with Sheer SHIMMER Craft Spray in Sparkle. Allow to dry.


Step 8

Stamp the four-butterfly image (from the Tim Holtz Alterations French Flight stamp/die set) on to the panel with VersaFine Clair in Nocturne. Stamp the image just off center and then to the left of the panel.


Step 9

From the same Butterfly stamp set, stamp the large butterfly image into a piece of white cardstock with VersaFine Clair in Nocturne.


Step 10

Apply three colors of Memento (Morocco, Teal Zeal, Elderberry) directly onto your Craft Mat and then add water; use like you would watercolors to paint the butterfly image. Allow to dry.


Step 11

Spray the butterfly image with Sheer SHIMMER Spray in Sparkle.  Allow to dry.


Step 12

With the coordinating die from the stamp set, die cut the butterfly image.


Step 13

Adhere black thread, in a circle pattern, underneath the butterfly and then mount to panel with double-sided foam tape (directly over the previously stamped image).


Step 14

With a paintbrush, apply GooseBumps Clear Texture Spray to butterfly. Allow to dry.


Step 15

Edge panel with VersaFine Clair in Nocturne and then embellish with adhesive pearls.


Step 16

Add sticker sentiment “Make It Happen” below the colored butterfly.


Step 17

Add the pages, back panel and metal rings to transform this project into an art journal.

Supplies

Imagine
Other  
  • Mark Richards Pearls – Dark Grey
  • Tim Holtz Alterations Stamps – French Flight
  • Sizzix Thinlits – French Flight
  • Sizzix Sidekick – Brown & Black
  • Lori’s Cards & Creations – Inspire Background stamp
  • 3M Foam Mounting Tape

Create an Cat Themed Card with Ombre Background with Memento Ink

by Melissa Andrew

Today, I create a Kitty Theme Ombre background using a watercolor technique and Memento Ink. This will give you a gorgeous transition from dark to light of the same color. The technique is smooth and allows for a seamless background. The Memento ink is vibrant and colorful and can be easily moved with water. In addition, I show you how to watercolor images directly with Memento Inks.

Skill: Advanced
Time: 1 hour

Directions

Supplies

Imagine
Other
  • LDRS Creative Stamp Set – Kitten Caboodle
  • White Acrylic Paint
  • Acrylic Stamp Block
  • Paint Brush – 12 round, 6 round
  • Water Color Paper
  • White Cardstock
  • Misti Stamping Tool


Create A Song Bird Theme Card For Valentines Day

by Kyriakos Pachadiroglou

Create A Song Bird Theme Card For Valentines Day

Using Imagine’ s Craft Mat, I made a mirror image of the stamp as I wanted to create a background with a repetitive pattern on it. Having a stamp design with one only way to stamp, the Craft Mat kept the VersaFine Clair ink long enough to place the cardstock and capture the stamped image at the reverse direction. The same technique can be used on various materials such as fabric and wood. It could also work well on transparent sheets when you need both side stamped image.

Skill: beginner
Time: 1 hour

Directions


Step 1

Mark on the craft mat an outline of the cardstock size with a pencil to use a guideline to align your stamps. For this project, a 4 x 6 cardstock cutting is used.


Step 2

Stamp the birds on the Craft Mat using the Nocturne VersaFine Clair ink pad inside the guidelines. Press the cardstock piece on the craft mat and inside the guidelines.


Step 3

Stamp to cover the rest of card piece to create the repetitive pattern.


Step 4

Set the stamped cardstock piece on the front of a card 5 x 7 inch with Tear It! Tape.


Step 5

Add color details on the flowers with the Fabrico marker in Red Brick.


Step 6

On a piece of white cardstock, stamp with VersaMark the love word, cover with Imagine’ s red embossing powder and heat set. Distress the edges of the paper.


Step 7

Use lightweight clay and the rubber mold to make a feather and when dries whitening it further with All-Purpose Ink in White.


Step 8

Place two side to side layers of Tear It! Tape to match the size of the ribbon and glue the chevron ribbon on the card.


Step 9

Continue with the Tear It! Tape to set the word “love” on top of the ribbon.


Step 10

Add rhinestones with the On Point Glue on the flowers.

Supplies

Imagine
Other
  • White cardstock
  • Heat tool
  • Rhinestones
  • Feathers rubber mold
  • Kaisercraft – Bonjour stamp set
  • Penny Black – All about love stamp set
  • May Arts – chevron ribbon red
  • Light Weight Paper Clay


Create a Valentines with Emboss Resist Using Goosebumps Spray

by Lindsay Adreon

Create a Valentines with Emboss Resist Using Goosebumps Spray and VersaFine Clair

I am a clean and simple cardmaker who likes to focus on techniques, so the GooseBumps spray is PERFECT for my style of cardmaking! Using the spray and Versafine Clair inks together is a fast and easy way to create a fun and vibrant background for the upcoming Valentine’s Day holiday! (Plus I added a little sparkle, because who can resist that??)

Skill: Intermediate
Time: 1 hour

Directions

Supplies

Imagine 
Other
  • Craftin Desert Divas –  Nested Hearts & Flag Banner Dies
  • Joy Clair Stamps – Candy Hearts Stamp Set
  • Die Cutting Machine
  • Fun Foam
  • White Cardstock
  • Acrylic Blocks
  • Alcohol (For Clean Up)

See How to Use Acrylic Paint and Embroidery on a Birthday Card

by Elina Stromberg

See How to Use Acrylic Paint and Embroidery on a Birthday Card with Memento Inkpad and Craft Paints

Whenever you want to create interesting, bit grungy textures on a card background, I suggest you use acrylic paints for stamping! For this technique, you can use any pattern stamp you have in your stash and choose any colors to match to your main images. 

Skill: Intermediate
Time: 1.5 hours + drying time

Directions


Step 1

In this technique your Imagine craft mat will become handy: First, you use it as your palette for mixing the paints. Then you brayer the paint to a thin layer, add a hint of water should the paint be too heavy and then use the mat as your stamping pad. Simple and easy! The only thing to remember is to clean your stamp right after stamping. If the paint dries on your stamp it will be very difficult to remove. However, cleaning your craft mat you can do later; even if the paint is sticking to it, just mist the paint with water and wipe the mat clean with a baby wipe. Should there still be some paint left, just use a drop of hand sanitizer and your mat will look as good as new! Apply acrylic paint of your choice on the craft mat. I mixed white and red to get a beautiful light pink. Brayer the paint to a thin layer. Use the paint as your stamping pad. Keep the stamp in your hand, bend it, and stamp random patterns on the white paper. Let dry.


Step 2

Ink the background with a matching ink color. If you used a light acrylic paint color, use a darker ink. On a darker paint, a lighter ink color will best highlight the stamped pattern.


Step 3

Mist the inked pattern with water. Press the wet paper with a paper towel to pick up the excess ink. Let dry.


Step 4

Use a plastic stencil or a nesting metal die as your stencil and create a punched frame in the middle of your background. Secure the stencil with masking tape before starting. 
For punching, use a paper piercing tool or a darning needle. Place paper on an old mouse pad for easy punching and for protecting your crafting table.


Step 5

Sew a frame on the background using a straight stitch and three strings of embroidery yarn. Secure the end of the yarn on the back with double-sided tape.


Step 6

Stamp, color, and cut out your main image. Glue on the card front. Trim card to size, mat on a white card base. I used the same technique also for an ATC background; I think it looks quite nice, too!

Supplies

Imagine
Other
  • Acrylic paint – White, Red 
  • Brayer
  • Water mister
  • Ink blending tool
  • Honeycomb pattern stamp

  • Stamping Bella: Milton (Mouse) Stamp cgr 135

  • Carabelle Studio: Simple Elegance
  • Promarkers for coloring
  • Cardbase – white
  • Cardstock – White mixed media 
  • Dark purple paper
  • Metal nesting dies: Sizzix
  • Embroidery yarn, needle, paper piercing tool, old mouse pad