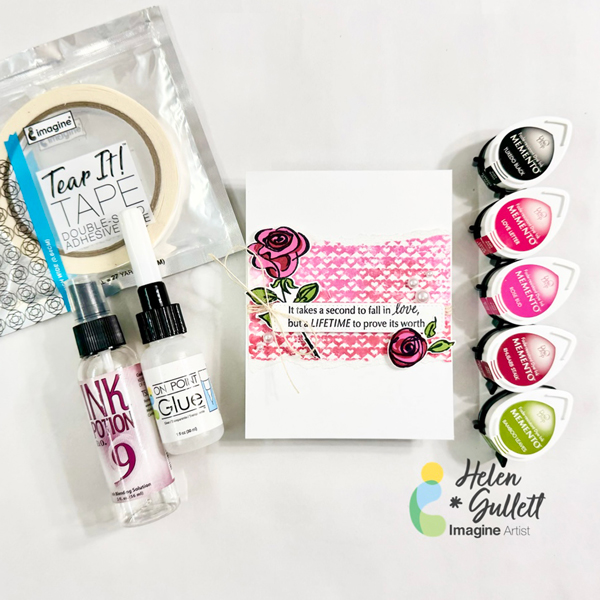
CAS Valentine’s Day Card

By Helen Gullett

Hello crafty friends! Valentine’s Day is around the corner and today, I have a love themed CAS card idea to share with you all. It is a fun and quick card to make to spread love with others through handmade cards.

Let’s get crafting!

Skill: Intermediate
Time: 15-20 minutes

Direction:

Step 1
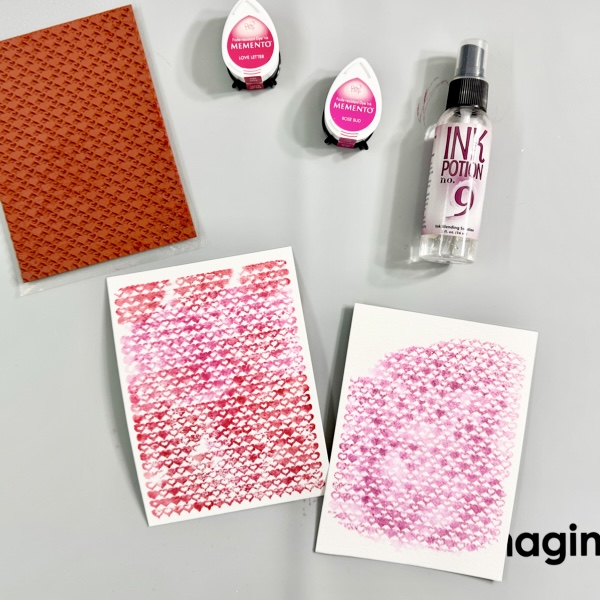
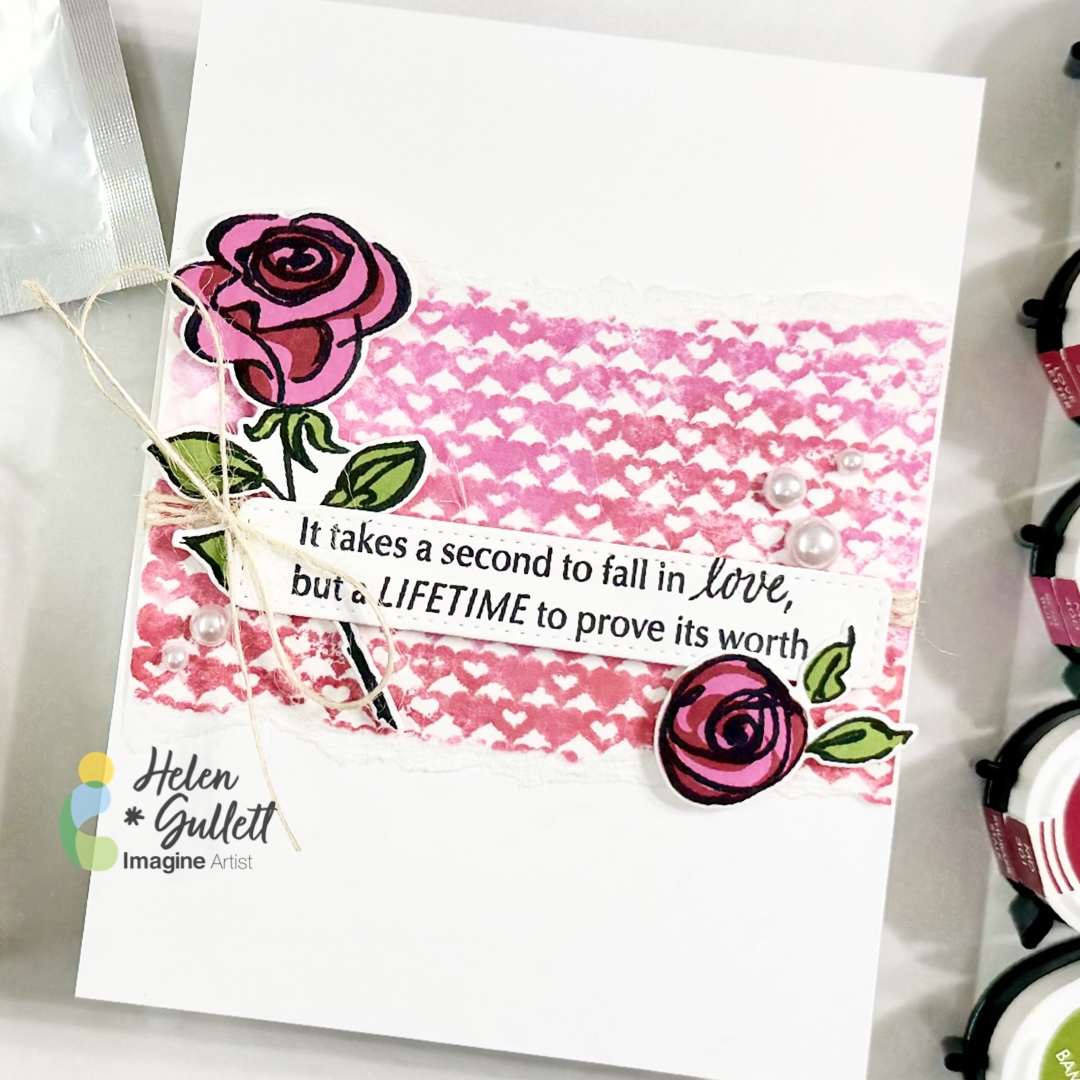
Cut out a piece of Canson watercolor paper into 4.5 inch x 6 inch that you want to use as your background panel. I use 9×12 Canson watercolor paper and trim it into 2 panels.

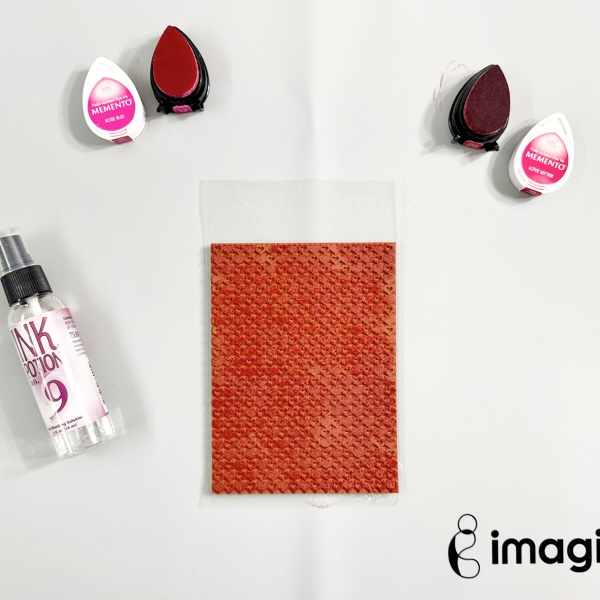
Dab randomly the Memento inks (Love Letter & Rose Bud) on the background stamp.

Spray lightly with the Ink Potion No. 9.

Step 2
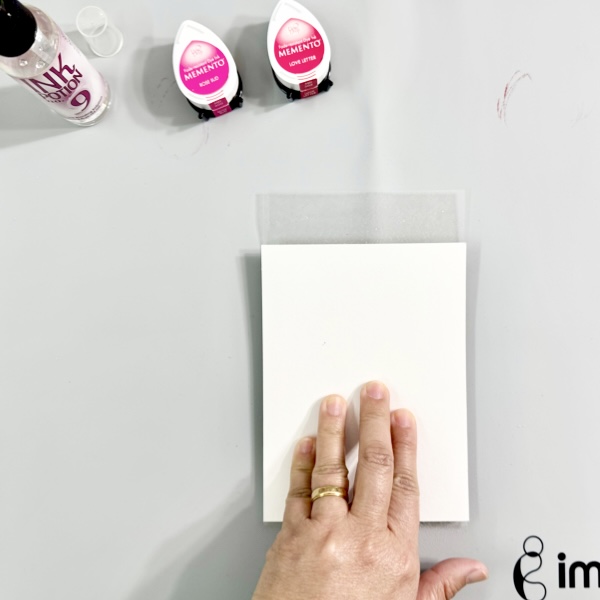
Add the watercolor panel to the inked stamp and firmly press it down to the stamp. Try to center it to the stamp.

Carefully move around your finger all over the watercolor panel to get the ink transferred well.

Lift up the paper off the stamp and you will get the first watercolor print background. There are still some inks left on the stamp, pray again with the Ink Potion No.9 to get the second print out of it.

Step 3
Repeat step 2 but instead of moving your hand all over the paper, you can try to just partially press the paper to get partially watercolor background print just like on the right panel in the picture.

Step 4
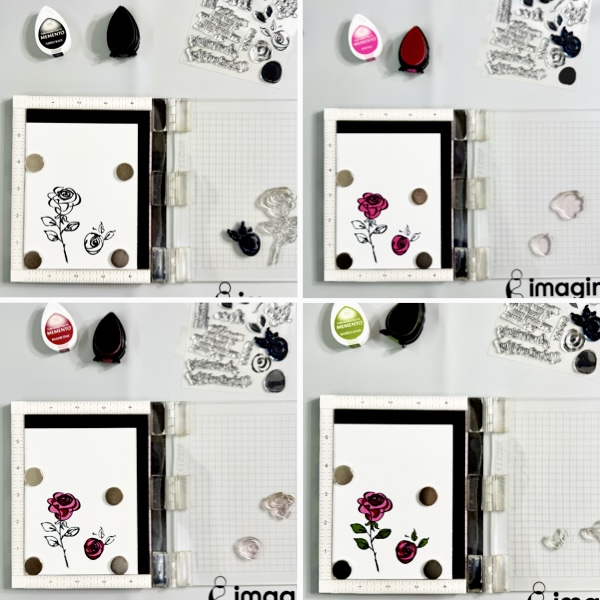
This layered stamping technique is easier done with a position stamping tool if you have it. If you do not have it, clear acrylic stamping blocks work, too. Cut out a white cardstock into 4.25 inch x 5.5 inch.

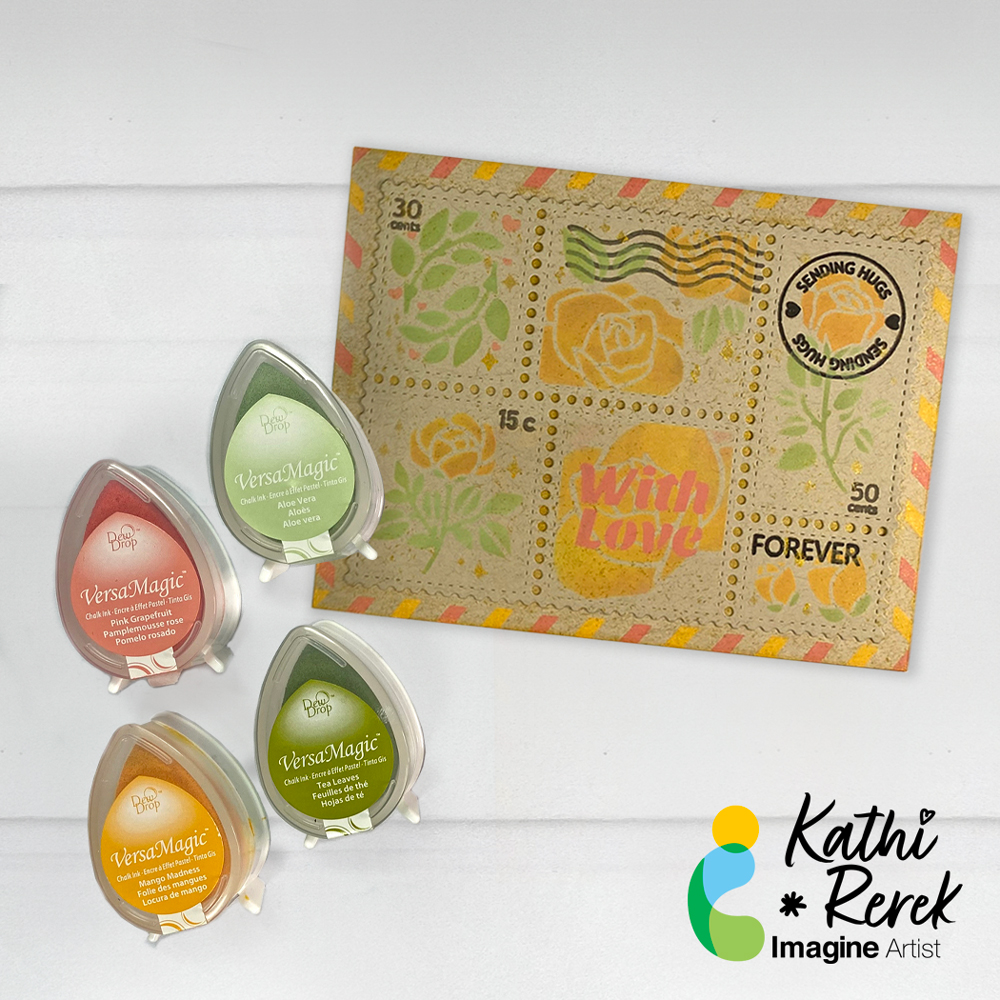
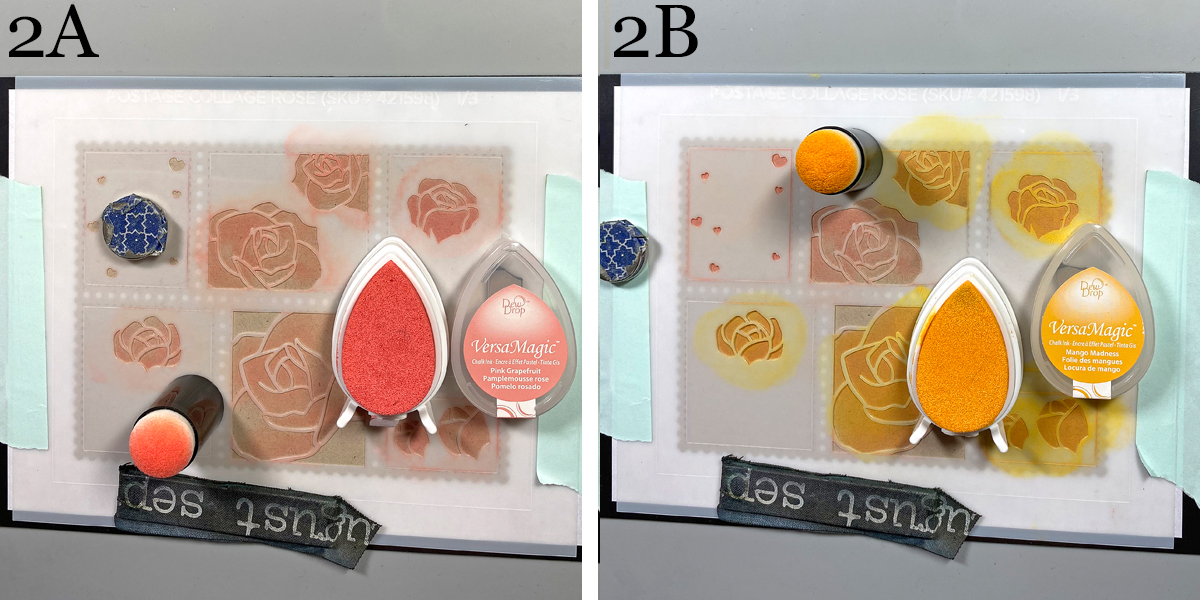
Stamp the outline flower images with a Memento Tuxedo Black ink pad.

Stamp the solid background flower images with a Rose Bud ink pad, then stamp the shadow flower images with a Rhubarb Stalk ink pad.

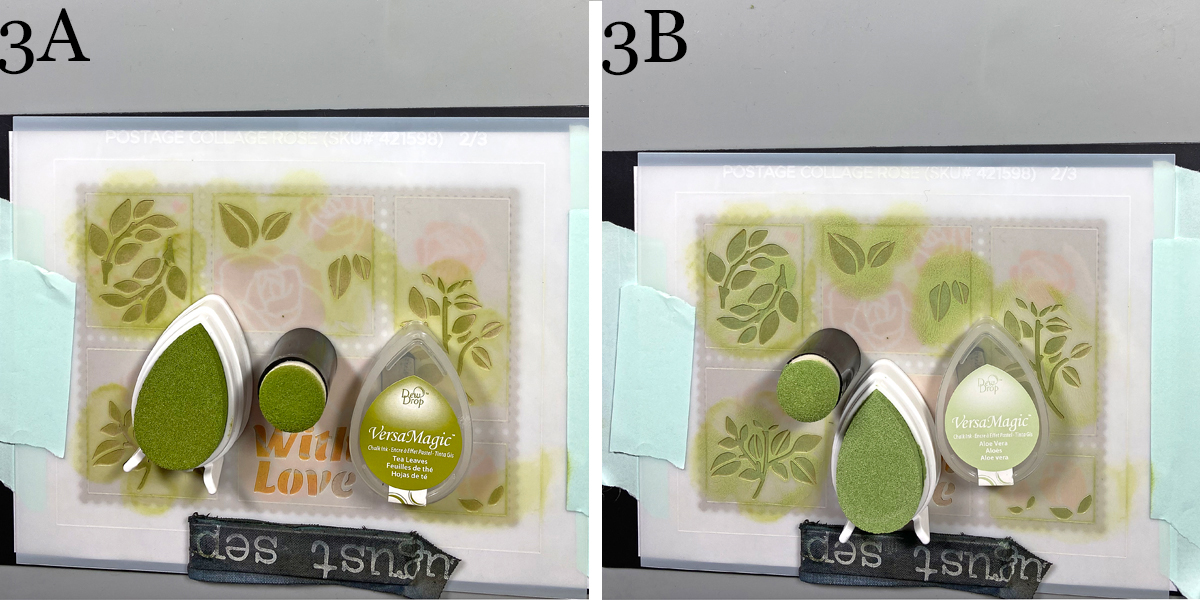
Stamp the leaves images with a Bamboo Leaves ink pad.

Step 5
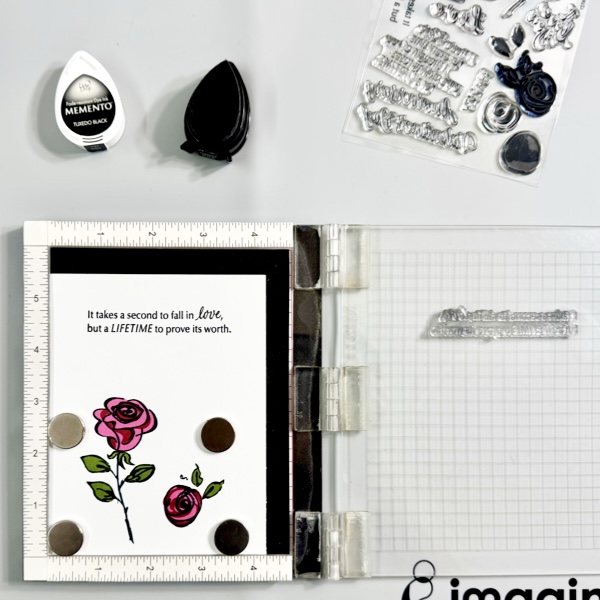
Stamp the sentiment with a Memento Tuxedo Black ink pad at the extra space of the cardstock panel.

Step 6
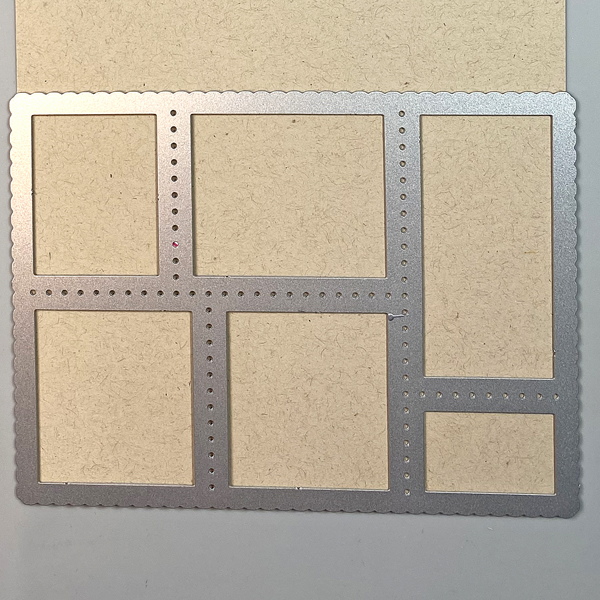
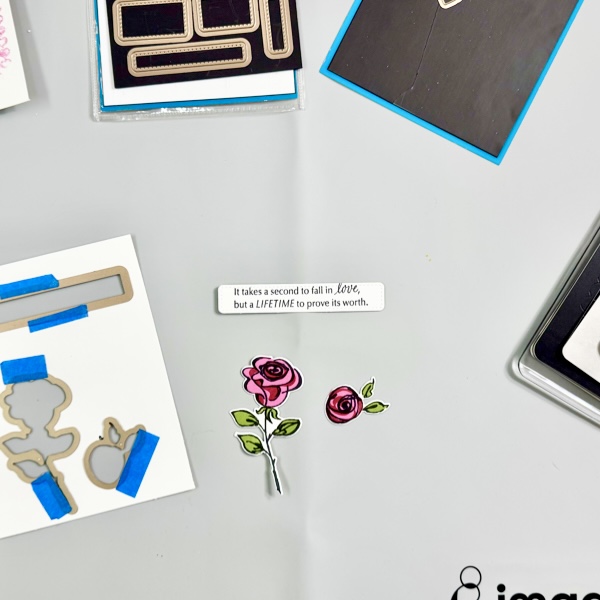
Cut out all the flower pieces with the matching dies. Optional, if you don’t have the matching dies to your stamp set, you can fussy cut it with scissors.

Cut out the sentiment with one of the Label framelits dies.

Step 7
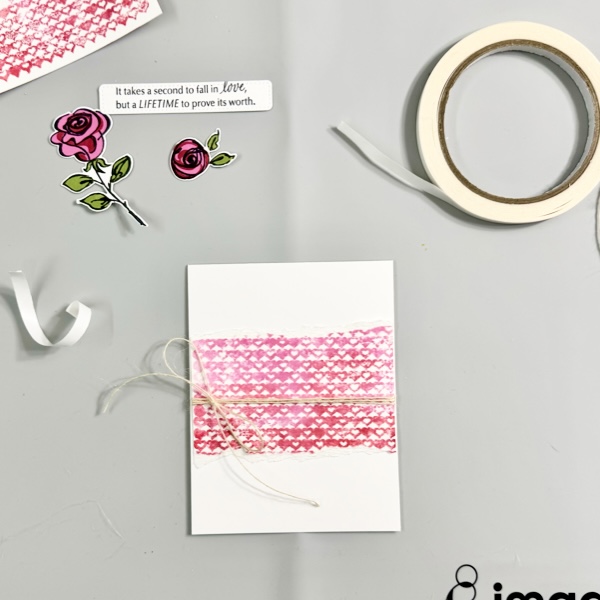
Rip the top and bottom of the watercolor background panel to give some texture to the background panel.

Optional: You can use the whole watercolor background panel as your background.

Wrap around some of the Burlap twine around the background panel and tie up a bow.

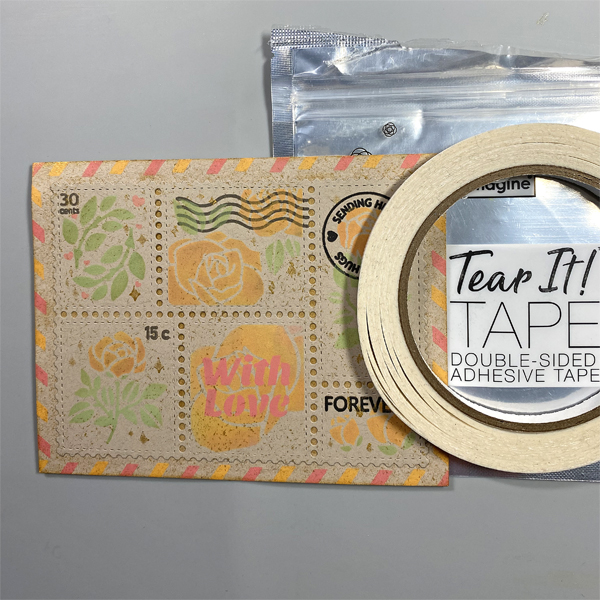
Add it to the card base with some of the Tear It! Tape.
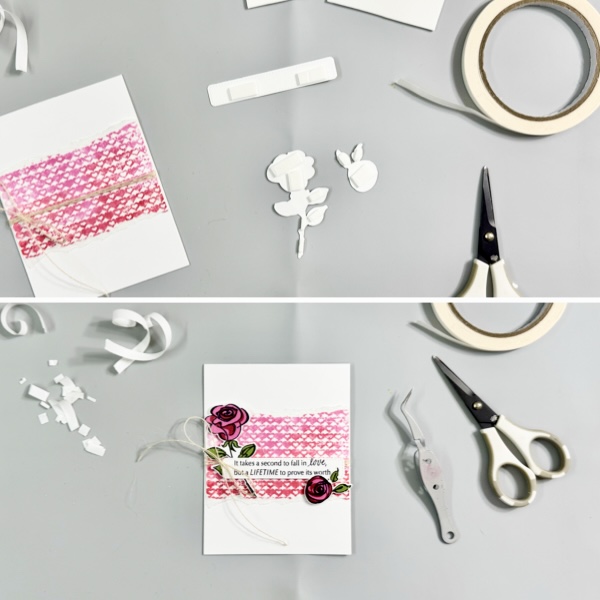
Step 8
Add some of the Tear It Tape! to both sides of the white fun foam and cut it into a 3D foam tape strip. Add some of them to the flowers and sentiment label.

Add each of the flowers and sentiment to the card.

Step 9
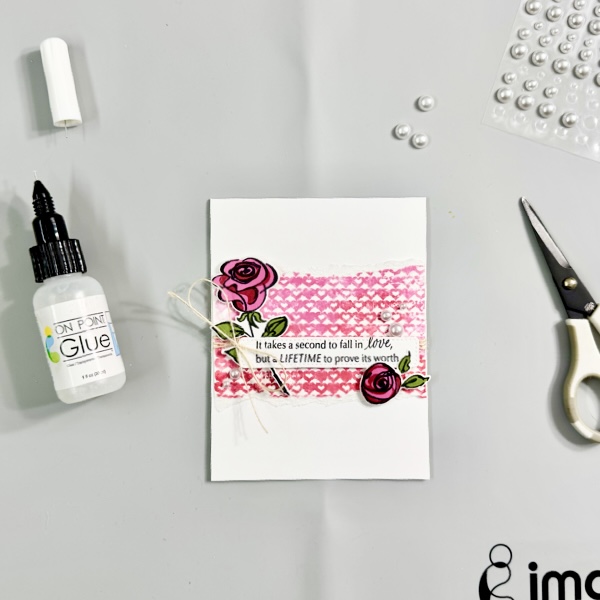
Add some of the white pearl gems with some of the On Point Glue to embellish the card.

Hope this CAS card project gives you an idea to make some Valentine’s Day. Thank you for stopping by our blog today. Have a fabulous day!

Craft Supplies

Imagine Crafts:

Others:

  • Layered Rose Stamp & Die Set (Dare 2B Artzy)
  • Label framelits die set (Dare 2B Artzy, retired)
  • Hearts Background Stamp (A Jillian Vance Design, retired)
  • Burlap Twines
  • Pearl gems
  • Neenah Solar White Cardstock 80 lb
  • Canson  Watercolor paper 140 lb
  • White fun foam
  • MISTI stamping tool
  • Micro-tip scissors
  • Tweezers
  • Paper trimmer
  • Die cutting Machine

Let’s Make a Rose Postage Card

By Kathi Rerek

It’s summer and the roses are in full bloom. Let’s make a Rose Postage Card with VersaMagic and Delicata Inks!

Skill Level: Intermediate
Time: 1.5 hours

Directions:

Step 1:
Use the Postage Collage die to cut Desert Storm cardstock.

Steps 2A and 2B:
Place a magnetic panel onto the cardstock panel. Use temporary adhesive to secure the Rose Postage Collage die-cut to a piece of scrap paper. Use magnets and low-tack tape to secure the first Rose Postage Collage Stencil to the die-cut. Use a Sponge Dauber to apply Pink Grapefruit VersaMagic Ink over the stencil onto the die-cut (2A). Use another Sponge Dauber to apply Mango Madness VersaMagic Ink over the stencil onto the die-cut, blending the ink as you go (2B).

Keep the Postage-Collage Die-cut panel in place. Remove the stencil and clean. Heat set the collage panel.

Steps 3A and 3B:
Use magnets and low-tack tape to secure the second Rose Postage Collage Stencil to the Postage Collage die-cut. Use a Sponge Dauber to apply Tea Leaves VersaMagic Ink over the stencil onto the die-cut (3A). Use another Sponge Dauber to apply Aloe Vera VersaMagic Ink over the stencil onto the die-cut, blending the ink as you go (3B). Keep the Postage-Collage Die-cut panel in place. Remove the stencil and clean. Heat set the collage panel.

Steps 4A & 4B:
Move the Postage Collage Die-cut panel to the base of a stamping platform. Secure with magnets. Position the postmark, cancellation, cost, and “forever” stamps from the Postage Collage Stamp Set facedown on the panel. Press the platform’s lid onto the back of the stamp, lift, ink the stamps with Morning Mist VersaFine Clair Ink, and stamp (4A). I re-inked and stamped some of the stamps with Nocturne VersaFine Clair Ink to add visual weight.

I decided that I wanted to add the words “With Love” from the second Postage Collage Stencil and that I wanted to add more stamped postage items to the collage.

Step 5:
Move the Rose Postage Collage Die-cut back onto the magnet panel and secure the second Postage Collage Stencil with magnets and low-tack tape overtop. Re-use the Sponge Dauber from Step 2A to apply Pink Grapefruit VersaMagic Ink over the “With Love” words on the stencil onto the Postage Collage Die-cut panel. When done, lift the stencil, clean it, then heat set the Postage Collage Die-cut panel.

Step 6:
Place the Postage Collage Die-cut Panel again onto the base of a stamping platform and secure it with magnets. Place additional postage stamps from Postage Collage Stamp set facedown on the image panel. Press the platform’s lid onto the back of the stamp, lift, ink the stamps with Morning Mist VersaFine Clair Ink, and stamp. When done, remove the Postage Collage Die-cut Panel and heat set.

Step 7:
Move the Rose Postage Collage Die-cut panel back to the large magnet panel. Use magnets and low-tack tape to secure the third Postage Collage Stencil to the Postage Collage Die-cut panel. Use a Sponge Dauber to apply Golden Glitz Delicata Ink over the stencil onto the Postage Collage Die-cut panel.

Step 8:
Use the pouncy tool to apply Golden Glitz Delicata Ink randomly over the Postage Collage Die-cut panel. Heat set the panel and set it aside.

Steps 9A and 9B:
Cut a piece of Desert Storm cardstock to 5.5” x 4.25”. Use temporary adhesive to secure this panel to a piece of scrap paper. Use magnets and low-tack tape to secure the first Postage Collage Stencil to the die-cut. Use a Sponge Dauber to apply Pink Grapefruit VersaMagic Ink over the stencil onto the die-cut (9A). Remove the first stencil and heat set the panel.

Use magnets and low-tack tape to secure the second Postage Collage Stencil to the panel. Use a Sponge Dauber to apply Mango Madness VersaMagic Ink over the stencil onto the die-cut (9B). Remove the stencil and heat set the panel.

Step 10:
Use the pouncy tool to apply Golden Glitz Delicata Ink all over the panel. Heat set.

Step 11:
Use Tear-It! Tape to adhere the Postage Collage Die-cut panel to the 5.5” x 4.25” panel, then use to adhere the panel to an A2 card cut from the same cardstock.

Finished Card

Supplies Used:

Imagine:

Other Supplies:

  • Desert Storm Classic Crest Cardstock by Neenah Papers
  • Postage Collage Clear Stamp Set by Waffle Flower
  • Postage Collage Cutting Die Set by Waffle Flower
  • Postage Collage Stencil Set by Waffle Flower
  • Rose Postage Collage Stencil Set by Waffle Flower
  • Pouncy Tool – Source unknown
  • Low-Tack Tape
  • Magnet Packaging from the Postage Collage Die Cut Set by Waffle Flowers
  • Misti  Stamping Platform by My Sweet Petunia

Learn to Make a Rose Themed Congratulations Card 

2022-Annie-Aug-700x700

By Annie Collins

– Hello Crafty Friends – Annie here with a fun summer themed card featuring a variety of Imagine Crafts products.

Skill Level: Beginner

Time to Complete: 30 Minutes

Art Supplies:

Imagine:

VersaMagic Inks: Pixie Dust, Pink Petunia, Red Brick, Sage, Oasis Green, & Hint of Pesto

• Memento Ink: Summer Sky

• magine Crafts: Tear It! Tape

• Imagine Crafts: On Point Glue

• Imagine Crafts: Craft Mat

Other products

• Hero Arts Stamps: Color Layering Set: Layering Rose CM243

• Recollections Brand 110# Cardstock: White

• Accent Ultra Smooth 80# Cardstock: Opaque White

• Lifestyle Crafts Embossing Folder: Lattice

• Blending Brush

• Tiny Acrylic Bubbles: Clear, Pink and Light Blue