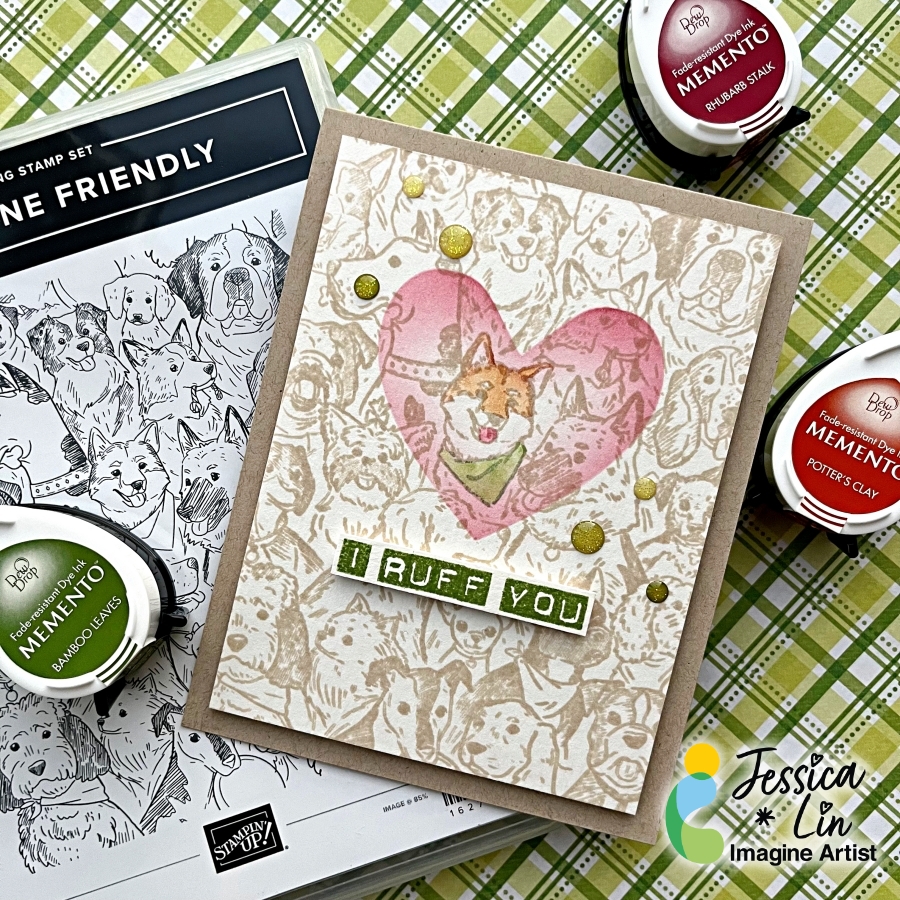
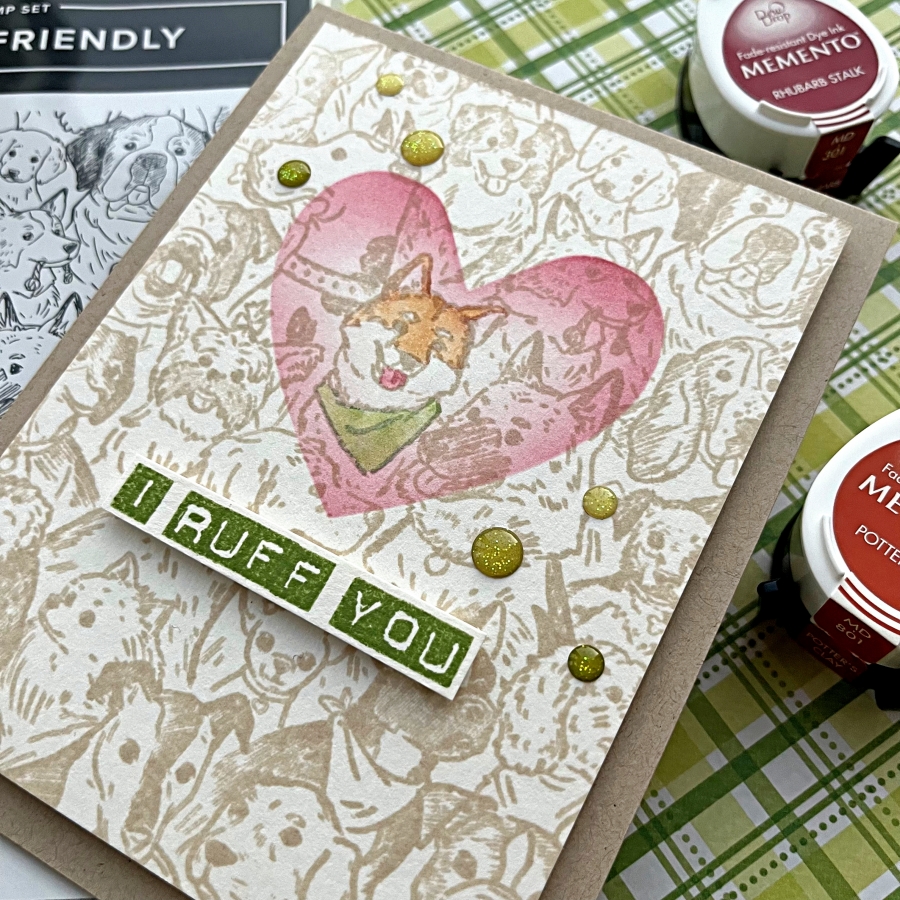
Hi everyone, it’s Jessica here. Today I have a special Valentine’s card to share with you. If you are a dog person, the background stamp we are using today is for you. It’s really unique and you could highlight any of the dogs to create personalized cards for the recipient.
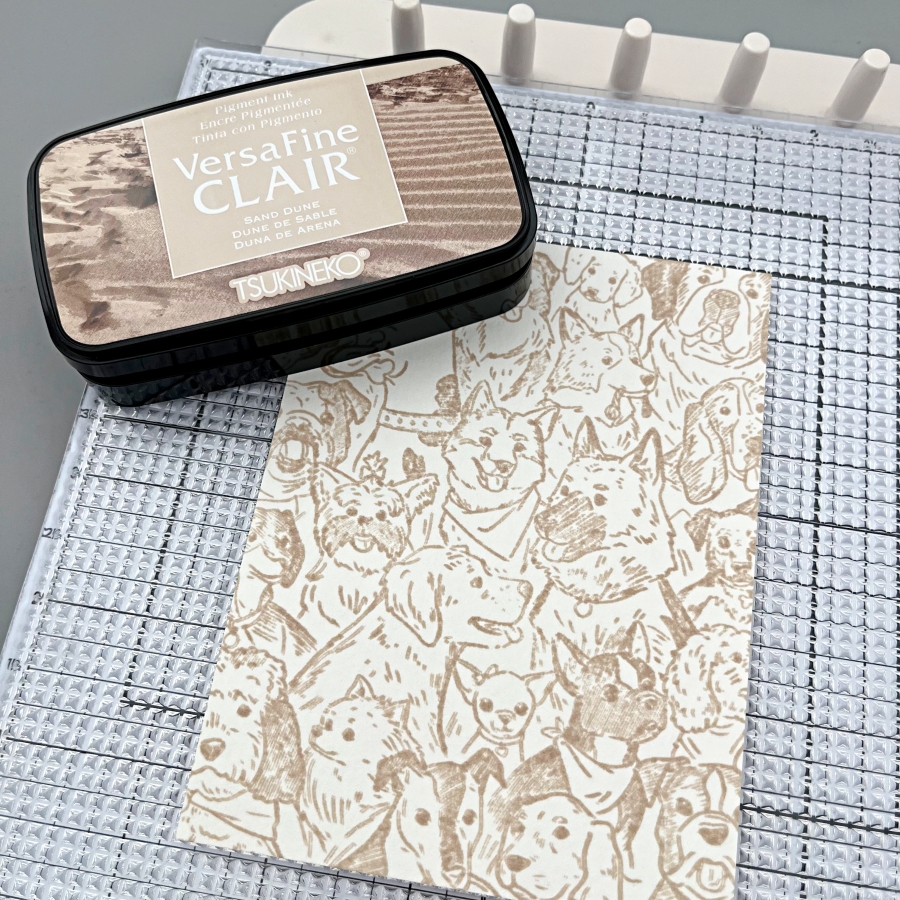
Step 1: Ink up Stampin’ Up!’s Doggone Friendly background stamp with Sand Dune VersaFine Clair ink, then stamp on a piece of watercolor cardstock. I recently got a photopolymer sticky mat from Altenew and have enjoyed using it so far. It ensures the cardstock stays in place when you are stamping, which is a handy feature when you are stamping large images like background stamps.
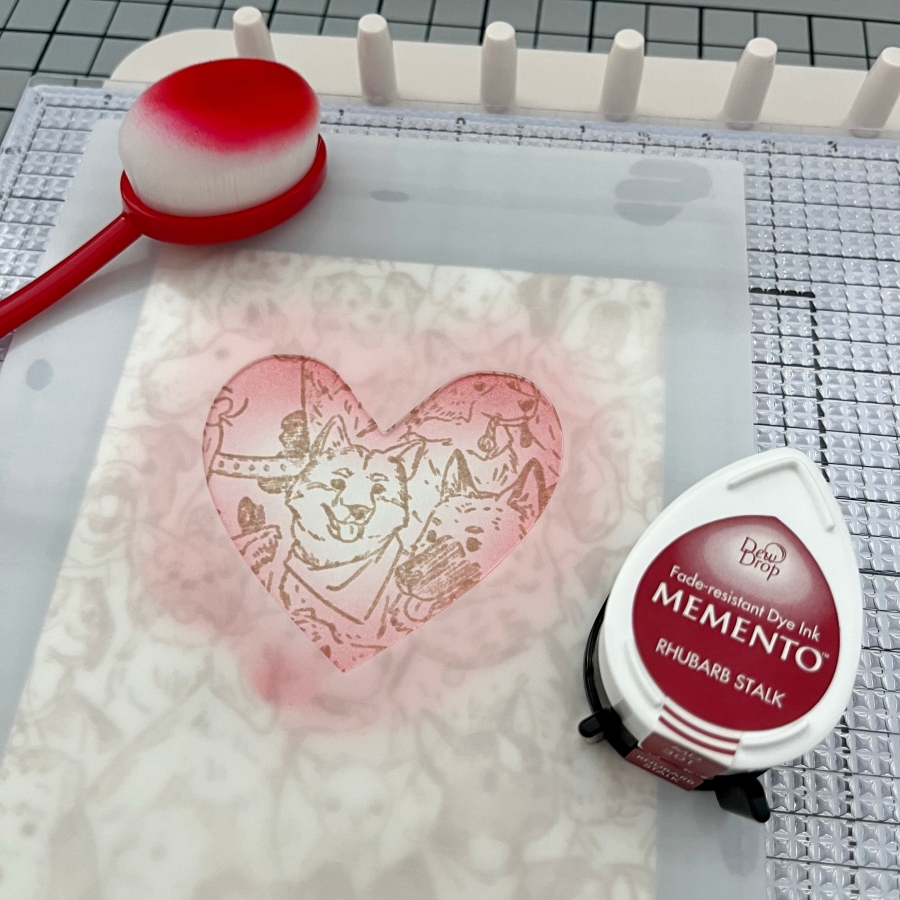
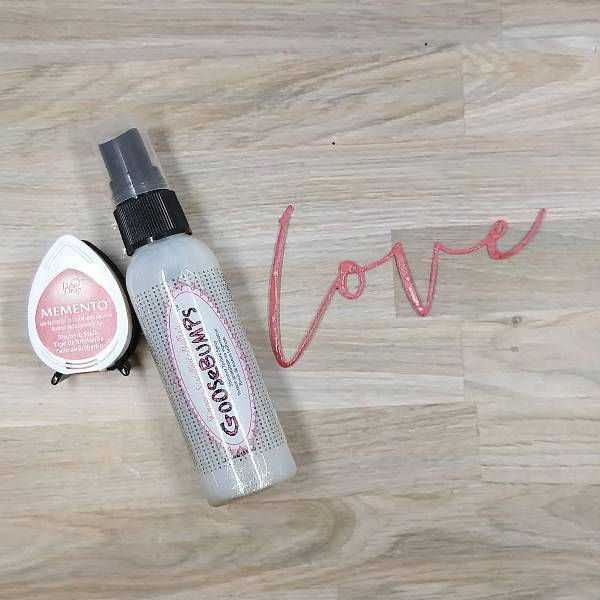
Step 2: I wanted to highlight the Shiba Inu in the middle by creating a spotlight effect around him. I laid down the Spotlight Heart stencil in the center and ink blended the edges lightly with Rhubarb Stalk Memento ink. Memento inks are perfect for ink blending and since they are dye inks, the blended areas will not cover up the background stamp details.
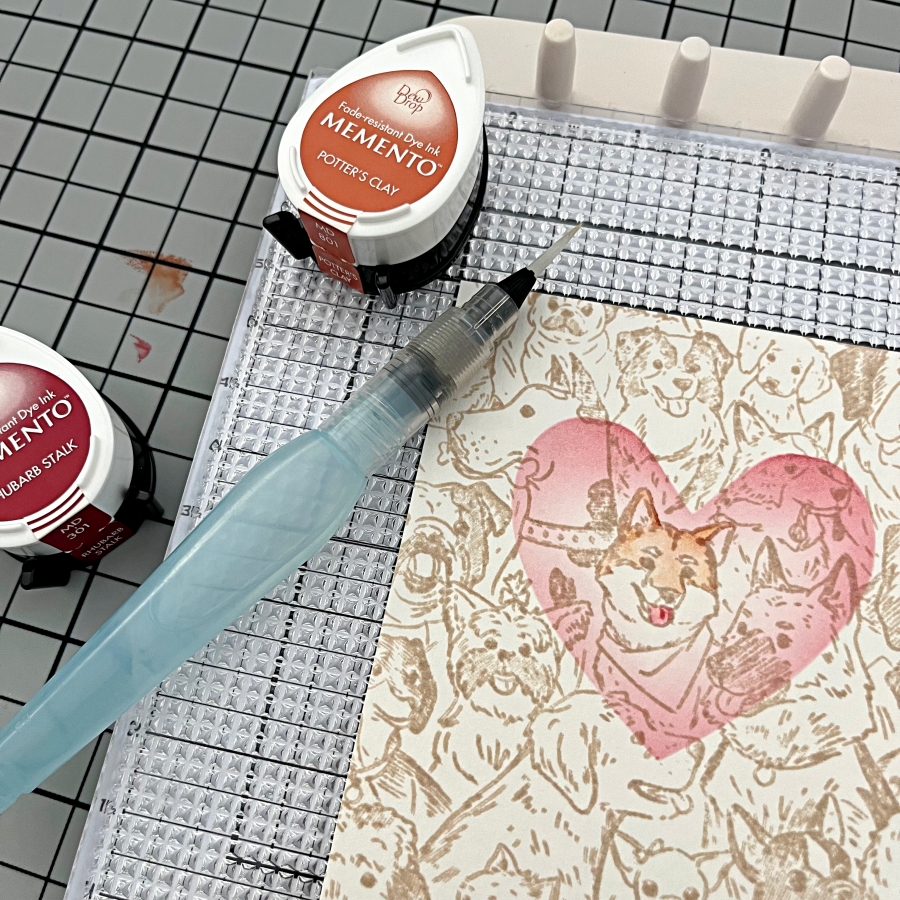
Step 3: This step is completely optional, but I decided to add some simple watercoloring. I chose Potter’s Clay for his face and used Rhubarb Stalk to color his tongue. For his scarf, I used Bamboo Leaves (not pictured here).
Step 4: Lastly, I stamped a “punny” sentiment using Bamboo Leaves Memento ink. I have used the Labeler Alphabet stamp set many times before to create custom sentiments. I thought this phrase compliments the blended heart shape nicely. Finally, I added some green enamel dots to decorate and the card is completed!
We’re thrilled to introduce our 2025 Artist-in-Residence Design Team! This exceptional group of designers is sure to inspire you with their remarkable creativity and talent.
Clockwise: LV Handcrafted, Anna Escalada York, Ceil Pritchett, Katy Ingram, Helen Gullett, Tracy Fear, Jessica Lin
Hi! I’m Linh – or LV Handcrafted on social media. I live in Seattle, WA with my husband and our two dogs. I’ve been crafting since I was in high school but took a long break as I started my career. Now (many years later) I am my own boss working as a business consultant, so I can balance my time and do more of what I love – papercrafting! There’s always so much to learn in papercrafting, and I find great joy in adding my own twist and sharing what I’ve learned. I love Imagine products. There’s such a wide range of media supplies. It’s so fun to experiment, have a bit of a play and create something exciting. I’m honored to be a part of this amazing team.
Hi! I am Helen. I am a stay-at-home wife and a mom of 2 daughters. I grew up in Indonesia and now live in Ohio with my family. I am working at home part time as a translator. I love paper crafting, Bible Journaling, working on mixed media and DIY projects. I love coffee, tea, and dark chocolate.
Hello crafty friends! My name is Jessica Lin. You may have recognized me or seen some of my previous projects, and I am so excited to be back on Imagine’s design team! I am a crafty gal in my late twenties, but my passion for cardmaking started a long time ago when I was 9. I was introduced to wooden stamps and I haven’t stopped stamping since. Some of my other hobbies include sewing, washi tape collaging, and I hope one day I’ll learn how to crochet, too.
I grew up in Taiwan and speak Mandarin as my mother tongue, so my YouTube channel is mostly filmed in Chinese. This year, I decided to create a bilingual Instagram account. If you are inspired by bold, vibrant colors and enjoy detailed projects with lots of layers, come have a visit! I look forward to meeting and crafting with all of you!
I am Ceal Pritchett and I reside in the mountains of western North Carolina with my husband and our little fur baby Shih Tzu. I have been a crafter in some form since childhood. I fell in love with cardmaking around 15 years ago. I am a clean and simple cardmaker who sometimes dabbles in other things like art journals, bible journaling, and painting.
Anna Escalada York grew up on a farm outside of Phoenix, Arizona and moved to Portland, Oregon to go to college, where she met her husband. They have two children (one in high school and the other in middle school), a cat and two guinea pigs. She is also a proud teacher at her local high school for almost 20 years in SE Portland, Oregon (go Lightning)! Her other hobbies are reading, riding her bike, nerding out to Star Wars, and reading.
Anna has been crafting (almost exclusively card making) since 2004, but stepped away for a while when it was too hard to juggle the demands of being a mom of little children and working full time. She returned to her craft room in 2019 and started blogging consistently in 2020. One of her recent crafty achievements has been creating 700 cards in 2021. Her favorite craft supplies include heat embossing, using splatter, and coloring with markers. Her favorite style is sparkle!
Hi! My name is Tracy Fear, known on social media as Not Afraid of Color, and my friends call me T! I am a Pacific Northwest native living in north Alabama for the past 15+ years. I am retired and live with my retired husband, our 3 dogs, and 8 cats last I counted.
I am a lifelong crafter with skills with stained glass, sewing, quilting, crochet, sculpture, beaded jewelry, macrame, crochet, woodworking, and many others. Most recently I have honed my attentions to paper crafts, specifically making cards.
Hello Crafty Friends! My name is Katy Ingram. I am a wife and mama to 1 son and 4 kitties. I live in southeastern North Carolina off the coast of Topsail Island and I LOVE making handmade cards. I started my card making journey back in 2016 and in 2019 I started my youtube channel and blog Eastwicks Paper and Ink. I wanted an outlet to share and hopefully inspire your creativity with my card making as well as some tips and tricks along the way. I am so excited to be joining the Imagine Crafts Guest Artist Team. I look forward to meeting and crafting with you!
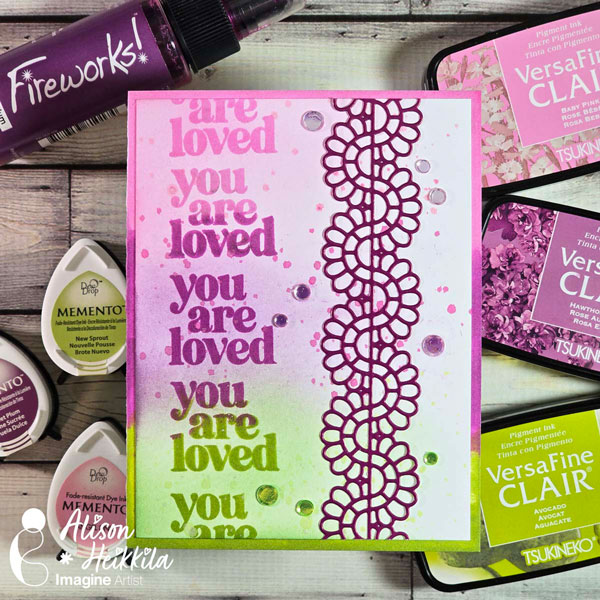
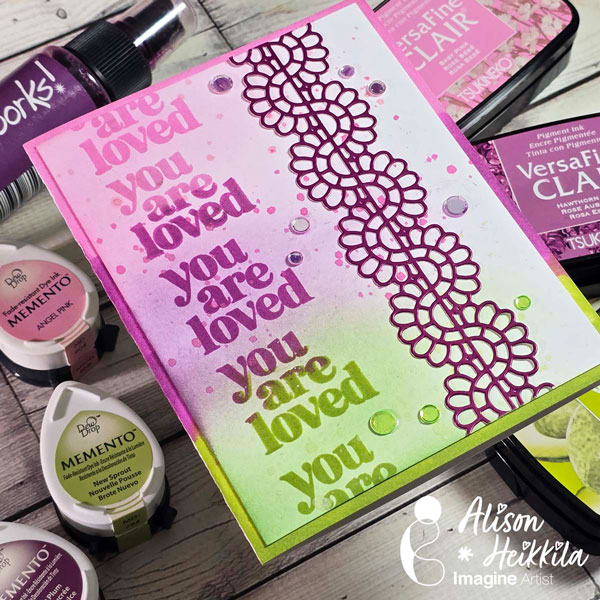
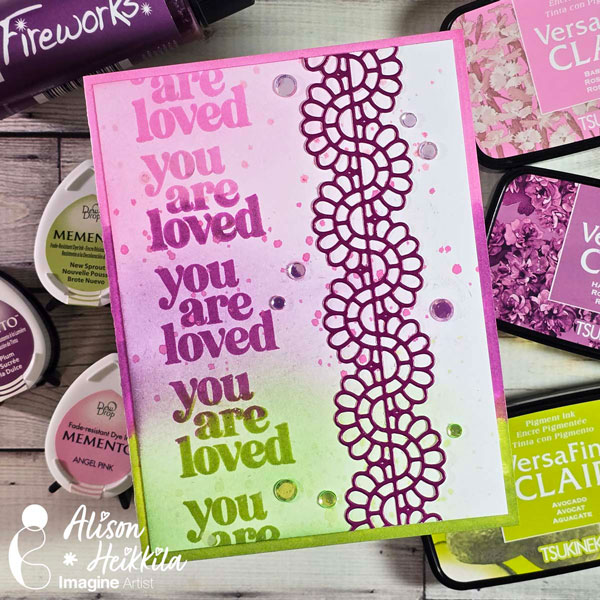
Hello! Alison Heikkila here. Grab a sentiment that’s worth repeating and let’s do some tone on tone stamping. You can do any color combo you want, just try not to overlap colors that are opposite on the color wheel. The techniques we’re doing today are great ways to mix various inks you may have in your stash.
Skill Level: Intermediate Time to Complete: 20-30 Minutes
*Some affiliate links are used in this post. That means that if you shop through these links, I may receive a small compensation, at no cost to you. For more information, please see my Affiliates page, where I also have some coupon codes.
This was so much fun to create. I’d love to make it again with different colors. What colors would you use? I might try teal, terra cotta, and cocoa next. Thanks so much for stopping by. Have an inspiring day!
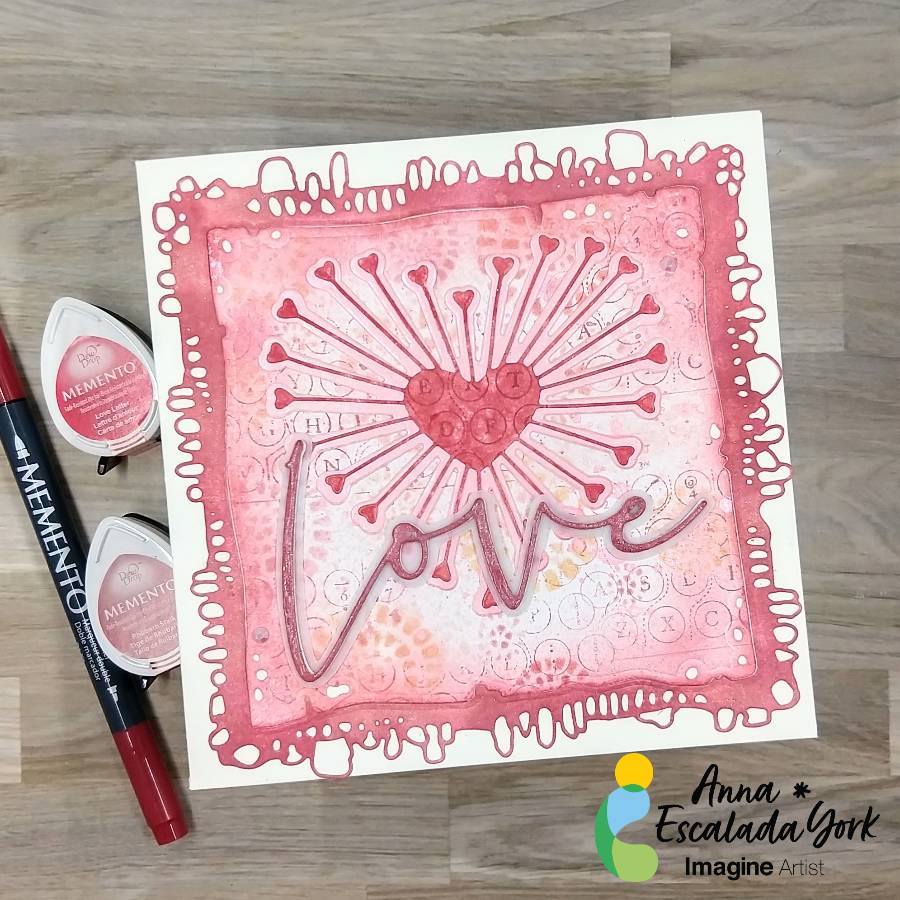
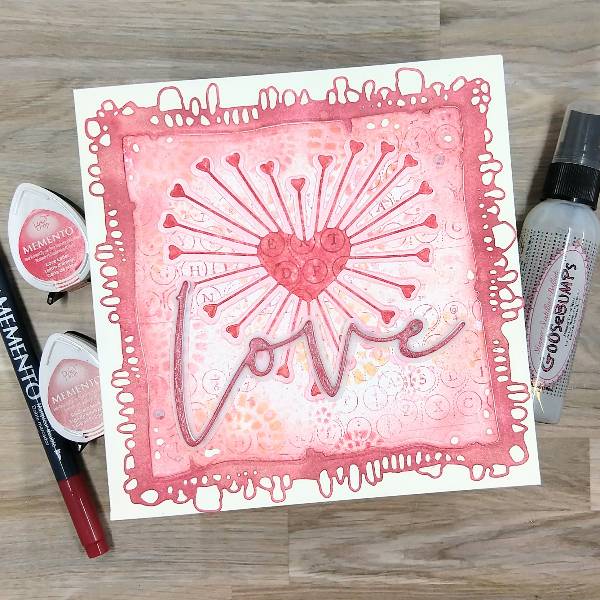
I wanted to use some dies in my stash plus some warm colored inks to make a Valentine’s Day card for my husband.
Skill: Intermediate Time: 1.5 hours
Directions:
Step 1:
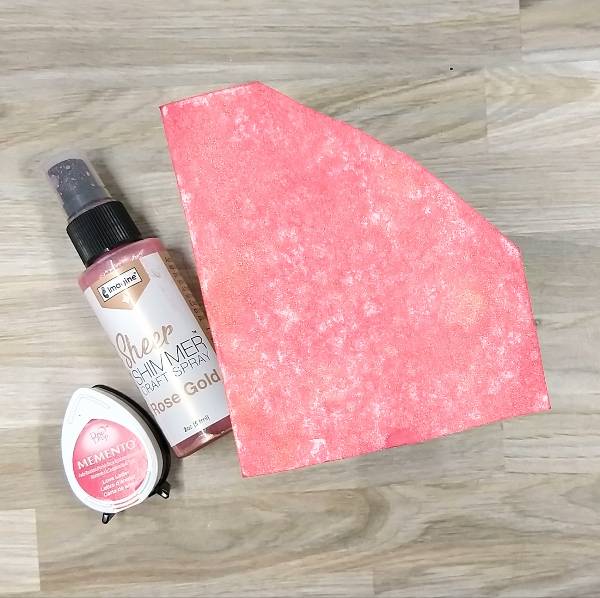
Rub a piece of watercolor paper with a Love Letter Memento ink pad. Don’t worry too much about the consistent color across the watercolor paper.
Step 2:
Spray the same watercolor paper with Rose Gold Sheer Shimmer Craft Spray and allow to dry.
Step 3:
Die cut the colored and sprayed watercolor paper.
Step 4:
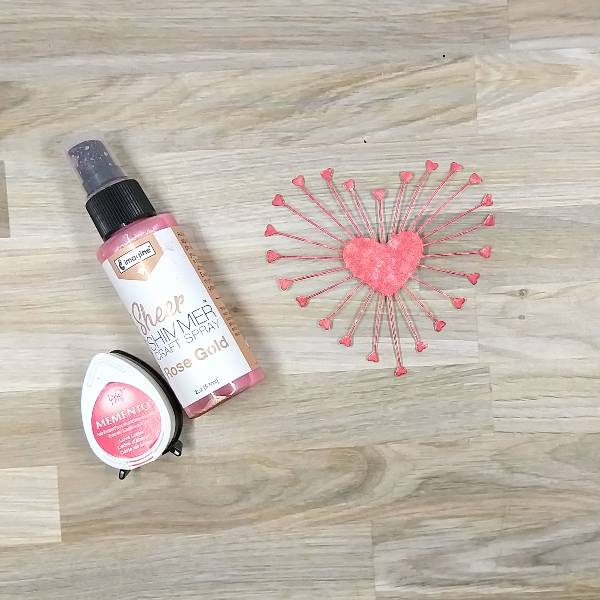
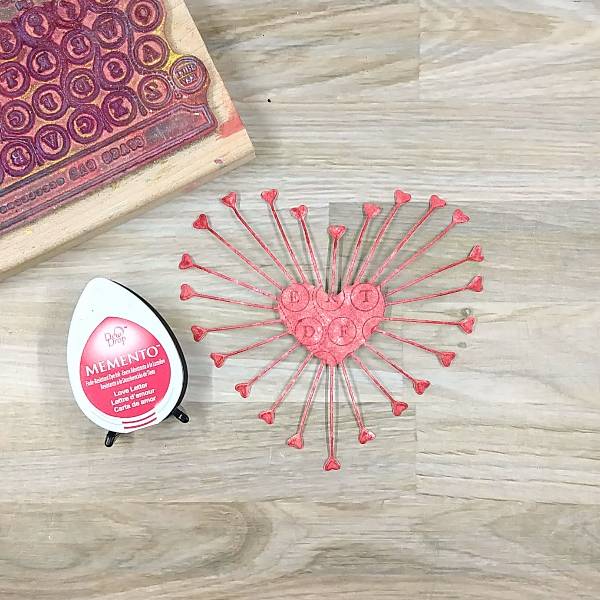
Use a background or texture stamp to to stamp the center of the die cut with ore Love Letter Memento ink. If desired, rub the small hearts around the edge with more Love Letter Memento ink as well.
Step 5:
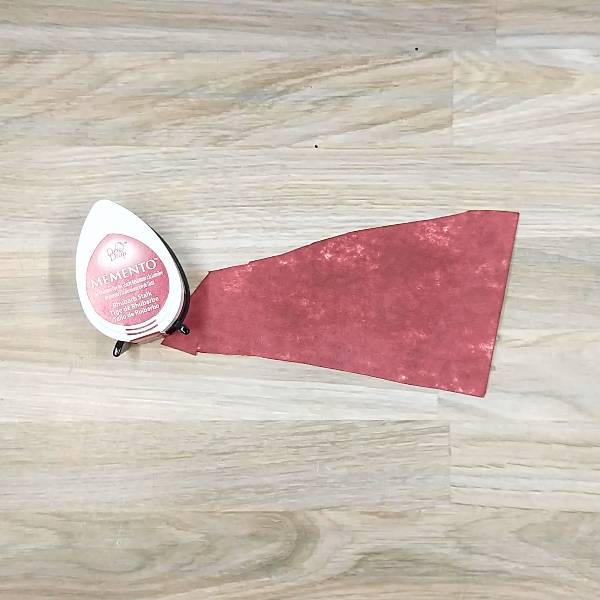
Rub a piece of watercolor paper with Rhubarb Stalk Memento ink pad. Again, don’t worry too much about the consistent color across the watercolor paper.
Steps 6 and 7:
Die cut the Rhubarb Stalk colored watercolor paper and use a paintbrush to paint GooseBumps Shimmer Texture Spray on the die cut. Allow the GooseBumps Shimmer Texture Spray to dry (or if you are impatient like me use your heat tool to dry it quickly).
(Not pictured: Die cut two more layers of the sentiment die with scraps of cardstock and glue the three layers together for dimension. Then die cut the shadow of the sentiment with vellum and glue the sentiment onto the shadow.)
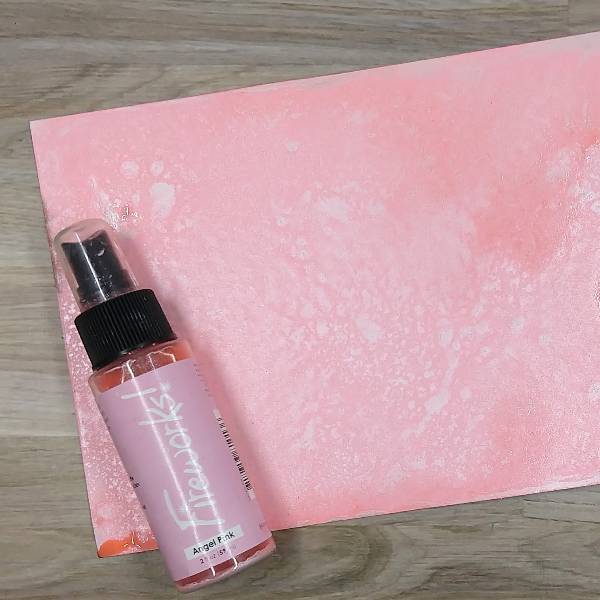
Step 8:
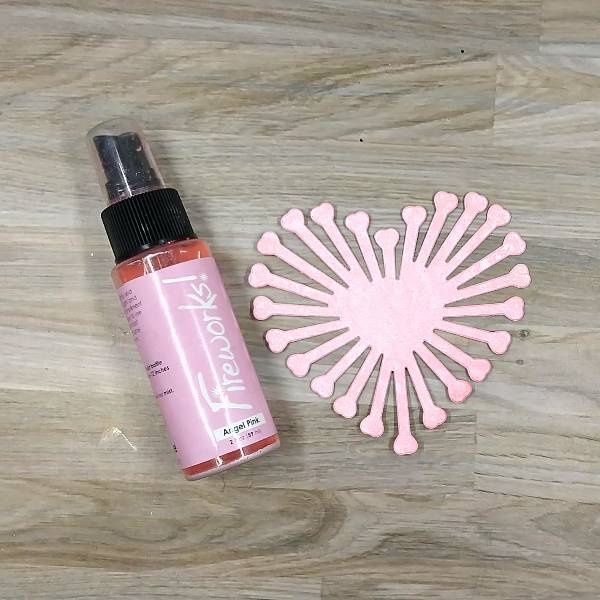
Spray enough Angel Pink Fireworks! Shimmery Craft Spray onto a piece of watercolor paper to totally color the paper and allow to dry.
Step 9:
Die cut the sprayed watercolor paper. Glue the two layers of die cut hearts together.
Step 10:
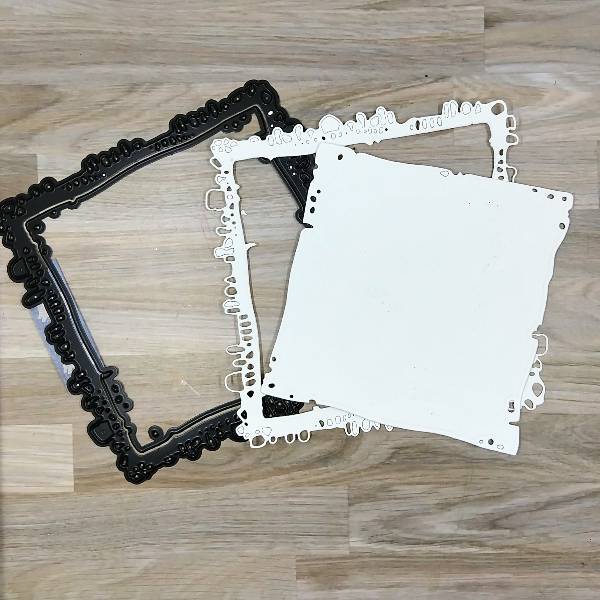
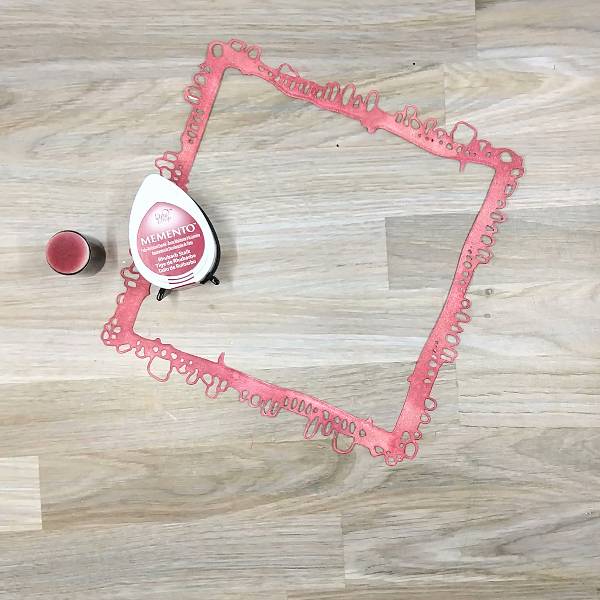
Tape an outer and inner frames together with tape and use them both together to die cut more watercolor paper.
Step 11:
Ink blend the die cut frame with Rhubarb Stalk Memento Ink using a sponge dauber.
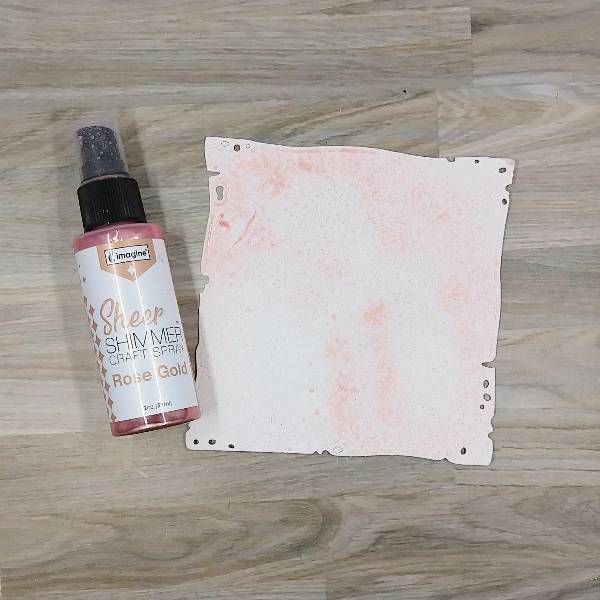
Step 12:
Spray the internal part of the die cut with Rose Gold Sheer Shimmer Craft Spray and allow to dry.
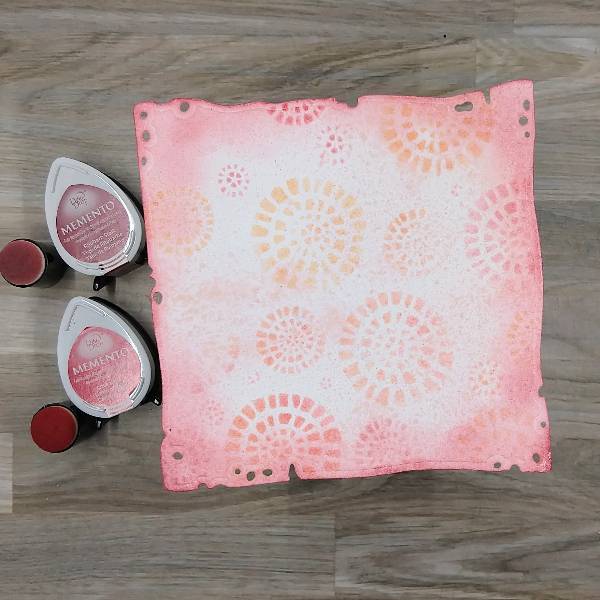
Step 13:
Use Love Letter and Rhubarb Stalk Memento Ink to ink blend through a stencil. Then ink blend around the edges of the die cut with more Rhubarb Stalk Memento Ink.
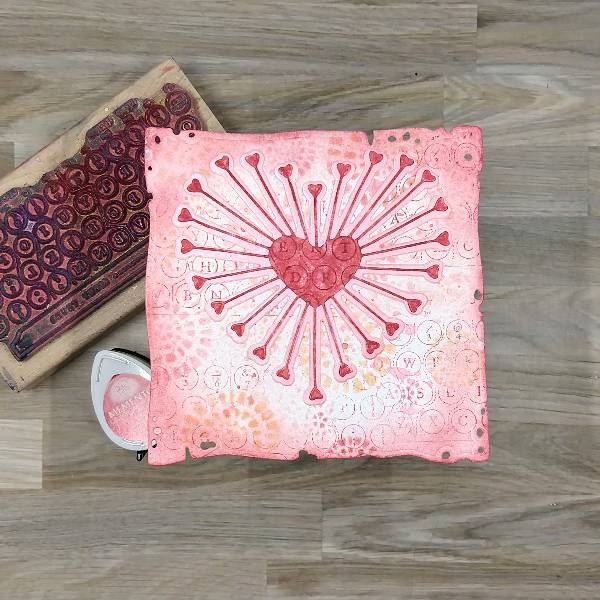
Step 14 and 15:
Use the same texture stamp used to stamp the red heart, stamp the background (internal part) of the card base with more of the Love Letter Memento Ink multiple times to add some more interest to the background.
Step 16:
Arrange the card and glue it onto a 6” x 6” card base. Start out by gluing the sentiment onto the internal part of the cardpanel (over the die cut heart). Then glue the frame onto the card base and nestle the internal part of the card onto the card. Add sequins on the lower left and upper right parts of the card.
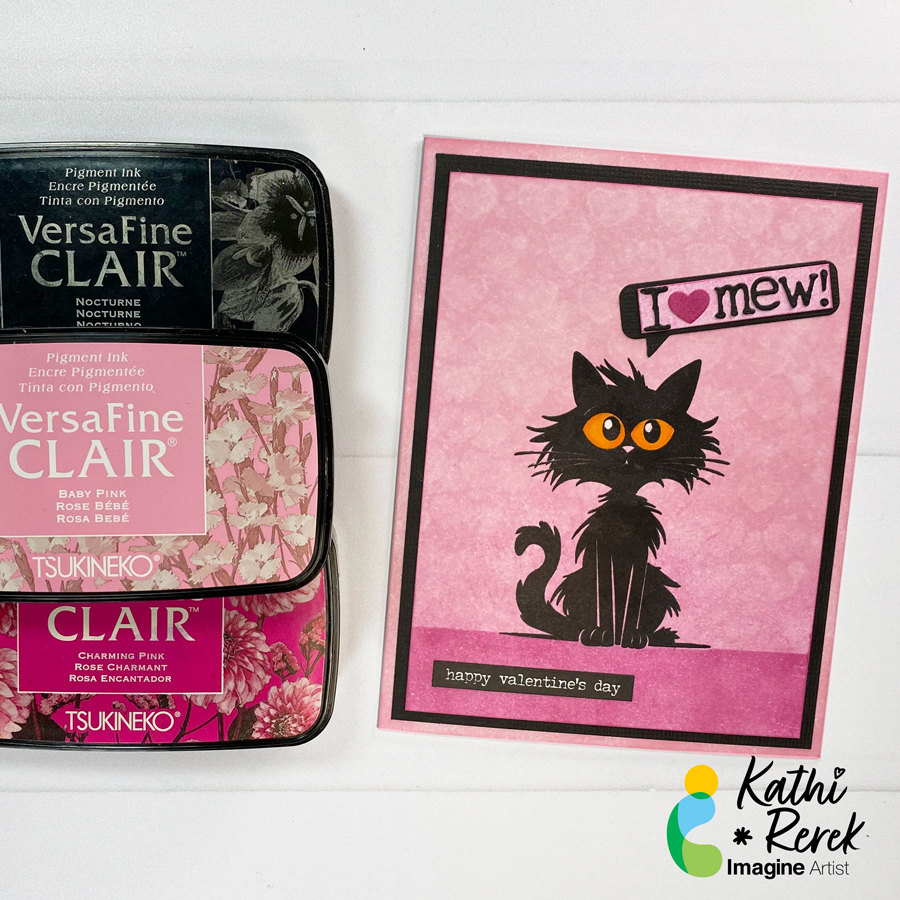
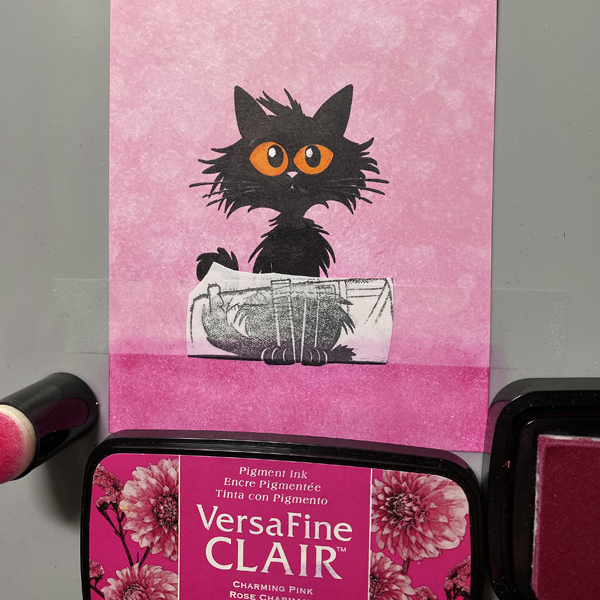
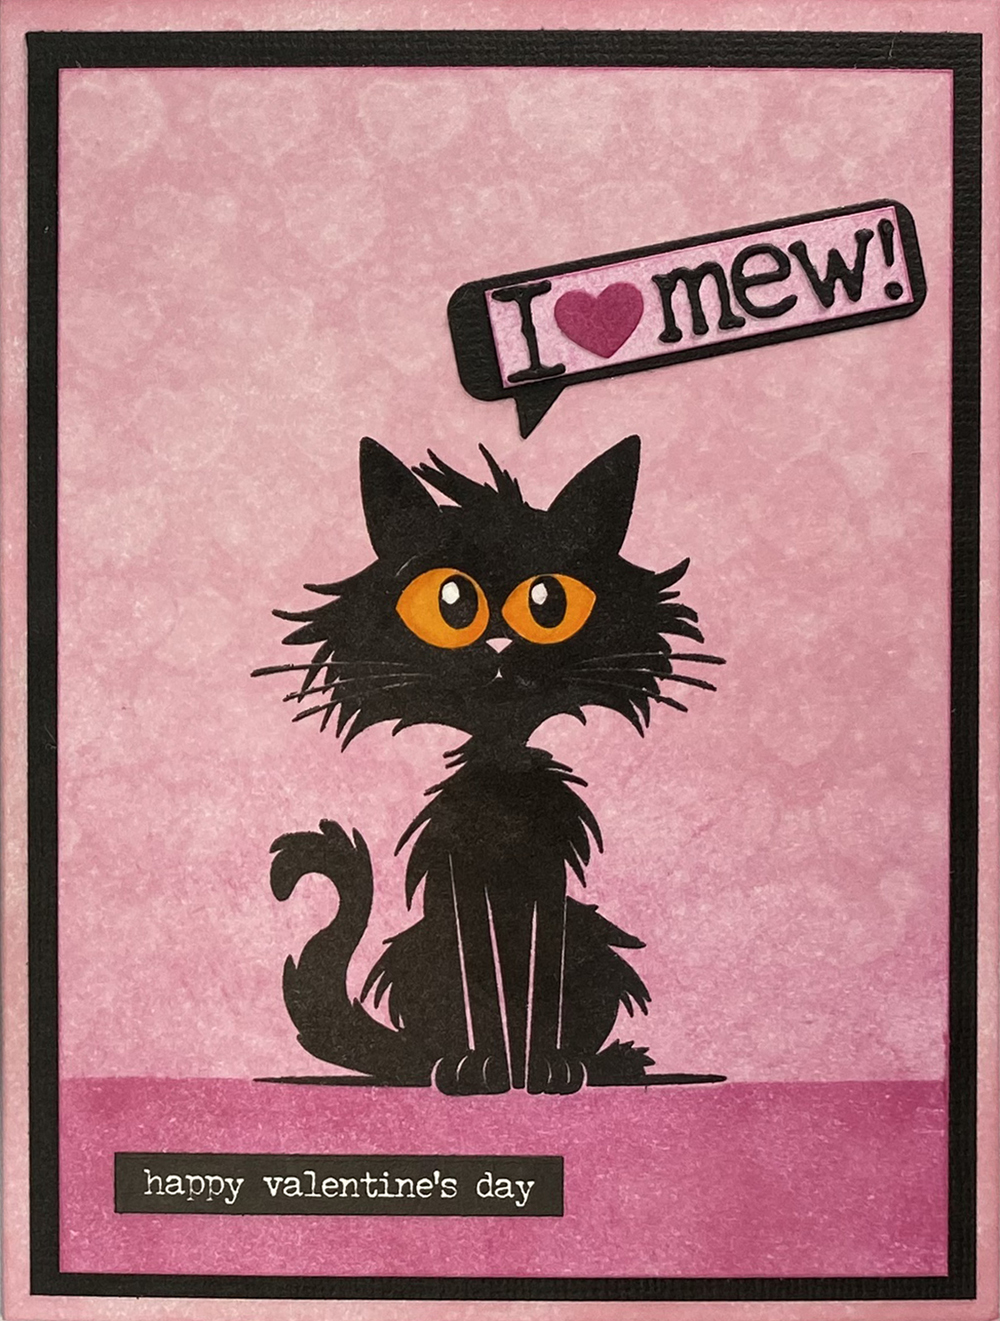
Here’s a punny Valentine’s Day card that showcases the blending of the new Baby Pink VersaFine Clair Ink with the Charming Pink VersaFine Clair Ink. I also used Purell to create a fun ghosting technique!
Skill Level: Beginner Time: 45 minutes
Instructions:
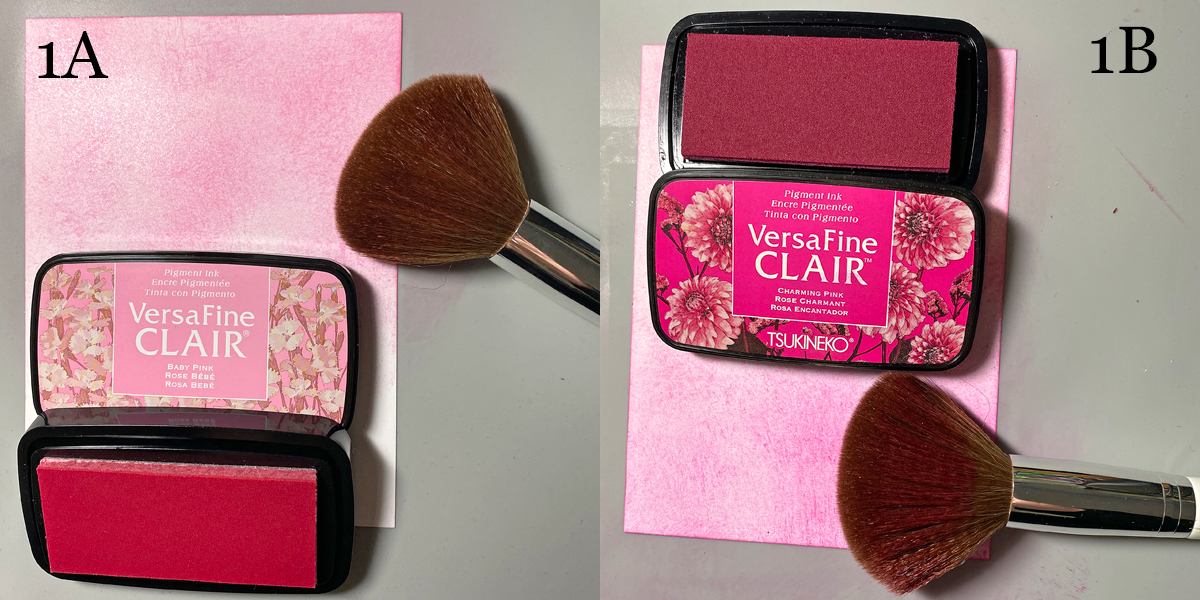
Steps 1A and B:
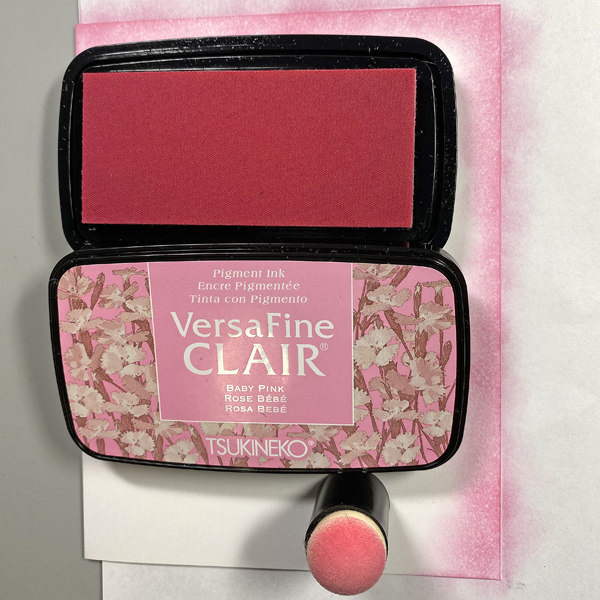
Use a make-up brush to apply Baby Pink VersaFine Clair Ink to a piece of white cardstock. Start at the top of the panel and work downwards. The make-up brush creates soft textured look on the cardstock. Continue to brush downwards until the brush doesn’t put ink onto the cardstock (1A)
Use the same make-up brush to apply Charming Pink VersaFine Clair Ink from the base of the cardstock panel, blending as you go. (1B)
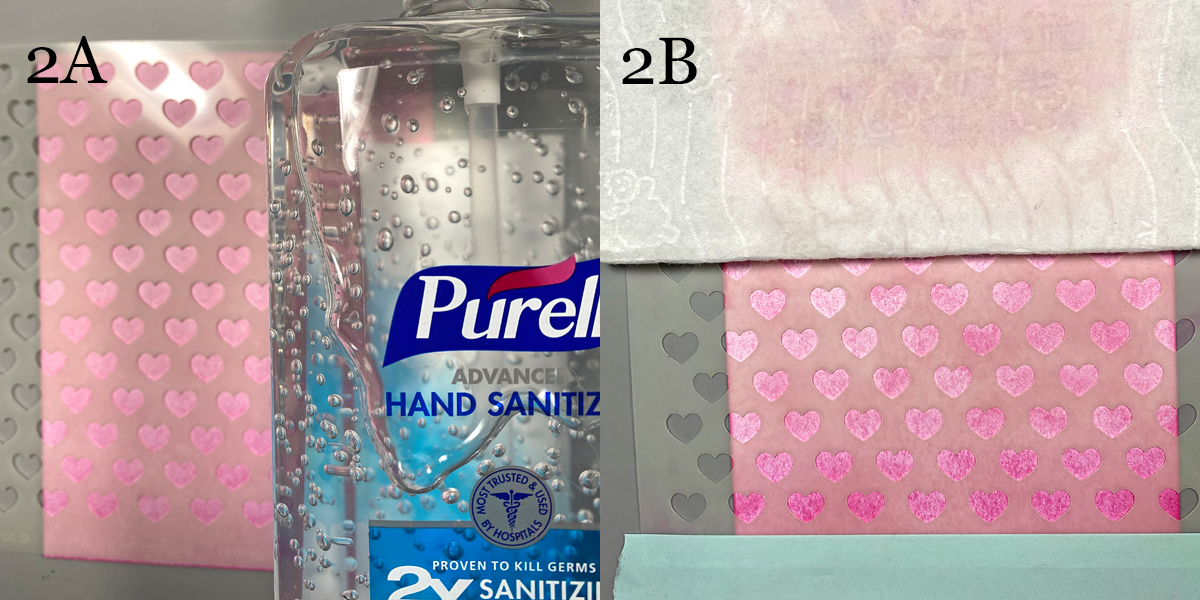
Steps 2A and B:
Place the Staggered Hearts stencil over the inked panel. (2A)
Add Purell to a dry baby wipe until it’s saturated then use the wipe to apply the Purell over the stencil onto the cardstock. The Purell will lift the VersaFine Clair Ink, creating ghosted hearts on the background. Heat setting will accentuate the ghosted effect while setting the ink. (2B)
Step 3:
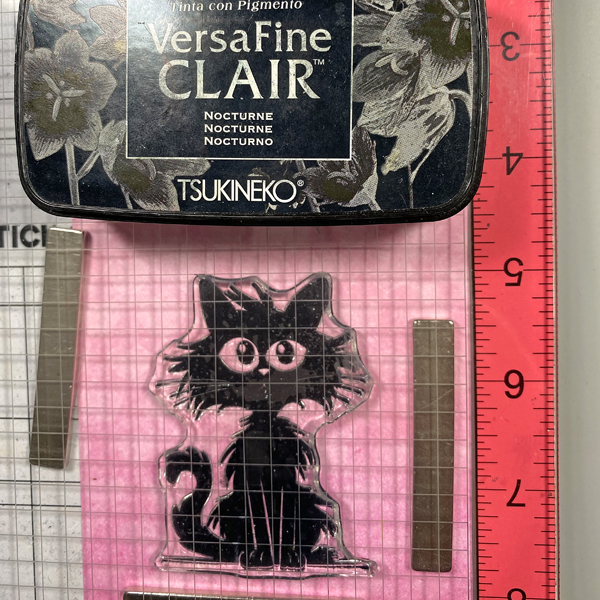
Place the inked cardstock panel onto a stamping platform. Use Nocturne VersaFine Clair Ink to stamp the cat. Re-ink and stamp again if necessary for a crisp image. Remove the image panel and use a paint brush dipped and the ink pad to do any necessary touch ups to the image. Heat set.
Step 4:
Use Prismacolor markers to color the cat’s eyes, taking care to avoid the black ink and contaminate your markers. Use a white gel pen to add highlights to the cat’s eyes. No photos. Sorry.
Step 5:
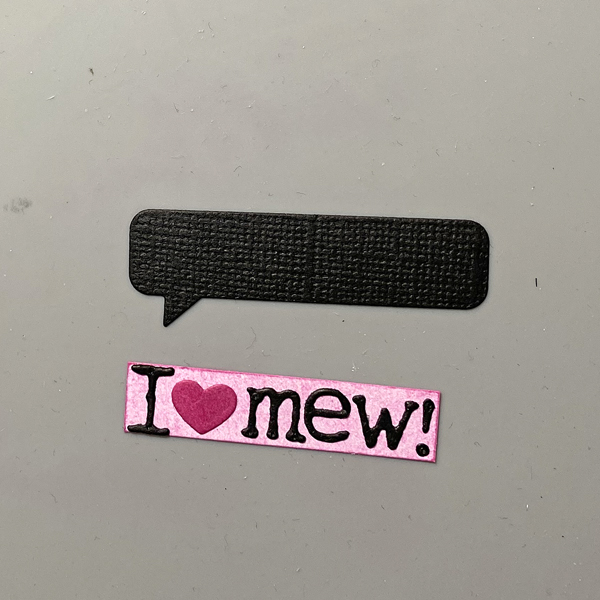
Use alphabet dies and a speech bubble die to cut black cardstock. Use a flag and a heart die to to cut to cut extra inked cardstock from Step 1. Smoosh the heart die-cut onto the Charming Pink VersaFine Clair inkpad. Trim the ends off of the flag die-cut and edge with Charming Pink VersaFine Clair Ink. Adhere the letter die-cuts and the heart to the pink strip, then adhere to the black speech bubble die-cut.
Step 6:
Use Nocturne VersaFine Clair Ink to stamp the cat onto the scrap of repositionable sticker paper. Fussy-cut the sticker paper along the bottom and place it over its counterpart as a mask. Place a strip of repositionable Scotch Tape across the image panel. Use a Sponge Dauber to apply Charming Pink VersaFine Clair Ink over the tape and the masked cat paws to the bottom of the image panel.
Remove the tape and the mask over the cat. Use Use a Sponge Dauber to edge the image panel with Charming Pink VersaFine Clair Ink.
Step 7:
Use a Sponge Dauber to apply Baby Pink VersaFine Clair Ink to the outside .5” perimeter of an A2 card. Heat set.
Step 8:
Cut a panel of black cardstock to 4” x 5.25”. Use Tear It! Tape to mat the image panel with the black cardstock, adhere the matted image panel to the card, and adhere the speech bubble die-cut as shown. Use the sentiment sticker to finish the card.
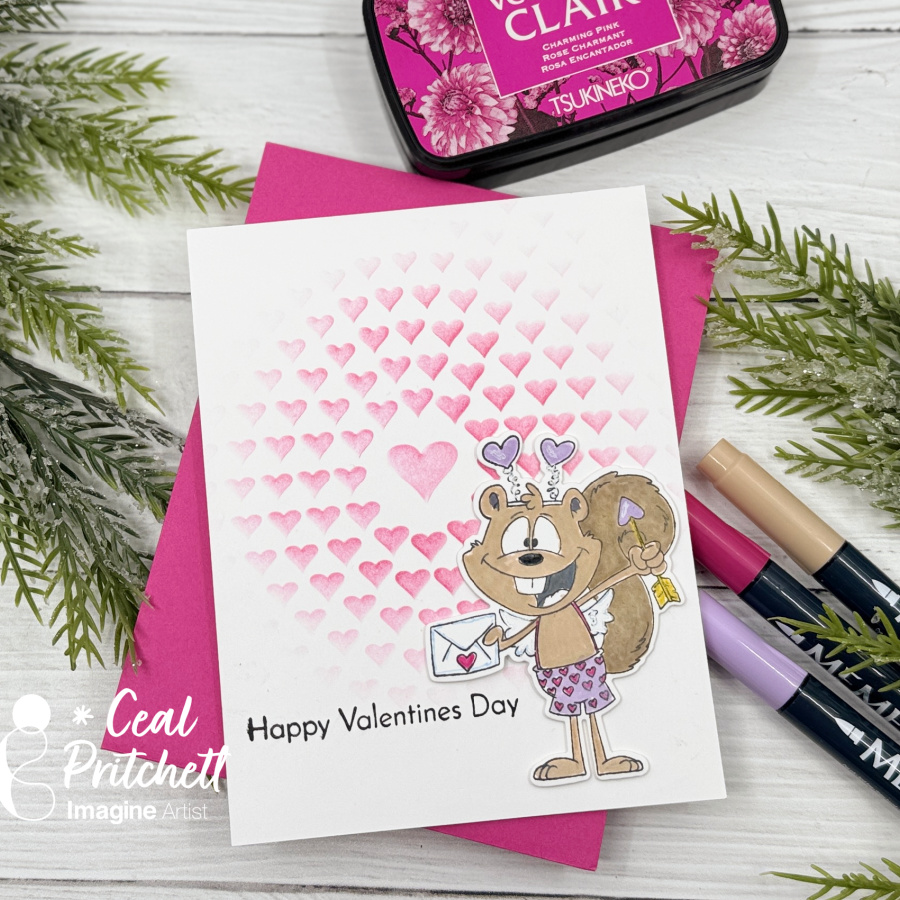
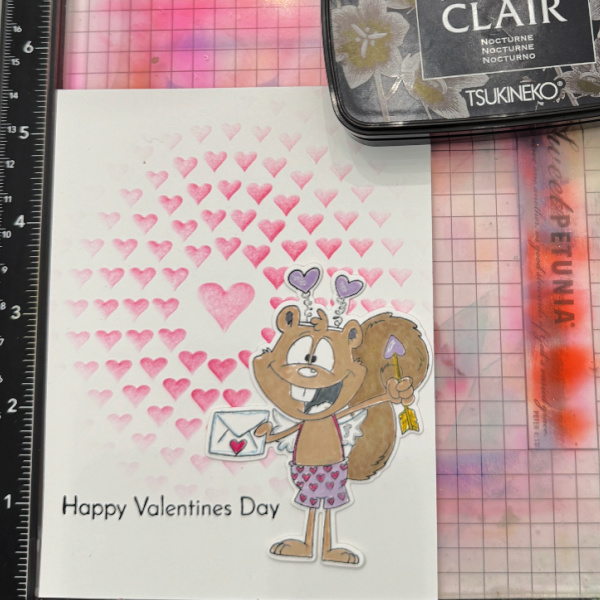
Hello crafty friends! It’s Ceal, here. Today I am sharing a Clean & Simple Valentines card.
Skill Level: Beginner to Intermediate Time: 30 to 45 Minutes
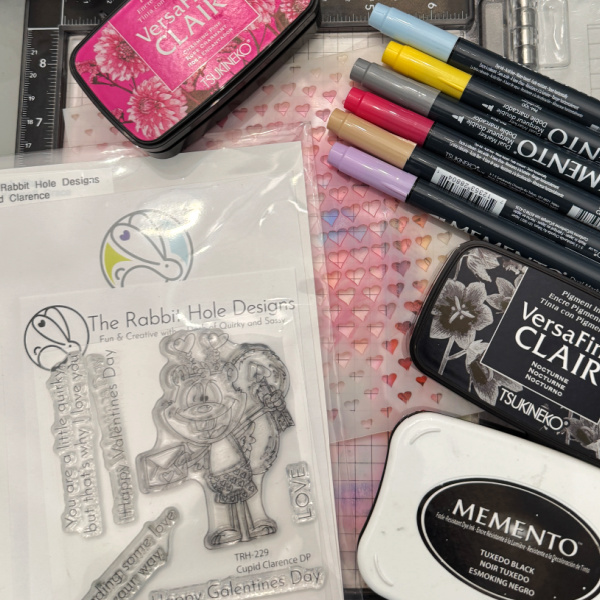
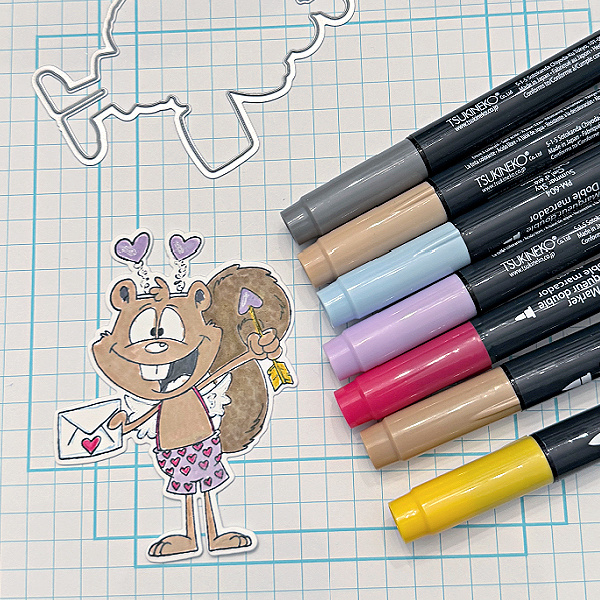
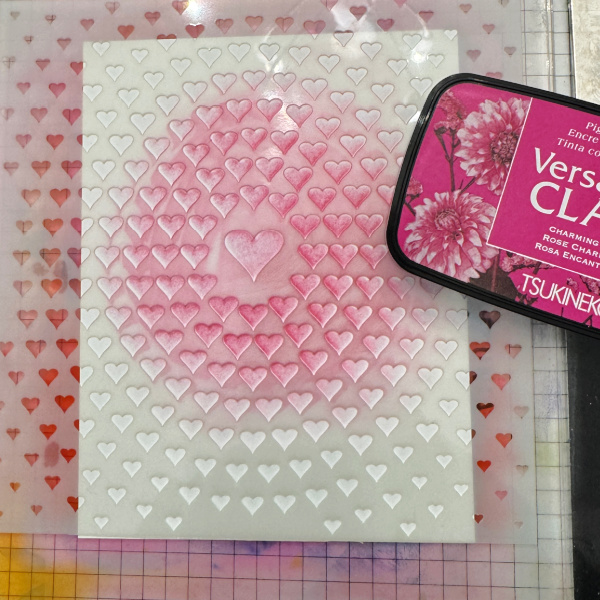
Directions: Gather you supplies. You will need a stencil, valentines stamp, pink or any color ink, markers and black ink.
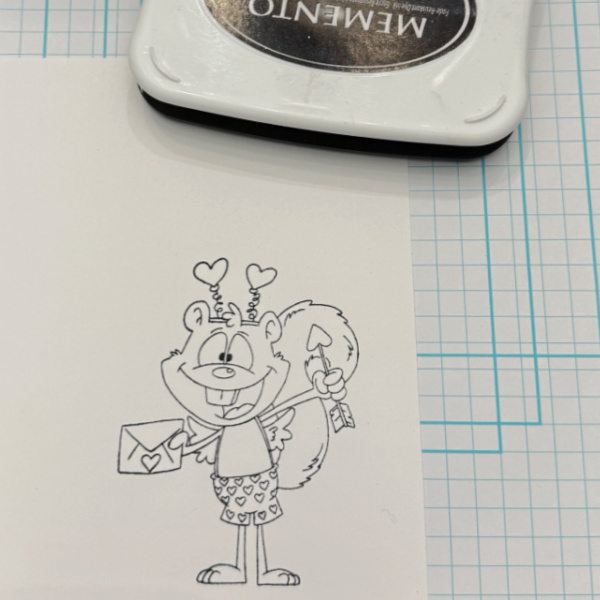
Step 1: Stamp your image with black ink ,I used Memento Tuxedo Black.
Step 2: Color the image with markers and then cut out with coordinating die.
Step 3: Place a white panel cut to 4.25 x 5.5 down on a grip mat or other sticky surface. Lay stencil over it and add color with a sponge or blending brush starting in the center and gradually getting lighter toward the edge.
Step 4: Add the panel to a card base and stamp the sentiment using VersaFine Clair Nocturne. Add foam tape to op up the image.