See How to Create a Layered Wedding Invitation

by Jowilna Nolte

See How to Create a Layered Wedding Invitation

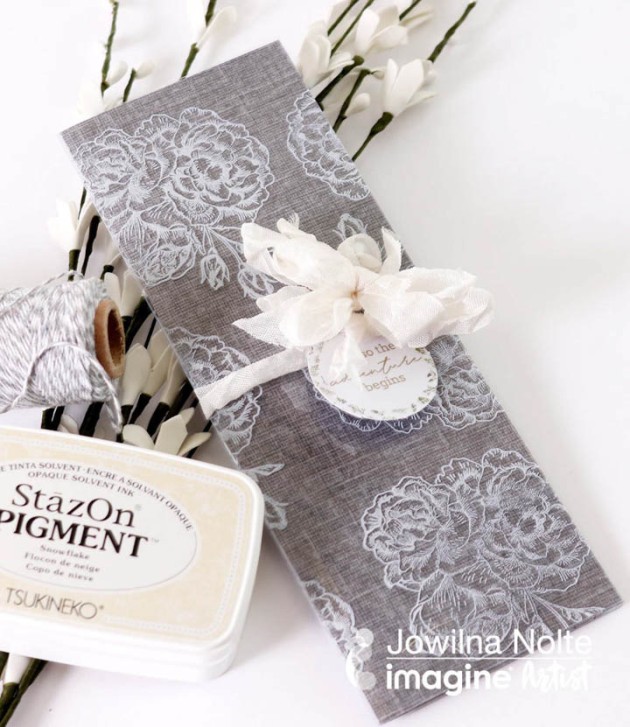
The versatility of stamps and ink is the best part of my everyday. When it comes to making beautiful cards or wedding invitations the sky is the limit. I wanted to see how the new StazOn pigment would work on various handmade papers that I often use for invitations and there’s no surprise that this ink is made for so much more than the ordinary. Take a look at what I stamped on this invitation all using this amazing ink.

Skill: Beginner
Time: 30 minutes

Directions


Step 1

Print the details of the invitation on smooth foiled handmade paper and trim to the desired size. Mine measures 5 x 7”.


Step 2

Next, I stamped a small little flower randomly all over the printed invitation using StazOn in Snowflake. It’s there and looks amazing but hard to see on a photo.


Step 3

Trim a piece of acetate the same size as the invitation details and stamp a lace border at the bottom and the same small flower as previously on the top half of the acetate piece.


Step 4

Use the same small flower and stamp it onto your silk ribbon using the StazOn Pigment. This was my best discovery that it stamped perfectly, was dry instantly and looks amazing.


Step 5

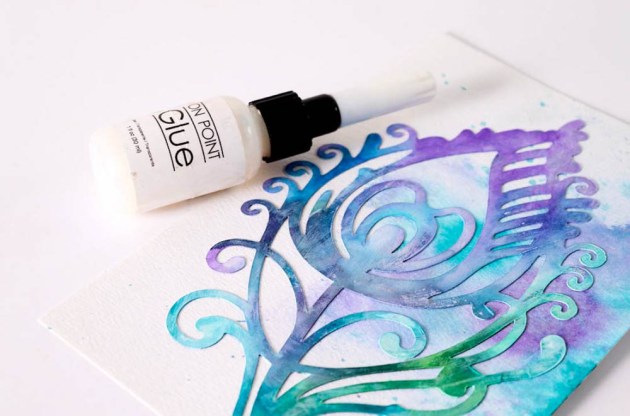
Layer a handmade piece of textured paper at the bottom, then the invitation details portion, handmade silk paper with the stamped acetate on top of it all. Adhere the paper pieces together with On Point Glue using a small drop only.


Step 6

Punch 2 holes at the top of the layered stack and tie with the stamped ribbon into a bow.


Step 7

All the stamped layers look so amazing on top of each other and this ink worked on all the surfaces I tried and tested – and the end result is simply exquisite.

Supplies

Imagine
Other
  • Kaisercraft – stamps
  • Handmade Paper
  • Japanese Paper Company
  • Ribbon
  • Midori Silk
  • Acetate

See How to Create an Elegant Save The Date Card

by Jowilna Nolte

See How to Create an Elegant Save The Date Card

April is the month of white weddings here at Imagine. With the new addition of StazOn Pigment, this month is going to be amazing. I can’t imagine life without StazOn pigment and can hardly remember the ways back when. So let’s explore this amazing ink some more with this Save the Date card.

Skill: Beginner
Time: 15 minutes

Directions


Step 1

Place an acetate sheet onto a darker surface so you can see when you have stamped. Ink the stamp with StazOn Pigment in Snowflake (white) and stamp repeatedly onto acetate.


Step 2

Once the ink is dry, which is really quick, use a bone folder to fold the acetate in half and trim to size. Mine measure 3″ x 8”. Fold a piece of grey paper and trim to fit inside the acetate cover. Adhere with a small piece of tape at the back.


Step 3

Mist a piece of ribbon using Sheer Shimmer Spray in Frost. The spray gives the ribbon an off-white finish that is gorgeous. Dry the ribbon with a heat tool.


Step 4

Add printing side the grey folded sheet as desired. Wrap the ribbon around the outside and tie a printed Save the Date tag to it. Tie the ribbon into a double bow to finish off your clean an elegant Save the Date card.

The beautiful white stamping on the acetate makes for an elegant look and feel, setting the scene for what’s to follow at the wedding.

Supplies

Imagine
craft matImagine Craft Mat

StazOn Pigment in Snowflake

Sheer Shimmer in Frost

Other
  • Gray paper
  • Kaisercraft – Save-the-Date sentiment tag
  • Acetate
  • Kaisercraft – floral stamp
  • Ribbon

Learn How To Upcycle Old Computer Parts Into A Beautiful Collage

by Jowilna Nolte

Learn How To Upcycle Old Computer Parts Into A Beautiful Collage

StazOn ink has always been one of my favorite for mixed media projects, but the addition of StazOn Pigment has been a true game changer. I used the ink on several surfaces for this Teal and Magenta upcycled project, and I simply love the outcome of the StazOn Pigment ink on these surfaces.

Skill: Intermediate/Advanced
Time: 30 minutes

Directions


Step 1

Ink the resin wings using a sponge dauber with StazOn Pigment Peacock Feathers.


Step 2

Ink a metal disk by lightly tapping the ink pad onto the metal repeatedly. I did not cover the entire surface but left some open spaces.


Step 3

Once the ink on the disk is dry, stamp flower images onto the disk using Snowflake StazOn Pigment ink. Note: The ink pulled some of the pink ink off the metal leaving a silver flower impression which looked quite amazing.


Step 4

Die-cut white cardstock leaves and color them using your ink pads with the direct to paper method.


Step 5

Color flowers using All-Purpose inks on choice.


Step 6

Adhere the die-cut leaves, wings, and flowers to your metal disk using gel medium. Add thread, gold glitter, and other elements to finish off your project.

Supplies

Imagine
Other
  • Metal disk – recycled hard drive part
  • Joy Clair stamps
  • Flowers – Little Birdie, Prima
  • Scrap and Decor – Resin Wings
  • Prima – Leaf die-cut
  • Die-cut machine
  • Kaisercraft – DIY Cuts
  • PrimaGel – Gold glitter
  • Little Birdie Crafts

Make a Peacock Feather Design with All-Purpose Inks

by Jowilna Nolte

Make a Peacock Feather Design with All-Purpose Inks

The month of March celebrates the beautiful color in Peacock Feathers and with so many ink choices in just the perfect colors, it was hard to choose what to create. But in the end, my love for watercolors and the stunning effects won and I created this art journal page using All-Purpose Inks.

Skill: Intermediate
Time: 30 minutes

Directions


Step 1

Color a sheet of watercolor paper. Paint a layer of water on top and then drop All-Purpose Ink onto the paper to let it mix and flow. Mist with more water to activate and promote flow. Leave to dry.


Step 2

Die-cut a peacock feather using a Silhouette machine. Paint with a layer of gesso and then add color using peacock color shades of All-Purpose Inks and a paint brush.


Step 3

Once the feather is dry, use On Point Glue to adhere the feather to the watercolor paper piece.


Step 4

To add shading and interest, add some grey and brown ink to your craft mat and mist with water, then paint in shadows. Use a graphite pencil for shading even more and adding details.


Step 5

Add some additional stamping and a quote as desired. Then adhere the page into your art journal or frame it as a home decor piece.

Supplies

Imagine
Other
  • Silhouette die machine
  • Peacock Feather metal die
  • Smooth white cardstock
  • Graphite pencil
  • Watercolor paper

Learn How To Use Rose Gold Shimmer Stix For A Beautiful Card

by Jowilna Nolte

Learn How To Use Rose Gold Shimmer Stix For A Beautiful Card

The new Sheer Shimmer Stix shows the range of products from Imagine and how the control of the dauber adds just the right amount of shimmer and shine to any crafting projects. Take a look at how this die-cut element is transformed into the star of the show with a few strokes of genius using the clever new Shimmer Stix.

Skill: Advanced
Time: 20 minutes

Directions


Step 1

Use a pre-cut heart or download the cut file from the link in the products list below and cut with a Cricut machine. Create the die-cut heart and take it apart. Use a jumbo dauber and blend Radiant Neon Coral around the outside edges.


Step 2

Use the Rose Gold Sheer Shimmer Stix to add shimmer over the inked heart.


Step 3

Use the same Shimmer Stix to add color and shine to the outside of the die-cut heart. Leave to dry.


Step 4

Ink a chipboard sentiment using Radiant Neon Coral ink pad.


Step 5

Ink the chipboard sentiment with VersaMark ink pad and sprinkle with glitter embossing powder. Heat the powder until fully melted with your heat gun. Use On Point Glue to adhere the outside and the inner of the die-cut heart to the front of your folded card.


Step 6

Use Rose Gold Sheer Shimmer Spritz to add colored splats to the background of your card and leave the ink drops to dry. Adhere the embossed sentiment to the front of the card and finish off diamanté. The shimmer created by the embossed sentiment and that of the Sheer Shimmer Stix and Spritz makes for an amazing shiny card.

Supplies

Imagine
Other

See How to Use Inkers for a Mixed Media Tag

by Jowilna Nolte

See How to Use Inkers for a Mixed Media Tag

This month’s color, Coral offers so many possibilities. I pulled out all my products in those shades and created a bright and beautiful gift tag perfect for tying around a gift. I love making tags instead of cards – so quick and easy and just the right size to experiments and create some fun effects.

Skill: Beginner
Time: 30 minutes

Directions


Step 1

Add a few drops of dye ink refill ink onto watercolor paper and mist with water. Keep adding drops of ink and mist with water until you are happy with the look.


Step 2

Use a tag template and cut your colored paper into a tag shape.


Step 3

Stamp birds and sentiment onto smooth white cardstock using VersaFine Clair Nocturne ink.


Step 4

Add a few drops of re-inker ink onto your craft mat. Mist water next to the ink. Pick up a small amount of water and mix with the ink and then paint your bird images.


Step 5

Mist your tag and painted birds using Shimmer Spray in Frost. It gives the end product a beautiful shimmer.


Step 6

Trim your sentiment strip and adhere it to the bottom of your tag. Adhere to the painted birdie above the sentiment. Add additional stamped detail to the left of the tag and the background. Use inks to add splatters over the tag for some interest.

Supplies

Imagine

Other

  • Watercolor paper
  • Cardstock – white
  • Stampers Anonymous – stamp
  • Paint brush
  • Watercolor paint