See How to Create an Elegant Save The Date Card

by Jowilna Nolte

See How to Create an Elegant Save The Date Card

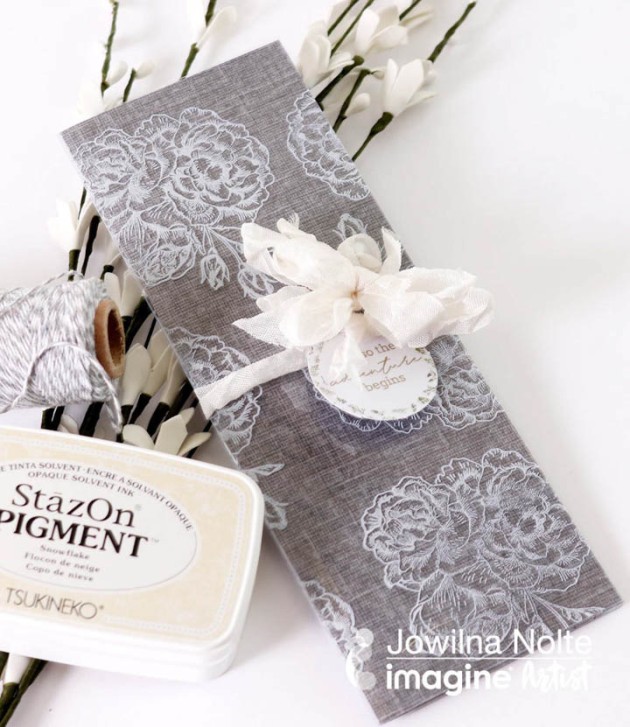
April is the month of white weddings here at Imagine. With the new addition of StazOn Pigment, this month is going to be amazing. I can’t imagine life without StazOn pigment and can hardly remember the ways back when. So let’s explore this amazing ink some more with this Save the Date card.

Skill: Beginner
Time: 15 minutes

Directions


Step 1

Place an acetate sheet onto a darker surface so you can see when you have stamped. Ink the stamp with StazOn Pigment in Snowflake (white) and stamp repeatedly onto acetate.


Step 2

Once the ink is dry, which is really quick, use a bone folder to fold the acetate in half and trim to size. Mine measure 3″ x 8”. Fold a piece of grey paper and trim to fit inside the acetate cover. Adhere with a small piece of tape at the back.


Step 3

Mist a piece of ribbon using Sheer Shimmer Spray in Frost. The spray gives the ribbon an off-white finish that is gorgeous. Dry the ribbon with a heat tool.


Step 4

Add printing side the grey folded sheet as desired. Wrap the ribbon around the outside and tie a printed Save the Date tag to it. Tie the ribbon into a double bow to finish off your clean an elegant Save the Date card.

The beautiful white stamping on the acetate makes for an elegant look and feel, setting the scene for what’s to follow at the wedding.

Supplies

Imagine
craft matImagine Craft Mat

StazOn Pigment in Snowflake

Sheer Shimmer in Frost

Other
  • Gray paper
  • Kaisercraft – Save-the-Date sentiment tag
  • Acetate
  • Kaisercraft – floral stamp
  • Ribbon

Learn How to Blend Ink using Shimmer Stix

by Roni Johnson

Learn How to Blend Ink using Shimmer Stix

New products are always fun but they are even MORE fun when it sparkles which is exactly what Shimmer Stix has in spades. It’s the same beautiful Shimmer Spritz Spray in a fun new package. AND this card is doing double duty by picking up on the Color of the Month – Living Coral but with a twist, it is a combination of 2 Radiant Neon colors blended together to make one with the help of Shimmer Stix.

Skill: Intermediate
Time: 30 minutes

Directions


Step 1

Cut a piece of white cardstock to 3.75 x 5 inches. Rub Radiant Neon Electric Coral on the upper portion of the card panel. Rub Electric Orange Radiant Neon Ink directly over the Electric Coral. Rub Electric Orange Radiant Neon Ink directly over the Electric Coral.


Step 2

Use the Shimmer Stix to blend and drag the inks together down the length of the panel.


Step 3

This blends the ink and colors the panel with shimmer at the same time. It’s hard to show the truly beautiful shimmer you get from the Shimmer Stix but this photo captures a bit of that shimmer and sparkle.


Step 4

Cut a cover-up using the Gina Marie Flower Burst Trio Cover Plate on white cardstock. Mount the cover up onto the Shimmer Blended card panel and affix to a black card base.


Step 5

Cut three “Sparkle” sentiments, one from blue cardstock and two from black cardstock.


Step 6

Use On Point Glue to glue the layers together with the blue on top. Apply a layer of Shimmer irRESISTible Pico Embellisher to the sentiment and let dry. Add a dot of Electric Blue irRESISTible Pico Embellisher to the center of each flower. Adhere the sentiment to the card using On Point Glue. Just look at that beautifully blended shimmer!!

Supplies

Imagine
Other
  • Gina Marie – Flower Burst Trio Cover Plate
  • Queen and Co – Sparkle Sentiment Die-cut
  • Cardstock – White, Black, Blue

Announcing Sheer Shimmer Stix

We are so excited to tell you about a new product that will be hitting the market soon—not only is Sheer Shimmer going to be available in Rose Gold, but also in an all-new easy applicator! Sheer Shimmer Stix can be held like a pen to swipe the dauber top applicator over a project surface to effortlessly and cleanly apply the elegant sheer shimmer you already love.

Sheer Shimmer Stix Color Swatches:

Quick Facts about Shimmer Stix

  • Same elegant Sheer Shimmer effect as the sprays
  • Swipe-on application for controlled results
  • Stix dauber top allows for quick, uniform, large surface area application

Keep your eye on the blog all month where our artists are going to show you some awesome technique ideas for this new product and the announcement they are ready to order!