Create an Easy Mixed Media Inspired Wedding Card

by Lori Warren

Create an Easy Mixed Media Inspired Wedding Card

‘Tis the season to send that special couple an elegant handmade card wishing them a Happily Ever After.  This quick and easy card was made with Delicata Silvery Shimmer ink, a stencil and some pretty trimmings.  It came together quickly but should leave a lasting impression on the pair of lovebirds!

Skill: Beginner/Intermediate
Time: 30 minutes

Directions


Step 1

On a panel of cardstock, apply Delicata Silvery Shimmer ink over a stencil with a sponge dauber.


Step 2

Spray panel with Sheer Shimmer Craft Spray in Sparkle.


Step 3

Stamp a script stamp (partial impressions) in Koala Gray StazOn Pigment ink.


Step 4

Water down Versa Magic in Aegean Blue on mat and apply ink splatters to panel with a fan brush.


Step 5

Print saying and trim to size.


Step 6

Apply double-sided foam mounting tape to back of saying.


Step 7

Embellish with lace, trim and mounted saying.
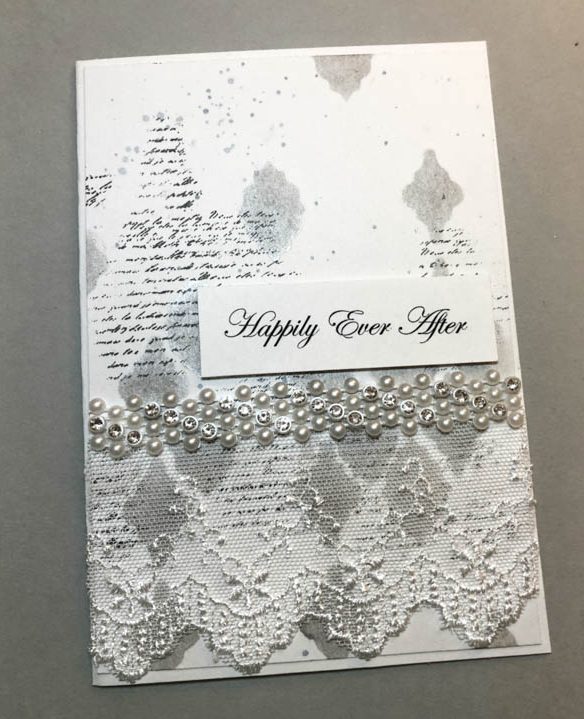

Step 8

Adhere panel to card base with Tear It Tape.

Supplies

Imagine
Other
  • Hampton Art – Script Stamp
  • TCW Stencil – Repeat Tile Remnant
  • Lace
  • Beaded trim
  • Cardstock – White
  • Double-sided dimensional tape
  • Printed saying
  • Fan brush
  • Paper trimmer or scissors

See How to Stencil with Sheer Shimmer Stix

by Martha Lucia Gomez

See How to Stencil with Sheer Shimmer Stix Rose Gold and Silver

Hello crafty friends! Today, I am showing you how to use the new Sheer Shimmer Stix with a stencil. It is a fabulous dauber applicator that you can apply and control at the same time. Take a look at my card:

Skill: Intermediate
Time: 1 hour

Directions


Step 1

I used Calypso Coral card stock to create the card base and the second layer is whisper white card stock. First, I took a stencil and secured it over the layer with masking tape. Next, I used Silver and Rose Gold Sheer Shimmer Stix added the shimmery color over the free areas of the stencil. The direct-to-paper application with the dauber top is super easy. The paper dries immediately and the shimmer touch is amazing!


Step 2

In a separate piece of whisper white card stock, I stamped flowers and leaves from the stamp set Wild Rose from Pretty Pink Posh with VersaFine Clair Nocturne and embossed with clear embossing powder. Next, I colored the center of the flowers with a dauber using two different colors of Memento Ink, Desert Sand and Peanut Brittle. For the leaves, I used two different greens of Memento Markers, Pear Tart and New Sprout. Next, I splattered the entire stamped piece with Sheer Shimmer Spritz Rose Gold using the spray tube to splatter the drops.


Step 3

Finally, I fussy cut my flowers and leaves with my scissors, resized the stenciled layer and pasted it directly over the card base. Then, I arranged and pasted the flowers on the lower part of the card. I completed this look adding a shimmering touch to the petals of the flowers with the Dauber Top of Frost Sheer Shimmer Stix and stamped the sentiment over a banner calypso coral with VersaFine Clair Nocturne. I used a Spanish Sentiment included on the new stamp set Sueña Alto from RG Studio 360. I am fascinated with the performance of the new Sheer Shimmer Stix Dauber Tops, you can keep the control of the color, you can mix tones and you can add just in the place that you want!

Supplies

Imagine
Other
  • Stencil
  • Wild Rose Stamp Set from Pretty in Pink Posh
  • Sueña Alto Stamp Set from RG Studio 360
  • Card stock – Calypso Coral, Whisper White from Stampin Up
  • Double-Sided Foam Tape

Announcing Sheer Shimmer Stix

We are so excited to tell you about a new product that will be hitting the market soon—not only is Sheer Shimmer going to be available in Rose Gold, but also in an all-new easy applicator! Sheer Shimmer Stix can be held like a pen to swipe the dauber top applicator over a project surface to effortlessly and cleanly apply the elegant sheer shimmer you already love.

Sheer Shimmer Stix Color Swatches:

Quick Facts about Shimmer Stix

  • Same elegant Sheer Shimmer effect as the sprays
  • Swipe-on application for controlled results
  • Stix dauber top allows for quick, uniform, large surface area application

Keep your eye on the blog all month where our artists are going to show you some awesome technique ideas for this new product and the announcement they are ready to order!

Learn How To Make A New Years Eve Necklace And Earrings

by Kyriakos Pachadirolgou

The leaf shape of the new Dewlet dies to inspire me to create a piece of jewelry everyone can make. Combining two different colors of metallic sheets, a gold one and a silver using SHEET Metal from Imagine, you can shape a shiny but still elegant necklace with a matching set of earrings. This project would make excellent New Years Eve celebration jewelry.

Skill: Advanced
Time: 1 hour

Directions


Step 1

Cut leaves from the SHEET Metal ATC cards and the gold colored aluminum foil. For this set, you will need 10 pieces for the necklace and 2 pieces for each earring.


Step 2

Lay the leaves on a flat surface, place them in the desired design and take a photo to follow the shape later.


Step 3

Use the round shape embossing tool and press into the leaves to create a hammered look.


Step 4

Set a small piece of Tear It! Tape on the back side of each leaf and add a drop of jewelry glue. This step will keep the leaves together in order to proceed to the next one and allow time for the jewelry glue to dry well.


Step 5

To set the waxed cord you can either punch holes and use jump rings or you can just glue it to the back of the leaves. The second option gives a more a steady result on the form of the necklace.


Step 6

To make the earrings, attach two leaves together, punch a hole and place the earring hook.

Supplies

Imagine
Other
  • Gold color aluminum foil
  • Jewelry glue
  • Waxed cord
  • Earring hooks
  • Jewelry end hooks/claps
  • Round embossing tool
  • Die cutting machine

DIY New Year’s Eve Party Hat

by Nadine Carlier

DIY New Year's Eve Party Hat by Nadine Carlier wm ic

It’s almost time to get your party hats on! How much fun would it be to have your very own custom New Year’s Eve hat this year? Or if you don’t like to go out for New Year’s you can also use this cute hat as a decoration.  Imagine has lots of gold and silver products that would work amazingly to create your own hat, for mine I used some Delicata inks, irRESISTible Pico Embellisher and Embossing powders.

Watch my video tutorial below to learn how to make your own New Year’s Eve Party Hat. Enjoy!

Click HERE for the link to print the Party Hat template.

Skill: Intermediate
Time: 30 min.

Supplies

Imagine
Other

Visit our YouTube Channel for more inspirational videos and subscribe to get updates when we post new videos.