How to Make Your Own Iridescent Glitter Cardstock for Valentine’s Cards or Any Occasion

By LV Handcrafted

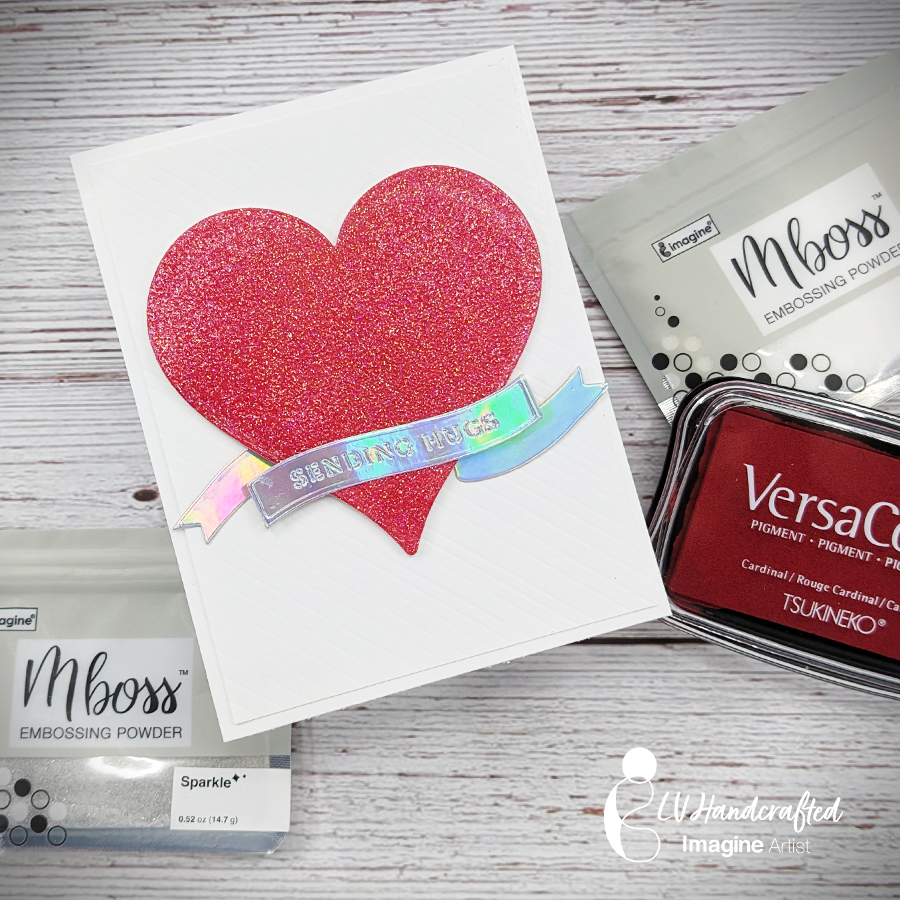
Hello friends! This is Linh (or LV Handcrafted on all the socials). Why buy colored cardstock or

specialty card when you can make your own! To make solid color cardstock, just swipe a panel

of white card stock with any ink pad. However, to take it up a couple notches, use any pigment

ink. I used VersaColor Cardinal ink on my card today. Before the ink dries, cover it in Mboss

Iridescent powder. Knock off any excess back into the zip-sealed bag. Using a heat gun, melt

the Mboss powder to get this GORGEOUS iridescent shine! And voila! You’ve made your own

custom colored iridescent glitter cardstock! This technique also works with Mboss Sparkle

powder for even more sparkle and shine!

Skill Level: Intermediate

Time to Complete: 15 minutes

Supplies Used:

Imagine 

• VersaColor Cardinal Ink Pad

• Mboss Iridescent Powder

• On Point Glue

Other Products:

• Tonic Studios Heart Die Set

• Tonic Studios Iridescent Mirror Card

• Spellbinders Sentiment Banner

• Hammermill 100lb white card stock

See How to Craft a Matching Trio of Christmas Tree Tags

by Lori Warren

Create a trio of fancy tags that will brighten the top of any Christmas gift or package.  A few randomly stamped red snowflake images onto a tag create the perfect backdrop for a Holiday tree focal point. Then, finish each tag with a sentiment such as “under the mistletoe” or “holiday cheers,” a bit of glitter, a golden star, and a Tulle ribbon bow.  Instant joy for this package upgrade!

Skill: Intermediate
Time: 15 minutes per tag

Directions

Art Supplies

Imagine
Other
  • Recollections – Christmas Noel Tag set
  • Hamption Art – Stamp and Die set SC0739
  • Hero Arts – Stamp set CL797
  • Fiskars – Stamp Set
  • Glitter
  • Small Bells – Gold
  • Tulle Fabric Roll – Red
  • Water-brush pen
  • Diecut machine

Learn How to Create Galaxy Backgrounds with 2 Different Embossing Techniques

by Lindsay Adreon

Learn How to Create Galaxy Backgrounds with 2 Different Embossing Techniques

There are many ways to create galaxy/night sky backgrounds for your cards. You can use ink blending, watercolor, ink smooshing, braying, and so much more. But did you know you can create galaxy and night sky backgrounds with embossing powder? It’s such a fast and easy way to get the galaxy look! I’m using a few of the new glittery Mboss Embossing Powders from Imagine to show you how to create your own backgrounds! I hope you all enjoy it!

Skill: Intermediate
Time: 30 – 45 minutes

Directions

Supplies

Imagine
Other
  • Heat Tool
  • MISTI Stamping Tool
  • Papertrey Ink – Out of This World Mini Stamp Set & Rocket Die
  • Joy Clair Stamps – Out of This World Stamp Set
  • Rinea Silver Foil Paper
  • Circle Die Set
  • Kat Scrappiness Wonky Wavy Stitched Rectangle Dies
  • Die Cutting Machine

Learn How to Blend Ink using Shimmer Stix

by Roni Johnson

Learn How to Blend Ink using Shimmer Stix

New products are always fun but they are even MORE fun when it sparkles which is exactly what Shimmer Stix has in spades. It’s the same beautiful Shimmer Spritz Spray in a fun new package. AND this card is doing double duty by picking up on the Color of the Month – Living Coral but with a twist, it is a combination of 2 Radiant Neon colors blended together to make one with the help of Shimmer Stix.

Skill: Intermediate
Time: 30 minutes

Directions


Step 1

Cut a piece of white cardstock to 3.75 x 5 inches. Rub Radiant Neon Electric Coral on the upper portion of the card panel. Rub Electric Orange Radiant Neon Ink directly over the Electric Coral. Rub Electric Orange Radiant Neon Ink directly over the Electric Coral.


Step 2

Use the Shimmer Stix to blend and drag the inks together down the length of the panel.


Step 3

This blends the ink and colors the panel with shimmer at the same time. It’s hard to show the truly beautiful shimmer you get from the Shimmer Stix but this photo captures a bit of that shimmer and sparkle.


Step 4

Cut a cover-up using the Gina Marie Flower Burst Trio Cover Plate on white cardstock. Mount the cover up onto the Shimmer Blended card panel and affix to a black card base.


Step 5

Cut three “Sparkle” sentiments, one from blue cardstock and two from black cardstock.


Step 6

Use On Point Glue to glue the layers together with the blue on top. Apply a layer of Shimmer irRESISTible Pico Embellisher to the sentiment and let dry. Add a dot of Electric Blue irRESISTible Pico Embellisher to the center of each flower. Adhere the sentiment to the card using On Point Glue. Just look at that beautifully blended shimmer!!

Supplies

Imagine
Other
  • Gina Marie – Flower Burst Trio Cover Plate
  • Queen and Co – Sparkle Sentiment Die-cut
  • Cardstock – White, Black, Blue

Here Are 2 Fabulous “You are My Anchor” Handmade Cards

In Life’s Storms Handmade Card by Kyriakos Pachadiroglou

There is always someone to rely on who is like an anchor in the sea! For today’s crafting reflection, I choose to make a handmade card with an ocean theme.

Lately, I have been obsessed with Vertigo plastic surfaces and have made bookmarks with an ocean theme. Again, Vertigo sheets work so nice to give the impression of water and I used them for the background of this card. I lightly colored a Vertigo Taffeta sheet using just two StazOn colors that blend to give a beautiful turquoise effect of the sea.

Then I decorated with the wooden fish shapes with Iridescent Creative medium to resemble the fish scales. The irRESISTible Pico Clear was used to give volume both on the anchor and the clear bubbles on the card. Although this card uses a variety of products, the design is still clean and simple and creates a lovely theme for you to share with that special someone in your life.

Supplies

Imagine
Other
  • Card Base – 5 x 7
  • Waffle Flower – Life anchor stamp set
  • Cardstock
  • Knorr Prandell – wooden fish
  • Waxed Cord– white


You are My Anchor in Life’s Storms by Jowilna Nolte

The color blue and ocean themes makes me happy! Throw in this amazing little stamp set from Waffle Flower and my heart skipped a beat. I used some out-of-the-box techniques for this card, so let me share with you some of the details.

On a sheet of Vertigo apply a thin layer of Creative Medium using a palette knife. Leave the medium to dry thoroughly. Once the creative medium is dry, color the Vertigo covered sheet using Memento Luxe ink. Lightly sweep the ink pad across the Vertigo and leave to dry. Out of blue cardstock die-cut with the Waffle Flower Life Anchor. Cover the die-cut anchor with a layer of GlazOn. While the GlazOn is still wet, lightly sprinkle with a layer of glitter and leave to dry.

While you are letting the anchor dry, use a circle stencil to add color to your card background. Apply different inks to the stencil, mist with water and stamp with the stencil onto the cardstock. Leave to dry. Mix a small amount of texture paste and color it using blue acrylic paint and a small amount of Memento Luxe inker. Use your palette knife to mix the color into the paste really well. Apply the colored paste through a stencil using smooth strokes in one direction. Leave the paste to dry. Use your matching Waffle Flower Life Anchor stamp set and stamp words and waves onto the card in between the stenciling. Cut the strips of Vertigo into smaller strips and use GlazOn to adhere the strips to your card front. Use your sewing machine to sew around the edges and finish off your card with the anchor attached with a brad and some blue ink splats.

Supplies

Imagine
Other
  • Jowilna Nolte – Stencil
  • Cardstock – white
  • Penelope Dee – Alpha Stencil
  • Waffle Flower – Life Anchor stamps and die
  • Glitter
  • Sewing Machine