Make a Ouija Board Halloween Card with VersaFine Clair Inks

By Kathi Rerek

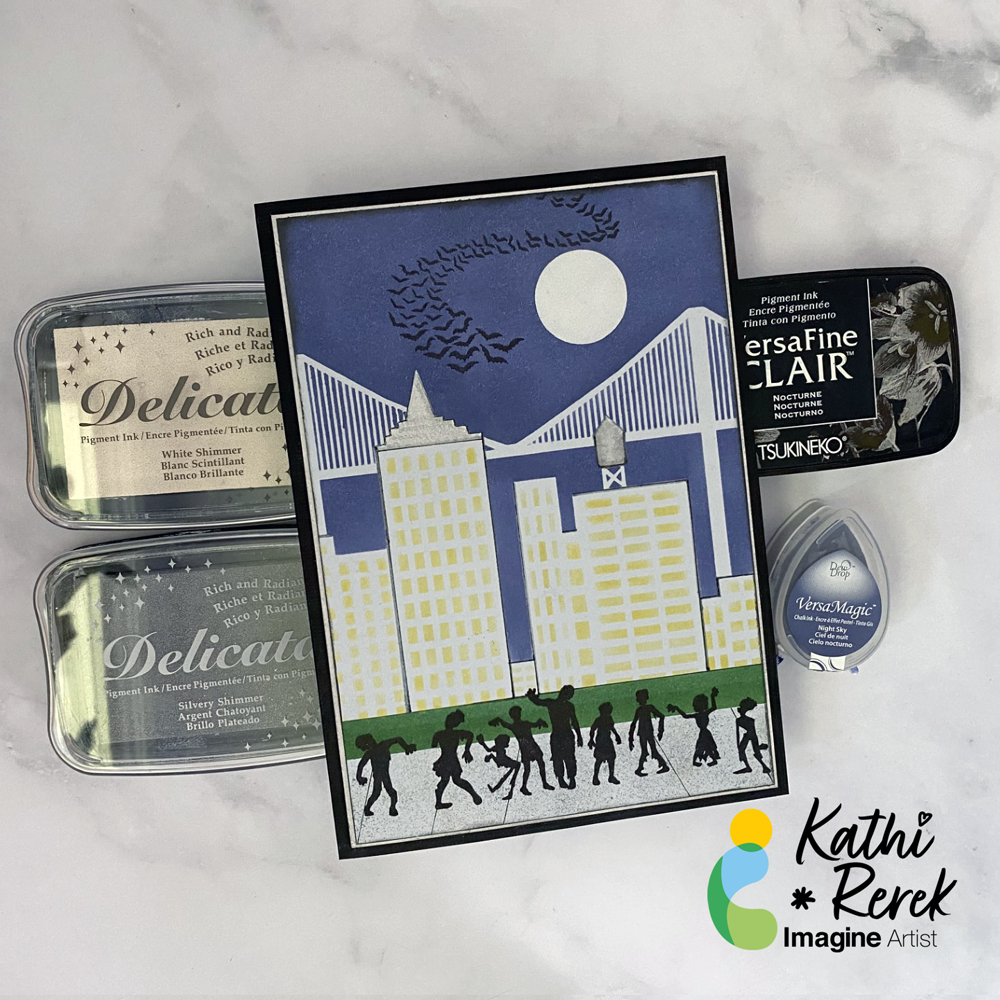
Halloween is the time of the year when the veil is the thinnest and people seek out spooky experiences. Here’s a card with NO stamping that uses both the old and new VersaFine Clair Inks with stencils and die-cuts!

Skill Level: Intermediate
Time: 1.5 hours

Instructions:

Step 1:
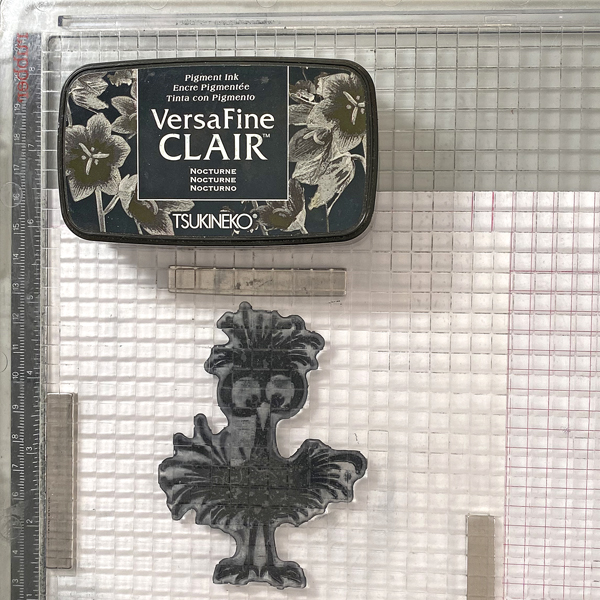
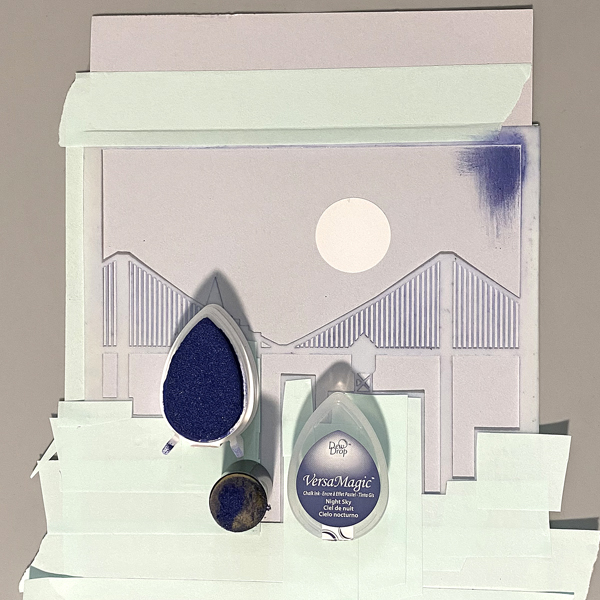
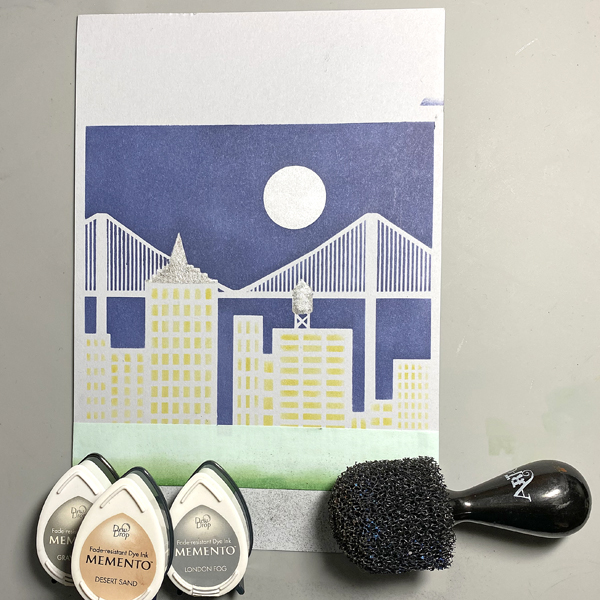
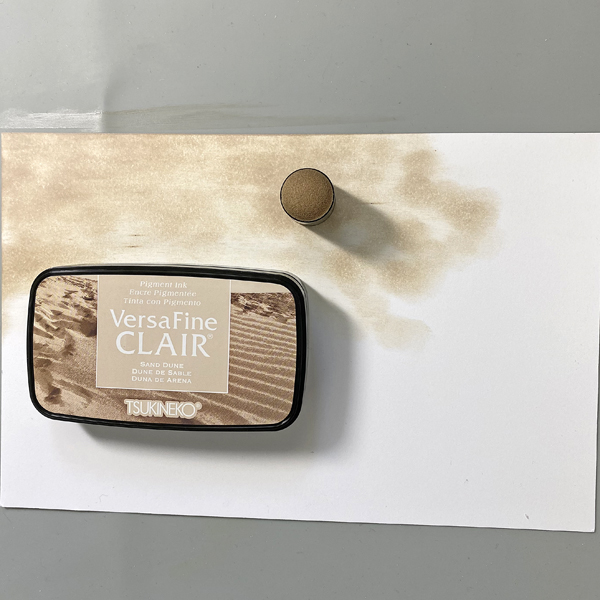
Use a Sponge Dauber to apply Sand Dune VersaFine Clair ink to a piece of white cardstock.
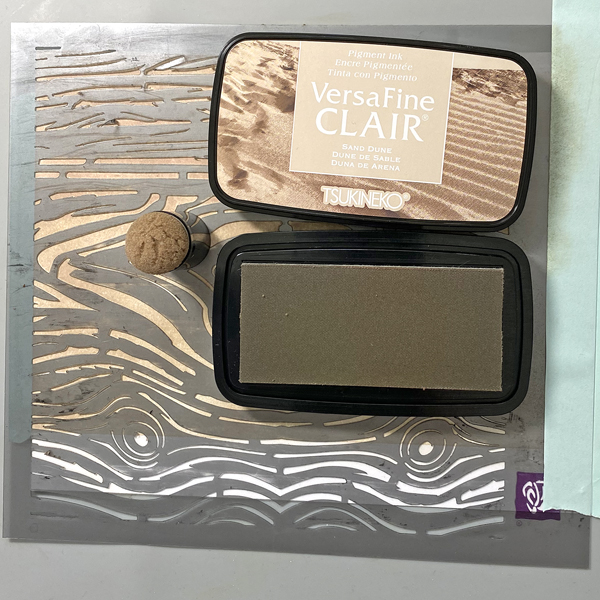
Step 2:
Use low-tack tape to secure the inked cardstock to the back of a wood-grain stencil. Use a sponge dauber to apply Sand Dune VersaFine Clair over the stencil onto the cardstock to create a subtle wood grained look. Remove the stencil and heat set the cardstock.

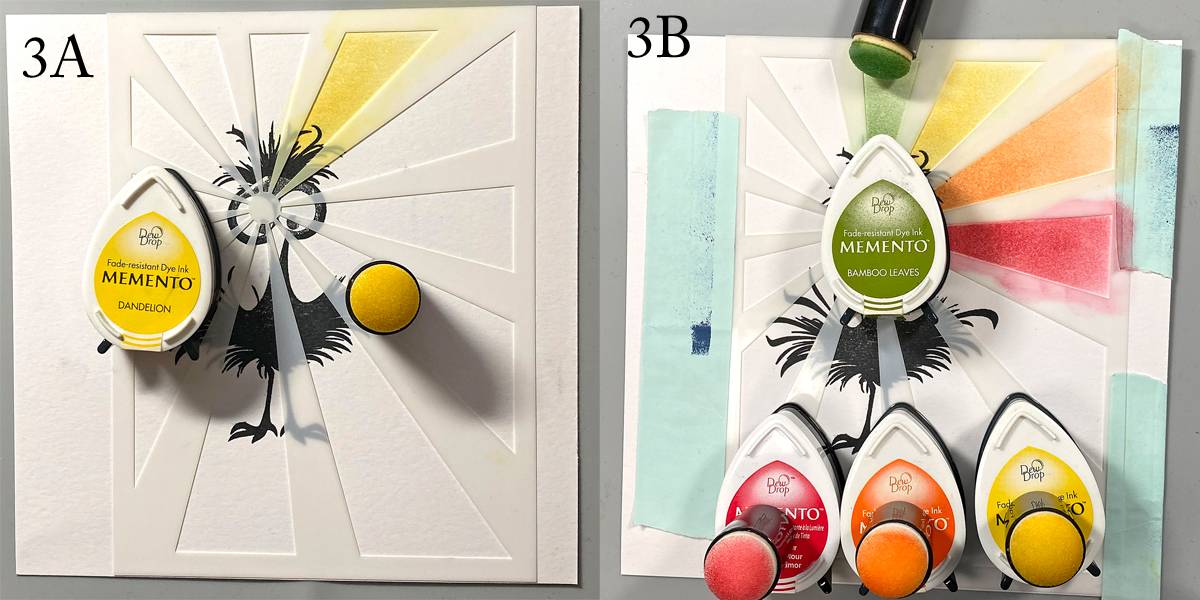
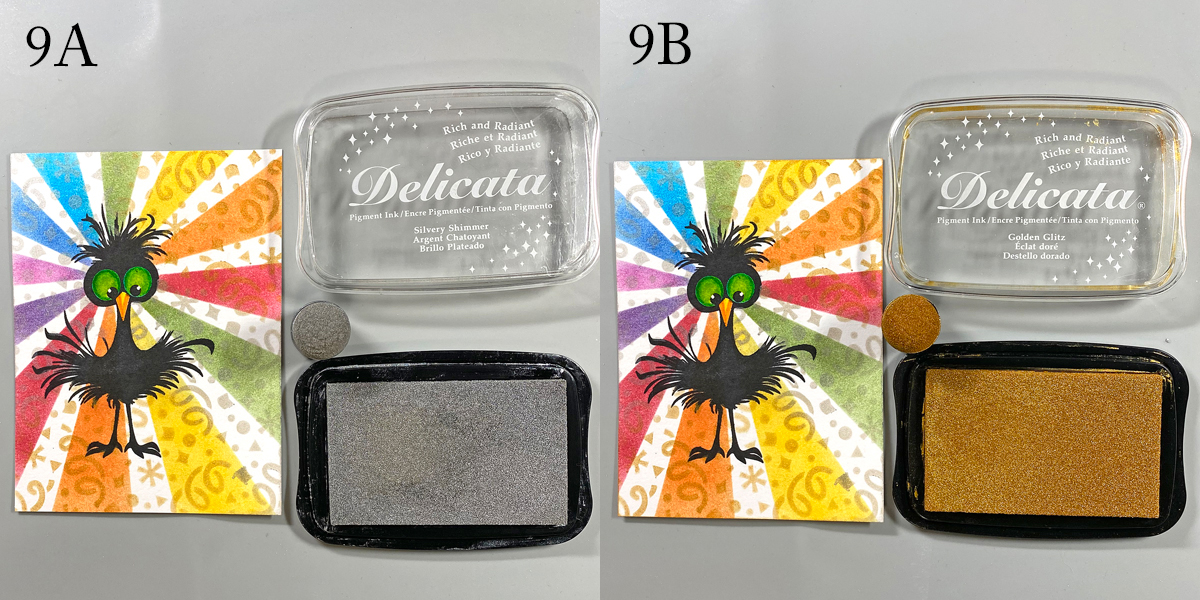
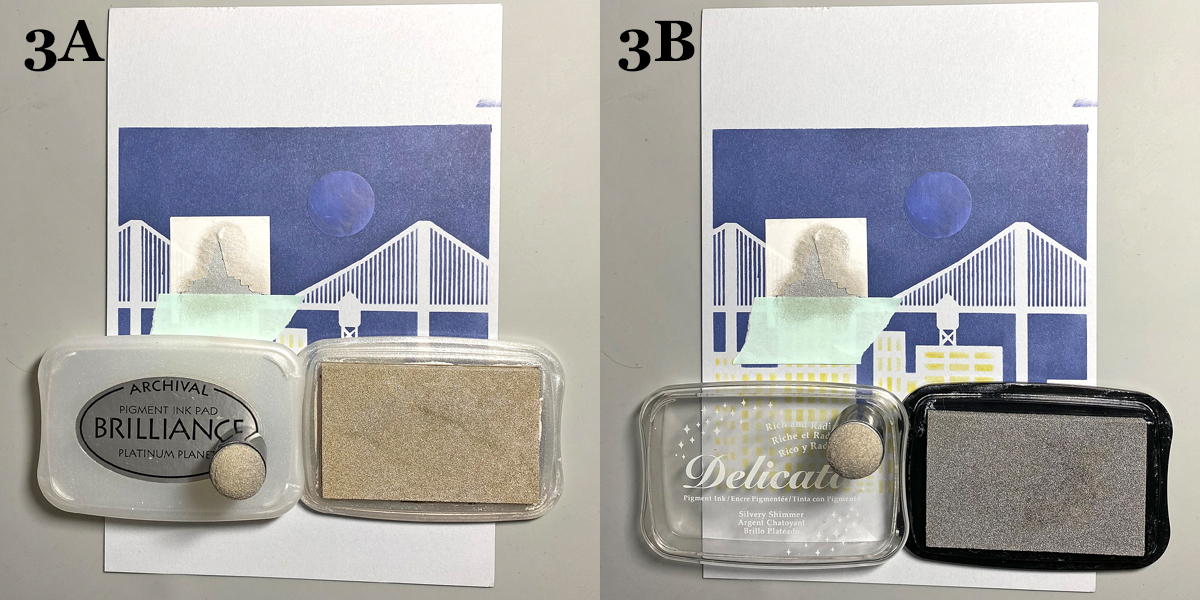
Steps 3A through 3E:
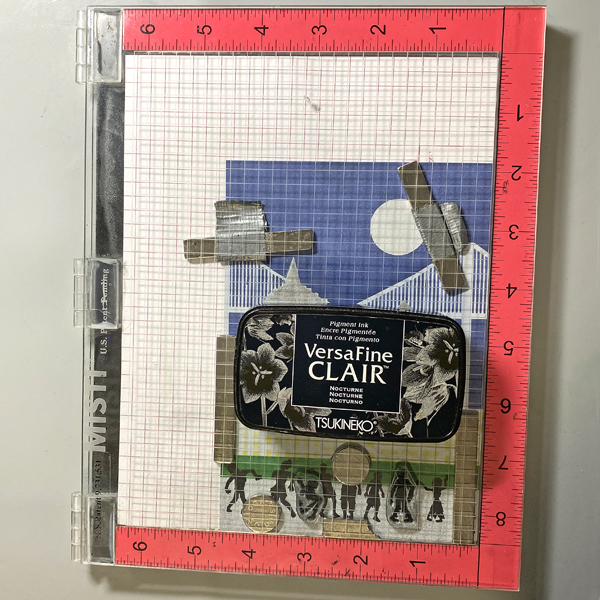
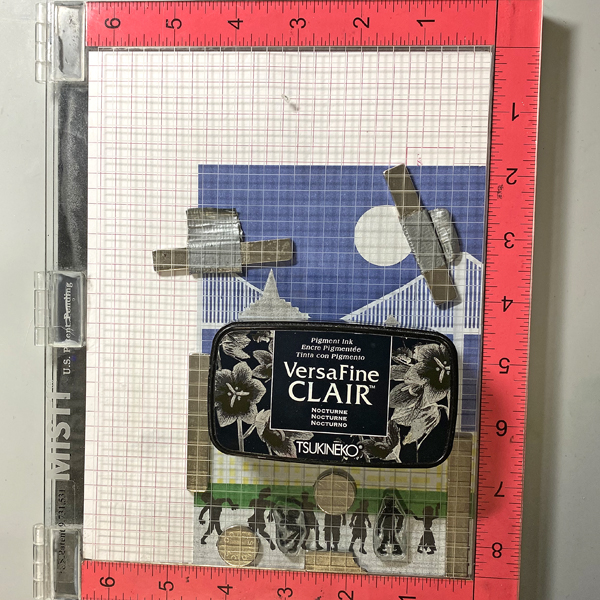
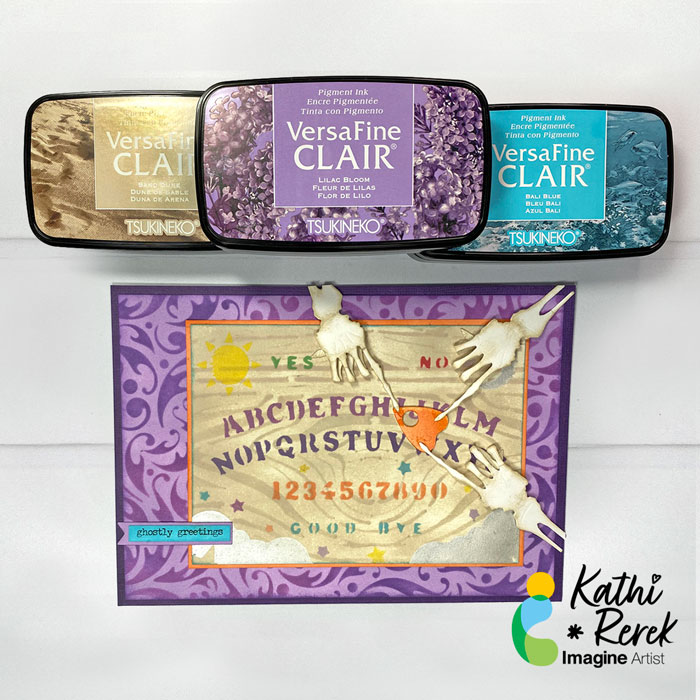
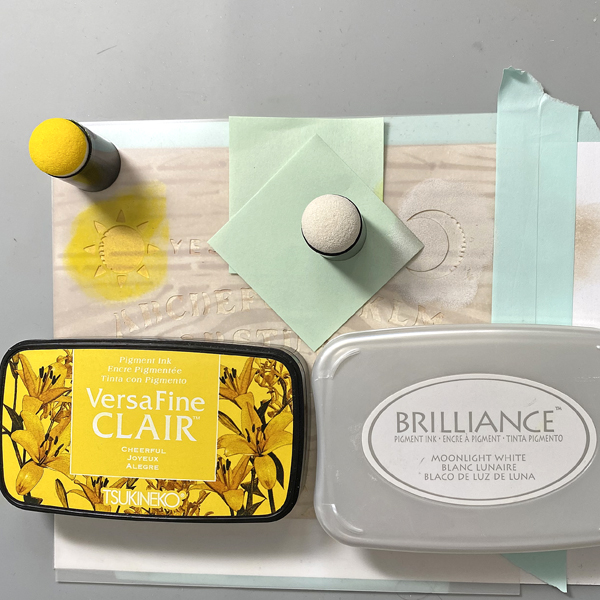
Use low-tack tape to secure the image panel to the back of the Ouija Board Stencil. Different colors of VersaFine Clair Inks and Moonlight White Brilliance ink will be applied to various areas of the stencil. I ended up adding Starlite Silver over the Moonlight White to add more contrast. Sorry there’s no photo.

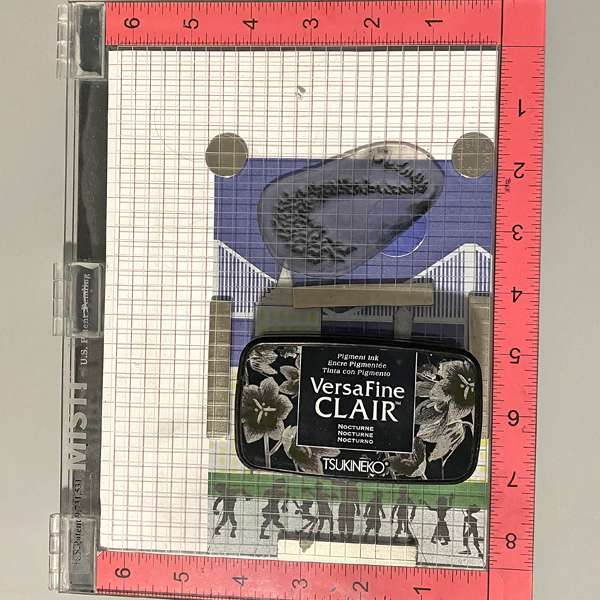
Place Post-It Notes to protect areas of the stencil and keep a paper towel at hand to wipe excess ink off of the stencil to avoid unwanted ink transfer.

Use a Sponge Dauber to apply Cheerful VersaFine Clair to the sun area of the stencil. Use a Sponge Dauber to apply Moonlight White Brilliance Ink to the moon and the clouds area of the stencil (3A).

Use Sponge Daubers to apply Grass Green and Strawberry VersaFine Clair Inks to the “Yes” and “No” words on the stencil (3B)

Use Sponge Daubers to apply Purple Delight and Monarch VersaFine Clair Inks to the the alphabet on the stencil (3C). Remember to use a paper towel to wipe away excess ink.

Use a Sponge Dauber to apply Summertime VersaFine Clair Ink to the numbers on the stencil (3D).

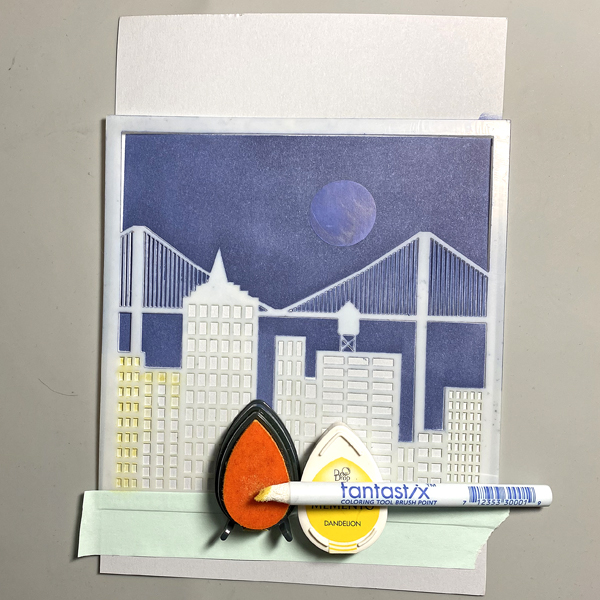
Use Fantastix to apply Lilac Bloom, Bali Blue, Summertime, and Cheerful VersaFine Inks to the stars on the stencil (3E)

Remove the stencil and thoroughly heat set the image panel.

Step 4:
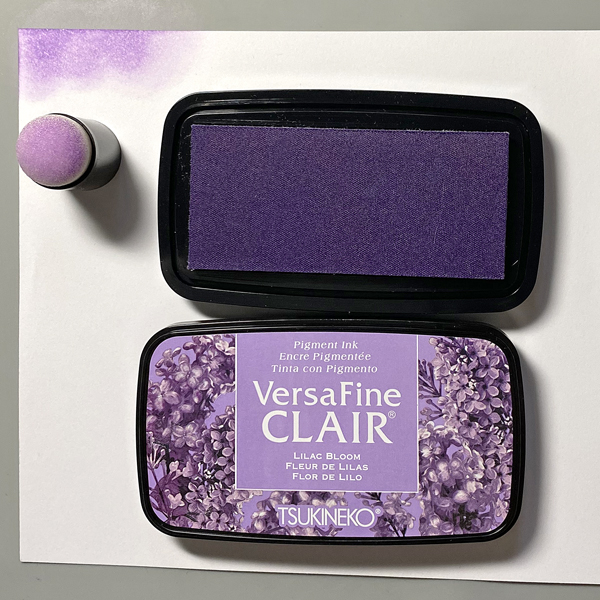
Use a Sponge Dauber to apply Lilac Bloom VersaFine Clair Ink to a piece of Mixed Media paper to create the background panel. Heat set.
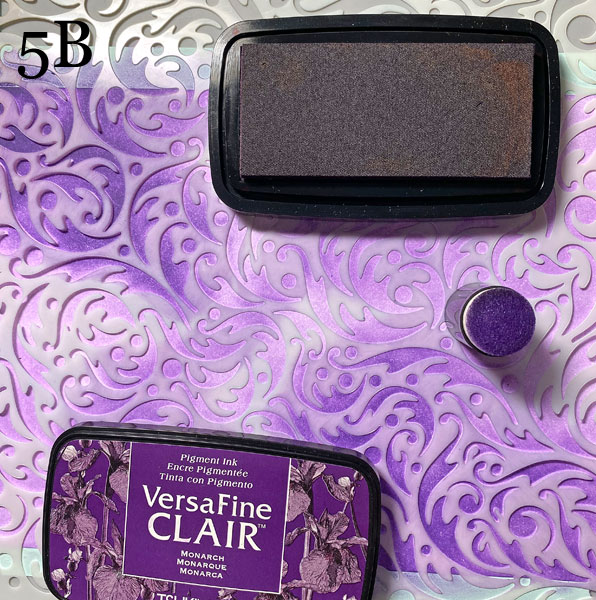
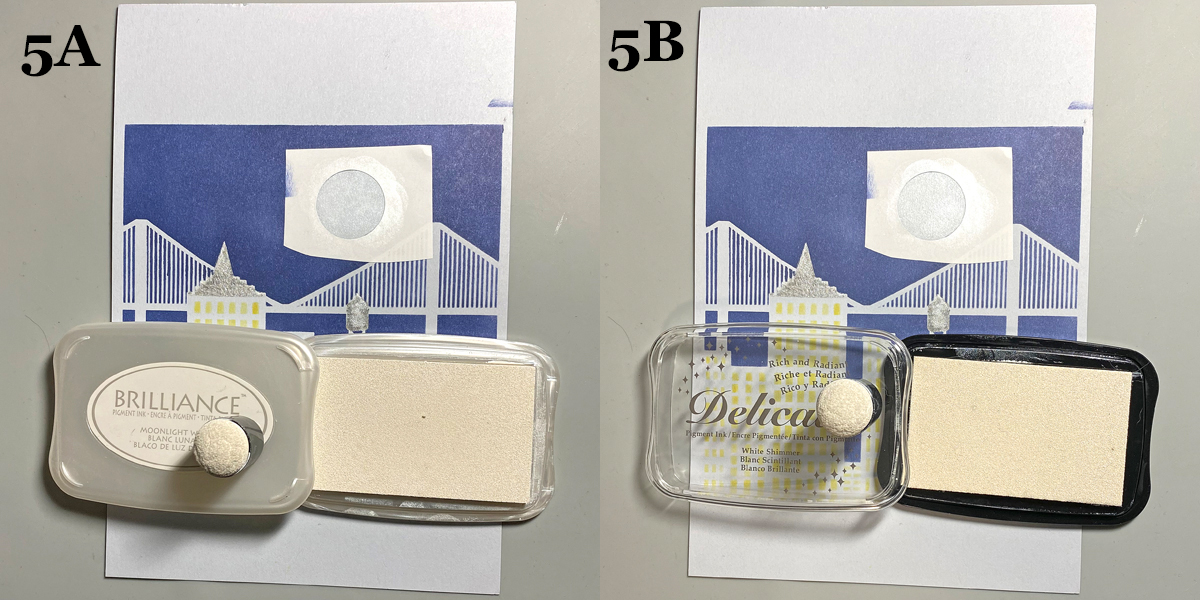
Steps 5A and 5B:
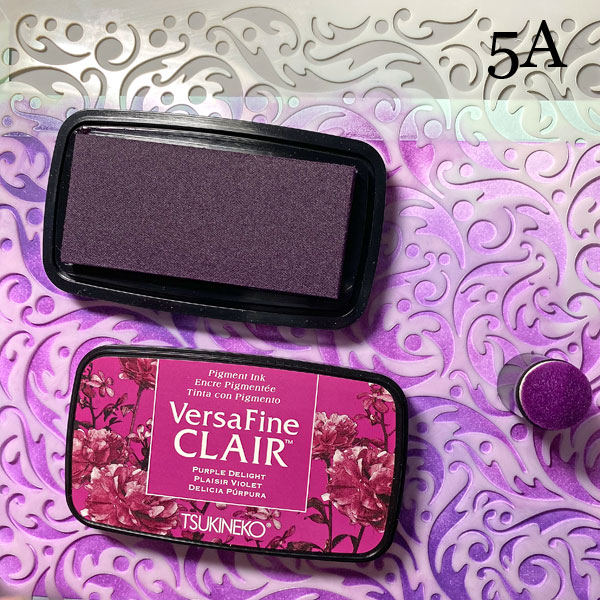
Use low-tack tape to secure the Lilac Bloom inked paper to the back of the Dynamic Stencil.

Use a Sponge Dauber to apply Purple Delight VersaFine Clair Ink randomly over the stencil (5A) onto the background panel. Use a separate Sponge Dauber to apply Monarch VersaFine Clair Ink over the the rest of the stencil (5B) onto the background panel.  Remove the stencil and heat set the panel.
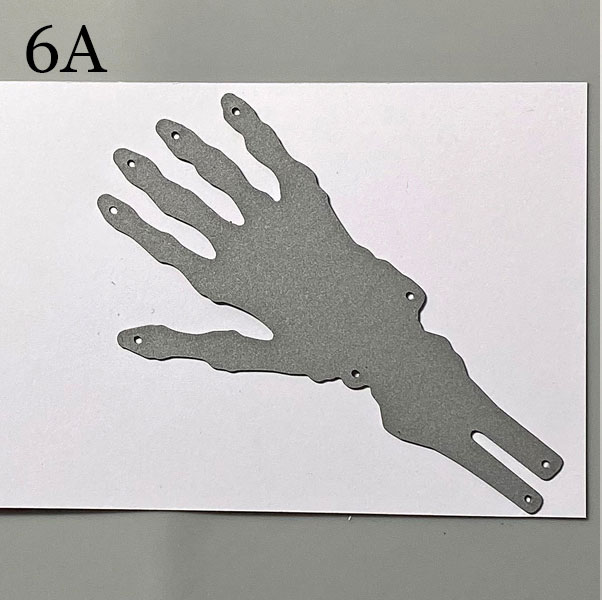
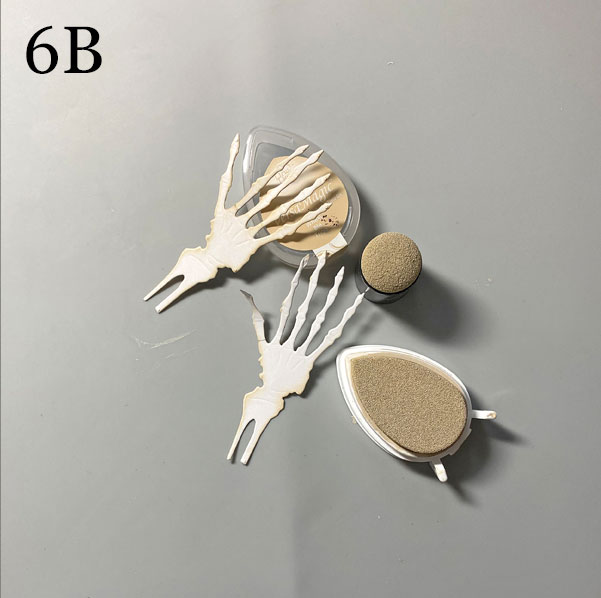
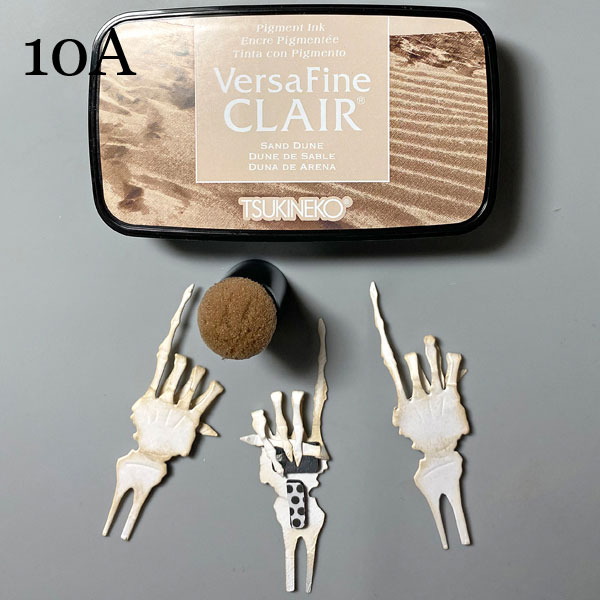
Step 6:
Use the skeletal hand cutting die to cut three hands from white cardstock.

Use a Sponge Dauber to apply Wheat VersaMagic Ink to the edges of the hands, fingers, and wrist bones. You can use the pointed edge of the DewDrop Inkpad to reach between the fingers! When the bones are aged to your liking, heat set all three hands then set them aside.

Step 7:
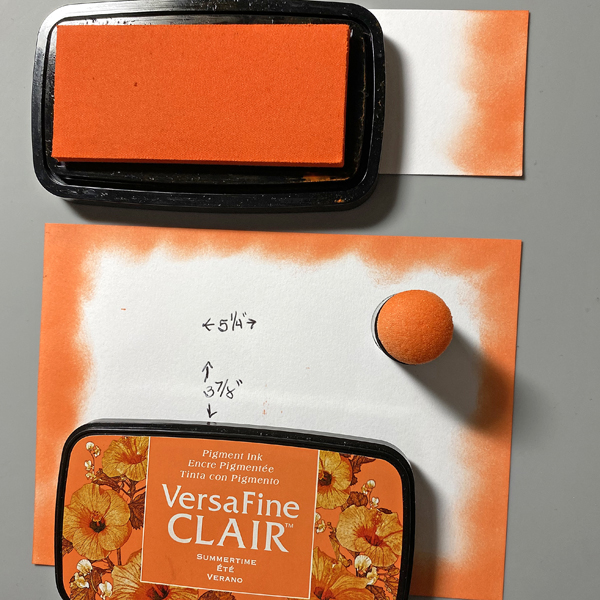
Cut a piece of white cardstock to 5.25” x 3.875”. Use a Sponge Dauber to apply Summertime VersaFine Clair Ink to the outer .5” of the panel. Heat set. Use this panel to mat the Ouija Board Panel, then adhere the matted Ouija Board panel to the stenciled background panel. Sorry that there’s no photo.
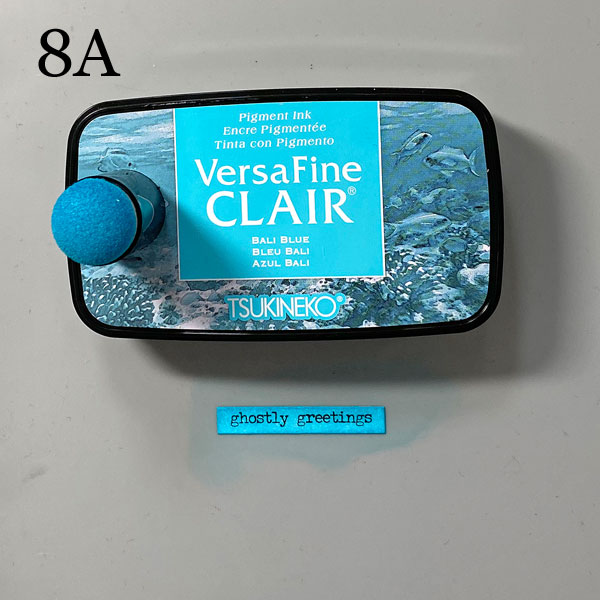
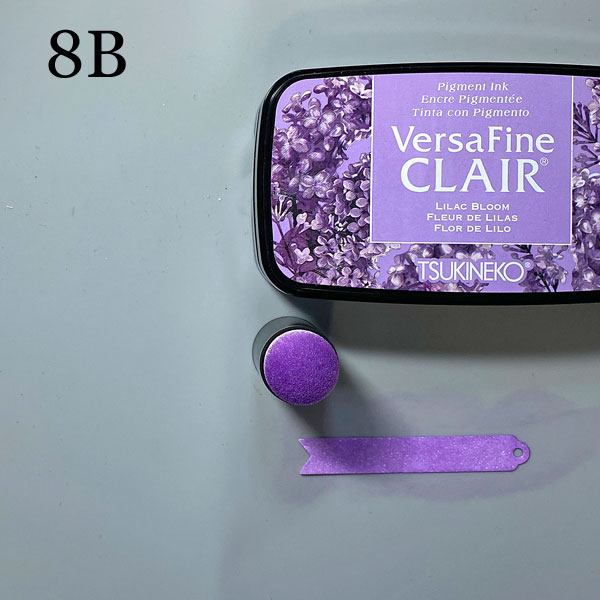
Steps 8A and B:
Use a Sponge Dauber to apply Bali Blue VersaFine Clair Ink to a sentiment sticker (8A). Heat set.

Use a Flag Die to cut white cardstock. Use a Sponge Dauber to apply Lilac Bloom VersaFine Clair Ink to the die-cut. Heat set.

Adhere the sticker onto the die-cut flag. Set aside.
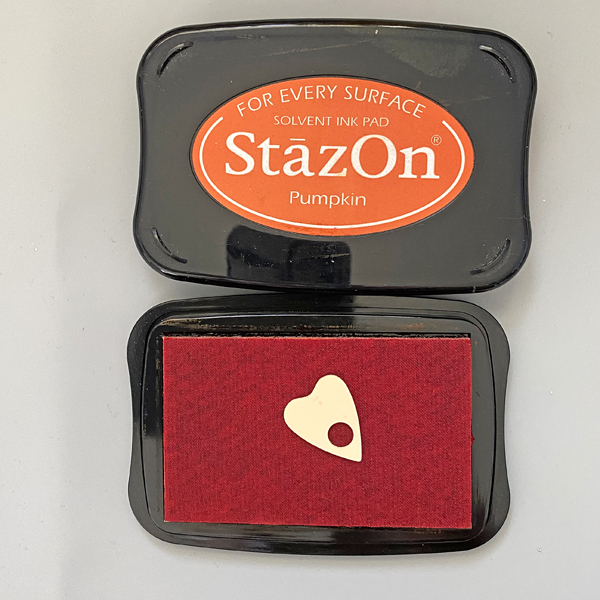
Step 9:
Press the plastic planchette facedown onto the Pumpkin StazOn Inkpad. Smoosh it around.Carefully remove and allow to dry.
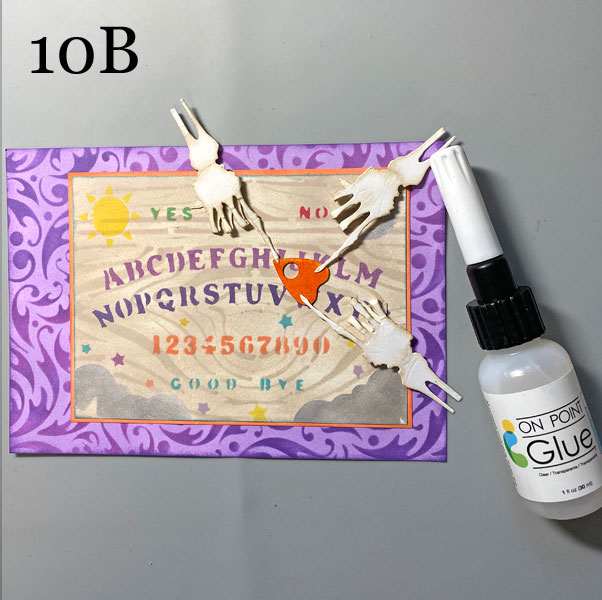
Steps 10A and 10B:
Place dimensional foam adhesive to the back of all three skeletal hands. Fold all the fingers, except the index fingers, backwards at the second joint, and press them onto the adhesive foam. You can add a piece of Tear It! Tape over them to keep them in place. Use a Sponge Dauber to apply Sand Dune VersaFine Clair Ink to the backs of the fingers and the joints to further “age” them (10A).

Use On Point Glue to attach the Planchette so that it’s pointing at the “H” for Halloween. Apply On Point Glue to the back of index fingertips, remove the tape backing, and adhere the skeletal hands as shown (10B).

Step 11:
Create a 5” x 7” card from white textured cardstock. Use a Sponge Dauber to apply Monarch VersaFine Clair Ink to the outer .5” of the card. Heat set.
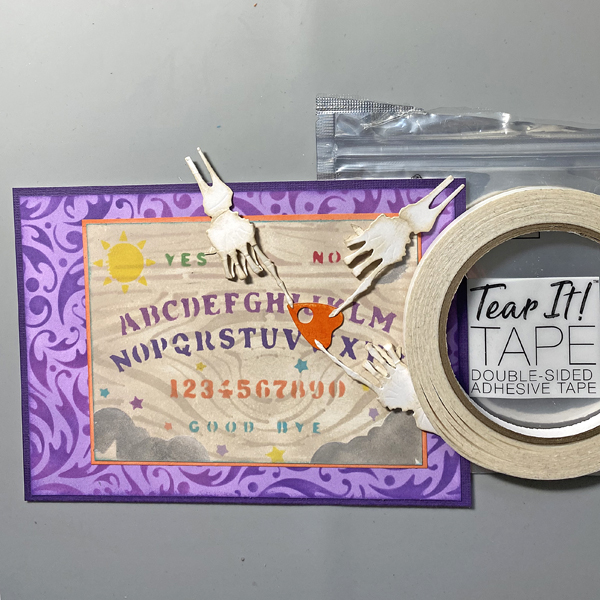
Step 12:
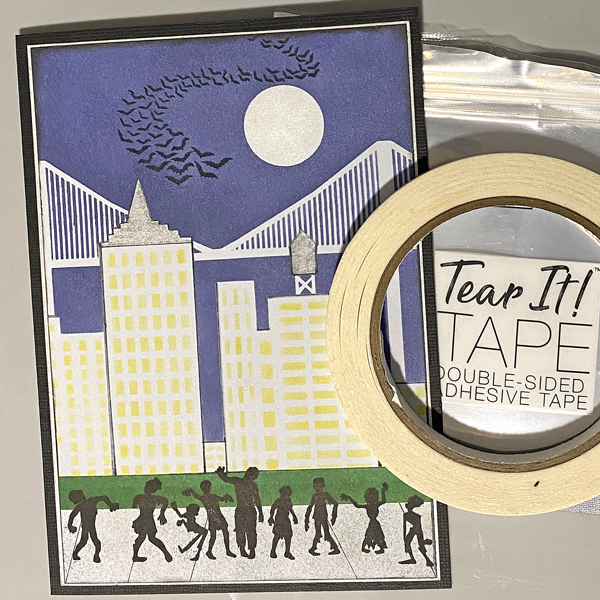
Use Tear It! Tape to adhere the layers of the card.
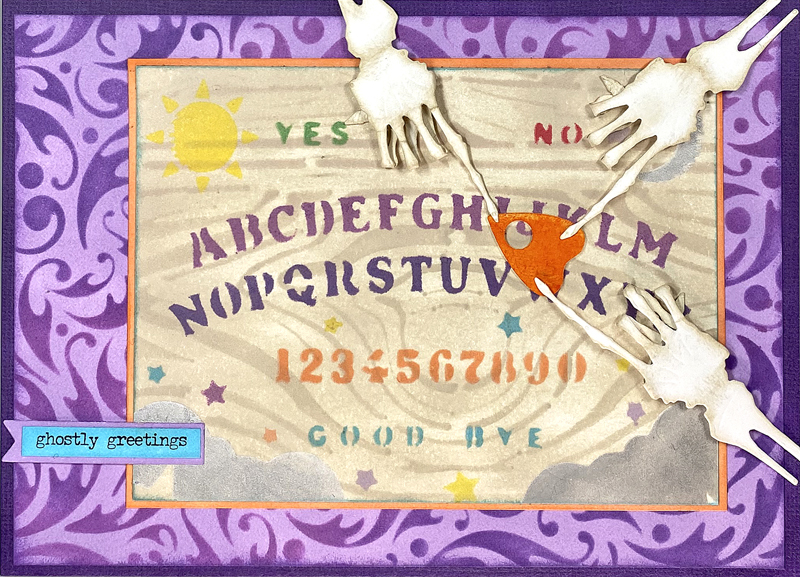
Finished Card

Imagine Crafts Supplies:

Other Supplies:

  • Bristol Paper by Strathmore
  • Avalanche Textured Cardstock by Bazzill Basics
  • Ouija Board 6×6 Stencil by Strumpet Stencils
  • Woodgrain Stencil by Prima Marketing
  • Dynamic Stencil by Lavinia Stamps
  • Skeletal Hand Cutting Die Source Unknown
  • Large Ouija Board Planchette by Retro Cafe Art
  • Low-Tack Tape
  • Post-It Notes by 3M

Make A Fun Happy Bird-Day Card

By Kathi Rerek

Let’s make a cheerfully bright and fun birthday card with a stamp, two stencils, and lots of ink!

Skill Level: Intermediate
Time: 1.5 hour

Step 1:
Use magnets to secure a  piece of white Bristol paper to the base of a stamping platform.

Use Nocturne VersaFine Clair ink to stamp the bird stamp from the “I’m Fine”  image twice — once onto the image panel and once onto repositionable sticker paper. Heat set the stamped image panel.

Step 2:
Fussy-cut the sticker paper version and place it onto the image panel as a mask.

Step 3:
Use low-tack tape to secure the Sunshine Small Stencil onto the stencil so that the “sun” is over the bird’s face. Use a Sponge Dauber to apply Love Letters Memento ink over the mask and masked image onto the image panel (3A).

Use a separate Sponge Dauber for each color to apply Tangelo, Dandelion, Bamboo Leaves, Bahama Blue, Danube Blue, Lilac Posies, and Grape Jelly Memento inks in rainbow order (ROYGBIV) counter-clockwise over the stencil onto the image panel (3B). Not all stenciling is shown. Remove stencil.

Step 4:
Use low-tack tape to secure the Confetti Stencil over the image panel. Use a Sponge Dauber to apply Silvery Shimmer Delicata ink over the stencil and masked image onto the top left and bottom right of the image panel (3A).

Use a separate Sponge Dauber to apply Golden Glitz Delicata ink over the stencil and masked image onto the top right and bottom left of the image panel (3B).

Remove the stencil and heat set the image panel. Set aside.

Step 5:
Secure a piece of black cardstock to the base of a stamping platform. Place the “You’re the best” sentiment from the Whatcha Saying? Clear Stamp Set, the “Happy Birthday”, “Celebrate”, and “Happy Birthday” sentiments from the Classic Sentiments Clear Stamp Sets facedown on the black cardstock.

Press the platform’s lid onto the back of the stamps, lift the platform, ink the stamps with the VersaMark Dazzle ink, and stamp. Remove the black panel from the stamping platform.

Step 6:
Sprinkle White MBoss Powder onto the stamped sentiments, slide the the excess powder back into the bag, and heat set the sentiment.

Step 7:
Use cutting dies to die-cut the sentiments. Trim the left side of the “celebrate” flag and the right side of the “happy birthday” flag. Use Silvery Shimmer Delicata ink to edge the trimmed sides. Heat set the ink. Put the sentiment die-cuts aside.

Step 8:
Use watercolor markers to color the bird’s eyes and beak. Use a white gel pen to add highlights to the eyes and beak. (No photo, sorry!)

Step 9:
Trim the image panel to 3.75” x 5”. Use a Sponge Dauber to edge the top left and bottom right with Silvery Shimmer Delicata ink (9A).

Use a separate Sponge Dauber to edge the top right and bottom left with Golden Glitz Delicata ink (9B).

Step 10:
Use Tear It! Tape to adhere the image panel to a black panel cut to 4” x 5.25” and to adhere the matted image panel to a white A2 card.

Use Use Tear It! Tape to adhere the sentiments to finish the card.

Imagine Crafts Supplies:

Other Supplies:

  • Bristol Paper by Strathmore
  • Raven Cardstock by Bazzill Basics
  • Avalanche Cardstock by Bazzill Basics
  • I’m Fine Clear Stamp Set by Funky Fossil Designs
  • Classic Sentiments Clear Stamp Set by Hefty Doodle
  • Whatcha Saying? Clear Stamp Set by Hefty Doodle
  • Sunshine Small Stencil by Darkroom Door
  • Confetti Stencil by Newton’s Nook Designs
  • Sentiment Banner Die Set – Honey Bee Designs
  • Whatcha Saying? Die Set by Heffy Doodle
  • Emerald, Leaf Green, Light Green, Yellow, Brilliant Yellow, and Butterscotch Le Plume II Markers by Marvy/Uchida
  • Repositionable Sticker Paper by Avery
  • Curved Craft Scissors by Fiskar’s
  • Low-tack Tape
  • Stamping Platform by Tonic Studios
  • Misti Stamping Platform by My Sweet Petunia

Let’s Make a Cute “Hoppy” Easter Card

By Ceal Pritchett

Hello crafty friends,

It’s Ceal, here. Today I am sharing an Easter card with you. With Valentines Day behind us, the next holiday I send out cards for is Easter.

Here are supplies I used.

Skill Level: Intermediate
Time: 1 hour

Directions:

Step 1:
Using the layering stencil and Brilliance inks, ink blend the panel to create a background.
Look how shiny it is!

Step 2
Stamp and color the image (bunny) using VersaFine Clair Nocturne and fussy cut it out with the coordinating die.

Step 3
Stamp the sentiment “Easter” with VersaColor in Rose then fussy cut it out or use coordinating die.

Step 4
Stamp the sentiment “Hoppy” with VersaFine Clair Nocturne and fussy cut it out into a small rectangle.

Step 5
Attach the image to the card front using foam for dimension.

Step 6
Attach the sentiment to the card front using On Point Glue.

Craft Supplies
Imagine:
VersaFine Clair – Nocturne
VersaColor – Pink
Brilliance – Pearlescent Orchid
Brilliance – Pearlescent Purple – No Longer Available
Brilliance – Pearlescent Lavender
Brilliance – Pearlescent Sky Blue
Sponge Daubers
On Point Glue

Other:
Misti 2.0
Neenah 110lb Solar White card base
Neenah 80lb Solar White
Hero Arts Pitch Black cardstock
OLO Markers

Let’s Make a Happy Easter Card

By Anna Escalada York

– In today’s tutorial, I will show you how to use Brilliance Pigment Ink and VersaMagic Chalk Ink
to watercolor an image. This is a wonderful way to stretch your supplies and possibly try a new
technique. In addition, I will share some mistakes I made along the way while making this card.

Skill: Intermediate
Time: 1.5 hours

Directions:

Step 1:
Using a stamping platform, stamp the floral image with Nocturne VersaFine Clair ink.
Optional step: Heat emboss with a clear or holographic embossing powder. I did this because I
didn’t want to wait for the VersaFine Clair ink to dry.

Step 2:
Die cut the floral image with the corresponding die. I was “off” in the die cutting and so some of
the stamped image was cut off. You can mostly see this on the singular bud on the left side of
the image.
Not shown: Using the same die to die cut a piece of pink glitter cardstock.

Step 3:
Press the Pearlescent Orchid Brilliance Dew Drop pad onto a piece of acetate packaging and spray with Sparkle Sheer Shimmer Spray. On another part of the same acetate packaging (or possibly a palette or other non-porous surface, press the Pearlescent Purple Brilliance Dew Drop pad onto the surface and spray with more of the Sparkle Sheer Shimmer Spray. You should have two areas of color that you can mix with the spray to use as a watercolor.

Paint each flower or bud with a single layer of Pearlescent Orchid Brilliance Ink mixed with the
Sparkle Sheer Shimmer Spray. Let the watercolor dry. Add some Pearlescent Purple Brilliance
Ink mixed with the Sparkle Sheer Shimmer Spray to the edges of the petals to add some
dimension and interest.

Repeated the process for the stems. Press the Tea Leaves VersaMagic Chalk Ink pad onto a
piece of acetate and Spray the ink with more of the Sparkle Sheer Shimmer Spray. Use a
paintbrush to paint the stem green. Let dry. If desired, repeat the process to amplify the intensity
of the green watercolor. Let dry.

Not pictured: Gluing the pink glitter cardstock die cut behind the flower so that it can be seen on
the left side of the floral image.

Step 4:
Place a piece of wide washi tape over a piece of cardstock for the background panel
before die cutting that cardstock. (I used a leftover piece of cardstock that had some leftover
pink gel press printing on it so that you can see a little of the pink through the washi tape).
Don’t have washi tape? Use a piece of patterned paper.

Step 5:
The die cut set that was used to make the panel allows for two layers if desired. To make the
matte layer, use a slightly larger die to die cut a piece of pink glitter cardstock and then glue the
two panels together. Set them aside to dry.

Step 6:
Press more of the Pearlescent Orchid Brilliance Ink Dew Drop onto the acetate packaging and
spray more of the Sparkle Sheer Shimmer Spray onto the ink to create more watercolor and
splatter both the floral image and the background with the orchid colored watercolor. To splatter,
extend your finger parallel to the paper and tap a brush that has the Orchid watercolor on it
multiple times. To create a more uniform splatter, move the paint brush or the paper around so
that the splatter is added to a variety of places.

Spray more of the Sparkle Sheer Shimmer Spray (or water) into the gold watercolor pan and
then tap the paintbrush across the floral image and panel a second time. Let dry.

As you can see in the picture, between step 3 and now, the singular bud on the left was trimmed
from both the stamped layer and the pink glitter cardstock so the die cutting mistake was
eliminated.

Step 7:
Stamp the sentiment with Nocturne VersaFine Clair ink.
Optional step: Heat emboss the ink with holographic embossing powder to eliminate drying
time. (I originally was going to use this die cut sentiment, but later realized that it wouldn’t fit. I also
forgot to take pictures of the sentiment I trimmed with my paper cutter and ended up adding to
the card. So please use your imagination.)

Step 8:
On the sentiment that you see on the finished card, I trimmed the sentiment with my paper
trimmer. The one picture above was die cut with a hexagon die. Regardless of how you end up
shaping your sentiment (using a trimmer or a die), press the edges of the sentiment into the
Pearlescent Orchid Brilliance Dew Drop pad to add color to the edges. Set aside to dry.

Steps 9 and 10:
Time to glue! Glue the flower on the left third of the background panel. Then glue the panel onto
an A2-sized white card base.

For step 10, attach foam tape behind the sentiment except on the upper left corner (since that
will be overlapping with the floral image. Attach the sentiment to the lower right corner of the
panel.

Step 11:
Add pink and green sequins onto the card–on the lower left corner, close to the sentiment, and
on the upper right corner of the card panel.

Art Supplies
Imagine
• Brilliance Ink – Pearlescent Orchid, Pearlescent Purple
• Sheer Shimmer Spray – Sparkle
• VersaMagic Ink – Tea Leaves
• VersaFine Clair Ink – Nocturne

Other
• Altenew – washi tape – Dotted Wide Washi Tape
• Altenew-Foam Tape-Instant Dimension Foam Tape
• Catherine Pooler- sequins -Mission sequin mix
• Gina K Designs – dies- Master Layout 2 die set
• Kuretake – watercolor – Starry Colors Gansai Tambi Watercolors
• Local King Rubber Stamp – stamp and die set- Cherry Blossom
• Pink & Main – stamp set- Spring Sayings
• Embossing powder in my stash
• Watercolor paper
• Pink glitter cardstock
• Scissors
• Holographic embossing powder
• Small paint brush
• Stamp positioner
• Paper trimmer
• Glue

Zombies Invade Brooklyn Card

By Kathi Rerek

Halloween card made easy with VersaMagic, Brilliance, Delicata, VersaFine Clair, and Memento Inks!

Skill Level: Beginner to Intermediate

Time: 1 hour

Step 1.

Use low-tack tape to secure the Cityscape Stencil to a 5.5” x 8.5” piece of light grey cardstock. Trim and place low-tack tape to cover the buildings’ windows. Use a circle punch to cut a circle from mask paper and adhere the circle mask above the bridge. Keep the mask paper with the circular hole for another step..

Use a sponge dauber to apply Night Sky VersaMagic Ink over the stencil and the moon mask onto the the grey cardstock to create a night sky.

Step 2:

Keeping the stencil in place, remove the tape covering the windows. Use a Fantastix to apply Dandelion Memento Ink over the window apertures of the stencil.

Step 3:

Trace the spire onto masking paper, fussy-cut along the lines, leaving the outline of the spire intact. Place the mask around the spire on the image panel. Use low-tack tape to cover the base of the spire.

Use a sponge dauber to apply Platinum Planet Brilliance Ink to the spire, then apply Silvery Shimmer Delicata Ink overtop to amp up the silver.

Step 4:

Use low-tack tape to cover the area around the rooftop water tower, leaving the tower unmasked. Use a Fantastix to apply Platinum Planet Brilliance Ink to color the water tower. Use another Fantastix to apply Starlight Black Brilliance Ink to add shading to the water tower.

Step 5:

Remove the circle mask from the sky. Adhere the mask paper with the circle hole to the sky area, leaving the center open. Use a Sponge Dauber to apply Moonlight White Brilliance ink to color the moon white. Use a Sponge Dauber to apply White Shimmer Delicata Ink overtop to add shimmer to the moon.

Step 6:

Use a scrap of cardstock and low-tack tape to cover the buildings. Place another piece of low-tack tape horizontally across the bottom 1.25” of the image panel.Use Sponge Daubers to apply Cottage Ivy and Bamboo Leaves Memento Ink between the masked areas to create a grassy lawn.

Step 7:

Use low-tack tape to cover the grassy areas. Use the pouncy tool to apply London Fog, Grey Flannel, and Desert Sand Memento Inks to create a cement sidewalk.

Step 8:

Use magnets to secure the image panel to the stamping platform. Position the Zombie stamps facedown where desired. Press the lid of the platform onto the back of the stamps, lift, ink the stamps with Nocturne VersaFine Clair Ink, and stamp. Re-ink and repeat stamping if needed to attain a good solid impression.

Remove the Zombie stamps from the platform., then remove the image panel from the platform,. Heat set the stamped images.

Step 9:

Place the image panel back onto the base of the stamping platform, secured with magnets.. Place the other two small Zombie stamps facedown between the other stamped images. Press the lid of the platform onto the back of the stamps, lift, ink the stamps with Nocturne VersaFine Clair Ink, and stamp. Re-ink and repeat stamping if needed to attain a good solid impression.

Remove the stamps from the platform Remove the image panel from the platform. Heat set.

Step 10:

Place the image panel back onto the stamping platform, secured with magnets. Place the Bat Colony Stamp facedown in the sky area as shown. Press the lid of the platform onto the back of the stamps, lift, ink the stamps with Nocturne VersaFine Clair Ink, and stamp. Re-ink and repeat stamping if needed to attain a good solid impression.

Remove the stamps from the platform Remove the image panel from the platform. Heat set.

Step 11:

Trim the image panel to 4 5/8” x 6 5/8” . Use a Sponge Dauber to edge the image panel with Midnight Black VersaMagic Ink.

Step 12:

Trim a piece of white cardstock to 4.75” x 6.75”. Use a Sponge Dauber to apply Platinum Planet Brilliance Ink to the outside .5” of the image panel. Then use a Sponge Dauber to apply Silvery Shimmer Delicata Ink overtop to add to the metallic shine.

Step 13:

Use Tear It! Tape to mat the image panel to the silver-inked cardstock, then use Tear-It! Tape to adhere the matted image panel to a black 5” x 7” card.

Imagine Crafts Supplies:

Other Supplies:

  • Light Grey Cardstock
  • Cityscape Stencil TCW376 by The Crafters Workshop
  • Bat Colony Clear Polymer Stamp by Lavinia Stamps
  • Zombie Party by Whimsy Stamps
  • Low-Tack Tape
  • Mask Paper by Gina K Designs
  • Pouncy Tool
  • Heat Gun by EK Success
  • Mini Guillotine Trimmer by Tim Holtz for Tonic Studios
  • Misti Stamping Platform by My Sweet Petunia