Hello Friends! Katy here with my latest video sharing a great way to use Memento Inks on textured paper. I used cold pressed watercolor paper, but you could use any type of textures paper you have.
Hi everyone! It’s Jessica here. Father’s Day is right around the corner. Do you have a card design in mind? I tend to struggle with masculine cards, so I decided to keep it simple this year with a geometric patterned background. Let’s take a look!
Step 1: Let’s start by trimming a piece of Classic Crest Solar White to 3 1/2” x 4 3/4”. This is my go-to cardstock – not only is it great for stamping, it is perfect for ink blending also. I am blending Memento Summer Sky ink with Altenew’s Styled Background stencil set.
Step 2: Next, turn the stencil 90 degrees, and ink blend with Memento Paris Dusk ink. I picked the light and dark blue color scheme today because it is gender-neutral, and they pair well with the DCS Blue Calico and Indigo Blue cardstock that I’ll be using later.
Step 3: Rotate the stencil once again, and ink blend with Memento New Sprout ink. You can see how smoothly the ink blends on the Classic Crest Solar White cardstock. There are no streaks or splotchy areas.
Step 4: For the last color, ink blend Memento Bamboo Leaves after you turn the stencil 90 degrees.
Step 5: This is what the final geometric pattern looks like after all of the ink blending. Since the Classic Crest Solar White cardstock has a really smooth surface, the end result looks like the patterns were airbrushed onto the paper.
Step 6: Now we are ready to add the sentiment of the card. I wanted the sentiment to match the patterned background, so I picked DCS Blue Calico and Indigo Blue cardstock. I die cut alphabet letters from these cardstock with Stampin’ Up’s Mini Alphabet die. One thing to keep in mind is that the DCS cardstock have a textured side with linear grains. Be sure to die cut letters of the same word by placing the dies in the same orientation to achieve a more cohesive result.
Step 7: Finally, trim a piece of DCS Blue Calico to 3 3/4” x 5” and adhere the ink blended panel on top. Then mount the layers onto an A2 sized card base with DCS Indigo Blue cardstock. Lastly, apply On-Point Glue to the back of the letter die cuts and adhere them to the card front to complete the card.
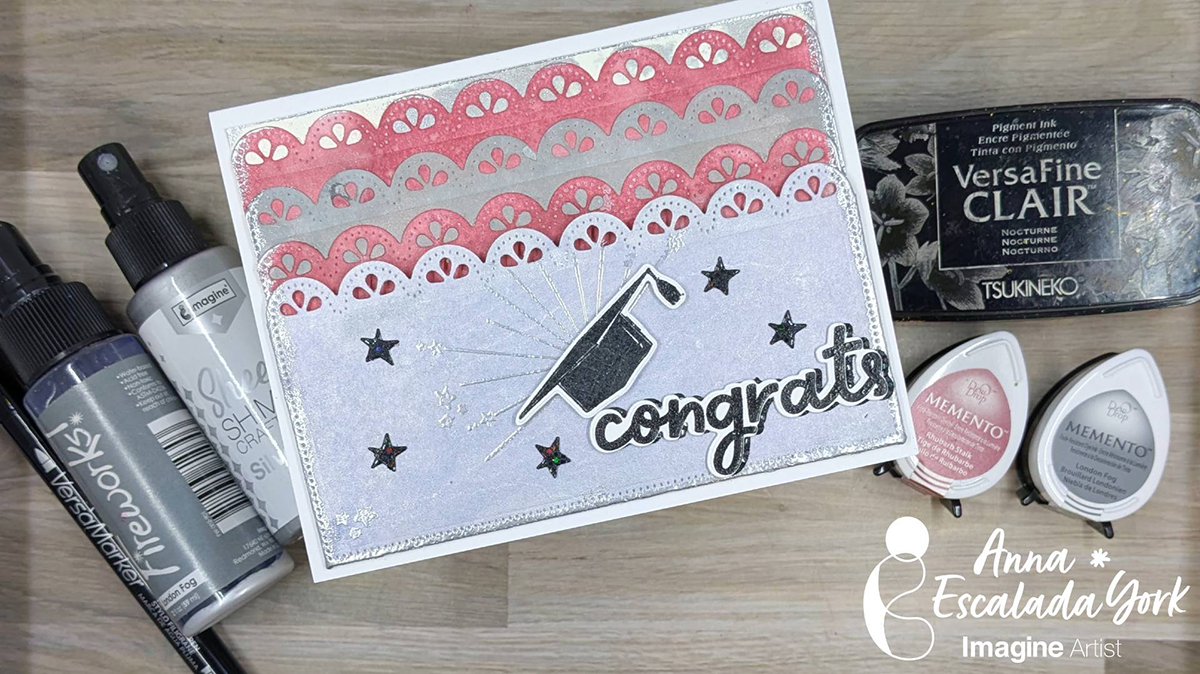
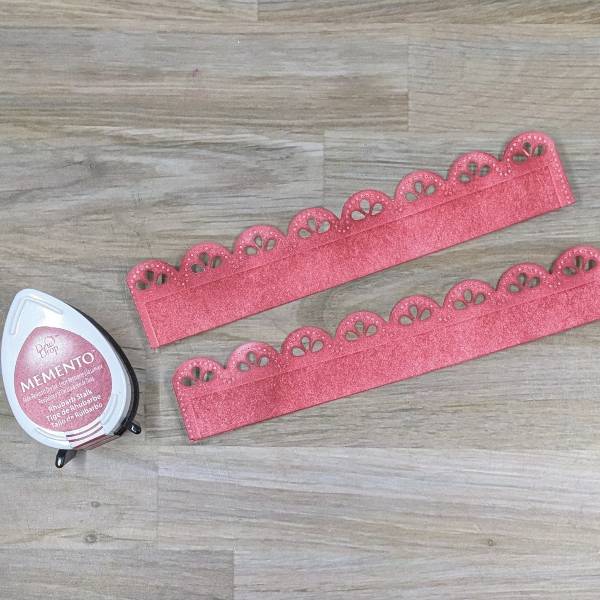
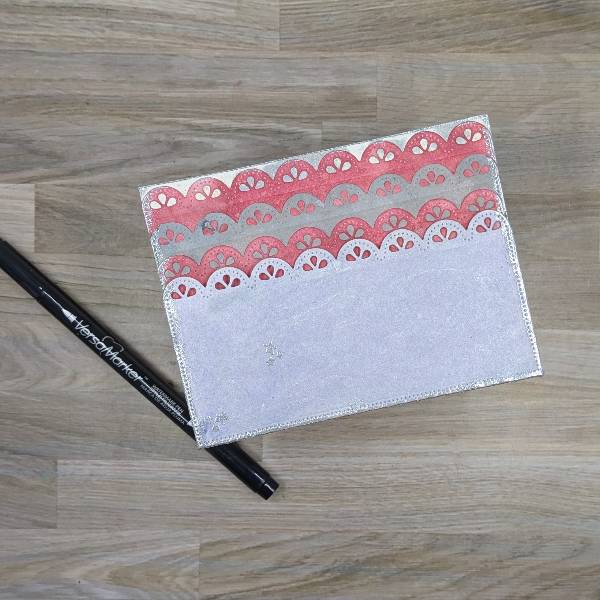
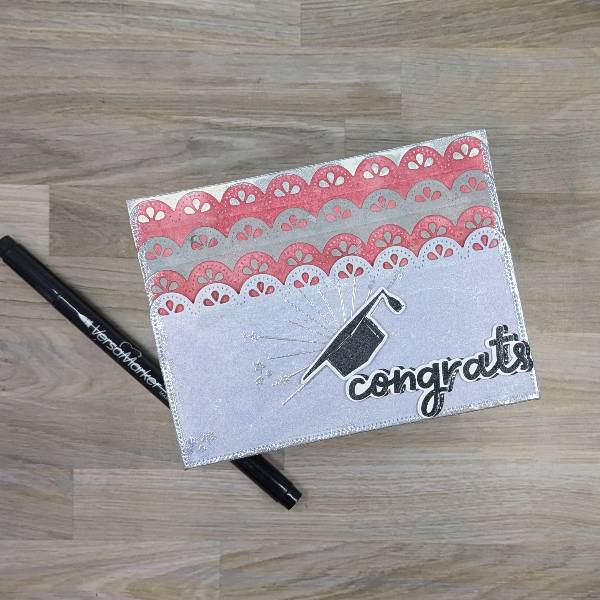
– As a high school teacher, it is time to get ready for graduation! I have lots of seniors and want to say goodbye with a handmade card. This card design allows for a discreet gift card to be tucked into the front and features our school’s colors–maroon and silver.
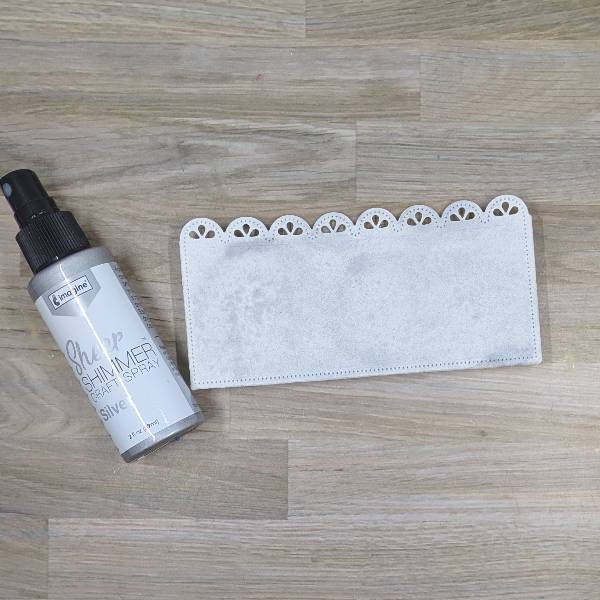
Step 1: Die cut a gift card holder out of watercolor paper and spray with Silver Sheer Shimmer Craft Spray. Allow the spray to dry and then spray a second time to intensify the color. Allow the spray to dry a second time.
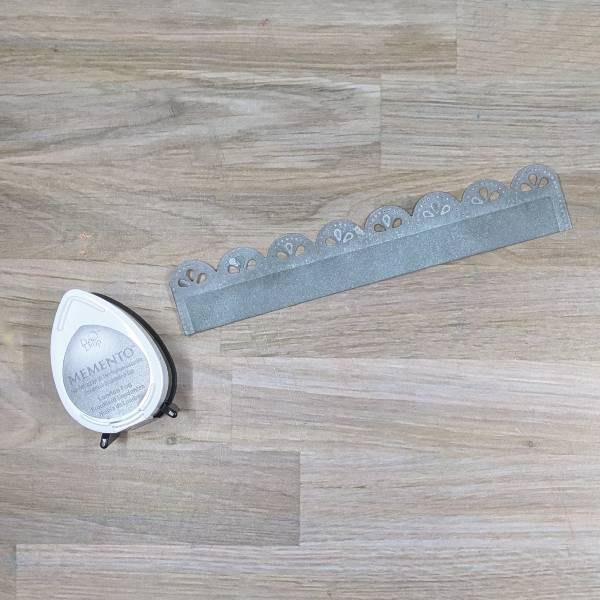
Step 2: Trim another piece of watercolor paper into three strips approximately 1” high by 5.5” long and die cut each of the dies with the top part of the same die cut from step 1. Use a sponge dauber to ink blend one of the strips with London Fog Memento Ink and set aside.
Step 3: Ink blend the two remaining die-cut watercolor strips with Rhubarb Stalk Memento ink with a second sponge dauber.
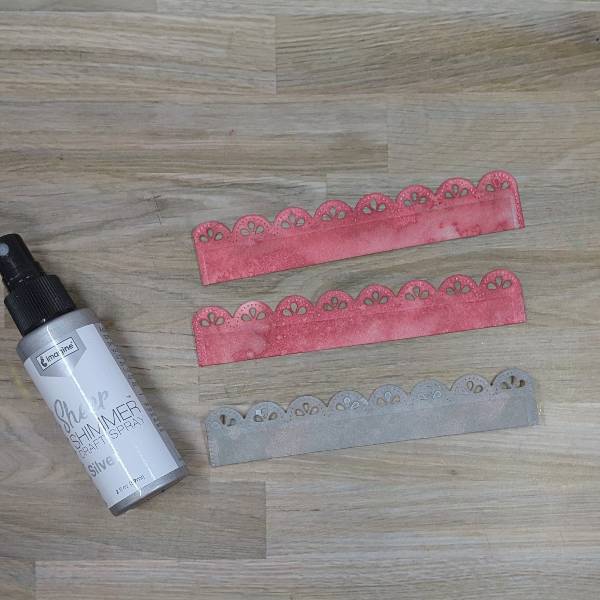
Step 4: Spray all three die cut strips with more of the Silver Sheer Shimmer Craft Spray to add some sparkle. Set the strips aside do dry.
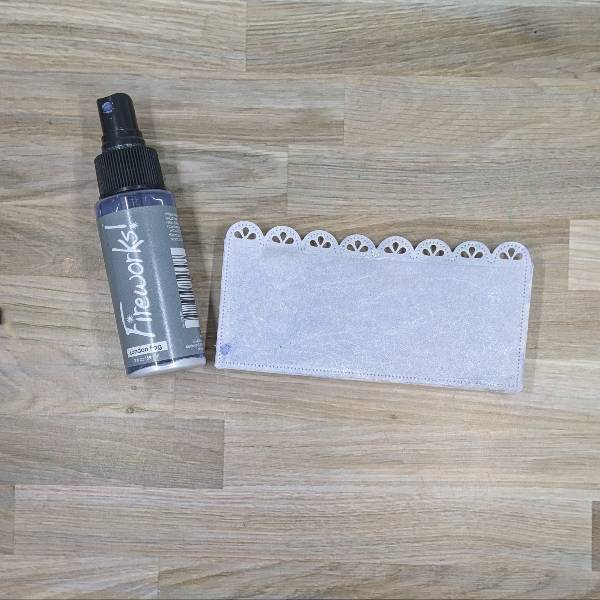
Step 5: Spray the large die cut gift card holder with London Fog Fireworks! Shimmery Craft Spray and set aside to dry.
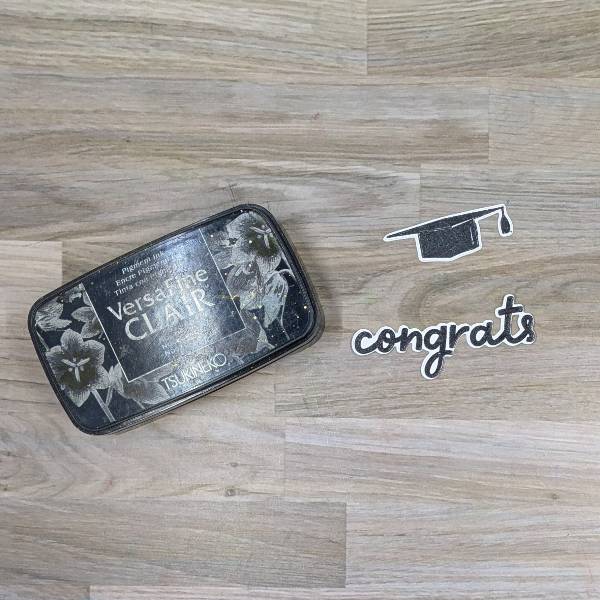
Step 6: Stamp both the sentiment and a graduation cap stamp on watercolor paper with Nocturne VersaFine Clair Ink. Heat emboss both with clear embossing powder and then die cut them with their corresponding dies. While die cutting the sentiment, use the same die to die cut a piece of of black glitter cardstock.
Step 7: Glue the three die cut strips and the gift card holder onto a white card panel (or in my case a watercolor smooshed panel made for another project that used some leftover London Fog Memento Ink mixed with some water), making sure that the top of the gift holder doesn’t get glued onto the card (so it can still be used to hold a gift card).
Then color the edges of the panel with a VersaMarker in order to heat emboss the outside edges with silver embossing powder. Then color some small star stamps on the lower left corner of the card and toward the middle of the card with the same VersaMarker to add more silver embossing powder.
Step 8: Not pictured: Color the rays and stars stamp in the upper center part of the gift card holder with more of the Clear Embossing Powder and then heat emboss it with more silver embossing powder.
Next, attach the stamp die cut over the rays with foam tape. Then offset glue the stamped sentiment die cut so that the black glitter cardstock can be seen peeking out on the right side. Glue the whole thing on the lower right corner of the greeting card.
Step 9: Die cut small stars out of black glitter cardstock and glue them around the stamped rays and the graduation cap. To finish the card, glue the whole card panel onto a white A2-sized card base.
• Altenew – foam tape – Instant Dimension Foam Tape • Emily Moore Designs – die set – Horizontal Pocket Die • Elle’s Studio – stamp and die set – Retired stamp set in my stash (used for the sentiment, stars and rays stamps) • Sizzix – die cut – Christmas Cutouts (retired) • Unity Stamp Co. – stamp and die set – Snarky Graduation Clear Embossing Powder • Silver Embossing Powder • Heat tool • Glue • Watercolor paper • Black glitter cardstock
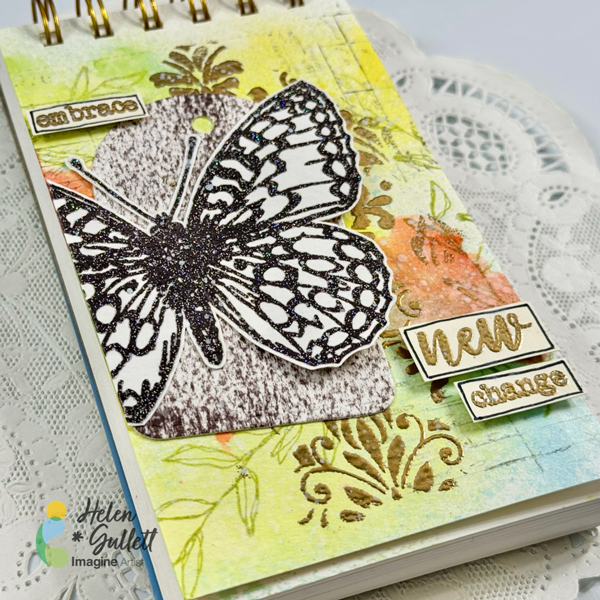
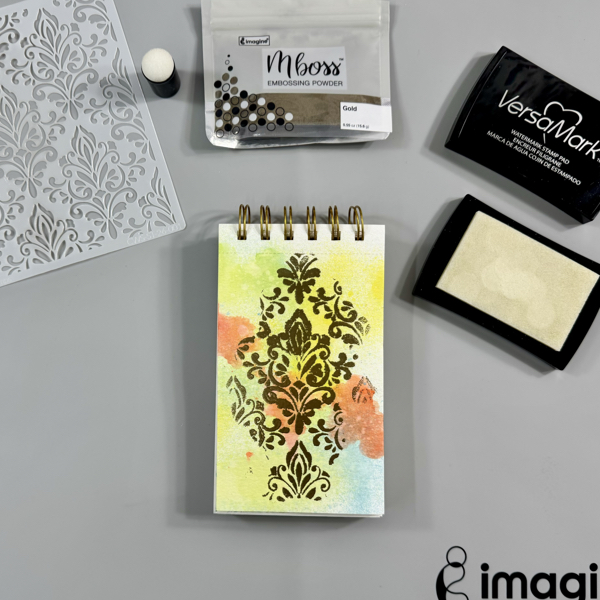
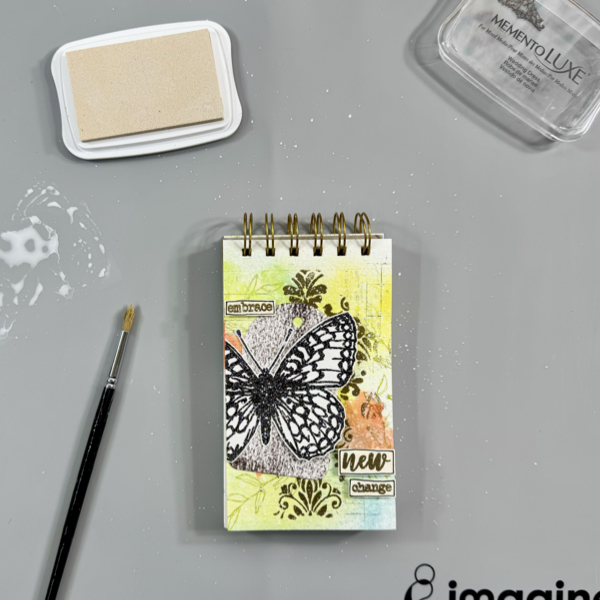
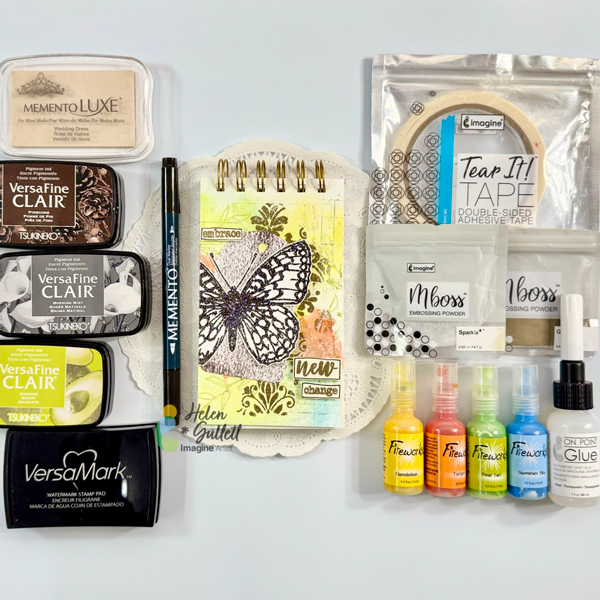
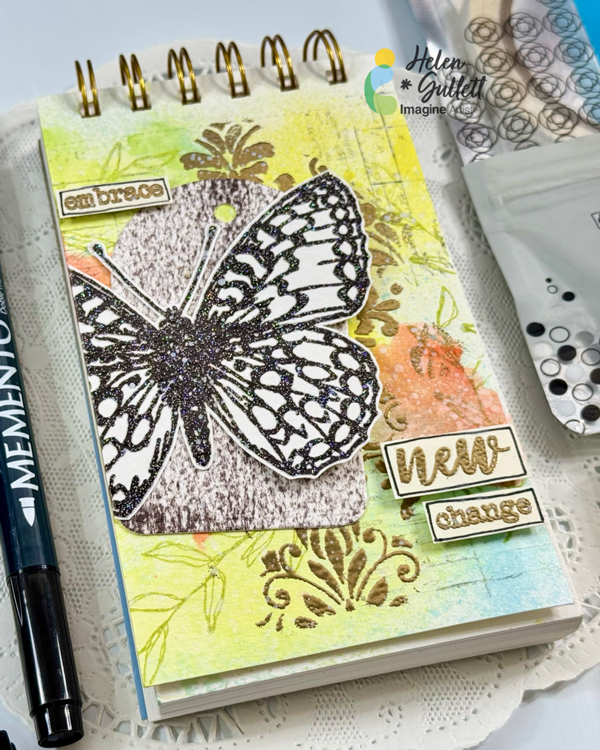
– Hello crafty friends! The new season always brings something new that can surprise us. And new change brings hope, it can be beautiful. Let us embrace it with expectation. Today, we are going to make an art journal together.
Let’s get crafting!
Skill: Intermediate Time: 30-45 Minutes
Direction:
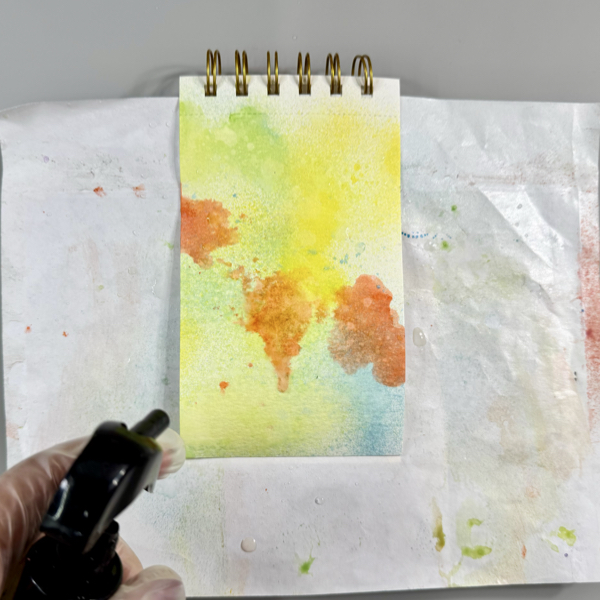
Step 1 First step we are going to build the base watercolor background. Spray randomly each color of the FireWorks! Shimmery Craft Spray.
Step 2 While the spray pains are still kinda wet, spray lightly some water using a sprayer bottle.
Let it sit for a few seconds and then dab off some of the water with a clean dry paper tower. This will create more texture to the background.
Dry the page with a craft heat gun. Make sure the surface is completely dry.
Step 3 Cover the page with some anti-static powder and brush it off the page.
Add the stencil on the page and secure it with a washi tape or low-tack tape.
Add the VersaMark Original ink to the page with finger sponge dauber and remove the stencil off the page.
Add some of the Gold Mboss Embossing Powder and heat set it with a craft heat gun.
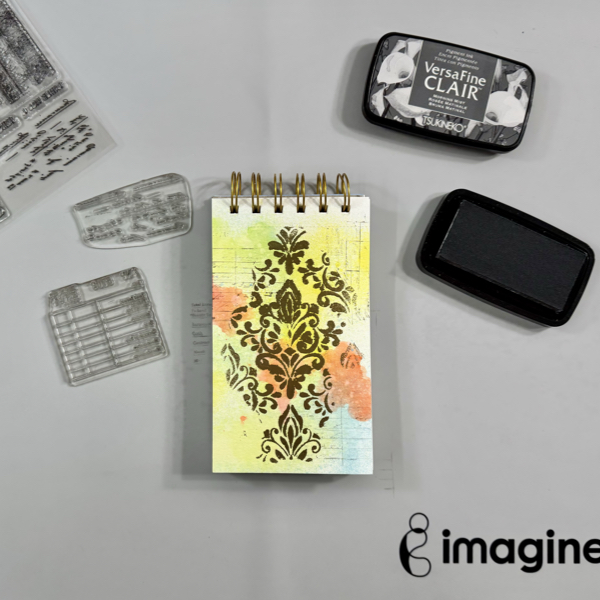
Step 4 Randomly on the page, stamp the ledger pattern stamp with VersaFine Clair Morning Mist ink using second generation stamping technique.
And then using the stamping technique and ink, stamp the script pattern stamp on the page.
Dry the stamped images with a craft heat gun.
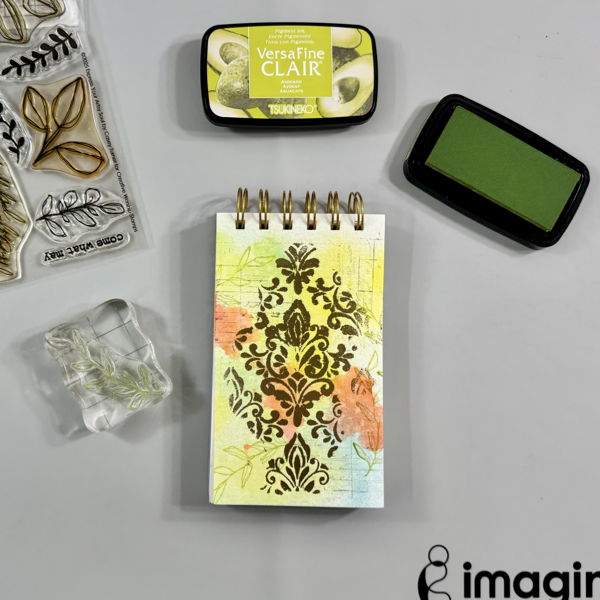
Step 5 Stamp the leaves branch on the page with VersaFine Clair Avocado ink.
Dry the stamped images with a craft heat gun.
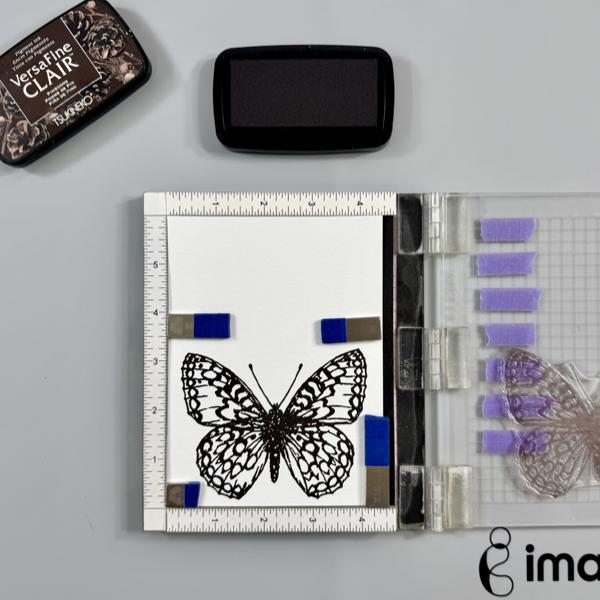
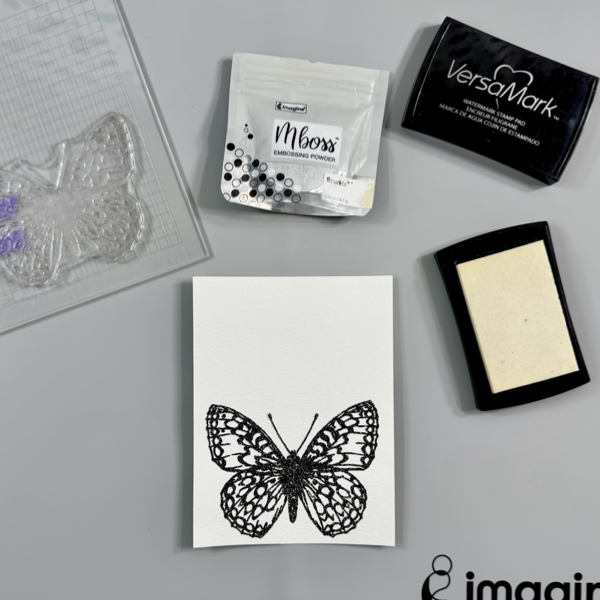
Step 6 Put a piece of white cardstock on the stamping tool and stamp the butterfly stamp with VersaFine Clair Pinecone ink.
Do not remove the stamp and paper.
Clean the ink off the stamp with Staz-On All-Purpose Stamp Cleaner.
Step 7 Stamp the same butterfly stamp with VersaMark Original ink.
Add some of the Sparkle Mboss Embossing Powder to the stamped image and heat set it with a craft heat gun.
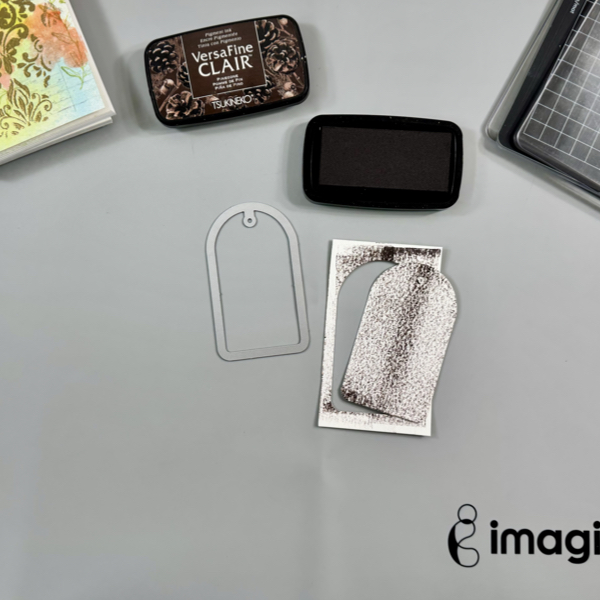
Step 8 On a piece of white cardstock, gently swipe the VersaFine Clair Pinecone across the cardstock.
Dry the ink with a craft heat gun.
Cut it with one of the Stitched Tag dies.
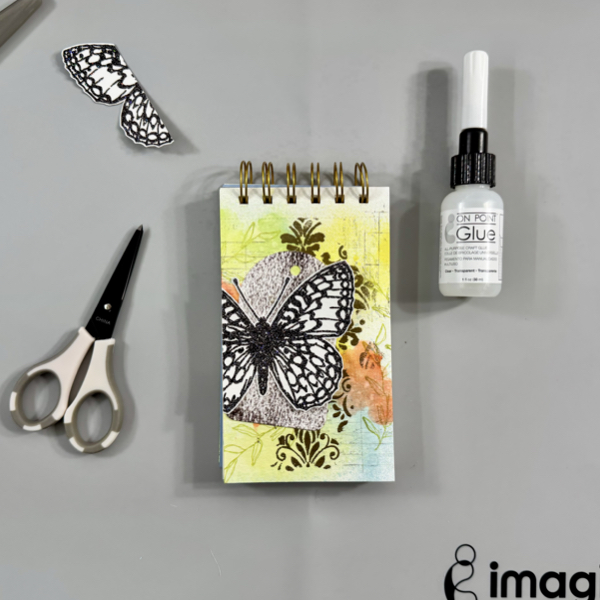
Step 9 Add the tag to the page with On Point Glue.
Put the butterfly slightly off the page, and then glue the center of the butterfly with some of the On Point Glue. Leave the wings loose.
Cut the extra wing off the page with micro-tips scissors.
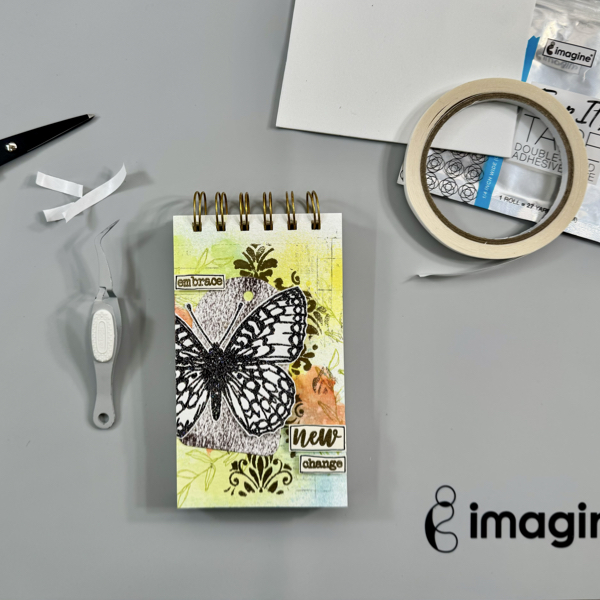
Step 10 Stamp the words on a piece of ivory cardstock with VersaMark Original ink.
Add some of the Gold Mboss Ebossing Powder and then heat set it with a craft heat gun.
Cut them with micro-tip scissors.
Draw lines around the word with Memento Marker Rich Cocoa.
Step 11 Add some of the Tear It! Double Sided Tape to 3D fun foam to create your own 3D foam tape.
Add some of the foam tape to each word and add them to the page.
Add some of the foam tape under the wings also to give them a 3D effect.
Step 12 Dab some of the Memento Luxe Wedding Dress ink on the craft mat and spray it with some water.
Pick up the ink with a small round brush, and add some splatters to the page.
Dry the whole page one more time with a craft heat gun.
This mini mixed media art journal page is done. It has a combination of the shimmery background, sparkly butterfly, and shiny gold metallic embossed texture and sentiment.
I hope you like the page and give this tutorial a try. Thanks so much for stopping by our blog today.
– For teachers, April and May are PACKED!! At this time of the year, it is hard for me to find the time to make elaborate cards, but I want to still be able to sit down and make a card in one sitting. So I turn to techniques that allow me to create something that are quick and easy but also are something to be proud of. This card features one of my go-tos for a quick but pretty card: the blackout technique.
Skill: Intermediate Time: less than 1 hour
Directions:
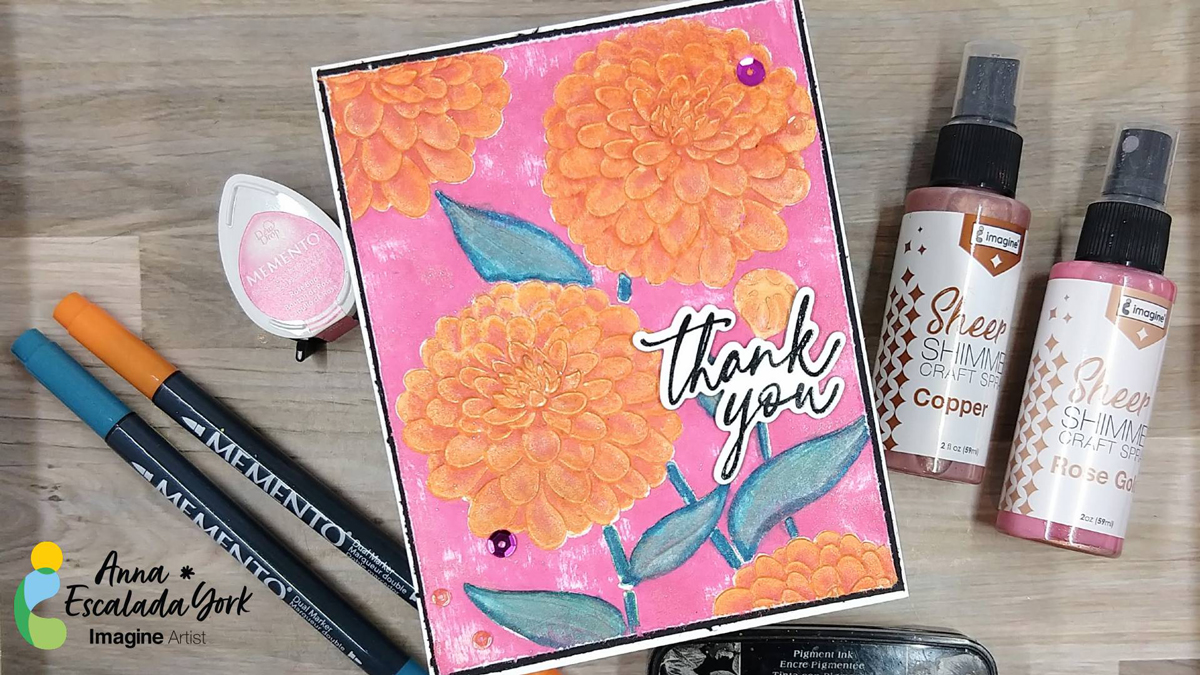
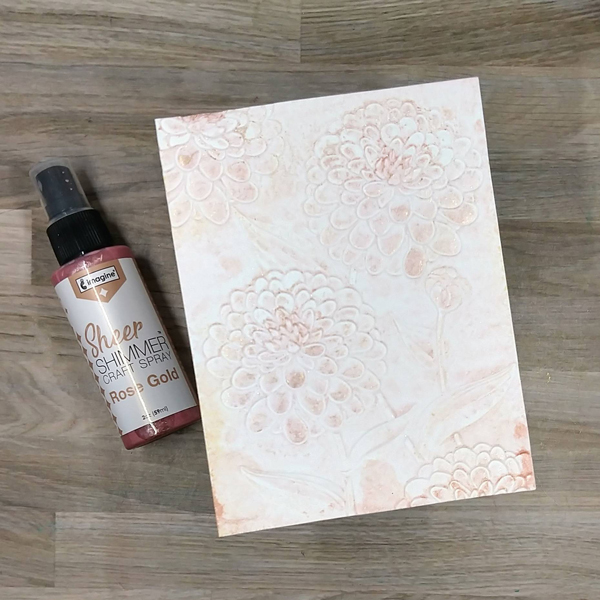
Step 1: Use a paper trimmer to cut a piece of watercolor paper to be 5.5” x 4.25” (the size of an A2-sized card). Then spray one side a floral embossing folder with Rose Gold Shimmer Craft Spray and run the watercolor panel through the die cutting machine sandwiched between the two sides of the embossing folder. You will be using the debossed (indented) side of the embossed panel. Allow to dry.
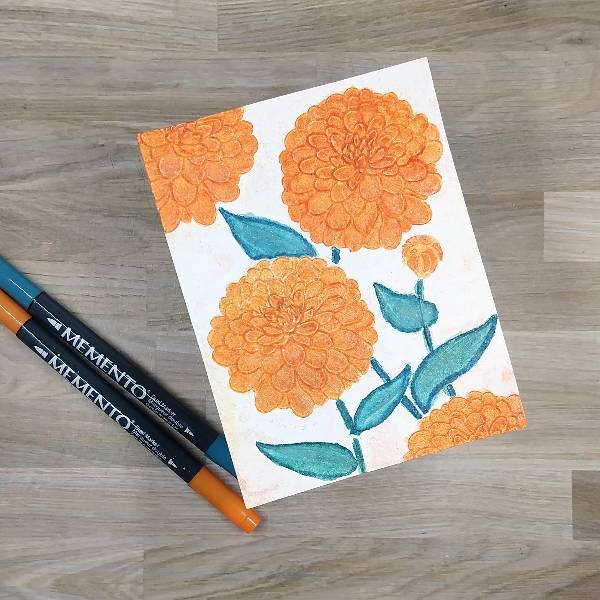
Step 2: Color the flowers with Tangelo Memento Dual Marker. Color the edges of the leaves and the stems with Teal Zeal Memento Dual Marker. Then watercolor over all parts of the leaves and the stems with Teal Zeal Memento Dual Marker mixed with water. Allow the water to dry and repeat the process a few times to help add depth to the centers of the leaves.
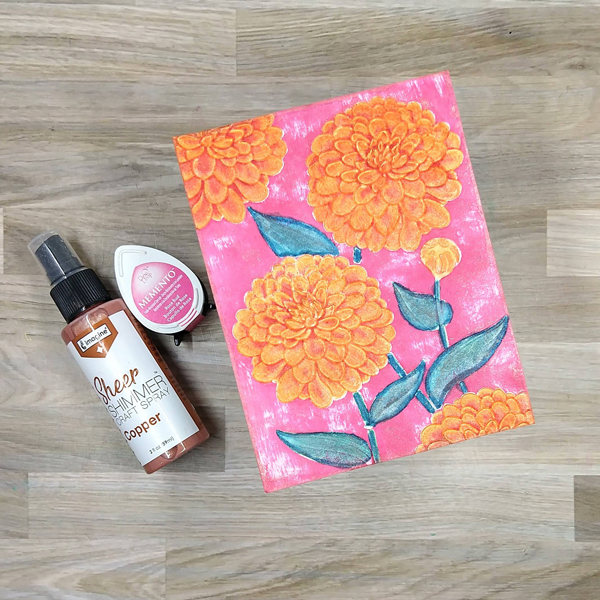
Step 3: Gently run the Rose Bud Memento ink pad across the card. Because the flowers are indented, they will mostly not be colored with the ink, but the flat parts of the card will be. I liked that some of the areas were not colored with the ink but additional passes of the ink pad can give consistent, universal coverage.
Spray Copper Sheer Shimmer Craft Spray onto a piece of acetate and watercolor smoosh the panel to add a little more sparkle. Lightly brush more of the copper spray on the leaves and allow the whole thing to dry.
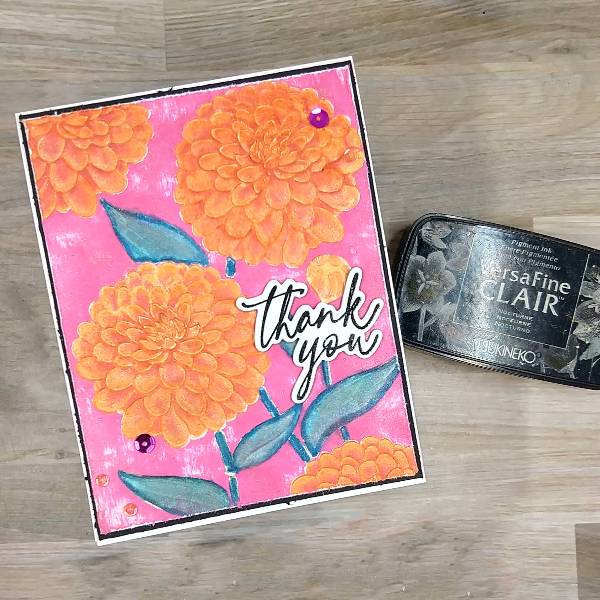
Step 4: Stamp the sentiment with Nocturne VersaFine Clair Ink and heat emboss with clear embossing powder. Then die cut the sentiment with the corresponding die. Use the die cut to die cut two additional layers of scrap cardstock and glue them behind the sentiment die cut for dimension.
Glue the sentiment onto the embossed card panel.
Trim the edges of the embossed card panel and distress the edges with a pair of scissors. Trim a piece of black cardstock a little bit bigger than the pink embossed panel and glue the two layers together. Glue pink and orange sequins on the upper right and lower left corners of the card panel. To finish the card, glue the whole card panel onto a white A2-sized card base.
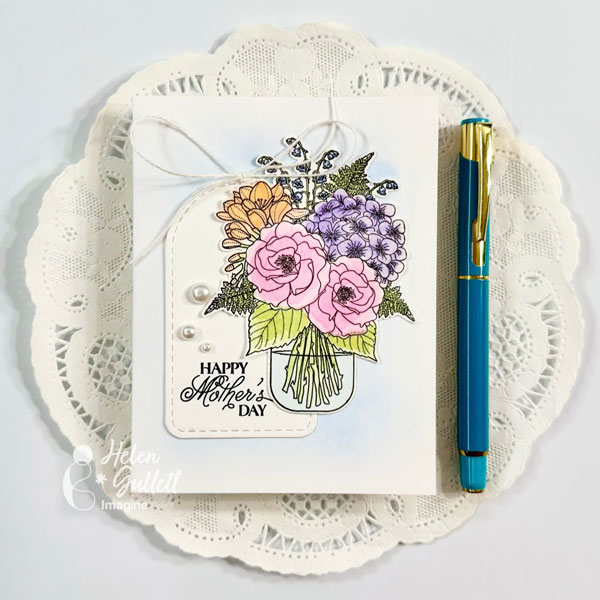
– Hello crafty friends! The special day to celebrate our mothers is here. We can celebrate them and show them love in many ways. But today, we are going to make a clean-and-simple handmade card for someone who has been a mother in our life.
Let’s get crafting!
Skill: Intermediate Time: 15-20 Minutes
Direction:
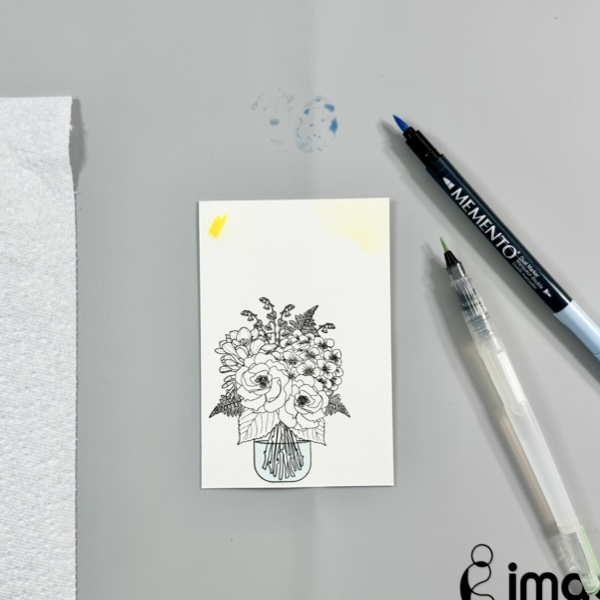
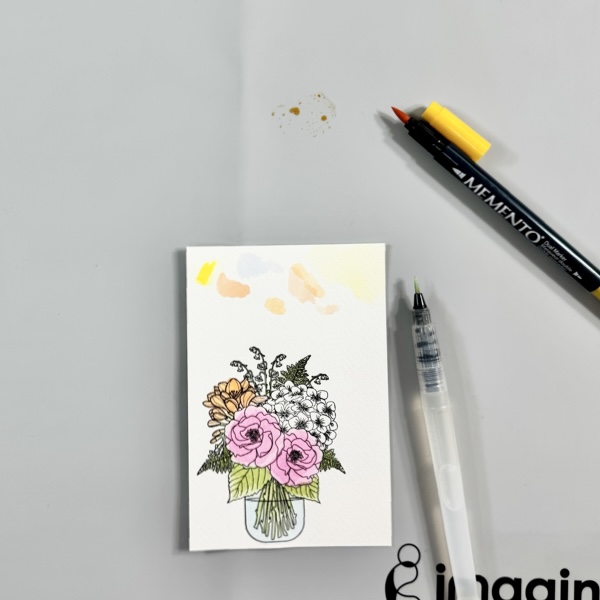
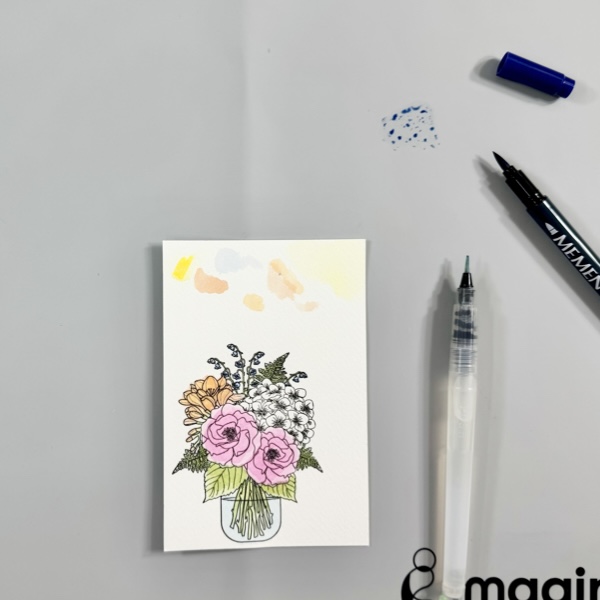
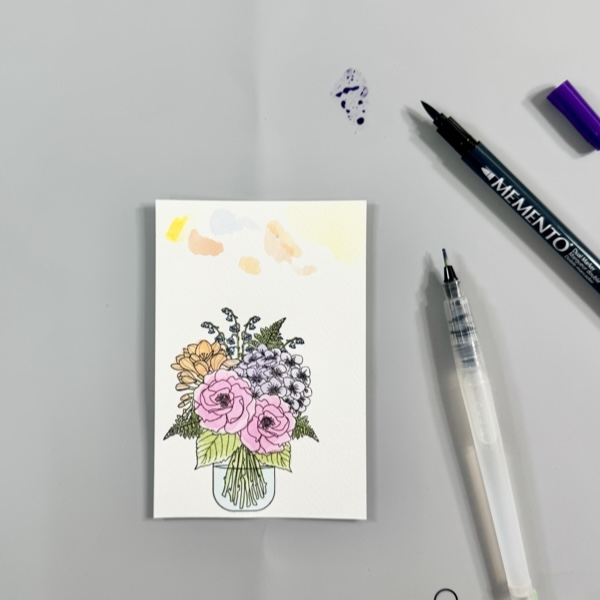
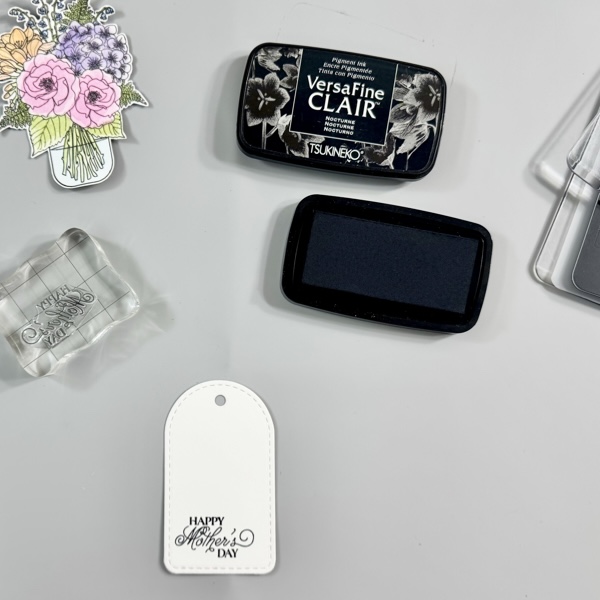
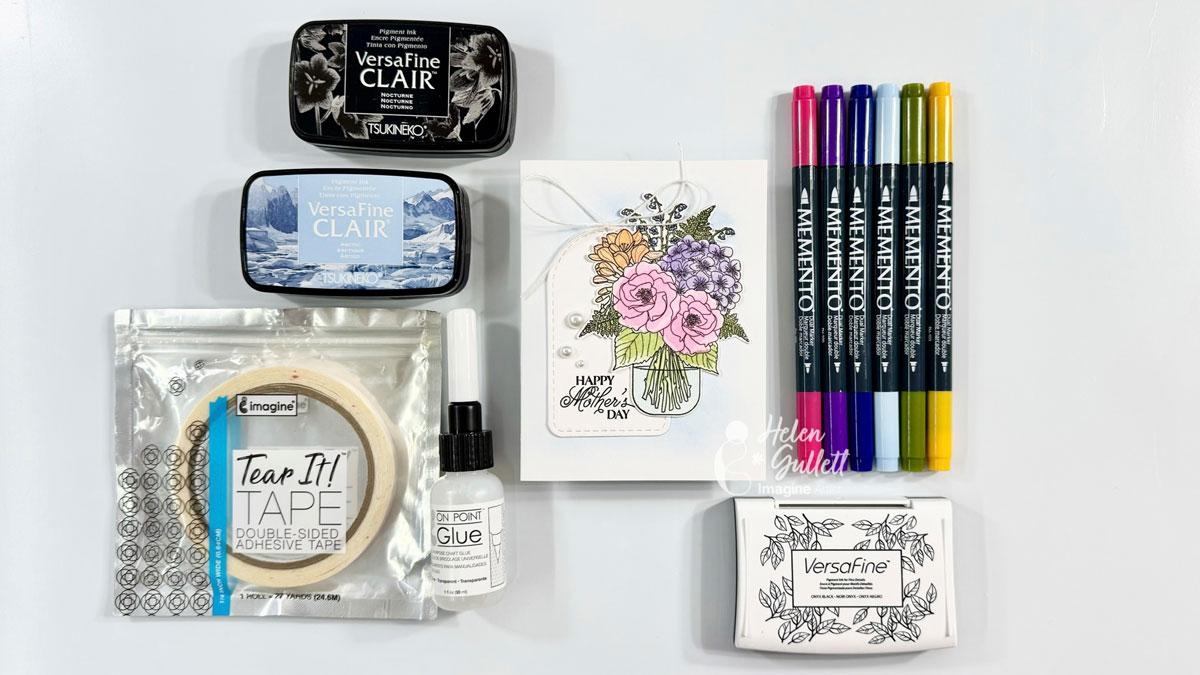
Step 1 Cut out a piece of watercolor cardstock into 4×6 inch and put it on the stamping tool. Stamp the mason jar bouquet image with VersaFine Onyx Black ink.
Step 2 Scribble some of the Memento Marker Summer Sky on the craft mat. Pick up ink with a wet waterbrush and start painting the water in the jar. Dry the paint in between to build up the layer of colors and shadow.
I used a waterbrush that can easily squish some water out to the brush, but you also can use any small round watercolor brush and clean water. Always have a piece of clean paper towel nearby to dab off too much water.
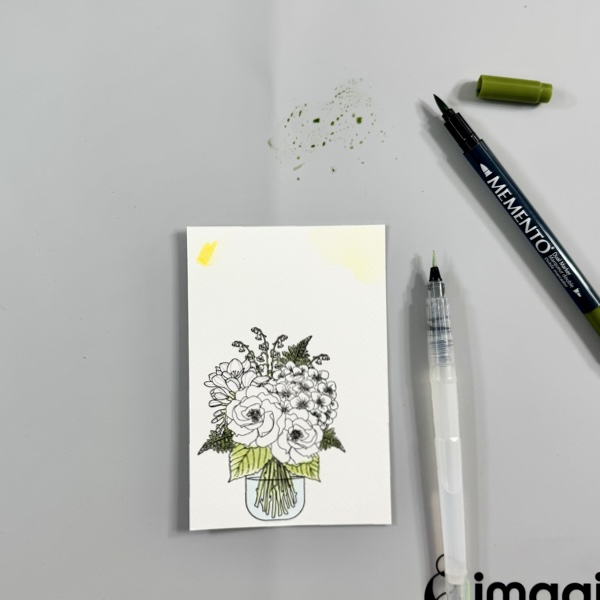
Step 3 Scribble some of the Memento Marker Bamboo Leaves on the craft mat. Pick up ink with a wet waterbrush and start painting the water in the jar. Dry the paint in between to build up the layer of colors and shadow.
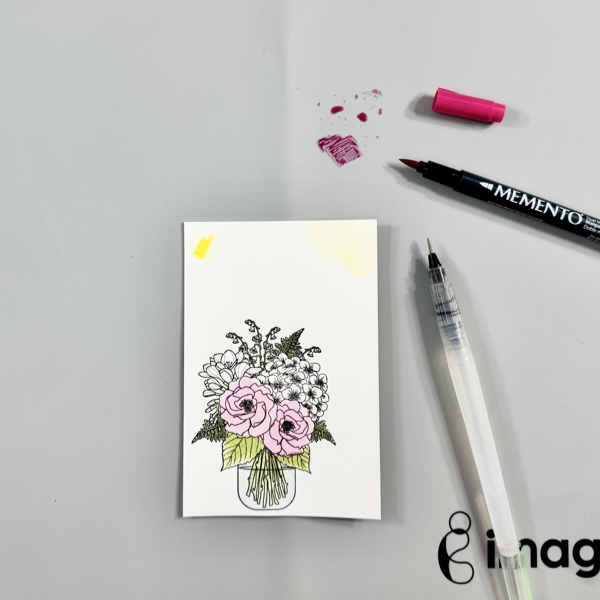
Step 4 Scribble some of the Memento Marker Rose Bud on the craft mat. Pick up ink with a wet waterbrush and start painting the water in the jar. Dry the paint in between to build up the layer of colors and shadow.
Step 5 Scribble some of the Memento Marker Cantaloupe on the craft mat. Pick up ink with a wet waterbrush and start painting the water in the jar. Dry the paint in between to build up the layer of colors and shadow.
Step 6 Scribble some of the Memento Marker Paris Dusk on the craft mat. Pick up ink with a wet waterbrush and start painting the water in the jar. Dry the paint in between to build up the layer of colors and shadow.
Step 7 Scribble some of the Memento Marker Grape Jelly on the craft mat. Pick up ink with a wet waterbrush and start painting the water in the jar. Dry the paint in between to build up the layer of colors and shadow.
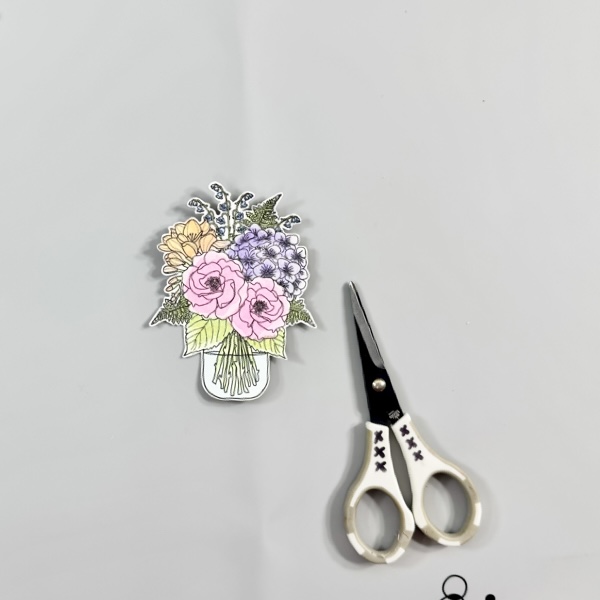
Step 8 Dry the whole watercolored image well with a craft heat gun. Fussy cut the image using the micro-tip scissors.
Step 9 Cut out a piece of white cardstock with one of the Stitched Tag dies. Stamp the sentiment on the tag with VersaFine Clair Nocturne ink. Dry the stamped sentiment with a craft heat gun.
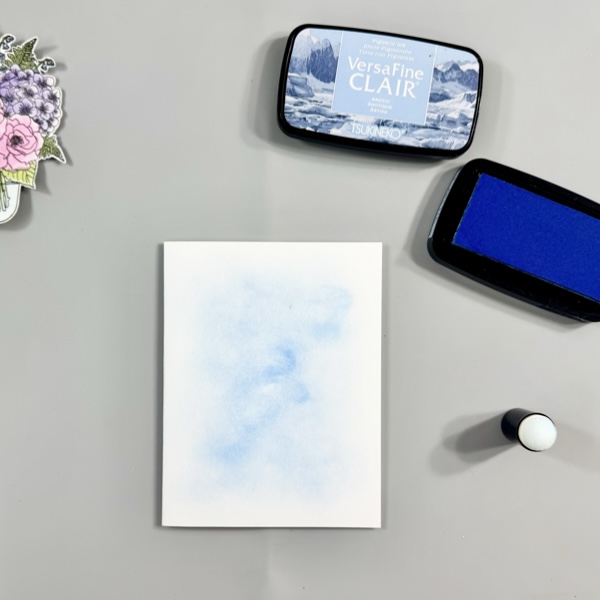
Step 10 Add some of the VersaFine Clair Arctic ink on the front card base with finger sponge dauber. Dry the ink with a craft heat gun.
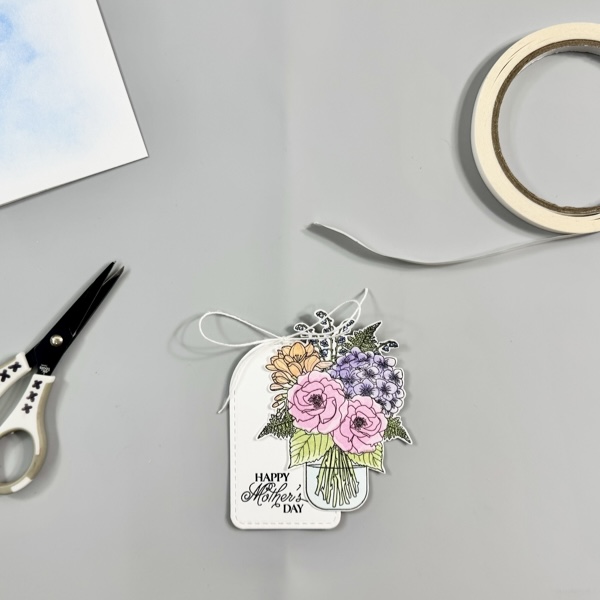
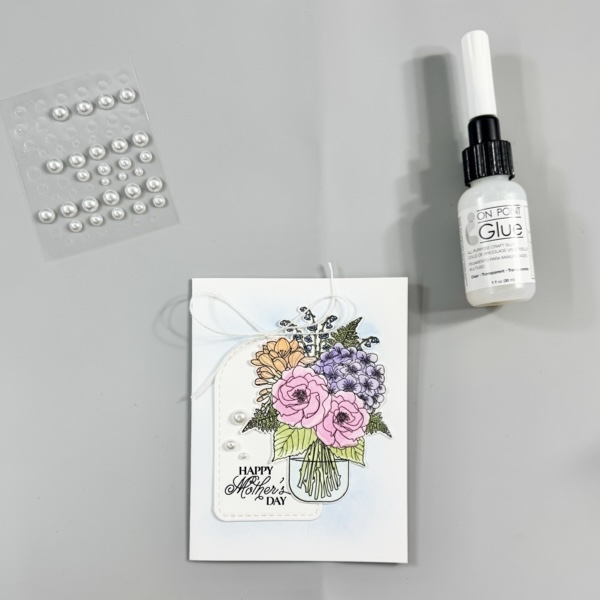
Step 11 Put some of the Tear It! Double-sided Tape on the back of the mason jar and add it to the tag. Tie up some of the white twine on the tag.
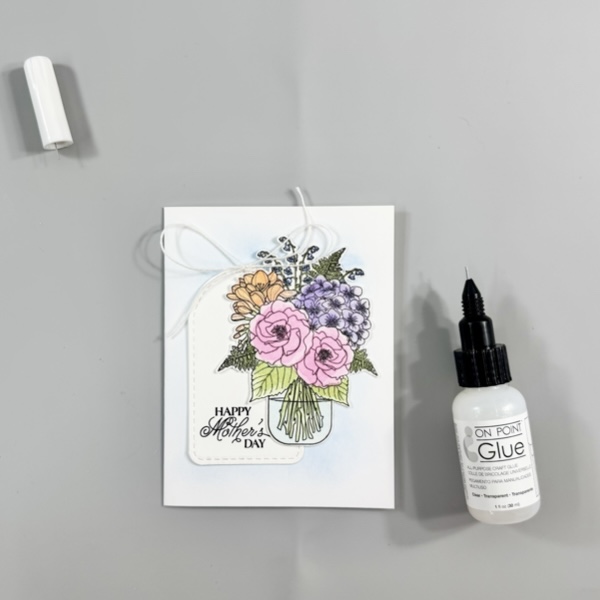
Step 12 Add the mason jar bouquet tag to the card with some of the On Point Glue.
Step 13 Embellish the card with some of the pearl gems.
This clean-and-simple Mother’s Day card may look simple yet it has layers but it is not bulky so it is perfect to be sent out to someone who has been a mother to you on this special time.
I hope you like this card and give this tutorial a try. Thanks so much for stopping by our blog today. Have a wonderful day!
Craft Supplies
Imagine Crafts:
Memento Marker (Cantaloupe, Bamboo Leaves, Summer Sky, Paris Dusk, Grape Jelly, Rose Bud)