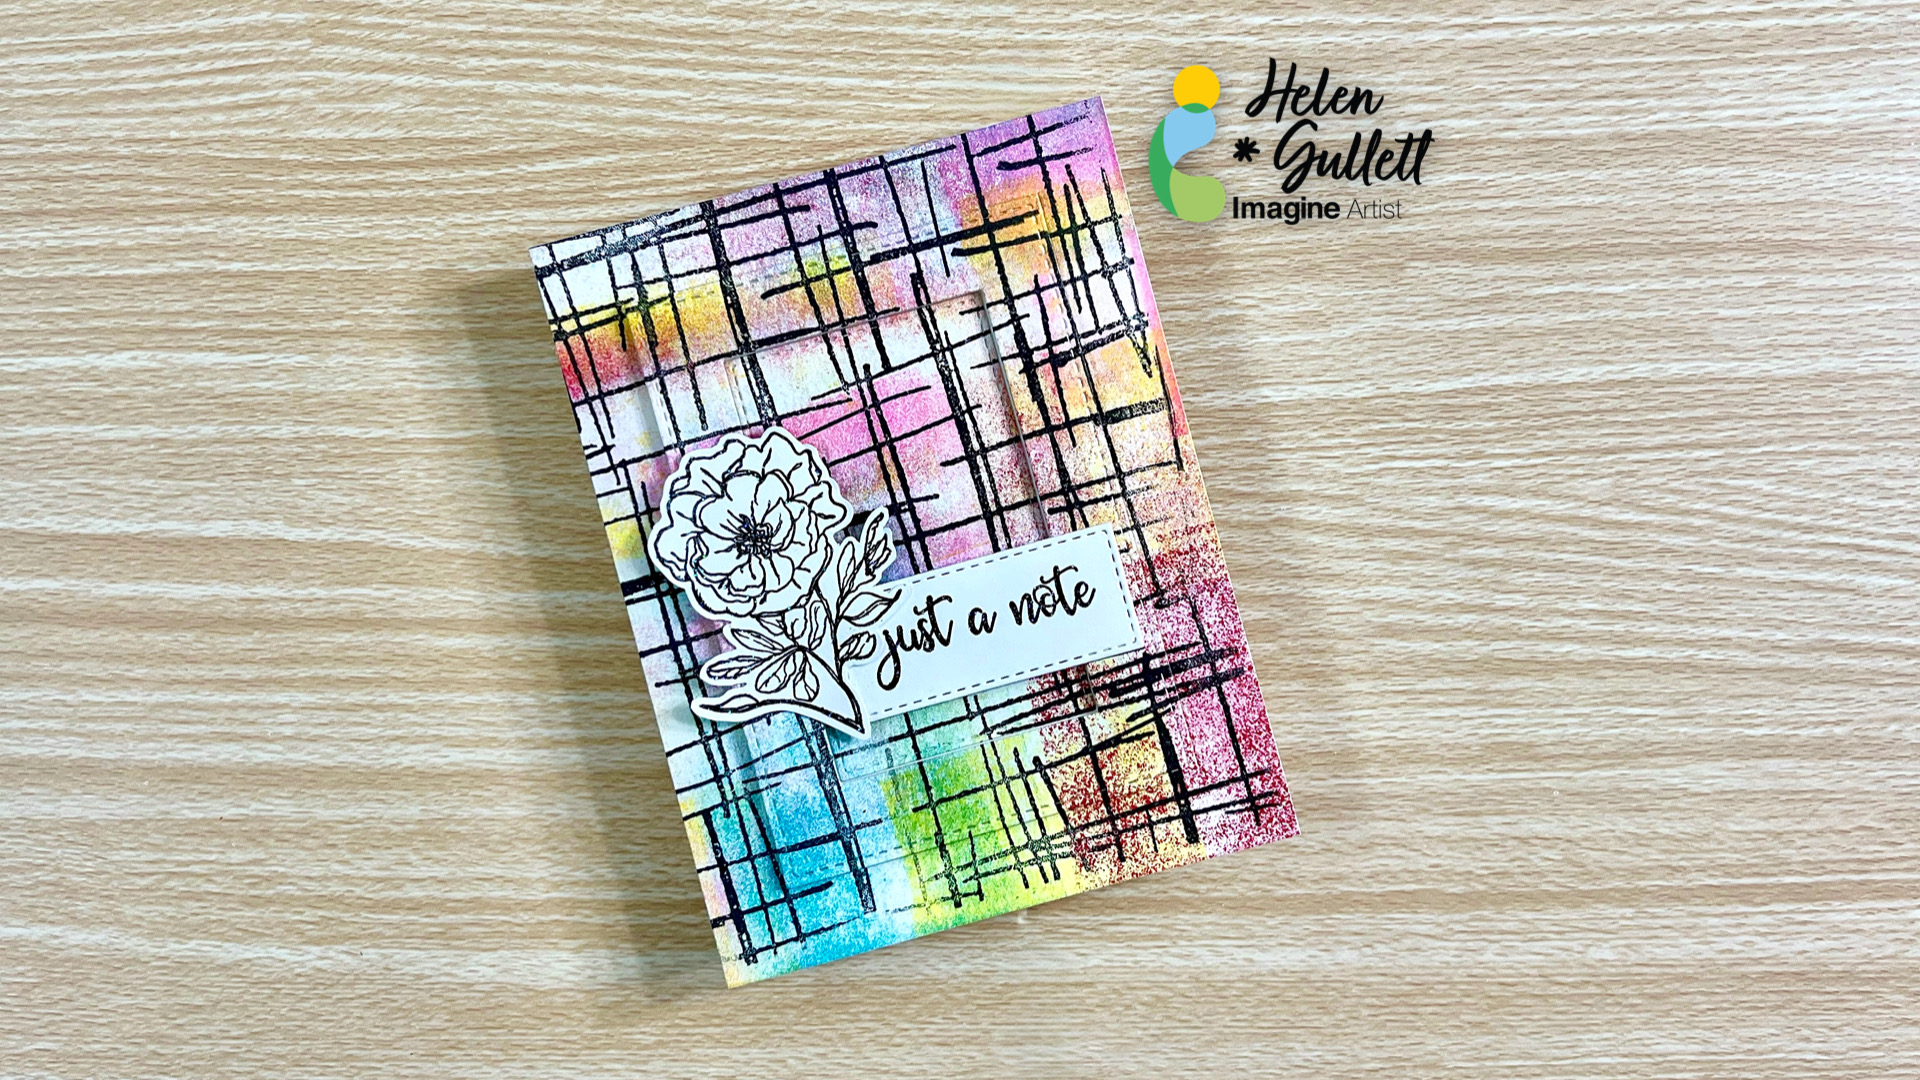
Hello hello hello crafty friends! Today, I have this Funky Card to share with you. Creating that funky background is super fun and easy. I totally had fun with some of the VersaColor ink pads!
Skill: Intermediate Time: 30 minutes
Direction:
Step 1 We will work on a whole piece of 8.5 inch x 11 inch heavyweight white cardstock. Pick 3 or 4 colors you want to use. Make sure the choice of colors won’t muddle when you mix them together.
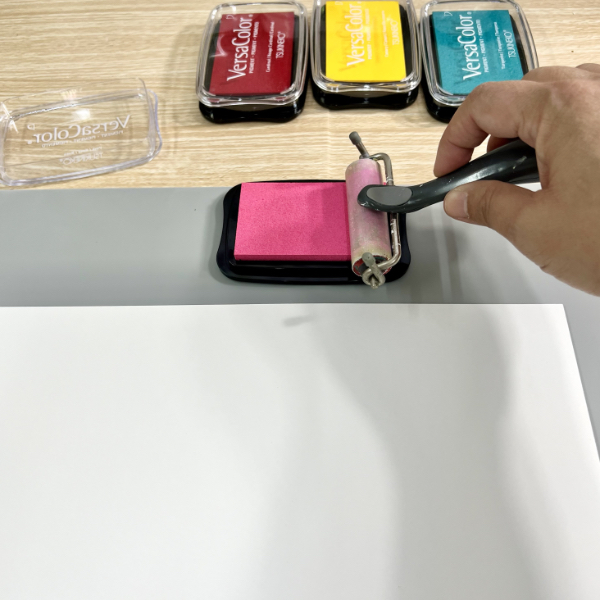
Roll the mini brayer directly on the VersaColor ink pad several times.
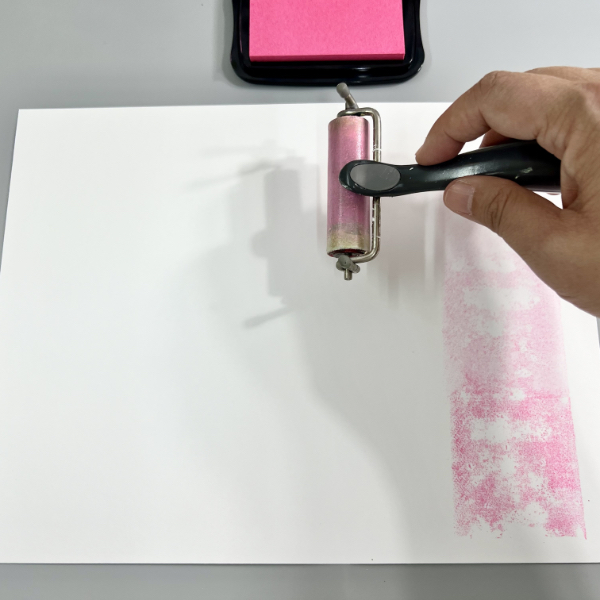
Step 2 Roll the inked mini brayer on the white cardstock in any direction you want vertically and horizontally.
Do the step 1 and step 2 several times for each color you want to use for your background.
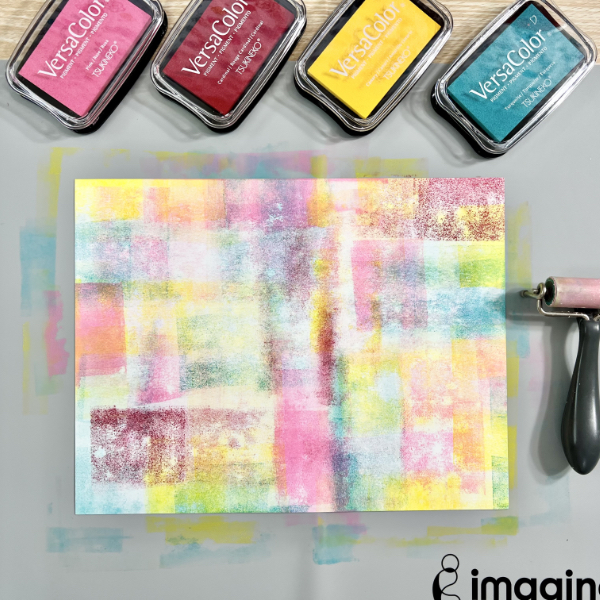
Step 3 After several times adding inks on the cardstock with a mini brayer, you can add more layer on top of the first one you did, or you can fill in the space as you want.
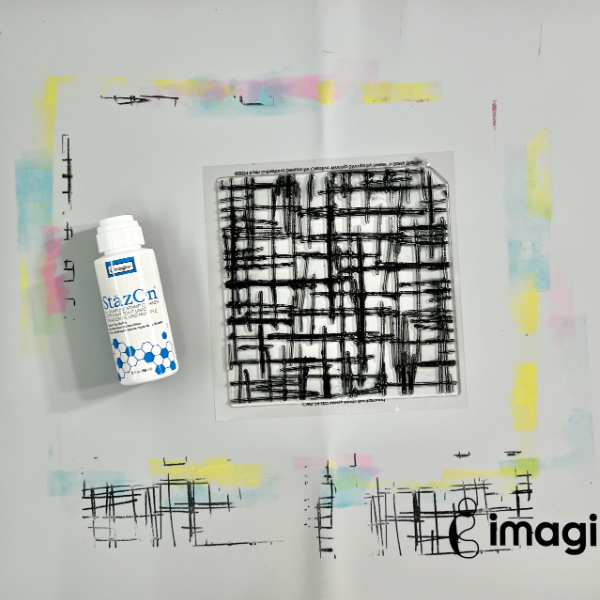
Use the Staz-On All-Purpose Stamp Cleaner and paper towel to clean the brayer.
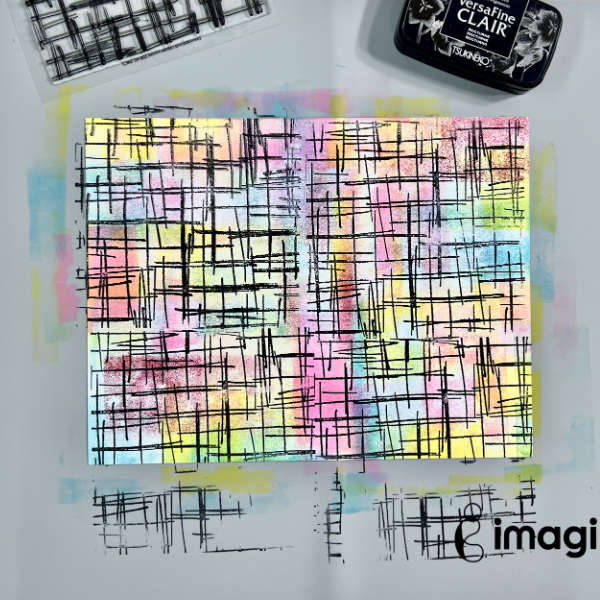
Step 4 Next, pick a funky pattern background stamp to add texture on the inked cardstock. Stamp the background stamp on it with VersaFine Clair Nocturne Ink Pad for contrast colors.
Step 5 Stamp it several times until you fill the whole cardstock. This will look very funky and messy but don’t worry you’ll find it will be fun to use it on project later.
Step 6 After adding ink colors with mini brayer and stamping, the craft mat will look like in the picture above. Don’t panic! The inks will clean right off the mat with that amazing Staz-On All-Purpose Stamp Cleaner. Simply dab some of the cleaner on the mat and use paper towel to clean all the inks off. Repeat as needed.
Use the stamp cleaner also to clean ink off the background stamp, too.
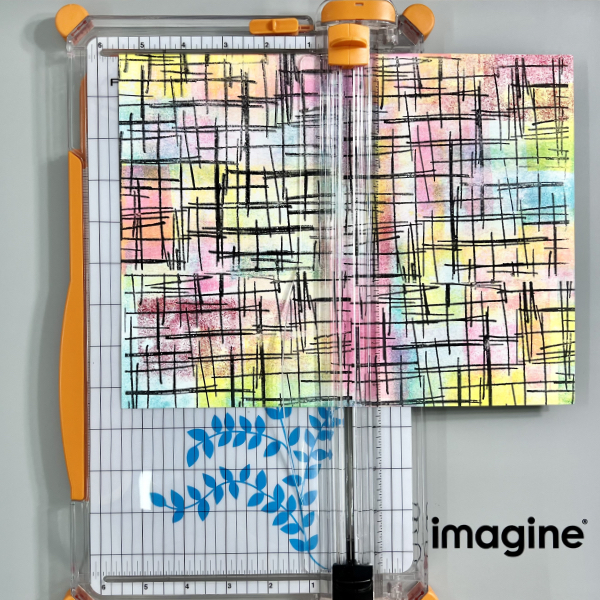
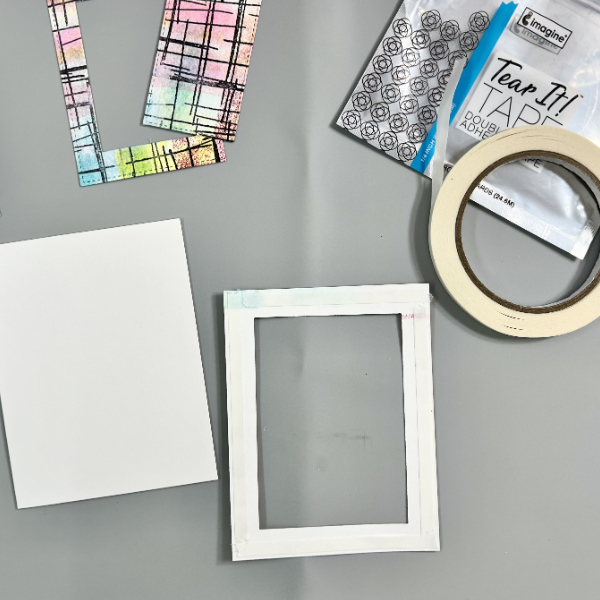
Step 7 Next step, use the paper trimmer to trim cardstock into 4 – 4 ¼ inch x 5 ½ inch background panels.
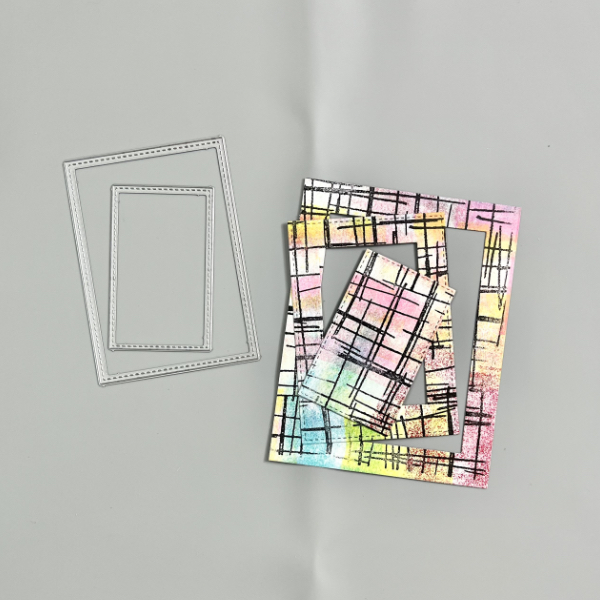
Step 8 Cut one of the background panels using 2 sizes of rectangle dies.
Step 9 Add some of the Tear It! Tape on the back of the largest frame. Peel off the backing and add the frame to an A4 card base (4 ¼ inch x 5 ½ inch card).
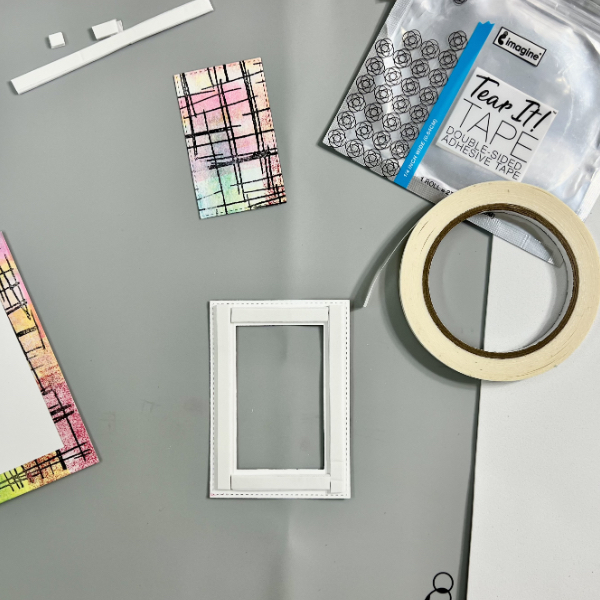
Step 10 Add some of the Tear It! Tape on thin fun foam to create some thin strips of 3D foam tape.
Add the foam tape on the second frame (the middle cut out), and add it to the card. Make sure the pattern matching with the first one on the card.
Final step for the background, add the last piece of the cut out in the middle of the card just with the Tear It! Tape.
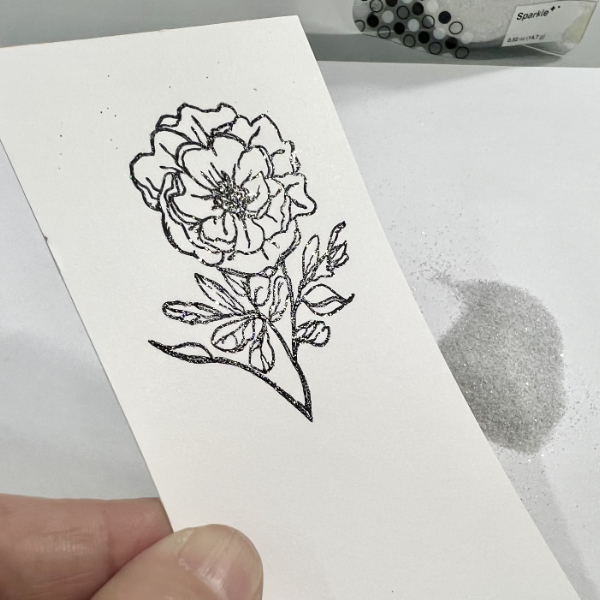
Step 11 Stamp the flower on a piece of white cardstock with VersaFine Clair Nocturne Ink Pad using stamping tool or acrylic block.
Step 12 Add some of the Sparkle Mboss Embossing Powder directly on the stamped image and heat it up with a craft heat gun. After embossing it, fussy cut the flower with micro-tip scissors (or use the matching die set if available for your stamp).
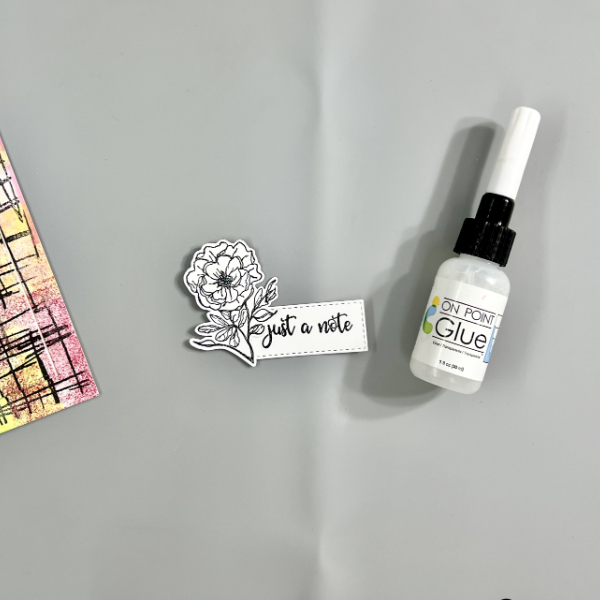
Repeat step 11 and step 12 for the sentiment. And then cut the sentiment with a label die (or you can just trim it with paper trimmer).
Step 13 Put together the flower and sentiment label with On Point Glue. Put a couple acrylic blocks on them and let the glue to dry.
After that, add them to the card with some of the fun foam in the middle and secure the edge on the raised frame with On Point Glue.
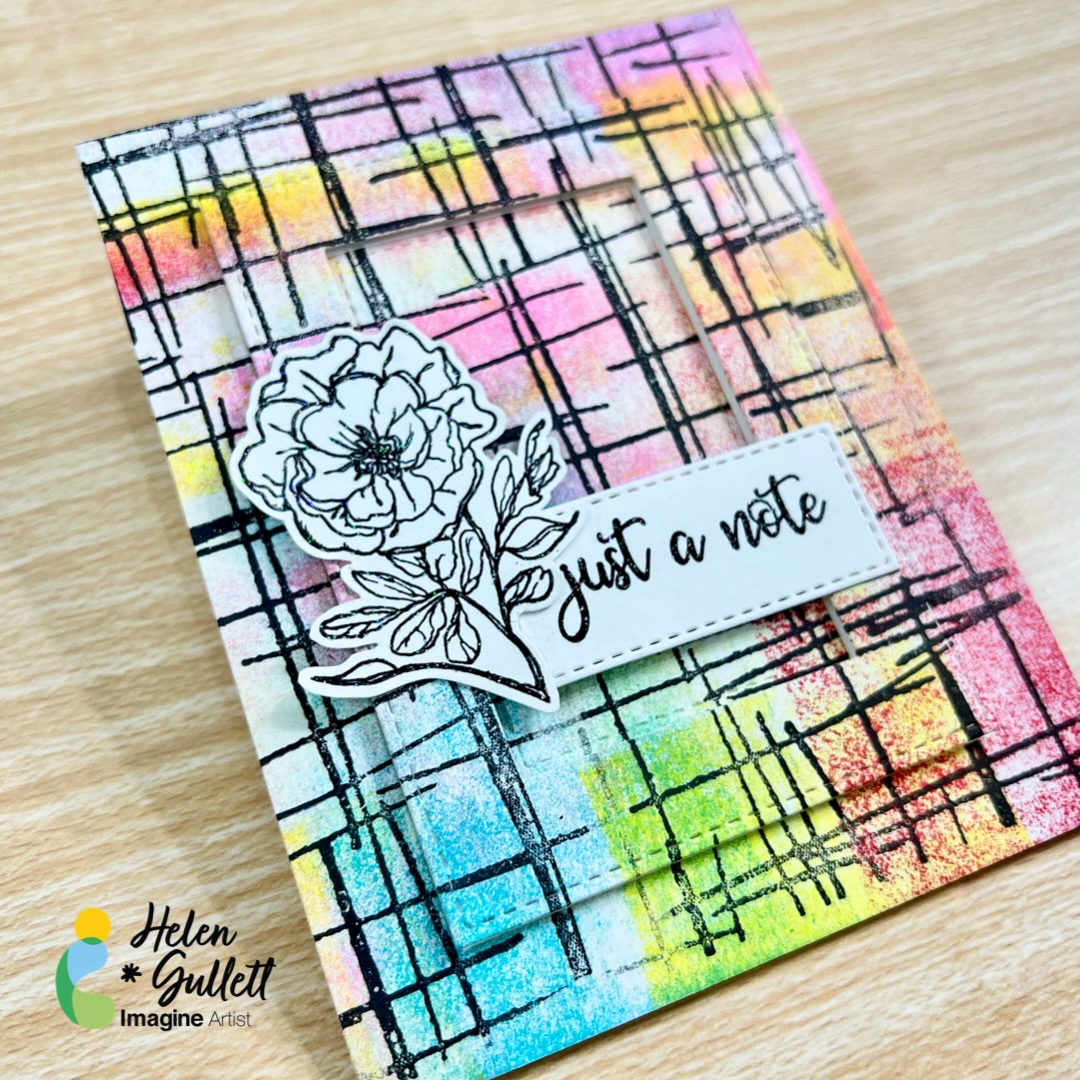
Here’s the finish card with some funky patterns and dimensions. Isn’t it fun? I hope you will give it a try and have fun creating your own funky background card.
Thank you so much for stopping by our blog today. Have a wonderful day!
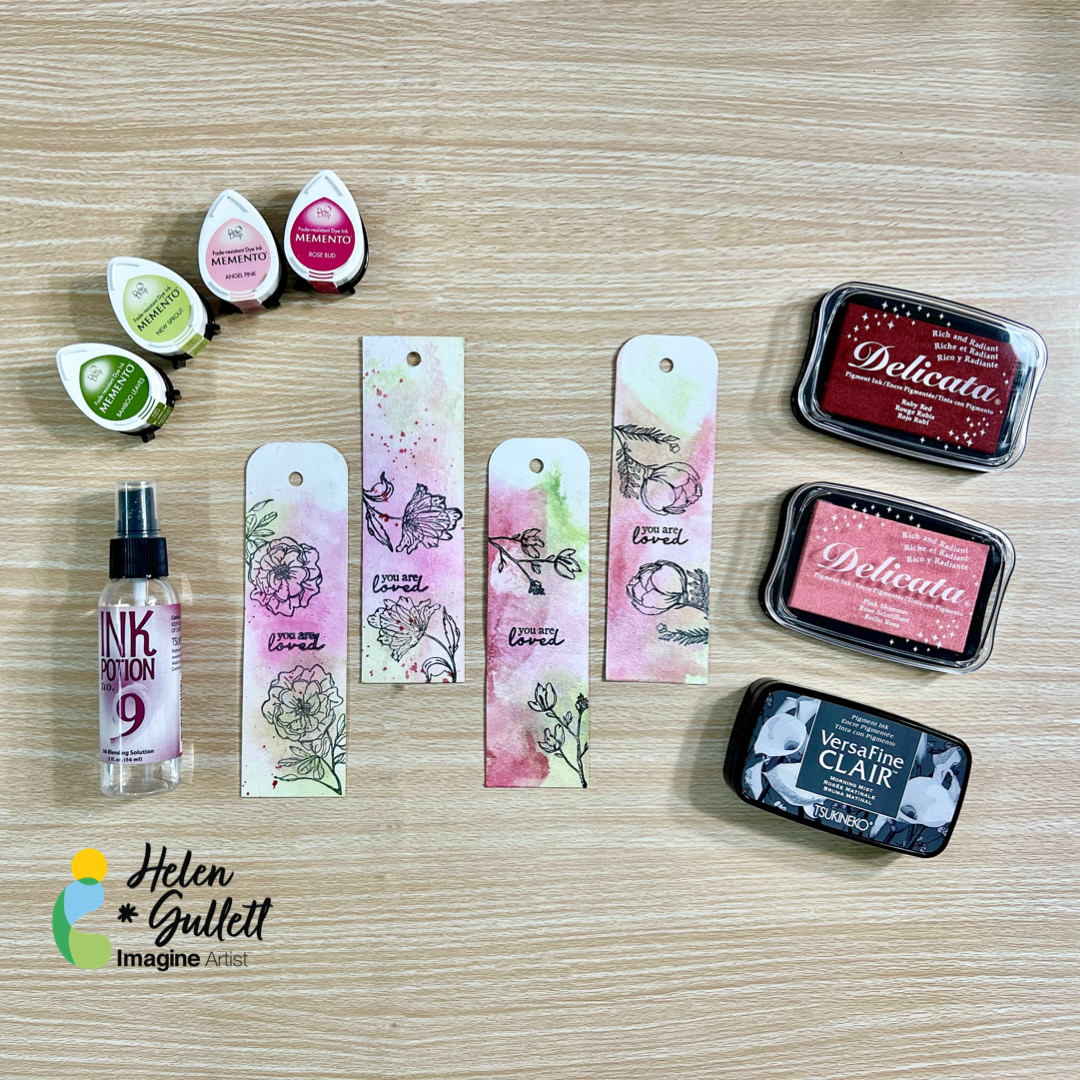
Hello crafty friends! Today, I want to share with you how to make these Spring themed bookmarks, using Imagine Crafts products and simple crafting tools. These bookmarks are a great gift for book lovers, or donating to your local library, or even just for you to use personally. You can make a batch of them in a short time!
Skill: Beginner Time: 15-30 minutes
Directions:
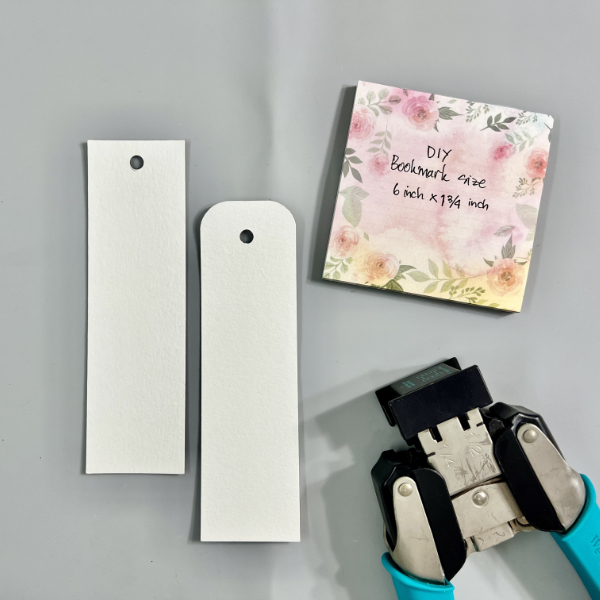
Step 1 I find that Canson Watercolor Paper 140lb is the best to make bookmarks. They are not only thick and sturdy, but also you can use any craft techniques with this paper – either simply stamping, or watercoloring, or even mixed media.
Cut a piece of watercolor paper into 6 inch x 1 ¾ inch size. One piece of this 9 x 12 watercolor paper, you can get 10 bookmarks.
You can leave it as a rectangle or you can round the corner with the corner rounder punch. Next, use a ¼ inch hole punch to punch a hole at the center top of the bookmark for ribbon or teasel.
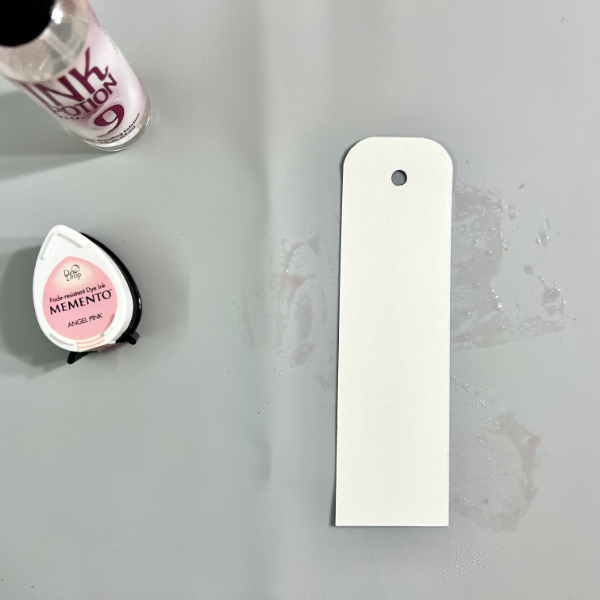
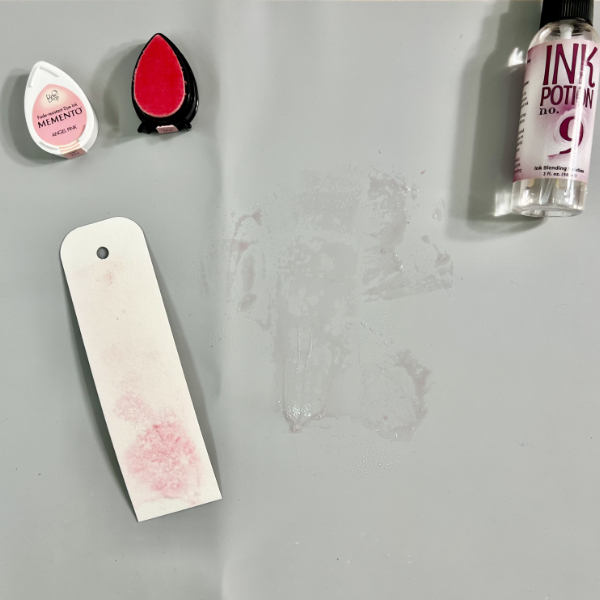
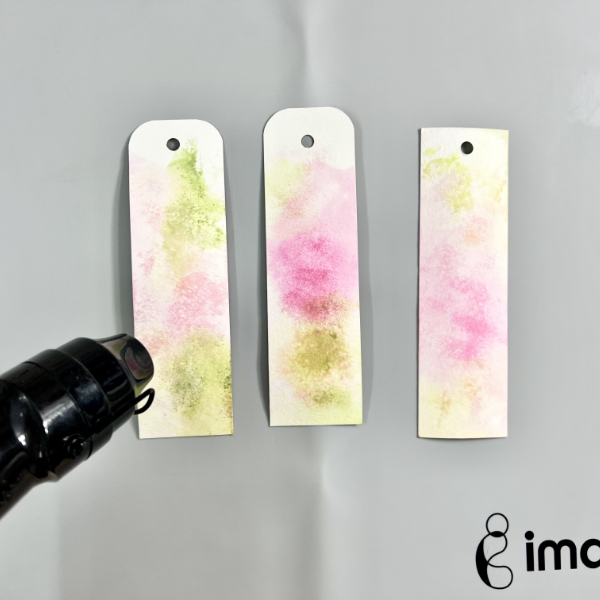
Step 2 Next step is to create the watercolor wash background using Memento DewDrop ink and Ink Potion No. 9 Spray on each of the bookmarks.
Dab the Memento ink on the craft mat and then spray with some of the Ink Potion No. 9.
Step 3 Smoosh a bookmark into the ink. Gently press to get the ink transferred to the bookmark.
Step 4 You can repeat this step as many times as you want to get the first color wash you like to get. You can spray the ink more to get lighter color, or spray the ink less to get more darker color.
And then repeat the step 2 and step 3 with different colors that you want to use on your bookmark background. For mine, I used the Memento Dew Drop Inks Angel Pink, Rose Bud, New Sprout, and Bamboo Leaves colors.
Step 5 When done with adding watercolor washes on the bookmarks, use the craft heat gun to dry them.
Option step, you can repeat step 2, step 3, and step 4, if you want to add more color to them.
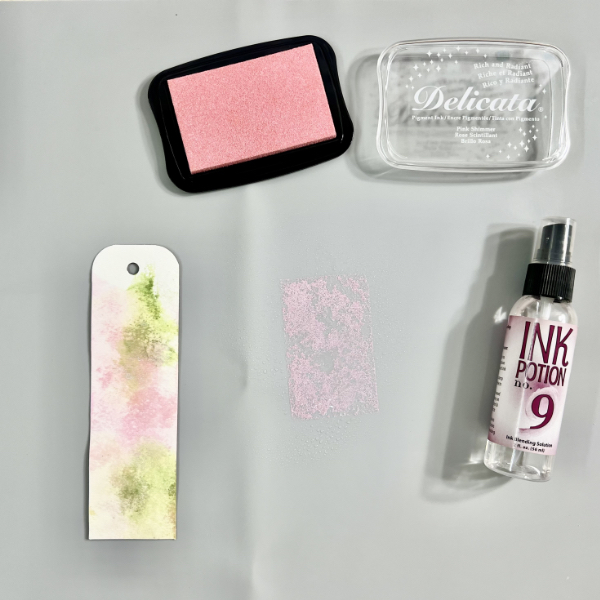
Step 6 Dab some of the Delicata ink on the craft mat, spray it with the Ink Potion No. 9, and then smoosh the bookmark into the ink. Gently press it to get the ink transferred well.
You will get a shimmer look on the bookmark with this step.
Dry all the ink on the bookmark with a craft heat gun.
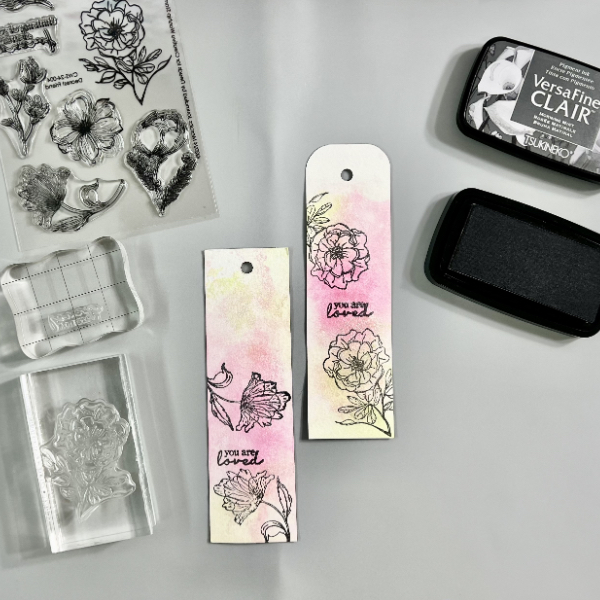
Step 7 When the bookmark background is completely dry, stamp the image and sentiment on them with VersaFine Clair ink using acrylic blocks (or stamping tool of your choice).
Use a craft heat gun to dry the stamped images and sentiments.
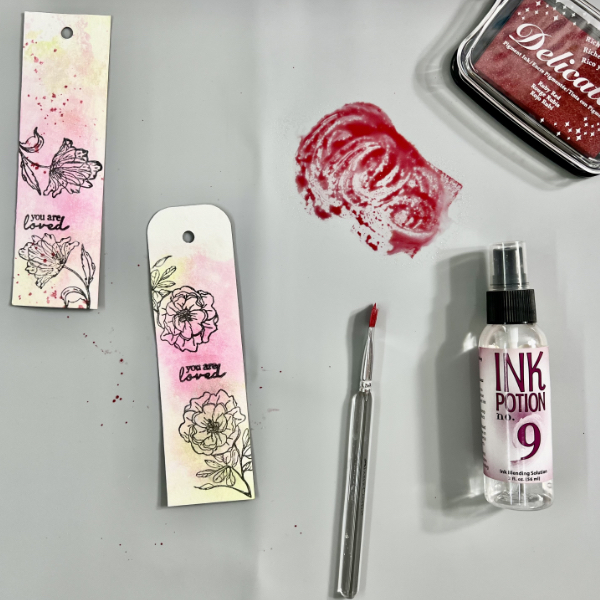
Step 8 This is optional. You can leave the bookmarks as they are, or you can add some more ink splatters to them.
To add more splatters to the bookmark, dab some of the Delicata Ruby Red ink on the craft mat, spray it with Ink Potion No. 9, and use a flat brush (or fan brush) to add the splatters.
Use a craft heat gun to dry the bookmarks.
Add some ribbon or teasel to the bookmarks.
Hope that you like this project and give it a try. Thanks so much for stopping by our blog today. Have a wonderful day!
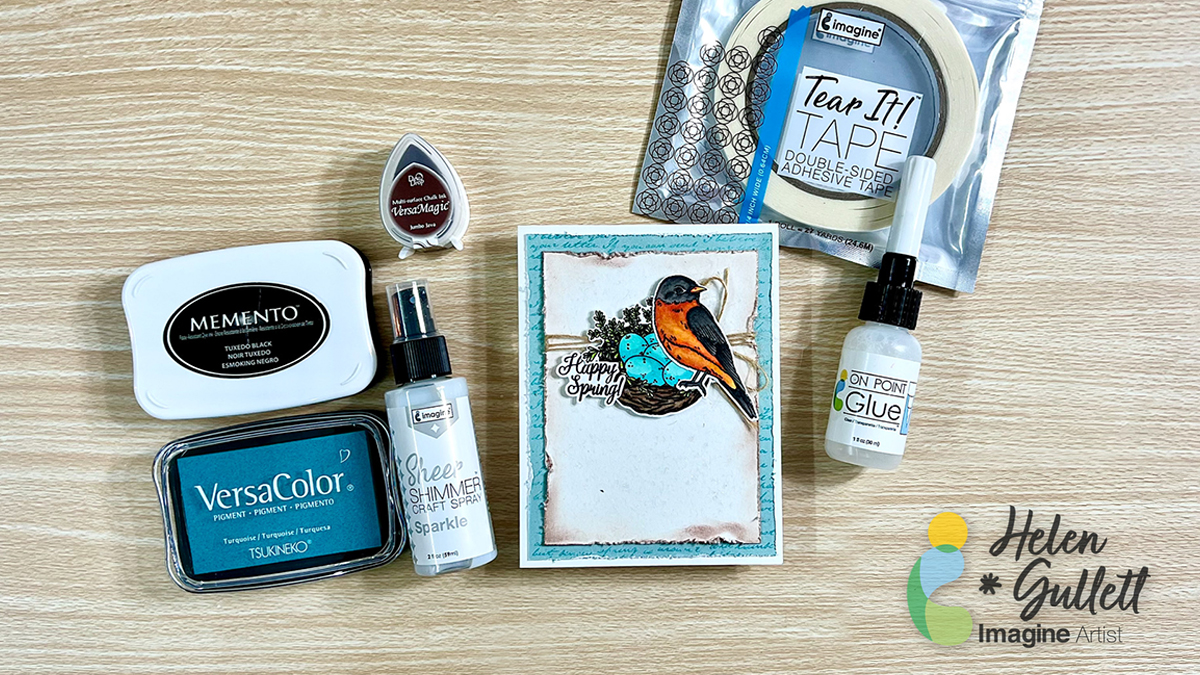
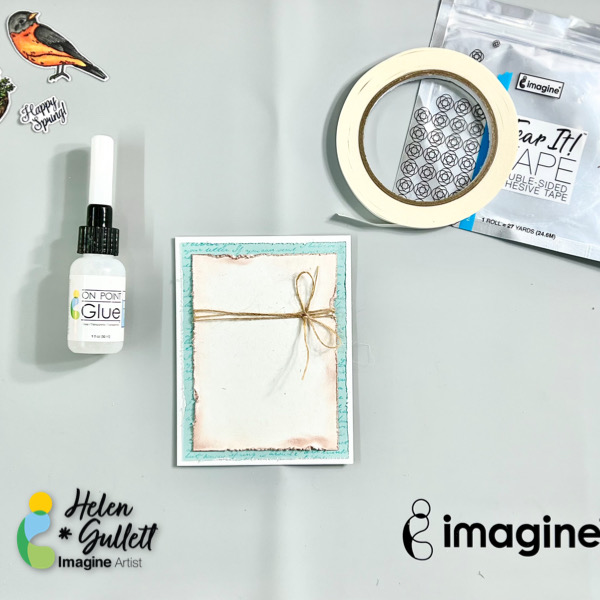
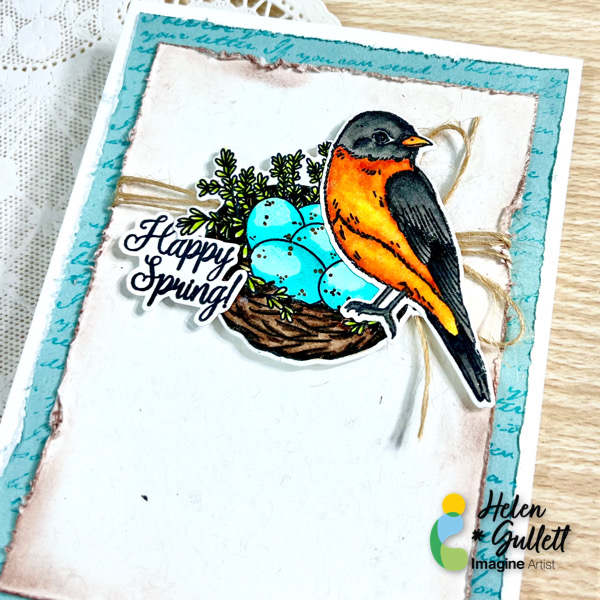
Hello hello hello! Today, I wanna share with you how to make this Happy Spring card using Imagine Crafts products, stamps, die cuts, and coloring medium. I found Spring inspiration on Pinterest to create this clean-and-simple style with some layers. You can make this card with any sentiment or vocal images based on the theme or season.
Skill: Intermediate Time: 30 – 45 minutes
Direction:
Step 1 Cut a piece of 8.5” x 11” white cardstock with a paper trimmer. One half you use it to make an A4 card base (5.5’ x 4.25’) by scoring in the middle of the cardstock.
And for the other half, use it for stamping elements and sentiments. You can to cut out the shapes with the matching dies, if needed.
Step 2 For my card, I cut out the shapes with the matching dies first.
Arrange the shape dies on the white cardstock and secure them with washi tape or removable tape to keep in place while cutting.
I keep both negative and positive die cuts. This will make the next step stamping images easier.
Step 3 Put the positive and negative die cuts on the stamping tool. Secure them with the magnet. Arrange the clear stamp on top of each matching cut out, make sure it is well positioned. Put the sentiment you want to stamp at the extra space, if they fit.
Step 4 Pick up the stamps with the stamping tool lid and ink the stamps with the Memento Tuxedo Black ink pad. If it is needed, you can re-stamp them. Clean the stamps with Staz-On All Purpose Cleaner.
I like to stamp several images and sentiments at one go, then I can pick and choose what to use on this project, and save others for the next project.
Cut the sentiment with scissors, or you can cut it with any label die you have in stash. I simply just cut it out with scissors to make a sentiment label or cut around the sentiment.
Step 5 After stampin, you can pick and choose which images and sentiment to use now.
Color the images with your favorite coloring medium. Since we use Memento Ink for stamping, the best coloring medium will be alcohol markers and pencil colors. I used alcohol markers to color the nest and bird.
Step 6 Cut out a light blue cardstock into 5.25” x 4” for the first base mat.
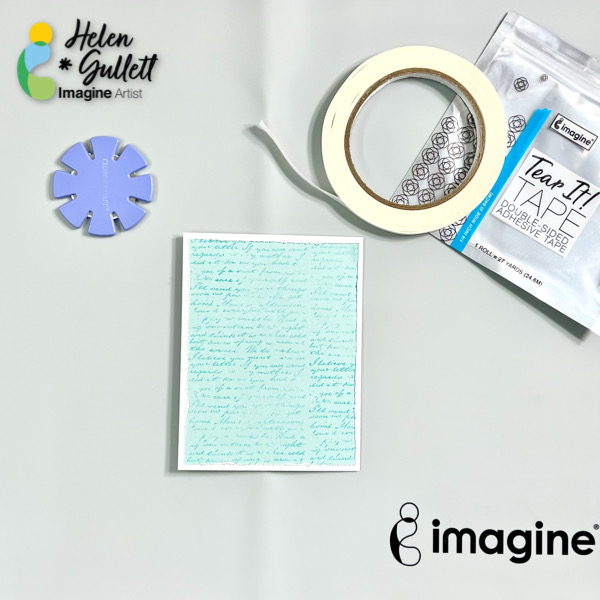
Stamp it with a background stamp of your choice lightly with the VersaColor Turquoise.
To get a lighter stamped image for the background, you can use second generation stamping technique: stamp it the first time on a scrap paper and then stamp it for the second time on the cardstock.
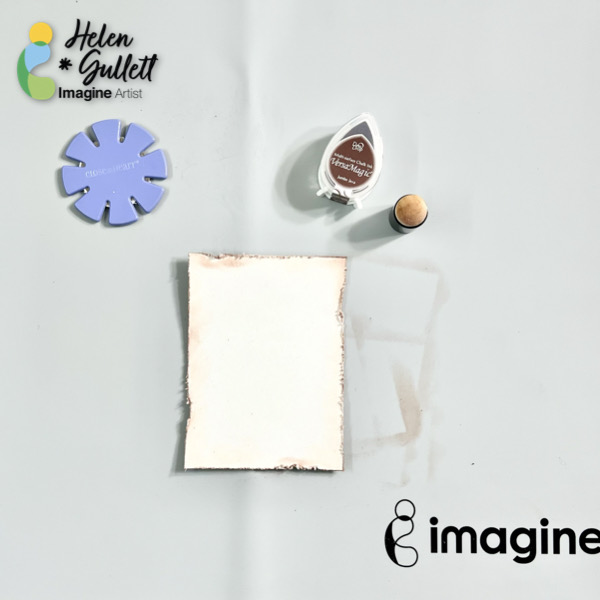
Step 7 Next, cut out a piece of off-white cardstock (or white) into 4.75” x 3.5” for the second background mat. Using a distressed tool or scissors to add the distress look on each edge of the cardstock. Add the VersaMagic Jumbo Java ink on the edges using the sponge dauber.
Step 8 It’s time to put the card together. Using a distressed tool or scissors to add the distress look around the background mat.
Add some of the Tear It! Tape on the back of the background mat and add it to the card base. Firmly press it down.
Step 9 Wrap some of the burlap twine around the second background mat and tie up a bow. Add a dab of permanent glue using the On Point Glue to secure the bow in place on the card. Add some of the Tear It! Tape on the back of the background mat, add it to the card, and press it firmly to make sure it adheres well, especially around the twine.
Step 10 Add some of the Tear It! Tape on a piece of fun foam to make your own 3D foam tape. Add the foam tape on the back of each element and sentiment and add each of them to the card. Add some glue using On Point Glue under the overlapping element and sentiment.
Step 11 To add some extra sparkle to the card, use a flat brush to add some of the Sheer Shimmer Spray – Sparkle. This spray gives some sparkle to this card for sure!!!
Dry the splatters with a craft heat gun.
Here’s the close up look of the finish card. You can add extra gems or embellishments to the card or you can just leave it as it is.
May this card give you hope for the new season coming soon! Thank you so much for stopping by our blog today. Have a wonderful day!
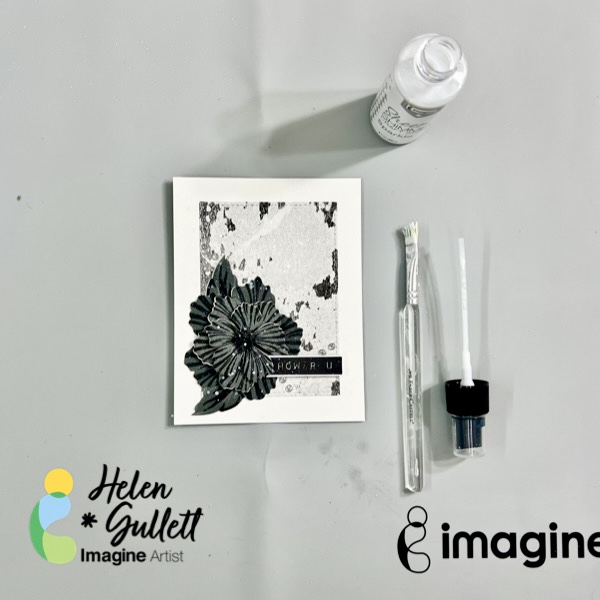
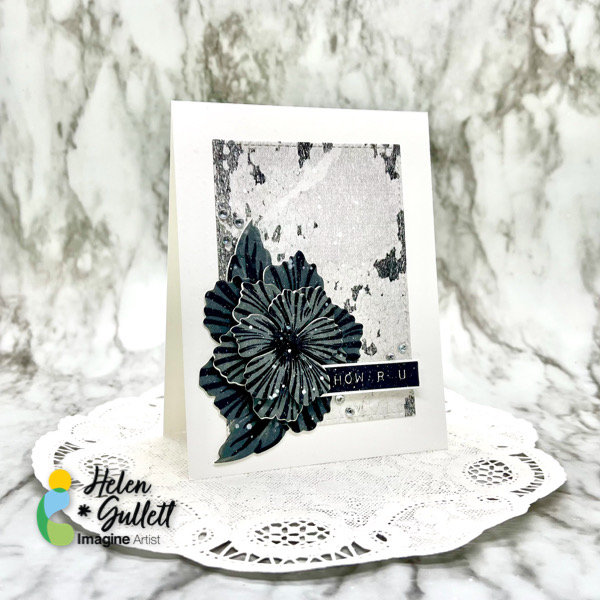
Hi everyone! Helen is here. I am super excited today to share with you all my very first project as one of the new Imagine Artists in Residence!!! I have been a big fan of Imagine Crafts products since I started making crafts. I made this monochromatic card. It is clean-and-simple yet has some layers to create an encouragement card or any occasion card.
Directions:
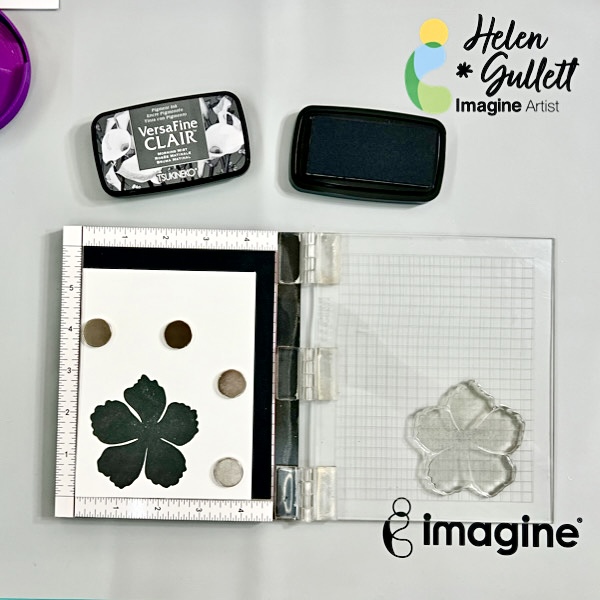
Step 1 Stamping the sentiment labels. Arrange the stamp labels you want to use on the stamping tool and then stamp them on a piece of white cardstock with VersaFine Clair Nocturne ink pad. Stamping tool will help to get great second stamping for bold result. After stamping, dry the ink with craft heat gun and then trim them using the paper trimmer.
Step 2 Using the stamping tool, stamp the solid image of the flower (the first layer base of the layering flower stamps) using the VersaFine Clair Morning Mist ink pad on the white cardstock. Use the pressure tool to press the inked stamp to the cardstock to get even and better transfer ink. This pressure tool is very handy to use when stamping big images. But you can always stamp it again if needed.
Step 3 Line up the second layer of the flower stamp image on top of the solid stamped image. Make sure you position it in the right direction. Grab the stamp using the lid of the stamping tool and then ink it with VersaFine Clair Nocturne ink pad and then stamp it. Use the pressure tool to press the inked stamp to the cardstock to get even and better transfer ink. You can always stamp it again if needed.
Step 4 Grab the last part of the layering flower stamps, position it in the center of the stamped flower and then stamp it using the VersaFine Clair Nocturne ink pad. For this center part, I stamped it 3 times to get darker stamped image. You still can use the pressure tool to press the inked stamp to the cardstock to get even and better transfer ink.
Repeat these steps: 2, 3, and 4 for the leaves.
After stamping the images, use the StazOn All-Purpose Stamp Cleaner Dauber Top to clean the ink of all the clear stamps.
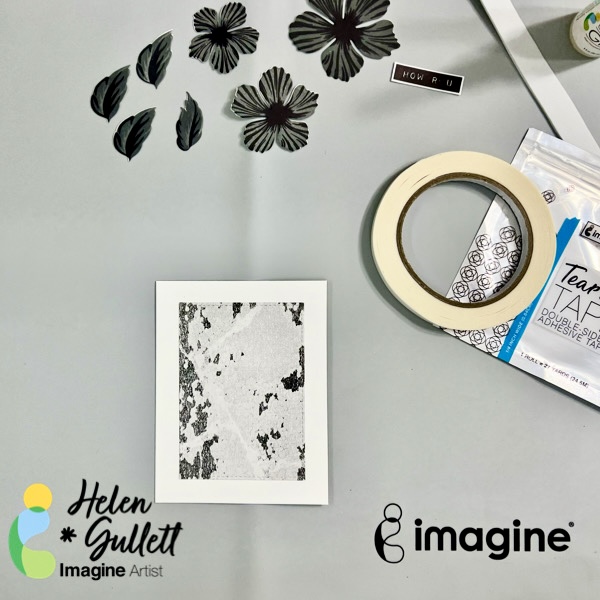
Step 5 Cut all the flowers and leaves using the matching thin metal dies using the die cutting machine. And then after that, you can cut the pattern paper also with one of the Stitched Rectangle Dies to make a background mat for the flowers.
Step 6 Make a white card base out of the 8.5-inch x 11-inch 110lb white cardstock you cut into 2 pieces using the paper trimmer, using score in the middle of the cardstock, and then fold it into a card.
Put some of the Tear It! Tape on the back for the pattern background mat and then add it to the card base. This tape is strong and permanent, so make sure you position it at the center of the card lightly and then press it down.
Step 7 This is the time we arrange all the stamped flowers and leaves. Using the On Point Glue to add the first layer of the flower and leaves on the card. This glue gives you a few seconds of its drying time so you can position the flower and leaves to the spot where you like it. Then press them down and hold them down for a few seconds for the glue to dry permanently.
Step 8 For the second and third layers, we will use foam tape for extra dimension to the flower. I made the foam tape out of white fun foam and Tear It! Tape. I put pieces of the foam tape on the petals of the flowers and added them to the base flower. And then, add one of the sentiment labels to the card with foam tape, too.
Step 9 Add some splatters of the Sheer Shimmer Craft Spray on the card using the spray bottle nozzle and flat brush (or fan brush). Add also some white paint splatters on it for more texture.
Dry the splatters on the card with a craft heat gun by moving the heat lightly around the top.
It is optional, you can embellish the card with some clear gems or other embellishment you like.
Look at those layers on a CAS style card! That’s my first project to share with you. Thanks for stopping by the blog today!
We’re thrilled to unveil our 2024 Artists In Residence Design Team!
Get ready to be inspired by the remarkable creativity of our group of skilled designers.
Let’s get to know them a bit…
LV Handcrafted
Hi! I’m Linh – or LV Handcrafted on social media. I live in Seattle, WA with my husband and our two dogs. I’ve been crafting since I was in high school but took a long break as I started my career. Now (many years later) I am my own boss working as a business consultant, so I can balance my time and do more of what I love – papercrafting! There’s always so much to learn in papercrafting, and I find great joy in adding my own twist and sharing what I’ve learned. I love Imagine products. There’s such a wide range of media supplies. It’s so fun to experiment, have a bit of a play and create something exciting. I’m honored to be a part of this amazing team.
Hello! My name is Alison Heikkila and I have been a crafter my entire life. My mom started me off with coloring and stringing beads from a very young age, and I never stopped. I have an art degree with a specialization in jewelry and sculpture, but I love working in many mediums and styles. Getting inky is absolutely one of my favorite things!
I have an amazing husband who loves to see what I create each day (and even crafts along with me sometimes!) and two very creative kids. Sometimes the four of us craft together, which is so much fun. We’ve also got two dogs, and we reside in New York.
I love to create, as I feel it truly feeds my soul. Getting a little “playtime” in my craft room each day is really important to me. I look forward to sharing projects with you.
Hi, I am Amalia from Cool Cakes and Crafts with Amalia on YouTube. I am new to the team but a longtime paper crafter. I started my crafty adventures as a Wilton Method of Cake Decorating instructor for 17 years, (that’s where the “Cool Cakes” comes from) then a fellow instructor invited me to a SU! Party and I was hooked! I live and work in New York City and while it certainly is a big city you would be surprised how far outside of the city I have to travel to find paper crafting resources! Thank goodness for online shopping and Imagine! Aside from baking and card making, I also make beaded jewelry and create projects with polymer clay. As you can tell, I love all the creative things and I love sharing it with others and showing everyone how fun and easy it is to be creative.
Hi, I’m Nancy May, mother, sister, friend, licensed clinical social worker, creative, but you might know me as Handi Scandi. I have been crafting for many years – since my adult children were littles. It started as an inexpensive way to decorate my home to make it cozy for my family, and when my children loved to get messy with me in the process it became so much more. All of my children are creatives and creativity manifests itself differently in each of us. Stamping became my safe space, if you will, shortly after my youngest daughter passed away. I needed something to focus on rather than grief, and I remembered how much I loved stamping and card making. This crafty life has taken on a life of its own and I have been introduced to the wonderful world of card making on a much grander scale. As I learn more and more about art and the creative process I find myself drawn to mixed media, art journaling, grunge, stencils, sprays, pastes, and inks…glorious inks! I am an intuitive crafter who rarely has a plan, loves to get messy and inky and shows myself grace throughout the process. I reframe mistakes as opportunities and almost never throw things away. Through all of this I am developing my own style that I have coined grungy elegance. I am so excited to be a part of the Imagine Crafts team as it opens another door of exploration, creativity and discovery.
Hi! I am Helen. I am a stay-at-home wife and a mom of 2 daughters. I grew up in Indonesia and now live in Ohio with my family. I am working at home part time as a translator. I love paper crafting, Bible Journaling, working on mixed media and DIY projects. I love coffee, tea, and dark chocolate.
Hi, it’s me Simply Monica mother of two. I have an amazing grandson Jace and another one coming soon to join the bunch. I have been crafting over 20 yrs and love it. It’s my happy place and I hope to inspire others with my journey at Imagine
I’m a cat-loving card maker who also creates tags, art journals, and home décor pieces. I love stamping, mixed media, and experimenting with different supplies and techniques. I love to paper craft because there’s something so oddly calming about focusing on a project. My favorite part is when a project comes out the way I had envisioned it in my mind’s eye. I also like to share my creations online and always include full supply lists and detailed instructions on my blog posts.
Hello crafty friends! My name is Jessica Lin. You may have recognized me or seen some of my previous projects, and I am so excited to be back on Imagine’s design team! I am a crafty gal in my late twenties, but my passion for cardmaking started a long time ago when I was 9. I was introduced to wooden stamps and I haven’t stopped stamping since. Some of my other hobbies include sewing, washi tape collaging, and I hope one day I’ll learn how to crochet, too.
I grew up in Taiwan and speak Mandarin as my mother tongue, so my YouTube channel is mostly filmed in Chinese. This year, I decided to create a bilingual Instagram account. If you are inspired by bold, vibrant colors and enjoy detailed projects with lots of layers, come have a visit! I look forward to meeting and crafting with all of you!
I am Ceal Pritchett and I reside in the mountains of western North Carolina with my husband and our little fur baby Shih Tzu. I have been a crafter in some form since childhood. I fell in love with cardmaking around 15 years ago. I am a clean and simple cardmaker who sometimes dabbles in other things like art journals, bible journaling, and painting.
Anna Escalada York grew up on a farm outside of Phoenix, Arizona and moved to Portland, Oregon to go to college, where she met her husband. They have two children (one in high school and the other in middle school), a cat and two guinea pigs. She is also a proud teacher at her local high school for almost 20 years in SE Portland, Oregon (go Lightning)! Her other hobbies are reading, riding her bike, nerding out to Star Wars, and reading.
Anna has been crafting (almost exclusively card making) since 2004, but stepped away for a while when it was too hard to juggle the demands of being a mom of little children and working full time. She returned to her craft room in 2019 and started blogging consistently in 2020. One of her recent crafty achievements has been creating 700 cards in 2021. Her favorite craft supplies include heat embossing, using splatter, and coloring with markers. Her favorite style is sparkle!