Wedding invitation styles are constantly changing and updating and recently on Pinterest I have seen some beautiful CLEAR invitations using acrylic sheets. I wanted to find a DIY to make clear invitations and still have them be very elegant. I used StazOn Pigment Ink and a Marble stamp layering stamp set to get the look I was going for, and it was easier than I thought to create these see-through translucent invitations!
Wedding invitations can be expensive! But with Delicata Inks and a pretty layered flower stamp, you can create some inexpensive invitations that are not only pretty but they are also easy to make. Find out how by watching my video below.
This card project is a playful combination of two very different design elements; a simple white graphical front and a rich bright colorful background. This design idea can be used for various card projects of different sizes and shapes; this background looks as great on a large square card as on a small ATC. For the background use your favorite colors and color combinations and add additional layers with stamps and stencils. The graphical white card front will calm down even the busiest color burst background making the result look elegant and beautiful.
Skill: Beginner Time: 2 hours + drying time
Direction
Step 1
Trim a panel from white cardstock. The size should be slightly smaller than your card base (approx. 0.25 inch smaller on all edges). Place the panel on your craft mat, backside up. Using a pencil and a ruler trace a border around the edges. Trace a few straight lines across the panel, letting the lines cross. Decide on the placement of the solid front label that will be the base for the stamped sentiment. Mark the label area clearly so that it will be left uncut.
Step 2
Place the front panel on a cutting mat. Using a craft knife and a ruler cut out the areas inside the crossing lines. Leave a thin border on both sides of the lines. Do not cut into the solid label area.
Step 3
Mist a piece of white heavy watercolor paper with water. Use your craft mat as a palette: Remove the nozzle from the Fireworks mist, pour a drop of color on the craft mat and apply color on the paper using a brush. Add drops of another matching color either with a brush or with the nozzle. Mix colors using both water and a brush, let dry before adding more layers of color.
Step 4
When finished with painting splash the paper with clear water. Let water react with the colors for a few seconds and lift off excess by pressing the paper with a paper towel. Let dry completely and trim to size of your white card front.
Step 5
Using one or two ink colors stamp the sentiment text on the card front.
Step 6
Assemble the card by first gluing the white card front on the colorful background and then attaching the entire front panel on the card base.
Extra Tip:
When coloring a card background I often use a paper slightly larger than my finished project. After trimming the panel to the final size I keep the colorful leftover pieces and use them for decorating the inside of the card. This way I’m continuing the same color and/or pattern theme on the inside of the card!
Graduation season is upon us. As much as it a joyous time in anyone’s life, you feel the pressure of the final exams, think about that next phase of your life and probably make a big move. Don’t forget the grad in your life, and make him/her a fun, grungy card. I will show you how you can create a simple, yet layered background with fun ruler embellishments and matching sentiment.
Skill: Beginner Time: 30 minutes
Directions
Step 1
Smoosh the Turquoise Gem VersaMagic ink onto the Imagine Craft Mat.
Step 2
Spray water over the ink. Smoosh the watercolor paper and create a random background. Dry the paper.
Step 3
Stencil the gears with the Vintage Sepia VersaFine ink and Inkblusher.
Step 4
Using the palette knife and modeling paste, stencil another image.
Step 5
Spray some Walnut Ink, then brush the ink with a wet brush. Dry paper.
Step 6
Stamp the ruler stamps with the Piano Black StazOn Pigment ink.
Step 7
Cut out the rulers and ink the edges with the Piano Black StazOn Pigment ink.
Step 8
Assemble card. Glue on the rulers and add a sentiment.
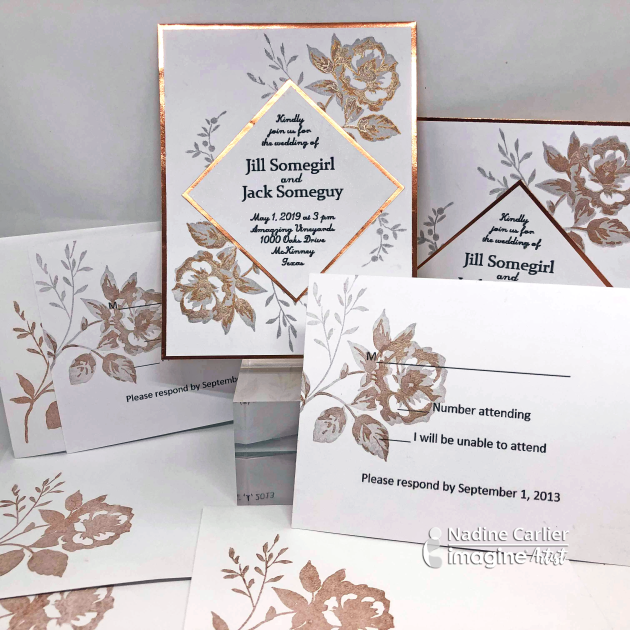
Happy spring, everyone! This month we are focusing on wedding themes and I thought I would share some ideas using large floral stamps. When you are mass producing cards or invitations, you want to minimize the number of steps when creating. So using large images will save you a lot of time. Creating with a mess-free ink, like StazOn Pigment, is also key because it dries instantly and won’t smear. Lastly, for quick embellishing, use the Sheer Shimmer Stix to add the final wow factor. And your simple wedding project is done!
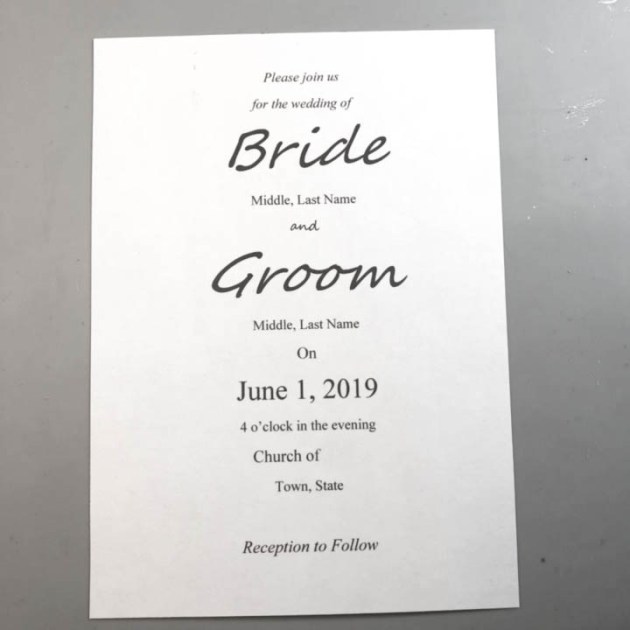
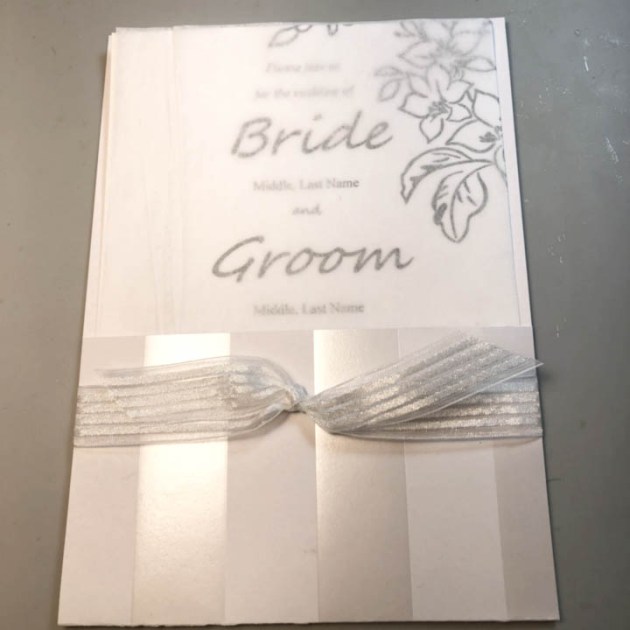
Did you know that, according to Wikipedia, there are 2.5 million weddings in the United States each year? Wow, who knew?! That means that there are a lot of individuals out there planning for their big day! It’s a good thing that this project is designed to inspire those planning for their special day to create quick, simple and elegant handmade wedding invitations.
Time: 30 minute Skill: Beginner/Intermediate
Directions
Step 1
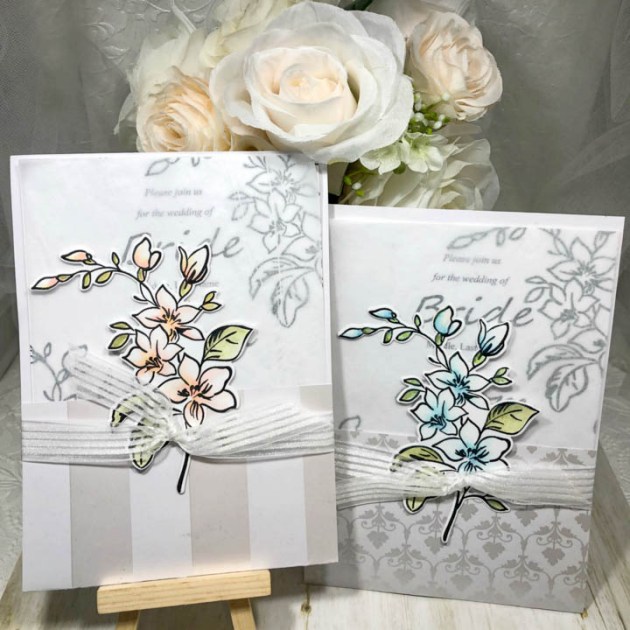
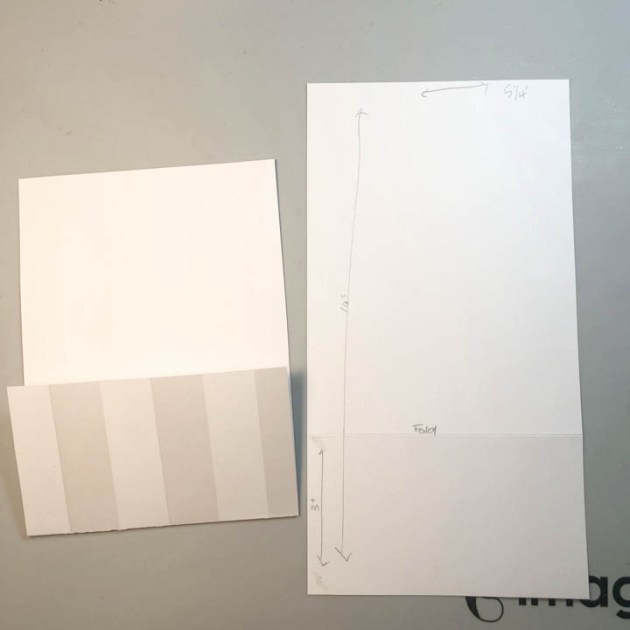
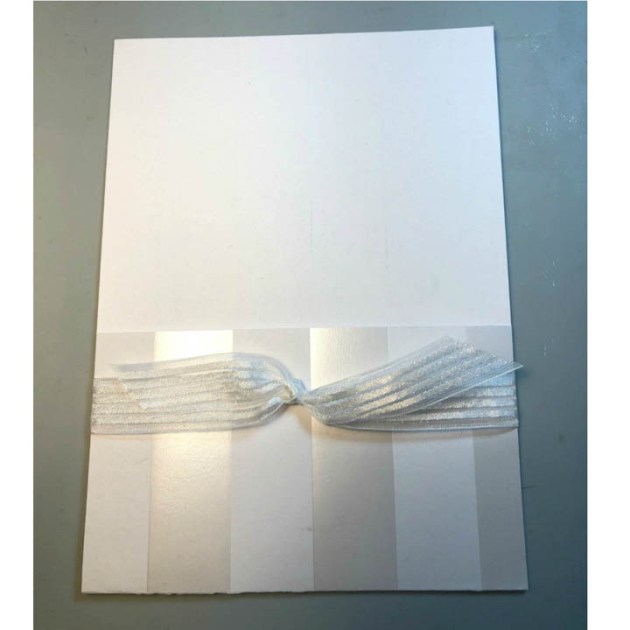
Cut a piece of decorative cardstock to size, 5 ¼” x 10”. Fold up at 3” from the bottom.
Step 2
Tie sheer ribbon around the bottom portion of the folder.
Step 3
Print wedding announcement on a 5”x 7” piece of cardstock.
Step 4
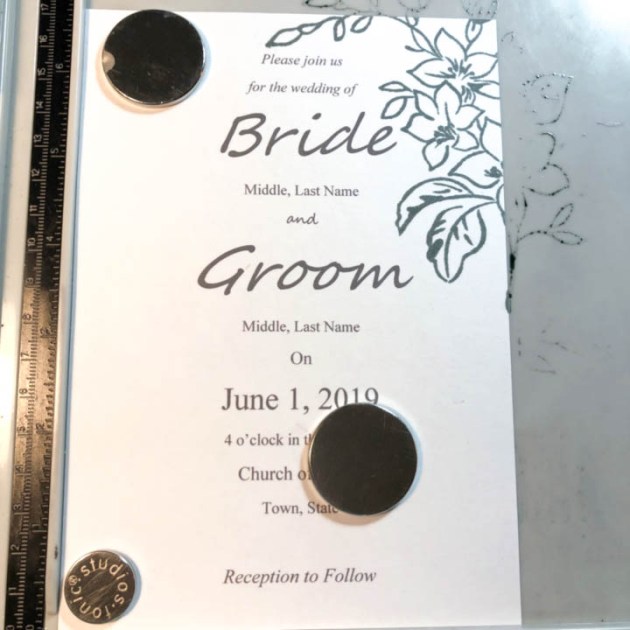
Stamp floral image with Memento London Fog at top right and bottom left of invitation.
Step 5
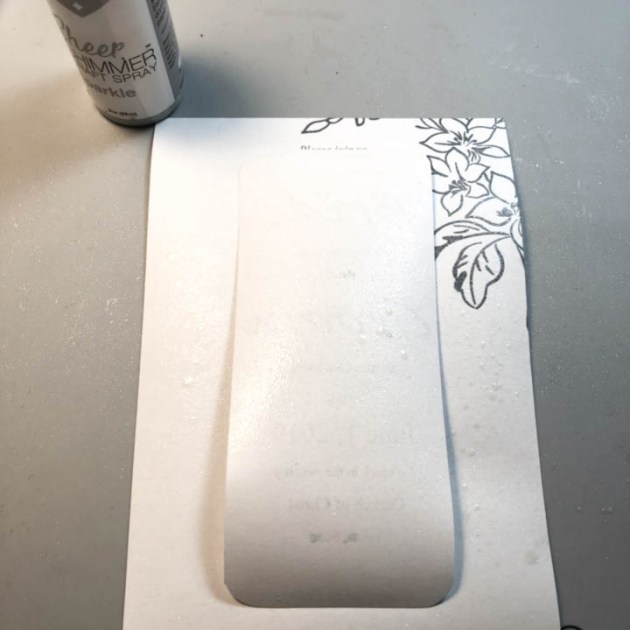
Create a template to cover printed words and spray with Sheer Shimmer Craft Spray.
Step 6
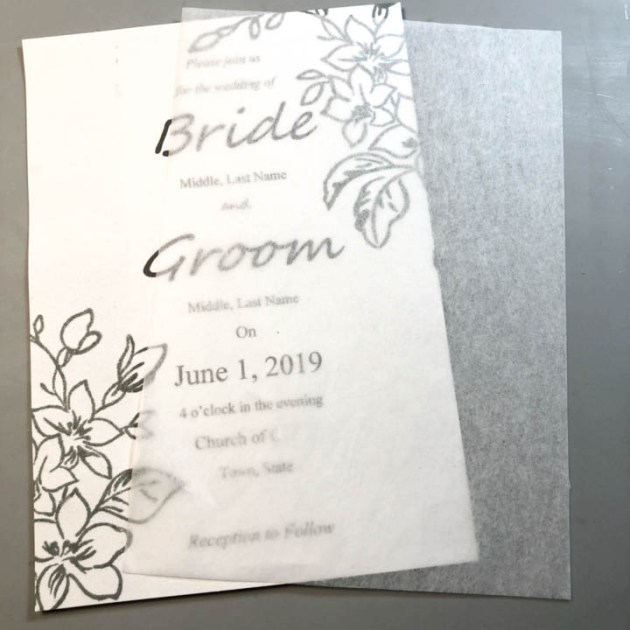
Cut tissue paper to cover invitation.
Step 7
Slide invitation, with tissue cover, into the previously made folder.
Step 8
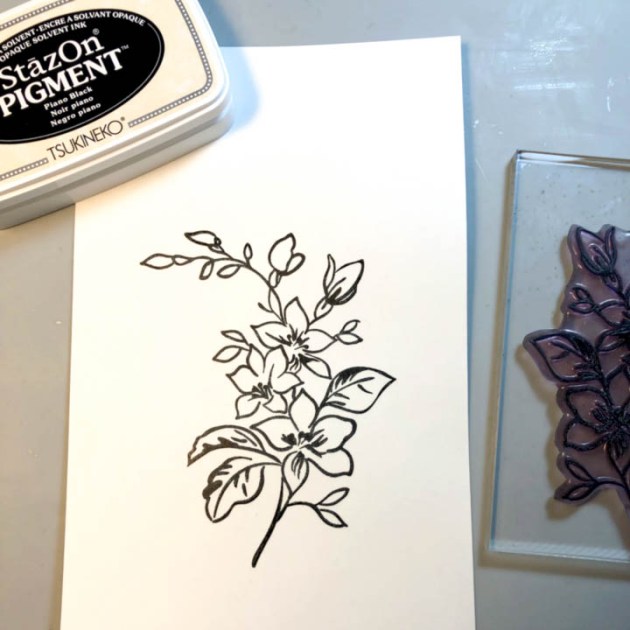
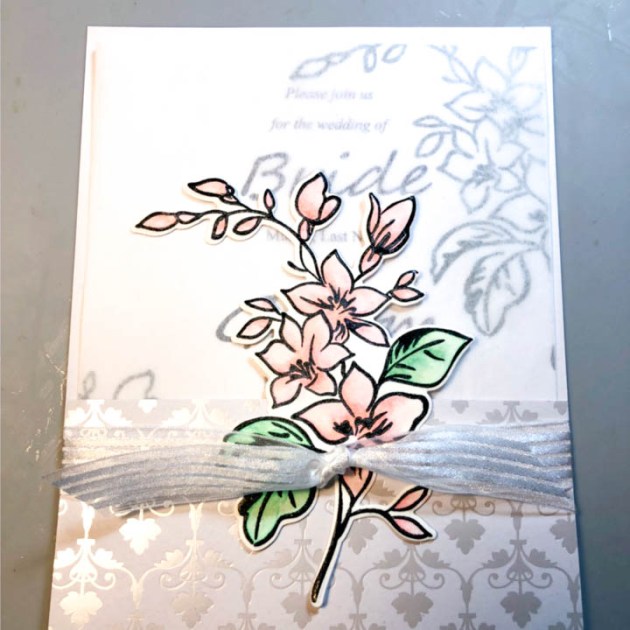
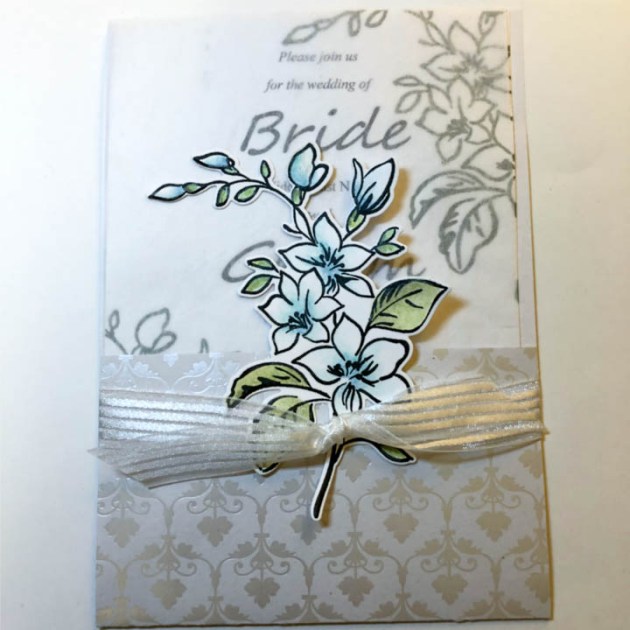
Stamp floral design on cardstock with StazOn Pigment ink in Piano Black.
Step 9
Using watercolor pen and VersaMagic ink, water-color floral image.
Step 10
With matching die, cut out floral image.
Step 11
Adhere to the bottom portion of folder front, see the example for placement. Try the same design in different color schemes.
Supplies
Imagine
VersaMagic Chalk Ink – Pink Grapefruit, Mango Madness, Tea Leaves, Hint of Pesto, Turquoise Gem, Ocean Depth, Cloud White