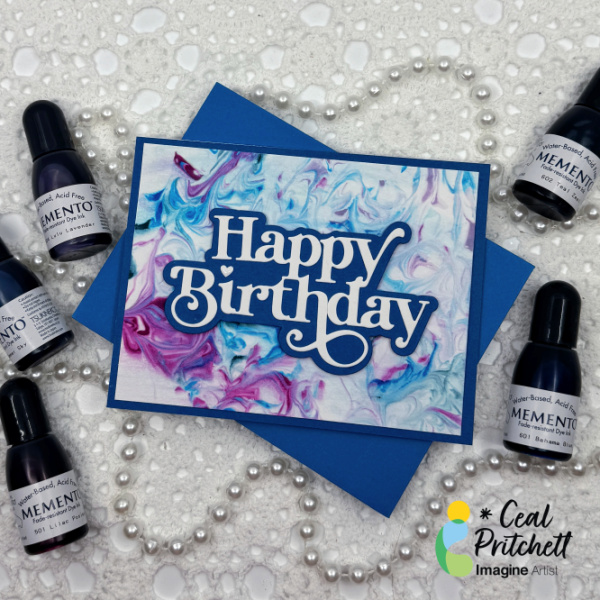
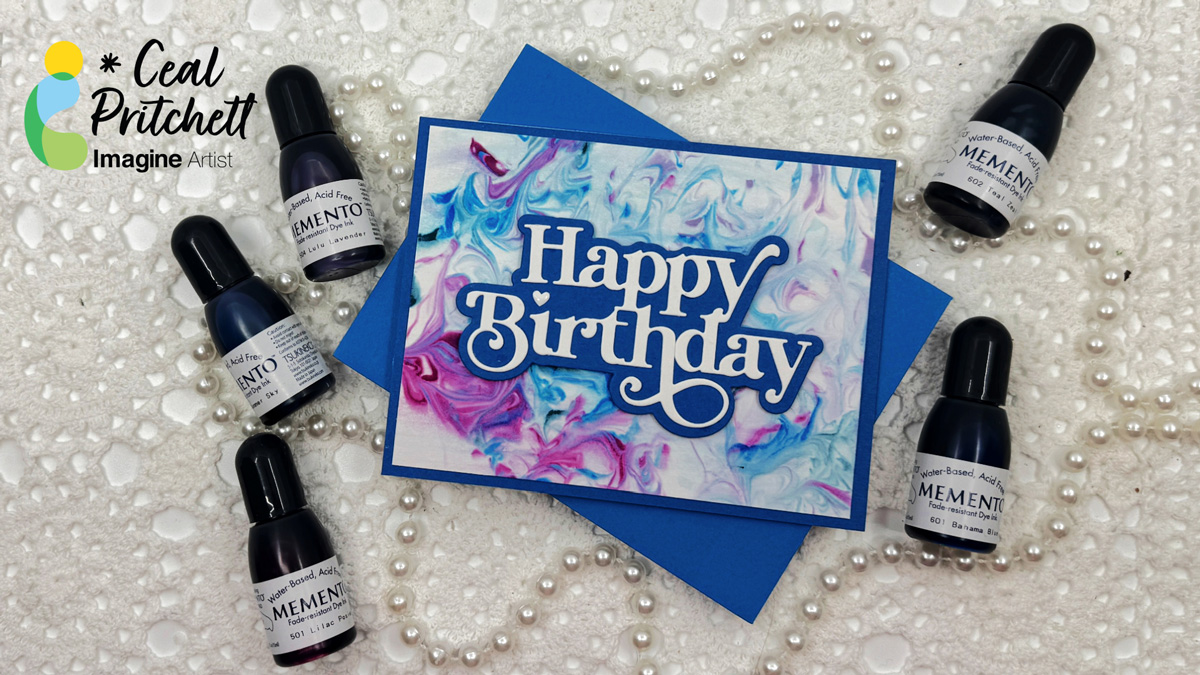
Hello Friends, It’s Ceal, here. Today I am sharing a fun background technique with you that even a child can create. This is a Mixed Media project. Does the word mixed media have you thinking I can’t make a mixed meda card? It used to for me but honestly mixed media is simply a card made with two different mediums, so this one is shaving cream and ink. Don’t let the word mixed media scare you.
Skill: Beginner Time: 45 Minutes
Directions:
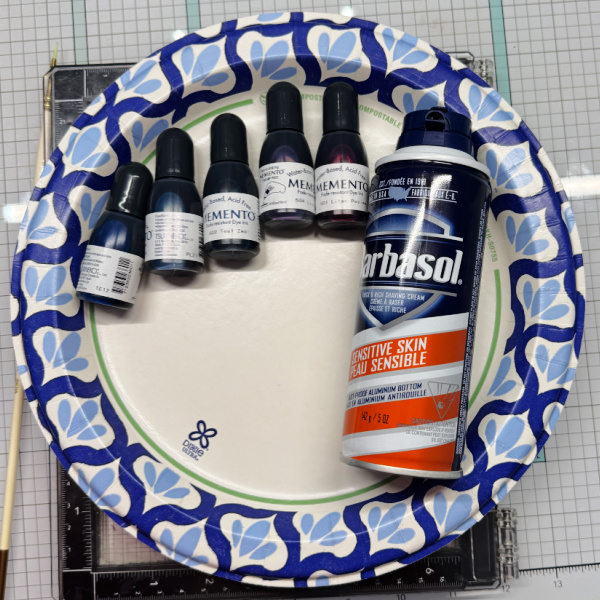
Gather your supplies. You will need a sentiment die cut of your choosing, some foaming shaving cream (gel will not work, some re inkers in different colors, a paper plate, a toothpick and some water friendly paper.
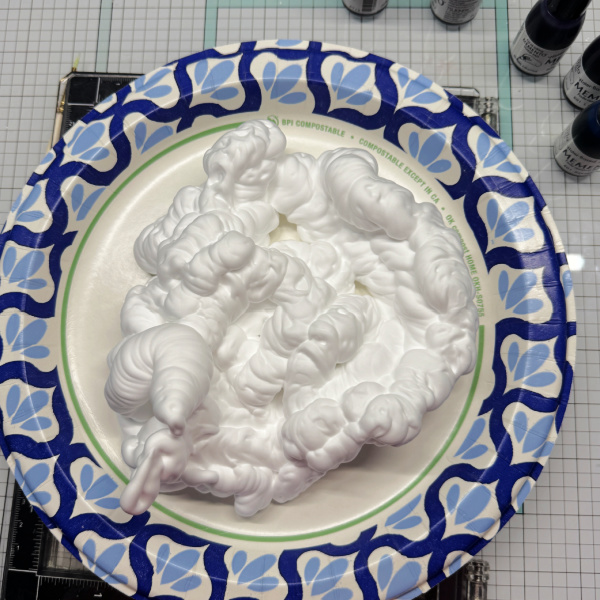
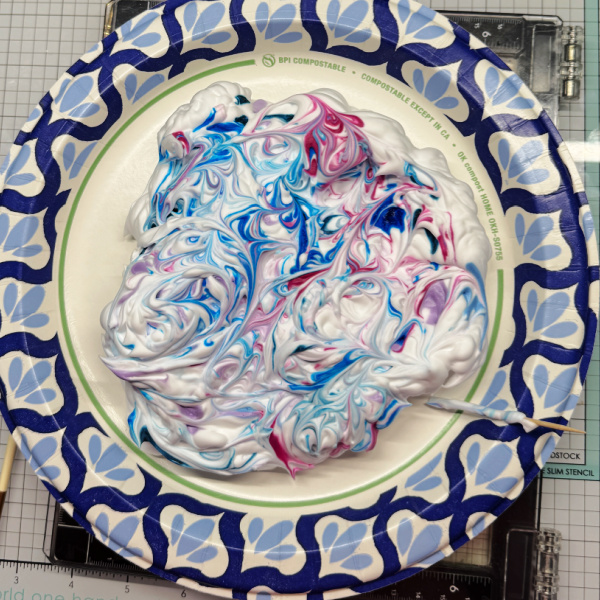
Step 1: Add shaving cream to the paper plate.
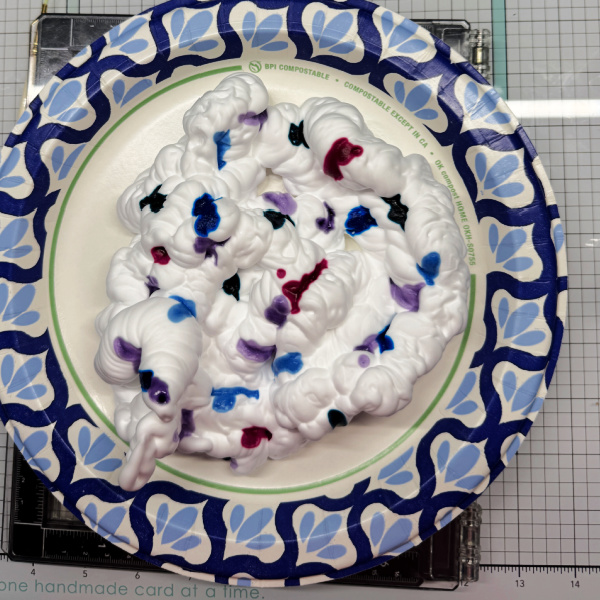
Step 2: Add drops of re inkers to the shaving cream. I used 5 different colors.
Step 3: Using a tooth pick, swirl the colors around.
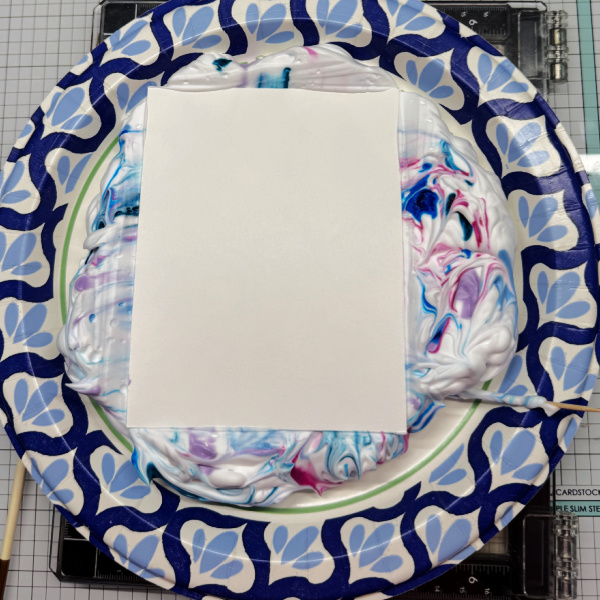
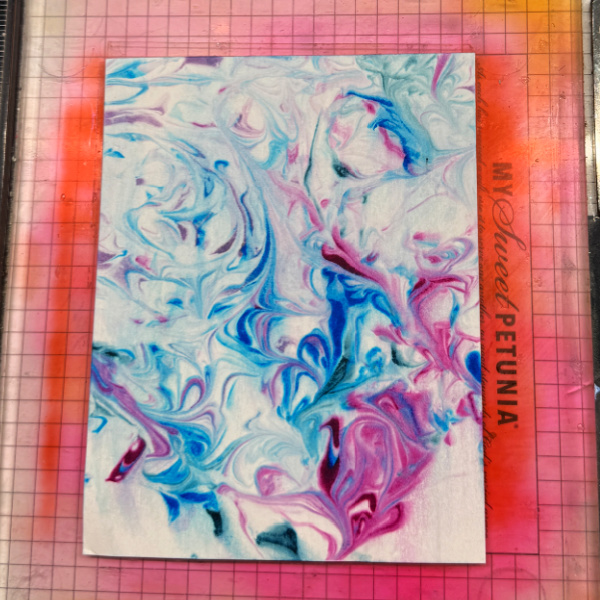
Step 4: Place water friendly paper (I used Bristol Vellum) face down into the shaving cream. Wipe off with paper towel. The results will look like the next photo and as a added bonus, it will smell so good.
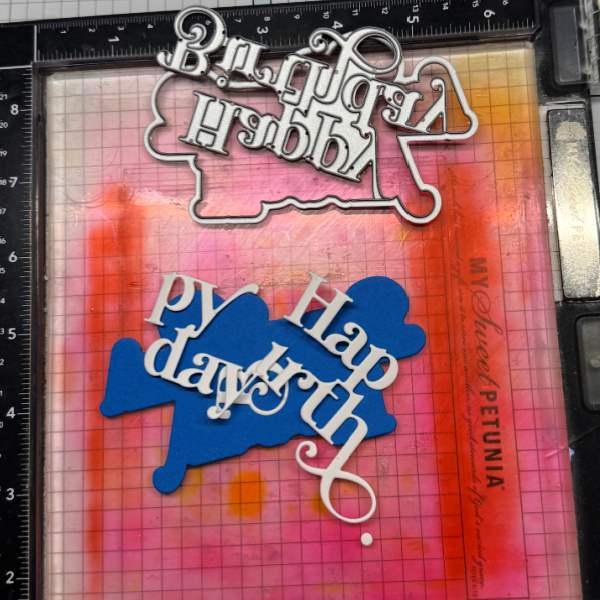
Step 5: Cut the sentiment out of White cardstock and the backer out of a coordinating color of cardstock. Adhere them together and add to the front of the card.
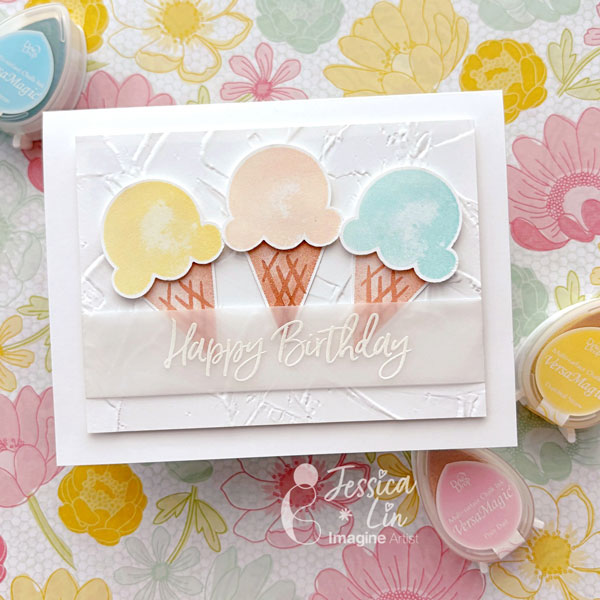
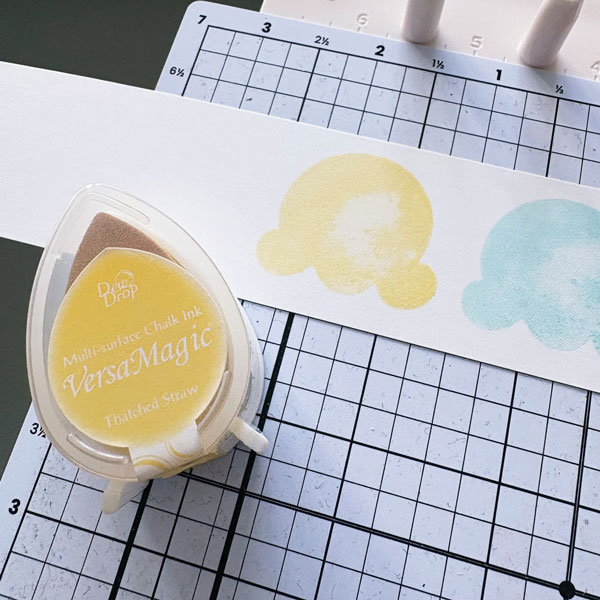
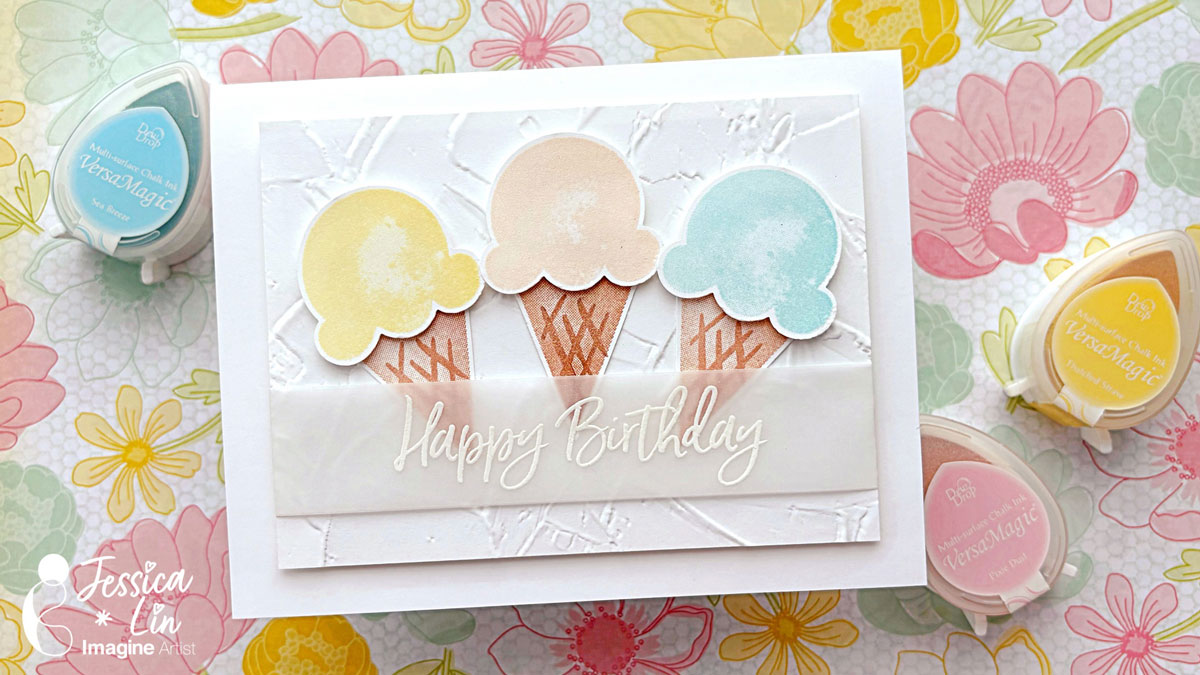
Hi everyone! It’s Jessica here. Today I am sharing a birthday card using one of my favorite ink pads – VersaMagic. They have great pastel colors that are just perfect for sorbet and ice cream images.
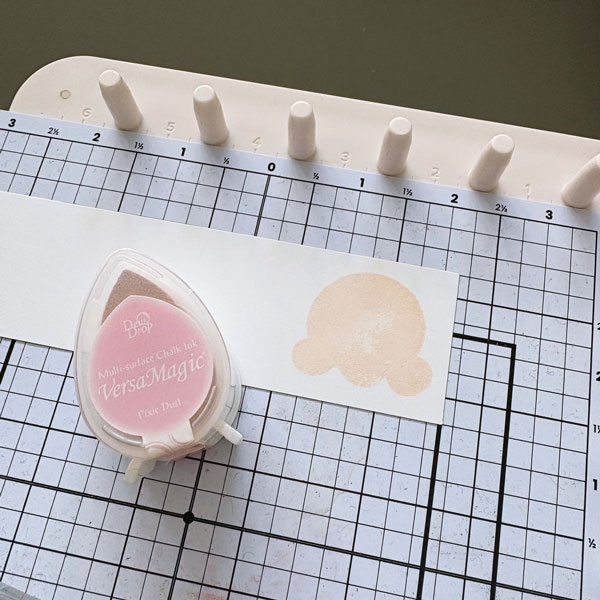
Step 1: The first color I chose is VersaMagic Pixie Dust – it reminds me of the classic strawberry ice cream. I used it to stamp the ice cream scoop image from Stampin’ Up’s Sweet Ice Cream set.
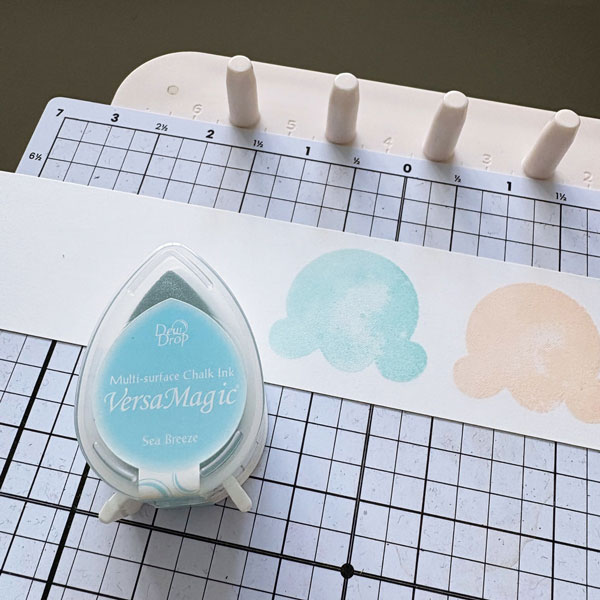
Step 2: Then I used VersaMagic Sea Breeze to stamp my second scoop of ice cream. You will notice that the ice cream image is not entirely solid. I really like the “watercolor” look it gives off.
Step 3: For my last scoop of ice cream, I used VersaMagic Thatched Straw. A soft yellow like this is hard to find in the ink pad world. I have yet to find a similar hue as soft as this color.
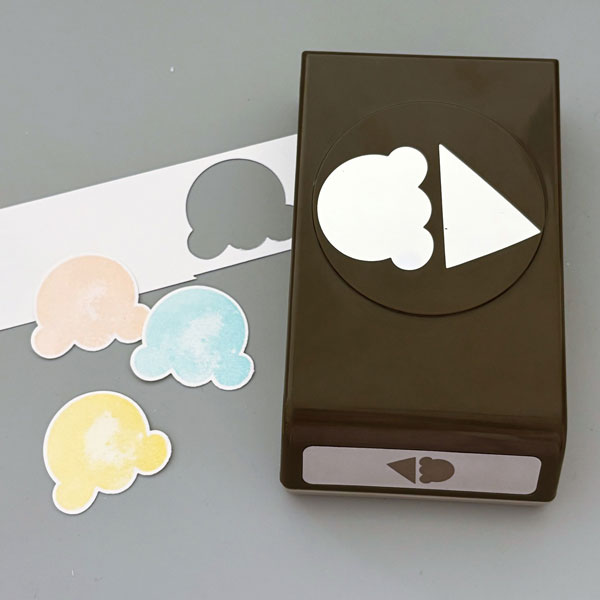
Step 4: Once the stamped images are left to dry for 5-10 minutes, I punched them out with the coordinating Ice Cream Cone Builder punch.
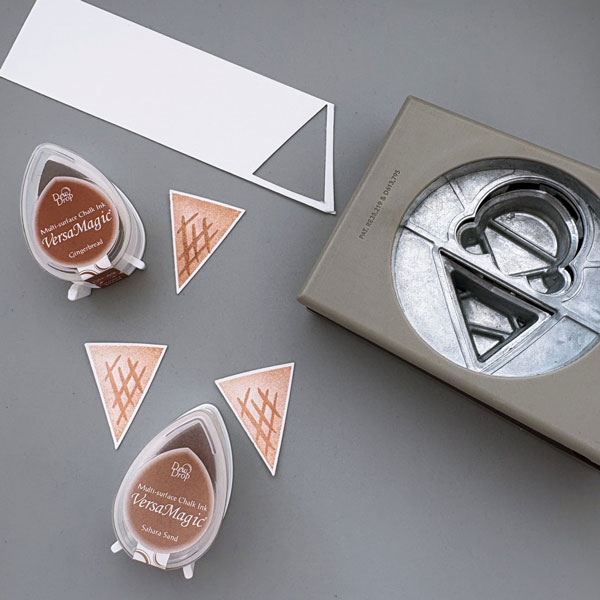
Step 5: For the ice cream cones, I used VersaMagic Gingerbread and Sahara Sand. The darker one on top is stamped with Gingerbread, and the two lighter ones on the bottom are stamped with Sahara Sand.
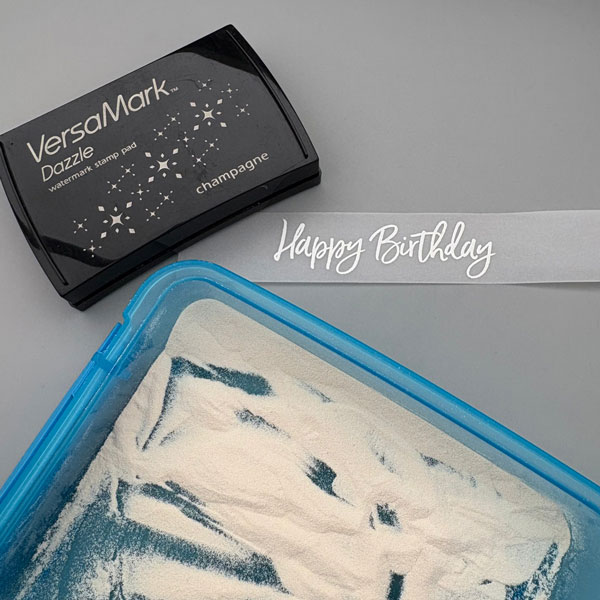
Step 6: I decided to heat emboss the sentiment on vellum to match the soft, pastel palette of the card. I stamped the “Happy Birthday” stamp with VersaMark Dazzle Champagne and heat embossed with white Mboss powder.
Step 7: To complete the card, I adhered all of the elements onto a card panel that I embossed with Stampin’ Up Painted Texture embossing folder. I hope you enjoyed today’s tutorial and have a sweet day!
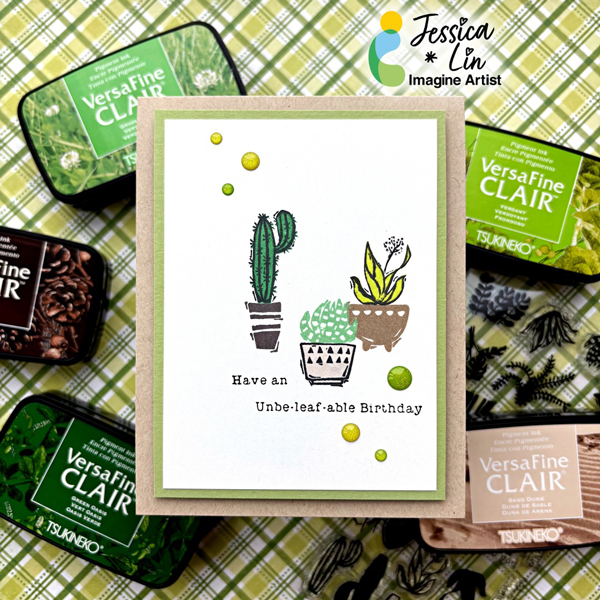
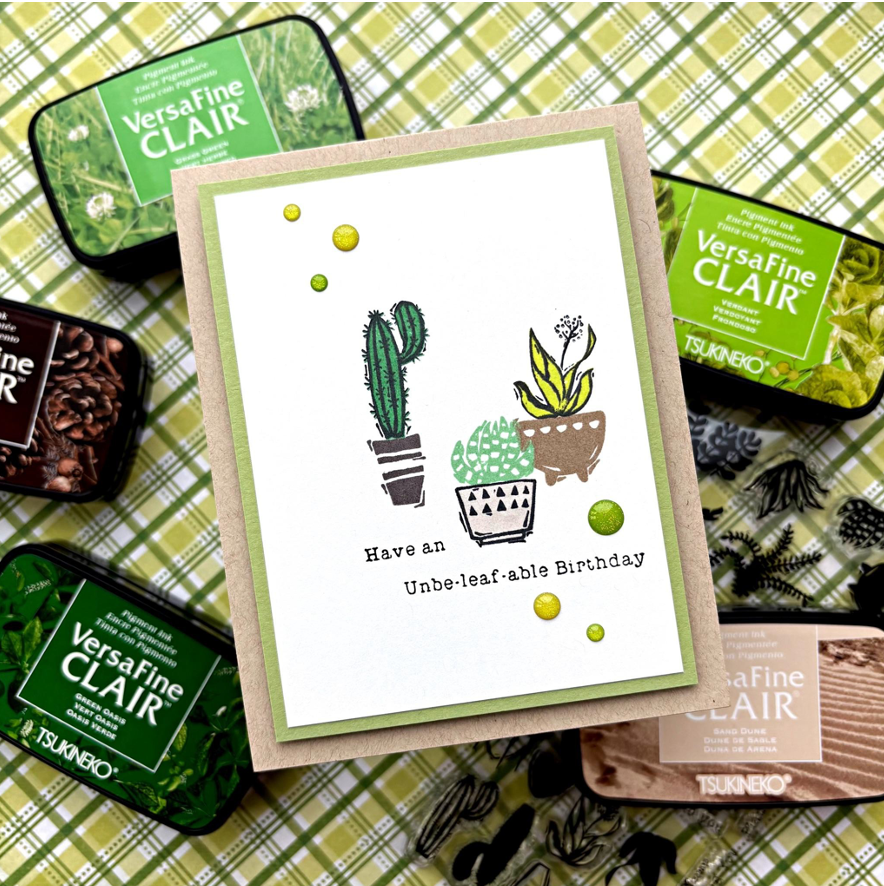
Hi everyone! It’s Jessica here. I am always looking for ways to create gender-neutral birthday cards, and I am so excited to share a beginner-friendly version today. This plant stamp set has some punny sentiments for Valentine’s Day, too. Some of the phrases are perfect for all-occasions, which makes this set so versatile to pair up with the potted plants images.
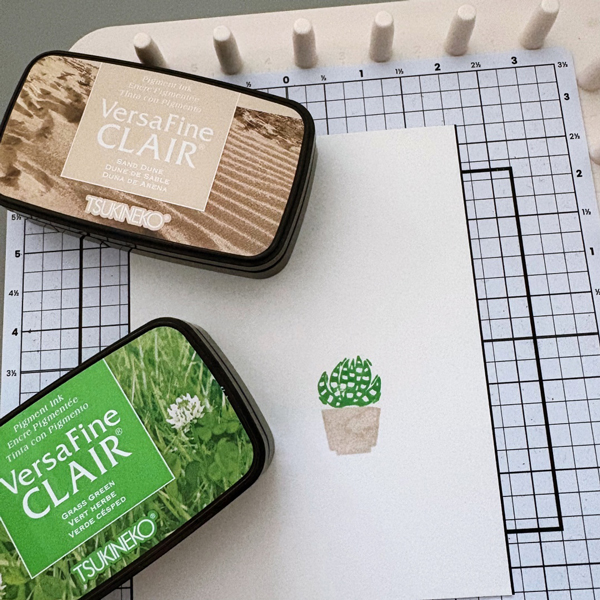
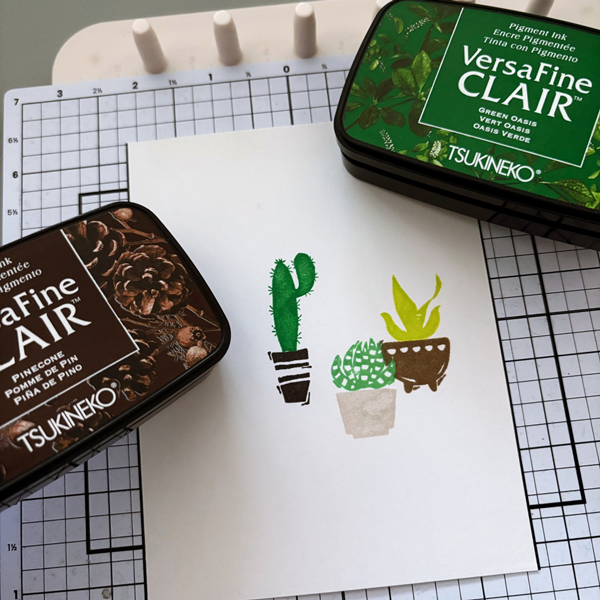
Step 1: Stamp the succulent plant with VersaFine Clair Grass Green ink pad. For the pot, use VersaFine Clair Sand Dune. Stamp another succulent image on a post-it note and fussy cut the image for masking in step 2. Tip: Stamp on the sticky edge of the post-it note so that the fussy cut image will turn into a temporary sticker
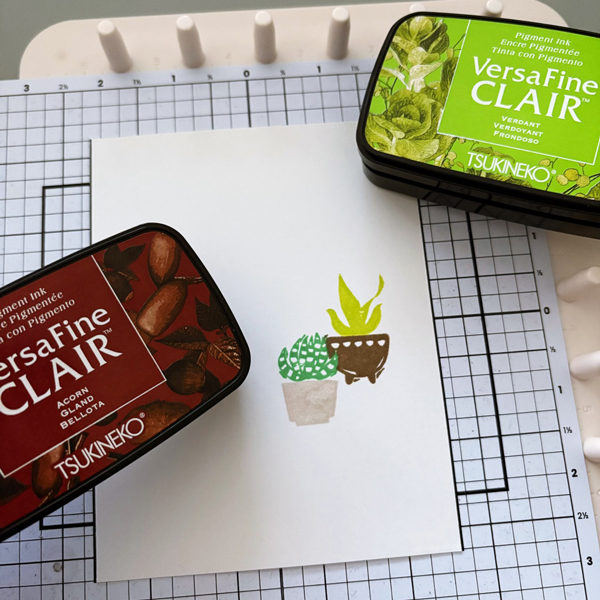
Step 2: Mask the stamped succulent image with the fussy cut sticky note. Then stamp the second plant pot with VersaFine Clair Verdant and Acorn. Masking the succulent plant creates the illusion that it sits in front of the second plant pot. I did not overlap the two plants very much, but you could stamp the two closer together to emphasize the spatial arrangement.
Step 3: For the third cactus plant, stamp with VersaFine Clair Green Oasis and Pinecone. I love the different shades of greens and browns in the VersaFine Clair line; they complement each other so well.
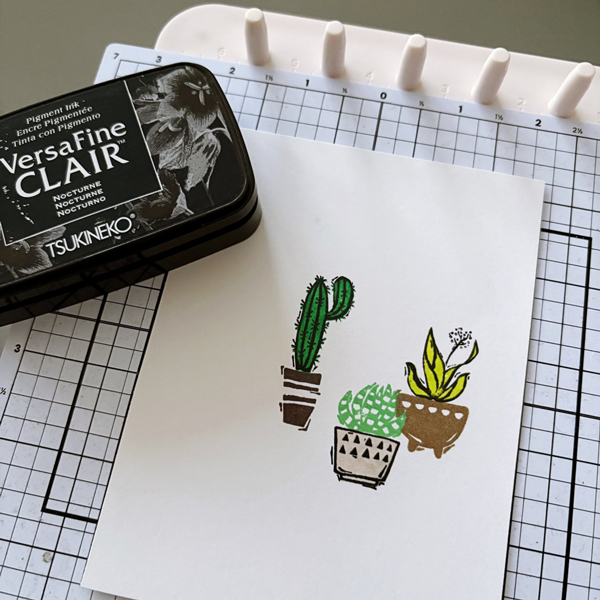
Step 4: Lastly, stamp the outline images with VersaFine Clair Nocturne ink pad. The super cute pun sentiment was also stamped with the same ink.
Step 5: Trim the stamped card panel to 3 ½’’ x 4 ¾’’. Adhere it to a 3 ¾’’ x 5’’ piece of green cardstock, then adhere both layers to a cardbase with foam tape.
Step 6: For the final finishing touch, add a few enamel drops from Doodlebug Sprinkles Limeade.
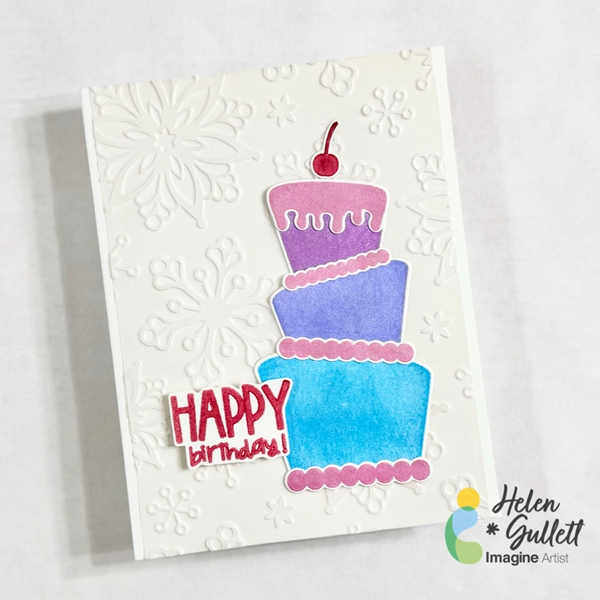
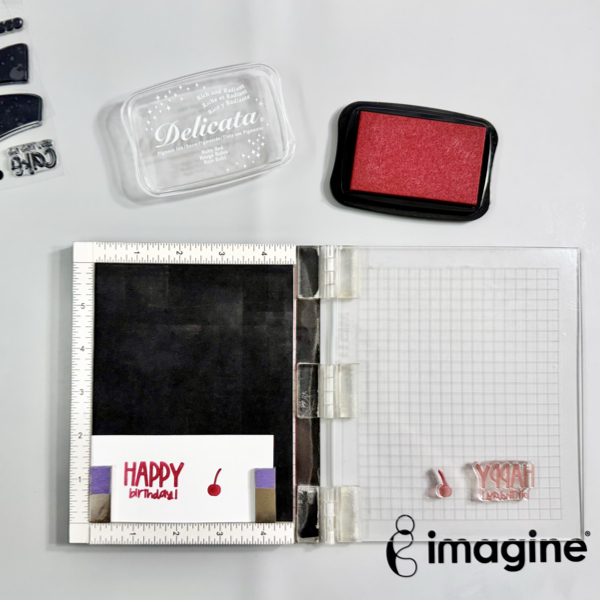
Hello crafty friends… If you are like me, I always need birthday cards at any season. Since it is Winter now, today we are going to make a Winter themed birthday card. Let’s gather your supplies and make it together.
Skill: Intermediate Time: 15-20 minutes
Directions:
Step 1
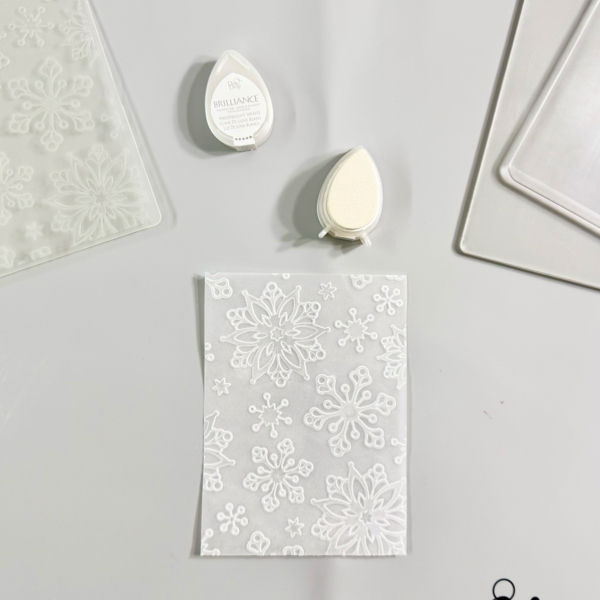
First, cut out a piece of vellum paper into 4.25 inch x 5.5 inch (or any size that will fit inside your embossing folder).
Add some of the Brilliance Moonlight ink to the embossing folder on the raised side, carefully add the vellum paper to the embossing folder, and then run it through the die cutting machine (make sure to follow your die machine sandwich instructions for embossing folder).
It’s optional, you add more of the white ink to the embossed vellum if you want to.
Use a craft heat gun to dry the ink on the embossed vellum.
Step 2
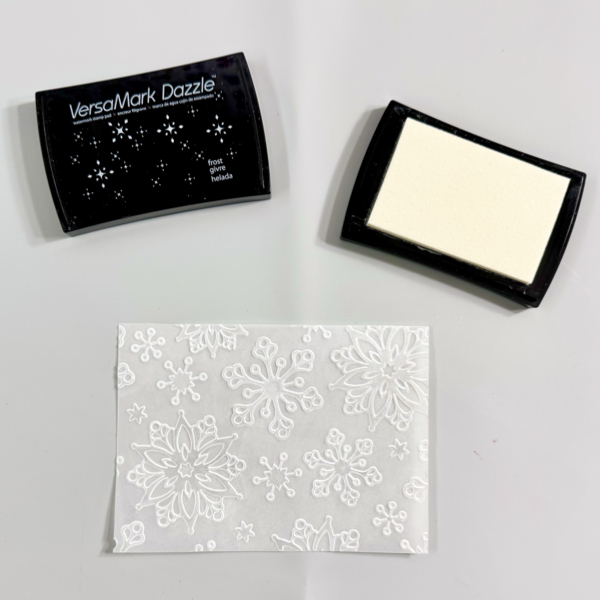
To add more shine and sparkle to the white snowflake embossed vellum, gently rub some of the VersaMark Dazzle Frost ink pad on the embossed side (raised image).
Dry the ink on the embossed vellum with a craft heat gun.
Trim it into 4 inch x 5.5 inch. I suggest using scissors instead of papertrimmer.
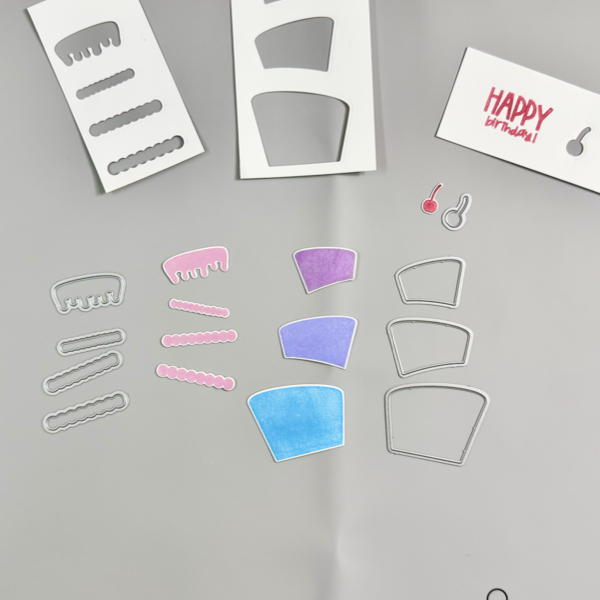
Step 3
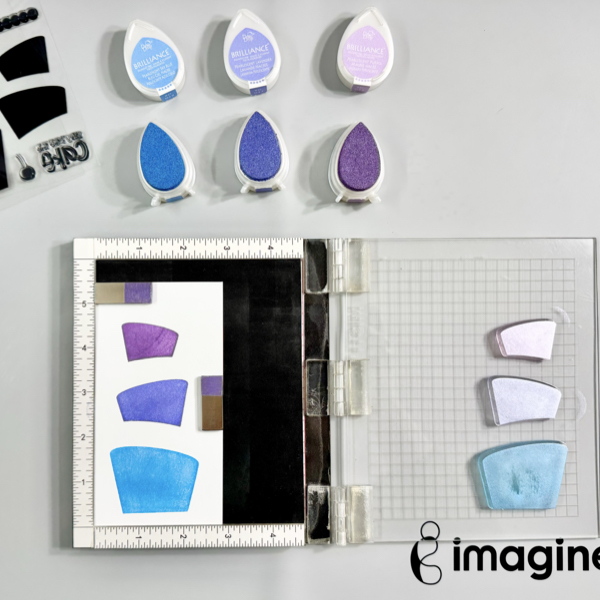
Add the 3 cake image stamps on the stamping tool, and then add the Brilliance inks (Pearlescent Purple, Pearlescent Lavender, and Pearlescent Sky Blue) to each cake stamp. Stamp them on a piece of white cardstock.
Repeat this step if needed to get good solid stamped images.
Dry the ink well with a craft heat gun and set it aside.
Step 4
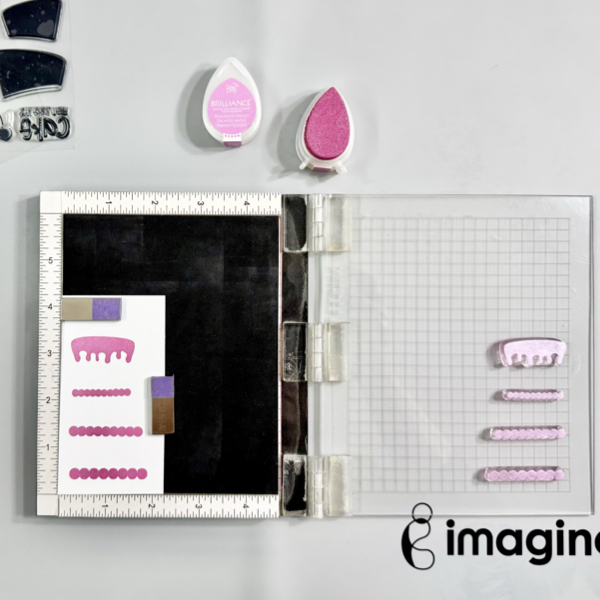
Add the icing image stamps on the stamping tool, and then add the Brilliance Pearlescent Orchid to each cake stamp. Stamp them on a piece of white cardstock.
Repeat this step if needed to get good solid stamped images.
Dry the ink well with a craft heat gun and set it aside.
Step 5
Next, stamp the cherry and sentiment using the stamping tool with Delicata Ruby Red ink on a piece of white cardstock.
Repeat this step if needed to get a good solid stamped image.
Dry the ink well with a craft heat gun and set it aside.
Step 6
Cut each image with the matching die using a die cutting machine.
If you do not have the matching die set for your stamp set, you can fussy the stamped images with micro-tip scissors.
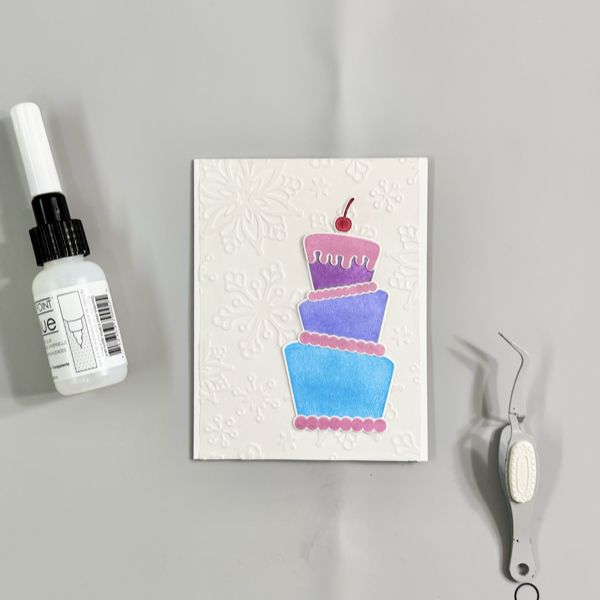
Step 7
Add the embossed vellum paper to the card using On Point Glue, press gently to make sure the vellum adhered well to the card background.
Add the birthday cake pieces to the card using On Point Glue, press gently to make sure they adhered well to the vellum background.
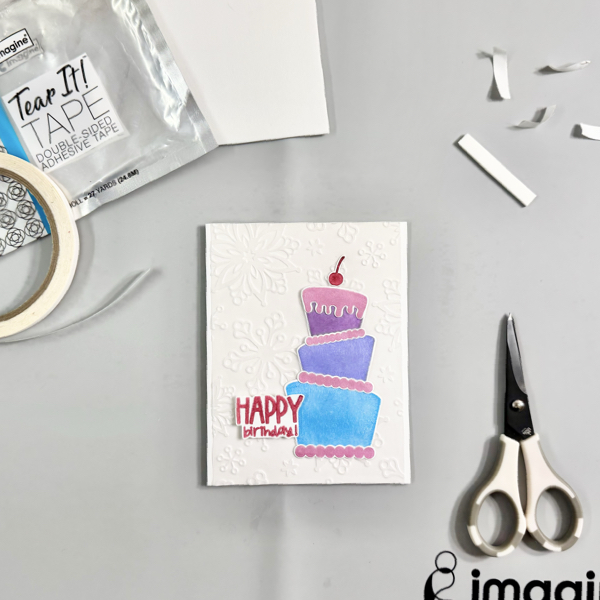
Step 8
Fussy cut the sentiment using the micro-tip scissors.
Add some of the white fun foam to the back of the sentiment using some of the Tear It! Tape, then add the sentiment to the card.
This card is easy and fun to make, especially the Brilliance Pearlescent inks give extra sparkle to the cake!
Thank you for stopping by our blog today. Have a wonderful day!
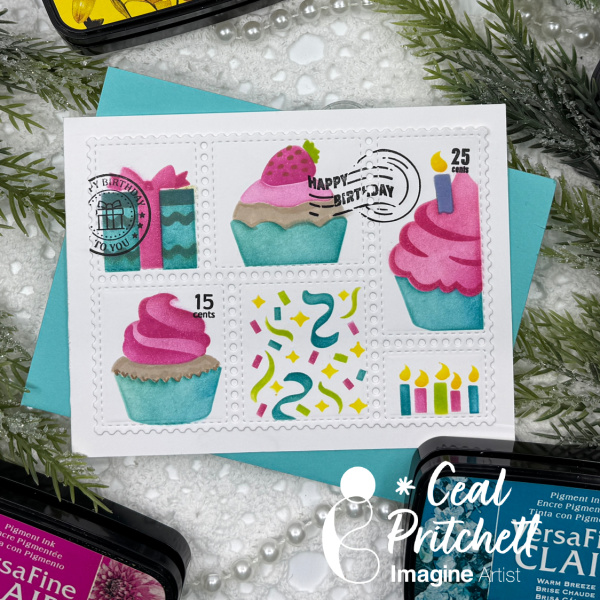
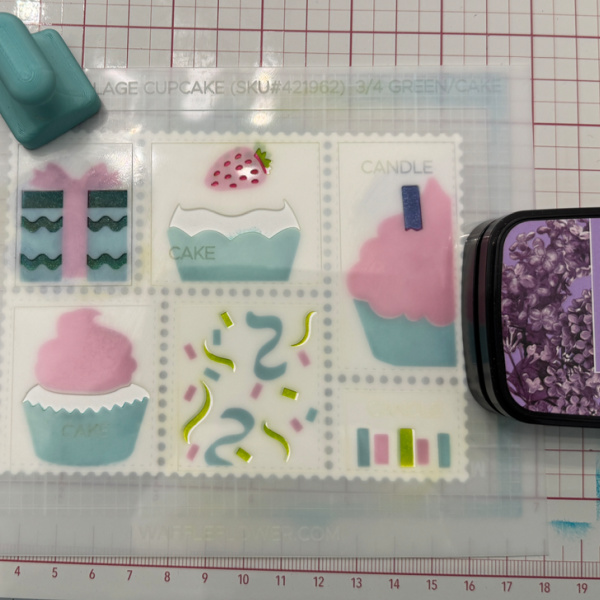
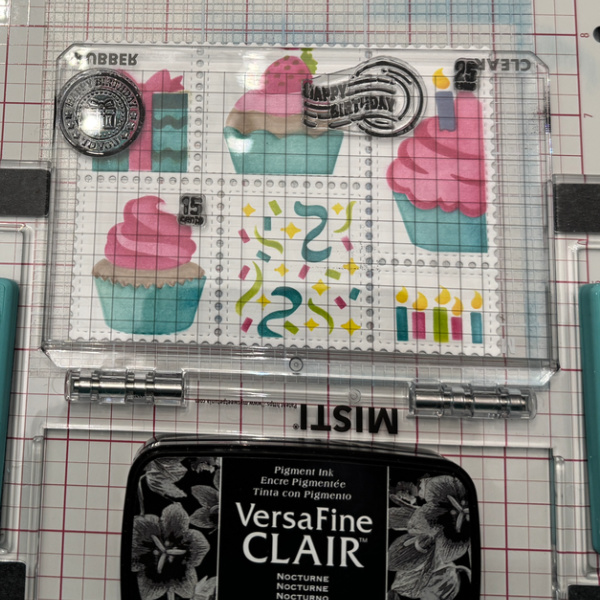
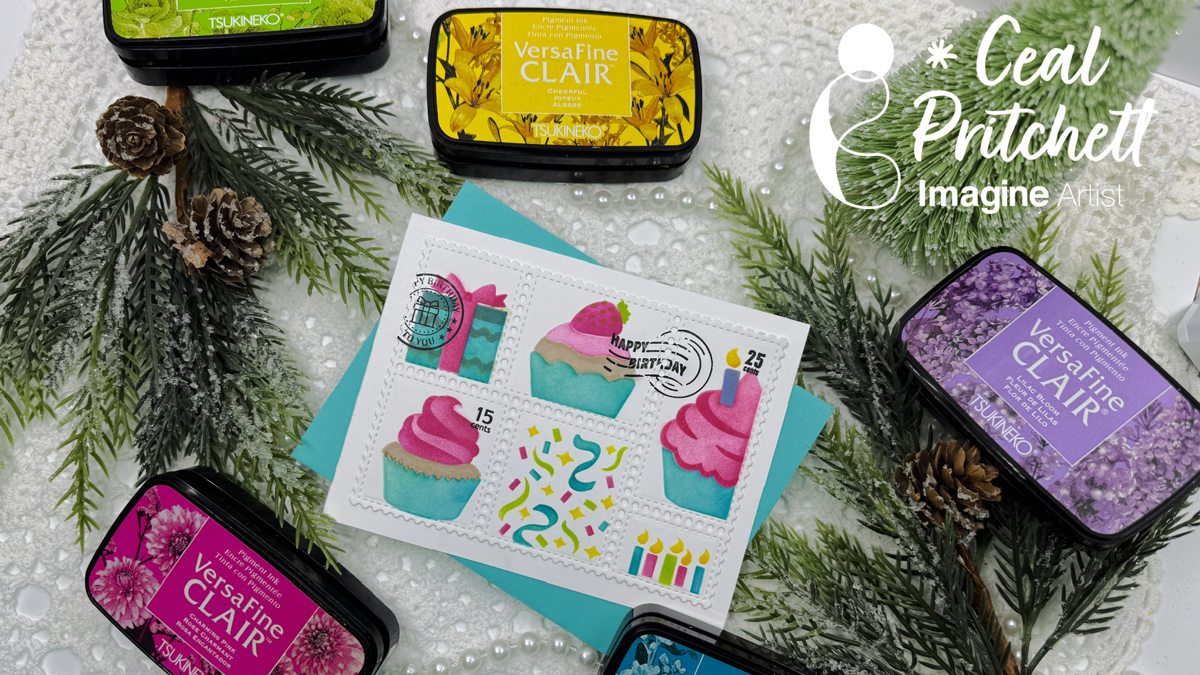
It’s Ceal, back to share with you. Today I am sharing a birthday card using some postage stencils which are all the rage lately.
Skill: Beginner Time: 30 minutes
Directions:
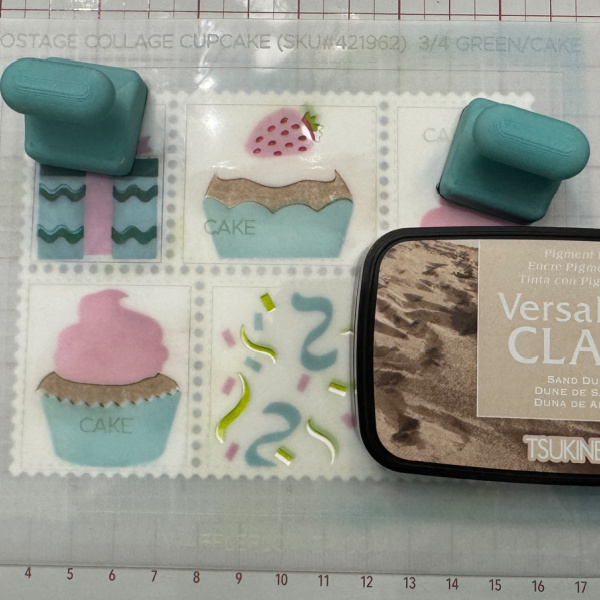
Gather your supplies. For this project you will need several colors of inks, postage stencils and a postage die.
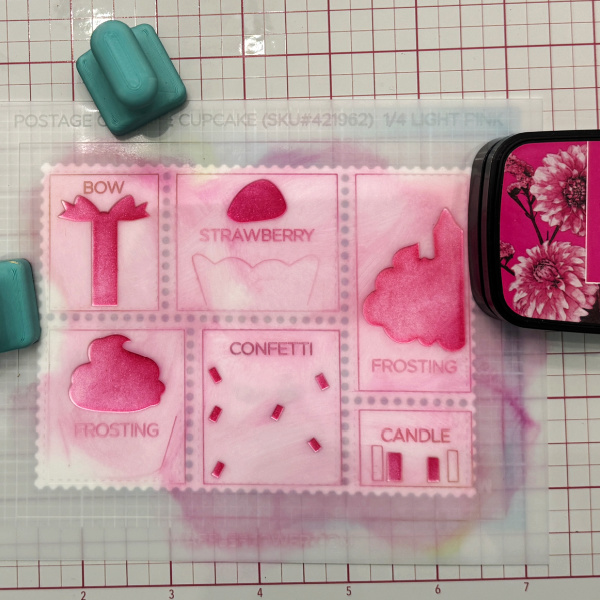
Step 1: Using VersaFine Clair Charming Pink, ink the first layering stencil.
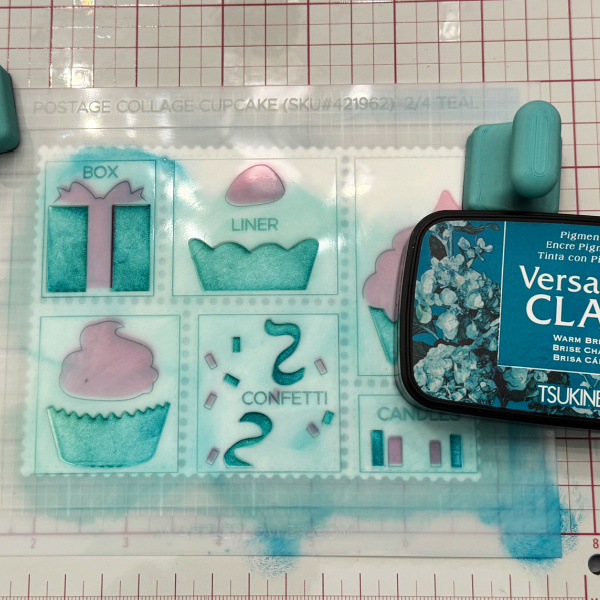
Step 2: Using VersaFine Clair Warm Breeze, ink up the second layering stencil.
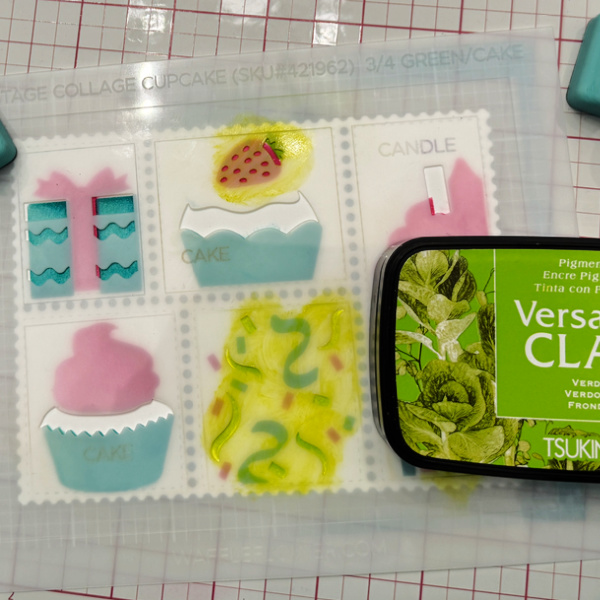
Step 3: Using VersaFine Clair Verdant, ink the strawberry, the candles and the streamers.
Step 4: Using VersaFine Clair Lilac, ink the candle and over the present.
Step 5: Using VersaFine Clair Sand Dune, ink the cake portion.
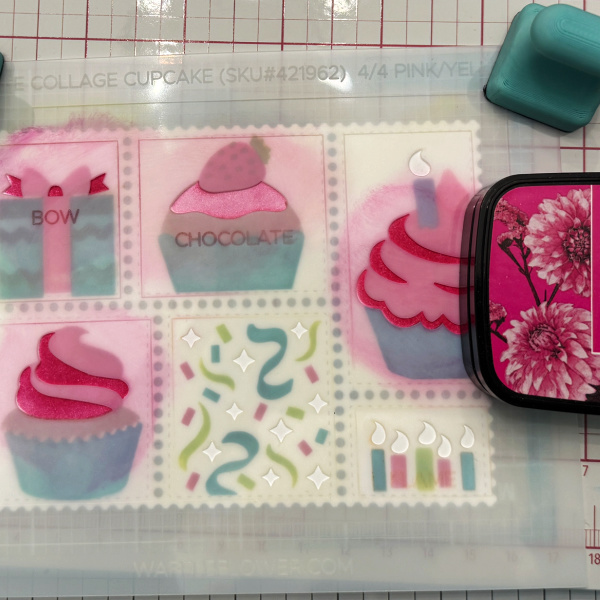
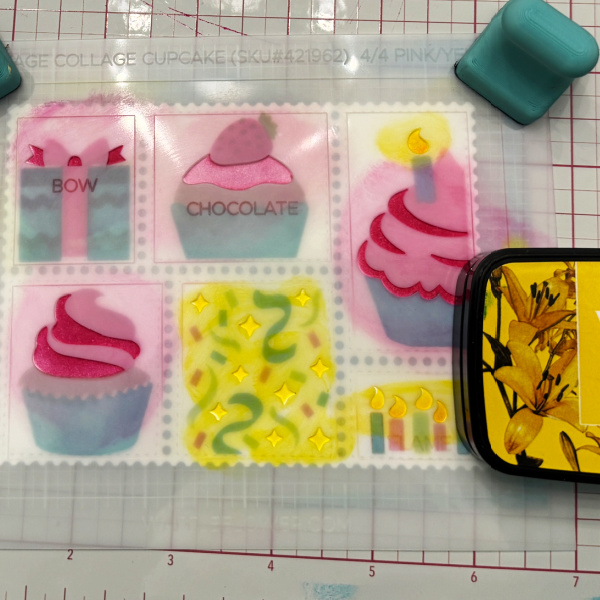
Step 6: Using VersaFine Clair Charming Pink, ink over the cake frosting again with a heavy hand, the cupcake up top I inked with what ink was left on the brush.
Step 7: Using VersaFine Clair Cheerful, ink over the candle flames and streamers.
Step 8: Stamp sentiment and postage with VersaFine Clair Nocturne.
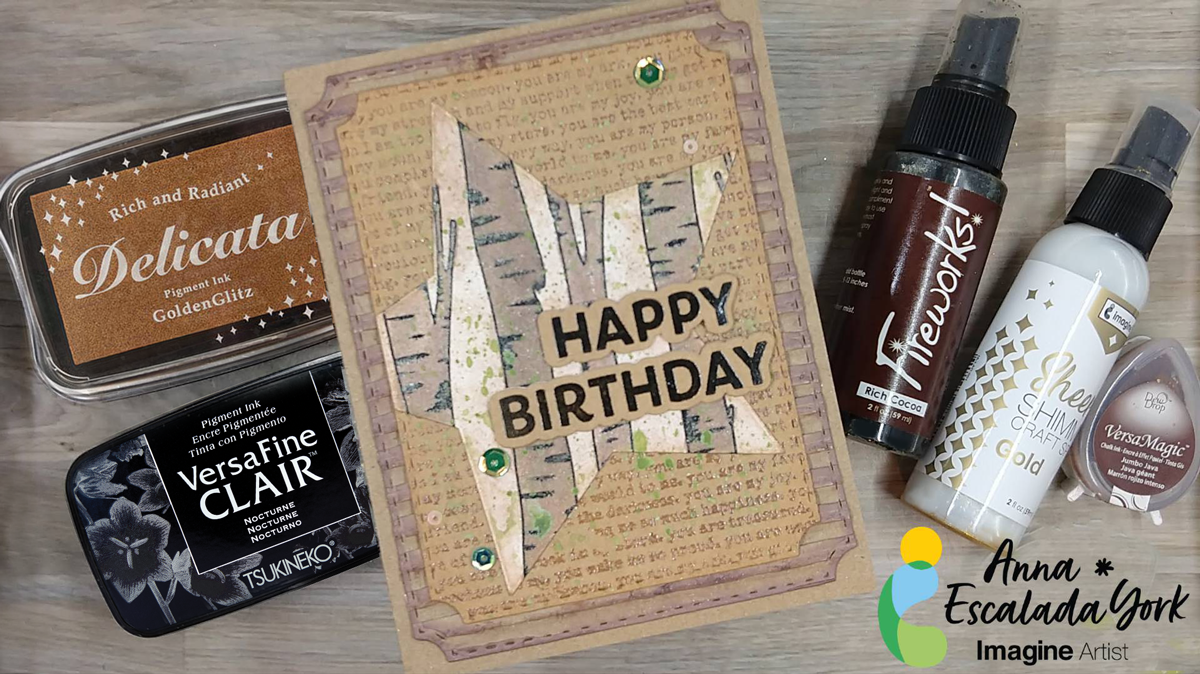
I wanted to use my husband’s birthday to make him a personalized birthday card. He loves to be in nature and loves it when I use recycled materials (mostly because then we don’t have to buy new things). I also added a background that expresses how I feel about him.
Skill Level: Intermediate Time: 2 hours
Directions:
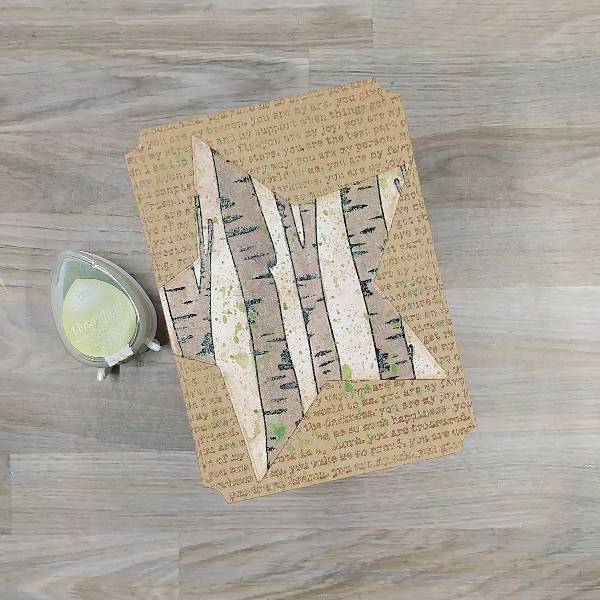
Step 1: Stamp a piece of kraft cardstock with a text-based background stamp with Jumbo Java VersaMagic Chalk Ink. Heat emboss with clear embossing powder. Die cut the panel with the second-largest die from a nested A2-sized nested die set.
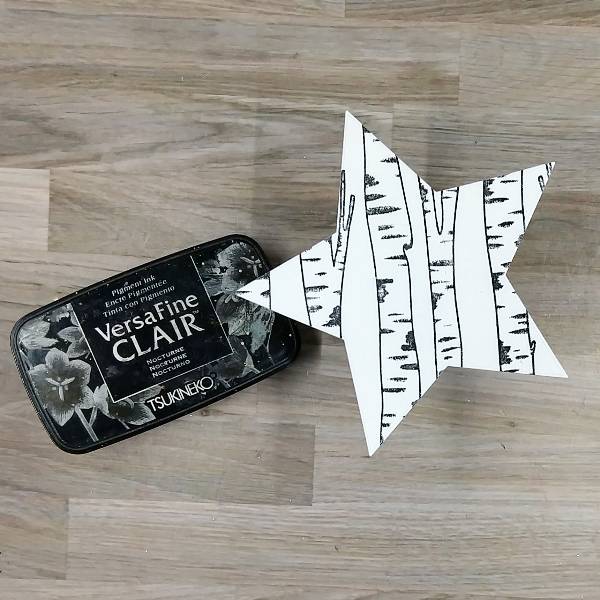
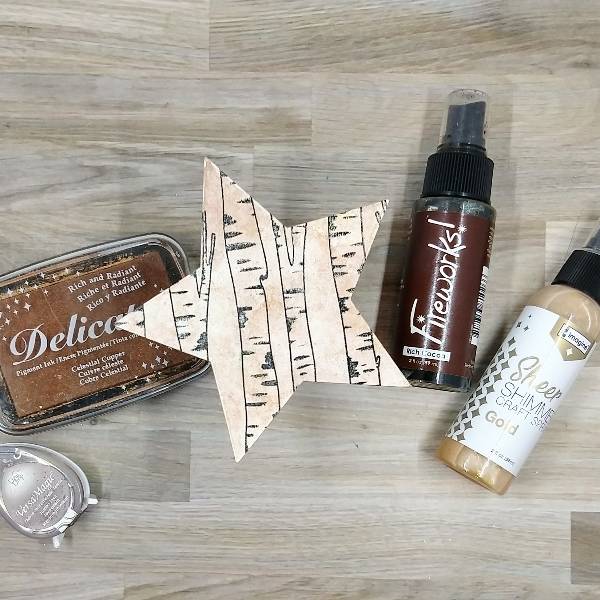
Step 2: Stamp a large tree stamp set on a piece of watercolor paper with Nocturne VersaFine Clair ink. Heat emboss with clear embossing powder. Die cut with a mid-sized star die from a nested star die set.
Step 3: Lightly spray Rich Cocoa Fireworks! Craft Spray and Gold Sheer Shimmer Craft Spray onto the watercolor stamped star. Blot a little of the spray off with a paper towel and allow to dry. Then Then press Celestial Copper Delicata ink onto a piece of acetate packaging and spray with water. Watercolor smoosh the star by pressing the liquid copper onto the panel. Then repeat the watercolor smooshing with Jumbo Java VersaMagic Chalk Ink mixed with water on the acetate. Let the panel dry again.
Step 4: Mix some of the remaining Jumbo Java VersaMagic Chalk Ink and water with more of the Rich Cocoa Fireworks! Craft Spray to make a darker brown watercolor. Paint the trees with the watercolor. Allow to dry. Apply a second coat of watercolor to a few trees to add interest and darker trees. Allow to dry a second time.
Step 5: Stamp a sentiment on kraft cardstock with Nocturne VersaFine Clair ink. Then heat emboss with more clear embossing powder. Then die cut with the corresponding dies.
Optional: Die cut 2 more die cut layers for each of the sentiment (3 layers total for each of the dies–1 that is the stamped kraft layer, and two scrap layers). Glue the layers together and set aside to dry.
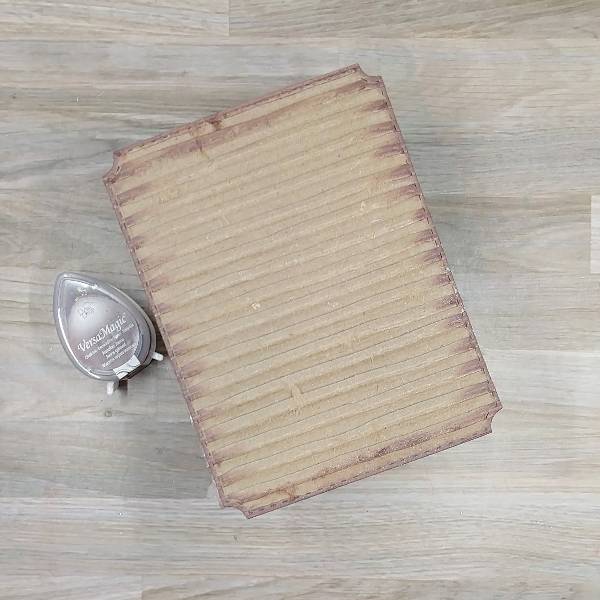
Step 6: Die cut a piece of corrugated cardboard with the largest die from an A2-sized nesting panel die set. Then brush the edges of the panel with Jumbo Java VersaMagic Chalk Ink.
Step 7: Use a sponge dauber to ink blend the edges of the star with Celestial Copper Delicata ink. Glue the die cut star onto the smaller, stamped panel. Trim the overhanging left part of the star. Then press Tea Leaves VersaMagic Chalk Ink onto acetate packaging and spray with water.
Splatter the Tea Leaves-colored watercolor onto the panel. Add a couple of watercolor smooshed areas to add interest (or to cover areas where you want splatters but the splatters are not doing what you want). Allow to dry.
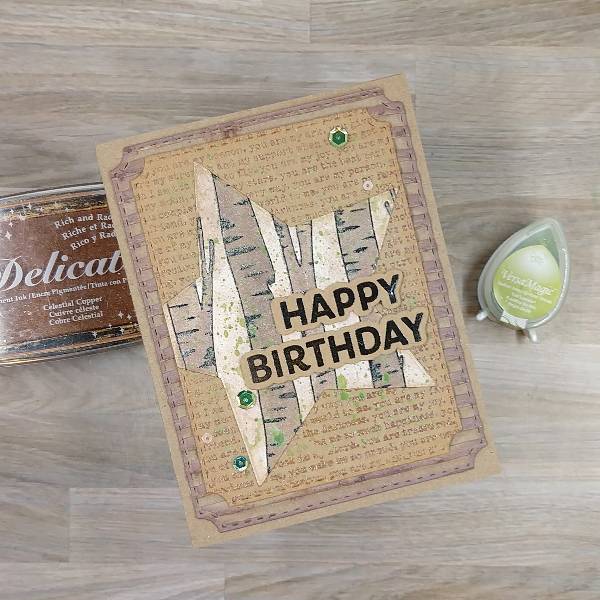
Step 8: Brush the edges of the smaller, stamped panel with the Celestial Copper Delicata ink pad.
Step 9: Assemble the card. Glue the two panels together. Glue the sentiment strips onto the panel. Then add sequins on the lower left and upper right parts of the card. Then glue the whole thing onto an A2-sized kraft card base.
Other • Altenew – die set – Wings & Petals (for the sentiment) • Altenew – stamp set – Wings & Petals (for the sentiment) • Catherine Pooler – sequin mix – Wintergreen • Pink and Main – die set – Notched Corners • Simon Hurley create – background stamp – Timber! • Simon Says Stamp – die set – Nested Stars Wafer Dies • Simon Says Stamp – background stamp – You Are • Kraft cardstock • Watercolor paper • Corrugated cardboard • Clear Embossing Powder