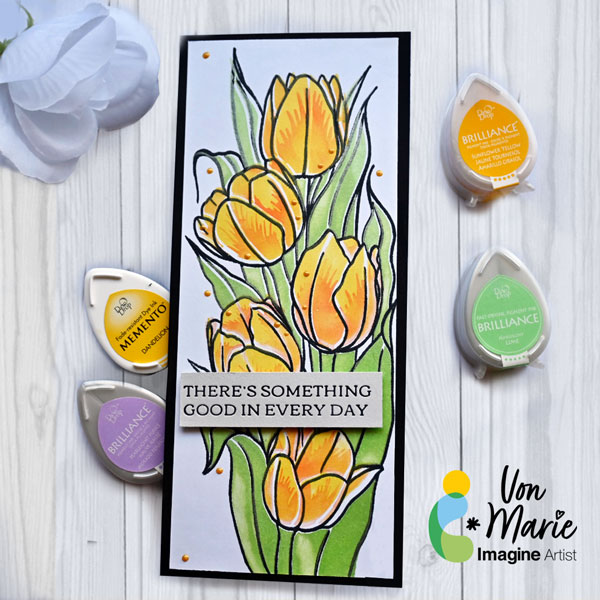
Hello everyone. Von Marie here with my latest video using some Beautiful inks to help with my project for a Spring Tulips Slimline Card. These Brilliance Dew Drops and VersaFine Clair inks are really nice and fun to use. I love the coverage they gave me for these Tulips and Leaves. I had so much fun making this card. Full Details are on my video.
Skill: Intermediate Time: 45 Mins
Craft Supplies
White Cardstock Paper 110 lb. Black Cardstock Paper 110 lb. Slimline Card Base 8 x 31/2 Glass Board and magnets Die-cutting Machine Betterpress Machine Glue Foam Tape
Other Products Used: Unity Stamps Co.Slimline Layering Tulips W/Coordinating Stencil Pinkfresh Studio Betterpress Favorite Things Sentiment Plates ALTERNATIVE PRODUCTS THAT CAN BE USED TO RECREATE SOMETHING SIMILAR Any inks, stencil, or flower stamp You can watch how to create this Spring Card Here
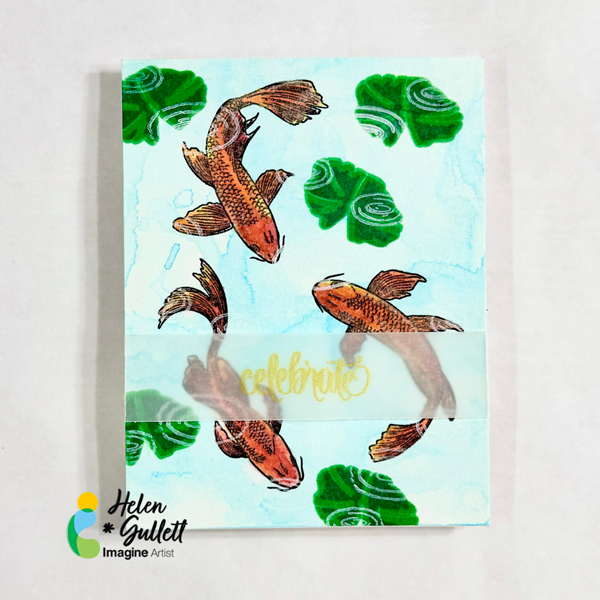
Hello crafty friends… Helen is here today. Today, I would like to share an idea to make a Lunar New Year card. Lunar New Year marks the new month for the new year in oriental calendar and it is also the beginning of Spring. Today we are going to do some watercoloring with Fireworks! Shimmery Craft Sprays and layer stamping technique.
Skill: Beginner Time: 15 minutes
Direction:
Step 1
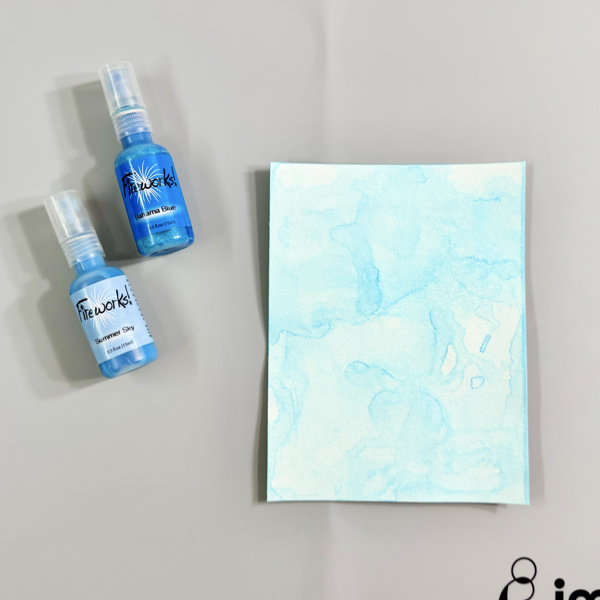
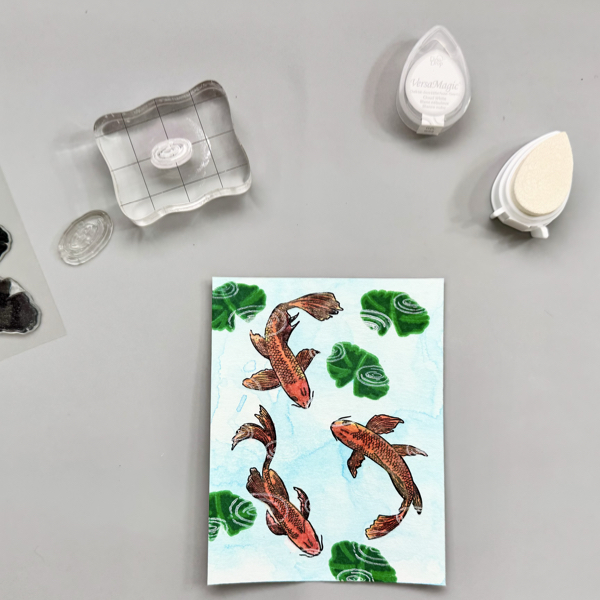
First, cut out a piece of watercolor paper (I used 140 lb watercolor paper) into 4.25 inch x 5.5 inch.
Spray the Fireworks! Summer Sky and Bahama Blue on the craft mat, and lightly spray with water to create the watercolor ink blends on the craft mat.
Smoosh the watercolor paper to the ink and repeat it until the watercolor inks cover the paper. You can dry the ink in between smooshing for extra texture and more layers of colors. Dry the whole panel with a craft heat gun.
Step 2
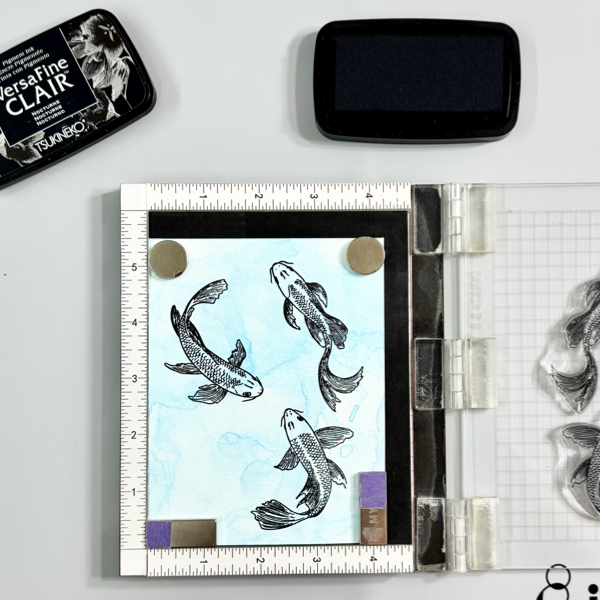
Put the watercolored background panel on the stamping tool.
Stamp the fish images on it with the VersaFine Clair Nocturne ink pad. Repeat it if needed.
Dry the stamped images well with a craft heat gun and put it back on the stamping tool.
Step 3
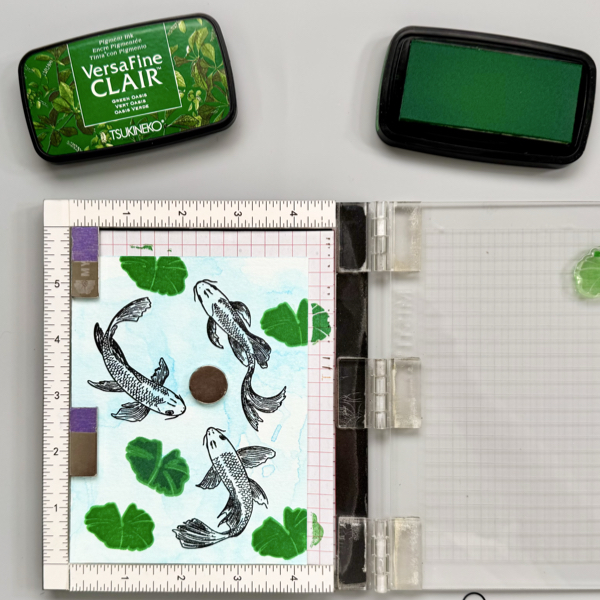
Stamp the bottom layer of the lily pad leaf with the VersaFine Clair Grass Green ink pad.
Move the position of the stamp to a different spot and stamp again.
Repeat it until you like the pond scene on the card.
Dry the stamped images well with a craft heat gun and put it back on the stamping tool.
Step 4
Next is to stamp the second layer of the lily pad leaf. Position the stamp on top of the first stamped image and then stamp it with the VersaFine Clair Green Oasis ink pad.
Repeat it until you stamp on all the first layer stamped images.
Dry the stamped images well with a craft heat gun and put it back on the stamping tool.
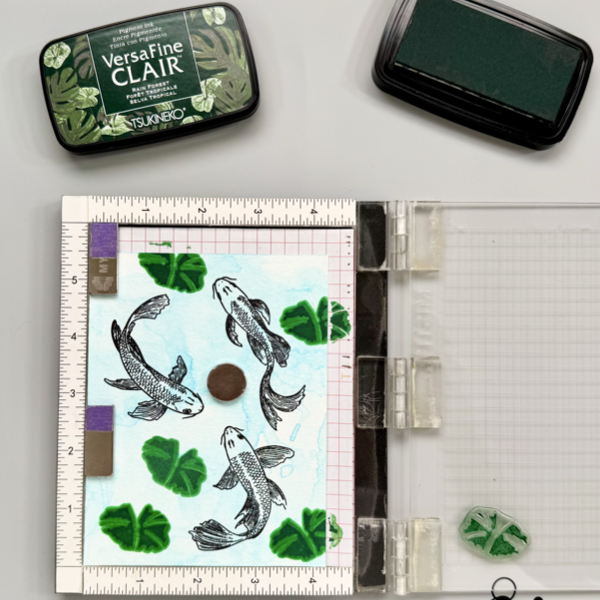
Step 5
Next is to stamp the third layer of the lily pad leaf which means it is the top layer of the layer stamps. Usually it would be the darkest color of the color combo.
Position the stamp on top of the previous stamped image and then stamp it with the VersaFine Clair Rain Forest ink pad.
Repeat it until you stamp on all the stamped images.
Dry the stamped images well with a craft heat gun.
Step 6
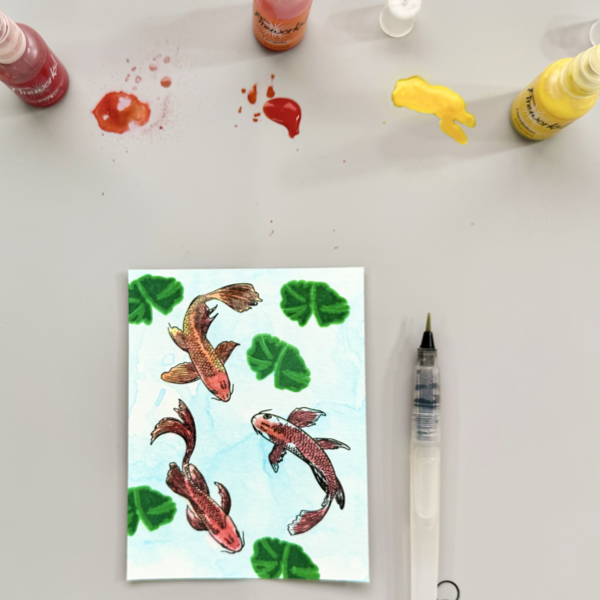
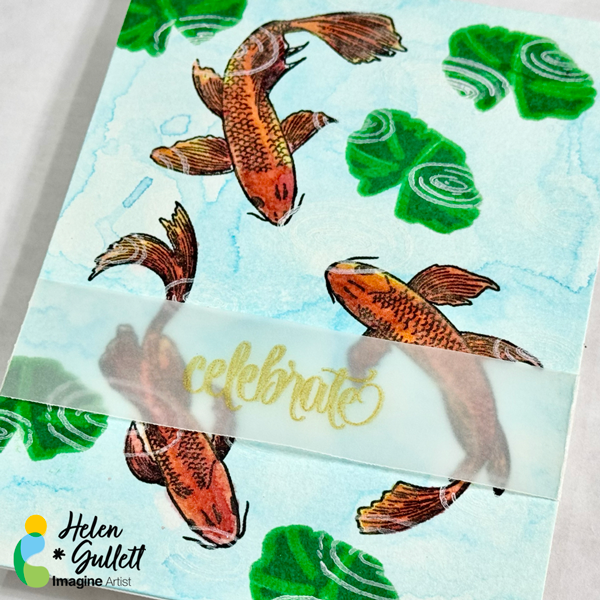
This is the fun part: watercoloring with the Fireworks! Shimmer Craft Spray.
Spray a little bit of each color of the Lady Bug, Dandelion, and Tangelo directly on the craft mat. I only sprayed it once and no water was added.
Pick up the ink color and start watercoloring the koi fishes. Each color will blend well.
For a lighter pigment color, you spray a little bit of water and mix it together.
Step 7
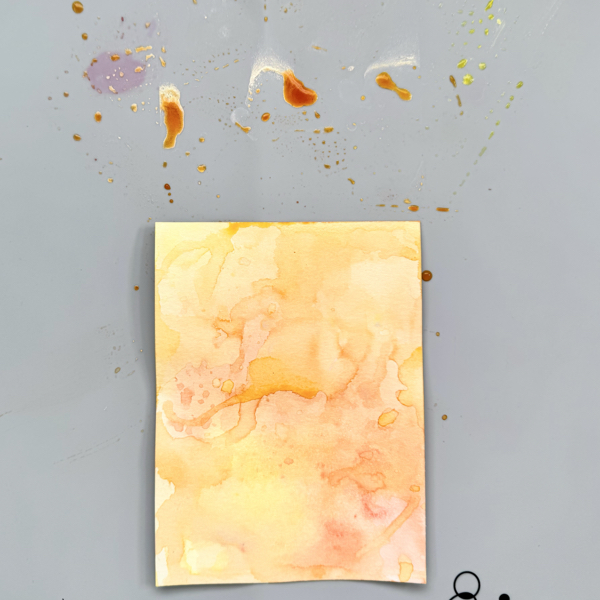
DO NOT WIPE OFF the left over of the Fireworks! Shimmer Craft Sprays on the mat.
Spray more water on it and smoosh a piece of watercolor paper on it to get another watercolored background panel.
Dry it well with a craft heat gun and set side so you can use for your next project.
Step 8
Stamp the water ripple stamps all over the panel with a stamping block using the VersaMagic Cloud White Dew Drop ink.
This will give the water ripple effect that those koi fishes swimming under the water.
One more time dry the whole panel with a craft heat gun to make sure all the inks are set well on the watercolor paper.
Step 9
Cut a piece of heavyweight heat-resistant vellum paper into 1 inch x 4.75 inch.
Put it on the stamping tool and secure it with the magnets.
Stamp the sentiment in the middle of the vellum paper with Brilliance Galaxy Gold Dew Drop ink.
Carefully remove it from the stamping tool and dry the ink with a craft heat gun.
Step 10
Add the sentiment vellum strip on the background panel and fold the extra flap to the behind of the panel and secure it with some of the On Point Glue.
Add the whole finished panel to the card base with On Point Glue. Hold it down for a couple minutes until the glue dries well.
The card is done.
This watercolored Lunar New Year card is flat enough to send it in regular mail for sure. I hope you will give this tutorial a try to create your own flat card yet has some layers effect on it.
Thank you so much for stopping by our blog today. Have a wonderful day!
Craft Supplies
Imagine Crafts:
VersaFine Clair – Grass Green, Green Oasis, Rain Forest, Nocturne
Hello crafty friends… If you are like me, I always need birthday cards at any season. Since it is Winter now, today we are going to make a Winter themed birthday card. Let’s gather your supplies and make it together.
Skill: Intermediate Time: 15-20 minutes
Directions:
Step 1
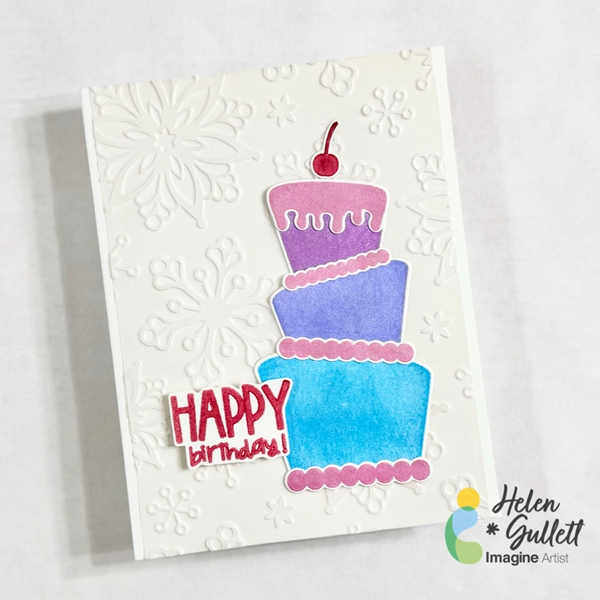
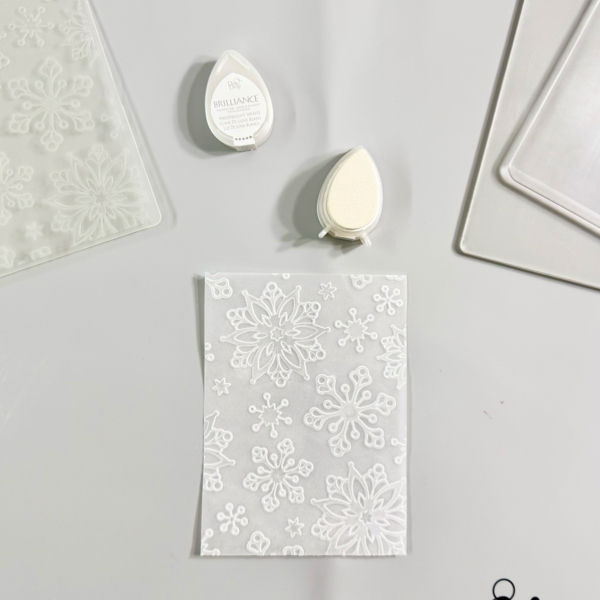
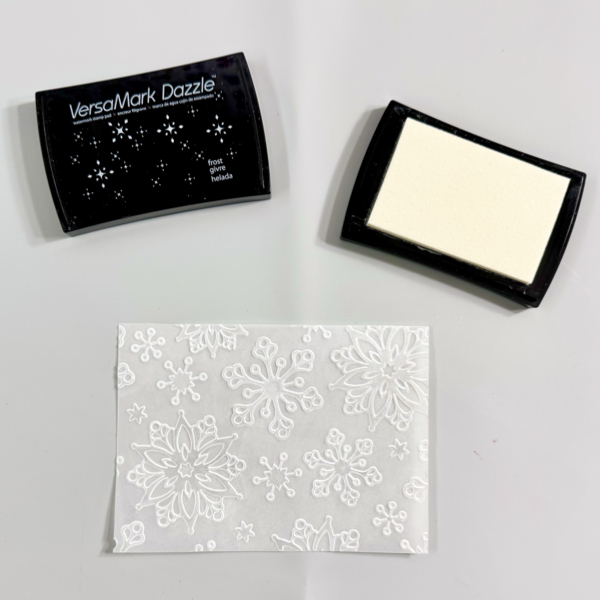
First, cut out a piece of vellum paper into 4.25 inch x 5.5 inch (or any size that will fit inside your embossing folder).
Add some of the Brilliance Moonlight ink to the embossing folder on the raised side, carefully add the vellum paper to the embossing folder, and then run it through the die cutting machine (make sure to follow your die machine sandwich instructions for embossing folder).
It’s optional, you add more of the white ink to the embossed vellum if you want to.
Use a craft heat gun to dry the ink on the embossed vellum.
Step 2
To add more shine and sparkle to the white snowflake embossed vellum, gently rub some of the VersaMark Dazzle Frost ink pad on the embossed side (raised image).
Dry the ink on the embossed vellum with a craft heat gun.
Trim it into 4 inch x 5.5 inch. I suggest using scissors instead of papertrimmer.
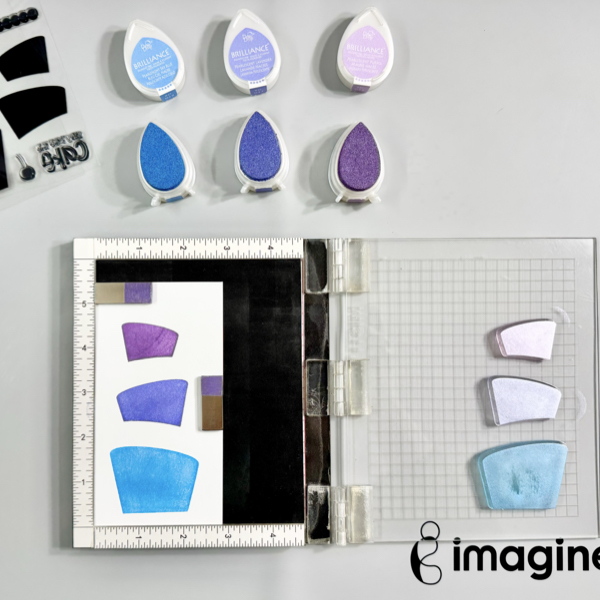
Step 3
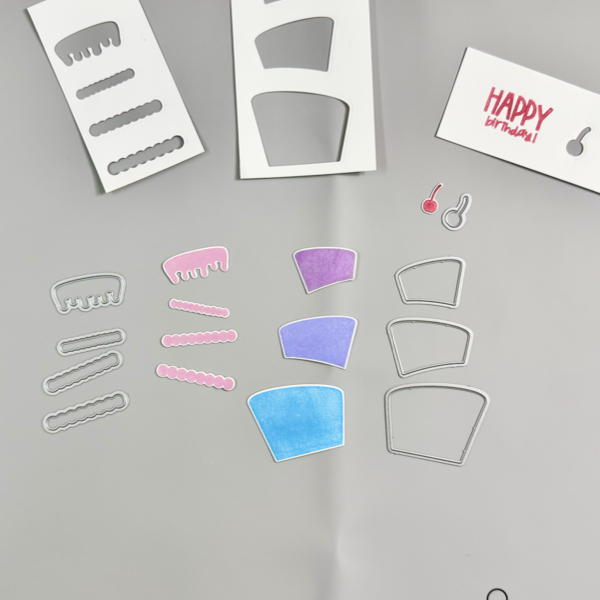
Add the 3 cake image stamps on the stamping tool, and then add the Brilliance inks (Pearlescent Purple, Pearlescent Lavender, and Pearlescent Sky Blue) to each cake stamp. Stamp them on a piece of white cardstock.
Repeat this step if needed to get good solid stamped images.
Dry the ink well with a craft heat gun and set it aside.
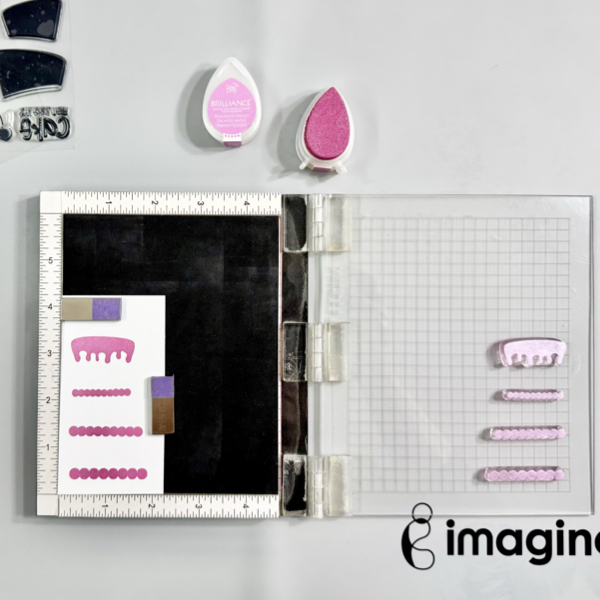
Step 4
Add the icing image stamps on the stamping tool, and then add the Brilliance Pearlescent Orchid to each cake stamp. Stamp them on a piece of white cardstock.
Repeat this step if needed to get good solid stamped images.
Dry the ink well with a craft heat gun and set it aside.
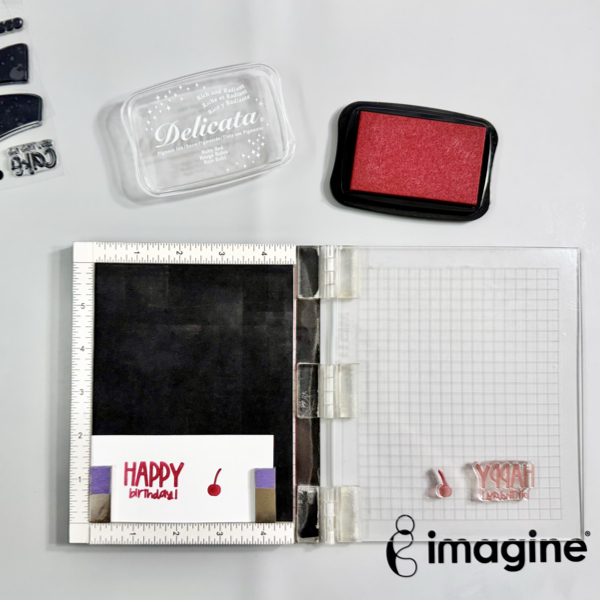
Step 5
Next, stamp the cherry and sentiment using the stamping tool with Delicata Ruby Red ink on a piece of white cardstock.
Repeat this step if needed to get a good solid stamped image.
Dry the ink well with a craft heat gun and set it aside.
Step 6
Cut each image with the matching die using a die cutting machine.
If you do not have the matching die set for your stamp set, you can fussy the stamped images with micro-tip scissors.
Step 7
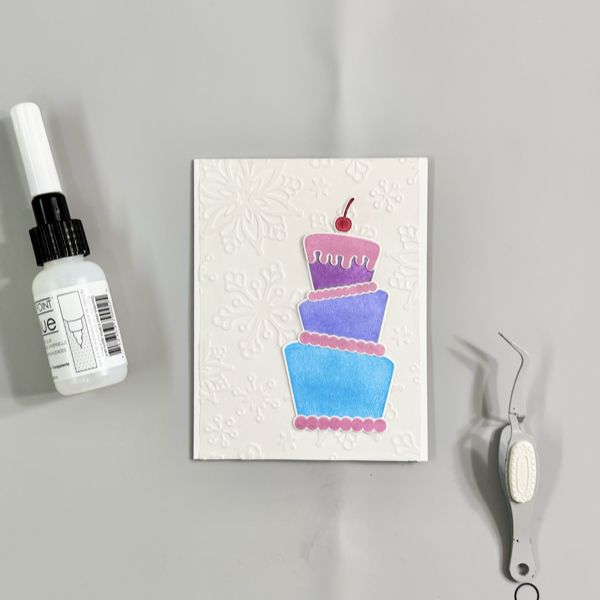
Add the embossed vellum paper to the card using On Point Glue, press gently to make sure the vellum adhered well to the card background.
Add the birthday cake pieces to the card using On Point Glue, press gently to make sure they adhered well to the vellum background.
Step 8
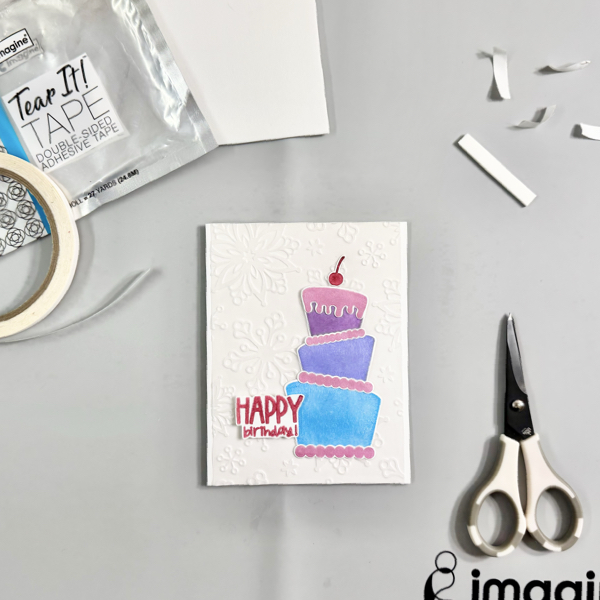
Fussy cut the sentiment using the micro-tip scissors.
Add some of the white fun foam to the back of the sentiment using some of the Tear It! Tape, then add the sentiment to the card.
This card is easy and fun to make, especially the Brilliance Pearlescent inks give extra sparkle to the cake!
Thank you for stopping by our blog today. Have a wonderful day!
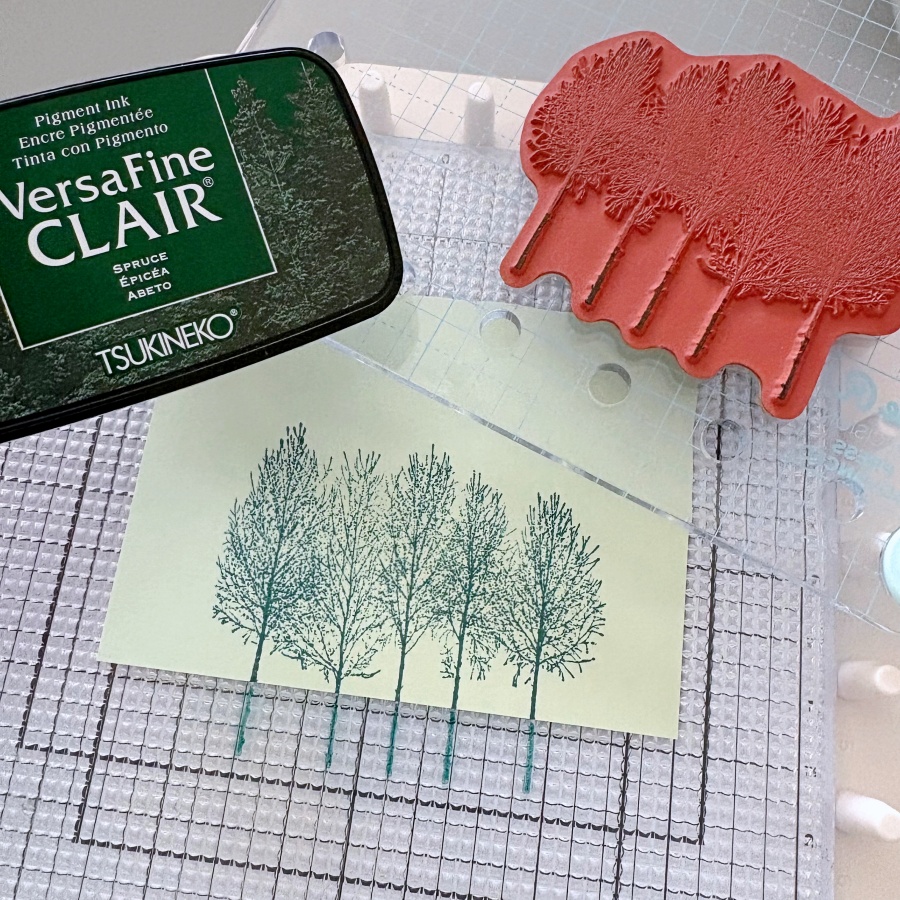
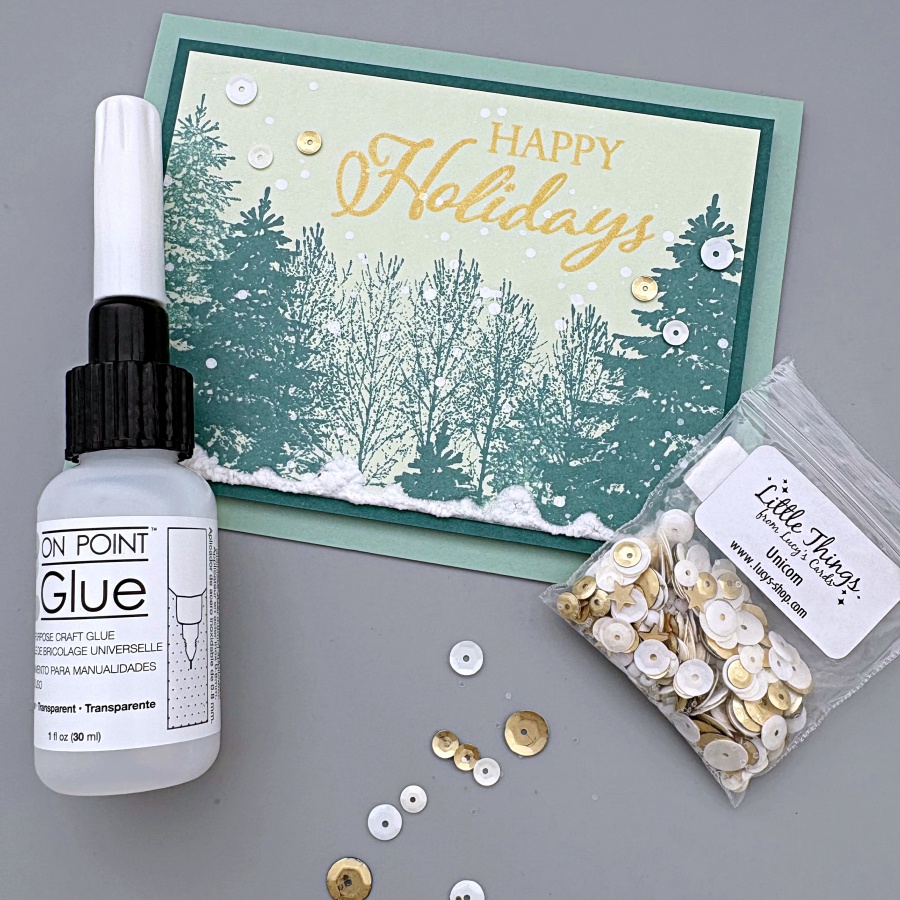
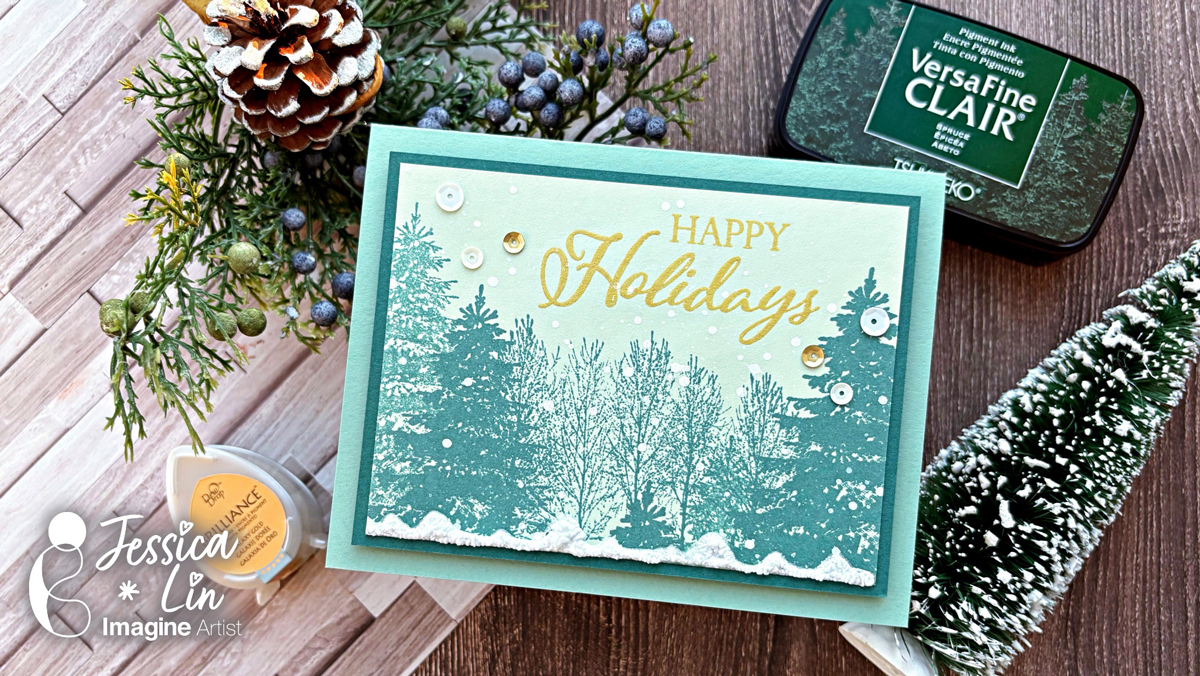
Hi everyone! It’s Jessica here. Today I have a beginner-friendly project to share with you. If you are just starting out and don’t have many ink pads, this tutorial is for you. I will be sharing some stamping techniques to help you create shades of color with just one ink pad. So let’s get started!
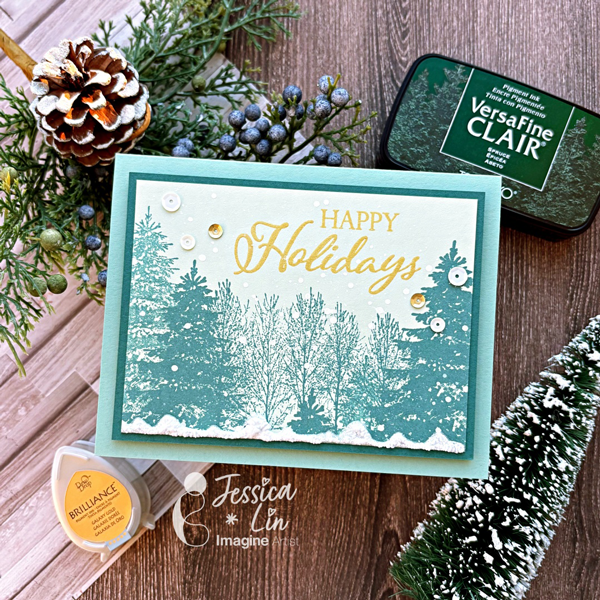
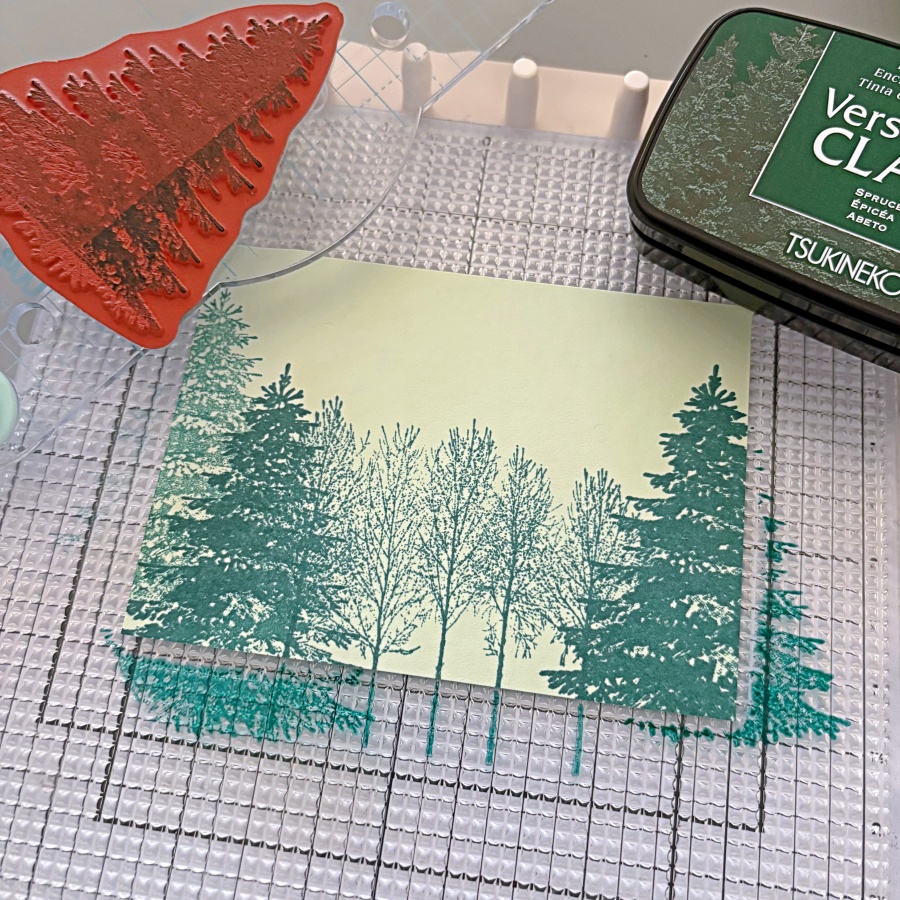
Step 1: The ink pad I will be using today is VersaFine Clair Spruce. It is perfect for stamping the pine tree images from Stampin’ Up’s Winter Woods set. I stamped the image in the center on a piece of 3 ½’’ x 4 ¾’’ Soft Seafoam cardstock.
Step 2: Then I stamped a different pine tree image on the left and right at various heights. You might notice that some of the pine trees appear darker; that is because I stamped the image twice. By using a stamp positioning tool, you can restamp an image at the same spot. In this case, it creates a darker shade of color even though you are using the same color ink pad. On the very left, there is a pine tree that looks lighter in color. To achieve this effect, you can stamp lightly on a piece of scrap paper first. Then, using the leftover ink, stamp on the cardstock to create a lighter shade.
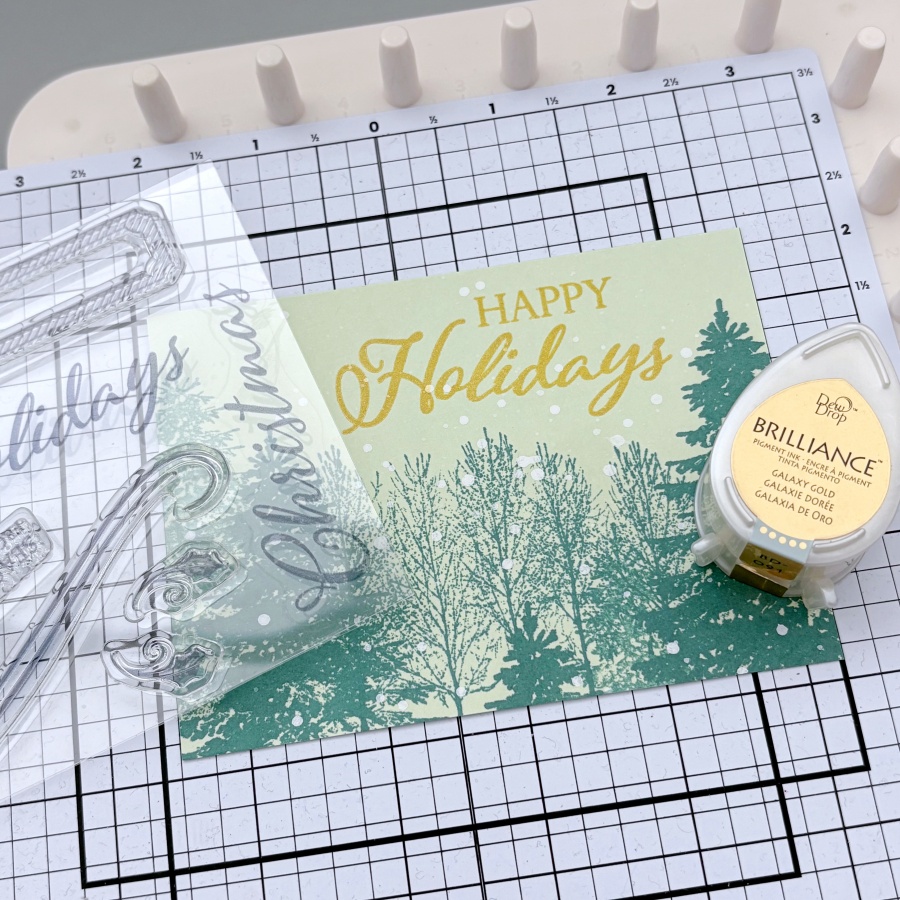
Step 3: I then sprinkled some diluted white acrylic paint for a snowing effect. Once the acrylic paint is dried, you can stamp the sentiment. I decided to use Stampin’ Up’s Merry Christmas to All stamp set and stamped it with Brilliance Galaxy Gold ink pad.
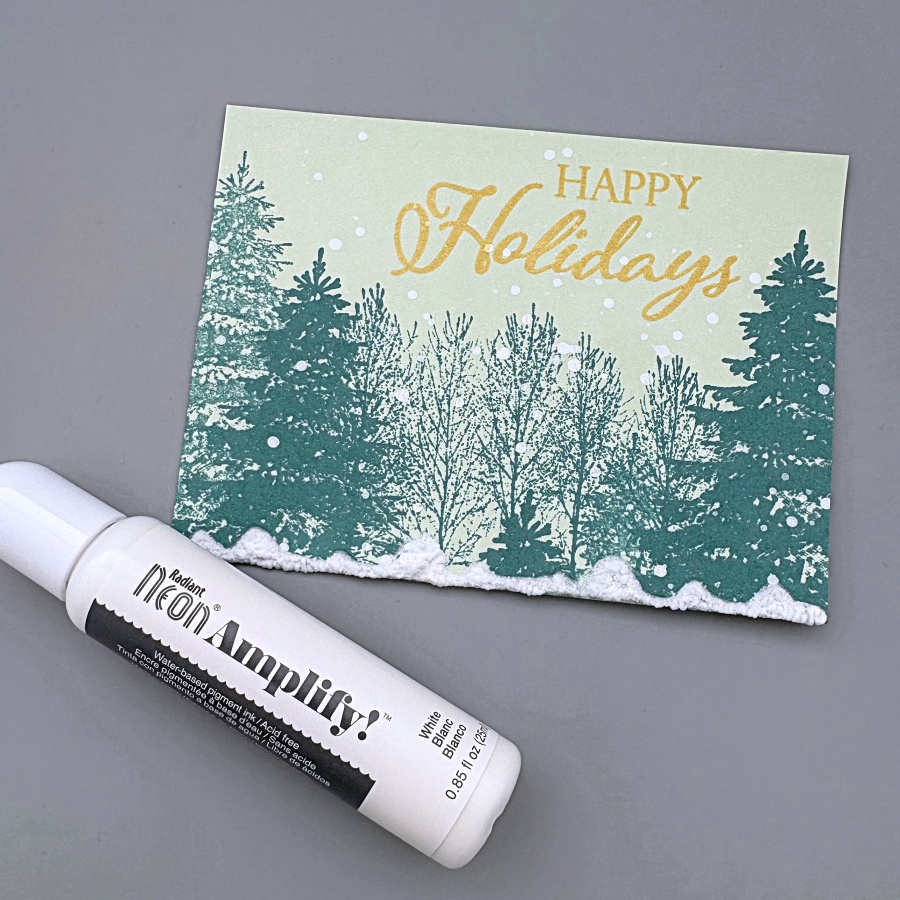
Step 4: For an even more dramatic snow effect, you could add white Neon Amplify to the bottom edge of the cardstock. I drew a wavy pattern that mimics the looks of piles of snow. You don’t have to wait for the puff paint to dry, you can heat set it with a heat gun immediately and the paint will puff up!
Step 5: Then I adhered the stamped panel to a piece of Shaded Spruce cardstock that measures 3 ¾’’ x 5’’. After that, mount the cardfront to an A2 Mint Macaron cardbase. For some finishing touches, I adhered some white and gold sequins with On-Point Glue, and this holiday card is complete!
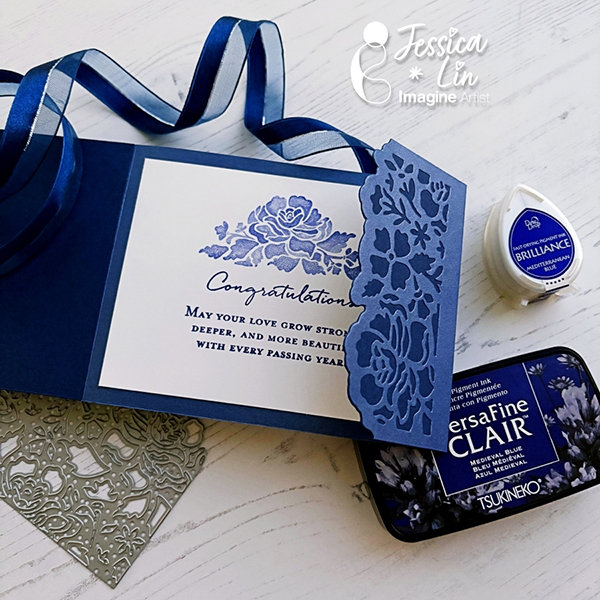
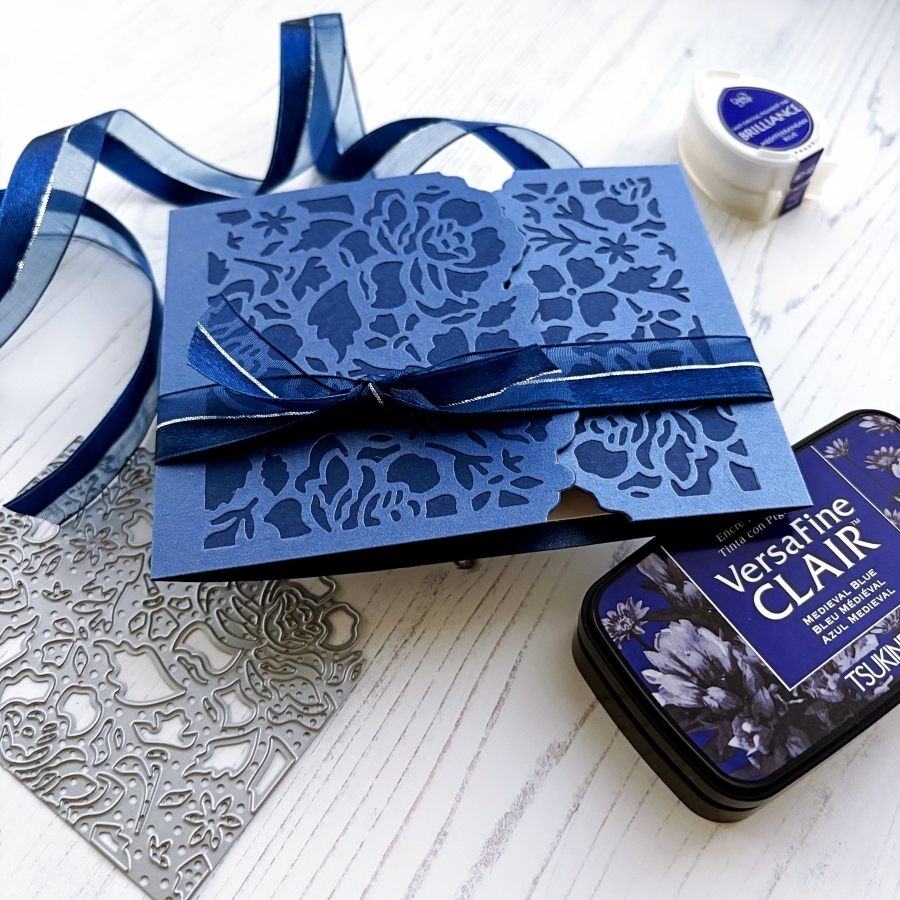
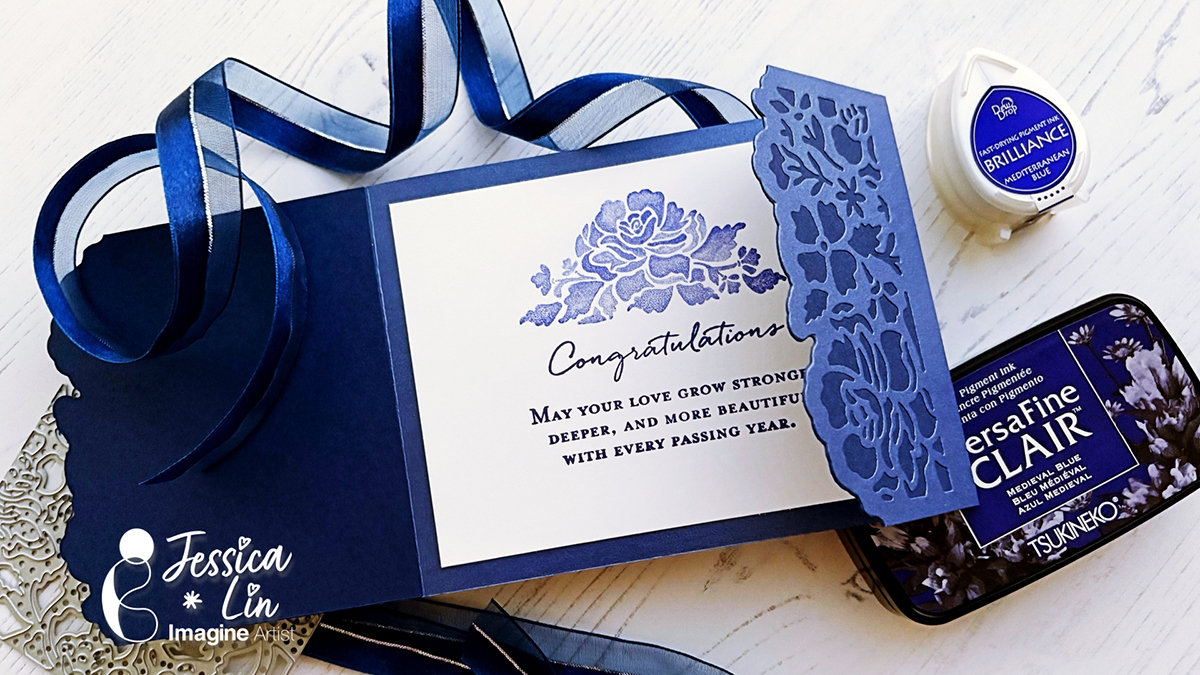
Hi everyone! It’s Jessica here. I am excited to share a wedding card idea today. This elegant layout is also perfect for wedding invitations. I love how this turned out and I’ll definitely be making more color variations in the future!
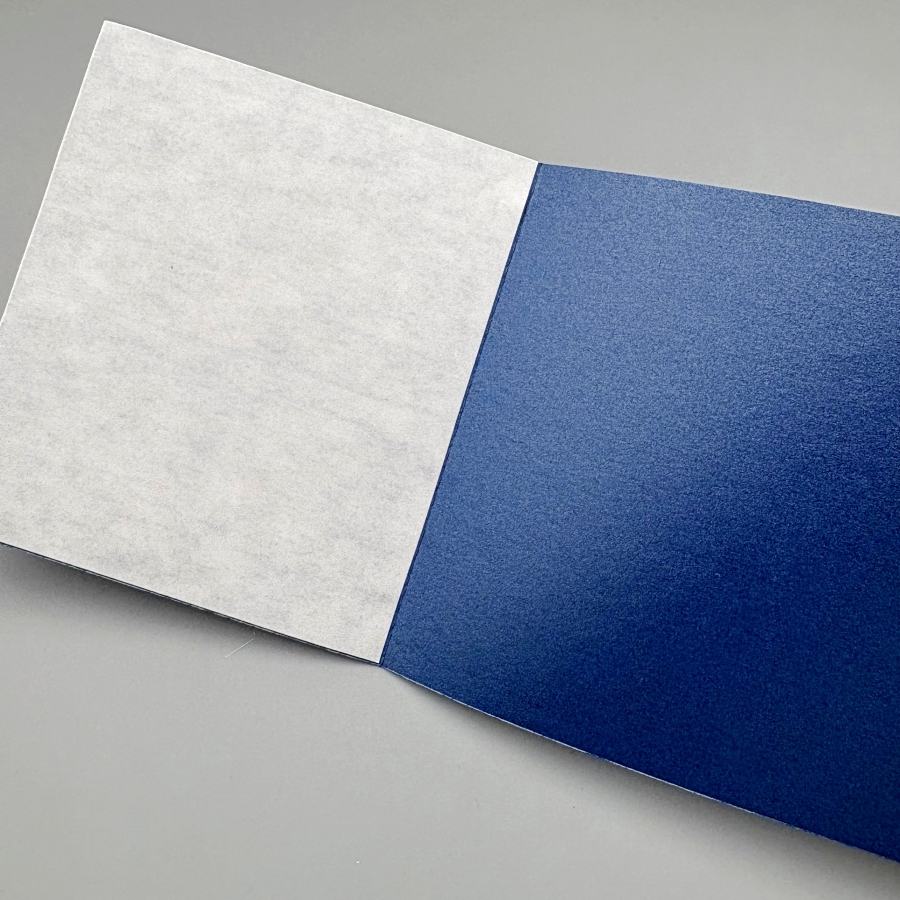
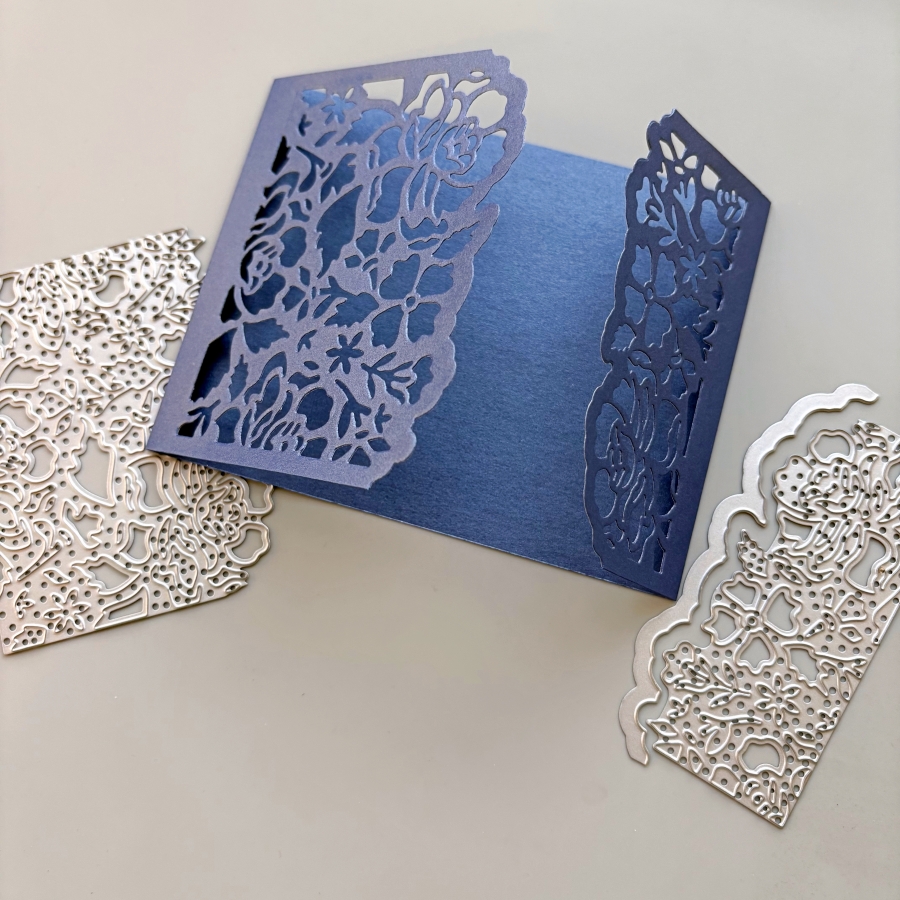
Step 1: On a piece of 4 ¼’’ x 5 ½’’ cardstock, score at 3 ⅜’’ and 8 ⅞’’. Then adhere Stick-It adhesive to the inner left and right flaps of the card. The Stick-It adhesive is great for sticking down large pieces of intricate die cut. If you don’t have the Stick-It adhesive, a great alternative would be liquid glue with fine-tip nozzles, such as the On-Point Glue.
Step 2: Die cut the left and right flaps with Stampin’ Up’s Detailed Floral dies. This would create beautiful card openings with delicate floral designs.
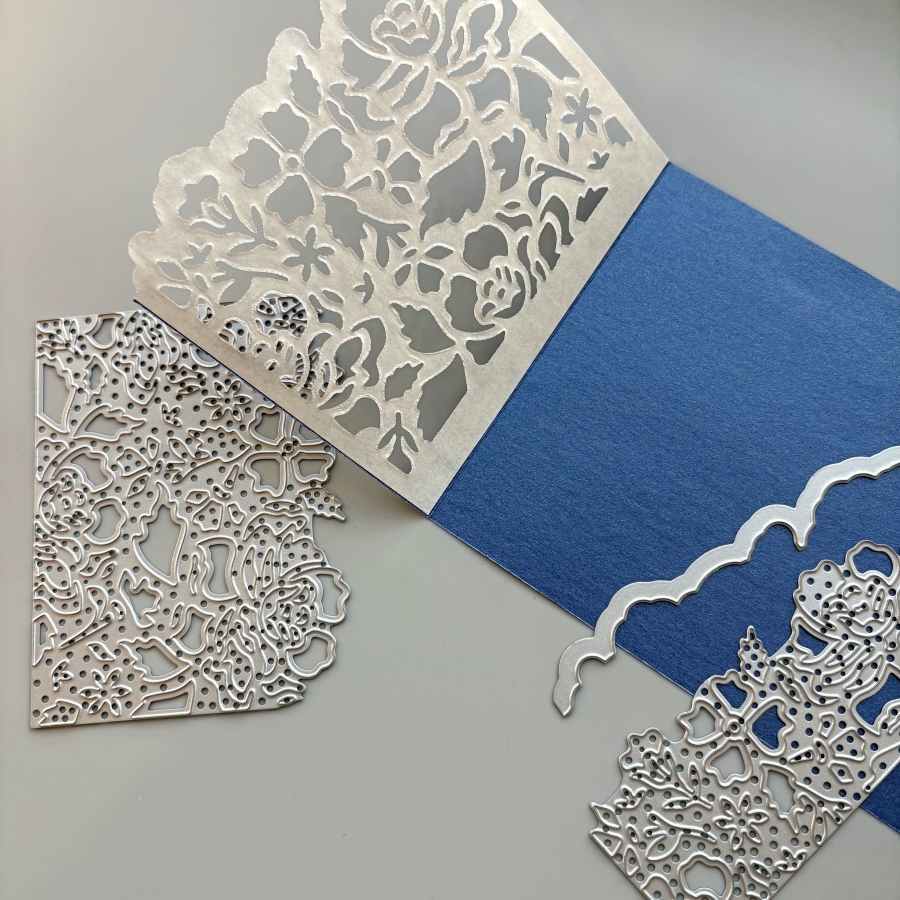
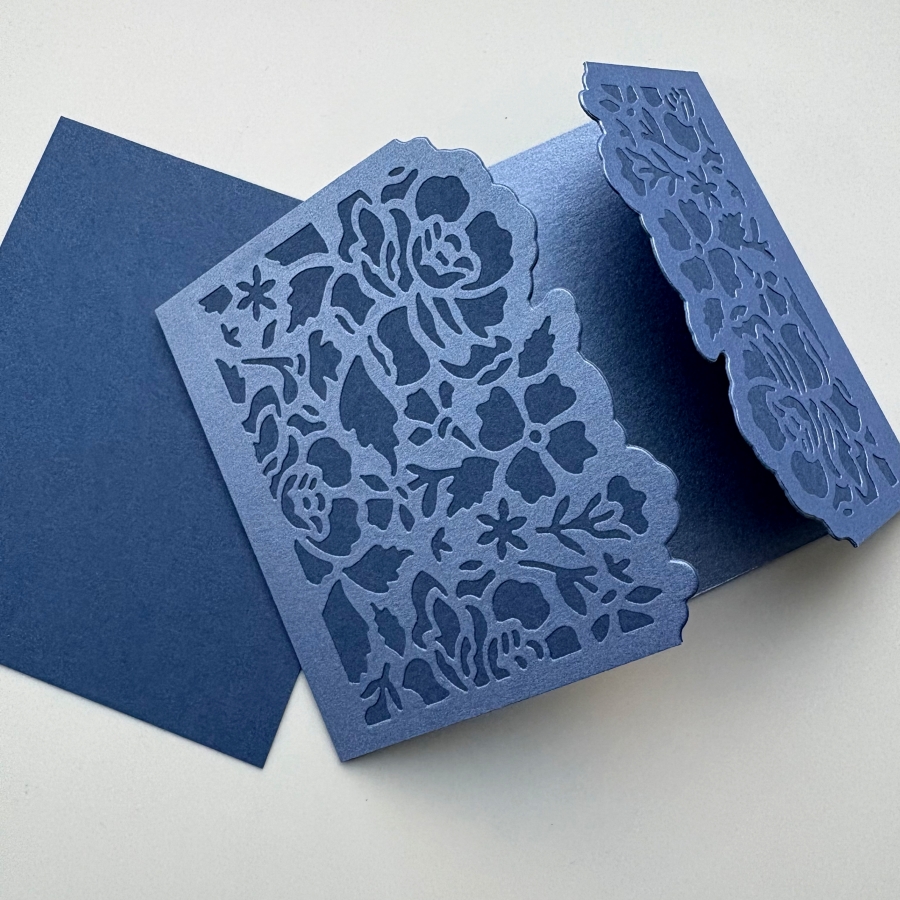
Step 3: Peel off the Stick-It adhesive backing and adhere it to a piece of navy cardstock. Burnish the die cut area with a bone folder to ensure the two pieces of cardstock are fully stuck together.
Step 4: Trim the excess navy cardstock along the top and bottom edges with a pair of scissors. Then die cut the floral border again with the Detailed Floral die. I chose to die cut right up against the edge of the first die cut layer. Alternatively, you could leave a border along the die cut piece if you place the die further away from the edge.
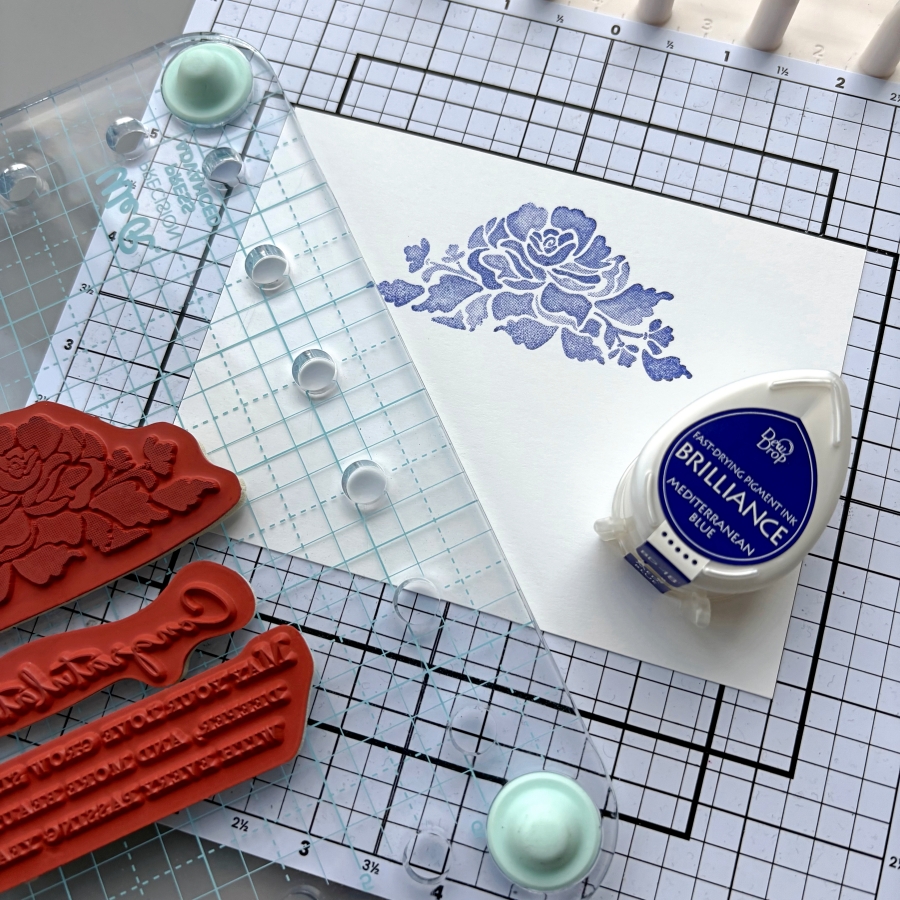
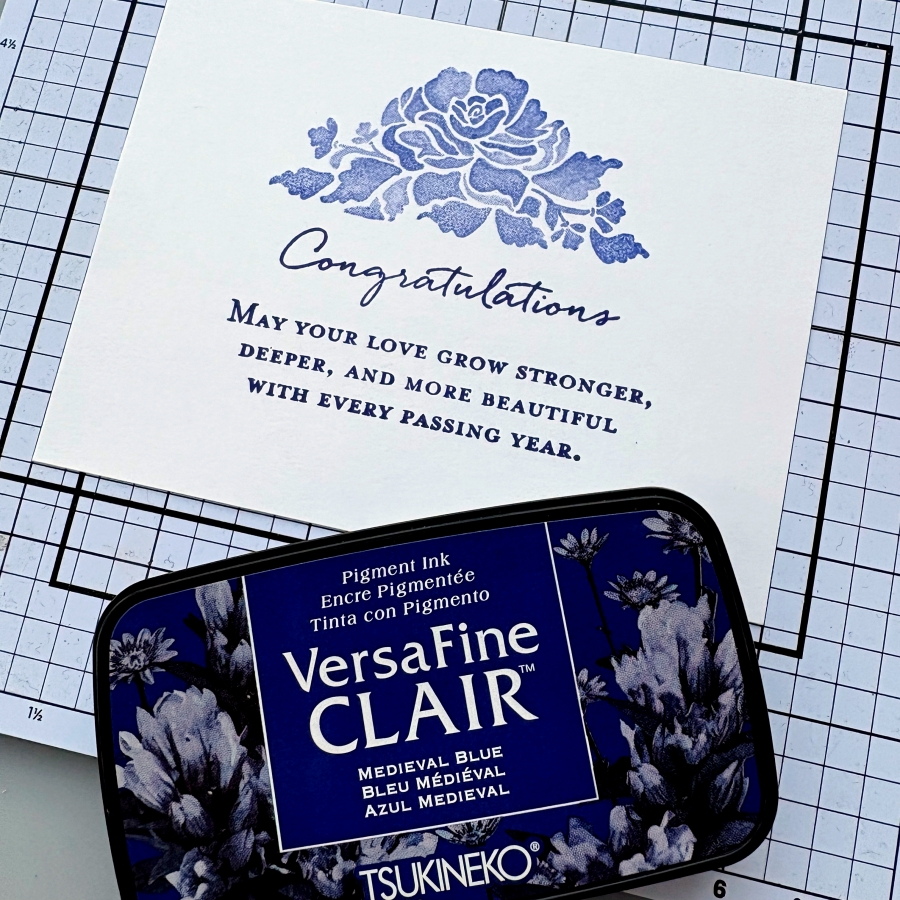
Step 5: I stamped the coordinating floral stamp from Stampin’ Up’s Floral Phrases stamp set. I inked the stamp lightly with Brilliance Mediterranean Blue ink pad so that the shading details of the stamp could be captured.
Step 6: This stamp set also includes some beautiful sentiment stamps that are perfect for wedding cards. I decided to use VersaFine Clair Medieval Blue ink pad to stamp the sentiment since this ink is known for giving crisp, clean lines. It is my favorite type of ink pad for sentiment stamping.
Step 7: Since this card has asymmetrical folds, I added a ribbon belly band so that the card flaps would be kept in place. Then I cut a short piece of ribbon and tied it around the belly bend to create the bow.
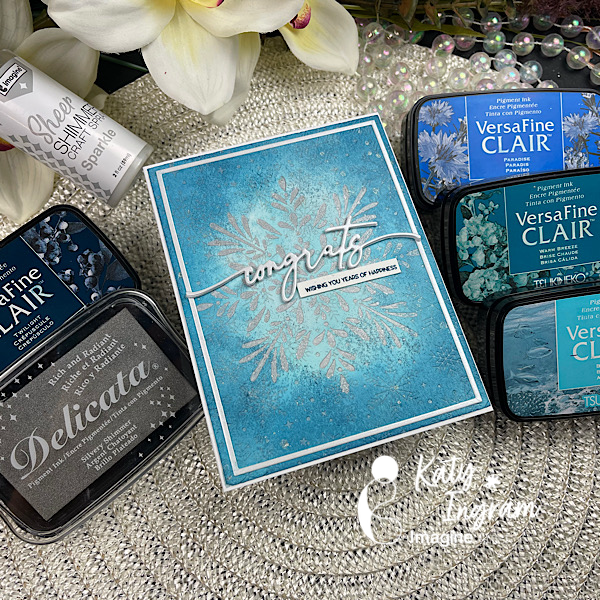
Hello Friends! Katy here with another project. In today’s video use my VersaFine Clairs with isopropyl alcohol to create a watercolor look. With this technique I created a wintry wedding card, but this will lend well to a birthday or holiday card as well.
• The Greetery Sentiment Suite Love Stamp Set • The Greetery Congrats Die • White Cardstock • Hot Pressed Watercolor paper • Stamp positioner tool • Isopropyl Alcohol