Learn How To Use Yupo Paper In A New Way

by Roni Johnson

Learn How To Use Yupo Paper In A New Way

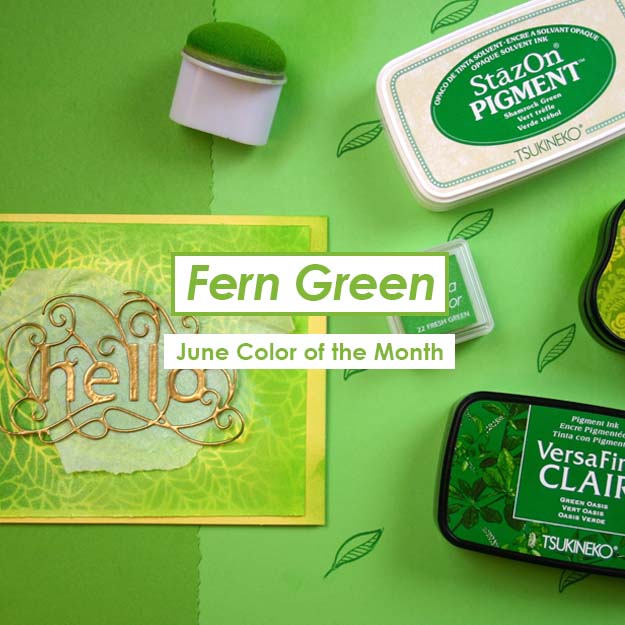
Fern Green…a cool, relaxing shady spot on a hot summer’s day…sounds wonderful, doesn’t it? Well, that’s what June’s color of the Month brings to mind. I thought I’d run with that theme and play around with a few different colors of green from the Fireworks Craft Spray and VersaFine Clair. I use these lovely Fern stamps, fern dies, and a special technique with Yupo paper to create this fun card.

Skill: Intermediate
Time: 1 hour

Directions


Step 1

Trim a piece of Yupo paper to 4 x 4.75” and select desired colors of Fireworks spray you’d like to use.


Step 2

Spritz the inks onto the Yupo paper.


Step 3

Use a heat tool to dry the inks, continue heating until the paper begins to shrink and wrinkle. Turn the paper over part way through heating, continue to heat and shrink. The Yupo paper is now about 45% of its original size.


Step 4

Turn your heat tool on to preheat so it gets nice and hot.


Step 5

Pounce one edge of the wrinkled Yupo onto a VersaMark ink pad.


Step 6

Dip the inked edge into Mboss embossing powder in Gold and use a pre-heated heat tool to melt the powder. Since the heat tool has been pre-heated melting should occur almost immediately thus causing no further shrinking to the Yupo.


Step 7

Repeat step 6 until all 4 edges have been embossed.


Step 8

Cut a piece of white cardstock 4” x 5.25”. Stamp a trio of fern branches over the entire panel using Rain Forest, Shady Lane, and Verdant VersaFine Clair inks.


Step 10

Flick Gold Sheer Shimmer Spritz over the panel and let dry.


Step 11

Sponge the same inks onto a scrap of white cardstock. Die-cut ferns from the various colors.


Step 12

Stamp the sentiment “sending hugs your way” on black cardstock using VersaMark ink. Sprinkle with white Mboss embossing powder, shake off excess and return it to the bag. Use a heat tool to melt the powder and trim.


Step 13

Mount the fern panel onto a black card base; affix the Yupo paper to the card and embellish.

Supplies

Imagine
Other
  • Yupo Paper
  • White & Black Cardstock
  • Rubber Stamp Tapestry – Fern
  • Spellbinders – Ferns
  • Heat Tool
  • Gold Thread

Color of the Month for June is Fern Green

Color of the Month for June is Fern Green. We love this soft green color because it reminds us of the beautiful plants that come bursting forward into the lushness of Summer. Some of the inks we recommend for this color are StazOn Cactus Green, VersaColor Fresh Green, VersaFine Clair in Green Oasis and Verdant.

Here is a sneak peek for what we have coming up this month…

Green Eyes Art Canvas by Kyriakos Pachadiroglou

Mixed Media by Roni Johnson

Resist Embossing by Martha Lucia Gomez

The Best Things in Life Aren’t Things

by Kyriakos Pachadiroglou

The Best Things in Life Aren't Things Greeting Card Design

The best things in life aren’t things! This is a lovely reminder to take time to appreciate your life and live it to the fullest. I wanted to create a holographic look to go along with this nice message. Combining Mboss, StazOn ink pads and Vertigo sheets is the best way to create a holographic card theme. The StazOn inks will quickly dry on the Vertigo sheet and following the pattern of the sheet will enhance the result. The white card base brightens the StazOn colors adding extra background lighting and the Mboss in Hologram creates an added effect.

Skill: Intermediate
Time: 1 hour

Directions


Step 1

On a 2 x 4 inch piece of watercolor paper, stamp the flourish design with VersaMark, cover with the Mboss embossing powder in Hologram and heat set.


Step 2

Cut the Vertigo sheet to 4 x 6 inches.


Step 3

Color with the StazOn in Fuchsia Pink and Vibrant Violet using sponge daubers trying to follow the pattern of the Vertigo sheet.


Step 4

Continue adding color with the StazOn Sunflower Yellow and Azure.


Step 5

Stamp the sentiment, butterfly and flourish design with the VersaMark, cover, and heat set the Mboss embossing powder in Black both on the Vertigo sheet and the watercolor paper. Fussy cut the butterfly. Cut out the sentiment in a square and set aside.


Step 6

Set the Vertigo sheet and the flourish embossed paper strip on the card base using the Tear It! Tape.


Step 7

Continue adding the butterfly stamped image, the sentiment and the rest of the embellishments as you see fit.

Supplies

Imagine
Other
  • Cardbase
  • Watercolor paper
  • Kaiserkraft stamps – Flourish, Tigerlilly
  • Paper Roses
  • Metallic beads
  • Scissors

Create an Underwater Scene with Mboss Shimmering Night Sky

by Melissa Andrew

In today’s tutorial, I show you how to use your Mboss embossing powder in Shimmering Night Sky to create an underwater scene. Together with Fireworks spray and Memento ink you can create a gorgeous card straight from a mermaid’s home, complete with sea critters. I show you beginning to end how to create a sea-filled, embossed, and watercolored card.

Skill: Intermediate
Time: 45 minutes

Directions

Supplies

Imagine
Other
  • Whimsy Stamps Die – Card Builder 1
  • Picket Fence Studios – Little Coral Girl stamp set
  • Heat Tool
  • Watercolor paper
  • Copic markers
  • Cardstock – White, Blue Shimmer
  • Paper trimmer
  • 6 round paintbrush
  • Antistatic tool

Create A Unique Embossed Spiral Design On A Greeting Card

by Martha Lucia Gomez

Hello there! Today, I have a Mboss Spiral card that I made featuring the new Mboss Embossing Powder from Imagine. I had the opportunity to buy this spiral background stamp a long time ago during a vacation but I never used it. I couldn’t find exactly what project this spiral shape would fit with. Now that Imagine has released the Mboss Embossing Powder, I made decided to use it for an embossing color blend project.

Skill: Intermediate
Time: 1 hour

Directions


Step 1

I started my process using basic black card stock and the small inkpad (or cube) of the VersaMark. I placed my stamp inside of my stamping tool and applied the ink starting in the center. I stamped this part and covered with Valentine Mboss. Then I removed the card stock and melted the powder with the heat tool. I repeated the process several times using Princess Party, Birthday Party, Sparkle, and Lucky Stars. I applied VersaMark in a circular way to keep the spiral shape.


Step 2

I resized the stamped layer and added a whisper white mat before to paste over the basic black card base. I finalized the card adding a die cut flower and sentiment that I stamped with Memento Ink Lilac Posies.

Supplies

Imagine
Other
  • Cardstock – Basic Black, Whisper White
  • Spiral Background Stamp
  • Stamparatus or Misti Stamping Tool
  • Spellbinders Shapeabilities – Lovely Lilac Etched die Good Vibes
  • Double-sided foam tape

Create A Fashion Forward Birthday Card With Mboss

by Iris Rodriguez

Create A Fashion Forward Birthday Card With Mboss

This month I had the pleasure of using Imagine’s new Mboss embossing powders for my projects. They are fine embossing powders that come in a lot of colors and glittery combinations, for instance: Valentine which is red and gold, New Year’s Eve which is black and gold, as well as special effect powders like gold metallic and new solid colors. In this project, I used glittery color combinations Valentine for the dress and New Years Eve for the background, purse, and sentiment. Check it out!

Skills: Beginner
Time 30 minutes

Directions


Step 1

Using a dress template or die cut, cut out a dress from watercolor paper.


Step 2

Place dress on foam and burnish the back side of the dress with a stylus. The dress will take on a curved shape giving it a dimensional look.


Step 3

Ink the front of the dress with the VersaMark ink.


Step 4

Apply Valentine Mboss Embossing Powder and using a heat tool, melt the powder. These new embossing powders come in a bag, in this image I added some powder onto a dish so that you can get a good view of this awesome color.


Step 5

Using the VersaMark ink, stamp a background image. Apply New Years Eve Mboss embossing powder and melt the powder with a heat tool. Do the same on the “Happy Birthday” sentiment and purse.


Step 6

Adhere a ribbon sash to the waist of the dress. Apply On Point Glue to the edges of the dress only and glue onto the card base. This will help to keep its dimension.


Step 7

Assemble the card with the dress, birthday sentiment, and matching card base.

Supplies

Imagine
Other
  • Watercolor paper
  • Scissors
  • Stylus
  • Cardstock – white, black or print of choice
  • Large Background stamp
  • Ribbon
  • Birthday sentiment stamp