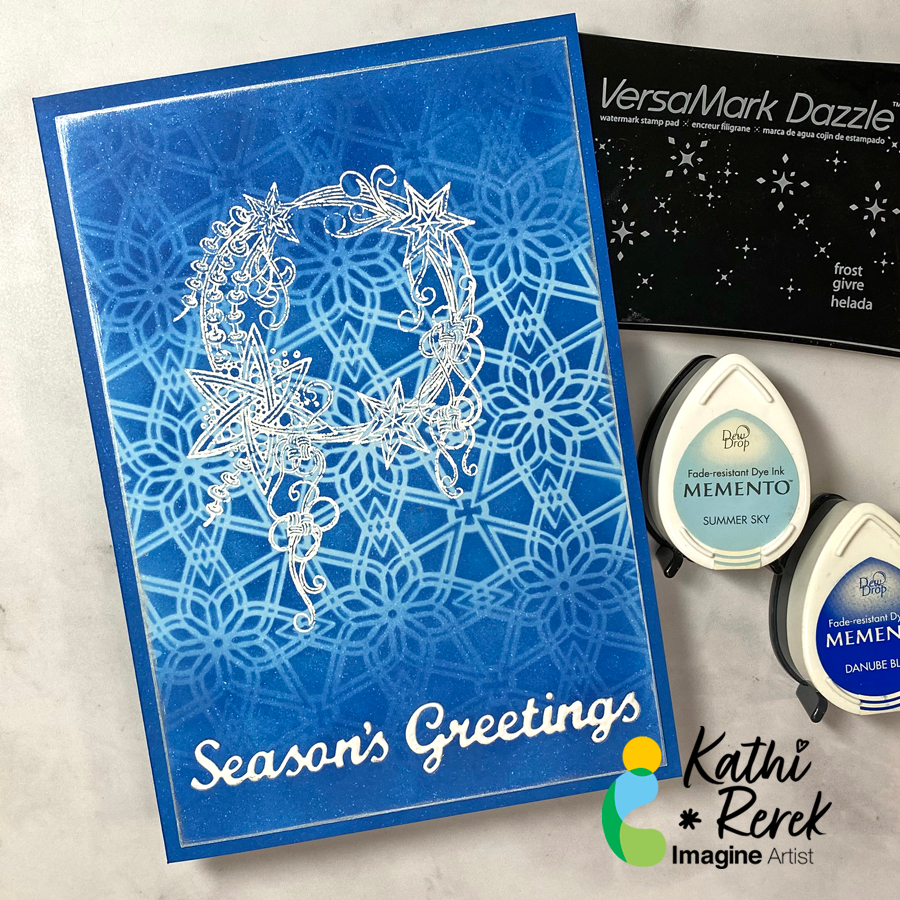
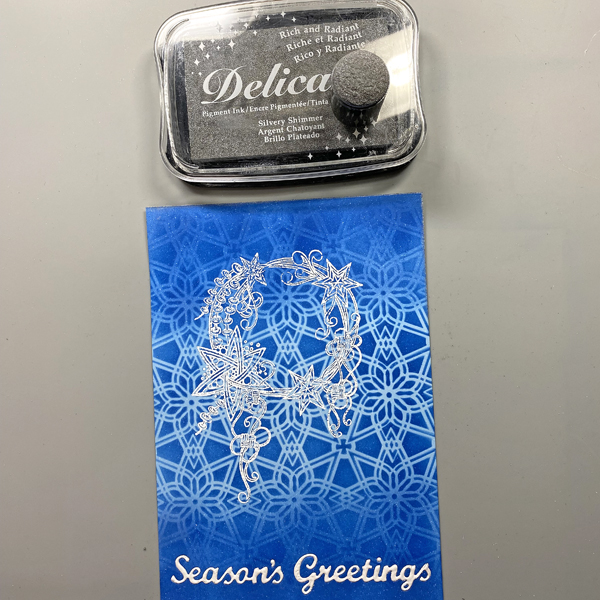
Here’s a dramatic, yet quick and easy Season’s Greeting’s Card
Skill Level: Beginner to Intermediate Time: 1 hour
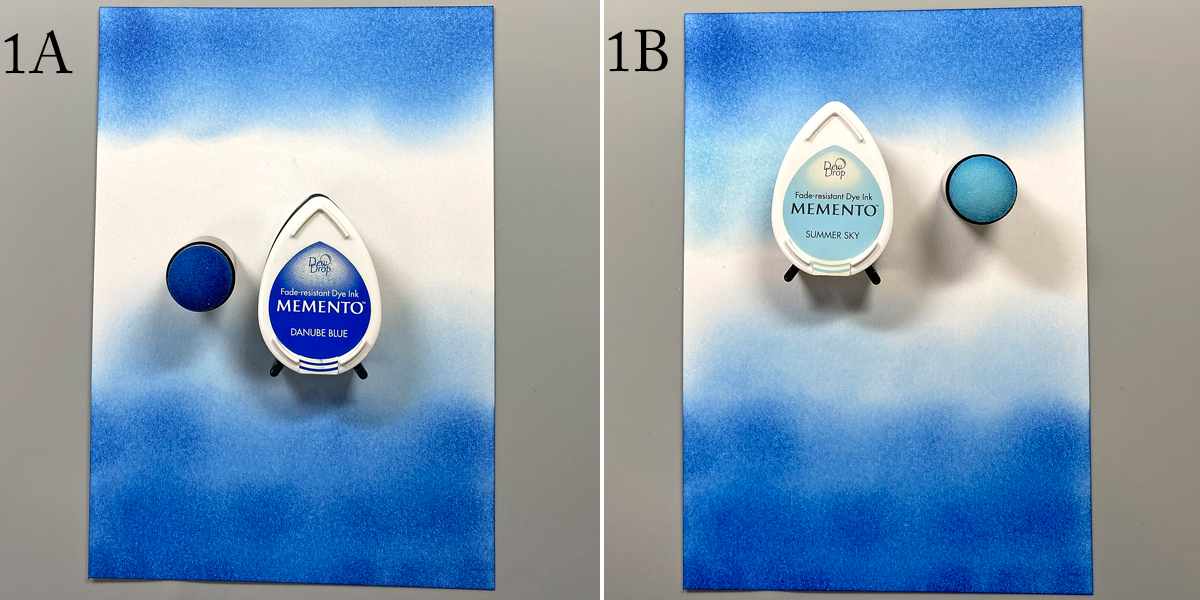
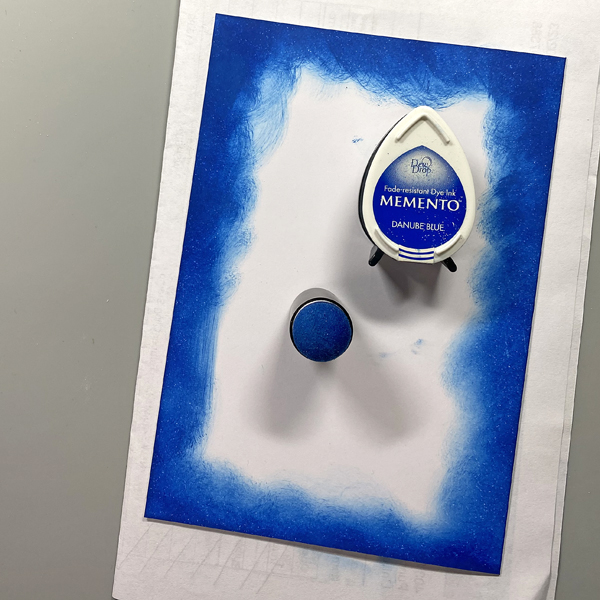
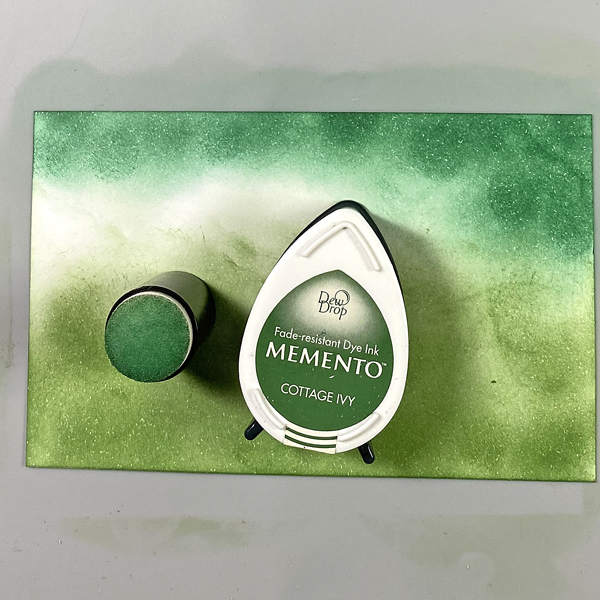
Step 1. Use a Sponge Dauber to apply Danube Blue Memento Ink to the top and bottom of piece of white cardstock. Use another Sponge Dauber to apply Summer Sky Memento Ink to the center of the cardstock, taking care to blend the blues where they meet.
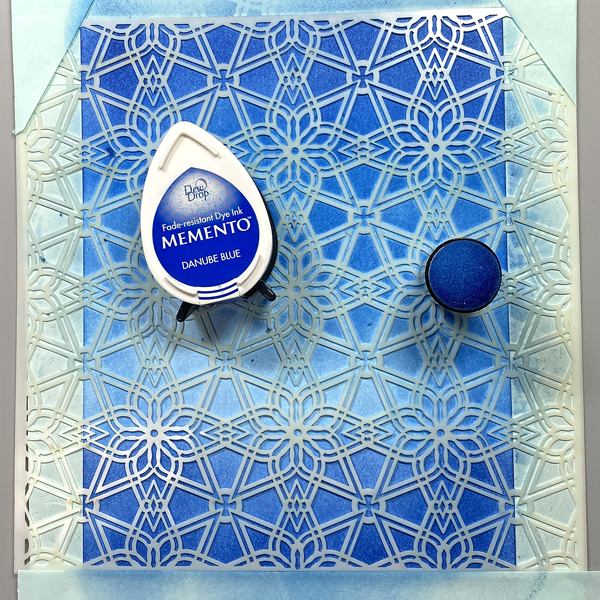
Step 2: Use low-tack tape to secure the Florastella Stencil to the inked cardstock. Sponge Danube Blue Memento Ink over the stencil onto the cardstock.
Remove the stencil and rub a used dryer sheet onto the image panel.
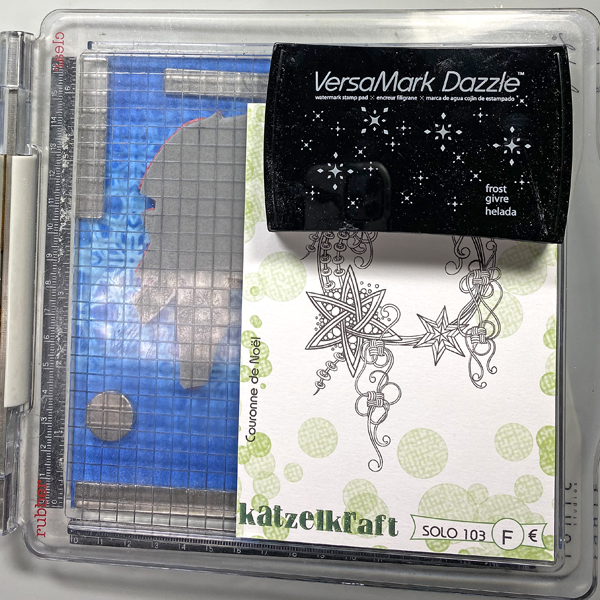
Step 3: Use magnets to secure the image panel to the base of a stamping platform. Position the Christmas Crown stamp facedown where desired. Ink the stamp with Frost VersaMark Dazzle Ink and stamp. Re-ink and stamp again to ensure a good impression. Remove the image panel from the stamping platform.
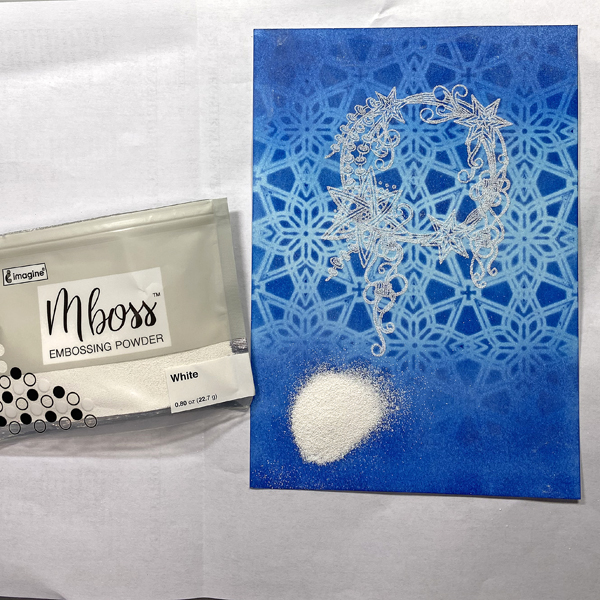
Step 4: Place the image panel onto a sheet of folded copier paper. Pour White Mboss Embossing Powder onto the image panel. Pour the excess powder onto the copier paper, then pour it back into its packet. Tap off any stray powder and heat set the image. Set aside.
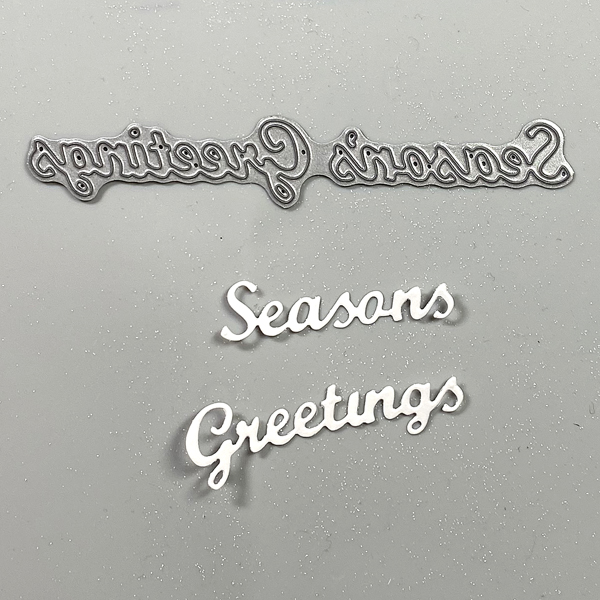
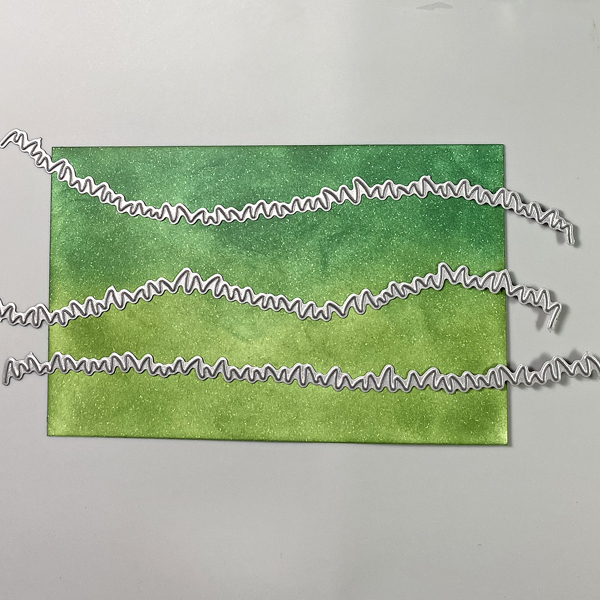
Step 5: Use a “Season’s Greetings” cutting die to cut white cardstock.
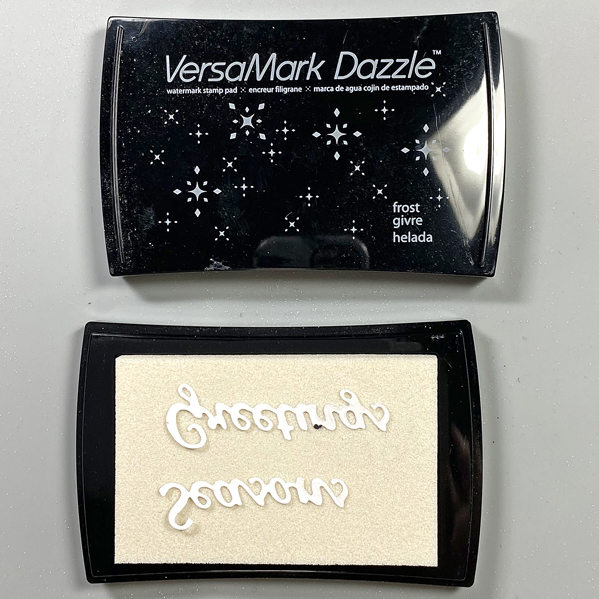
Step 6: Press the die-cut words face-down onto the Frost VersaMark Dazzle Inkpad.
Place the inked die-cut words onto the folded up copier paper, pour White Mboss Embossing Powder over the words, then use tweezers to remove them from the embossing powder. (Photo not shown.)
Pour the excess powder onto the copier paper, then pour it back into its packet.
Heat set the sentiment words to melt the embossing powder.
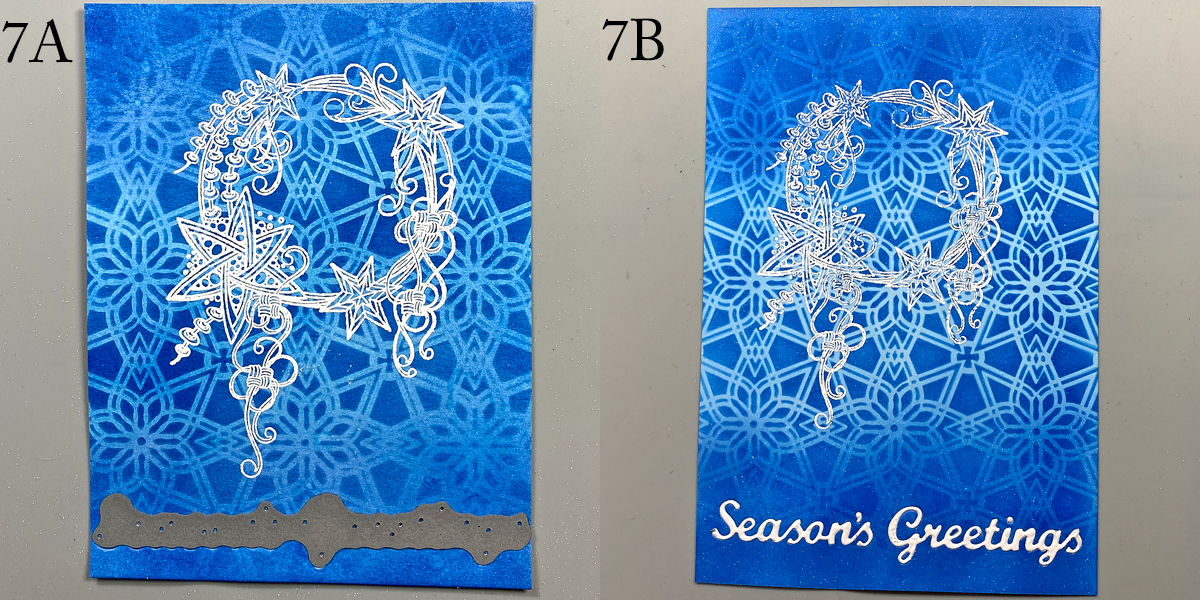
Step 7: Place the “Season’s Greetings” dies facedown towards the bottom of the image panel and run through the machine to cut.
Use Tear-It Tape on the back of the image panel to cover the die-cut area. (Photo not shown)
Inset the embossed sentiments into the apertures.
Step 8: Use a Sponge Dauber to apply Silvery Shimmer Delicata Ink to the edges of the image panel. Heat set. Use another Sponge Dauber to edge the image panel with White Shimmer Delicata Ink. Heat set.
Step 9: Cut white cardstock to 9” x 6.5”. Score at 4.5” and fold to form a 4.5” x 6.5” card. Place a piece of scrap paper into the card. Use a Sponge Dauber to apply Danube Blue Memento ink to the periphery of the card.
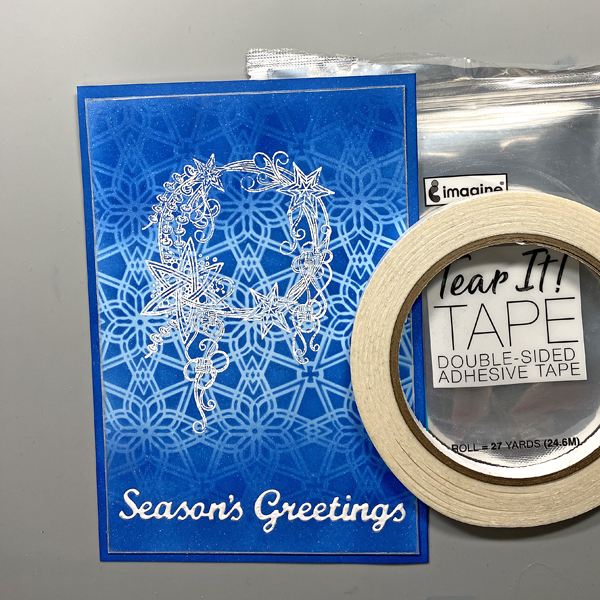
Step 10: Use Tear It! Tape to adhere the image panel to the front of the card .
– Let’s make a festive and fun Christmas card with ink, stamps, stencils, and minimal coloring.
Skill Level: Beginner to Intermediate Time: 1 hour
Step 1.
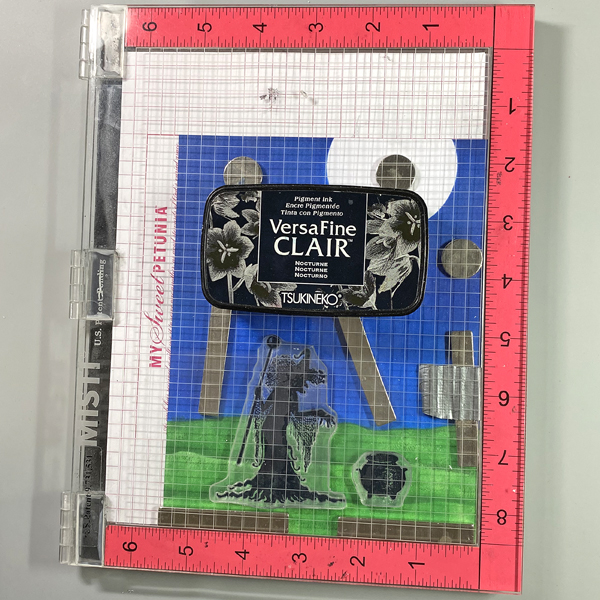
Use a stamping platform and Nocturne VersaFine Clair ink, stamp the penguin from the Penguin Clear Stamp Set onto a panel 6” x 8” panel of Mixed Media cardstock. Re-ink and stamp a second time to ensure a good impression. Keep the image panel secured to the base of the stamping platform. Remove and clean the stamp.
Step 2:
Position the the penguin from the Frost Clear Stamp Set to the right of the previously stamped penguin. Ink the stamp with Nocturne VersaFine Clair Ink and stamp. Re-ink and stamp if necessary to ensure a good impression. Remove the image panel from the platform. Remove and clean the stamp.
Step 3:
Place a piece of repositionable sticker paper on the base of the stamping platform. Place both penguins facedown onto the sticker paper. Ink the stamps with Nocturne VersaFine Clair Ink and stamp. Remove the stamps and the sticker paper sheet from the platform. Heat set the image panel.
Step 4:
Fussy-cut the sticker paper versions of the penguins and place atop their counterparts on the image panel to mask them.
Step 5:
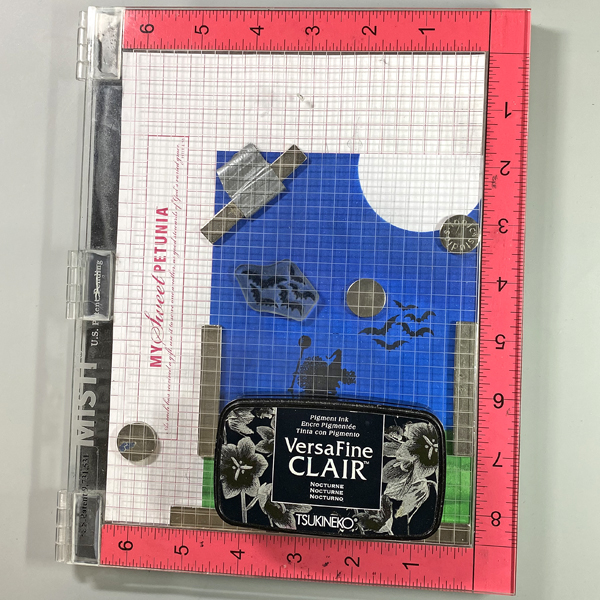
Position the Snow Globe stencil so that the opening is framing the penguins. Use low-tack tape to secure the stencil to the image panel and to cover the base of the image panel. Use a Sponge Dauber to apply Summer Sky Memento ink heavily around the edges of the Snow Globe fading inward over the masked penguins.
Step 6:
Keeping the Snow Globe stencil in place, remove some of the tape from below the globe area. Position the Snow Globe’s Base stencil below the snow globe on the image panel. Secure it with low-tack tape.
Position the circle mask, included with the Snow Globe stencil set, so that it covers the penguins. Secure it with low-tack tape as shown.
Use a Sponge Dauber to apply Rhubarb Stalk Memento ink along the top, bottom, and both sides of the Snow Globe Base stencil. Use the same Sponge Dauber to apply and blend Lady Bug Memento from the edges towards the center of the Snow Globe Base. When happy with the blending and coverage, remove, clean, and dry the Snow Globe stencil, Snow Globe Base stencil, and the circle mask. Use Scarlet Red and Red Chalk pencils to add dimension and detail to the Snow Globe base. Use a white chalk pencil to add a highlight.
Step 7:
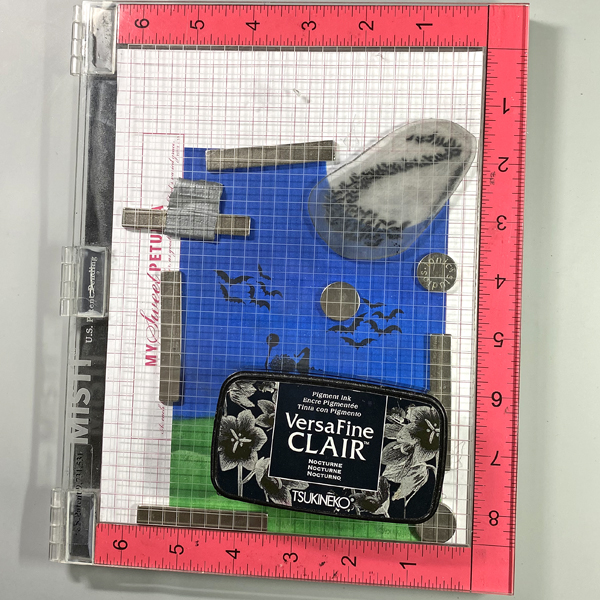
Place low-tack tape horizontally across the inked Snow Globe Base. Place the circle mask over the inked Snow Globe and masked penguins on the image panel. Use low-tack tape to secure the circle mask in place.
Use a Sponge Dauber to apply New Sprout Memento ink to the top part of the image panel as shown.
Step 8:
Place the Holly Background stencil over the circle mask onto the image panel. Secure the stencil in place with low-tack tape. Use a Sponge Dauber to apply Oasis VersaFine Clair ink over the stencil’s holly leaves onto the image panel. Use a paper towel to remove as much ink as possible from the stencil.
Use a Fantastix to apply Tulip Red VersaFine Clair ink over the stencil’s holly berries onto the image panel. Remove, clean, and dry the stencils and the circle mask. Heat set the image panel.
Step 9:
Use the stenciled leaves and berries as a guide to re-position the Holly Background stencil onto the image panel. Secure with low-tack tape. Place the Snow Globe stencil over top so that the globe aperture is framing the snow globe on the image panel. Secure with low-tack tape.
Use a Fantastix to lightly apply green ink from the Fresh Greens Kaleidacolor inkpad (the second pad from the left) over the stencil’s holly leaves onto the snow globe on the image panel. Use another Fantastix to apply Lady Bug Memento ink over the stencil’s holly berries onto the image panel.
Remove, clean, and dry the stencils.
Step 10:
Place low-tack tape horizontally on the line separating the snow globe from the holly leaf background.
Use a Sponge Dauber to apply Acorn VersaFine Clair ink to the image panel. Use black chalk pencils to add shading and horizontal lines. Smudge the chalk slightly.
Step 11:
Smoosh Sparkle Sheer Shimmer Stix onto the craft mat. Use a paintbrush to apply to the ground under the penguins to make it look icy.
Step 12:
Apply Sparkle Sheer Shimmer Stix onto the craft mat. Add a drop of New Sprout Memento Inker to the sparkly puddle. Mix with a paintbrush, then use the brush to make the penguins’ eyes green. Clean the craft mat.
Apply Sparkle Sheer Shimmer Stix onto the craft mat. Add a drop of Danube Blue Memento Inker to the sparkly puddle. Mix with a paintbrush, then use the brush to add an outline to the white areas of the penguins’ bellies. Clean the craft mat.
Step 13:
Apply Frost Shimmer Stix to the craft mat. Use a paint brush to add white to the beak of the compass penguin (on the left). Clean the craft mat.
Step 14:
Place the Snow Globe stencil back over the image panel. Cover the remainder of the background with a ruler or tape. Add a drop or two of Moonlight White Brilliance Inker to the craft mat. Spray with 91% Isopropyl Alcohol. Mix with a paint brush and splatter the penguins to add a snowy touch. Remove and clean the stencil. Clean the craft mat. Use a white chalk pencil to add highlights to the right and left side of the snow globe.
Step 15:
Use Tulip Red VersaFine ink to stamp the “Merry Christmas” stencil onto white cardstock. Use a sentiment cutting die to cut the sentiment.
Use a fancy tag cutting die to cut green cardstock. Adhere the sentiment to the green die-cut. Adhere the matted sentiment to the image panel as shown. Enhance the sentiment with rhinestones.
Step 16:
Trim the image panel to 4.625” x 6.625”. Cut a piece of black cardstock to 4.75” x 6.75”. Use Tear-It!Tape to adhere the image panel to the black mat. Use Tear-It! Tape to adhere the matted image panel to a 5” x 7” green card.
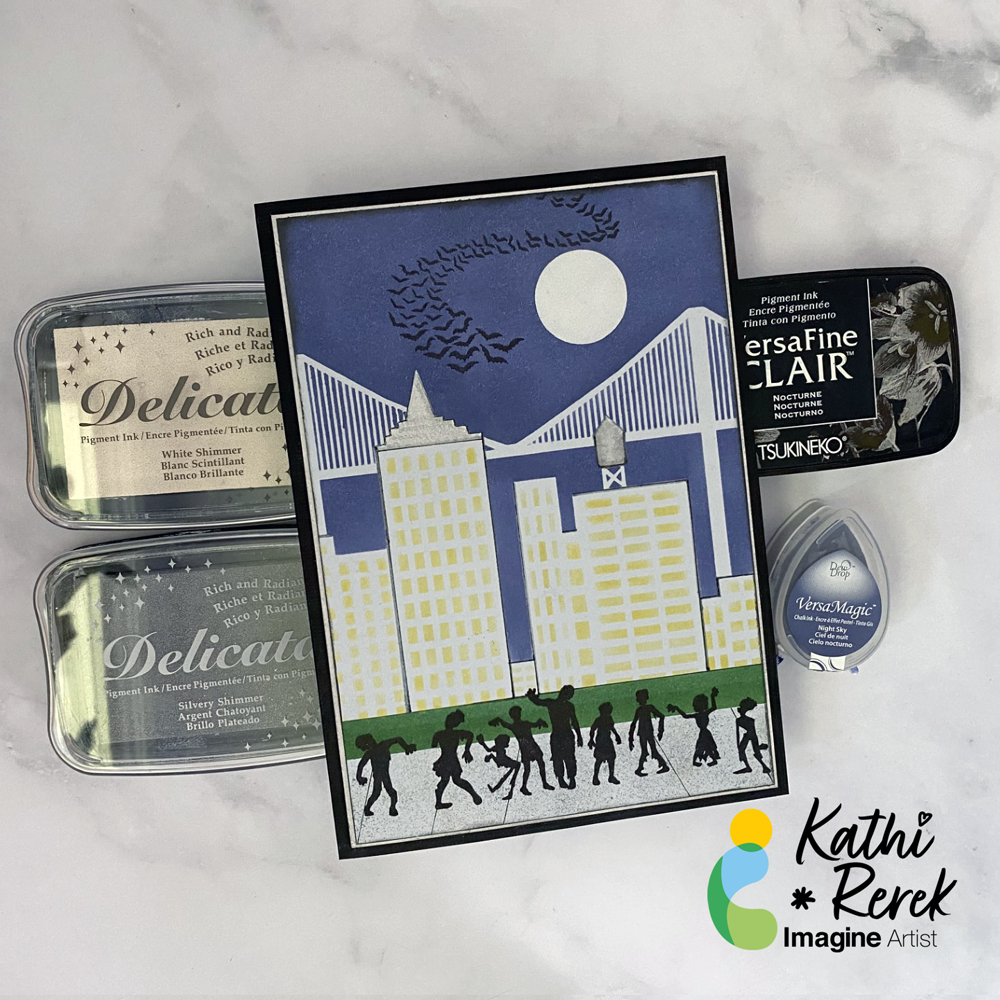
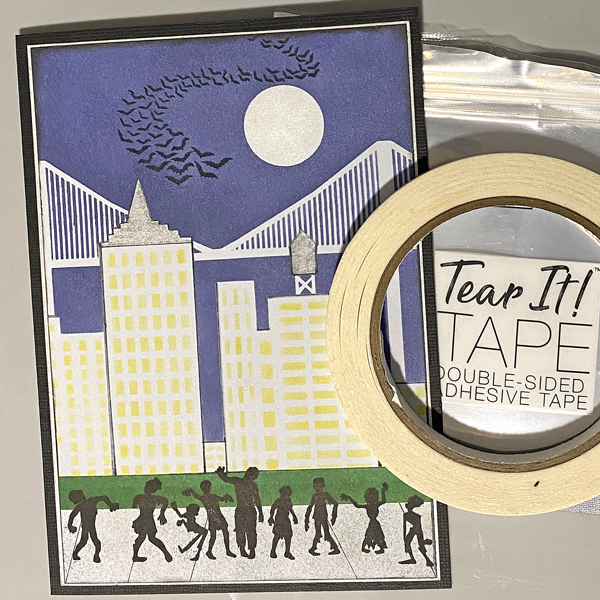
Halloween card made easy with VersaMagic, Brilliance, Delicata, VersaFine Clair, and Memento Inks!
Skill Level: Beginner to Intermediate
Time: 1 hour
Step 1.
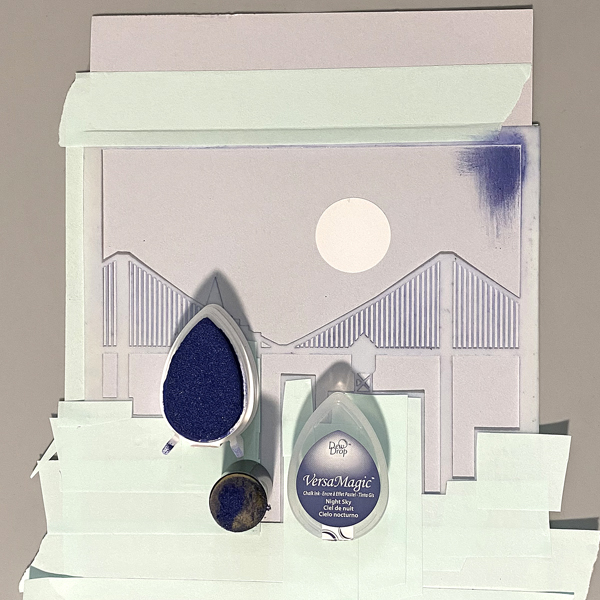
Use low-tack tape to secure the Cityscape Stencil to a 5.5” x 8.5” piece of light grey cardstock. Trim and place low-tack tape to cover the buildings’ windows. Use a circle punch to cut a circle from mask paper and adhere the circle mask above the bridge. Keep the mask paper with the circular hole for another step..
Use a sponge dauber to apply Night Sky VersaMagic Ink over the stencil and the moon mask onto the the grey cardstock to create a night sky.
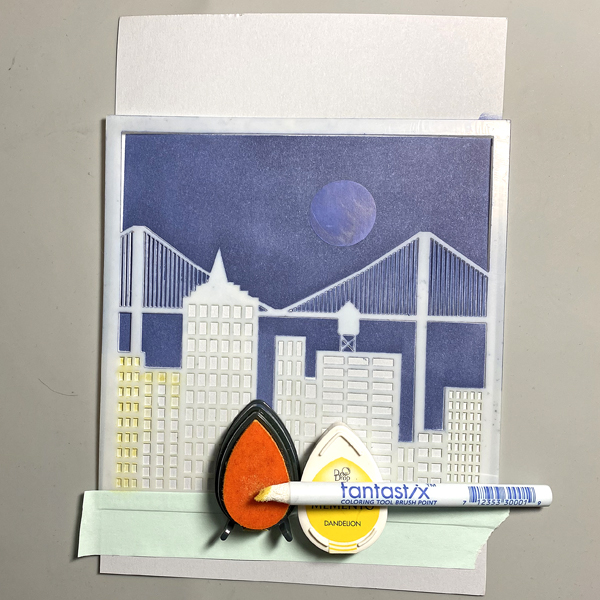
Step 2:
Keeping the stencil in place, remove the tape covering the windows. Use a Fantastix to apply Dandelion Memento Ink over the window apertures of the stencil.
Step 3:
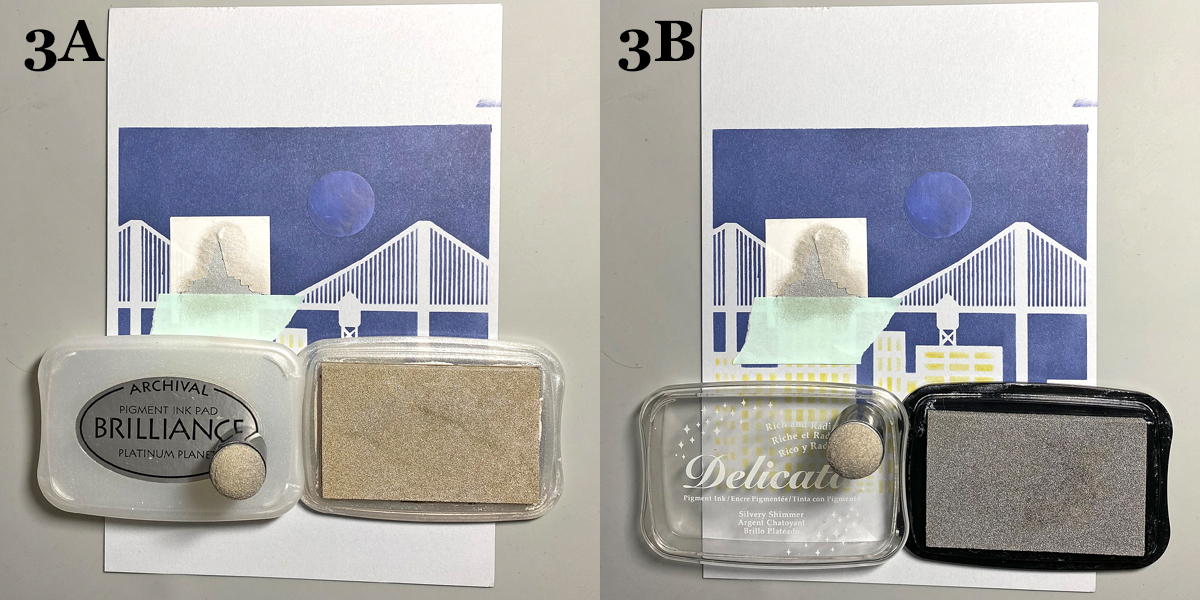
Trace the spire onto masking paper, fussy-cut along the lines, leaving the outline of the spire intact. Place the mask around the spire on the image panel. Use low-tack tape to cover the base of the spire.
Use a sponge dauber to apply Platinum Planet Brilliance Ink to the spire, then apply Silvery Shimmer Delicata Ink overtop to amp up the silver.
Step 4:
Use low-tack tape to cover the area around the rooftop water tower, leaving the tower unmasked. Use a Fantastix to apply Platinum Planet Brilliance Ink to color the water tower. Use another Fantastix to apply Starlight Black Brilliance Ink to add shading to the water tower.
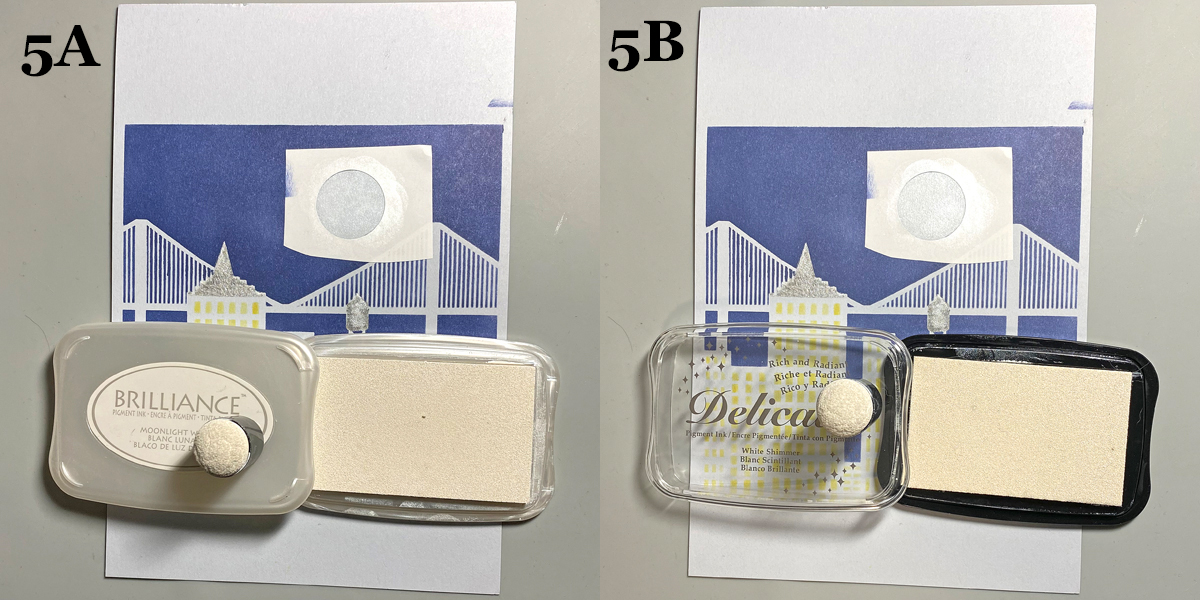
Step 5:
Remove the circle mask from the sky. Adhere the mask paper with the circle hole to the sky area, leaving the center open. Use a Sponge Dauber to apply Moonlight White Brilliance ink to color the moon white. Use a Sponge Dauber to apply White Shimmer Delicata Ink overtop to add shimmer to the moon.
Step 6:
Use a scrap of cardstock and low-tack tape to cover the buildings. Place another piece of low-tack tape horizontally across the bottom 1.25” of the image panel.Use Sponge Daubers to apply Cottage Ivy and Bamboo Leaves Memento Ink between the masked areas to create a grassy lawn.
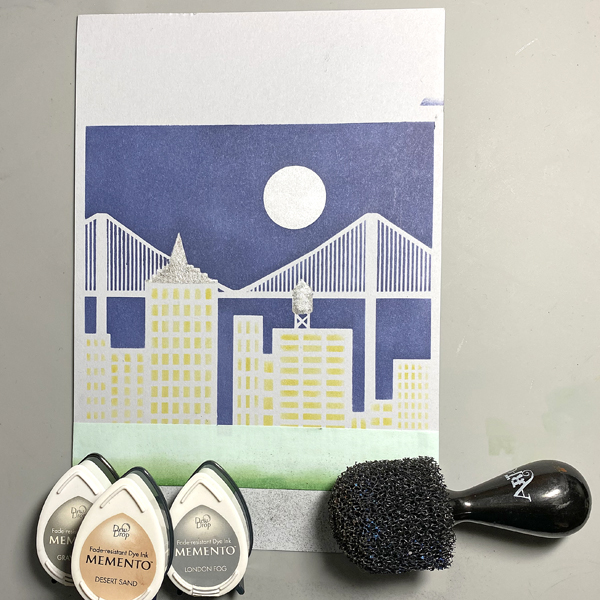
Step 7:
Use low-tack tape to cover the grassy areas. Use the pouncy tool to apply London Fog, Grey Flannel, and Desert Sand Memento Inks to create a cement sidewalk.
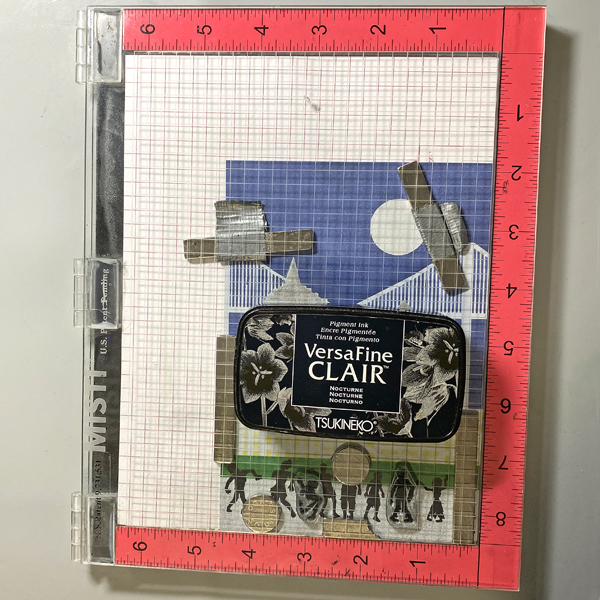
Step 8:
Use magnets to secure the image panel to the stamping platform. Position the Zombie stamps facedown where desired. Press the lid of the platform onto the back of the stamps, lift, ink the stamps with Nocturne VersaFine Clair Ink, and stamp. Re-ink and repeat stamping if needed to attain a good solid impression.
Remove the Zombie stamps from the platform., then remove the image panel from the platform,. Heat set the stamped images.
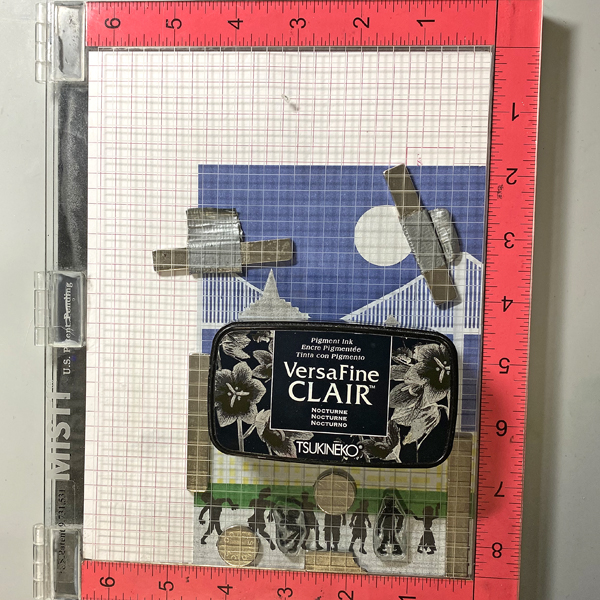
Step 9:
Place the image panel back onto the base of the stamping platform, secured with magnets.. Place the other two small Zombie stamps facedown between the other stamped images. Press the lid of the platform onto the back of the stamps, lift, ink the stamps with Nocturne VersaFine Clair Ink, and stamp. Re-ink and repeat stamping if needed to attain a good solid impression.
Remove the stamps from the platform Remove the image panel from the platform. Heat set.
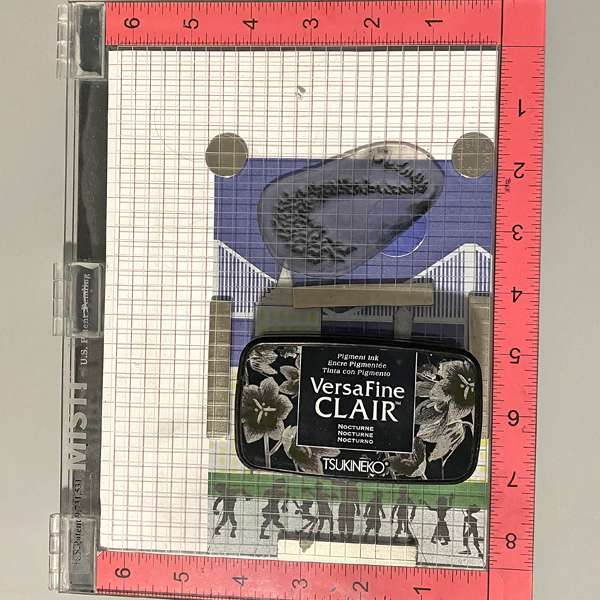
Step 10:
Place the image panel back onto the stamping platform, secured with magnets. Place the Bat Colony Stamp facedown in the sky area as shown. Press the lid of the platform onto the back of the stamps, lift, ink the stamps with Nocturne VersaFine Clair Ink, and stamp. Re-ink and repeat stamping if needed to attain a good solid impression.
Remove the stamps from the platform Remove the image panel from the platform. Heat set.
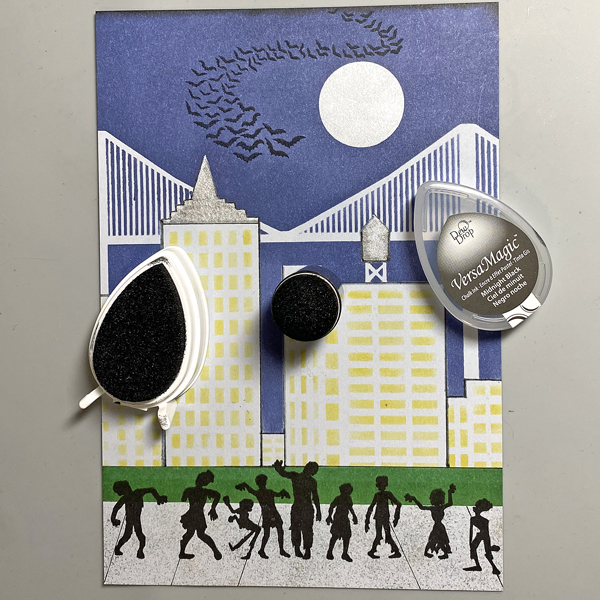
Step 11:
Trim the image panel to 4 5/8” x 6 5/8” . Use a Sponge Dauber to edge the image panel with Midnight Black VersaMagic Ink.
Step 12:
Trim a piece of white cardstock to 4.75” x 6.75”. Use a Sponge Dauber to apply Platinum Planet Brilliance Ink to the outside .5” of the image panel. Then use a Sponge Dauber to apply Silvery Shimmer Delicata Ink overtop to add to the metallic shine.
Step 13:
Use Tear It! Tape to mat the image panel to the silver-inked cardstock, then use Tear-It! Tape to adhere the matted image panel to a black 5” x 7” card.
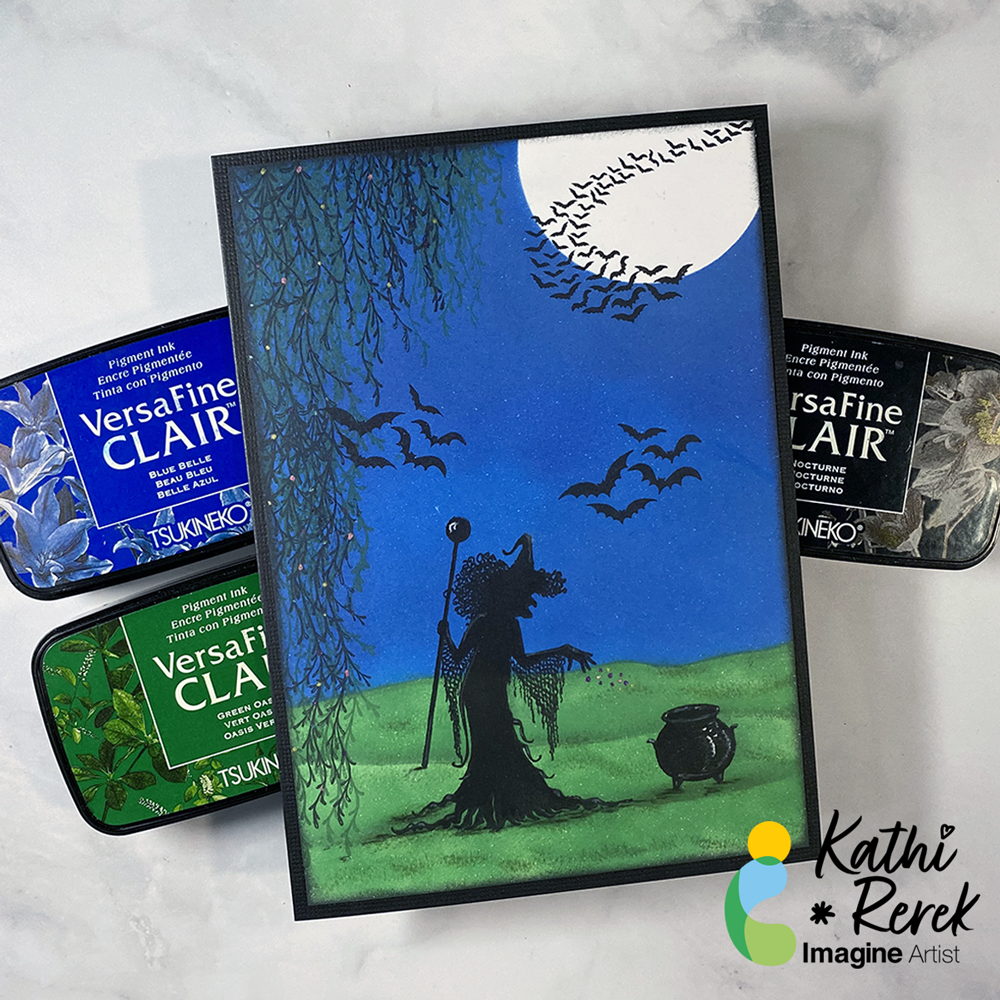
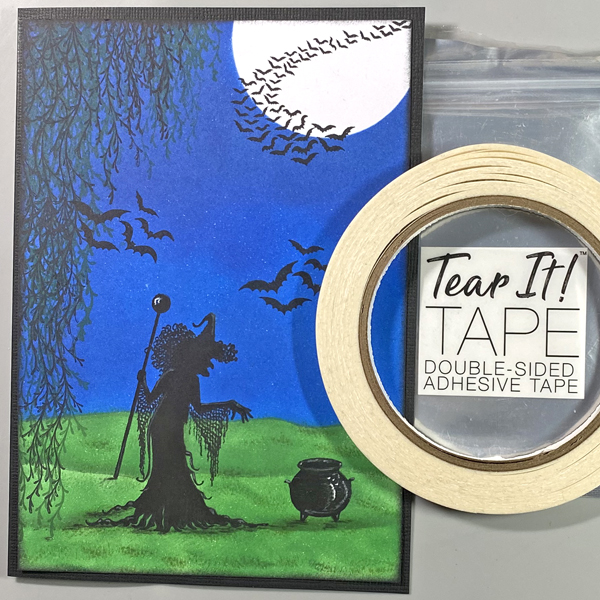
VersaFine Clair Inks make it easy to create a quick and bewitching Halloween scene!
Skill Level: Beginner to Intermediate
Time: 1 hour
Step 1.
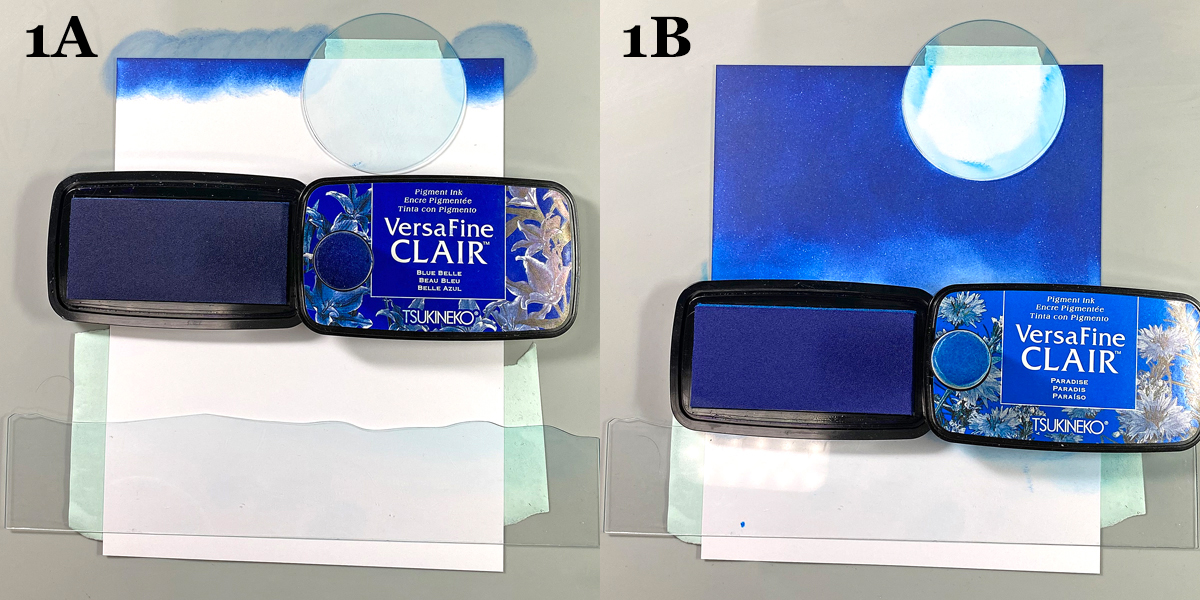
Use tape to secure the Moon mask and the flattest of the Hills mask to the back of a 4.75” x 6.75” panel of white cardstock.
Use a sponge dauber to apply Blue Belle VersaFine Clair Ink over the Moon mask onto the top part of the image panel to create a night sky.
Use another sponge dauber to apply Paradise VersaFine Clair Ink over the top of the Hills mask onto the image panel until the panel is covered.
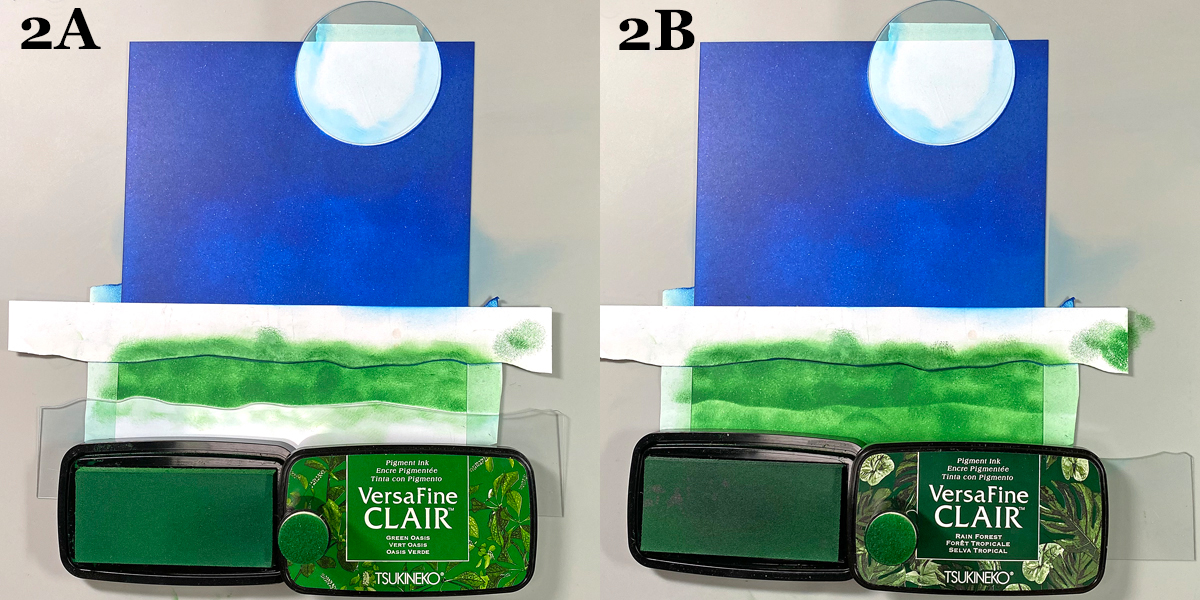
Step 2:
Move the Hills mask slightly downward and use the existing tape to secure it in place.
I had previously traced the Hills mask onto a piece of cardstock and fussy-cut it to create a paper mask for the negative portion of the mask. This was placed over the night sky.
Use a sponge dauber to apply Green Oasis VersaFine Clair Ink between the paper and acetate mask. Move the acetate mask downwards again and sponge Green Oasis VersaFine Clair Ink to fill in the grassy areas.
Use a different sponge dauber to apply Rain Forest VersaFine Clair Ink below the paper mask to add contrast and fill in the lawn. Remove the masks and heat set the panel.
Use a black chalk pencil to deepen the shadows in the grass.
Step 3:
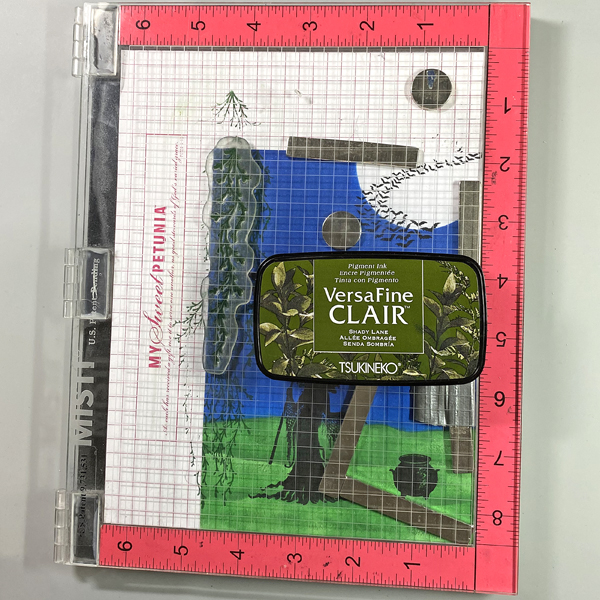
Use magnets to secure the image panel to the base of a stamping platform. Position the witch and the cauldron stamps facedown as desired. Press the platform’s lid onto the back of the stamps, lift, and ink the stamps with Nocturne VersaFine Clair Ink. Stamp. Re-ink and stamp again if needed to attain a good impression.
Use a black chalk pencil to add shadows below the witch and the cauldron.
Step 4:
Position the Bats stamp on the right side of the witch and above the cauldron. Use Nocturne VersaFine Clair Ink to stamp the image. Oops. No photo.
Clean and dry the Bats stamp. Reposition it so that it’s to the left of the witch. Use Nocturne VersaFine Ink to stamp the image.
Step 5:
Position the Bat Colony stamp at the top right of the image panel so the bats are in front of the moon. Use Nocturne VersaFine Clair ink to stamp the image.
Step 6:
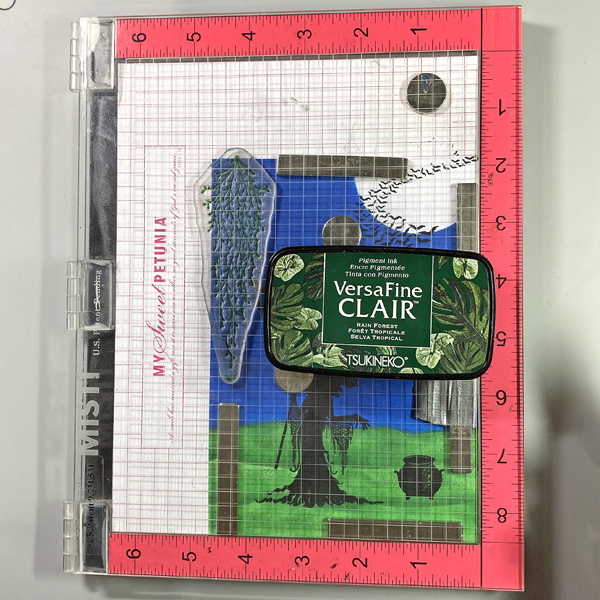
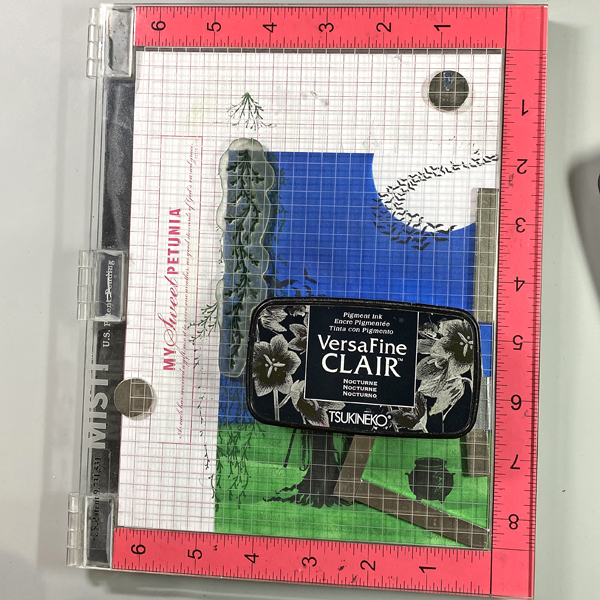
Position the larger of the Spanish Moss stamps along the right side of the image panel. Ink the stamp with Rain Forest VersaFine Clair Ink and stamp. Clean and dry the stamp. Move the stamp down, ink the stamp with Rain Forest VersaFine Clair Ink and stamp to extend the moss.
Step 7:
Position the smaller of the Spanish Moss stamps to the right of the stamped moss. Ink the stamp with Shady Lane VersaFine Clair Ink and stamp. Clean and dry the stamp. Move the stamp to the right, ink the stamp with Shady Lane VersaFine Clair Ink and stamp.
Step 8:
Clean and dry the stamp then move it back to the left. Ink the stamp with Nocturne VersaFine Clair Ink and stamp.
Step 9:
Place the larger of the Spanish Moss stamps onto an acrylic block. Ink the stamp with Nocturne VersaFine Clair Ink and stamp over the previous impressions using first and second generation stamping. Sorry there’s no photo.
Heat set the image panel.
Step 10:
Use Tear It! Tape to adhere the image panel to a 5” x 7” black card.
Step 11:
Use a white Gelly Roll Gel pen to add highlights to the cauldron. Use a white colored pencil to add shading to the witch and the cauldron.
Use Stardust Glitter Gel pens to add sparkle to the contents being thrown in the cauldron and to the Spanish Moss.
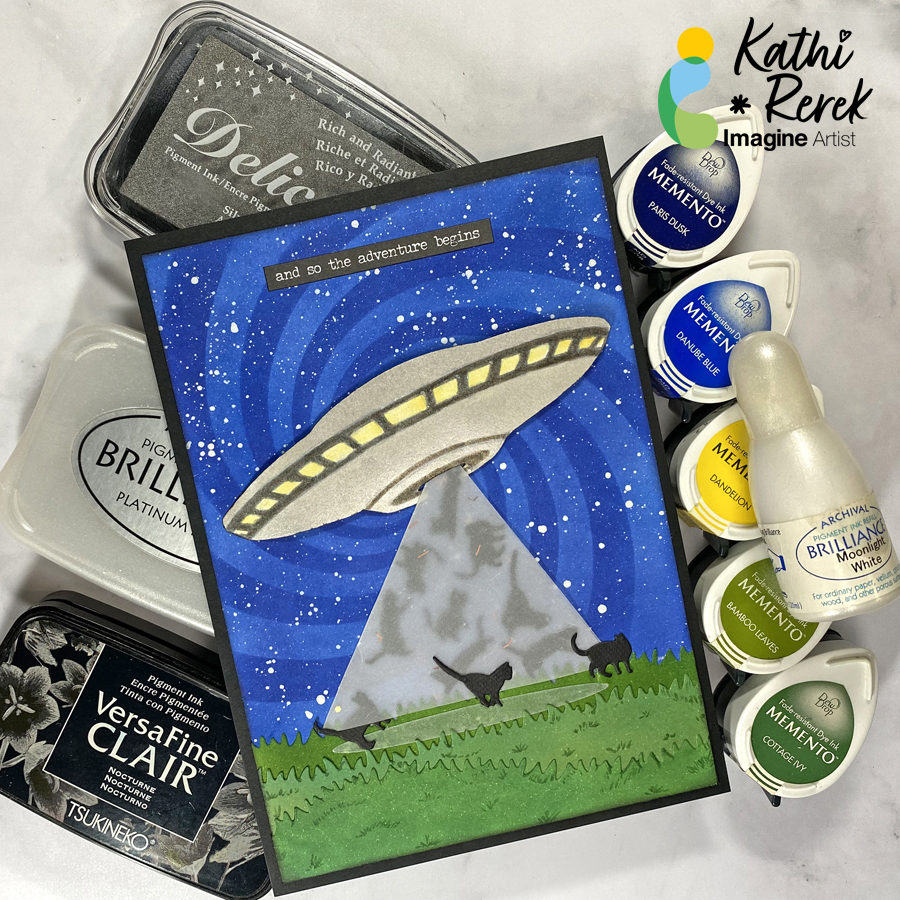
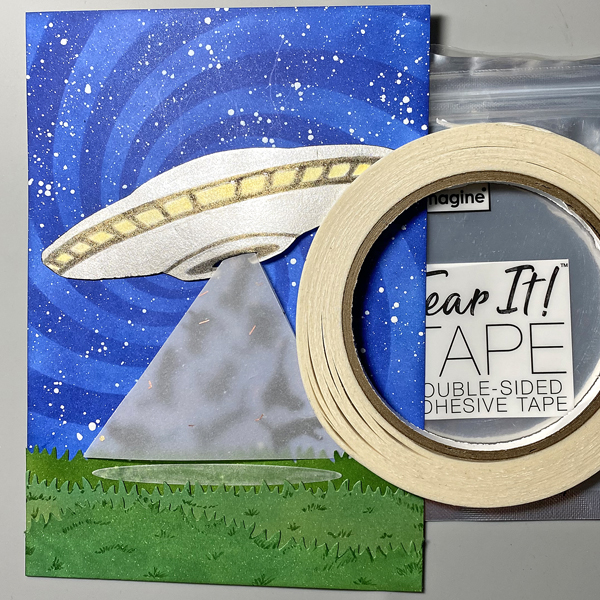
– Here’s a rare project from me that with no stamping at all. I’ve used inks, stencils, and cutting dies to create what will either be a wall hanging or a journal page.
Skill Level: Beginner to Intermediate
Time: 1.5 hours
Step 1.
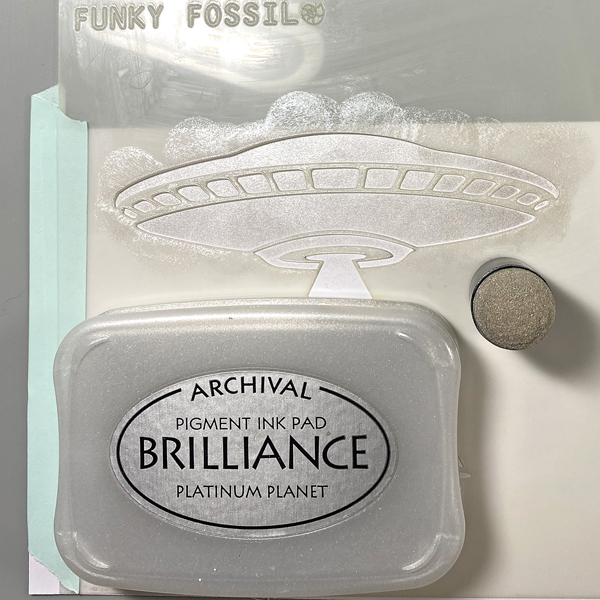
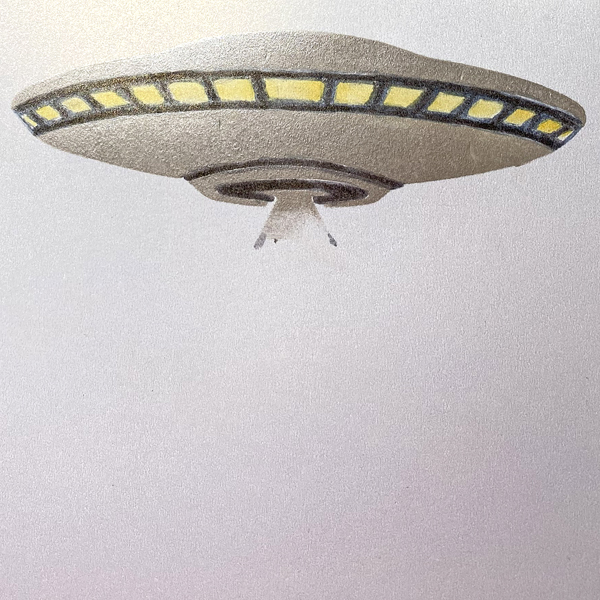
Secure the UFO stencil to a piece of cardstock with removable tape on both sides of the paper, creating a hinge. Apply Platinum Planet Brilliance over the stencil onto the cardstock. Open the hinged stencil and heat set the image panel.
Step 2:
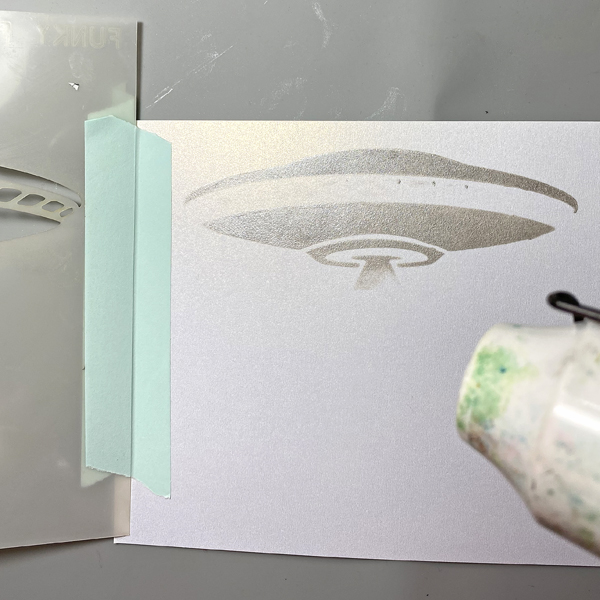
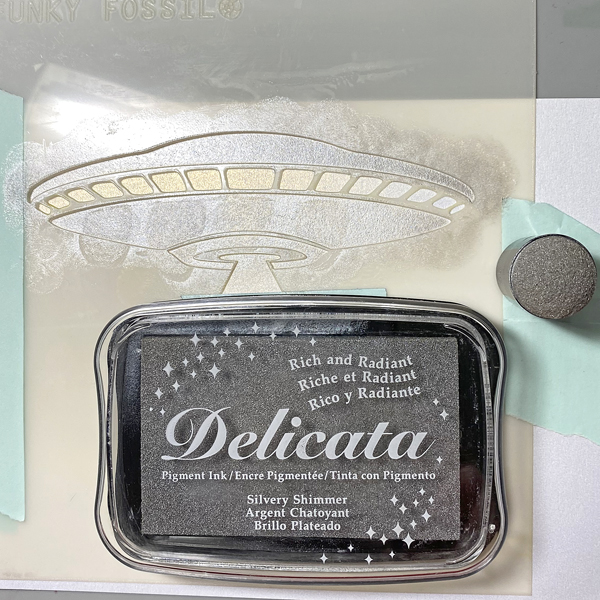
Put the UFO stencil back in place. Use a sponge dauber to apply Silver Shimmer Delicata over the stencil onto the image panel. Open the hinged stencil and heat set the image panel.
Step 3:
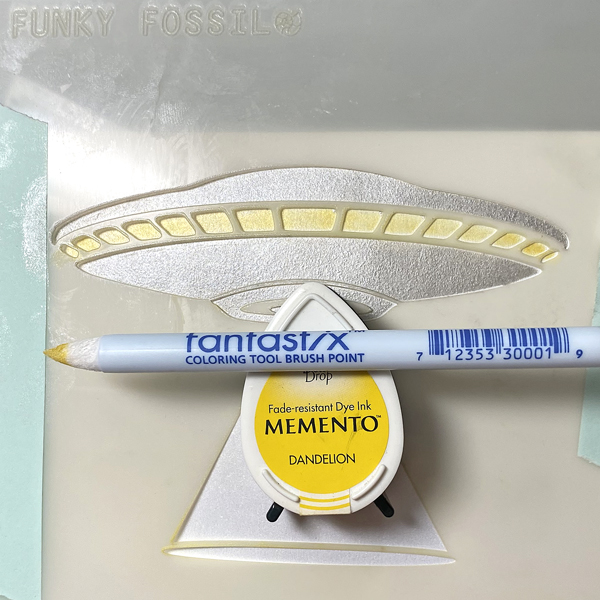
Use a brush-tipped Fantastix to apply Dandelion Memento ink through the UFO’s windows onto the image panel. Remove and clean the stencil.
Step 4:
Touch up the windows with the Fantastix. Use a grey watercolor marker to color the window frames and the bottom aperture of the UFO.
Step 5:
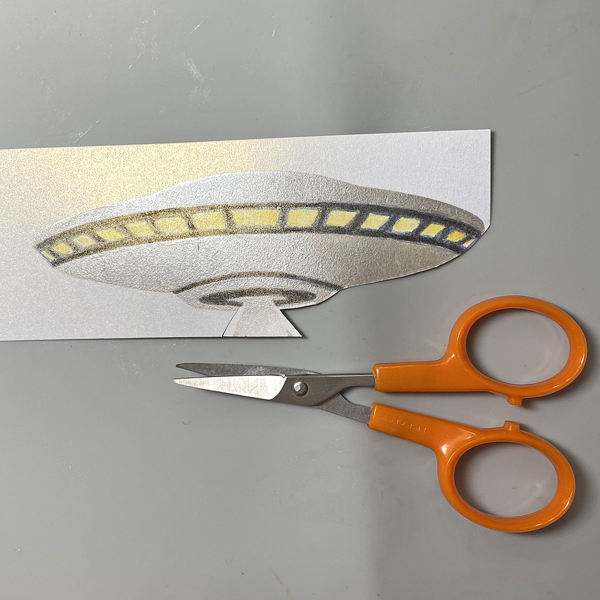
Fussy-cut the UFO, edge with a dark marker, and set aside.
Step 6:
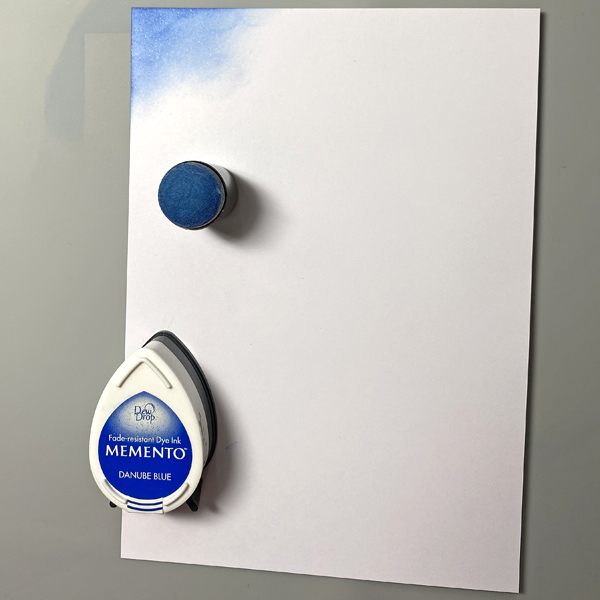
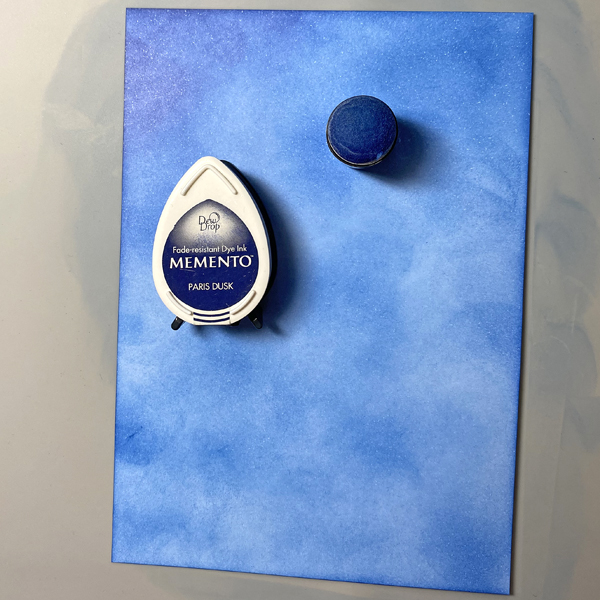
Use a sponge dauber to apply Danube Blue onto a 4.75” x 6.75” piece of Bristol Paper. Use a sponge dauber to blend Paris Dusk onto the Bristol Paper to create a mottled background.
Step 7:
Tape the Time Tunnel Stencil over the inked background panel. Use a sponge dauber to apply Paris Dusk Memento ink over the stencil onto the paper.
Step 8:
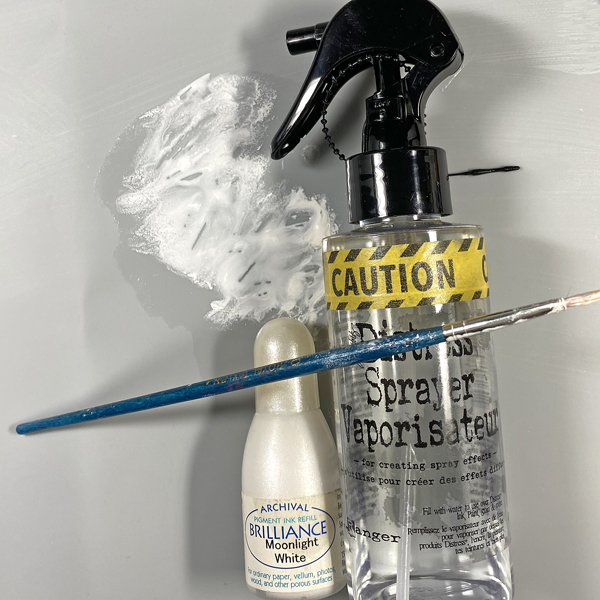
Squeeze a few drops of Moonlight White Brilliance re-inker onto a craft mat. Spray with 91% Isopropyl Alcohol. Use a paintbrush to mix the ink. Load the paintbrush with the diluted Moonlight Brilliance ink and splatter the background panel. Let air dry or heat set.
Step 9:
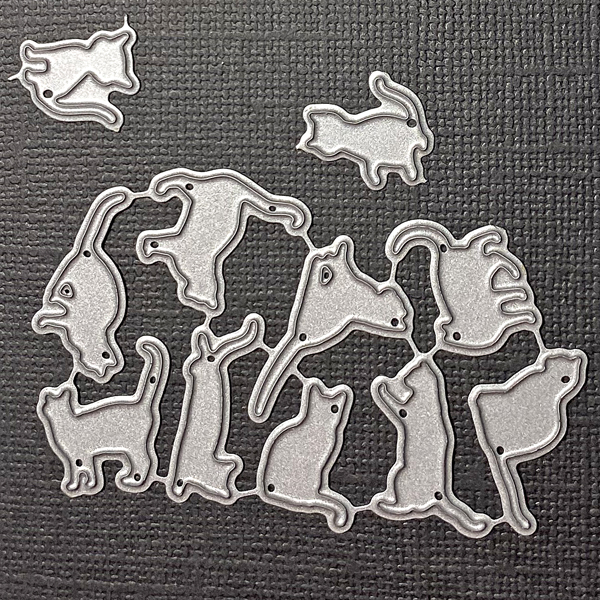
Use the Mini Cats die to cut Raven cardstock. Set the cat dies aside.
Step 10:
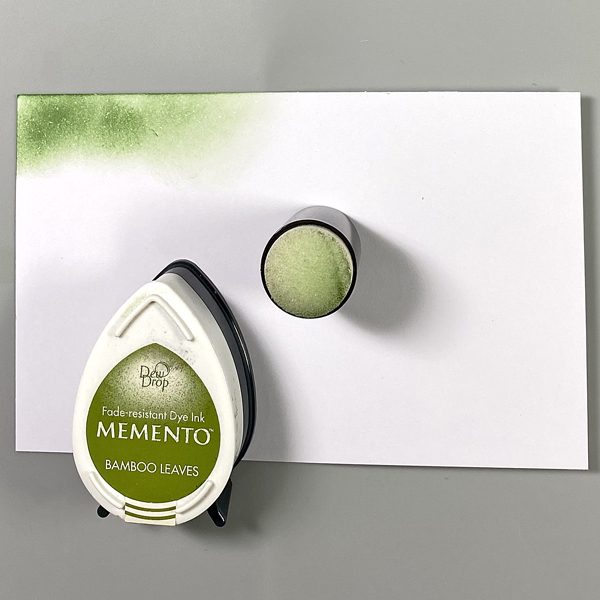
Use a sponge dauber to apply Bamboo Leaves Memento ink onto a white cardstock panel. Repeat Cottage Ivy Memento ink until the panel is covered.
Step 11:
Use the Grassy Hills Die set to cut the inked panels. Use a green Copic marker to edge the grass and to add details. Using Memento Ink to create backgrounds allows you to use Copic markers overtop!
Step 12:
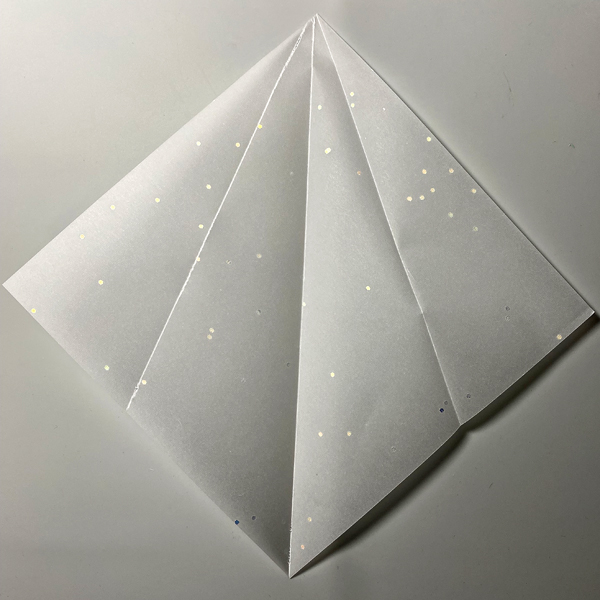
Cut a piece of vellum to 6” square. Score on the diagonal from one point to the opposite point. Fold.
Repeat with both sides until it looks like the above photo.
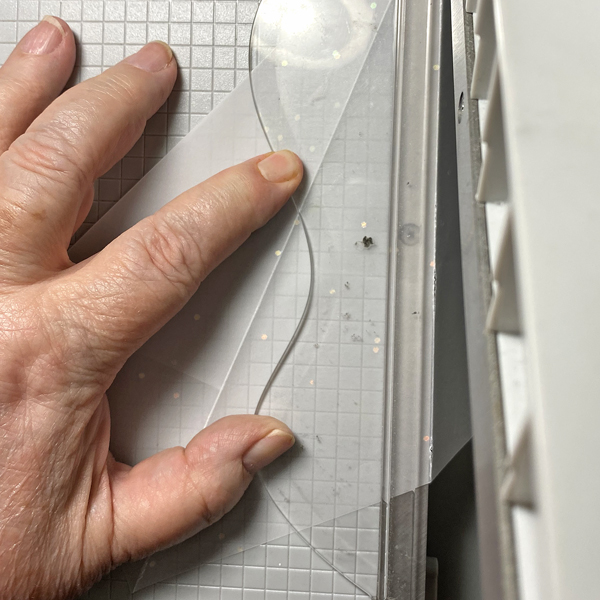
Step 13:
Place one edge of the scored, folded square along the cutting edge of a guillotine trimmer. Cut.
Step 14:
Use On Point Glue to adhere the die-cut cats to the interior of the folded vellum triangle. Sorry that I forgot to take a photo.
Step 15:
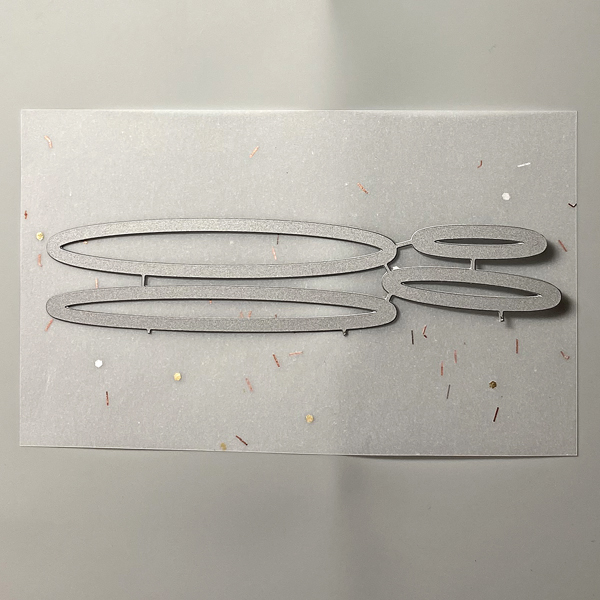
Back a piece of vellum with two-sided tape. Use the Oval Shadows Die-namics to cut the vellum.
Step 16:
Use Tear It! Tape to adhere the three layers of grass to the background panel as shown. Edge the panel with VersaFine Clair Nocturne .
Adhere the vellum cone and the vellum oval as shown. Use On Point Glue to adhere escaping and/or partially beamed-up cats atop the vellum oval and cone.
Use dimensional foam adhesive to adhere the UFO as shown.
Step 17:
Adhere the image panel to a 5” x 7” piece of Black Mixed Media paper. Add the sentiment sticker to finish the piece.