Hello friends, Katy here and in today’s video tutorial, I’m going to show you how to make a quick background using Memento inks and Sheer Shimmer Spray. Todays project is for Mother’s Day, but it can lend itself to Many different sentiments. Listed below are products I used in todays video including some Affiliate links at no additional cost to you. l thank you for using those links and supporting my work.
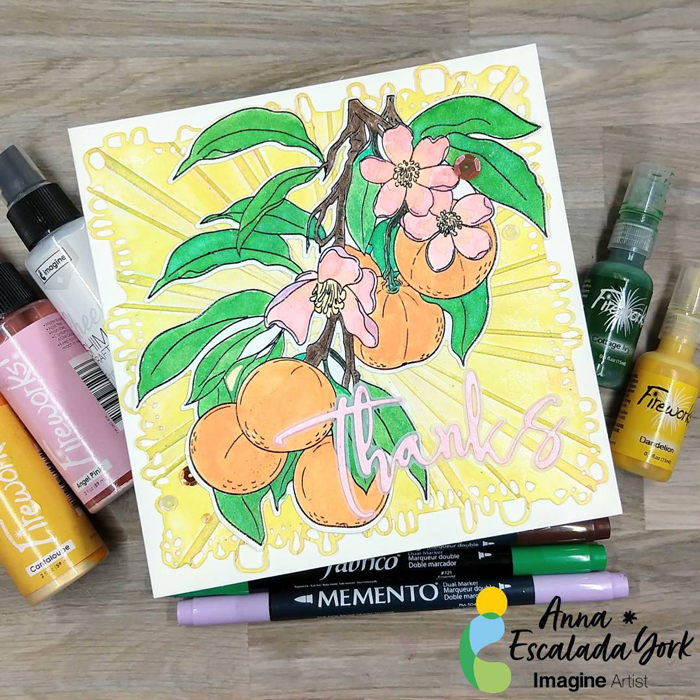
I used to be intimidated by the idea of multimedia cards, but all they are cards that have different types of products. This card features stamping, watercoloring with sprays and Amplify! Ink, and embossing.
Skill: Intermediate Time: 2 hours
Directions:
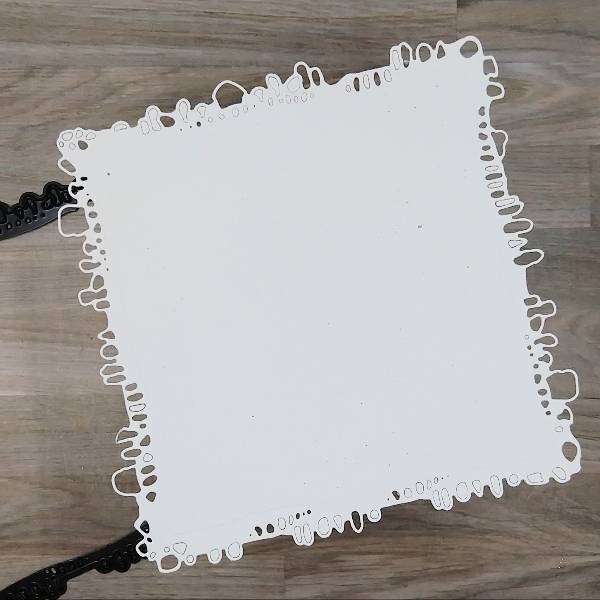
Step 1: Die cut a piece of watercolor paper.
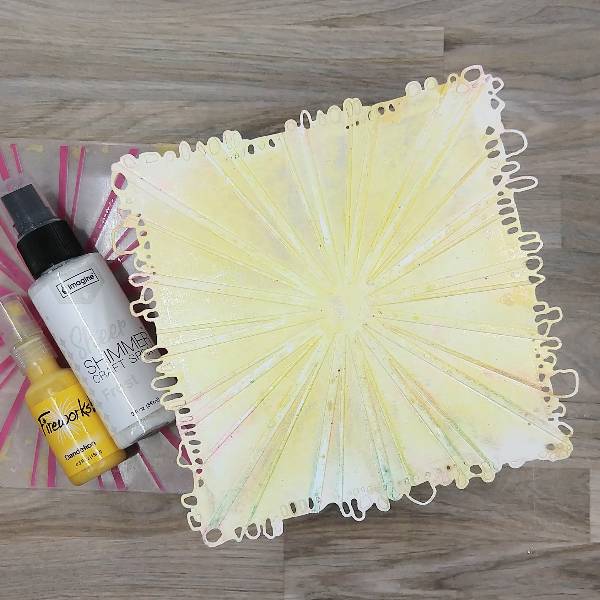
Step 2: Spray Dandelion Fireworks! Shimmery Craft Spray onto the center part of an embossing folder and Frost Sheer Shimmer Craft Spray around the edges. Place the die cut watercolor panel in the embossing folder. (The folder had some residual color from a previous project, but it will be covered up later.)
Step 3: Rub a Sunflower Yellow Brilliance Ink pad over the edges of the embossed watercolor panel.
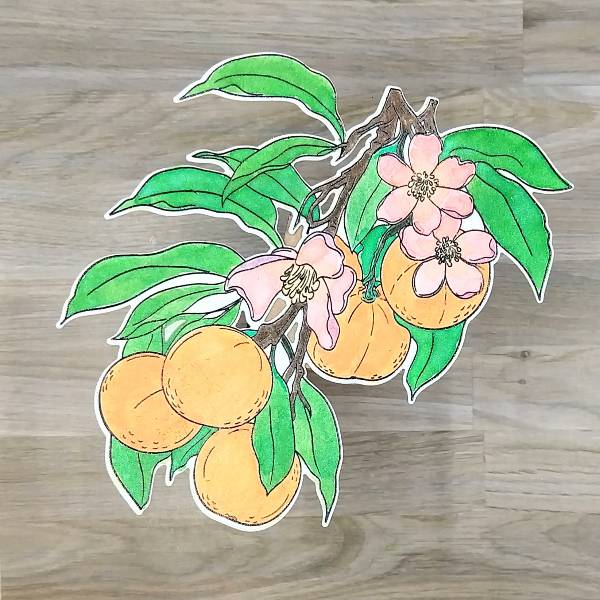
Step 4: Stamp the main image onto another piece of watercolor paper with Nocturne VersaFine Clair ink. Heat emboss with clear embossing powder.
Step 5: Use a variety of sprays and other media to color in the image.
The leaves were watercolored with Cottage Ivy Fireworks! Shimmery Craft Spray.
The green stems were colored with Emerald Fabrico Dual Marker.
The small branches were colored in with Rich Cocoa Memento Dual Marker.
The flowers were watercolored with Angel Pink Fireworks! Shimmery Craft Spray on the petals. After the petals dried, the center of the flower and the center part of the petals were water colored with Cantaloupe Shimmery Craft Spray. Finally, the outside parts of the petals were colored with Lulu Lavender Memento Dual Marker.
Electric Orange Radiant Neon Amplify! pigment ink and Cantaloupe Shimmery Craft Spray were mixed on a piece of scrap acetate and was watercolored onto the tangerines.
Step 6: Die cut the image with the corresponding die.
Step 7: Press Angel Pink Memento Dye Ink onto a scrap of watercolor paper. After the ink dries, spray Angel Pink Fireworks! Shimmery Craft Spray onto the same scrap of watercolor paper and allow it to dry.
Step 8: Die cut the pink watercolor paper with a thanks sentiment die and a piece of vellum with the sentiment’s shadow die.
Step 9: Glue the tangerine image onto the embossed watercolor background panel. Then glue the sentiment die cut to the vellum shadow sentiment die cut. Glue the sentiment onto the panel as well.
Step 10: Glue the panel onto a 6” by 6” square cardbase. Glue sequins on the lower left and upper right parts of the panel to finish the card.
AALL & Create – die set – Nature’s Doily Alex Syberia Designs – die set – Large Thanks die Altenew- die set – Tangerine Grove Altenew- stamp set – Tangerine Grove Catherine Pooler – sequin mix – València Sequin Mix Pink & Main – Embossing Folder – Sun Ray Clear Embossing Powder 6” by 6” cardbase Watercolor paper Vellum Die cutting machine Scissors Glue
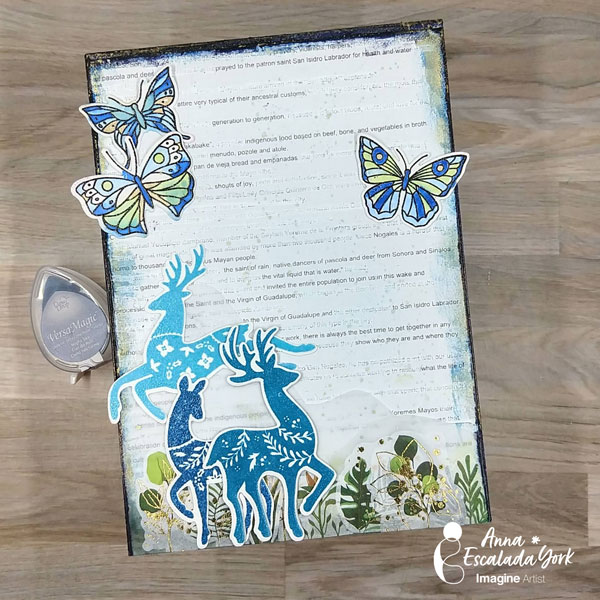
When I’m not making cards, I am a high school teacher and graduate student. I made something way out of my comfort zone for the final project for my graduate school class, and wanted to share it here as well. I created a blackout poem from a copy of a text related to my project and then added some stamped images related to it over the poem. I had a lot of fun making it, so I may have to start making more blackout poems in the future….
Skill: Intermediate
Time: 3 hours
Directions:
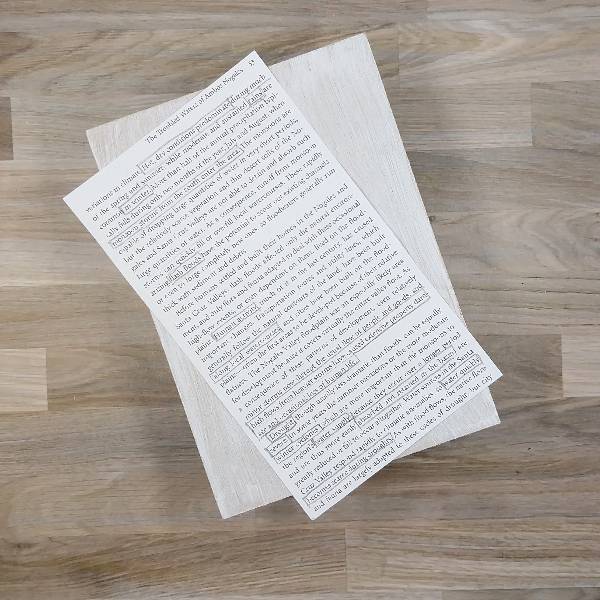
Step 1: Paint a thin layer of white gesso onto a 5” by 7” medium density fiberboard (MDF) panel.
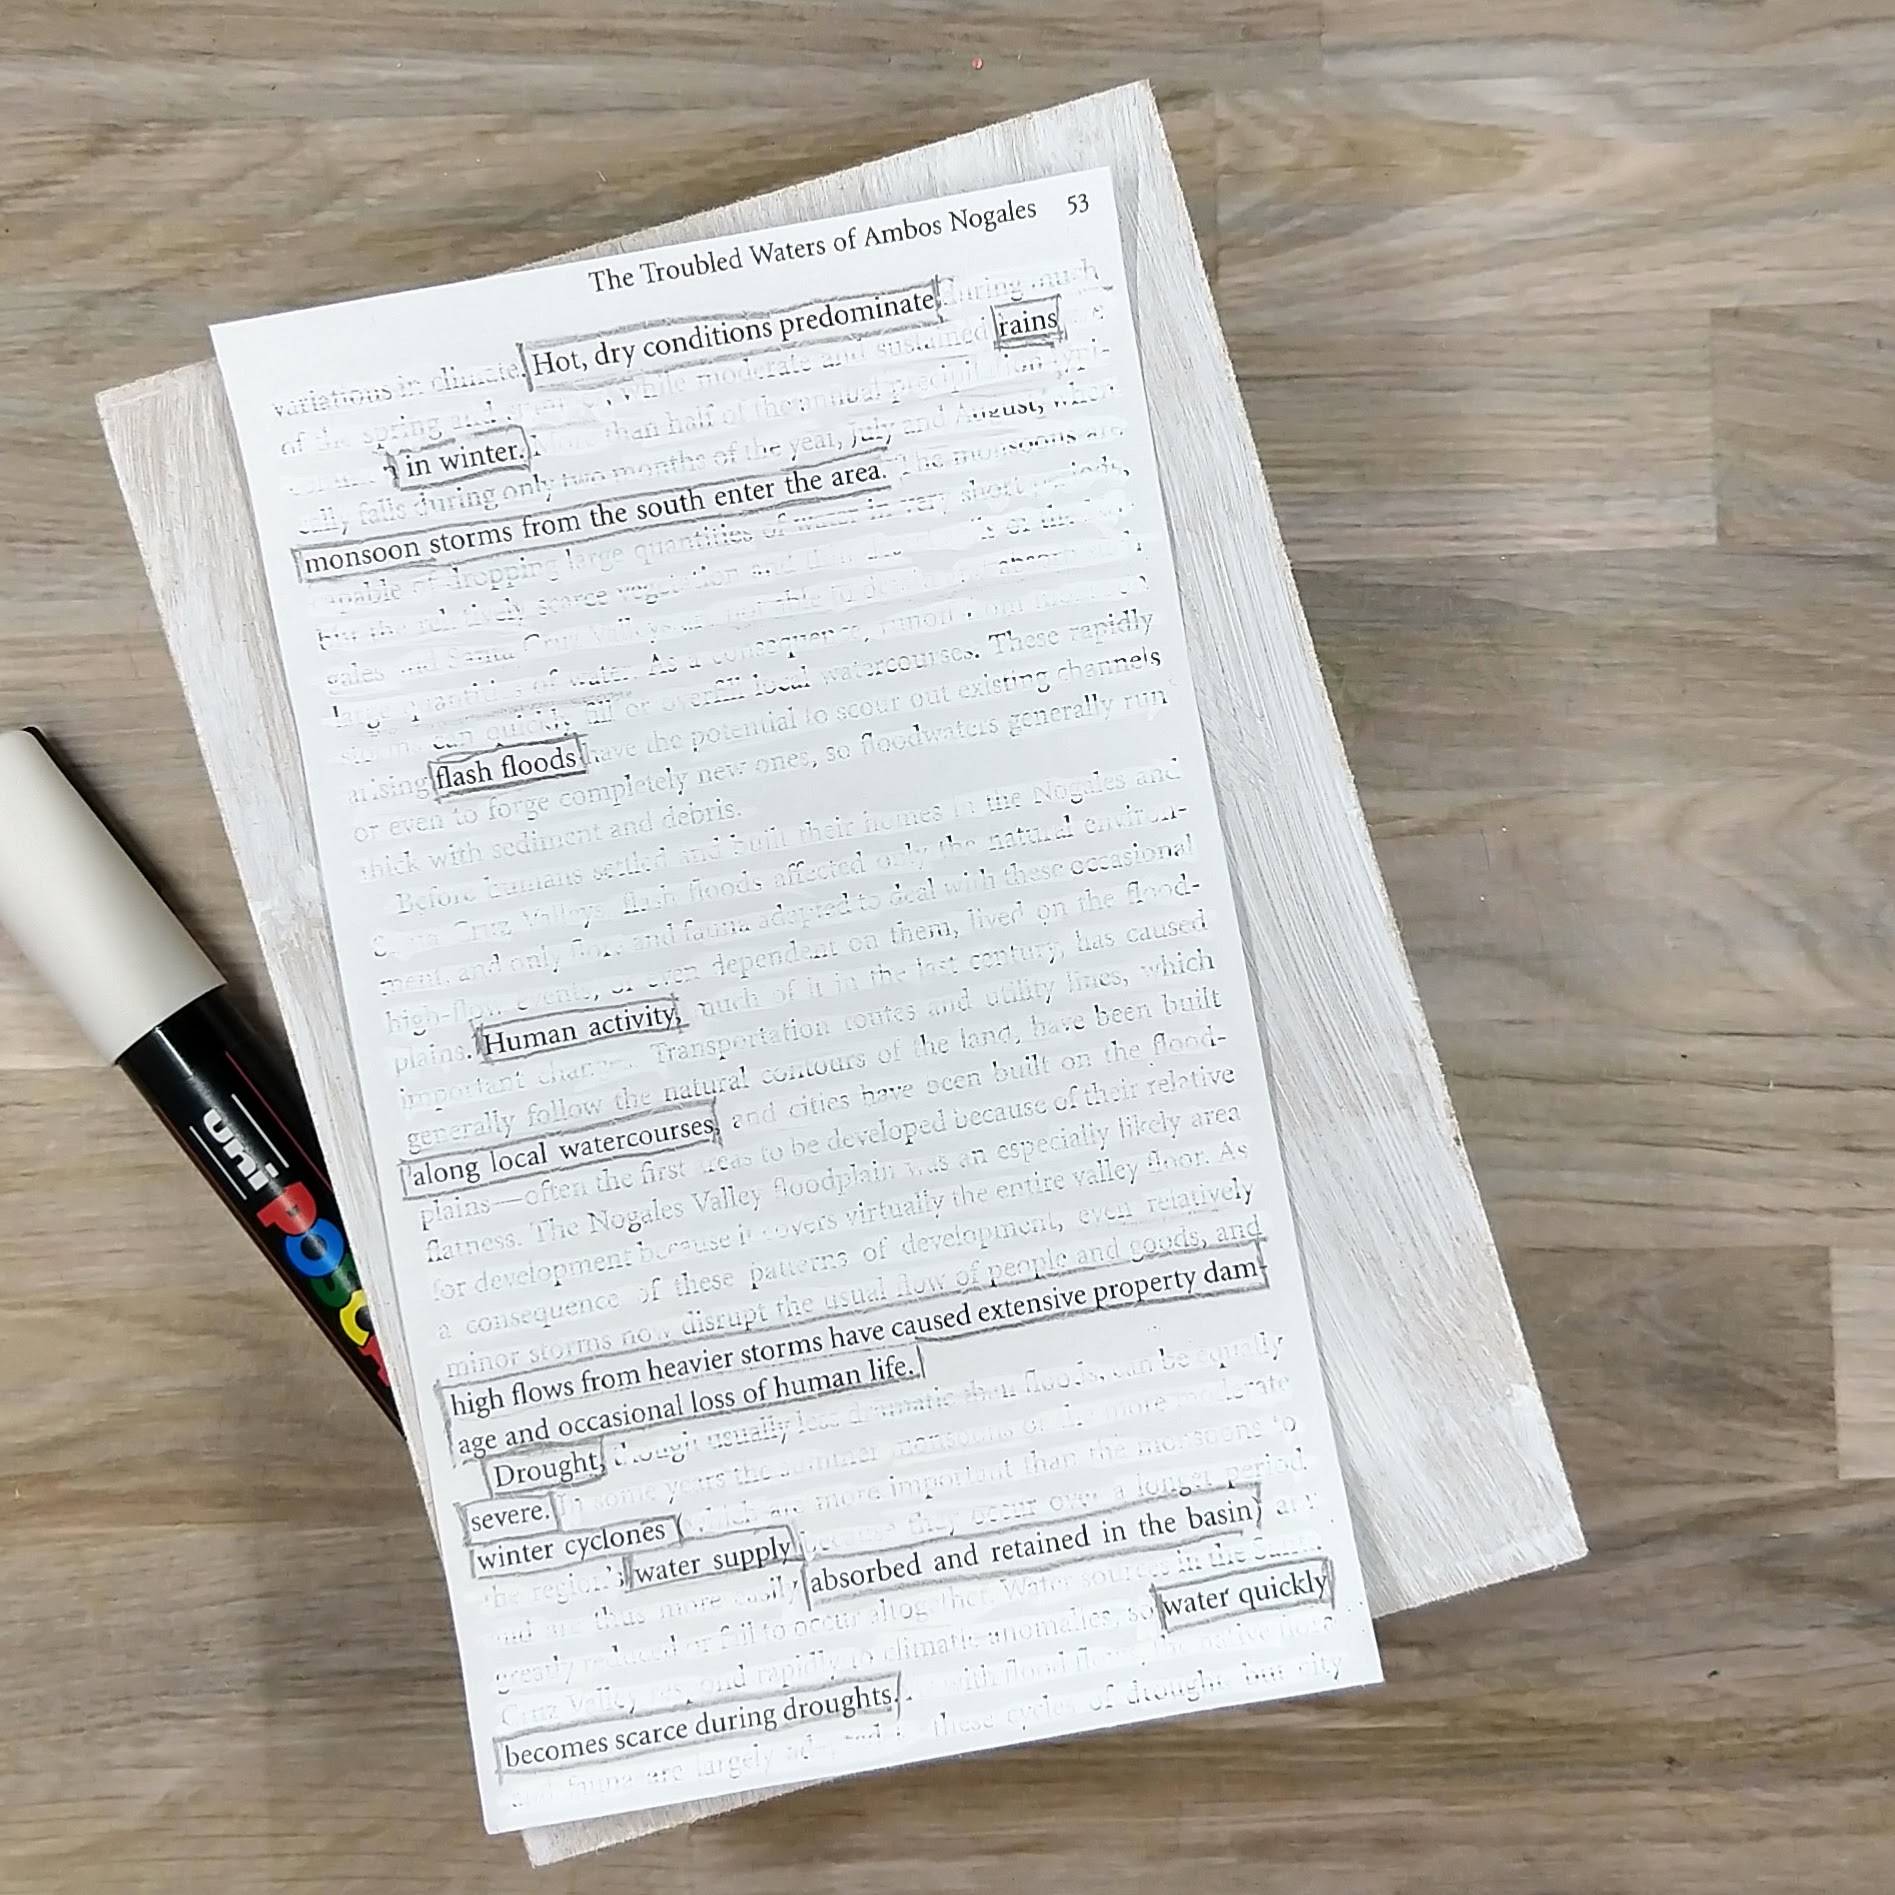
Step 2: Identify words that you want to keep by underlying them or drawing boxes around them in pencil (the other words will be crossed out).
Step 3: Using a white marker, cross out the other words, leaving the underlined words as the only words that we can see on the page. Erase the pencil marks.
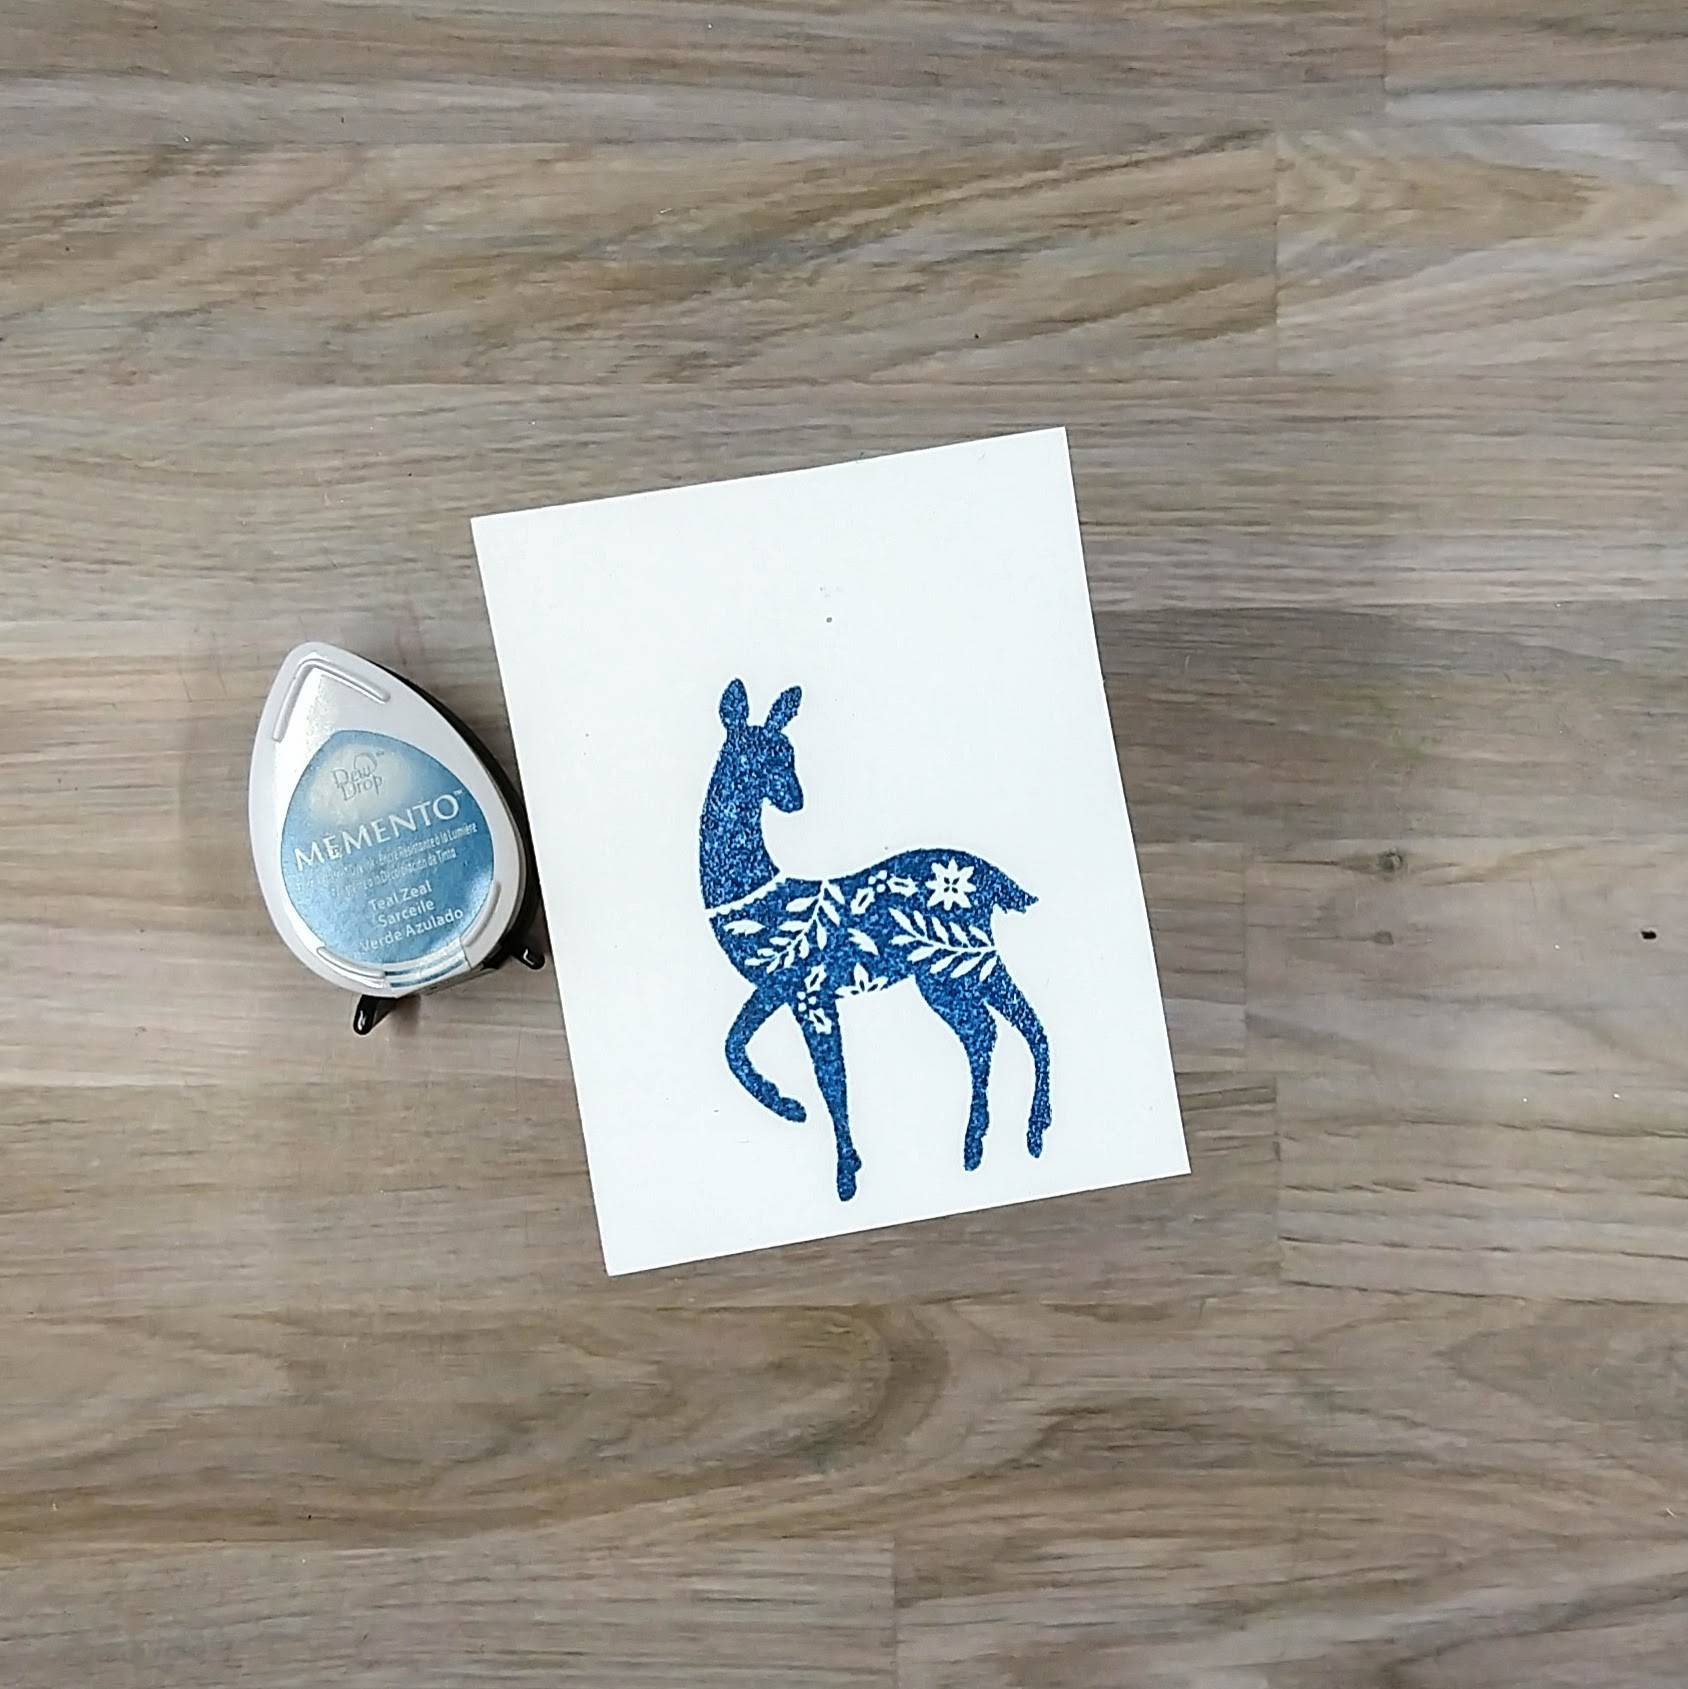
Step 4: Stamp two deer using Warm Breeze and Bali Blue VersaFine Clair Ink and then heat emboss both of them with clear Mboss powder. Die cut them with their corresponding dies. If desired, die cut the additional layers of scrap cardstock to fit behind the Warm Breeze buck (the deer that is standing rather than jumping) and glue them behind the stamped and embossed layer for dimension.
Step 5: If you are very quick and add embossing powder onto die ink immediately, you can emboss it! I decided to stamp and die cut one more deer for the panel and so repeated the process from step 4 with Teal Zeal Memento ink and more clear Mboss powder.
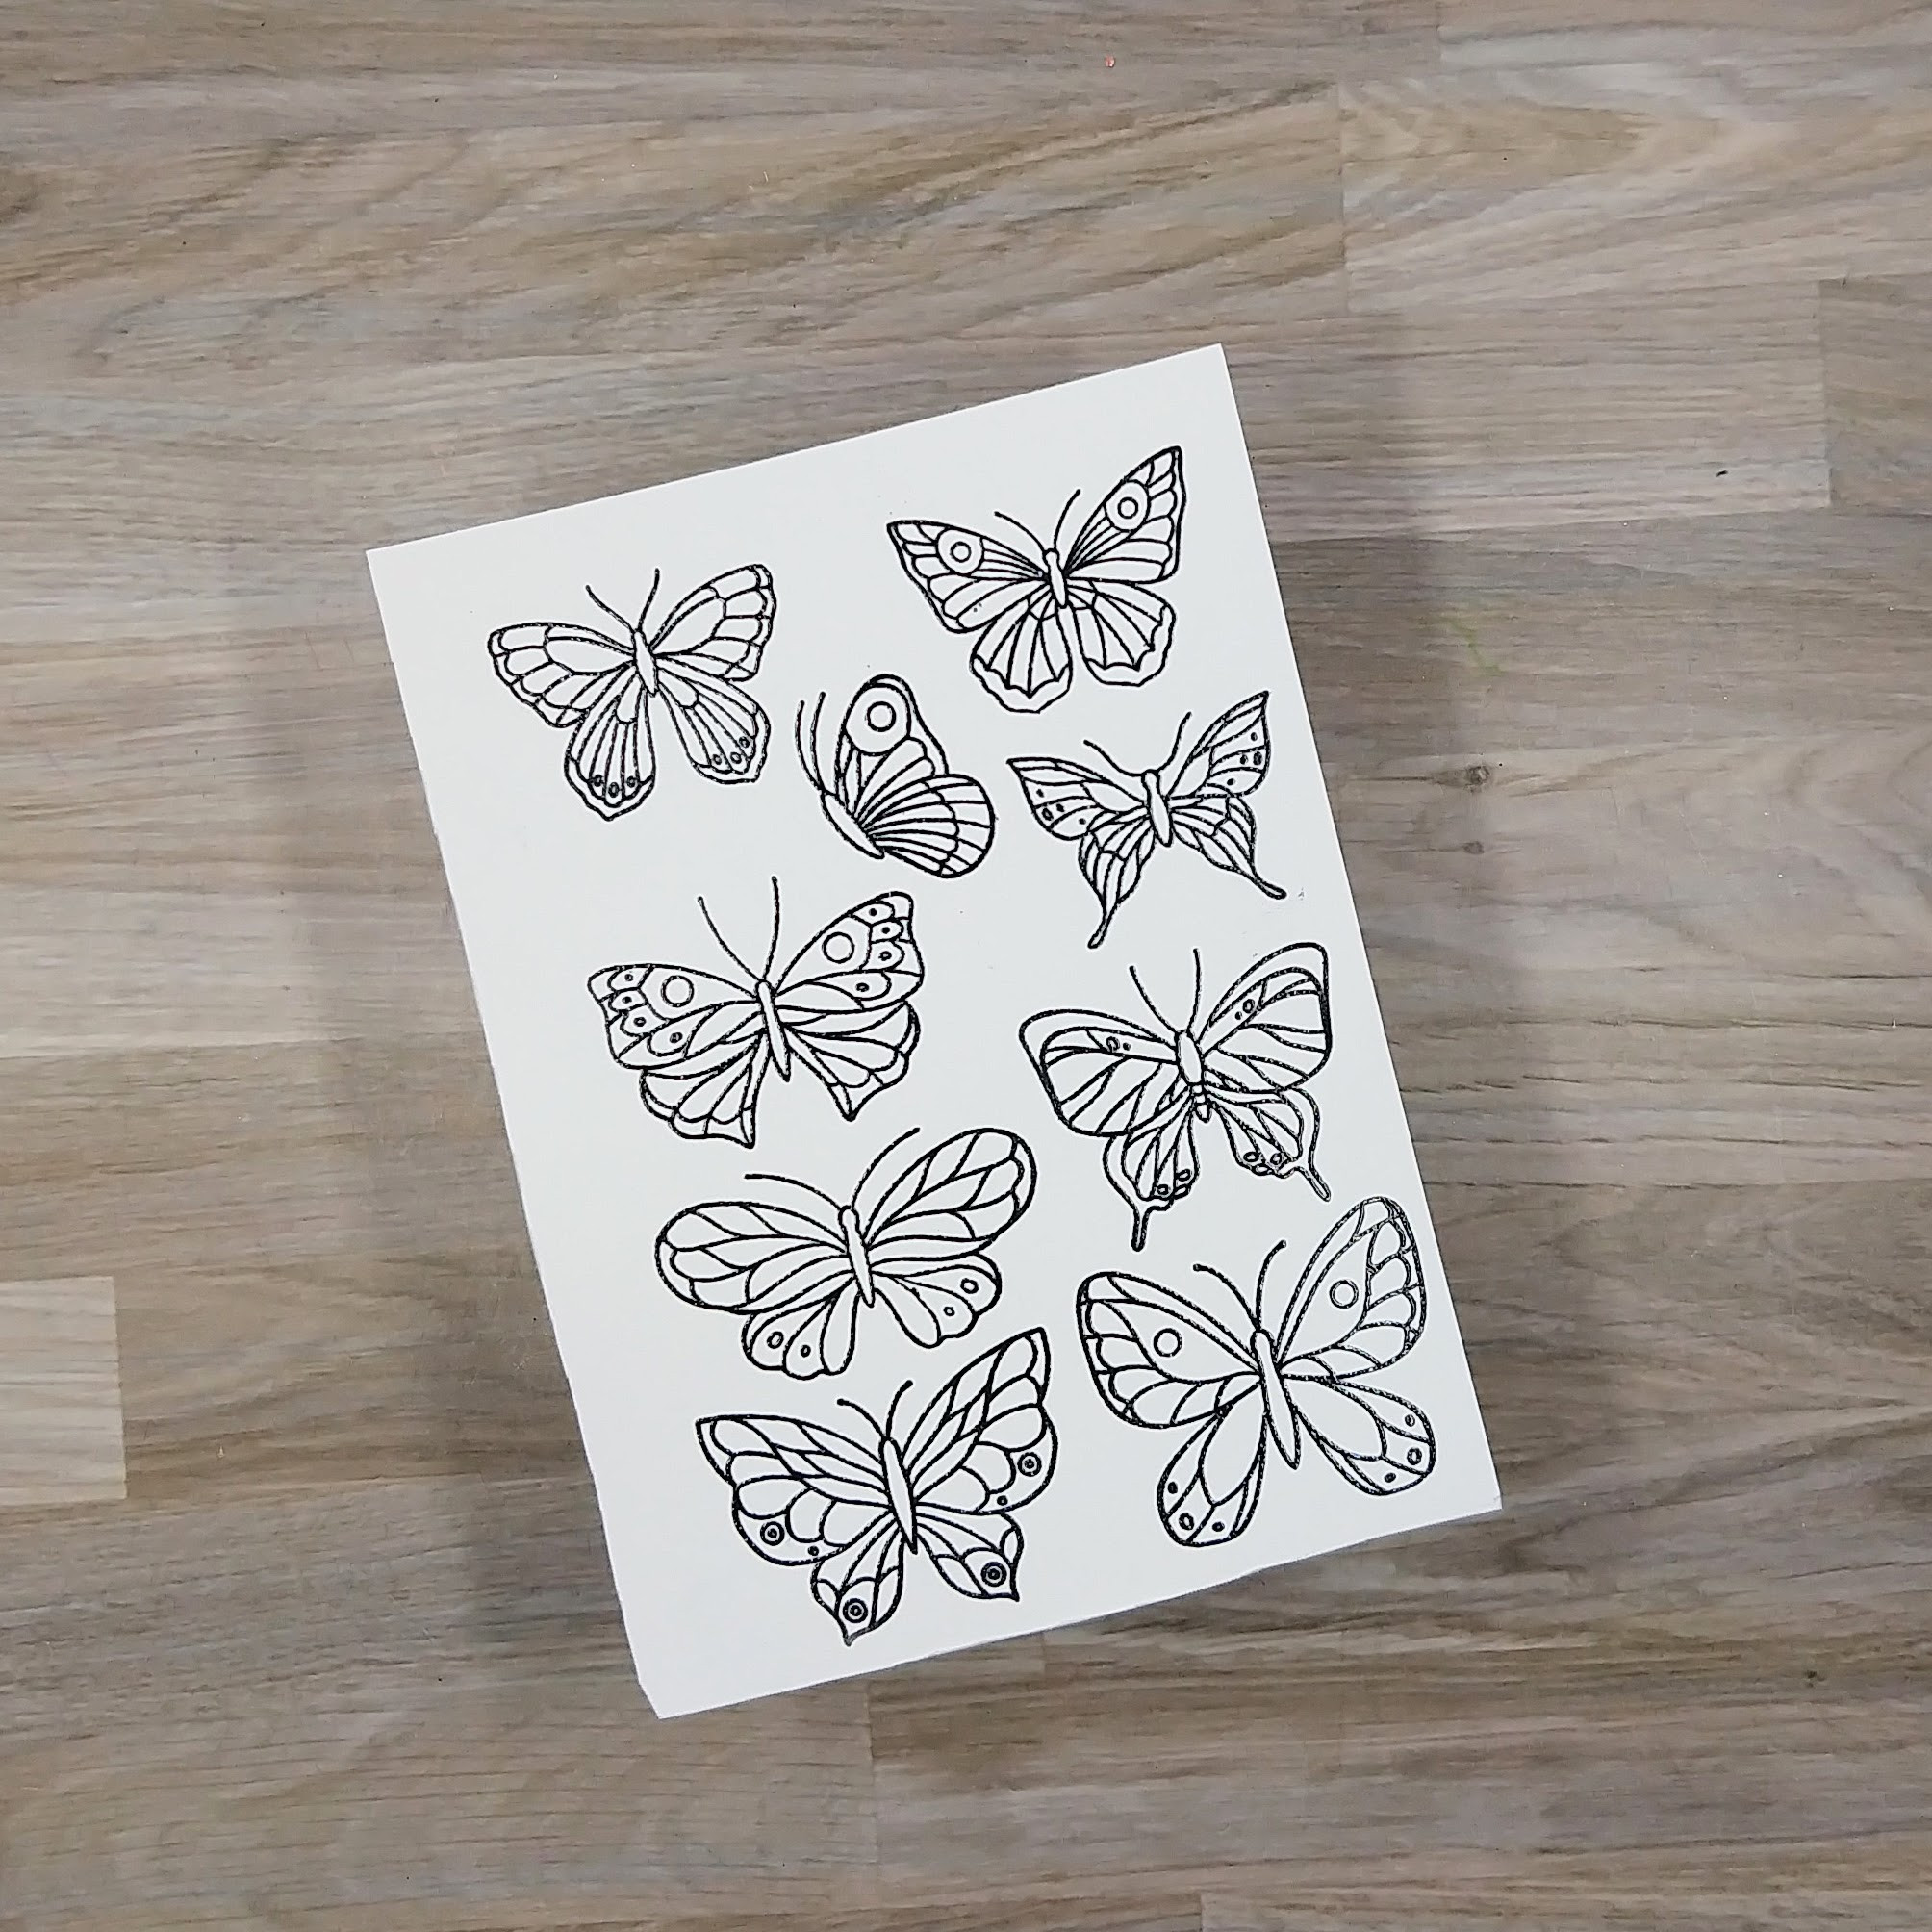
Step 6: Stamp butterflies onto another piece of watercolor paper with Nocturne VersaFine Clair ink. Heat emboss again with more clear Mboss powder.
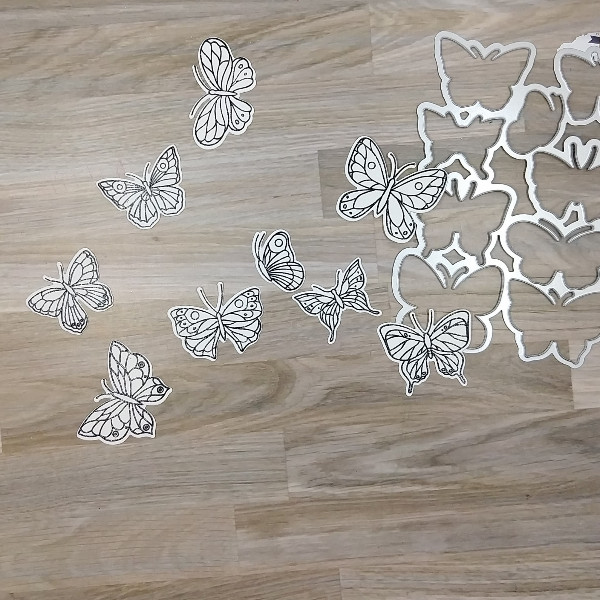
Step 7: Die cut the butterflies with their corresponding die. Not pictured: Color in the butterflies with New Sprout, Summer Sky and Danube Blue Memento Dual Markers and spray them with water to make the color blend into each other. After the water dried, color parts of the butterflies with a gold pen.
Step 8: Cut a piece of vellum with scissors to look like a mountain. Color the bottom of the vellum with Northern Pine Memento Dual Marker and then use your finger to smudge the marker color.
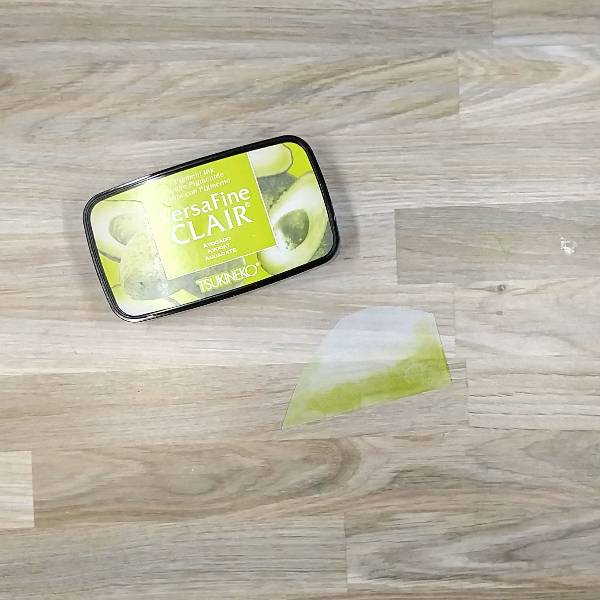
Step 9: Cut another smaller hill shape out of vellum and then smudge Avocado VersaFine Clair ink along the bottom and allow it to dry.
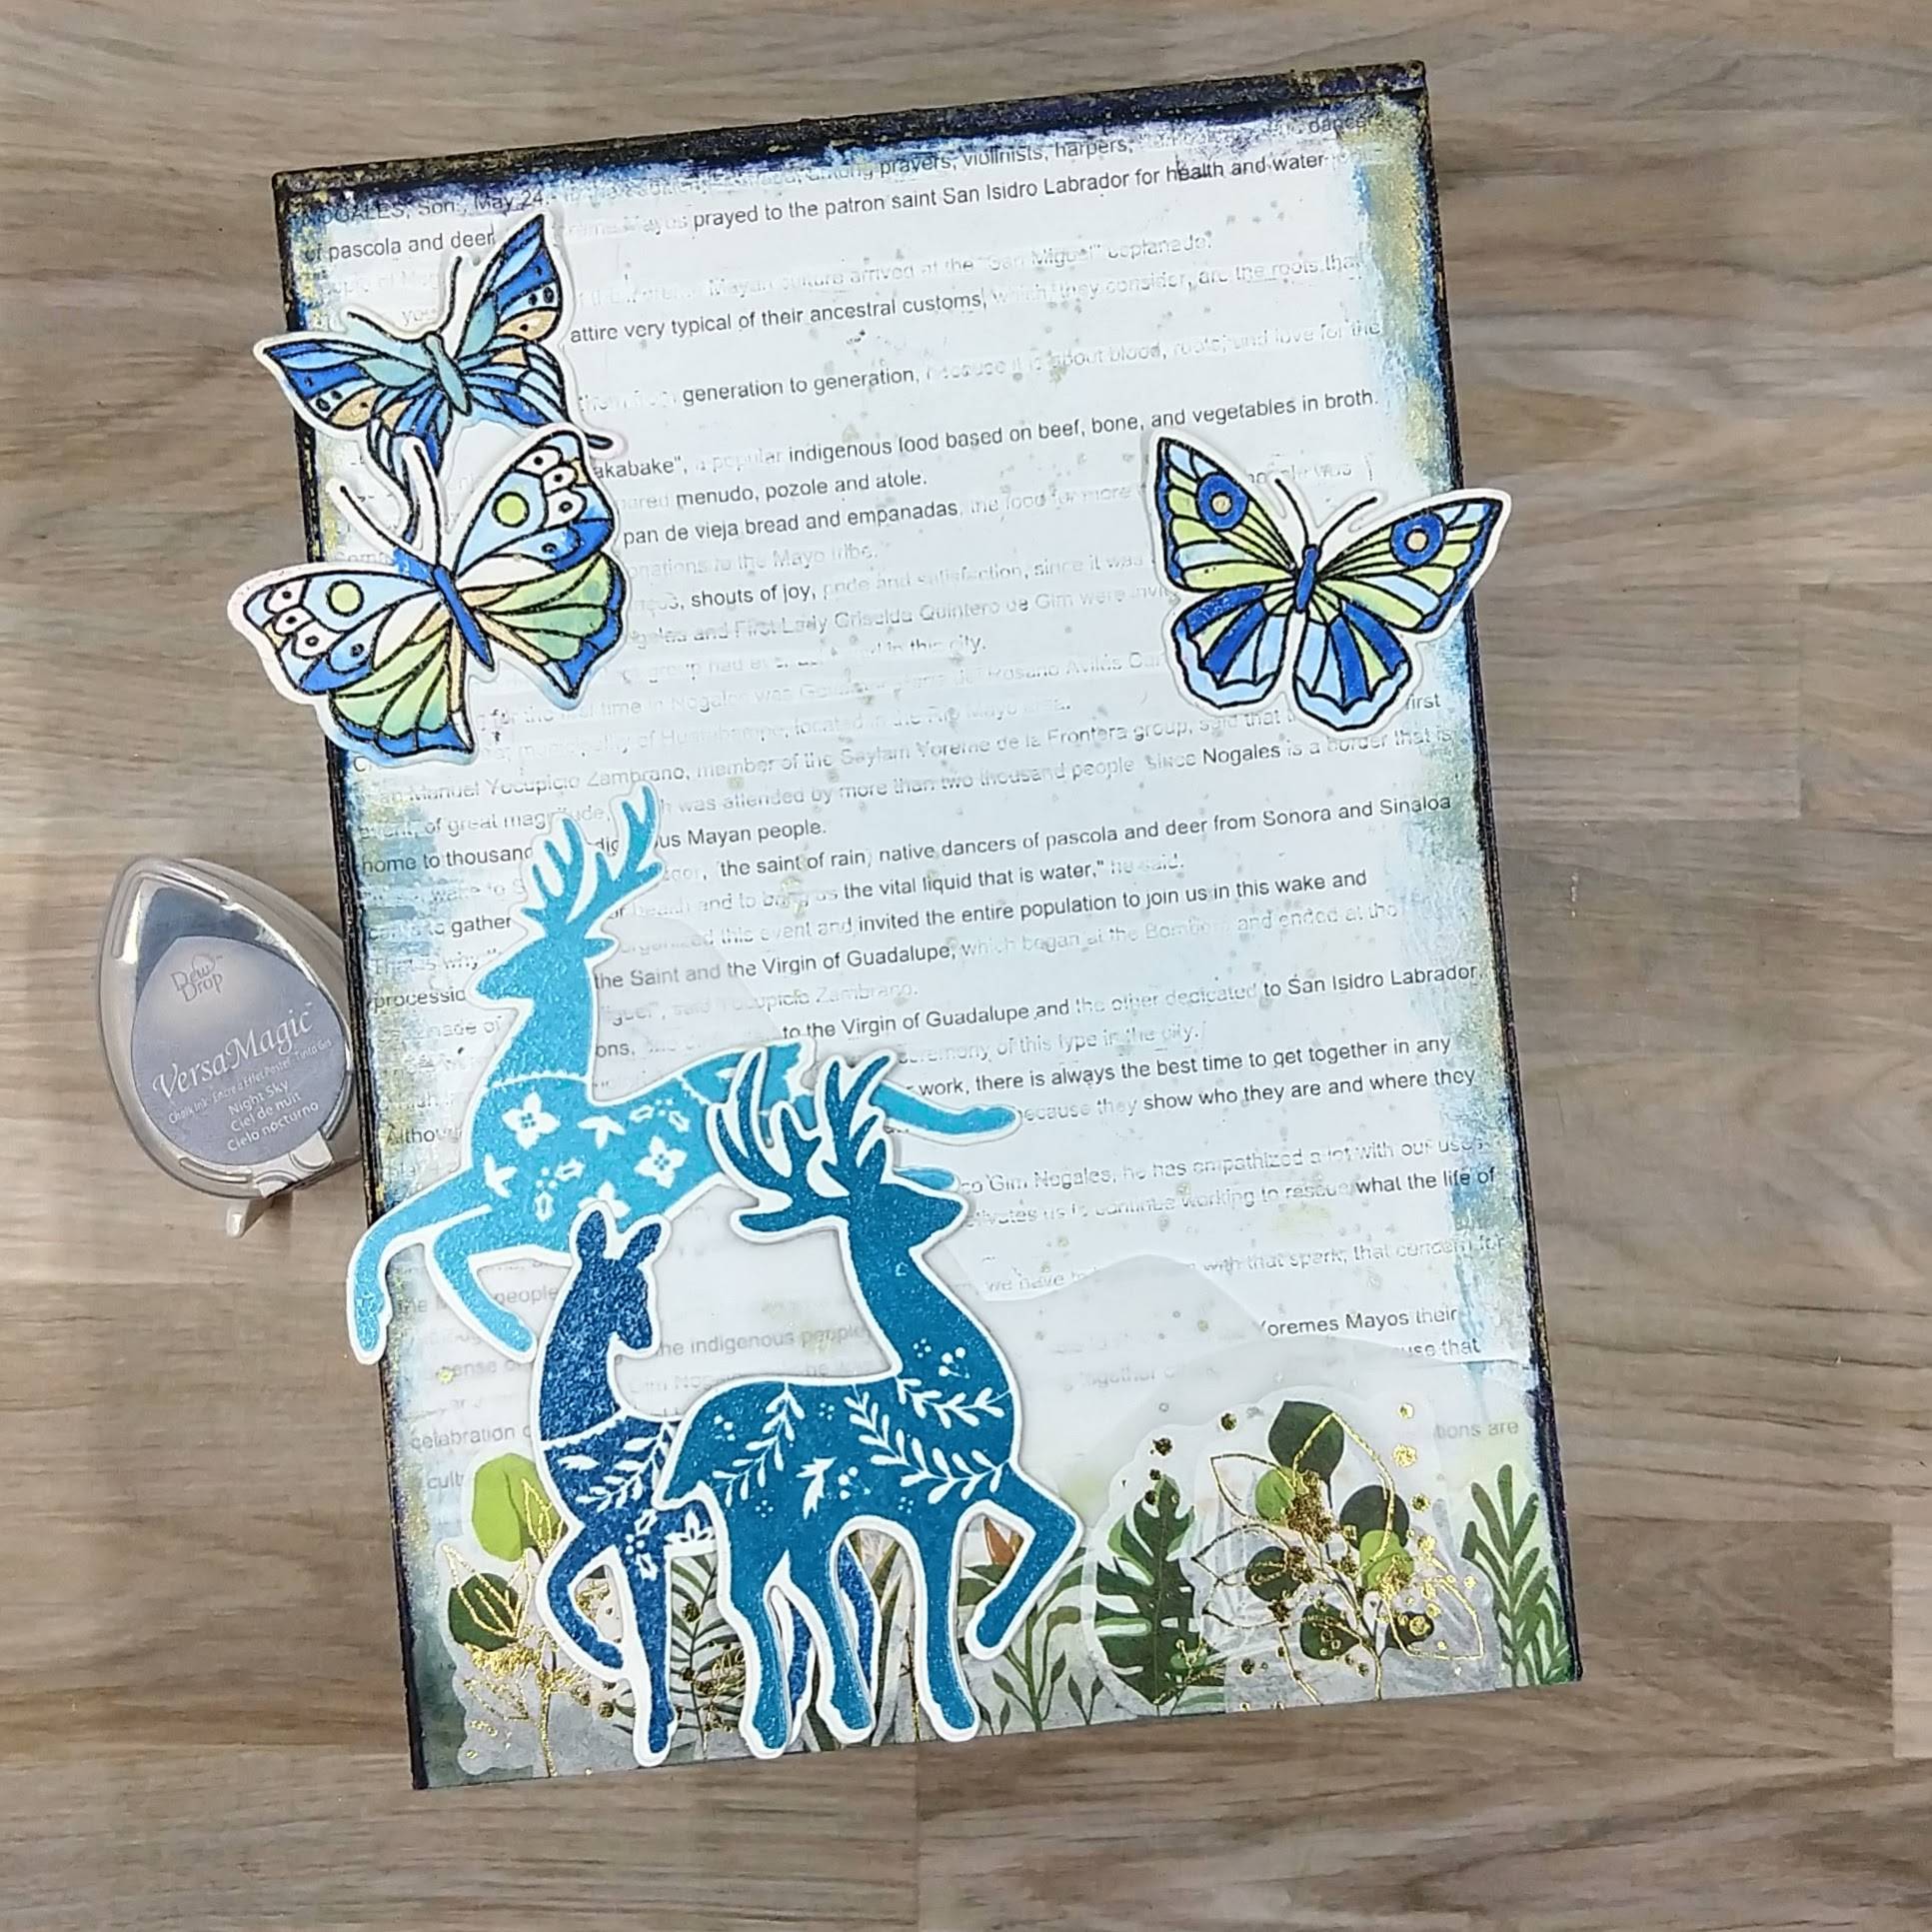
Steps 10-12: My decided not to save the pictures of steps 10-12. This picture was taken the next day after I realized that my camera betrayed me! Here are the steps that I took to get to finish the panel:
Step 10: Glue the blackout poem onto the backing panel. Then press the Night Sky VersaMagic ink pad onto the top and sides of the panel (to help cover up the fact that the blackout poem didn’t quite meet the edges of the panel) and heat emboss with clear Mboss powder. Repeat the process three times to help build up the amount of embossing powder on the side of the panel (and obscure the edges of the paper). Using a brush (or in my case my finger), smudge some Danube Blue Memento Dual Marker mixed with water on a piece of acetate around the top and
sides of the panel. Then press a Gold Sheer Shimmer Stix Dauber onto a piece of acetate packaging and add it to the sides and top edges of the panel as well. Allow to dry.
Step 11: Glue down the two vellum mountains on the bottom edge of the panel, making sure to have the glue hiding behind the deer and other elements on the panel as well as the butterflies. Add washi tape stickers across the bottom of the panel.
Step 12: Glue the deer onto the panel to finish the piece.
Other • Art Alternatives – MDF Panel (5” x 7”) • Catherine Pooler – die set – Peaceful Deer • Catherine Pooler – stamp set – Peaceful Deer • Golden – Gesso Semi-Opaque Acrylic Primer • Pinkfresh Studios – die set – Small Butterflies • Pinkfresh Studios – stamp set – Small Butterflies • The Washi Tape Shop – washi tape stickers – Green Oasis Gold pen • Copied book page (for the blackout poem) White marker • Watercolor paper Vellum • Pencil Paintbrush • Die cutting machine Paint brush • Paper trimmer Scissors • Glue
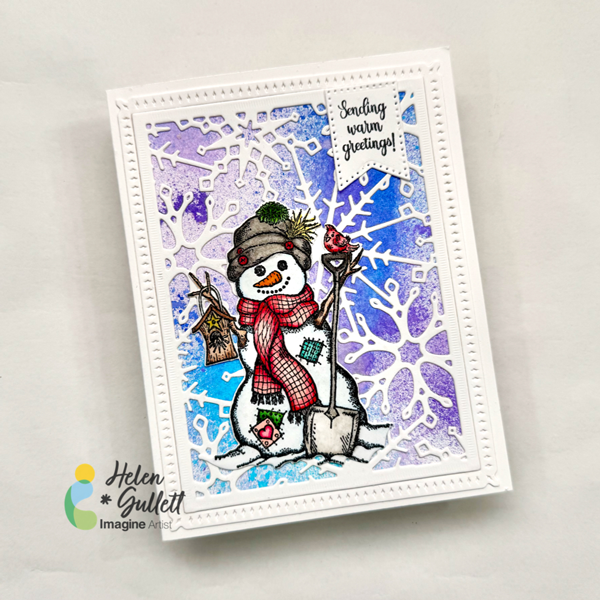
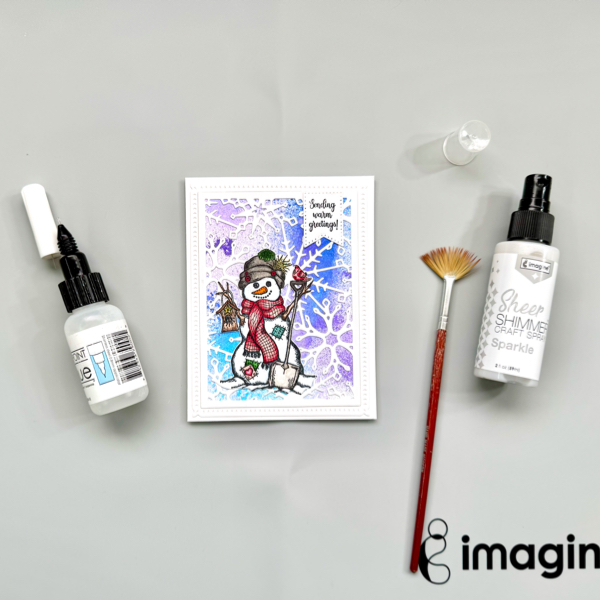
Hello crafty friends! Winter is here and today we are going to make this winter theme card to send some warm greetings to friends and family. Let’s get crafting!
Skill: Intermediate Time: 15-20 minutes
Direction:
Step 1
Cut out a piece of the heavyweight white cardstock into 4.25 inch x 5.5 inch.
Put it on the craft mat and make sure there is nothing around it since we are going to play with some craft sprays!
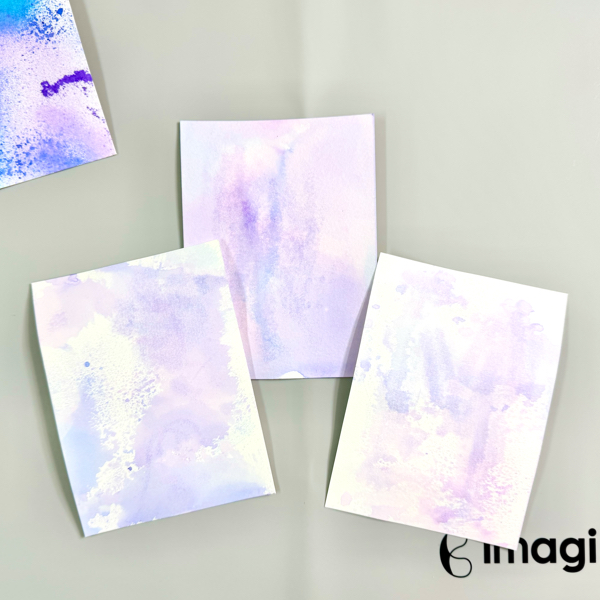
Start randomly spraying some of the Fireworks Shimmer Craft Sprays (Lulu Lavender, Grape Jelly, Bahama Blue, Paris Dusk) on the cardstock to create the background panel.
Set aside to dry or speed up the drying process with a craft heat gun.
Step 2
After removing the cardstock, do not wipe off the extra inks on the craft mat.
Grab a couple more cardstocks to create more background panels.
Spray extra water to get lighter colors effect on the cardstocks.
Set them aside to dry or speed up the drying process with a craft heat gun.
Step 3
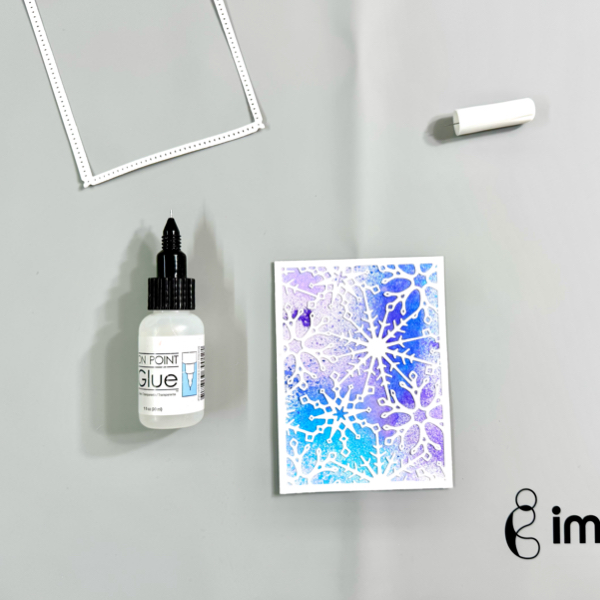
Cut another piece of heavyweight white cardstock with the snowflake background die using the die-cutting machine.
I added extra shim when cutting it because I used an intricate background die.
Step 4
Add the sprayed background panel to the card base with some of the On Point Glue. Press firmly for a few seconds until the glue dries.
Add some of the On Point Glue to the back of the cut out snowflake background panel. The fine point is perfect for this intricate die cut panel. Add it to the card and press firmly for a few seconds until the glue dries.
Step 5
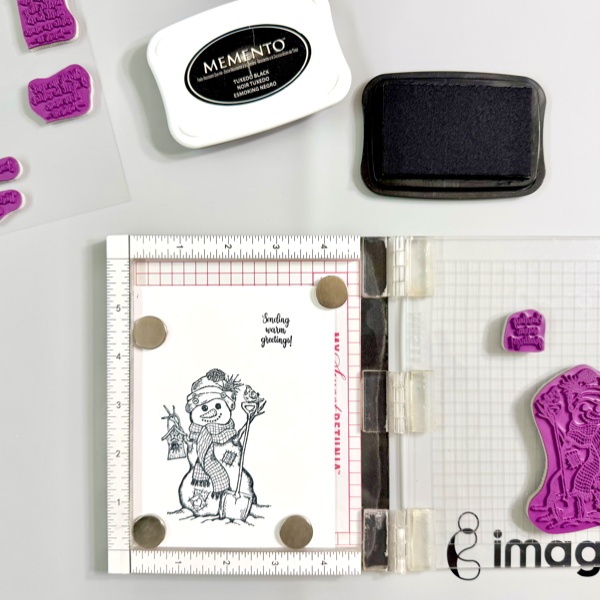
Stamp the snowman image and sentiment on a piece of heavyweight white cardstock with Memento Tuxedo Black ink pad.
Step 6
Color the snowman image with alcohol markers.
Cut out the snowman with a matching die (or fussy cut it with scissors).
Cut out the sentiment with a small banner die.
Step 7
Add both snowman and sentiment to the card with On Point Glue.
Add extra shimmer to the card with some of the Sparkle Sheer Shimmer Craft Spray. I used a fan brush to add the splatters to the card.
Use a craft heat gun dry the splatters on the card.
The card is done… I can say this picture cannot justify the shimmer and sparkle on this card. But I love how this card turned out to be! I hope you will give it a try.
Thanks for stopping by our blog today. Have a wonderful day!
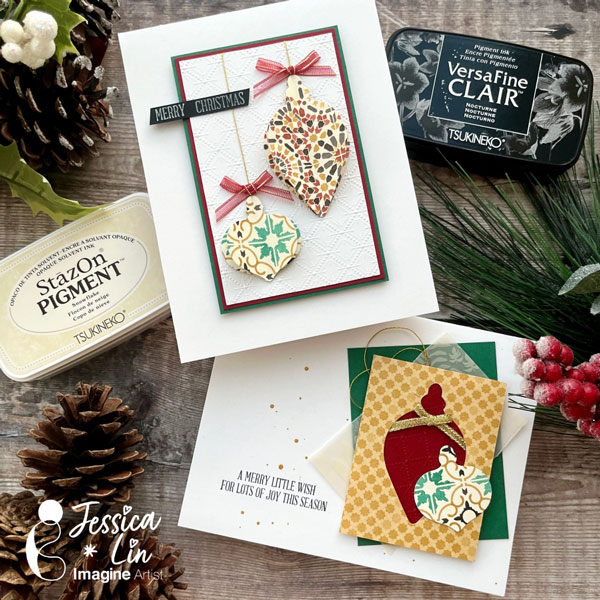
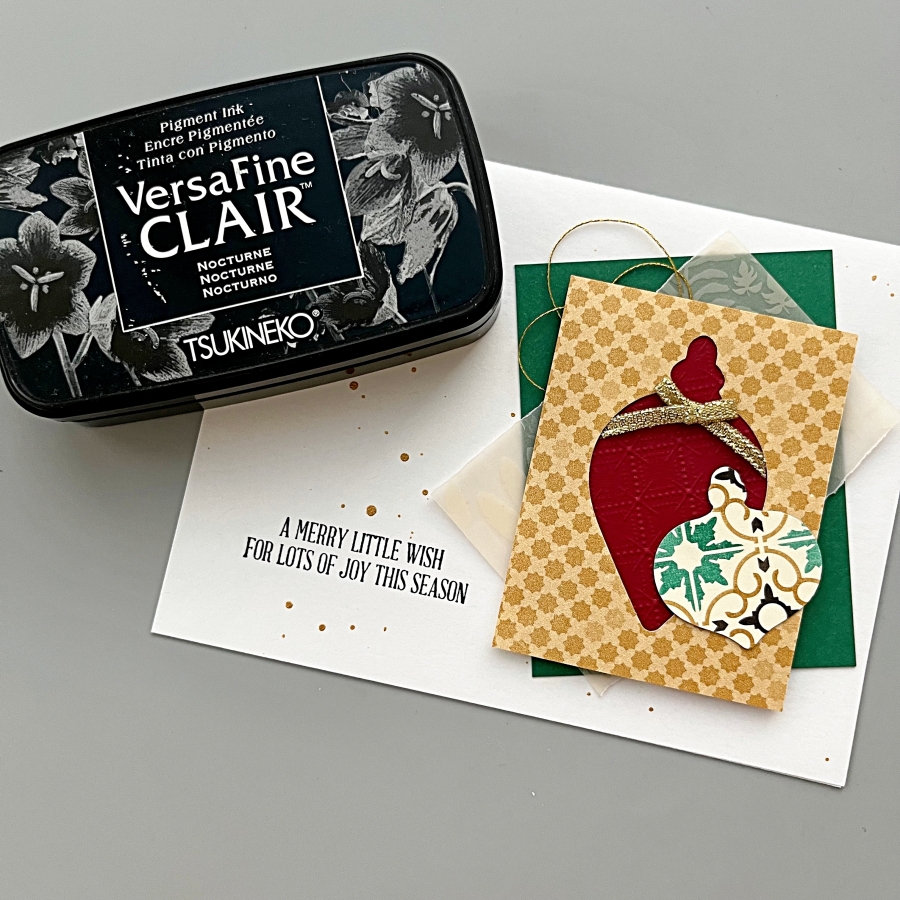
Hi everyone, it’s Jessica here. Quick & easy cards are so fun to make, and they are perfect for holiday mass production too! I made several versions today using some punches, and I hope you’ll enjoy this quick tutorial.
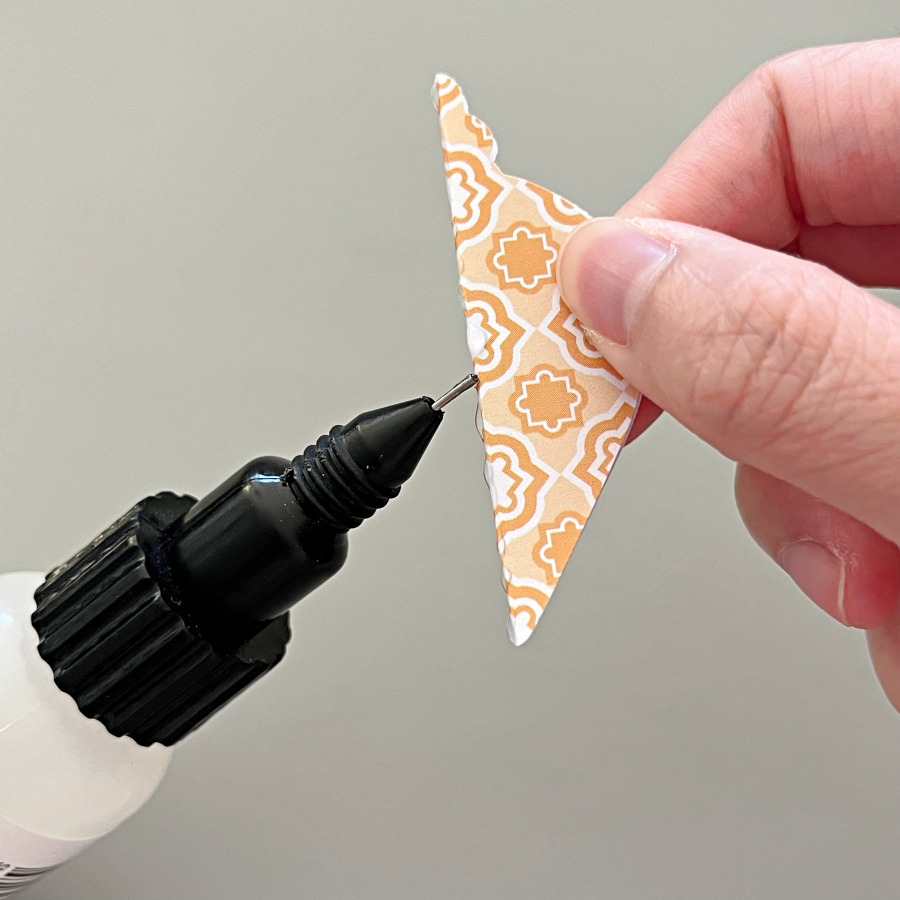
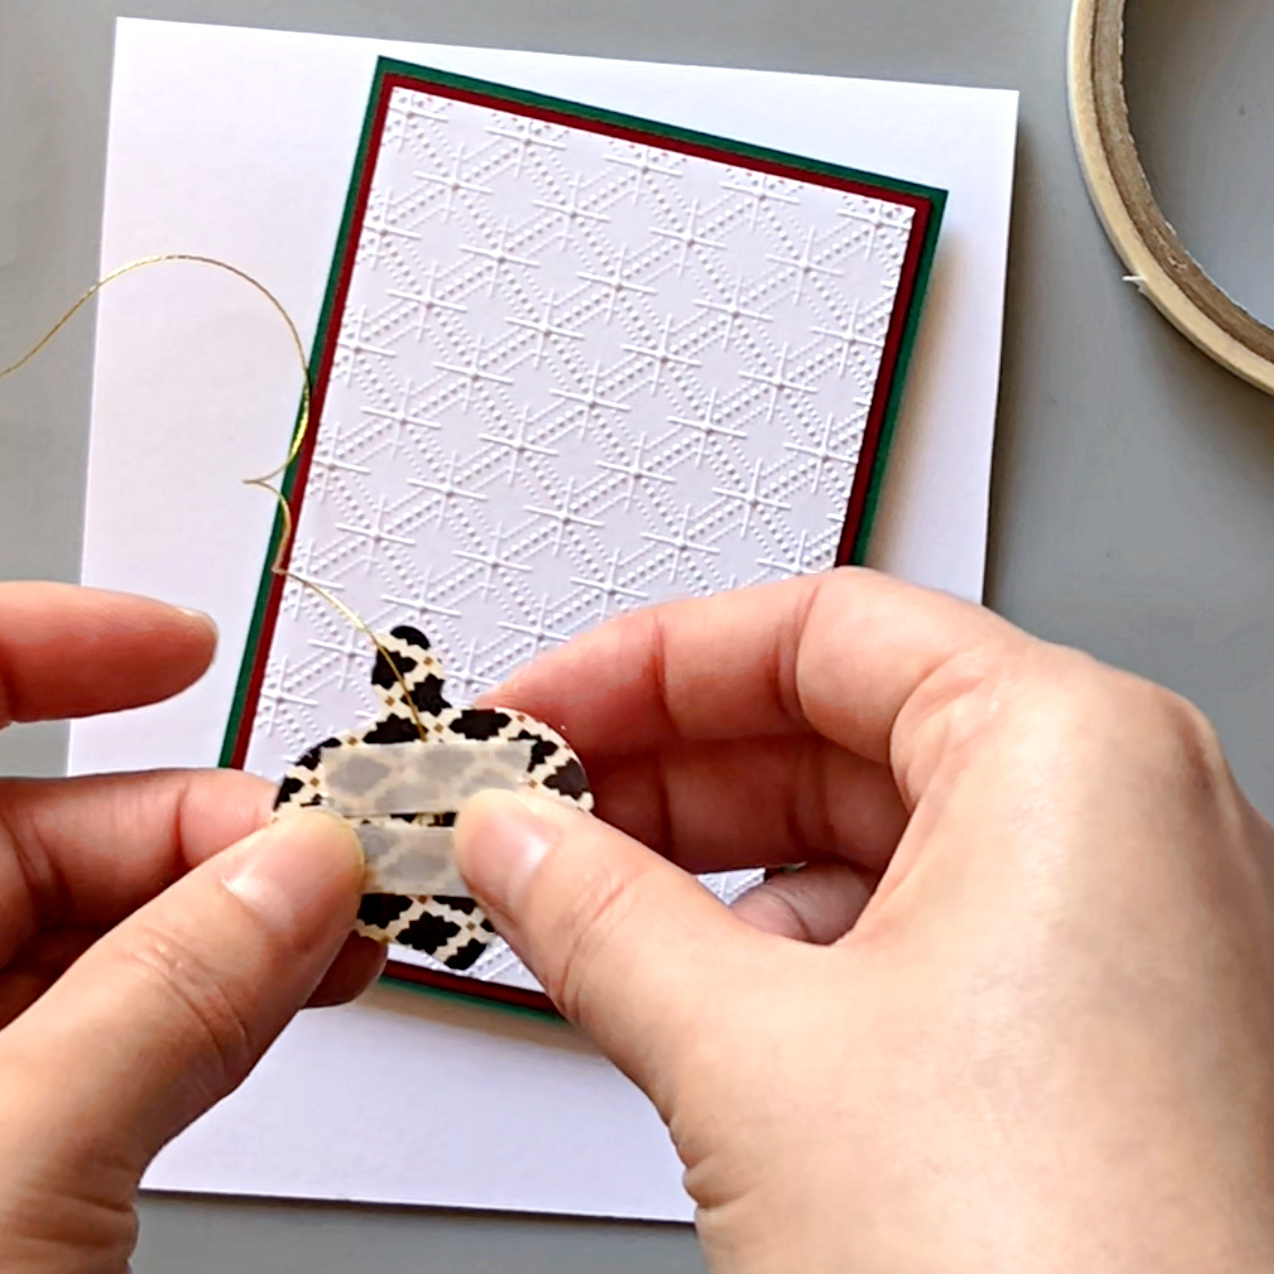
Step 1: Use Stampin’ Up!’s Gleaming Ornaments punches with patterned paper to create the christmas ornaments. Each ornament needs two pieces; one unscored and one scored in the middle.
Step 2: Apply On Point Glue onto the folded crease (backside of the patterned paper) and adhere to the unscored punch piece. Hold in place for 20-30 seconds while the glue dries.
Step 3: Prepare 3 pieces of cardstock and adhere them together with Tear It Tape. The largest size measures 2 3/4‘’ x 4 1/4‘’, the medium size measures 2 5/8‘’ x 4 1/8‘’, and the small size 2 1/2‘’ x 4’’.
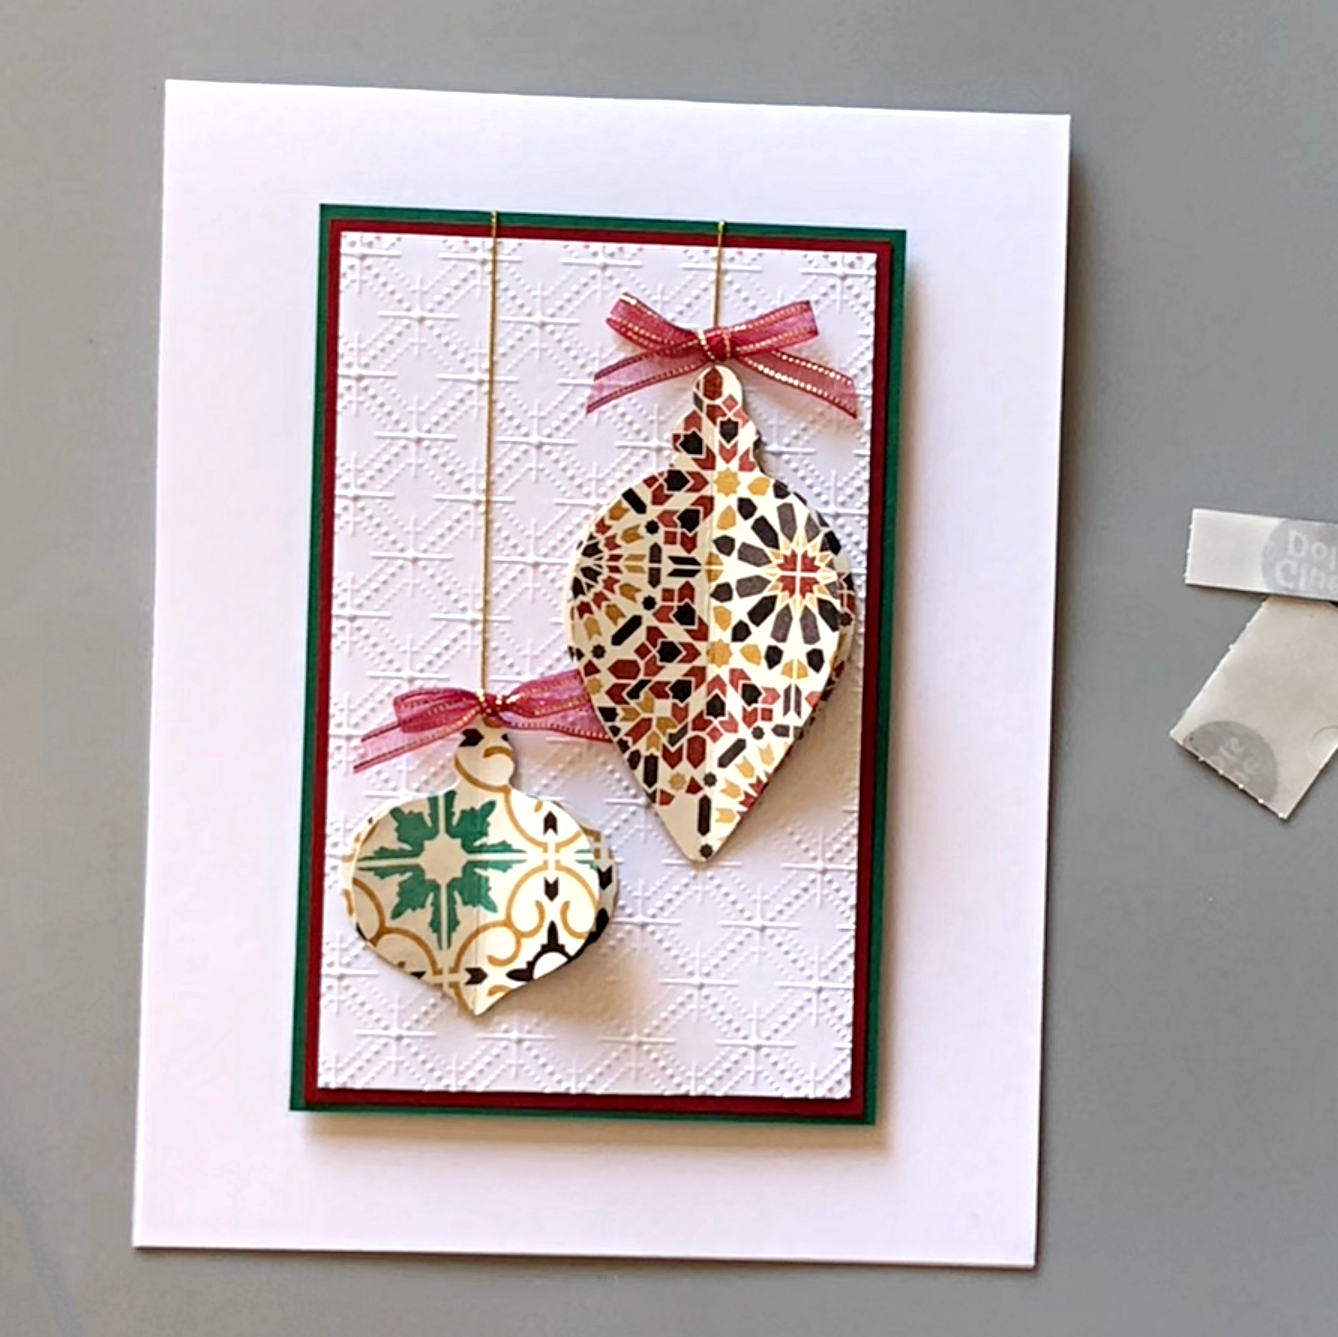
Step 4: Attach a piece of gold thread to the back of the ornament with Tear It Tape, and adhere to the layered background. Attach the other end of the gold thread to the back of the green cardstock layer.
Step 5: Adhere tiny bows to the top of the ornaments with glue dots.
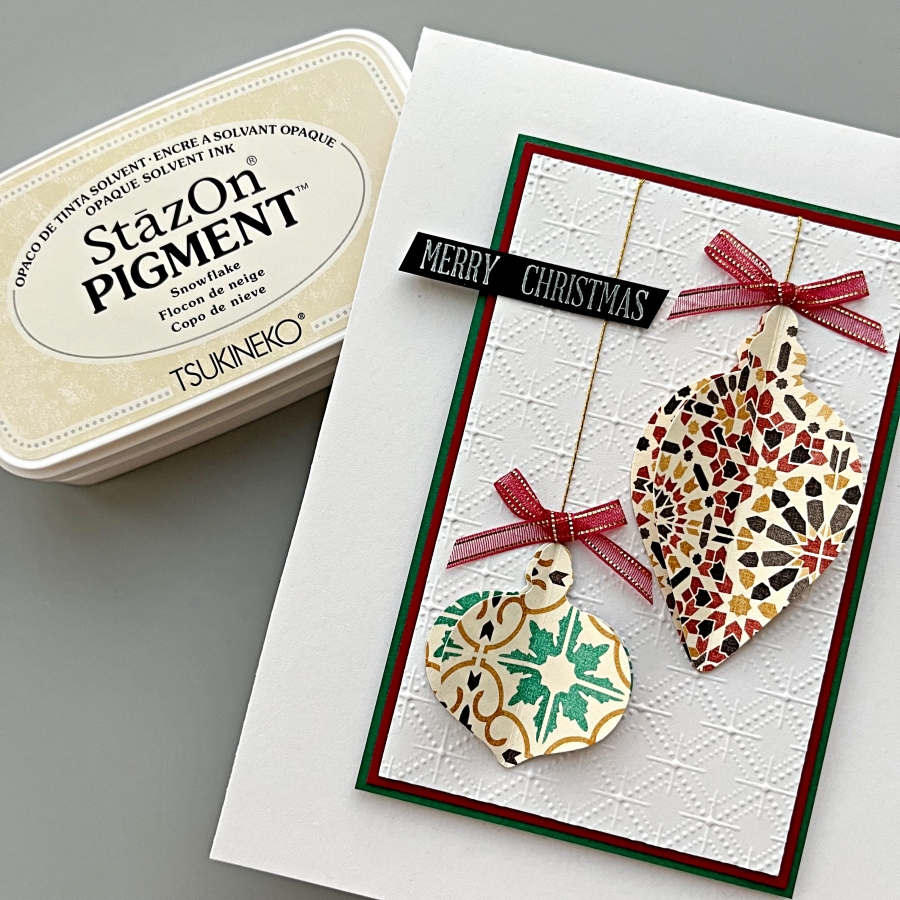
Step 6: Stamp the sentiment on black cardstock using StazOn Pigment ink. Adhere both the sentiment strip and the layered panel to the card base with Tear It Tape.
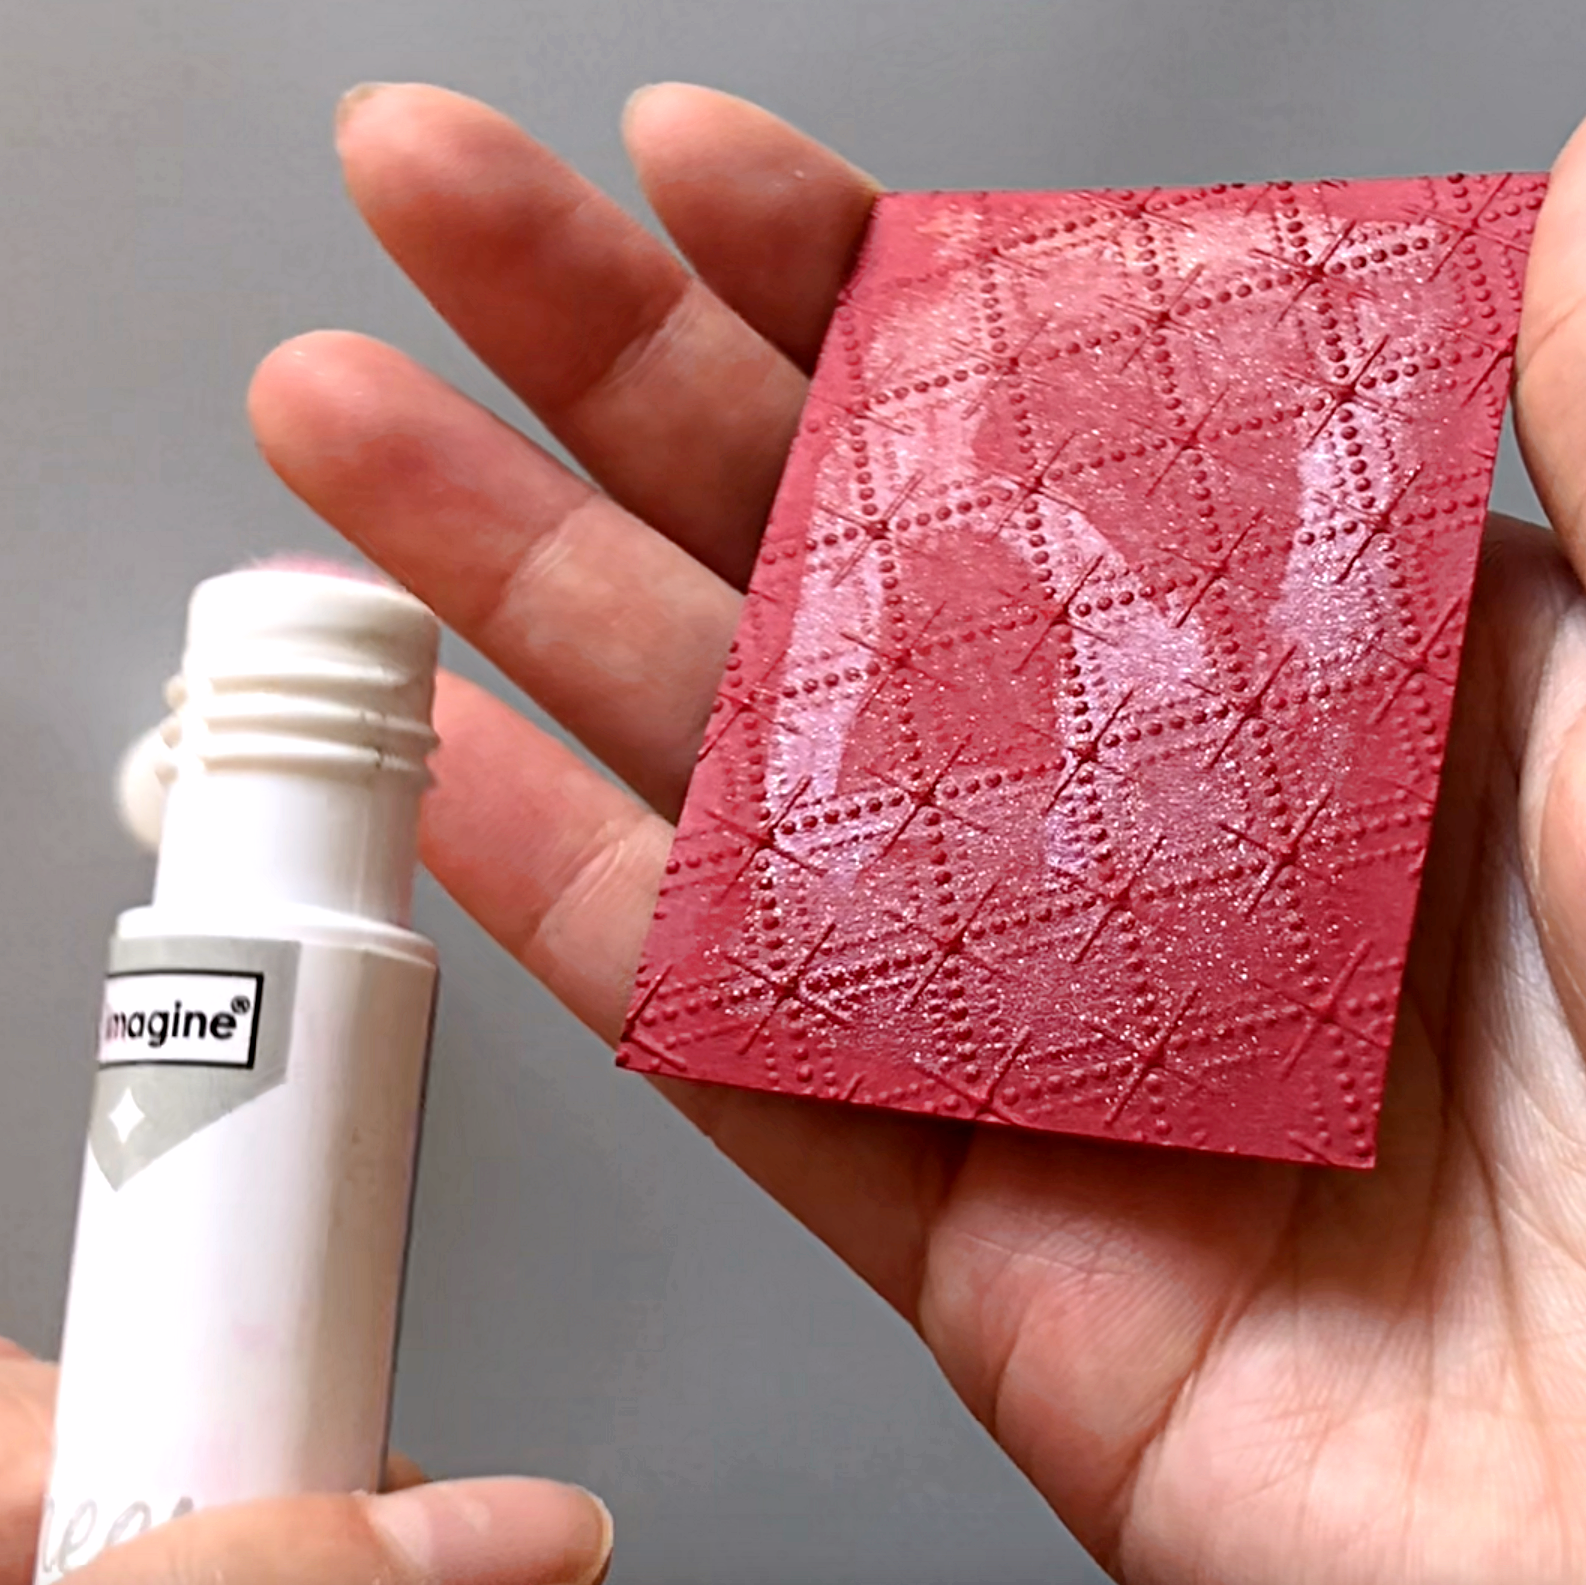
Step 7: For the second version of the christmas card, I used the negative pieces from the punches and layered red, embossed cardstock underneath. Generously apply the Sheer Shimmer Stix in sparkle to add additional shimmer.
Step 8: Adhered the patterned paper pieces onto the card base and stamp the sentiment using VersaFine Clair Nocturne ink. For a finishing touch, splatter on gold acrylic paint with a paint brush.
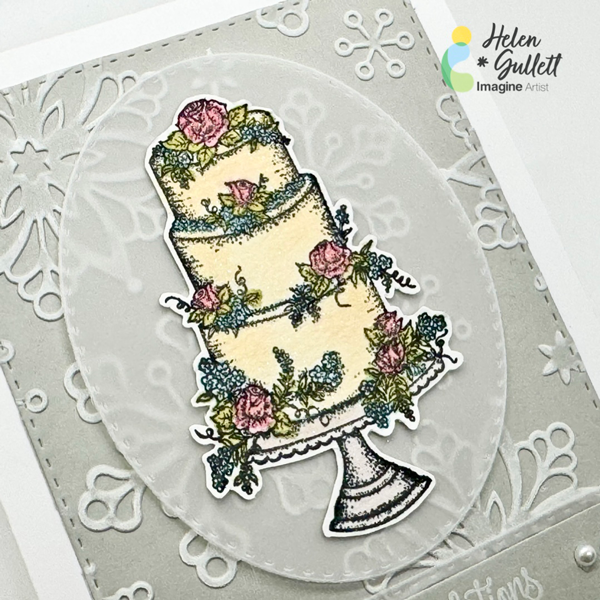
Today, I want to share with you this Winter theme wedding card that you can make to have it ready in your handmade card stash.
Skill: Intermediate Time: 15-20 minutes
Direction:
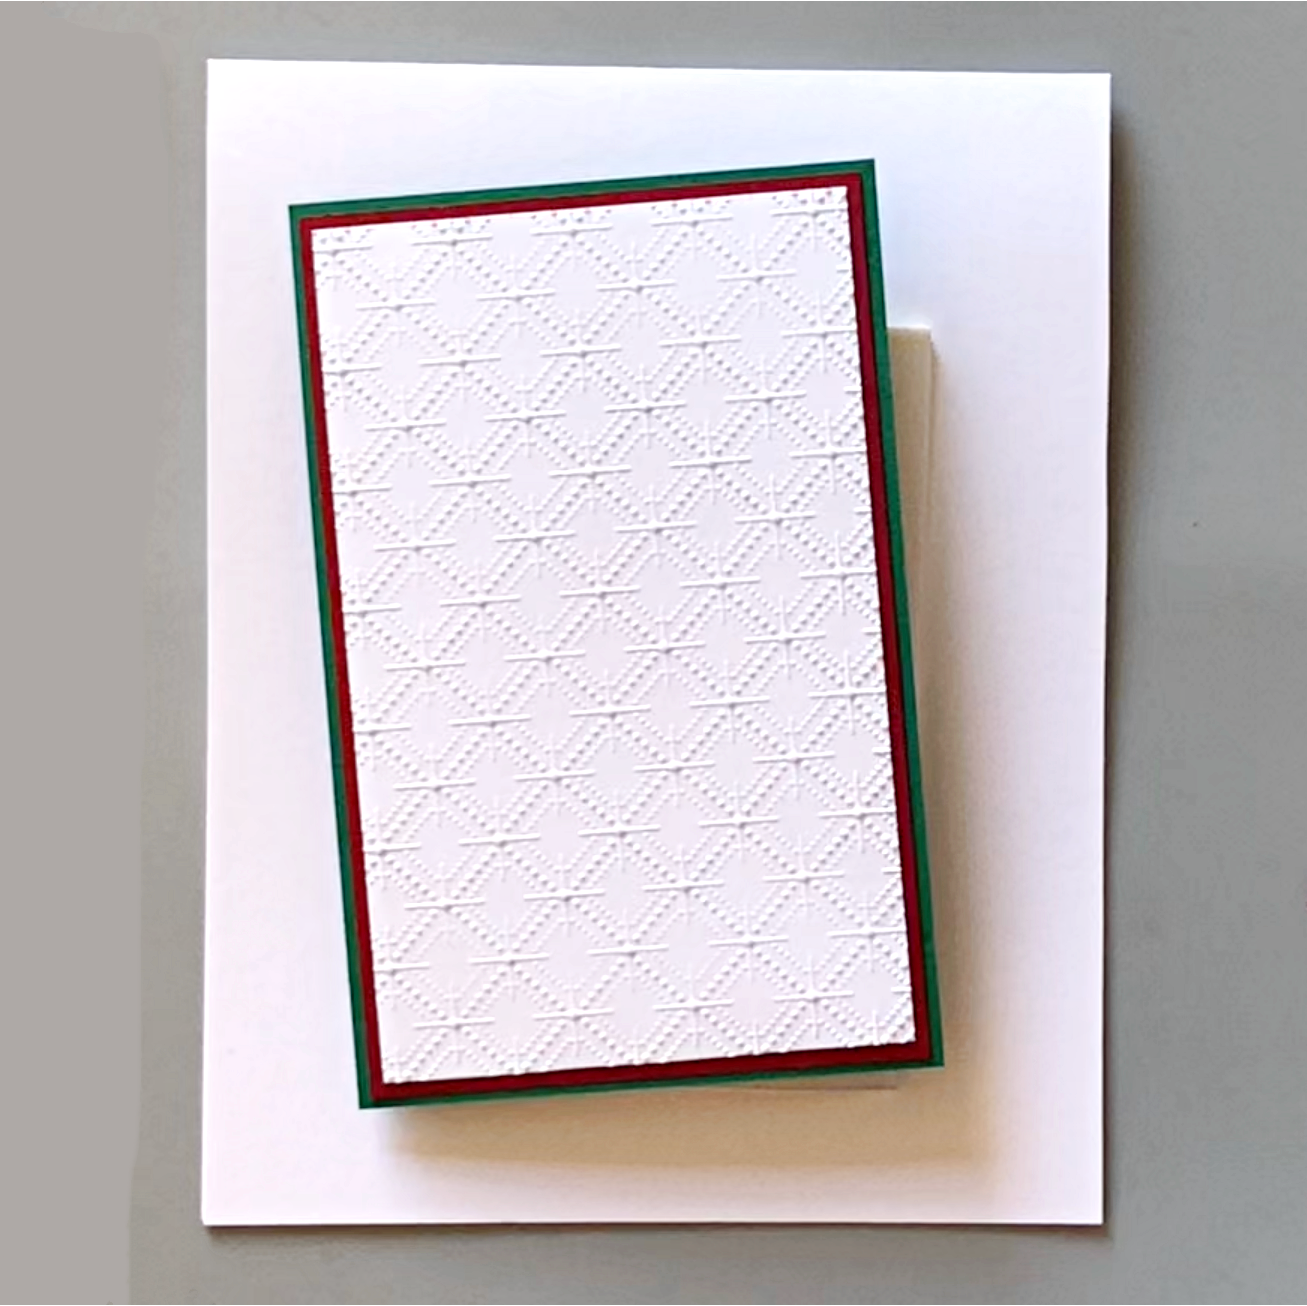
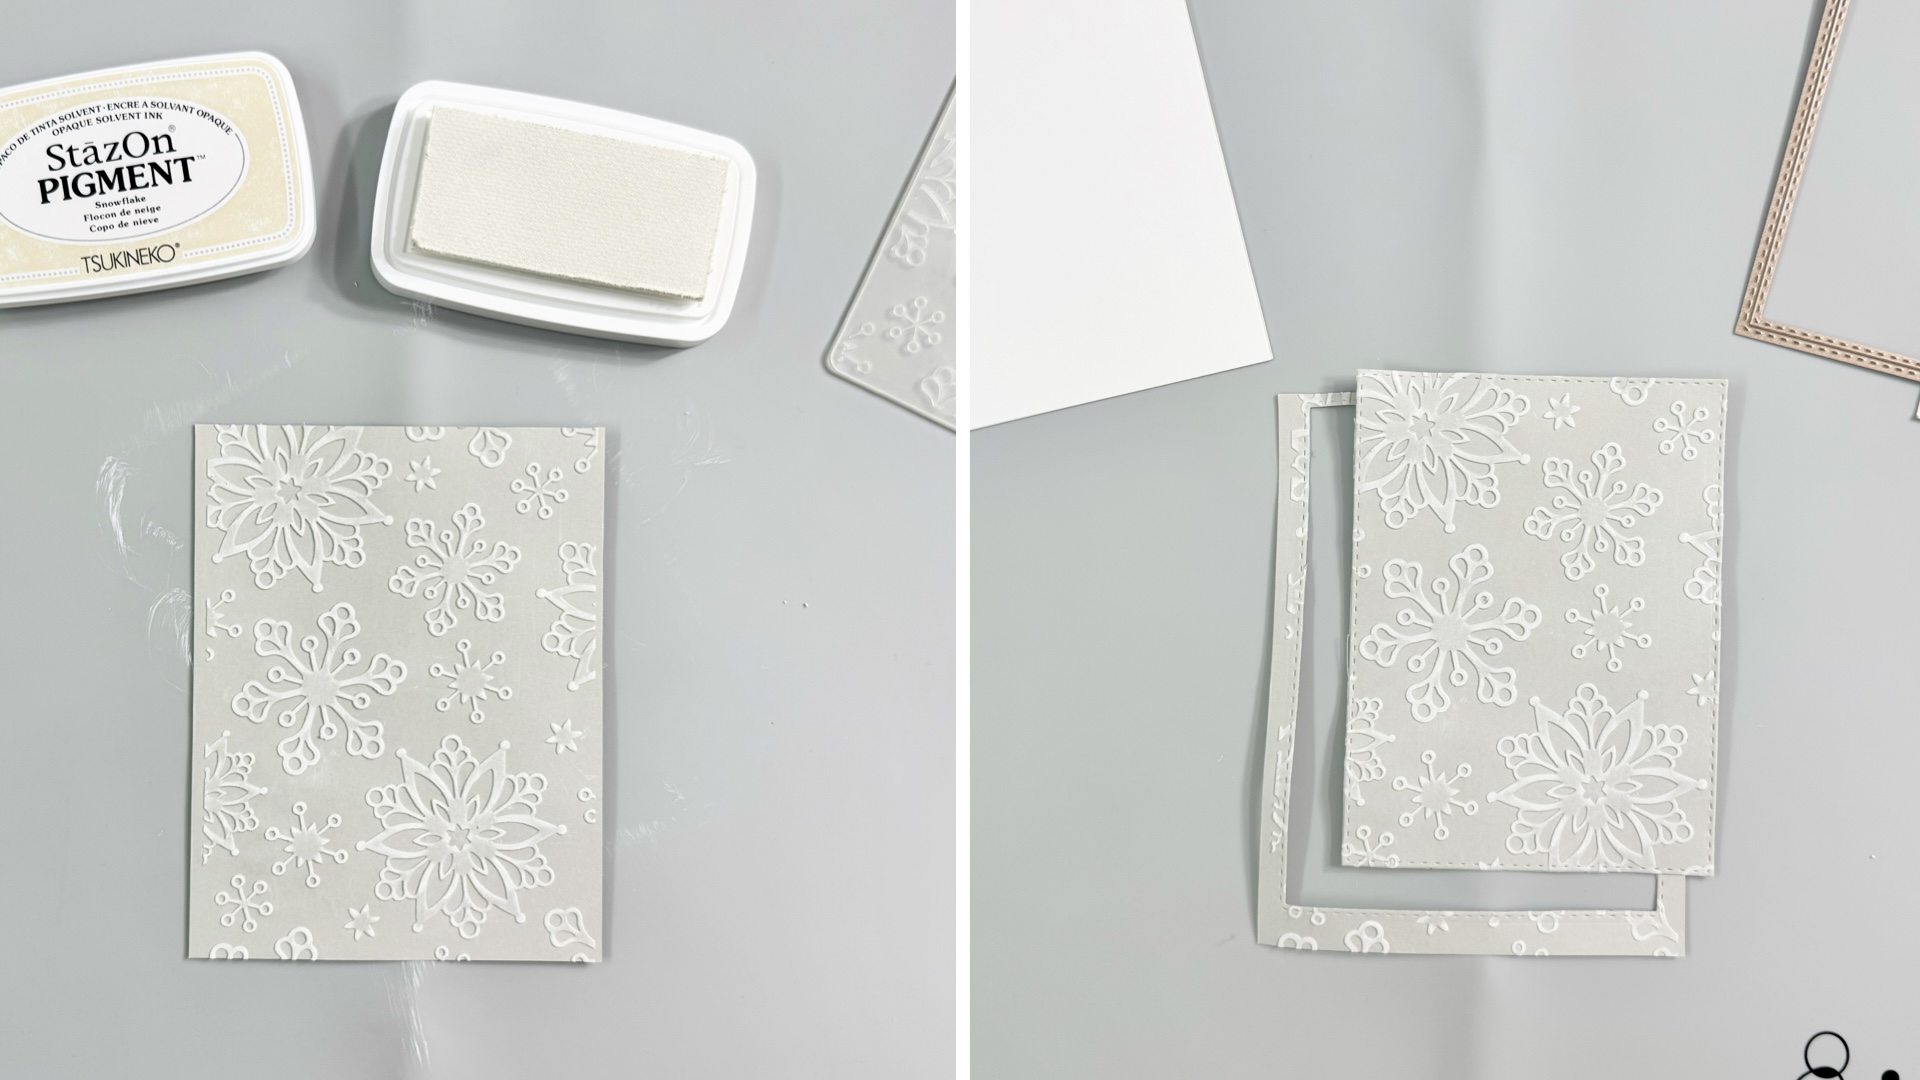
Step 1 Cut out a piece of light gray cardstock into 4.25 inch x 5.5 inch. Run it through your embossing machine with the snowflake embossing folder. Lightly rub the StazOn Pigment ink up on top of the embossed cardstock to add the white color on the snowflake. Since it is pigment ink, the ink will take a longer time to dry so you can use a craft heat gun to dry the ink. Cut it with one of the Double Stitched Rectangle Dies.
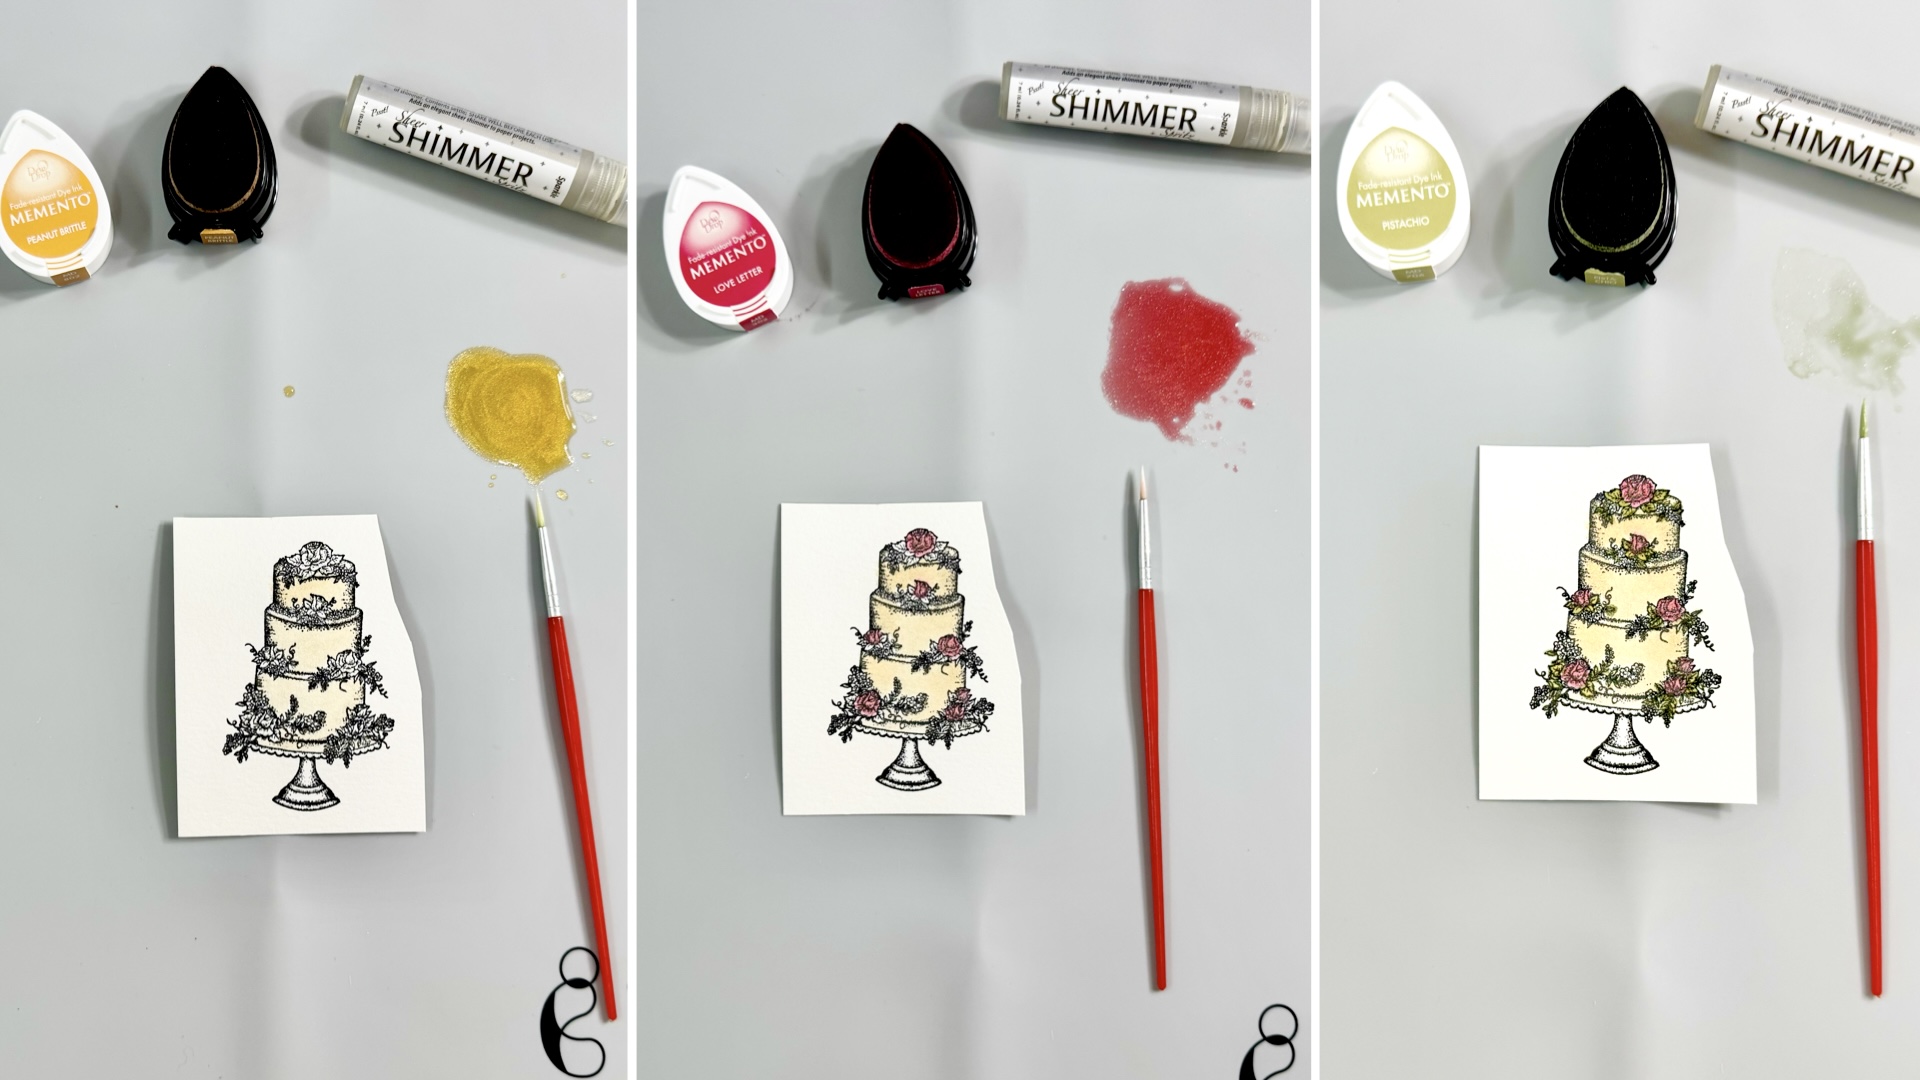
Step 2 Stamp the wedding cake image on a piece of watercolor cardstock with VersaFine Clair Nocturne ink using a stamping tool. I stamped the image twice to get a bolder print on it. Memento Dew Drop and Sheer Shimmer Sparkle to create sparkle watercolor paint. Dab the ink on the craft mat and add some of the sheer shimmer, mix together. First paint the cake with the Peanut Brittle ink. Dry the watercolor paint with a craft heat gun after painting. Next, color the flowers with the Love Letter ink. Dry the watercolor paint with a craft heat gun after painting. Then, color the leaves with the Pistachio ink. Dry the watercolor paint with a craft heat gun after painting.
Step 3 Then color the berries and other branches with the Teal Zeal ink. Dry the watercolor paint with a craft heat gun after painting. Last, color the base stand with the Gray Flannel ink. Dry the watercolor paint with a craft heat gun after painting. Fussy cut the wedding cake with micro-tip scissors.
Step 4 Cut out a piece of vellum paper with one of the double stitched oval dies and one of the double stitched pennant flag dies. Stamp the sentiment on a piece of gray cardstock with StazOn Pigment Snowflake ink pad using the stamping tool. Cut the sentiment with the smaller size of the double stitched pennant flat dies that match with the vellum.
Step 5 Add the embossed background to the card base with Tear It! Tape. Add the wedding cake on the oval vellum with some of the On Point Glue, then add them to the card with some of the Tear It! Tape. Stack the vellum pennant and sentiment pennant together using some of the Tear It! Tape and add them at the bottom of the cake with the same tape. Embellish the card with some of the white gems using the On Point Glue.
I wish I could capture the sparkle glitter watercolor paint on the cake with my camera. But I love how this Winter theme wedding card turned out, and hopefully you will like it too!
Thank you for stopping by our blog today. Have a fabulous day!