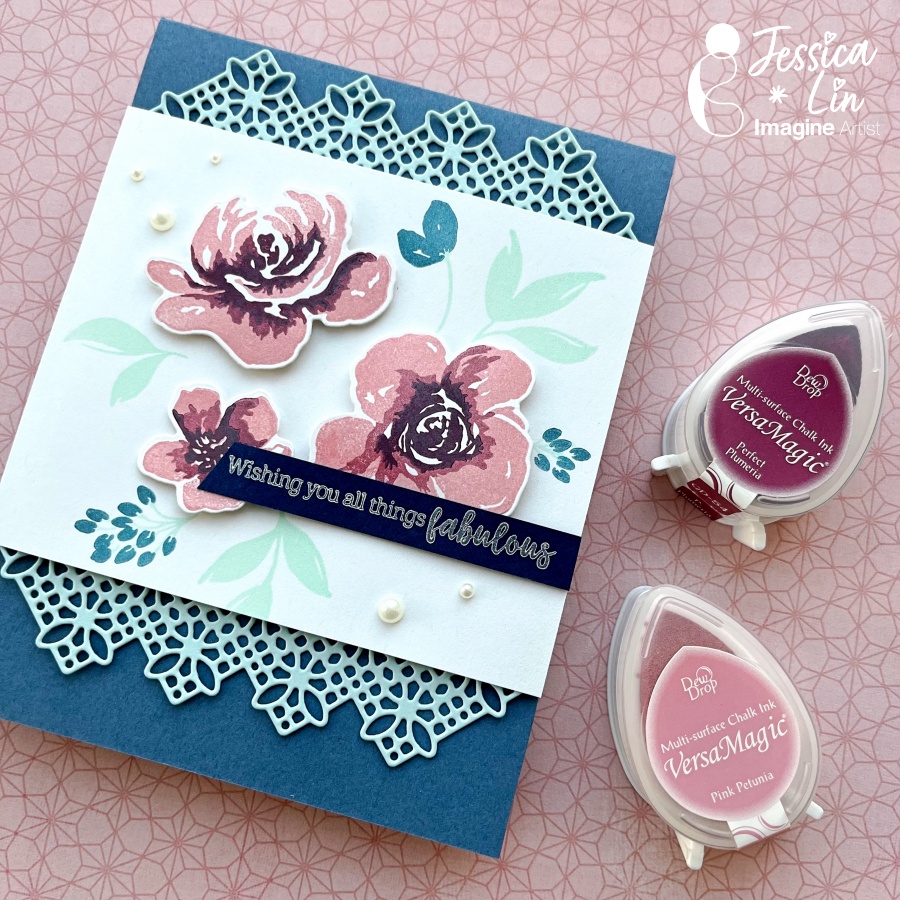
VersaMagic is one of my all time favorite ink pads. The pastel, muted tones create a nice range of colors, and some look great together for stamp layering. Today I’ll be sharing some ink combos I used for stamping the layered floral images from the All Things Fabulous set.
Skill Level: Intermediate
Time: 45 minutes
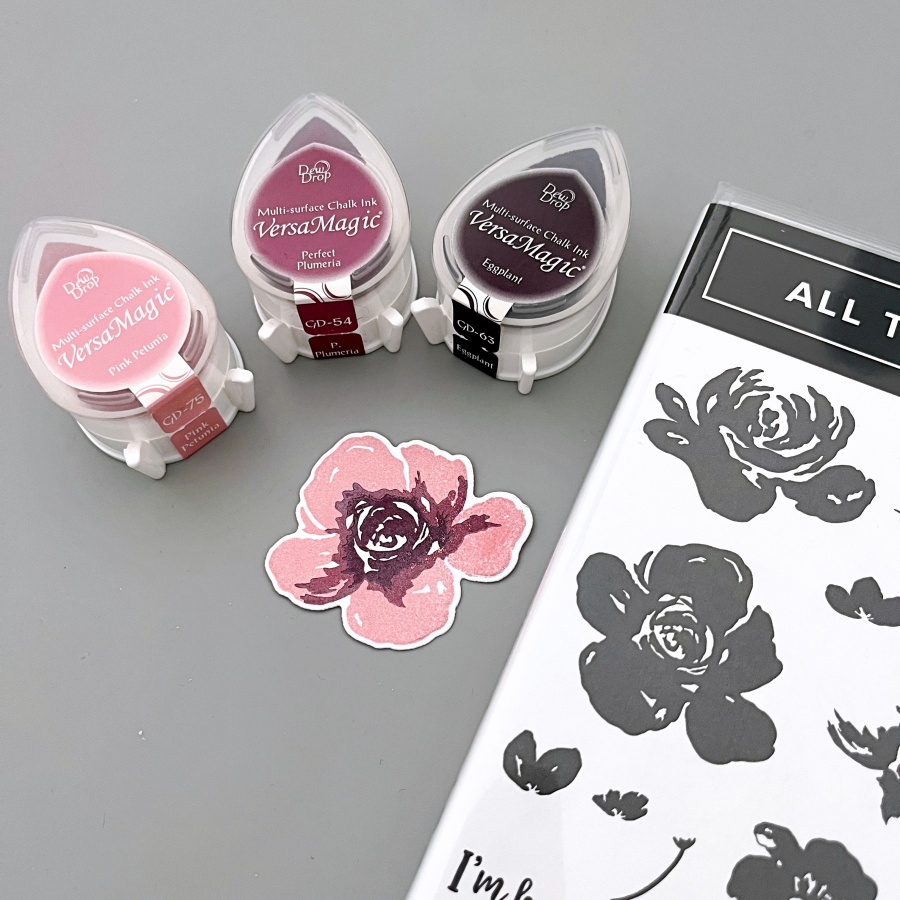
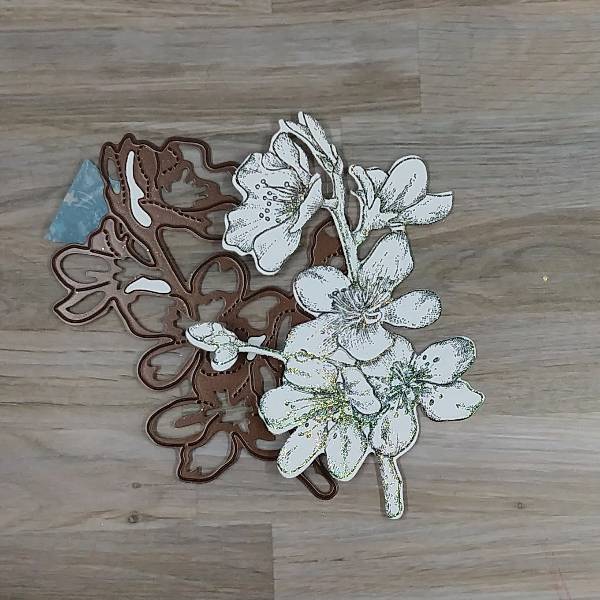
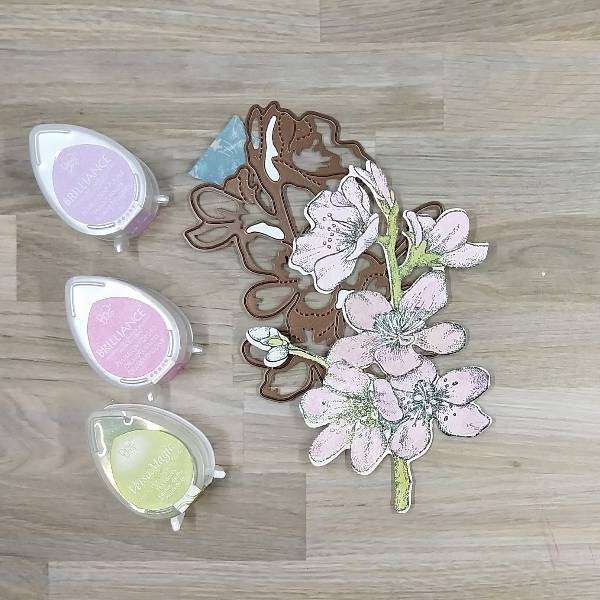
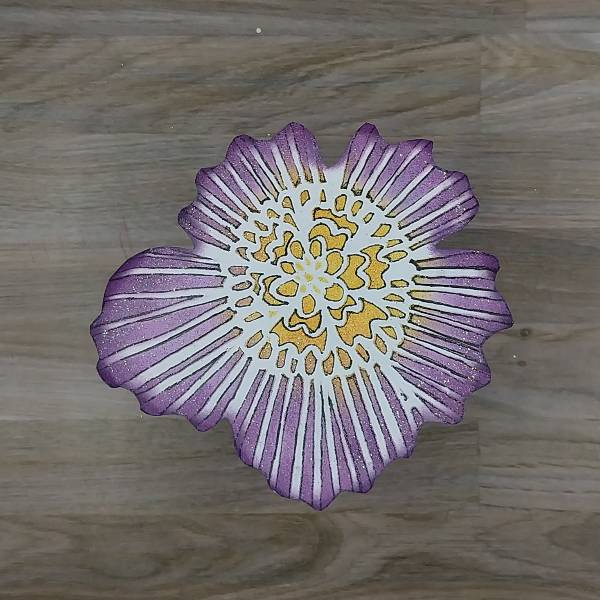
Step 1 Stamp the flower images with VersaMagic Pink Petunia, Perfect Plumeria, and Eggplant ink pads. I start with stamping the base layer with the lightest shade (Pink Petunia in this case), and work towards the darker tones. When layering the stamps, I find that aligning the center white spots is the easiest. After stamping, die cut the images with Fabulous Florals dies.
Step 2 Stamp leafy images onto the white card panel. I created 2 versions with different colored leaves. The version shown here is stamped with Aloe Vera (an all time favorite color of mine) but I decided to break out of my comfort zone and opted for the version using Aquatic Splash instead.
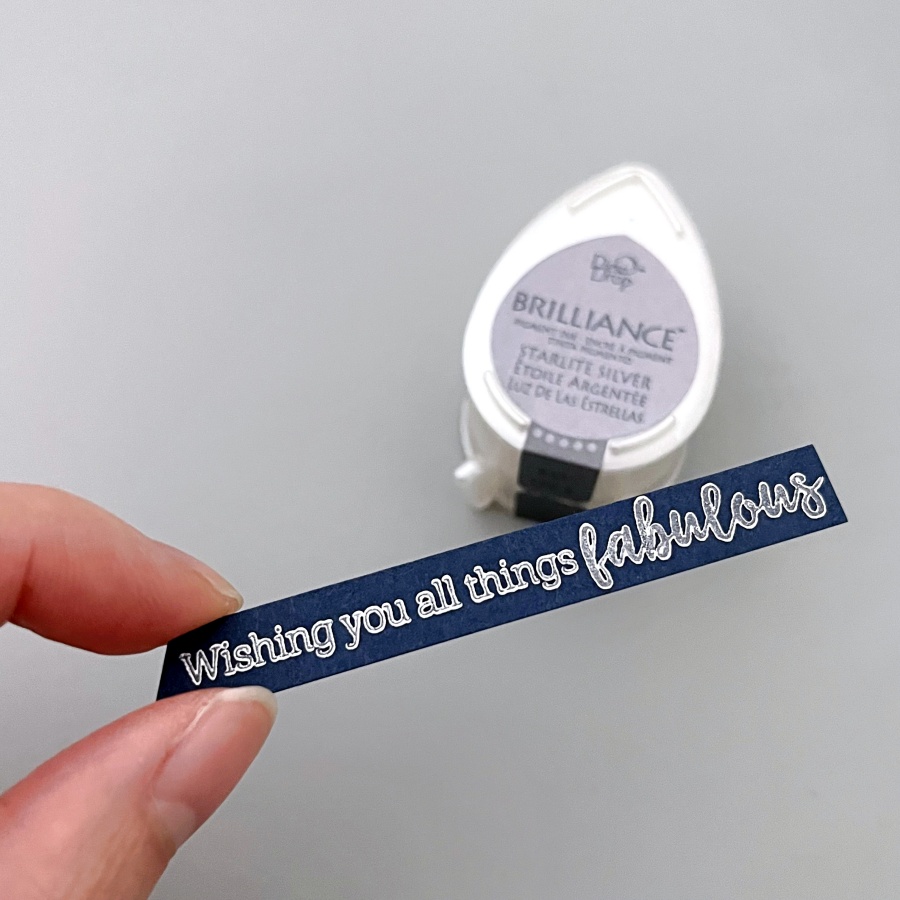
Step 3 Stamp the sentiment using Brilliance Starlite Silver ink pad. The shimmery effect is stunning against the dark cardstock! If you are looking for a silver ink pad, I highly recommend Starlite Silver.
Step 4 It’s time to embellish the card. This delicate lace die is to die for! It adds a feminine touch to the card and can be very versatile in my opinion. This die fits in the Mini Stampin’ Cut and Emboss machine as well! I’ve been enjoying the mini machine for die cutting flowers and smaller elements. Then I cut the lace die cut in half and adhere them on the top and bottom behind the white card panel.
I hope you like this floral card! The muted colors from the VersaMagic ink pads are just so pretty together. I hope you’ll try them out with layering stamps.
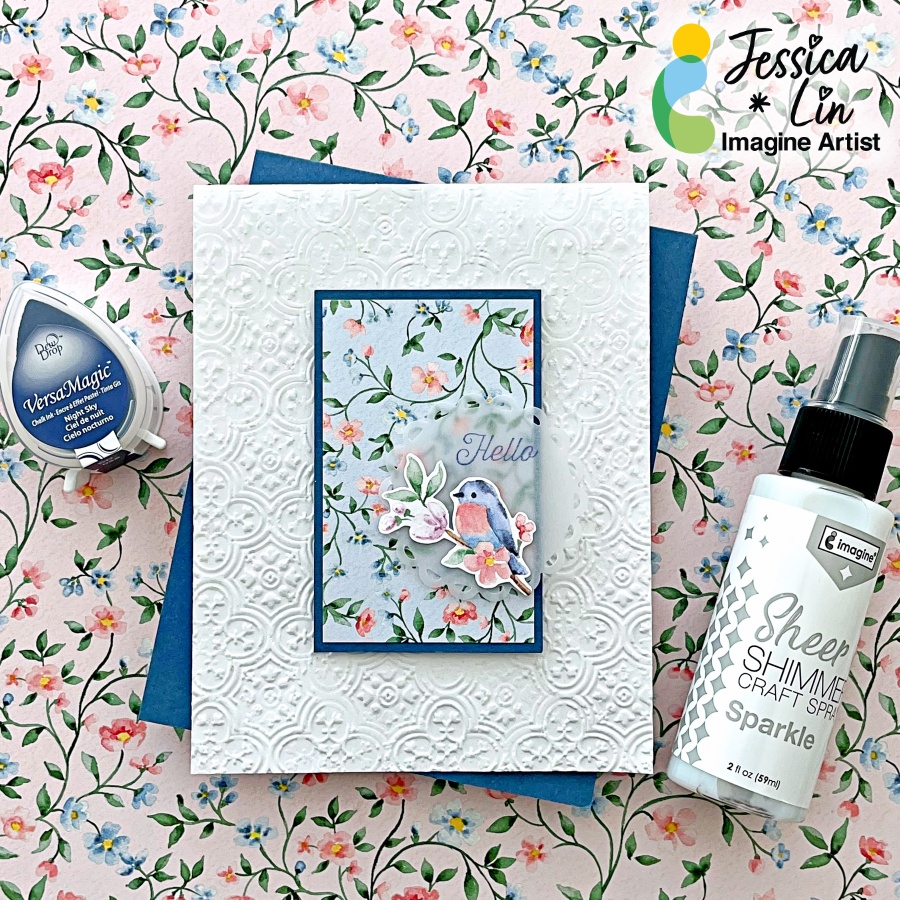
Let’s create a simple Easter card using some pretty patterned paper! The pastel colors and floral designs are too pretty to cover up! So I decided to stamp the sentiment on a piece of vellum. Stamping on vellum is tricky; but the VersaMagic ink pads work wonderfully. They don’t bead up and dry beautifully without fuzzy edges. Keep reading to see the final result!
Skill: Intermediate Time: 30 minutes
Directions:
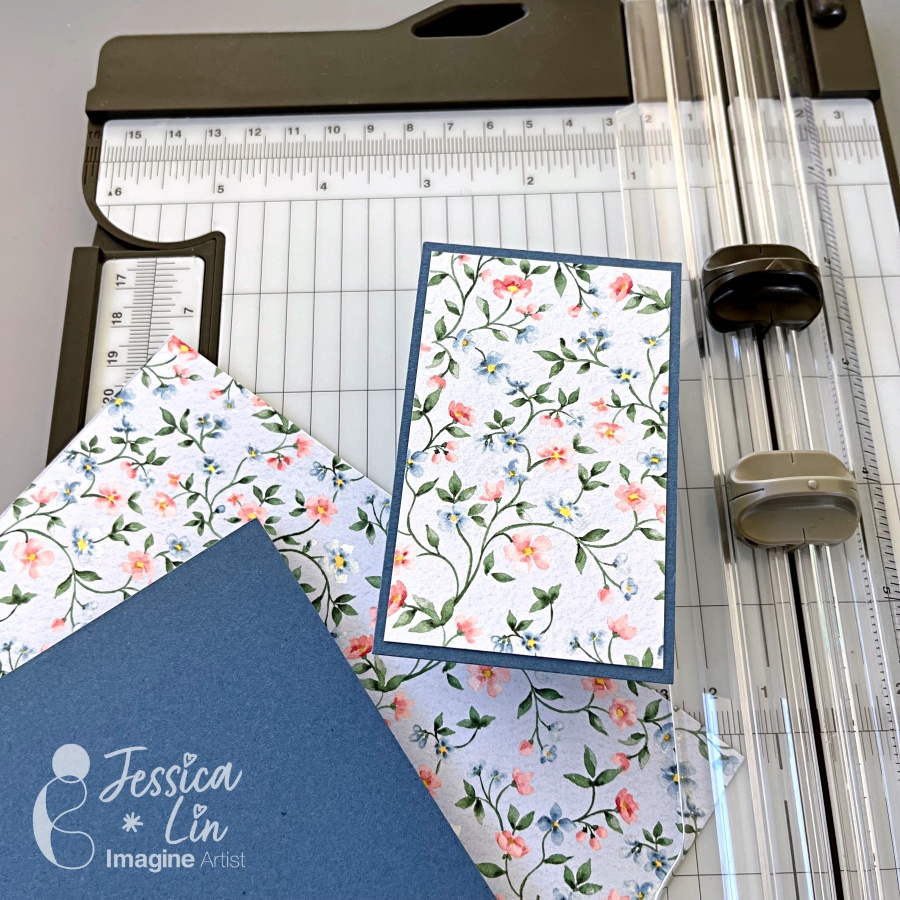
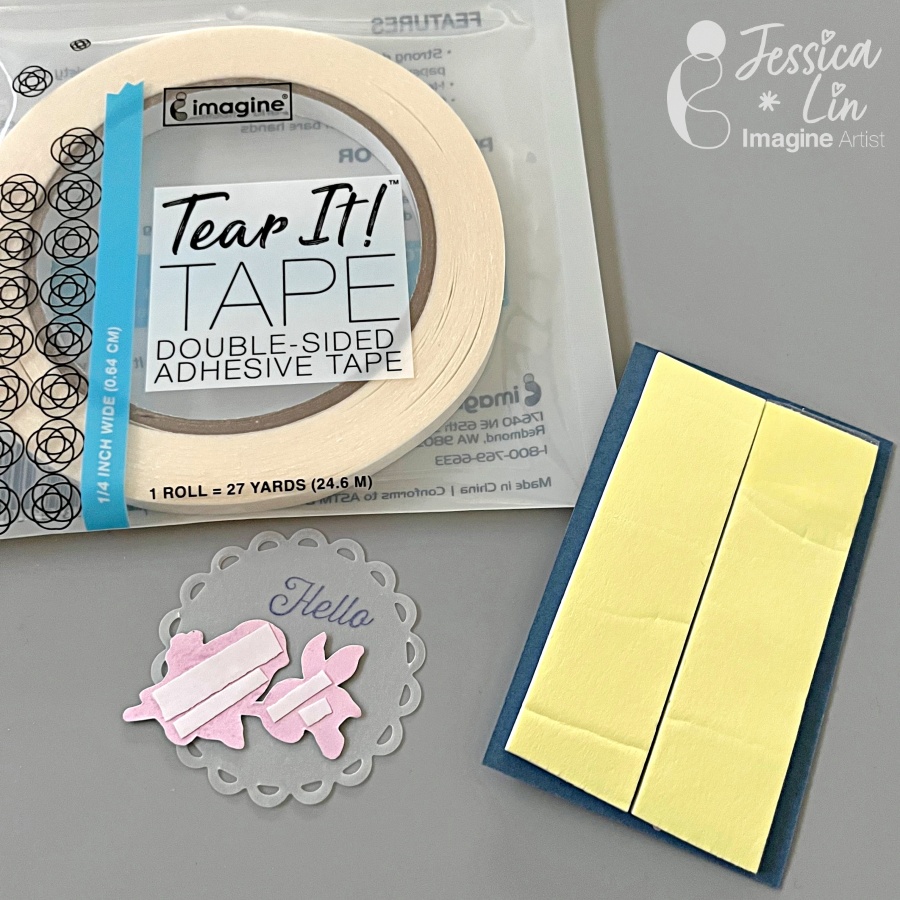
Step 1: Trim a piece of patterned paper to 3 3/16’’ x 1 15/16’’ and a piece of matching cardstock to 3 6/16’’ x 2 2/16’’. I used Flight & Airy paper pack which coordinates with Misty Moonlight cardstock. Adhere the two pieces together with Tear It! Tape.
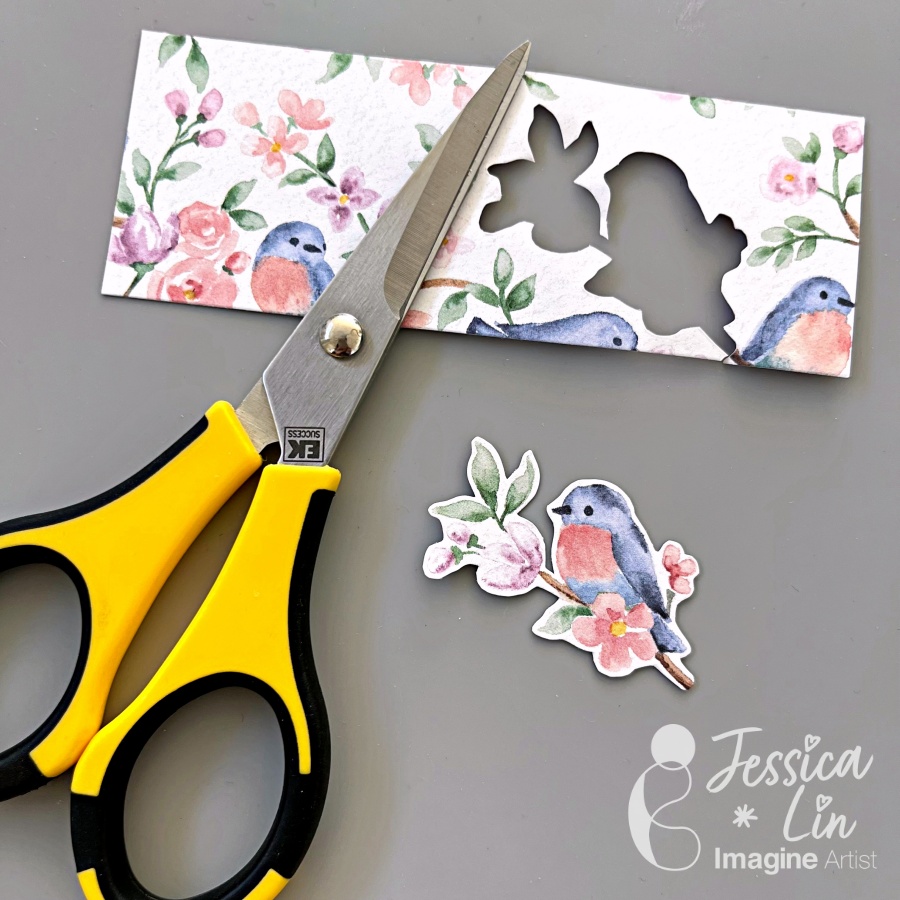
Step 2: Use stamps or, in my case, patterned paper to create a focal image. Fussy cut around the image with a pair of paper snips. These scissors are sharp and my favorite for fussy cutting!
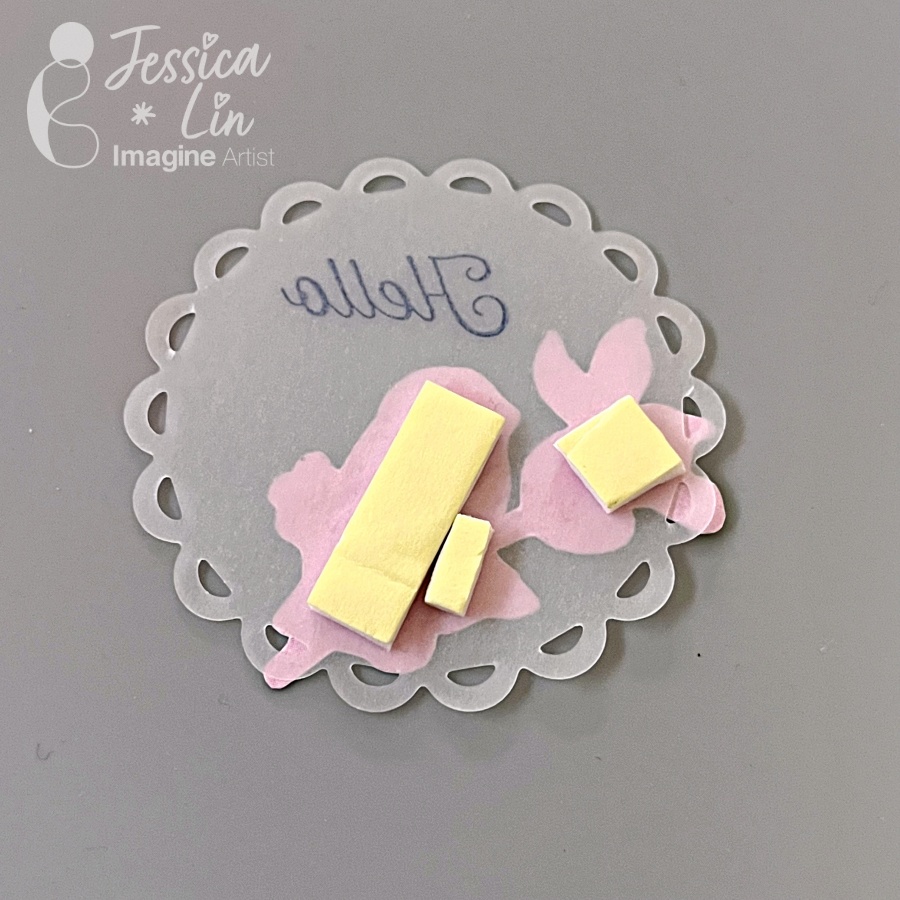
Step 3: Die cut a piece of vellum with a circular die of your choice. I used Spellbinders Lacey Circle dies with the Stampin’ Up! Mini Cut and Emboss Machine.
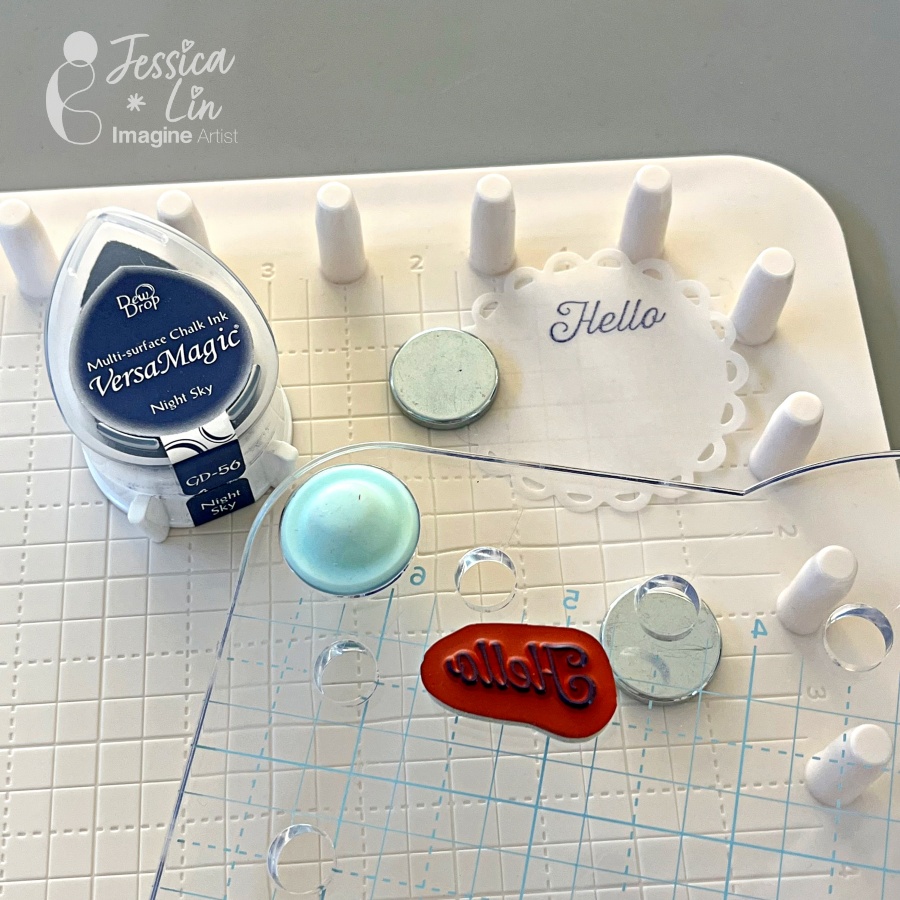
Step 4: Stamp a small sentiment using VersaMagic Night Sky ink pad. The image is crisp and clear after stamping, so I didn’t need to restamp with the We R Precision Press.
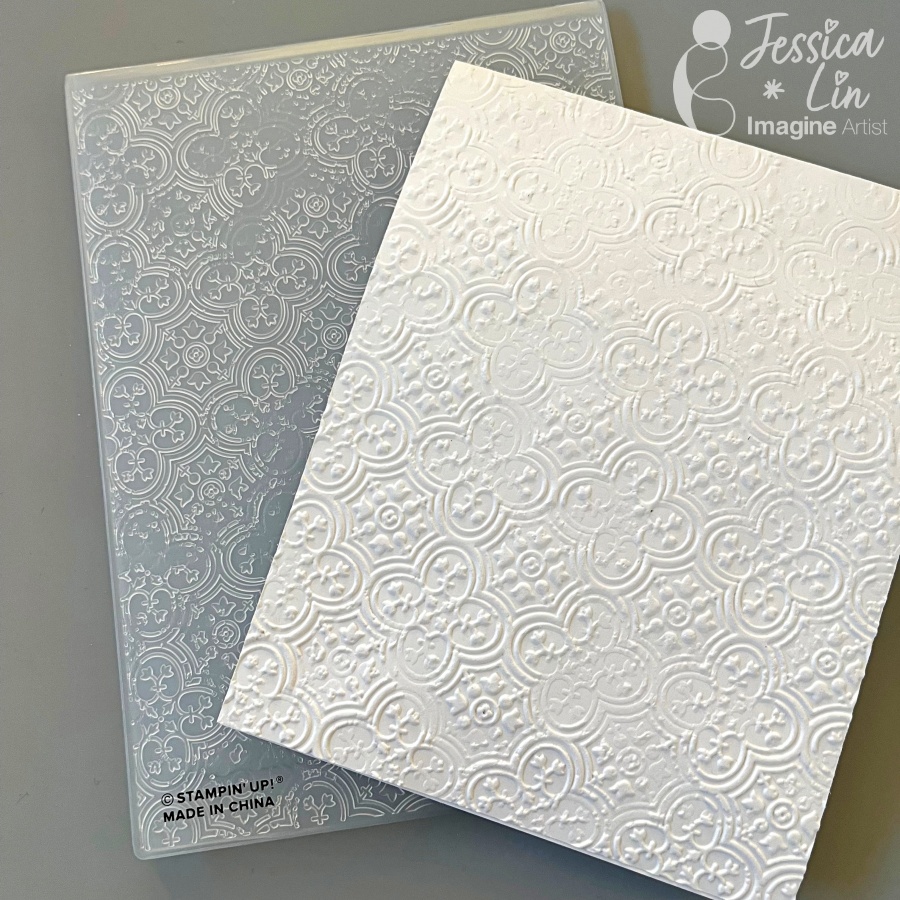
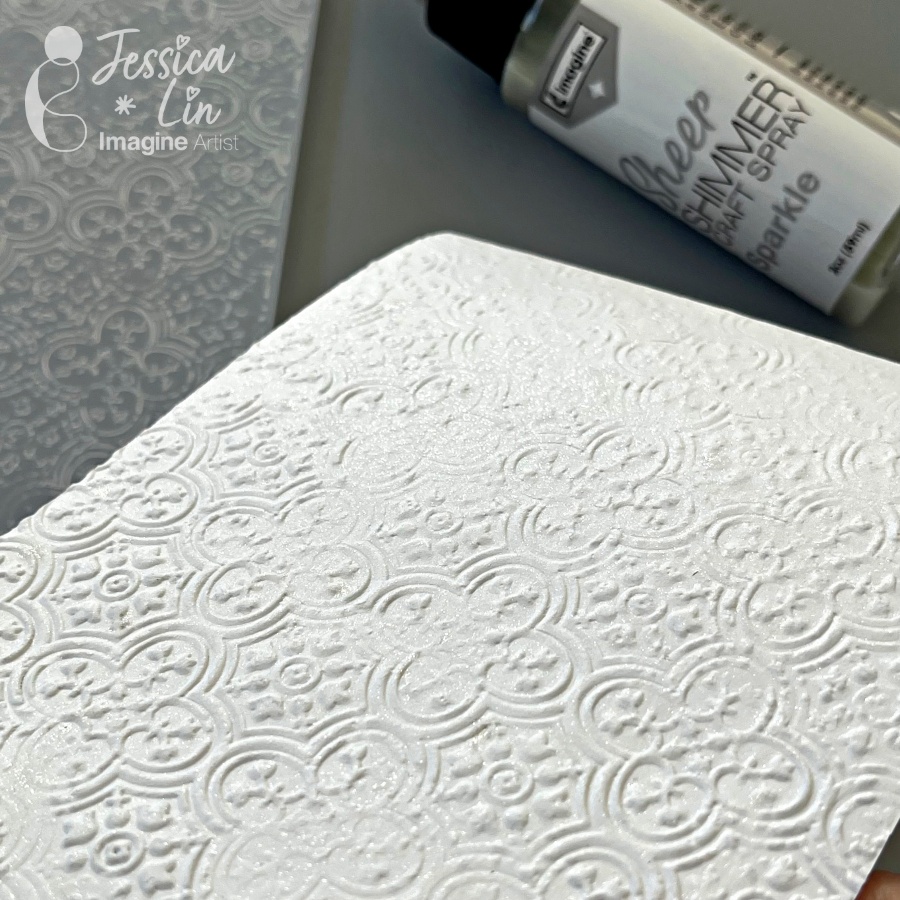
Step 5: Emboss the card front with any embossing folder to add interest to the background. The Distressed Tile embossing folder is simply gorgeous!
Step 6: To add a wow factor, lightly spray the whole panel with Sheer Shimmer in Sparkle. It adds just the right amount of glitter mist to elevate your project.
Step 7: It’s time to assemble everything together! Apply Tear It! Tape and foam tape to the back and adhere them to the embossed card front. When adhering vellum pieces to your project, remember to only apply tape and/or glue in areas where it would be hidden. Otherwise the adhesive will show through the translucent vellum paper.
– In today’s tutorial, I will show you how to use Brilliance Pigment Ink and VersaMagic Chalk Ink to watercolor an image. This is a wonderful way to stretch your supplies and possibly try a new technique. In addition, I will share some mistakes I made along the way while making this card.
Skill: Intermediate Time: 1.5 hours
Directions:
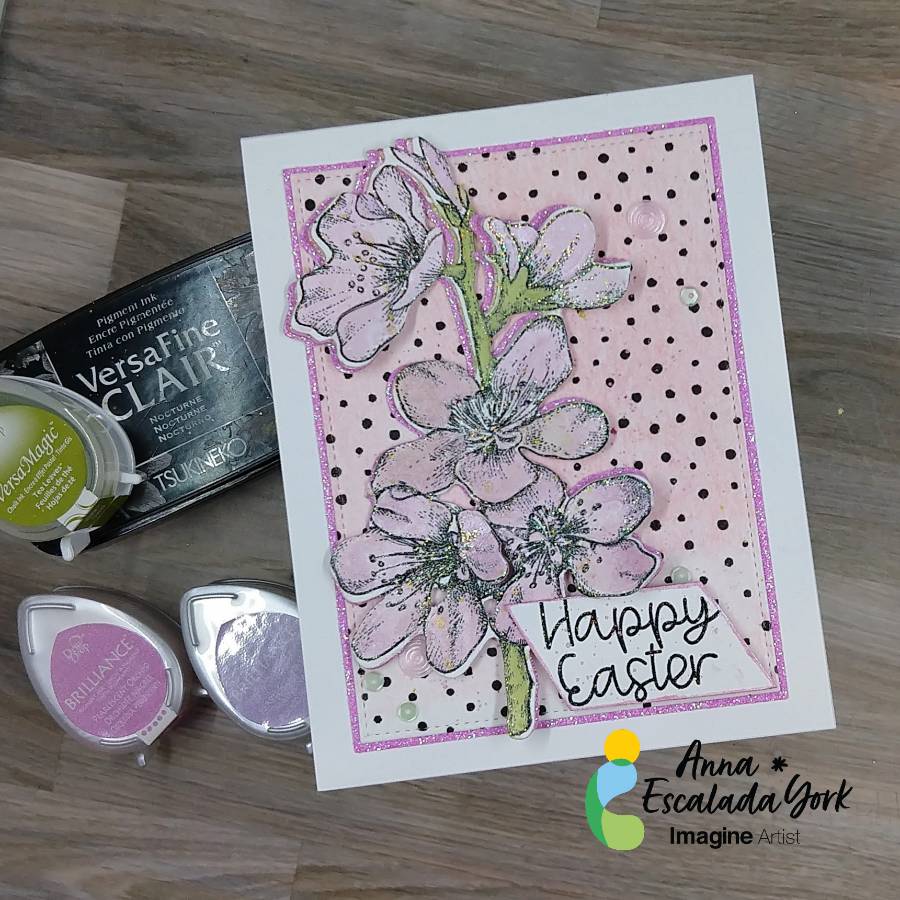
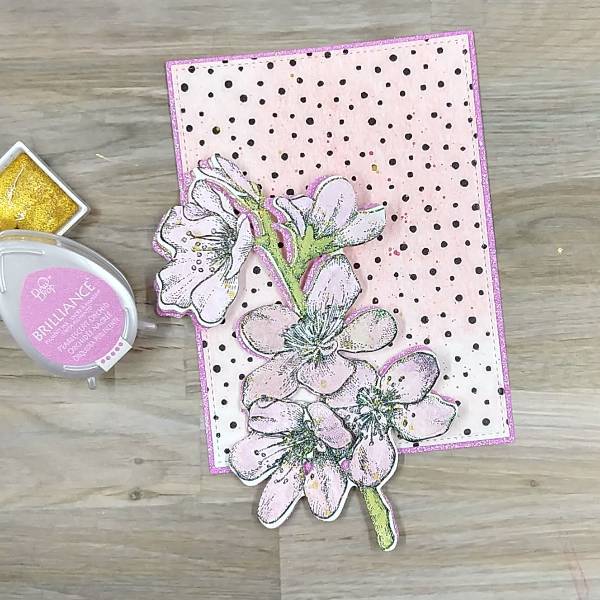
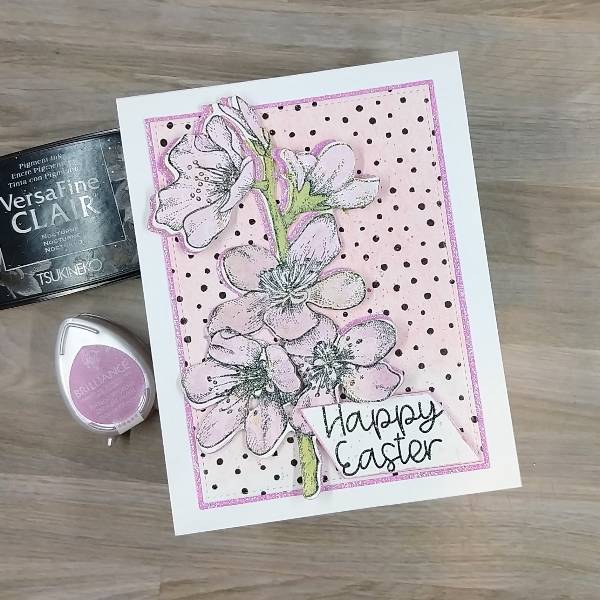
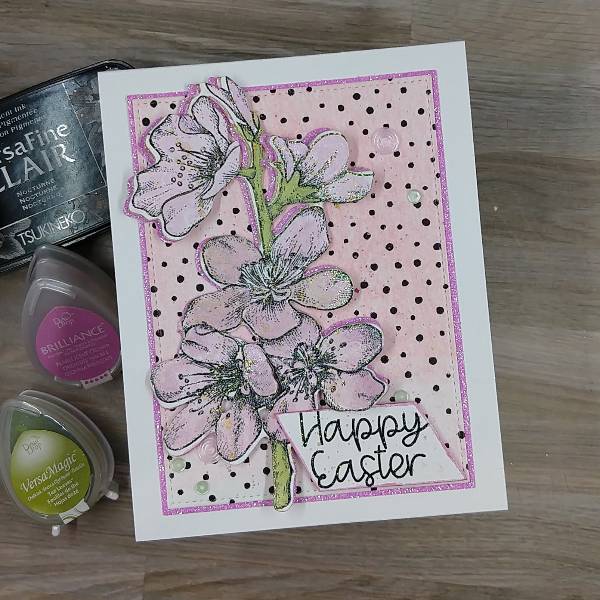
Step 1: Using a stamping platform, stamp the floral image with Nocturne VersaFine Clair ink. Optional step: Heat emboss with a clear or holographic embossing powder. I did this because I didn’t want to wait for the VersaFine Clair ink to dry.
Step 2: Die cut the floral image with the corresponding die. I was “off” in the die cutting and so some of the stamped image was cut off. You can mostly see this on the singular bud on the left side of the image. Not shown: Using the same die to die cut a piece of pink glitter cardstock.
Step 3: Press the Pearlescent Orchid Brilliance Dew Drop pad onto a piece of acetate packaging and spray with Sparkle Sheer Shimmer Spray. On another part of the same acetate packaging (or possibly a palette or other non-porous surface, press the Pearlescent Purple Brilliance Dew Drop pad onto the surface and spray with more of the Sparkle Sheer Shimmer Spray. You should have two areas of color that you can mix with the spray to use as a watercolor.
Paint each flower or bud with a single layer of Pearlescent Orchid Brilliance Ink mixed with the Sparkle Sheer Shimmer Spray. Let the watercolor dry. Add some Pearlescent Purple Brilliance Ink mixed with the Sparkle Sheer Shimmer Spray to the edges of the petals to add some dimension and interest.
Repeated the process for the stems. Press the Tea Leaves VersaMagic Chalk Ink pad onto a piece of acetate and Spray the ink with more of the Sparkle Sheer Shimmer Spray. Use a paintbrush to paint the stem green. Let dry. If desired, repeat the process to amplify the intensity of the green watercolor. Let dry.
Not pictured: Gluing the pink glitter cardstock die cut behind the flower so that it can be seen on the left side of the floral image.
Step 4: Place a piece of wide washi tape over a piece of cardstock for the background panel before die cutting that cardstock. (I used a leftover piece of cardstock that had some leftover pink gel press printing on it so that you can see a little of the pink through the washi tape). Don’t have washi tape? Use a piece of patterned paper.
Step 5: The die cut set that was used to make the panel allows for two layers if desired. To make the matte layer, use a slightly larger die to die cut a piece of pink glitter cardstock and then glue the two panels together. Set them aside to dry.
Step 6: Press more of the Pearlescent Orchid Brilliance Ink Dew Drop onto the acetate packaging and spray more of the Sparkle Sheer Shimmer Spray onto the ink to create more watercolor and splatter both the floral image and the background with the orchid colored watercolor. To splatter, extend your finger parallel to the paper and tap a brush that has the Orchid watercolor on it multiple times. To create a more uniform splatter, move the paint brush or the paper around so that the splatter is added to a variety of places.
Spray more of the Sparkle Sheer Shimmer Spray (or water) into the gold watercolor pan and then tap the paintbrush across the floral image and panel a second time. Let dry.
As you can see in the picture, between step 3 and now, the singular bud on the left was trimmed from both the stamped layer and the pink glitter cardstock so the die cutting mistake was eliminated.
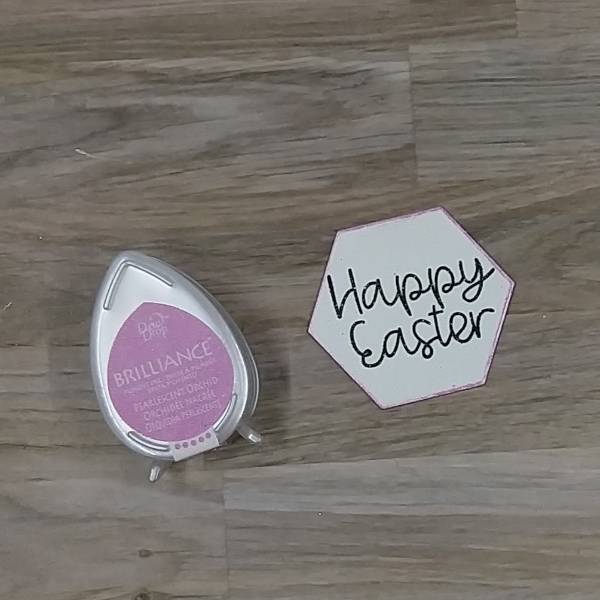
Step 7: Stamp the sentiment with Nocturne VersaFine Clair ink. Optional step: Heat emboss the ink with holographic embossing powder to eliminate drying time. (I originally was going to use this die cut sentiment, but later realized that it wouldn’t fit. I also forgot to take pictures of the sentiment I trimmed with my paper cutter and ended up adding to the card. So please use your imagination.)
Step 8: On the sentiment that you see on the finished card, I trimmed the sentiment with my paper trimmer. The one picture above was die cut with a hexagon die. Regardless of how you end up shaping your sentiment (using a trimmer or a die), press the edges of the sentiment into the Pearlescent Orchid Brilliance Dew Drop pad to add color to the edges. Set aside to dry.
Steps 9 and 10: Time to glue! Glue the flower on the left third of the background panel. Then glue the panel onto an A2-sized white card base.
For step 10, attach foam tape behind the sentiment except on the upper left corner (since that will be overlapping with the floral image. Attach the sentiment to the lower right corner of the panel.
Step 11: Add pink and green sequins onto the card–on the lower left corner, close to the sentiment, and on the upper right corner of the card panel.
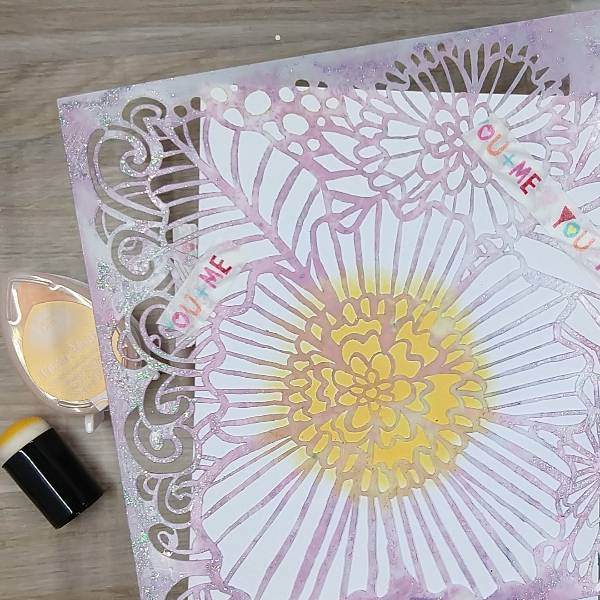
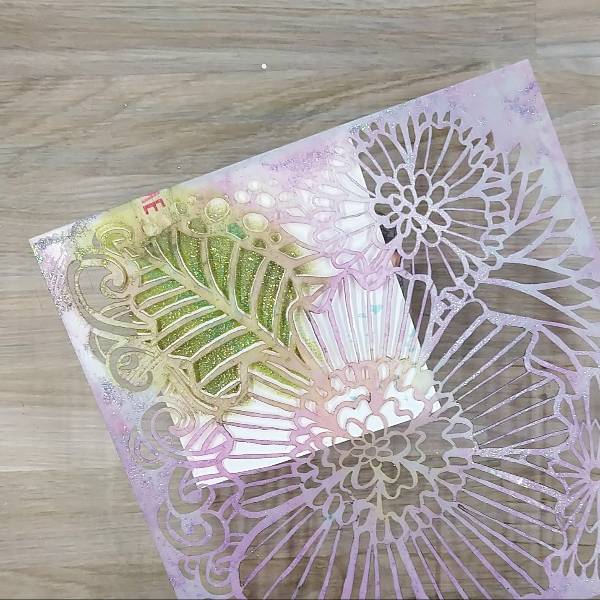
– In today’s blog post, I will show you a couple of ways to incorporate stencils into your cards using VersaMagic Chalk Inks, Brilliance Pigment Ink, and Delicata Inks. This is a wonderful way to use those stencils you have in your stash for an encouragement card or any holiday.
Skill: Intermediate Time: 1 hour
Directions:
Step 1: Use washi tape to secure a large floral stencil to a piece of cardstock or watercolor paper, making sure that the cardstock is slightly larger than the stencil image you are going to use. Use a sponge dauber to apply Mango Madness VersaMagic Chalk Ink onto the center of the flower. Optional: Move the stencil away from the image and heat emboss the center of the flower with clear embossing powder before replacing the stencil and moving onto the next step.
Step 2: Using a second sponge dauber, apply Pearlescent Purple Brilliance Ink to color in all of the flower’s petals.
Step 3: Using the same dauber, apply Purple Hydrangea VersaMagic Chalk Ink to the outer edges of the flower’s petals. Optional step: Remove the stencil and add embossing powder to your flower petals to help with smudging. Then return the stencil onto your paper in the exact same place on your paper.
Step 4: Using a black artist pen, trace the edges of the stencil’s holes (to add a border around each ink blended area of the stencil). Then remove the stencil and set it aside. (I decided not to add the black outlines to the innermost circle of the flower’s center as I was planning something different there. Later, I realized that I had not outlined one tiny triangle that I should have in the center of the flower.)
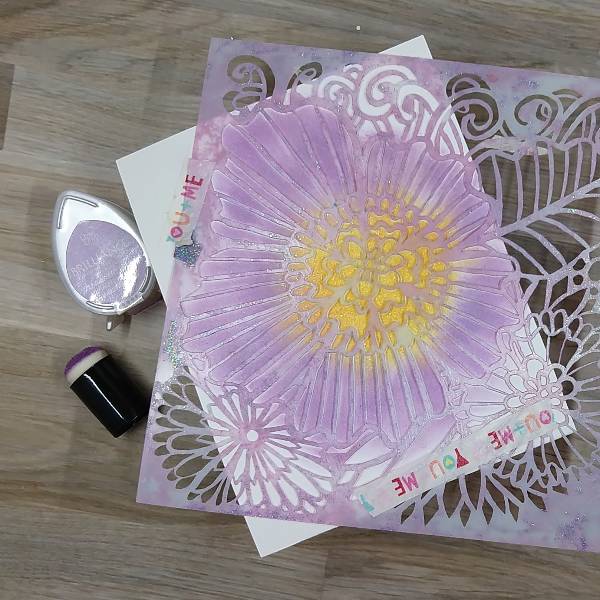
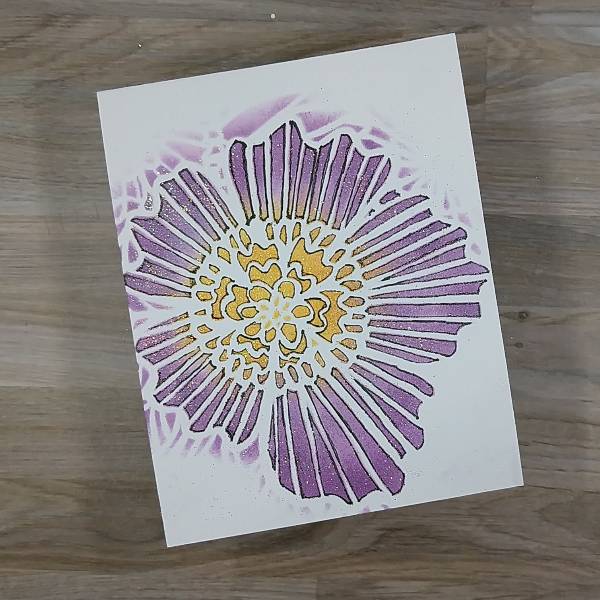
Step 5: Fussy cut the edges of the flower with a pair of scissors. Then use the sponge dauber to ink blend the edges of the flower with more of the Purple Hydrangea VersaMagic Chalk Ink.
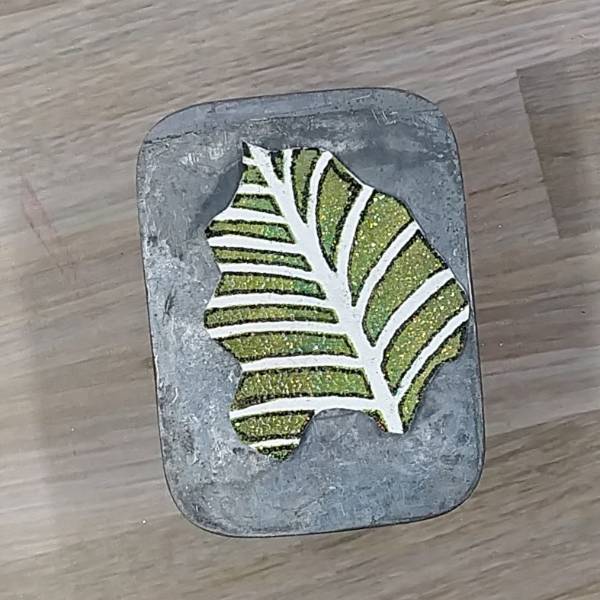
Step 6: Attach the leafy part of the stencil to another piece of watercolor paper or cardstock with more washi tape. Using another sponge dauber, blend the inner part of the leaf with Tea Leaves VersaMark Chalk Ink and the outer edges with Hint of Pesto VersaMark Ink. Mix a little Turquoise Gem VersaMagic Chalk Ink with water and watercolor the center parts of the leaves. Optional: Remove the stencil and heat emboss the ink with more clear embossing powder. Replace the stencil over the leaf.
Step 7: Using the black artist pen, trace the edges of the leafy part of the stencil’s openings (to add a border around each ink blended area of the stencil). Then remove the stencil and set it aside.
Step 8: Fussy cut the stenciled leaf using a pair of scissors. Using the same sponge dauber you used to blend the rest of the leaf, blend the Hint of Pesto VersaMagic Chalk Ink around the edges of the leaf. (Sorry, I forgot to take a picture of the leaf with the ink blended edges.)
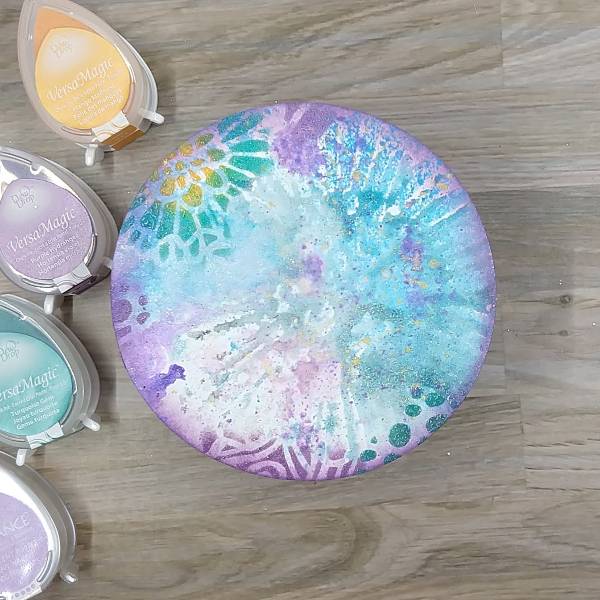
Step 9: Return the stencil to another piece of watercolor paper. Spray the paper through the stencil with Sparkle Sheer Shimmer Spray as well as Bahama Blue and Grape Jelly Fireworks! Shimmery Craft Spray. Allow the spray to dry or use your heat tool to dry the spray. After the spray dried, use a circular die to cut a piece of the watercolor paper that is slightly larger than the stenciled flower.
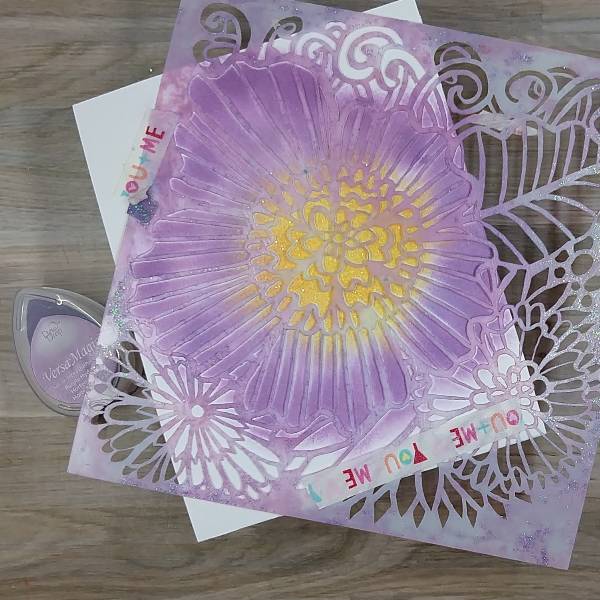
Step 10: Ink blend the whole edge of the circular die cut with more of the Brilliance Pearlescent Purple ink with a sponge dauber. Return the stencil to the circular die cut and use a variety of the same colors of ink to stencil the edges of the die cut using more sponge daubers. In blend the small flower with Mango Madness and Turquoise VersaMagic Chalk Inks, the dots with more of the Turquoise VersaMagic Chalk Inks, and the curved lines with Purple Hydrangea VersaMagic Chalk Ink. Optional: Heat embossed the ink with more clear embossing powder.
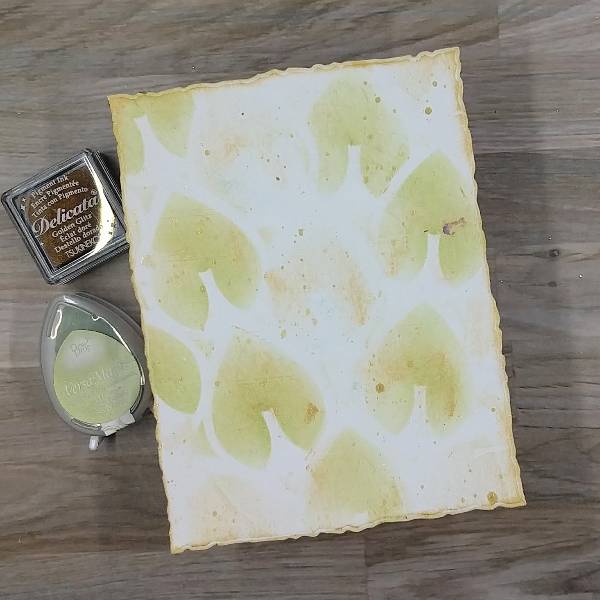
Step 11: Create the background panel by die cutting a piece of white cardstock or watercolor paper with an A2-sized die cut. Place a stencil with larger open leafy areas over the watercolor paper and then gently run Golden Glitz Delicata ink across the panel to add some soft gold accents. Ink blend several of the leaves with Tea Leaves VersaMagic Chalk Ink, making sure that there are some gold leaves and green leaves. Gently press the Golden Glitz Delicata Ink cube to the edges of the panel to leave a gold border around the edge of the panel. Splatter some gold watercolor across the panel and allow it to dry.
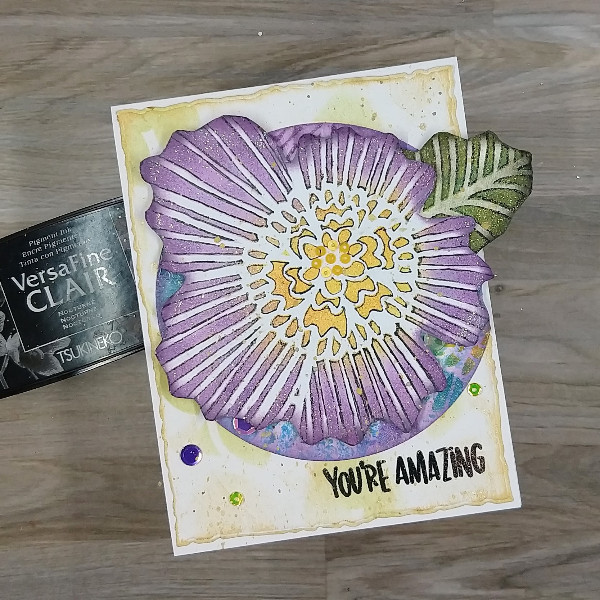
Step 12: Stamp a sentiment of your choice on the lower right part of the panel with Nocturne VersaFine Clair ink. Optional: Heat emboss the sentiment with clear embossing powder. Glue the circular die cut onto the center-right of the panel and trim the very edge of the circular die cut to match the background panel. Attach the leaf and flower to the card with foam tape. Glue small yellow sequins to the center of the flower and add purple and yellow sequins onto the card. Glue the whole panel onto an A2-sized white card base. Splatter a little more gold watercolor across the card.
Other TCW (The Crafter’s Workshop)-Stencil-Dahlia Blooms (6”x6”) Simon Says Stamp-Stencil-Mod Layering Leaves (1 of 2 stencils in the set) Simon Says Stamp-Stamp-Amazing Catherine Pooler-Sequins-Paisley Park and Saint Lucia sequin mixes Embossing powder in my stash Hero Arts-Die-Nesting Circle Infinity die set Honey Bee Stamps-Die-Deckle Edge A2 die set Altenew-Foam Tape-Instant Dimension Foam Tape Scissors Black artist pen Clear embossing powder Glue
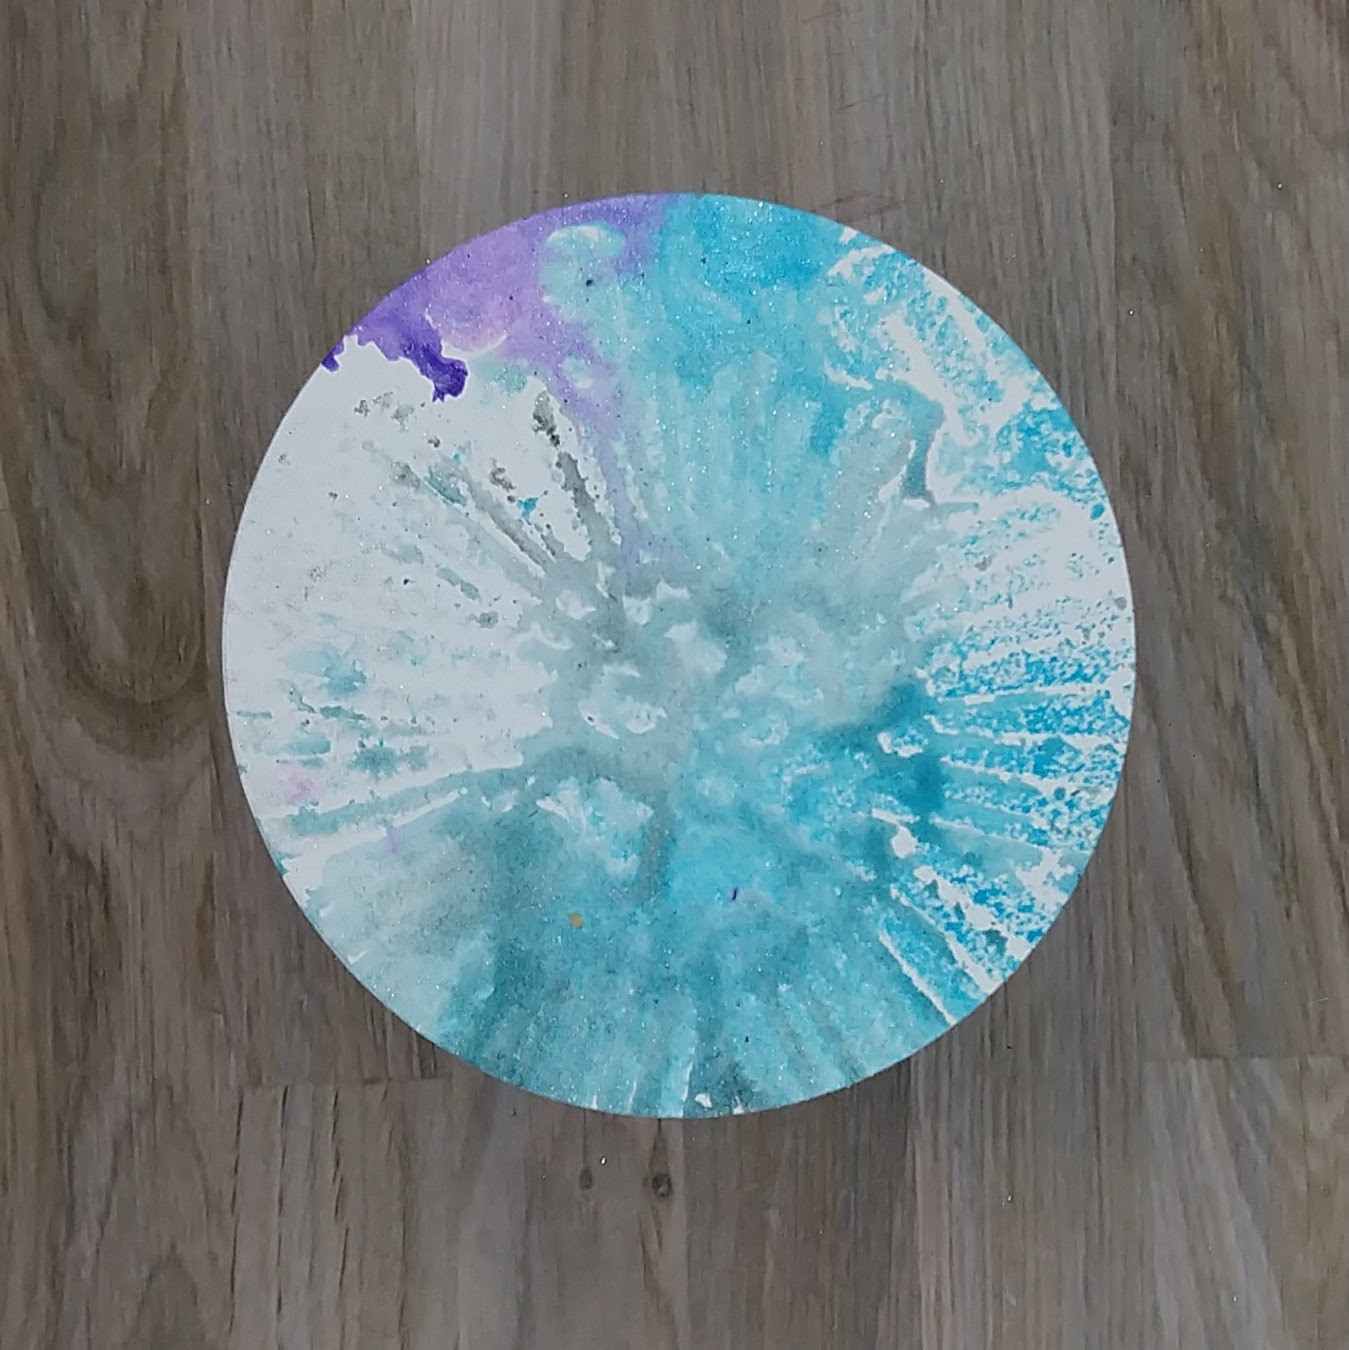
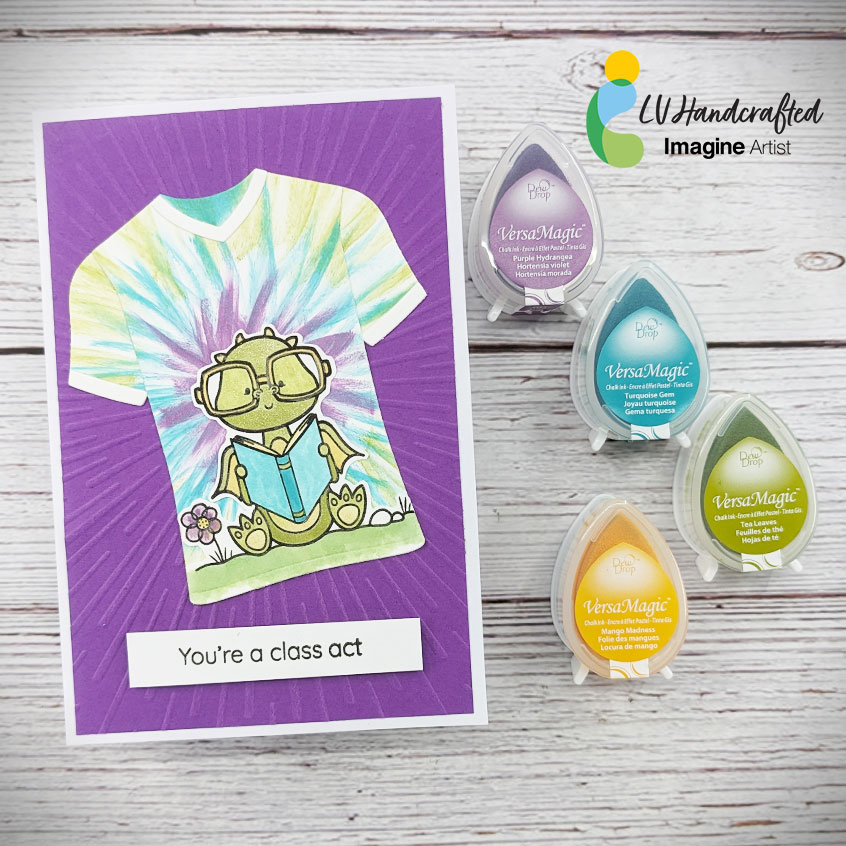
Hello friends! This is Linh (or LV Handcrafted on all the socials). I’m a little bit hooked on creating tie-dyed backgrounds. With this technique, I was able to create a smaller scale tie-dyed pattern, which fit perfectly for the t-shirt die I wanted to use. With this technique, you can use any dies you already have in your stash! I chose VersaMagic dewdrops because they are so juicy and you can really get very wispy swipes of ink to create that classic tie-dye effect. I used the same dew drop inks to color in my cute dragon as well.
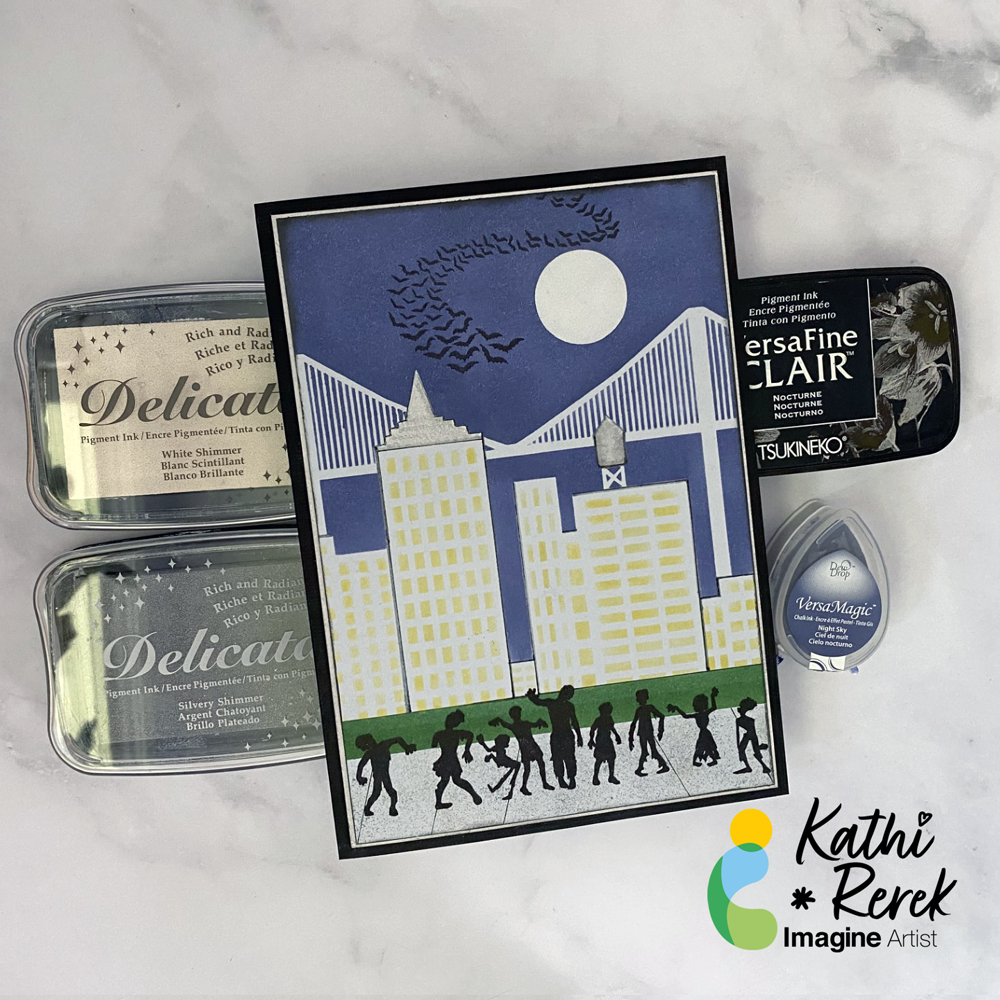
Halloween card made easy with VersaMagic, Brilliance, Delicata, VersaFine Clair, and Memento Inks!
Skill Level: Beginner to Intermediate
Time: 1 hour
Step 1.
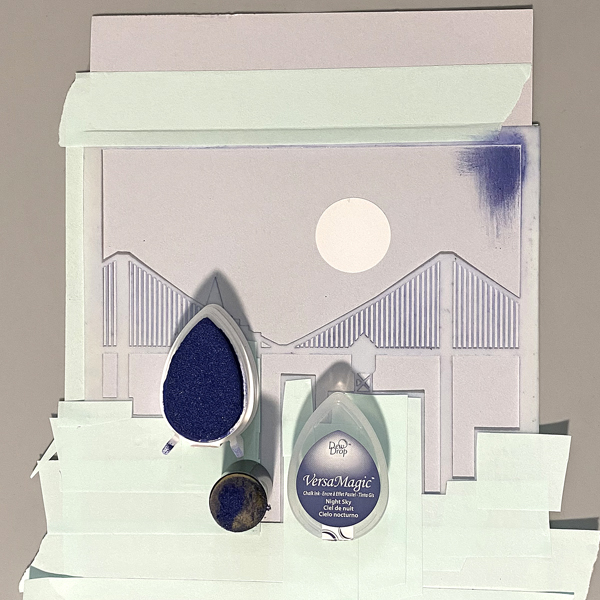
Use low-tack tape to secure the Cityscape Stencil to a 5.5” x 8.5” piece of light grey cardstock. Trim and place low-tack tape to cover the buildings’ windows. Use a circle punch to cut a circle from mask paper and adhere the circle mask above the bridge. Keep the mask paper with the circular hole for another step..
Use a sponge dauber to apply Night Sky VersaMagic Ink over the stencil and the moon mask onto the the grey cardstock to create a night sky.
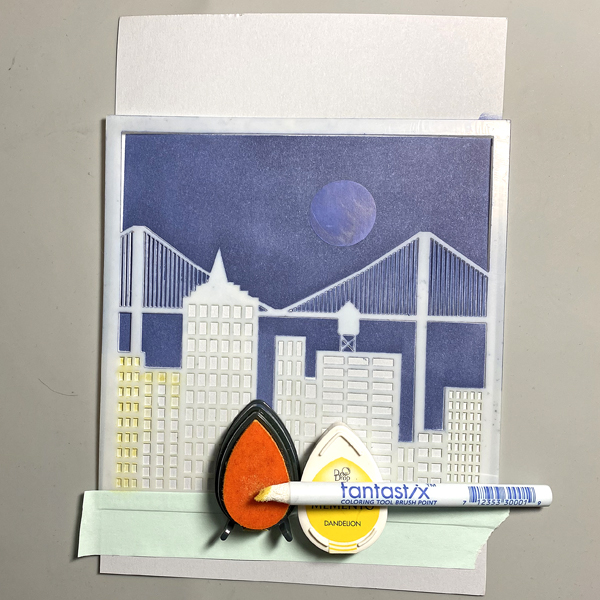
Step 2:
Keeping the stencil in place, remove the tape covering the windows. Use a Fantastix to apply Dandelion Memento Ink over the window apertures of the stencil.
Step 3:
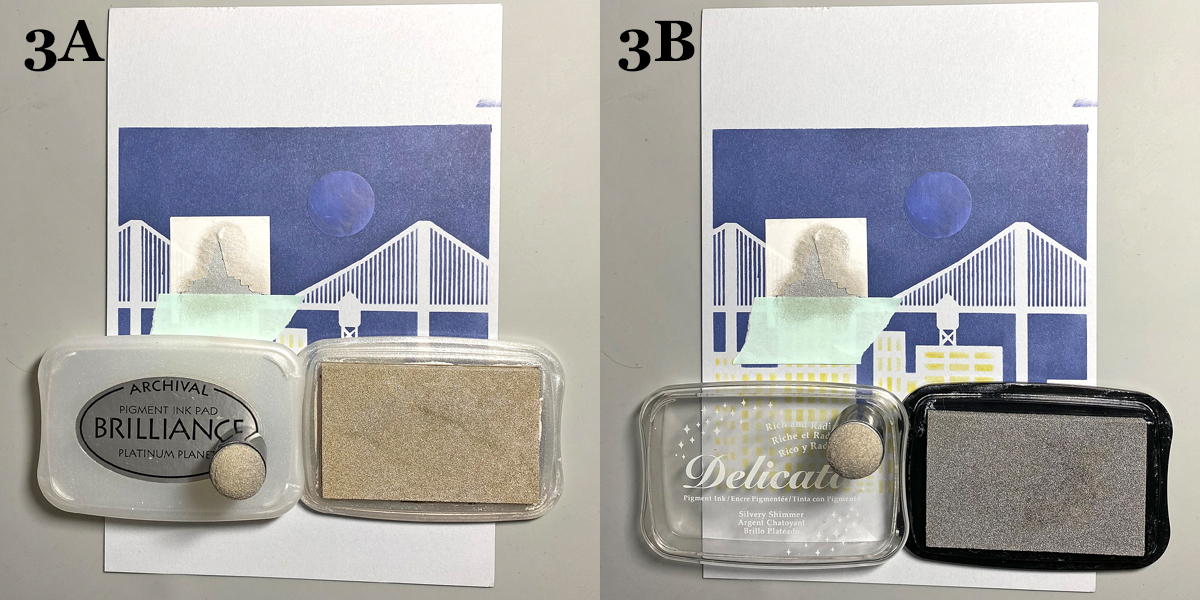
Trace the spire onto masking paper, fussy-cut along the lines, leaving the outline of the spire intact. Place the mask around the spire on the image panel. Use low-tack tape to cover the base of the spire.
Use a sponge dauber to apply Platinum Planet Brilliance Ink to the spire, then apply Silvery Shimmer Delicata Ink overtop to amp up the silver.
Step 4:
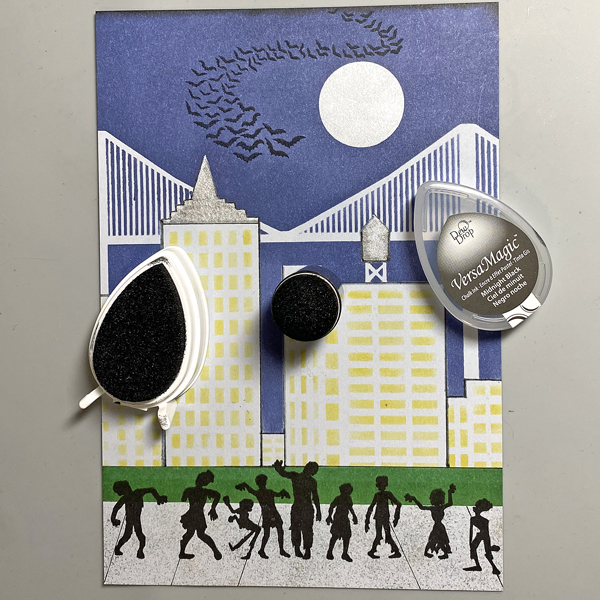
Use low-tack tape to cover the area around the rooftop water tower, leaving the tower unmasked. Use a Fantastix to apply Platinum Planet Brilliance Ink to color the water tower. Use another Fantastix to apply Starlight Black Brilliance Ink to add shading to the water tower.
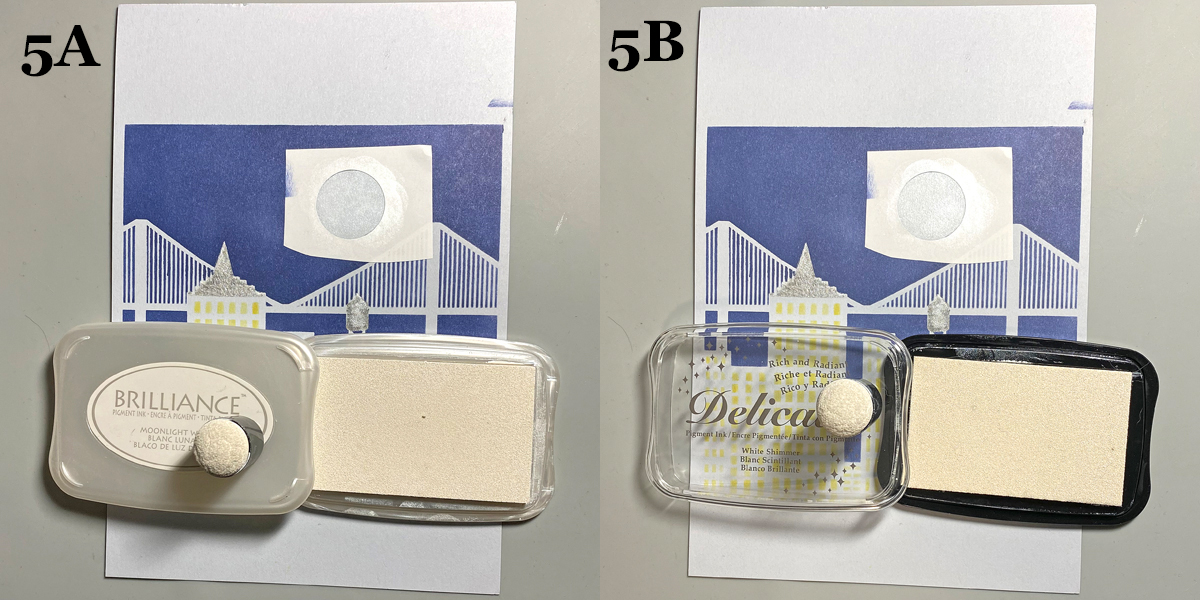
Step 5:
Remove the circle mask from the sky. Adhere the mask paper with the circle hole to the sky area, leaving the center open. Use a Sponge Dauber to apply Moonlight White Brilliance ink to color the moon white. Use a Sponge Dauber to apply White Shimmer Delicata Ink overtop to add shimmer to the moon.
Step 6:
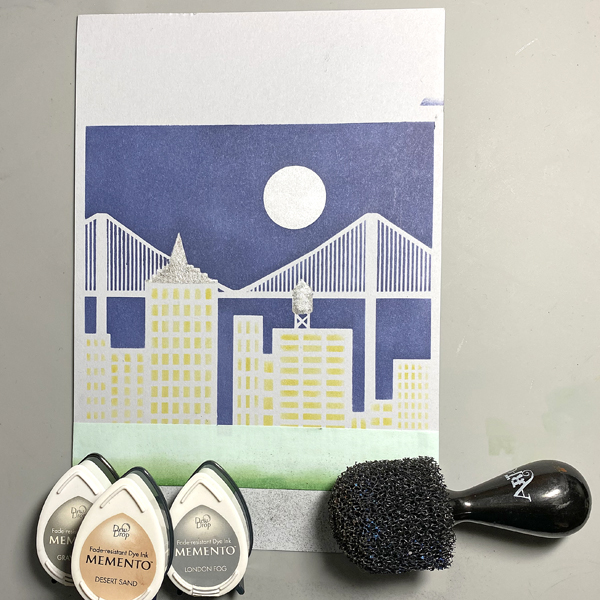
Use a scrap of cardstock and low-tack tape to cover the buildings. Place another piece of low-tack tape horizontally across the bottom 1.25” of the image panel.Use Sponge Daubers to apply Cottage Ivy and Bamboo Leaves Memento Ink between the masked areas to create a grassy lawn.
Step 7:
Use low-tack tape to cover the grassy areas. Use the pouncy tool to apply London Fog, Grey Flannel, and Desert Sand Memento Inks to create a cement sidewalk.
Step 8:
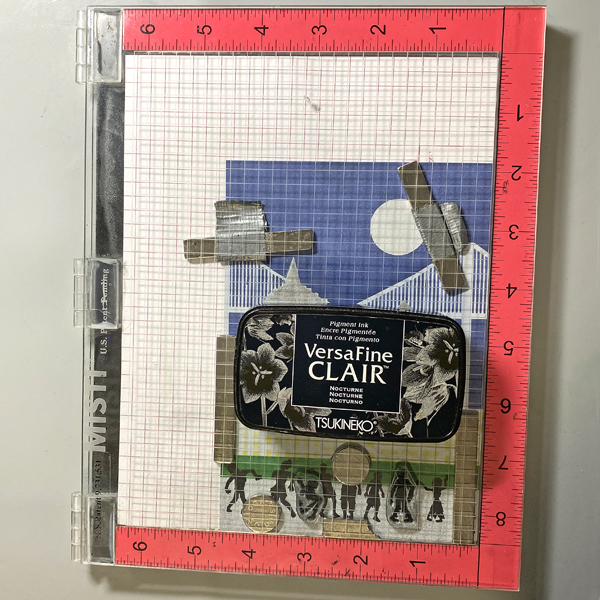
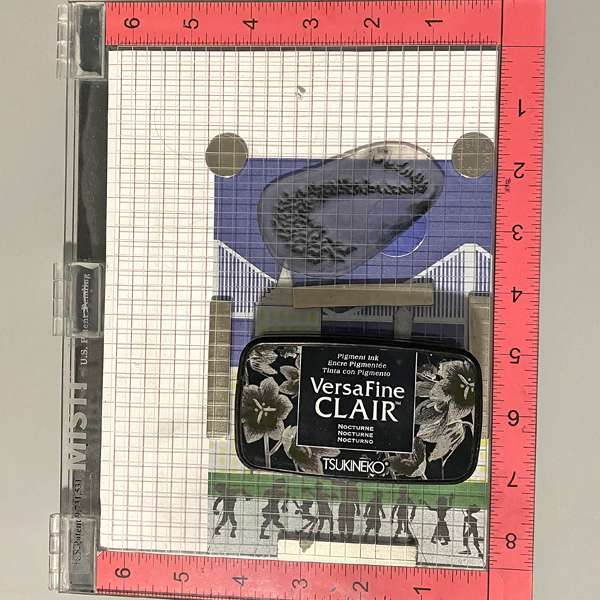
Use magnets to secure the image panel to the stamping platform. Position the Zombie stamps facedown where desired. Press the lid of the platform onto the back of the stamps, lift, ink the stamps with Nocturne VersaFine Clair Ink, and stamp. Re-ink and repeat stamping if needed to attain a good solid impression.
Remove the Zombie stamps from the platform., then remove the image panel from the platform,. Heat set the stamped images.
Step 9:
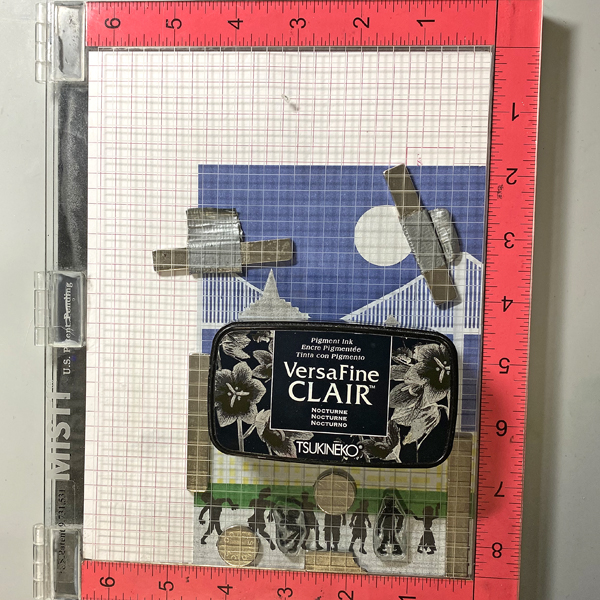
Place the image panel back onto the base of the stamping platform, secured with magnets.. Place the other two small Zombie stamps facedown between the other stamped images. Press the lid of the platform onto the back of the stamps, lift, ink the stamps with Nocturne VersaFine Clair Ink, and stamp. Re-ink and repeat stamping if needed to attain a good solid impression.
Remove the stamps from the platform Remove the image panel from the platform. Heat set.
Step 10:
Place the image panel back onto the stamping platform, secured with magnets. Place the Bat Colony Stamp facedown in the sky area as shown. Press the lid of the platform onto the back of the stamps, lift, ink the stamps with Nocturne VersaFine Clair Ink, and stamp. Re-ink and repeat stamping if needed to attain a good solid impression.
Remove the stamps from the platform Remove the image panel from the platform. Heat set.
Step 11:
Trim the image panel to 4 5/8” x 6 5/8” . Use a Sponge Dauber to edge the image panel with Midnight Black VersaMagic Ink.
Step 12:
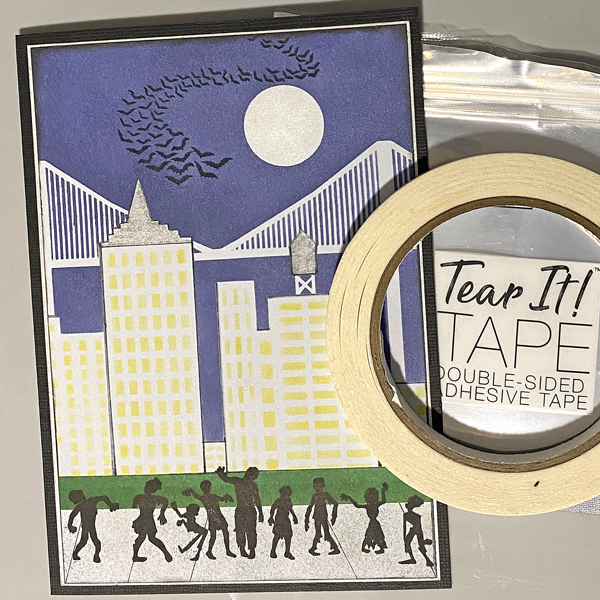
Trim a piece of white cardstock to 4.75” x 6.75”. Use a Sponge Dauber to apply Platinum Planet Brilliance Ink to the outside .5” of the image panel. Then use a Sponge Dauber to apply Silvery Shimmer Delicata Ink overtop to add to the metallic shine.
Step 13:
Use Tear It! Tape to mat the image panel to the silver-inked cardstock, then use Tear-It! Tape to adhere the matted image panel to a black 5” x 7” card.