Wedding invitations can be expensive! But with Delicata Inks and a pretty layered flower stamp, you can create some inexpensive invitations that are not only pretty but they are also easy to make. Find out how by watching my video below.
Happy spring, everyone! This month we are focusing on wedding themes and I thought I would share some ideas using large floral stamps. When you are mass producing cards or invitations, you want to minimize the number of steps when creating. So using large images will save you a lot of time. Creating with a mess-free ink, like StazOn Pigment, is also key because it dries instantly and won’t smear. Lastly, for quick embellishing, use the Sheer Shimmer Stix to add the final wow factor. And your simple wedding project is done!
Did you know that, according to Wikipedia, there are 2.5 million weddings in the United States each year? Wow, who knew?! That means that there are a lot of individuals out there planning for their big day! It’s a good thing that this project is designed to inspire those planning for their special day to create quick, simple and elegant handmade wedding invitations.
Time: 30 minute Skill: Beginner/Intermediate
Directions
Step 1
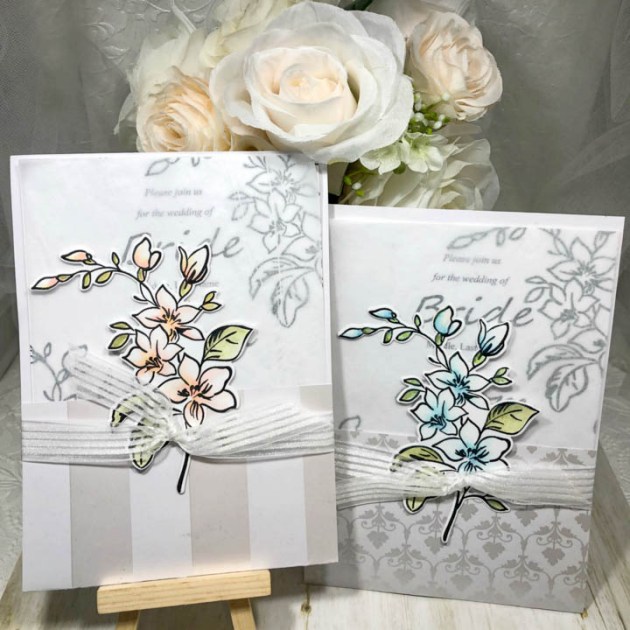
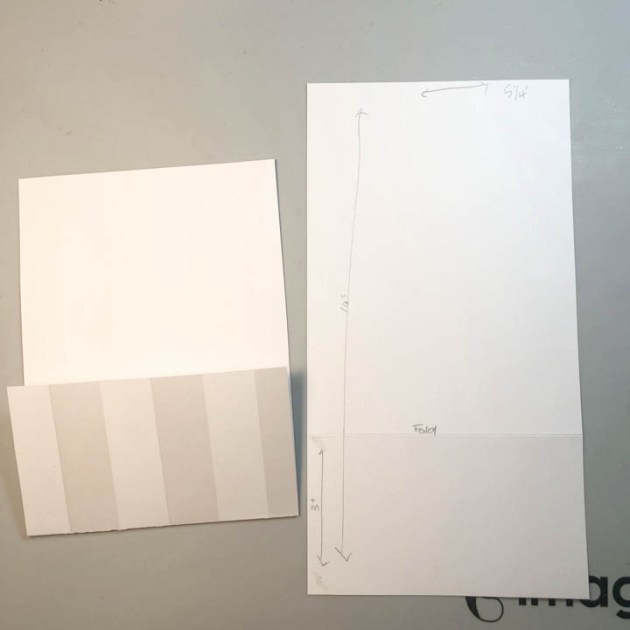
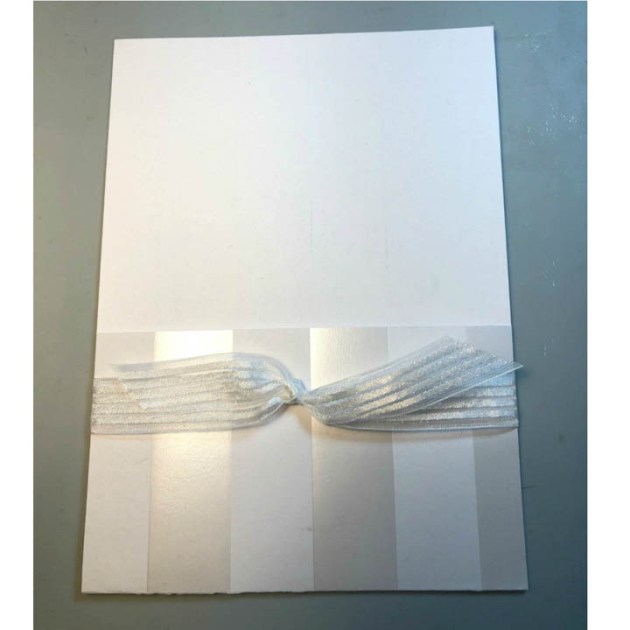
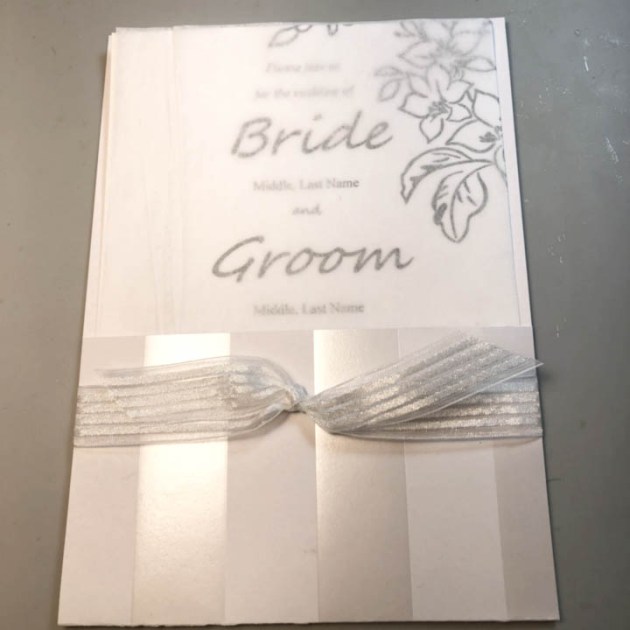
Cut a piece of decorative cardstock to size, 5 ¼” x 10”. Fold up at 3” from the bottom.
Step 2
Tie sheer ribbon around the bottom portion of the folder.
Step 3
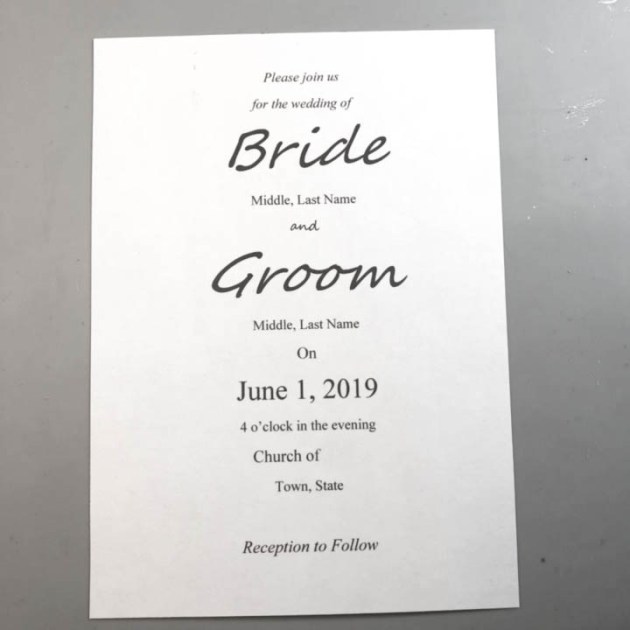
Print wedding announcement on a 5”x 7” piece of cardstock.
Step 4
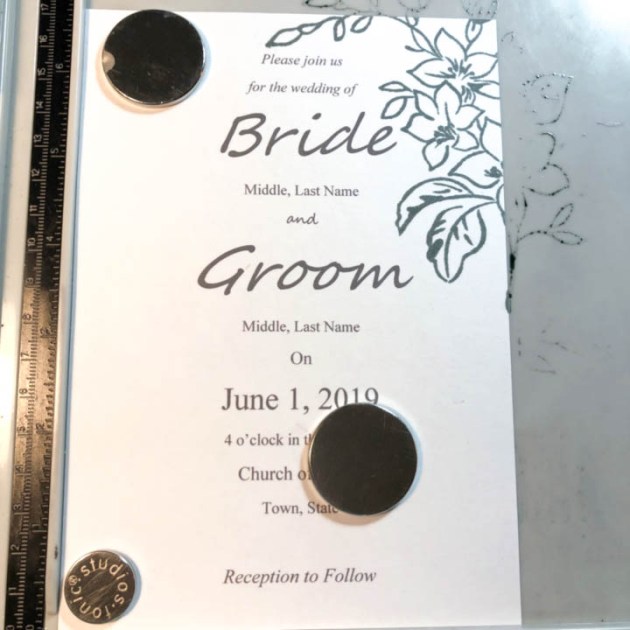
Stamp floral image with Memento London Fog at top right and bottom left of invitation.
Step 5
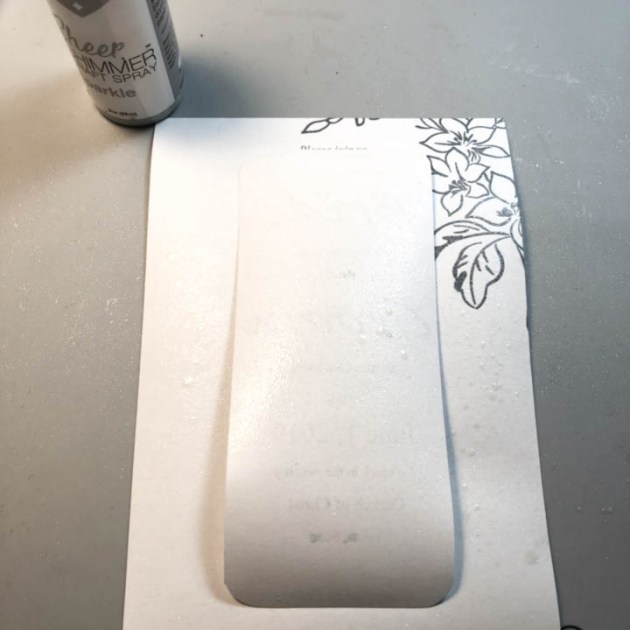
Create a template to cover printed words and spray with Sheer Shimmer Craft Spray.
Step 6
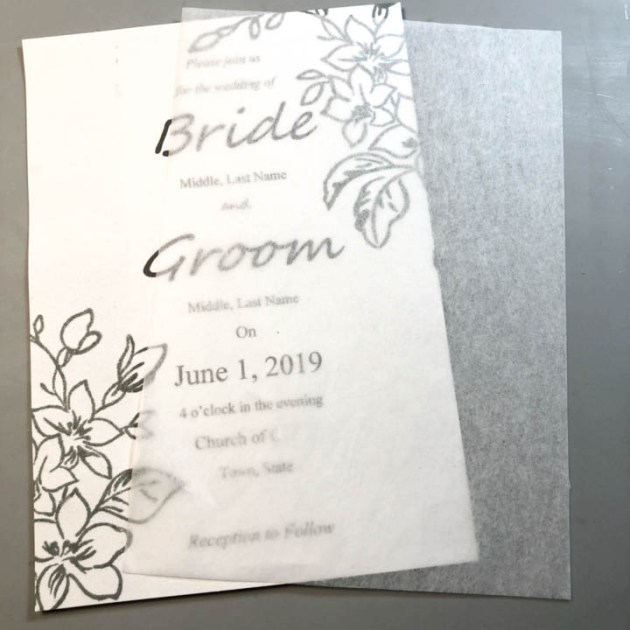
Cut tissue paper to cover invitation.
Step 7
Slide invitation, with tissue cover, into the previously made folder.
Step 8
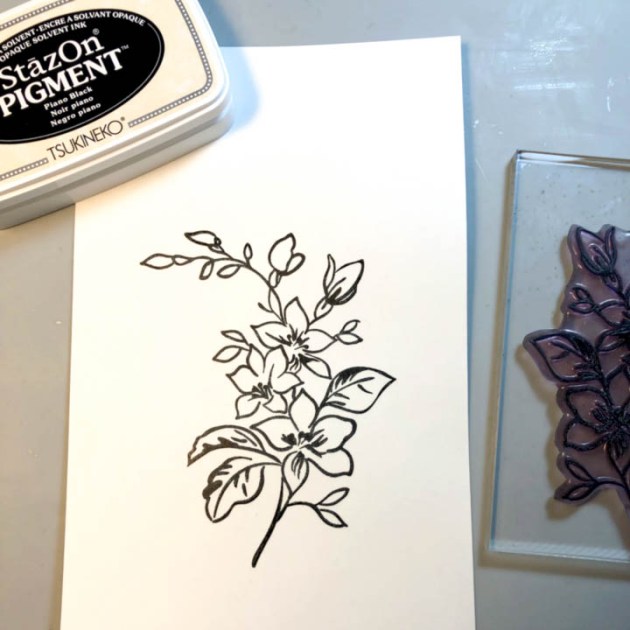
Stamp floral design on cardstock with StazOn Pigment ink in Piano Black.
Step 9
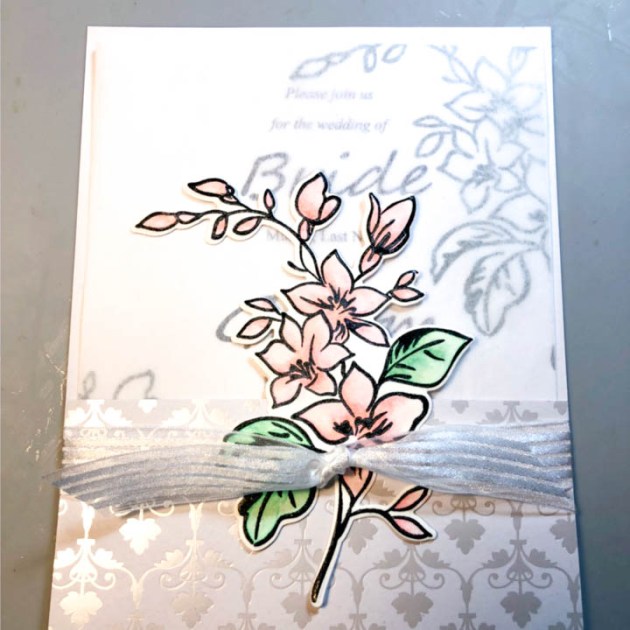
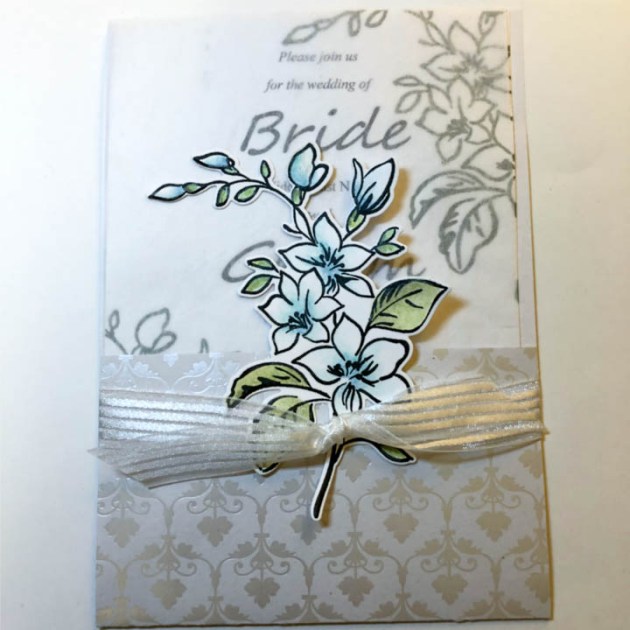
Using watercolor pen and VersaMagic ink, water-color floral image.
Step 10
With matching die, cut out floral image.
Step 11
Adhere to the bottom portion of folder front, see the example for placement. Try the same design in different color schemes.
Supplies
Imagine
VersaMagic Chalk Ink – Pink Grapefruit, Mango Madness, Tea Leaves, Hint of Pesto, Turquoise Gem, Ocean Depth, Cloud White
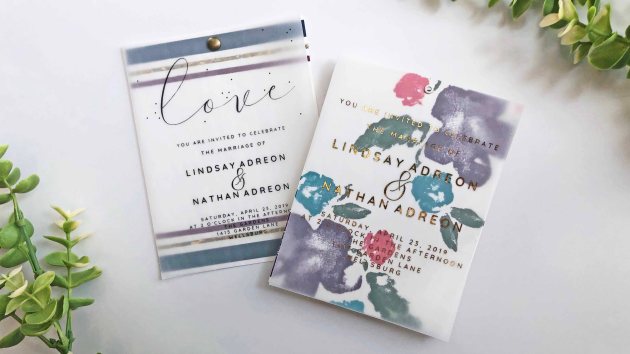
I have always loved the look of vellum overlays on wedding invitations and making them yourself is super simple! In today’s video, I’m sharing a few different designs along with different ways to attach the vellum overlays! I hope you all enjoy it!
Skill: Beginner/Intermediate Time: 20 minutes per invitation
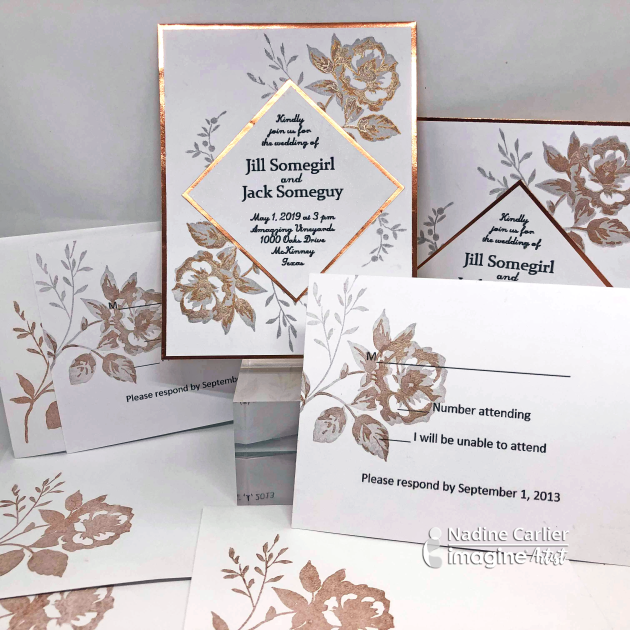
Hi there! Today, I have a unique wedding card technique to share with you. By using this technique each wedding invitation will have its own unique subtleties. I used Desert Sand Memento Ink but you can use the colors used in your wedding decor. Embossing folders can be used in several ways and it is fun and simple. Now that you can get wedding invitations in craft stores you can add your personal touch to the make it more special just by pasting the decorated layer on top.
Skill: Intermediate Time: 20 minutes
Directions
Step 1
Select an embossing folder, ink the flat layer of the folder with the color of ink of your preference. Since this is a wedding card, I used Desert Sand Memento Ink because it matches well with gold and enhances the white. You can apply the ink directly with the ink pad or using a brayer. Insert the card stock on your embossing folder and pass the sandwich through your cutting machine.
Step 2
On a separate piece of card stock with the same color of the card base, stamp the couple image using VersaMark. Sprinkle Gold Embossing Powder and use a heat tool to set.
Step 3
To create a matching frame for the couple image, I inked the edges of a rectangle with the VersaMark inkpad.
Step 4
Then I sprinkled a heavy amount of Gold Embossing Powder and melted the powder with the heat tool.
Step 5
If you want to add more details this is the moment. In my sample, I tie a bow in the ribbon around of the embossed background and pasted it directly over the card base. Then I pasted the main stamped image over the decorated card base using double-sided foam tape.
“Hey, little sister what have you done? Hey, little sister who is the only one?”…*continues Billy Idol song until the chorus* “It’s a nice day for a White Wedding”! We are happy to announce the Color of the Month for April is White Wedding. With wedding season just around the bend, we hope you are stocking up on the right inks for your special day.
We have been very pleased with our latest release of StazOn Pigment Ink in Snowflake. This ink will be great for multiple surfaces and especially great on dark or kraft cardstock. Another set of fantastic inks for wedding crafts is Delicata in White Shimmer (the name speaks for itself), Brilliance in Moonlight White (a bit of a heavier pigment ink), and VersaMagic in Cloud White (matte finish ink).
As always we challenge our artist with the color of the month and a technique or theme. This month expect to see white inks and wedding crafts!