Create A Song Bird Theme Card For Valentines Day

by Kyriakos Pachadiroglou

Create A Song Bird Theme Card For Valentines Day

Using Imagine’ s Craft Mat, I made a mirror image of the stamp as I wanted to create a background with a repetitive pattern on it. Having a stamp design with one only way to stamp, the Craft Mat kept the VersaFine Clair ink long enough to place the cardstock and capture the stamped image at the reverse direction. The same technique can be used on various materials such as fabric and wood. It could also work well on transparent sheets when you need both side stamped image.

Skill: beginner
Time: 1 hour

Directions


Step 1

Mark on the craft mat an outline of the cardstock size with a pencil to use a guideline to align your stamps. For this project, a 4 x 6 cardstock cutting is used.


Step 2

Stamp the birds on the Craft Mat using the Nocturne VersaFine Clair ink pad inside the guidelines. Press the cardstock piece on the craft mat and inside the guidelines.


Step 3

Stamp to cover the rest of card piece to create the repetitive pattern.


Step 4

Set the stamped cardstock piece on the front of a card 5 x 7 inch with Tear It! Tape.


Step 5

Add color details on the flowers with the Fabrico marker in Red Brick.


Step 6

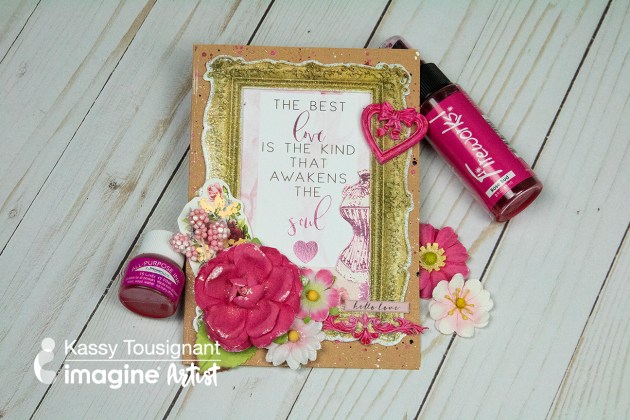
On a piece of white cardstock, stamp with VersaMark the love word, cover with Imagine’ s red embossing powder and heat set. Distress the edges of the paper.


Step 7

Use lightweight clay and the rubber mold to make a feather and when dries whitening it further with All-Purpose Ink in White.


Step 8

Place two side to side layers of Tear It! Tape to match the size of the ribbon and glue the chevron ribbon on the card.


Step 9

Continue with the Tear It! Tape to set the word “love” on top of the ribbon.


Step 10

Add rhinestones with the On Point Glue on the flowers.

Supplies

Imagine
Other
  • White cardstock
  • Heat tool
  • Rhinestones
  • Feathers rubber mold
  • Kaisercraft – Bonjour stamp set
  • Penny Black – All about love stamp set
  • May Arts – chevron ribbon red
  • Light Weight Paper Clay


Create a Valentines with Emboss Resist Using Goosebumps Spray

by Lindsay Adreon

Create a Valentines with Emboss Resist Using Goosebumps Spray and VersaFine Clair

I am a clean and simple cardmaker who likes to focus on techniques, so the GooseBumps spray is PERFECT for my style of cardmaking! Using the spray and Versafine Clair inks together is a fast and easy way to create a fun and vibrant background for the upcoming Valentine’s Day holiday! (Plus I added a little sparkle, because who can resist that??)

Skill: Intermediate
Time: 1 hour

Directions

Supplies

Imagine 
Other
  • Craftin Desert Divas –  Nested Hearts & Flag Banner Dies
  • Joy Clair Stamps – Candy Hearts Stamp Set
  • Die Cutting Machine
  • Fun Foam
  • White Cardstock
  • Acrylic Blocks
  • Alcohol (For Clean Up)

Learn How to Create a Layered Valentine’s Card with Cute Frame

by Kassy Tousignant

I just love using Imagine products with different finishes and textures together in a mixed media card.  The background of this Valentine card has shimmer from the Fireworks spray, dimension from the irRESISTible Pico Embellisher, and shine like no other from the Goosebumps spray!  Also, All Purpose Ink is fantastic for use on resin or clay shapes.  You can paint or spray it on for really great coverage.  The sparkle and shine from the embossing powder really makes the paper frame stand out!

Skill: Intermediate

Time: 1 hour

Directions

Supplies

Imagine
Other
  • Gesso
  • Foam tape
  • Heavy body gel
  • Cardstock – kraft, pre-printed sentiments or white
  • Prima Marketing – flowers, paper, embellishments
  • Resin heart shape

See How to Create a Mixed Media background with Self-Made Washi Tape

by Jowilna Nolte

See How to Create a Mixed Media background with Self-Made Washi Tape

Create a Valentines’ day card with a mixed media feel and matching washi tape that you make yourself in a few easy steps using your Imagine Craft Mat. Add interest with inks and textures layered to create interest.

Skill: Intermediate
Time: 1 hour

Directions


Step 1

Spray a piece of white cardstock with Fireworks Shimmery Craft Spray in Lady Bug and leave to dry.


Step 2

Use the direct-to-paper method and ink the remainder of the pane using Lady Bug and Lilac Posies Memento DewDrop inkpads.


Step 3

Use sponge daubers with ink to create a bokeh effect to the background. First, add red inked circles using Memento Luxe in Love Letter and then add white Brilliance circles over the top and slightly off-set for a fun effect.


Step 4

To create your own matching washi tape, adhere a strip of masking tape to your Craft Mat.


Step 5

Use Memento DewDrop ink pads to add color to the masking tape strip.


Step 6

Use VersaFine Clair in Morning Mist and a texture stamp to add script stamping to the tape. Leave the ink to dry before adhering the tape to your card.


Step 7

Carefully peel the masking tape off of your Craft Mat and adhere the washi tape to your card panel.


Step 8

Emboss the panel using a love-themed or Valentine’s Day themed embossing folder. Add a layered die-cut heart with a silver leafed heart on top. Finish off your card with ink splats and diamanté for a mixed media look and feel.

Supplies

Imagine

Other

  • Kaisercraft – Embossing Folder, Die-cutting machine
  • Heart die-cuts: Couture Creations
  • Masking tape
  • Wooden heart
  • Silver leaf material
  • Diamanté
  • Jowilna Nolte – Circle stencil and not square stencil

See How to Use Acrylic Paint and Embroidery on a Birthday Card

by Elina Stromberg

See How to Use Acrylic Paint and Embroidery on a Birthday Card with Memento Inkpad and Craft Paints

Whenever you want to create interesting, bit grungy textures on a card background, I suggest you use acrylic paints for stamping! For this technique, you can use any pattern stamp you have in your stash and choose any colors to match to your main images. 

Skill: Intermediate
Time: 1.5 hours + drying time

Directions


Step 1

In this technique your Imagine craft mat will become handy: First, you use it as your palette for mixing the paints. Then you brayer the paint to a thin layer, add a hint of water should the paint be too heavy and then use the mat as your stamping pad. Simple and easy! The only thing to remember is to clean your stamp right after stamping. If the paint dries on your stamp it will be very difficult to remove. However, cleaning your craft mat you can do later; even if the paint is sticking to it, just mist the paint with water and wipe the mat clean with a baby wipe. Should there still be some paint left, just use a drop of hand sanitizer and your mat will look as good as new! Apply acrylic paint of your choice on the craft mat. I mixed white and red to get a beautiful light pink. Brayer the paint to a thin layer. Use the paint as your stamping pad. Keep the stamp in your hand, bend it, and stamp random patterns on the white paper. Let dry.


Step 2

Ink the background with a matching ink color. If you used a light acrylic paint color, use a darker ink. On a darker paint, a lighter ink color will best highlight the stamped pattern.


Step 3

Mist the inked pattern with water. Press the wet paper with a paper towel to pick up the excess ink. Let dry.


Step 4

Use a plastic stencil or a nesting metal die as your stencil and create a punched frame in the middle of your background. Secure the stencil with masking tape before starting. 
For punching, use a paper piercing tool or a darning needle. Place paper on an old mouse pad for easy punching and for protecting your crafting table.


Step 5

Sew a frame on the background using a straight stitch and three strings of embroidery yarn. Secure the end of the yarn on the back with double-sided tape.


Step 6

Stamp, color, and cut out your main image. Glue on the card front. Trim card to size, mat on a white card base. I used the same technique also for an ATC background; I think it looks quite nice, too!

Supplies

Imagine
Other
  • Acrylic paint – White, Red 
  • Brayer
  • Water mister
  • Ink blending tool
  • Honeycomb pattern stamp

  • Stamping Bella: Milton (Mouse) Stamp cgr 135

  • Carabelle Studio: Simple Elegance
  • Promarkers for coloring
  • Cardbase – white
  • Cardstock – White mixed media 
  • Dark purple paper
  • Metal nesting dies: Sizzix
  • Embroidery yarn, needle, paper piercing tool, old mouse pad

Create an Ombre Background Using VersaFine Clair and Vellum Flowers

by Arjita Sepaha Singh

Create an Ombre Background Using VersaFine Clair and Vellum Flowers

For today’s card, I heat embossed few flower images with white embossing powder on vellum. I used my sharp pair of scissors to cut them. To create the background I have used Versafine Clair inks which are very highly pigmented and also blend beautifully with each other. I used a jumbo dauber to add the colors. The sunset ombre looks so beautiful and then arranged the flowers on the card. To finish the card I added few splatters of the shimmer spray and a sentiment.

Skill: Intermediate
Time: 1 hour

Directions

Supplies

Imagine

• VersaFine Clair – Red Tulip, Summer Time, Cheerful
• Embossing Powder – White
• VersaMark
• Jumbo Sponge Dauber
• On Point Glue
• Sheer Shimmer Spray – Sparkle

Other

• Cardstock – White, Vellum
• Powder Tool
• Heat gun
• Misti
• Scissors
• Stamp – sentiment, flowers