Use a Ghosting Technique to Create a Unique Christmas Card

by Martha Lucia Gomez

Use a Ghosting Technique to Create a Unique Christmas Card

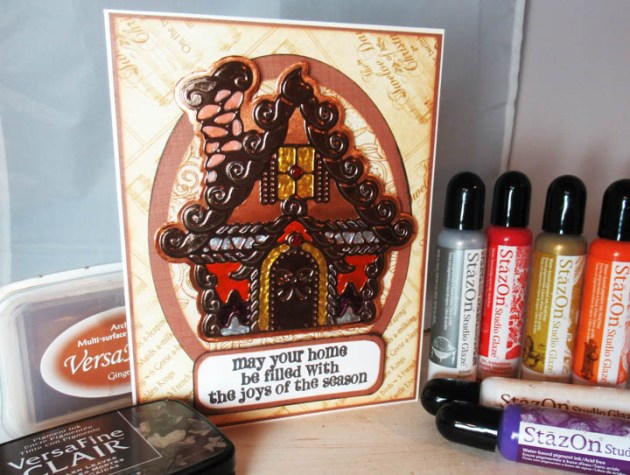
Hello everyone! Ghosting technique was one of the first techniques that I learned in cardmaking crafts and today I am sharing with you a lovely way to incorporate this ghosting technique in a Christmas Gingerbread Card. To realize this technique you only need glossy card stock and VersaMark ink to stamp the ghost image. In my project, I am using a Chevron Background from Recollections, but let me show you the process!

Skill: Intermediate
Time: 1 hour

Directions


Step 1

Take a piece of white glossy card stock and ink your stamp or stamps with VersaMark Ink and stamp directly over the glossy side and set this piece aside for a few minutes so the ink can dry.


Step 2

On a regular piece of cardstock, stamp the holiday-themed images that you want to use to decorate your card. I used a gingerbread image from a Stampin Up Set. I stamped the images with Memento Luxe Peanut Brittle and Clear Embossing Powder that I activated with the heat tool. Then I cut the gingerbread with the corresponding die cut.


Step 3

When the glossy card stock was totally dry, I sponged several times in circular motion with Desert Sand Memento Ink. If you want you can also use a brayer to create the resist effect.


Step 4

To finalize the card, I resized the glossy layer and created a gold mat using Gold Starstruck Rinea Foiled Paper and pasted this layer directly over the Cherry Cobbler card base. Then I cut the sentiment Merry Christmas using the same Gold Starstruck Rinea Foiled Paper with a Gina Marie Design Die Cut and pasted it over the chevron background and pasted the gingerbread using dimensional dots or tape. You can use any type the stamps to create this technique, not necessarily background stamps, all depends on the theme that you wanted to use in your card.

Supplies

Imagine
Other
  • Stampin Up – Scentsacional Season Stamp Set & die cut (retired)
  • Recollections – Chevron Background
  • Stampin Up – Cherry Cobbler Card Stock, White Glossy Card Stock
  • Rinea Foiled Paper – Gold Starstruck
  • Gina Marie Designs – Merry Christmas die cut
  • Dimensional tape or dots


Create An Inspiring Design To Help Free Your Mind

by Iris Rodriguez

Create An Inspiring Design To Help Free Your Mind

Do you ever think about things too much when you know it’s not necessary? A great way to break up this thinking pattern is to turn to creative endeavors, to “free your mind” and create what the muse wants instead. This month we have the fun challenge of creating projects with Rinea foils. There are so many funs things you can do with these foils; you can stamp on it, paint, use with mediums or create 3D decorative projects. For my card I have used foils as an embellishment, check it out.

Skill: Beginner
Time1 hour

Directions

Fireworks! Shimmery Craft Sprays in Lady Bug, Grape Jelly and Bamboo Leaves
Step 1

Spray water onto watercolor paper, then spray Fireworks! Shimmery Craft Sprays in Lady Bug, Grape Jelly and Bamboo Leaves in different areas. The water will help these inks spread and blend on the paper.

Jet Black StazOn ink
Step 2

Stamp the girl image with Jet Black StazOn ink. I decided to color with Prismacolor Marker Light Peach to color in the face. I colored the mouth and cheeks with Love Letter Memento Luxe ink. For the eyes, I used All-Purpose Ink in Sky Blue, for hair used Real Black and Thyme for the dress. Once all the ink is dry next fussy cut the image.

Cut out the butterflies from Rinea foil paper
Step 3

Cut out the butterflies from Rinea foil paper in various colors with either a die or a punch.

Adhere the girl image onto the card with On Point Glue. On Point Glue is perfect for these small pieces
Step 4

Adhere the girl image onto the card with On Point Glue. On Point Glue is perfect for these small pieces. Glue the butterflies to the top of her hair and forehead.

Stamp the sentiment "Free Your Mind"
Step 5

Stamp the sentiment “Free Your Mind”. Assemble card and add any additional personal touches.

Supplies

Imagine
Other
  • Watercolor paper
  • Cardstock – white
  • Rinea Foils – Jolly Variety pack; green, silver, gold, red
  • Martha Stewart – Classic and Monarch butterflies punch
  • Sentiment stamp
  • Prismacolor Premier Marker – Light Peach

See How to Create a Gingerbread House with Rinea Paper and StazOn Studio Glaze

by Steph Ackerman

See How to Create a Gingerbread House with Rinea Paper and StazOn Studio Glaze

The holidays are almost here and there is nothing as iconic for Christmas as a gingerbread house during the holidays. When the kids have outgrown this tradition, it is still possible to recreate the fun by using your craft supplies. In today’s project, I used StazOn Studio Glaze to fill in some of the details of this gingerbread die.

Skill: Intermediate
Time: 1 hour

Directions

 Gingerbread House from Rinea's Glossy Mocha/Gold Foil
Step 1

Using Spellbinders dies which includes two layered pieces, die cut the Gingerbread House from Rinea’s Glossy Mocha/Gold Foil. Die cut the second Gingerbread House base piece from Rinea’s Glossy Copper/Gold Foil. Use On Point Glue to adhere the layers together.

StazOn Studio Glaze in Valentine
Step 2

Using StazOn Studio Glaze in Valentine, add color to the candy dots in the Gingerbread House.

color using assorted StazOn Studio Glaze colors
Step 3

Continue adding color using assorted StazOn Studio Glaze colors between the die cut elements of the Gingerbread House. Allow each color to dry before moving onto the next color.

VersaFine Clair in Fallen Leaves
Step 4

Cut cardstock and pattern paper to fit a 5″ x 6 1/2″ card base. Die cut large ovals from cardstock and pattern paper. Ink the edges with VersaMagic in Gingerbread, then adhere to the card. Stamp the phrase with VersaFine Clair in Fallen Leaves, cut to fit and mat with cardstock.

 Gingerbread House for Christmas card
Step 5

Adhere the Gingerbread House and phrase to the card with foam adhesives for dimension. Finish the card with any additional personal touches!

Supplies

Imagine

Other

  • Rinea Foiled Papers – Earth Tones Foiled Paper Variety Pack
  • Bazzill Cardstock – brown, white
  • Graphic 45 – Pattern Paper
  • Spellbinders Dies
  • Hero Arts Stamp
  • Foam Adhesives

Dewlet Poinsettia Card Plus A Giveaway

by Nadine Carlier

Have you seen the new Dewlet Etched Metal Dies yet? The possibilities are endless as to what you can create with these fun little dies. For example, the Poinsettias on these cards were created using the Dewlet dies and Memento Dew Drops and embellished with some irRESISTible Pico Embellishers. Watch my video below to find out how you can win all the Imagine products I used, including the Dewlet dies!

Head over to our YouTube Channel! Comment and subscribe on this video by the end November 20th, 2018 (midnight) for a chance to win craft products by Imagine.

Skill: Intermediate
Time: 15 minutes

Directions


Supplies

Imagine
Other

Visit our YouTube Channel for more inspirational videos and subscribe to get updates when we post new videos.

Learn How To Stamp On Rinea Foil Paper With Stazon

by Martha Lucia Gomez

Learn How To Stamp On Rinea Foil Paper With Stazon

Hello crafty friends, today I have a quick and easy way to create special effects on your cards with a stamped foil background. During this month we have two challenges, to use Rinea Foiled Paper and to use the gingerbread color. To be honest, it as a little difficult for me to define the gingerbread color because in Imagine we have many options of colors of inks, so I used StazOn Gothic Purple, which is not a gingerbread tone, with papers on the line of gingerbread.

Skill: Intermediate
Time: 30 minutes


Step 1

I stamped several times the Lineal Floral Background from Pinkfresh Studios over a piece of Glossy Marigold/Gold Rinea Foil Paper using the StazOn Gothic Purple and let the ink dry for a few minutes. Misti or Stamparatus are fantastic tools in this process because you don’t need to move or re-position your paper or stamp to re-stamp your image in the same place.


Step 2

I cut the background with a postage die cut to resize the layer and make it more attractive.


Step 3

On the above photo, you can notice the fabulous texture created over the Rinea Foil Paper with this ink.


Step 4

To finalize my card, I created a Cajun Craze card base and the second layer in Very Vanilla cardstock that I used as the mat for the Stamped Foil Background. I pasted the stamped piece directly over the cardstock using Tear Tape It! Then, using a Simon Say Stamp Wafer Dies Good Vibes, I cut the word friend using the same colors of cardstock and complemented with the “thanks” word that I stamped over an oval die cut with Memento Tuxedo Black Ink.

Supplies

Imagine 

Other 

  • Pinkfresh Studio – Lineal Floral Background
  • Simon Say Stamp – Wafer Dies Good Vibes
  • Hero Arts – Oval Nesting Die Cuts, Postage Die Cuts
  • Cardstock – Cajun Craze, Very Vanilla
  • Rinea Foiled Paper – Glossy Marigold, Gold
  • Stamparatus or Misti Stamping Tool
  • Big Shot Die Machine

See How to Create a Beautiful Autumn Nature ATC Card Set

by Elina Stromberg

See How to Create a Beautiful Autumn Nature ATC Card Set

Artist Trading Cards aka ATC’s are wonderful little pieces of art. Their small 3.5” x 2.5” size doesn’t require too many materials nor too much time. Using just one single sheet of mixed media or watercolor paper you can create a pile of cards on one go. This set of ATC’s was inspired by the beautiful autumn nature. Bright, bold colors, and wilted garden flowers getting ready for winter. Simple but elegant, and so fun to create!

Skill: Beginner
Time: 1 hour

Directions


Step 1

Apply purple, pink, and orange Memento DewDrops on a white mixed media paper with Jumbo Daubers. Sprinkle water on the inked paper, letting the colors to mix. Let dry or dry with a heat gun.


Step 2

Decorate paper by stamping random text patterns on the paper. Use only one pattern stamp, but two ink colors (orange Memento Tangelo and dark purple VersaFine Clair Fantasia). Cut several cards from the inked and stamped sheet. The standard size of ATC is 2.3” x 3.5”. If you want to mat the cards on a solid color cardstock, trim these foreground cards slightly smaller than ATC. Mix white acrylic paint with water, and sprinkle paint drops on the cards. Let dry.


Step 3

Cut ATC backgrounds from dark red cardstock. Attach card fronts on the backgrounds with two-sided tape. Stamp flower shapes on the cards using black VersaFine Clair. Decorate ATC’s with word stickers that express sentiments such as “friends,” “treasure,” and “inspiration.”

Supplies

Imagine
Other
  • White mixed media paper
  • Cardstock – Dark Red
  • Acrylic paint
  • Stamps – Text stamp (‘Tekst’ by Wycinanka); Flower stem stamps (Artemio)
  • Word stickers
  • Double-sided tape