Learn How to Make Decorative Tea Light Candle Holders

By Kyriakos Pachadiroglou


Skill: Beginner, Intermediate, Advanced

Time: 45 min

Directions:

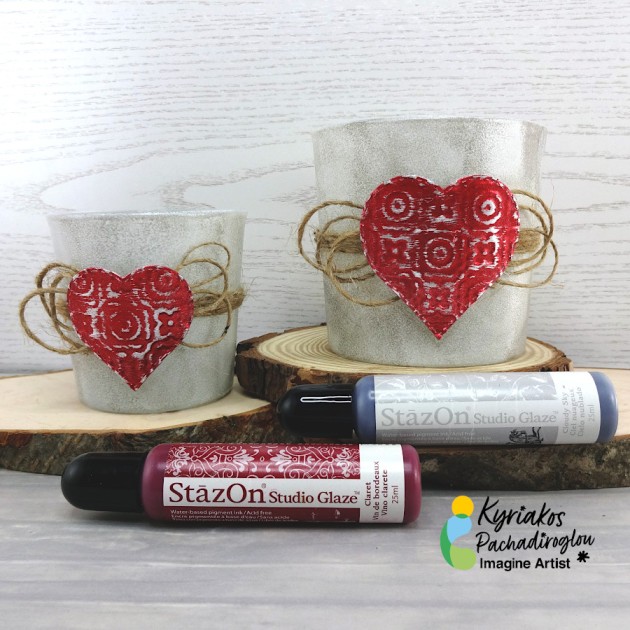
Cover glasses with All-Purpose ink and StazOn Studio Glaze to create frost and smoke effects. Die-cut and emboss SHEET metal to make embellishments that are covered with StazOn colors.


Step 1

Cover the glass surface with All-Purpose Ink white using a Sponge Dauber and lightly pressing on it creating a frost effect. Let it dry. (Use a heat tool to speed up the process)


Step 2

With a Sponge Dauber repeat the above using the StazOn Studio Glaze Cloudy sky.


Step 3

Place Tear It! Tape around the mid section of the glasses.


Step 4

Place the jute cord over the Tear It! Tape and wrap around to cover.


Step 5

Die-cut heart shapes of the SHEET metal in two different sizes. (If you don’t have a die cutting machine, use scissors to easily cut heart shapes of the SHEET metal).


Step 6

Cover with the StazOn Black Cherry using a Sponge Dauber.


Step 7

Continue with the StazOn Studio Glaze Claret.
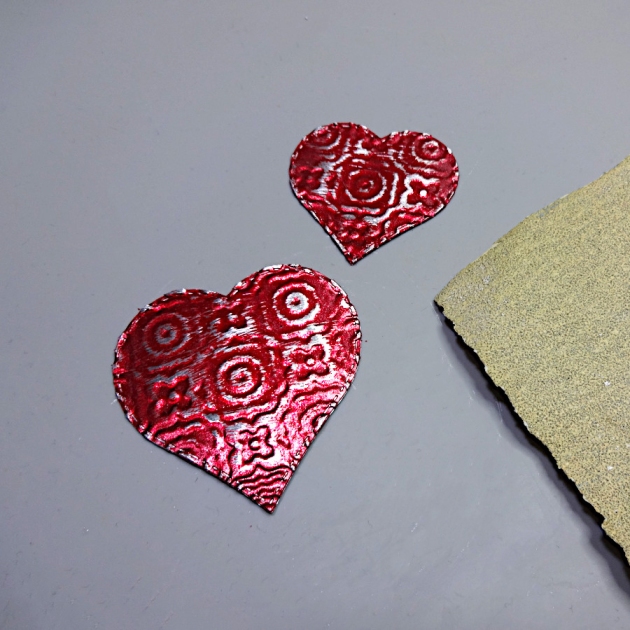
 

Step 8

Lightly sand the SHEET metal hearts to reveal the silver color.


Step 9

Make some loops with the jute cord, glue them on the glasses and add the hearts.

Art Supplies

Imagine

SHEET Metal – ATC card 

All-Purpose Ink – White

StazOn Studio Glaze – Cloudy Sky, Claret 

StazOn – Black Cherry

Sponge Daubers

Tear It! Tape


Other

Heart Dies and die-cutting machine

Embossing folder

Glasses

Sanding paper

Jute cord

Hot glue

How to Create a Thanksgiving Silverware Holder

by Annie Collins

Hello Crafty Friends!  In today’s crafting tutorial, I will show you how to make fun and quick Thanksgiving papercrafts. This is a silverware holder made with kraft paper, stylish stamps, and chalk inks in a matte-finish look. I enjoy making crafts during the holidays and this is one that is perfect for the weeks leading up to the big Turkey day!

Skill: Beginner
Time: 10 minutes

Directions

Art Supplies

Imagine
Other
  • Stampendous Stamps: Damask Fall Set
  • Simply Crafty SVGs: Silverware Holder
  • Recollections Brand 65# Cardstock: Kraft and Maroon
  • Bazzil Brand Cardstock: Golden Umber
  • Brother Scan N Cut Machine

How to Create A Mini Pumpkin Name Place Holder for Thanksgiving

by Annie Collins

Hello Crafty Friends! Annie here with a quick and easy name place holder for Thanksgiving Table Decor. Use any color that matches the color theme you are decorating with this year. In this video, I choose classic orange color for my paper base.

Here is a breakdown of the paper sizes

Stem: Kraft 1/2″ W X 2″ L
Leaf: Green 2″ W X 3″ L
Pumpkin: Orange 4″ W X 6″ L Then trim into 1/2″ W X 6″ L

Skill: Intermediate
Time: 1 hour

Directions

Art Supplies Used

Imagine
Other
  • Stampendous Stamps: Damask Fall Set
  • Recollections Brand 65# Cardstock: Orange, Green, and Kraft
  • Sharpie Marker Fine Point: Black
  • Trimmer
  • Scissors

How To Create a Fall Side Table Decoration for Thanksgiving

by LeeAnn McKinney

Hi there friends, Lee Ann here with a fun fall Thanksgiving Home Decor project. In this video, I tried StazOn Studio Glaze in several different colors and I was hoping to make the house a little fun. We do not have a lot of space (literal tiny home) and so anything I make needs to be condensed or small. I chose to pick up a 5″ x 7″ photo frame and play with the StazOn Studio Glaze with coloring in pumpkins, leaves, and other stamped images. StazOn Studio Glaze is a water-based acrylic product and oh it was fun. I plan to make more for the Christmas holidays. 

Skill: Intermediate
Time: 30 minutes

Directions

Art Supplies

Imagine
Other Items Used
  • MISTI Stamping Tool
  • Kat Scrappiness “Happy Fall Y’all” Stamp Set
  • Photo Frame, 110 lb Card Stock
  • Double-Side Tape

Mix Your Mediums for Fall Leaves Home Decor

by Lori Warren

If you like mixing things up, then you will like this Fall Mixed Media Home Decor sign. This Fall Leaves design uses a variety of techniques. See how to use Creative Medium to upcycle an autumn-themed napkin into leaf shape cutouts. Color and distress paper to create a dynamic look and feel.

This crafting project demonstrates the versatility of Imagine and Tsukineko art supplies and how well they can work together to create interesting pieces full of color and texture.

Skill: Advanced
Time: 1 hour

Directions

Art Supplies

Imagine

StazOn Pigment Ink Pad – Piano Black
StazOn Ink Pad — Metallic Gold
Creative Medium
VersaFine Ink Pad – Onyx Black
Memento Ink Pad – Sweet Plum
Memento Ink Pad – Rich Cocoa
Memento Ink Pad – Potter’s Clay
Memento Ink Pad – Desert Sand
GlazOn
Jumbo Daubers
Stipple Brush

Other

• Art Minds – Wood sign
• Fall Florals
• Sheer Ribbon
• TCW Stencil – TCW5002
• Tim Holtz Idea-ology – Pumpkin
• The Paper Studio Ribbon – Vintage Small Rosette
• DecoArt Enchanted – Ultra Black Basecoat, Gold & Magenta iridescent Top Coat
• Art C Stamp & Cut – pumpkin
• Stampers Anonymous, Tim Holtz collection – Skulls & Cobwebs
• Hero Arts – Stamps & frame cuts
• DCWV – Burlap Printed paper
• Cardmaking & Papercrafts – Autumn Wonder leaf embossing plate

See How to Transform Plain Pumpkins to Fancy Shimmery Metallic Pumpkins

See How to Transform Plain Pumpkins to Fancy Shimmery Metallic Pumpkins

by Lori Warren

Pumpkins are one of my favorite things to decorate and craft with during the Fall Season. Big ones, small ones, any shape and size of pumpkin just makes me smile. In this quick tutorial learn how to transform a normal plastic pumpkin from Hobby Lobby into a shimmery metallic multi-color pumpkin that will delight your guests. This tutorial can be used just to make the pumpkins a different color or you can continue craft with little paper embellishments to create a beautiful home decor piece.

Hoping this project will inspire many smiles this October!

Skill: Intermediate
Time: 20 minutes

Directions

Art Supplies

Imagine
Other 
  • Hobby Lobby Packaged Pumpkins/Gourds
  • Twine
  • White card stock
  • Hot glue gun