How to Make a Gingerbread House Garland

by Jennifer Vanderbeek

How to Make a Gingerbread House Garland

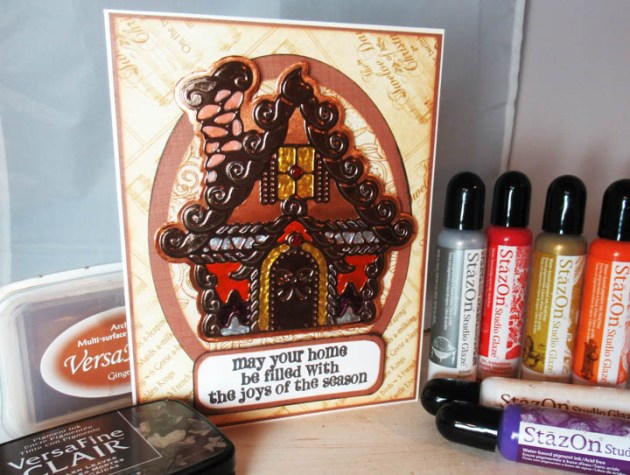
Die cuts and a few choice supplies combine to create this darling little gingerbread house garland. Not only is it perfect for the holidays, it’s an ideal craft to let kids help decorate (after the embossing is done!) and it would also look super sweet at a fairy tale themed event—think Hansel and Gretel and the witch’s house in the woods. A fun technique used in this project is layering the StazOn Studio Glaze while still wet. Drawing the tip of the Claret StazOn Studio Glaze bottle over the Cotton White made for near-seamless candy cane stripes once dried. Also, I’ve found it helps to be very generous with the Cotton White, especially on darker papers or backgrounds, if you want it to retain some opacity.

Skill: Advanced
Time: 15 minutes per house

Directions

Supplies

Imagine
Other
  • Cardstock – Craft
  • Die-Versions – Tall Victorian Home die
  • Sizzix – Big Shot Plus
  • 1/8” Hole Punch
  • Darice – Heat Tool
  • Baker’s Twine
  • Clear Tape

See How to Create a Gingerbread House with Rinea Paper and StazOn Studio Glaze

by Steph Ackerman

See How to Create a Gingerbread House with Rinea Paper and StazOn Studio Glaze

The holidays are almost here and there is nothing as iconic for Christmas as a gingerbread house during the holidays. When the kids have outgrown this tradition, it is still possible to recreate the fun by using your craft supplies. In today’s project, I used StazOn Studio Glaze to fill in some of the details of this gingerbread die.

Skill: Intermediate
Time: 1 hour

Directions

 Gingerbread House from Rinea's Glossy Mocha/Gold Foil
Step 1

Using Spellbinders dies which includes two layered pieces, die cut the Gingerbread House from Rinea’s Glossy Mocha/Gold Foil. Die cut the second Gingerbread House base piece from Rinea’s Glossy Copper/Gold Foil. Use On Point Glue to adhere the layers together.

StazOn Studio Glaze in Valentine
Step 2

Using StazOn Studio Glaze in Valentine, add color to the candy dots in the Gingerbread House.

color using assorted StazOn Studio Glaze colors
Step 3

Continue adding color using assorted StazOn Studio Glaze colors between the die cut elements of the Gingerbread House. Allow each color to dry before moving onto the next color.

VersaFine Clair in Fallen Leaves
Step 4

Cut cardstock and pattern paper to fit a 5″ x 6 1/2″ card base. Die cut large ovals from cardstock and pattern paper. Ink the edges with VersaMagic in Gingerbread, then adhere to the card. Stamp the phrase with VersaFine Clair in Fallen Leaves, cut to fit and mat with cardstock.

 Gingerbread House for Christmas card
Step 5

Adhere the Gingerbread House and phrase to the card with foam adhesives for dimension. Finish the card with any additional personal touches!

Supplies

Imagine

Other

  • Rinea Foiled Papers – Earth Tones Foiled Paper Variety Pack
  • Bazzill Cardstock – brown, white
  • Graphic 45 – Pattern Paper
  • Spellbinders Dies
  • Hero Arts Stamp
  • Foam Adhesives

Prepare for Thanksgiving with a Cardmaking Tutorial

by Steph Ackerman

Prepare for Thanksgiving with a Cardmaking Tutorial

It’s October but before you know it you will be packing away the costumes and preparing for Thanksgiving. Why not be ready by delving into the colors, signs, and beauty of the season. Selecting 4 – 5 colors of Fireworks Shimmery Craft Sprays you can easily achieve amazing color combinations that set the stage for your projects. See how quickly and easily these Fall cards go together using backgrounds created with Fireworks Sprays.

Skill: Intermediate
Time: 1 hour

Directions


Step 1

Spritz assorted colors of Fireworks! Shimmery Craft Spray on the craft mat. Be sure not to mix the colors – spritz them about the mat.


Step 2

Drag white cardstock across the craft mat. Spritz additional Fireworks on craft mat if necessary until the cardstock is covered.


Step 3

Allow the cardstock to dry, then spritz with Dandelion Fireworks adding color to the white spaces.


Step 4

Cut cardstock into 2 panels, each 4″ x 5″. Stamp leaf flourishes on both panels with VersaFine Clair in Pinecone. Add clear embossing powder and heat set.


Step 5

Ink the edges of the panels with Brilliance Pearl Beige Ink, then mat with brown cardstock. Add the panels to the cards. Add color to some of the leaves using Memento Markers.


Step 6

Stamp Happy Thanksgiving on leftover strips of the cardstock with VersaFine Pinecone Ink. Add Clear Embossing Powder and heat set. Mat with cardstock.


Step 7

Adhere Happy Thanksgiving to the vertical card with foam adhesives. Cut apart Happy Thanksgiving for the horizontal card and adhere with foam adhesives.


Supplies

Imagine
Other
  • Stamps – So Suzy/Crackerbox Stamps
  • Cardstock – brown, white
  • Foam adhesives

Create a High Contrast Card with Gold Embossing

by Martha Lucia Gomez

Create a High Contrast Card with Gold Embossing

The color challenge for July is Golden Glow and I immediately thought of Gold Embossing! I was so excited because I love Clean and Simple cards and I think using gold as your main color allows for a clean and simple design that is still sure to wow the recipient. While my card is in the style of CAS it is a bit of an advanced technique as it actually has three layers of paper! If you are looking for a beautiful design to create for a special occasion this White and Gold theme is an elegant combination. Enjoy!

Skill: Advanced
Time: 1 hour

Directions


Step 1

With masking tape create a border on the bottom of your card base. The width of the border depends on the size of the die cut letters that you want to use. In my project, I created a 1 inch border because the size of my die cuts is Jumbo. Ink the masked area directly with the VersaMark Inkpad. Cover the inked area with Gold Embossing Powder and melt the powder with the heat tool.


Step 2

Set the card base aside. Use large die letters to cut the letters “H” and “I” for the greeting. Align the letters over the card border and mask the lower portion with masking tape to match the card base border. (I used the same piece of masking tape for step one and two.)


Step 3

Cut a piece of whisper white cardstock to match the same area that is still white on the card base. In my sample, the card is a standard size, so my top layering piece is 5.5″ x 3.25″. Leaving the masking tape attached to the front side, apply On Point Glue on the back of the letters, above the masked area only. Paste the letters onto the separate layer aligning the masked area to the lower edge of your cardstock layer.


Step 4

Stamp a floral image on the left corner of the top cardstock piece with VersaMark and emboss with Gold Embossing Powder. Add a fun foam white layer behind the decorated layer and tape over the card base aligning the gold borders.


Supplies

Imagine
Other
  • Masking Tape
  • Altenew – Persian Motifs Stamp Set
  • Stampin’ Up – Large Letters Framelits
  • Big Shot Die Cutting Machine
  • Heat tool
  • Cardstock – White
  • MISTI Stamping Tool, Stamparatus or acrylic block

Imagine Tips & Tricks: Use Masking Tape to Ink Letters

by Melissa Andrew

Imagine Tips & Tricks: Use Masking Tape to Ink Letters

When you are in the middle of a craft project that requires inking small die-cut pieces it can get messy! Today is a simple trick on how to keep those fingers clean when using your favorite Tsukineko Inks and masking tape!

Supplies

Imagine
Other
  • Low Adhesive Tape – Masking Tape
  • Alphabet die
  • Die Cut Machine

Use a Masking Technique to Make this Fabulous Card

by Elina Stromberg

Masking is one of my favorite stamping techniques for cardmaking. It’s a simple way to create a dimensional look and feel, without having to layer and collage fussy cut images. For this technique you don’t need any special supplies; a stamp set, stamping ink, a few sticky notes, and your scissors will be enough!

Skill: Beginner
Time: 30 minutes – 1 hour

Directions


Step 1

Stamp the hot air balloon and clouds on sticky note pages. If the sticky part is only on a portion of the page, make sure to place your stamping close to the paper’s sticky border. Cut out the images.


Step 2

Stamp the images you want to appear in front on your cardstock and place the fussy cut mask on top, then stamp the second layer. Use Memento in Tuxedo Black for stamping hot air balloons, and Memento in Summer Sky for the clouds. Leave the masks in place.


Step 3

Color the background using two shades of Memento, Summer Sky and Danube Blue, and a jumbo dauber. Sponge on a hint of white acrylic paint on the inked surface. Remove masks.


Step 4

Color the front mages with alcohol markers. Stamp sentiment text and the flying birds with black StazOn.


Step 5

Die-cut a tree-line from dark blue cardstock. Glue it on the bottom of the card. Trim card to size, mat on a piece of dark blue cardstock. Attach to white card base using double-sided tape.

Supplies

Imagine
Other
  • Joy Clair Stamp – ‘Fly With Me’ stamp set
  • Sticky Notes
  • Scissors
  • Sizzix – ‘Tree Line’ die
  • White acrylic paint
  • Alcohol markers
  • Double-sided Tape
  • Cardstock – dark blue, white
  • Card base – White