See How to Create Fun Snowy Texture for a Christmas Card

by Roni Johnson

See How to Create Fun Snowy Texture for a Christmas Card with Radiant Neon Amplify in white

Winter is quickly approaching…at times it feels as if you’re looking at the world through the shroud of dingy grey gauze. The real beauty of winter can also be seen in the grey twilight when the pines have been darkened by an evening snowfall cutting you off from the worries of the outside world. This is what I look forward to in the coming months. I tried to capture that feeling in this Christmas card I’ve made for you today.

Skill: Beginner
Time: 30 minutes

Directions


Step 1

Pounce Grey Flannel and London Fog Memento Ink onto the craft mat. Pounce a bit of Niagara Mist VersaMagic ink as well.


Step 2

Spritz a bit of Ink Potion No.9 over the inks. Tap the mixture a bit to mix it up and eliminate some of the harsh lines.


Step 3

Press a white cardstock panel into the ink mixture several times until you are satisfied with the results.


Step 4

Stamp pine trees onto the inked panel using VersaFine Clair Morning Mist ink.


Step 5

Randomly dot Radiant Neon Amplify in White over the panel.


Step 6

Heat the Amplify medium to activate and puff it up.


Step 7

Trim and mat on black cardstock then adhere the panel to a grey card base. Stamp off the excess ink on the pine tree stamp on the inside of the card to create a ghostly grey pine forest. Add a bit of line work around the edge of the card to finish it off.


Step 8

Stamp sentiment on a scrap of white cardstock. Trim and adhere to the card front.

Supplies

Imagine
Other
  • Just For Fun Stamps – Pine Trees
  • Cardstock – White, Grey, Black
  • Heat Tool

Create a Matching Envelope and Christmas Card

by Kassy Tousignant

Create a Matching Envelope and Christmas Card

VersaFine Clair Ink and large sponge daubers make great patterned background papers for all of your projects! Check out this video to see how I used them to make a beautiful, distressed background for my Christmas card and matching envelope. The colors are so rich and vibrant and create the perfect matching set.

Skill: Advanced
Time: 1 hour

Supplies

Imagine

• VersaFine Clair – Nocturne, Pinecone, Rain Forest, Morning Mist
• VersaMagic – Cloud White
• All-Purpose Ink – Cool Grey
Embossing powder – Black
Memento Markers – Tuxedo Black, London Fog
• Ink Potion No 9
• Sponge daubers
• Fireworks Shimmery Craft Spray – London Fog
• Walnut Ink – Walnut
• IrRESISTibles Pico Embellisher – Black
GooseBumps – shimmer
• Tear It! Tape

Other

• Prima – Clear gesso
• Black twine
• Cardstock – white
• Envelope
• Stampers Anonymous – Tim Holtz Christmas stamp set

Create a Beautiful Mandala Thank You Card

by Martha Lucia Gomez

Create a Beautiful Mandala Thank You Card

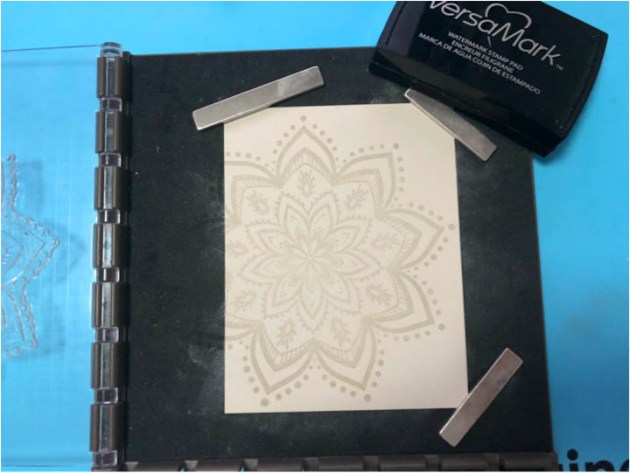
Exploring is part of this creative world, but not all of our readers are experts or have been following us for a long time so today I’ll welcome you back to the basics. A few months ago, I told you that if I had to choose one ink pad (in a hypothetical world), I would choose the VersaMark Ink. Today I am sharing with you one of the multiple reasons why I consider it my must-have product. We have inks in almost all colors but with the VersaMark Ink you create a watermark effect that enhances the color of the paper. I love this effect and love the subtle appearance it creates. In my project, I am using Sahara Sand cardstock and if you notice on the above photo the ink is the same as the paper, just a little darker to create more emphasis over the stamped image.

Skill: Beginner
Time: 30 minutes

Directions


Step 1

Select your color of cardstock and ink your stamp with VersaMark.


Step 2

Stamp your image once, twice or as many times that you need it to obtain all the details and a darker color. In my sample, I stamped twice. Let the ink dry for a few minutes. And this multiple stamping is easier with a stamping tool such as the Misti Stamping Tool.


Step 3

Repeat the process to stamp the “Thanks” sentiment. But this time you can create a totally different effect using the VersaMark with Embossing Powder. You only need to ink your stamp with the VersaMark and then cover the stamped image with Silver Embossing Powder in my case or with any other color of embossing powder and melt it with the heat tool. VersaMark is an excellent embossing ink.


Step 4

To make my card more special, I cut the stamped sentiment with the corresponding die cut and stamped the complement sentiment making the same process. If you want to obtain a major texture you can repeat the stamping process all the time that you wanted…just don’t burn your paper!

Supplies

Imagine
Other
  • Sahara Sand Card Stock
  • “Thanks” Stamps & Die cuts
  • Mandala stamp
  • Misti Stamping tool
  • Embossing powder anti-static bag
  • Die & embossing machine

Create Shimmery Greetings From Outer Space

by Jennifer Vanderbeek

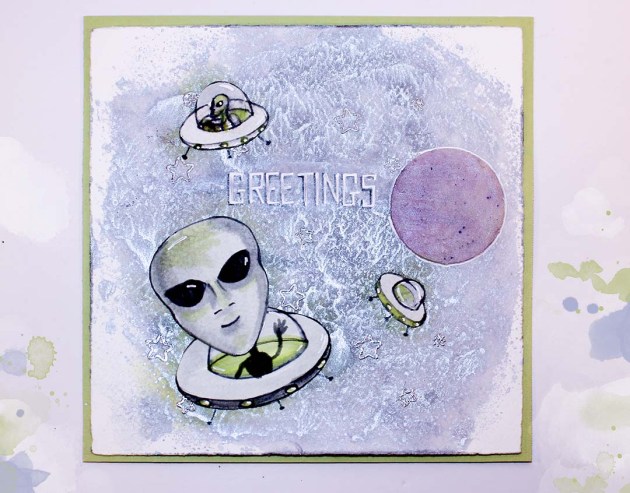
How about a little out-of-this-world fun while playing with the color of the month: Pebble Grey. While deciding what to do for this prompt I was reminded of the aliens known as Greys, so created this sky scene with shades of grey and silver and drew up some simple saucers to decorate the skies. In the video, you’ll also see how I fixed a goof and rescued the card front from a galactic disaster!

Skill: Advanced
Time: 1 hour

Directions

Supplies

Imagine
Other
  • Watercolor Paper
  • Cardstock – Pale Green
  • Paintbrushes
  • Staedtler – Combo Circle Template
  • Pickett – Isometric Ellipse Inking Template
  • Pencil
  • White Eraser
  • Acrylic Block
  • Studio Calico – Make a Wish stamp set
  • Uniball – Signo White Gel Pen
  • Fiskars – Paper Trimmer, Scissors
  • Wooden spoon
  • Post-It Tape

Create a Reversible Naughty or Nice Christmas Stocking

by Jennifer Vanderbeek

Create a Reversible Naughty or Nice Christmas Stocking

Getting a head start on the holiday crafting rush, I decided to sew up a quick stocking and decorate the linen cuff with Fabrico markers, All-Purpose Ink, and some heat-embossed accents. While deciding just how I wanted to do the embossing I tried out a lot of products: VersaMark, Delicata, and Creative Medium to name the top three contenders, but I decided that the fine details that On Point Glue afforded made it the best choice for this project. Because of the heat embossing, you want to make sure that the area you’re decorating is a fabric that won’t melt when you hit it with the heat tool. Linen, cotton, canvas, or wool (the natural, sheepy stuff, not the polyester kind) should all work just fine, but you might want to test a small piece before getting too far into decorating your stocking.

Skill: Advanced
Time: 1 hour + dry time

Directions

Supplies

Imagine
Other
  • Stocking blank (or materials to make your own)
  • Pencil
  • Watercolor paper
  • Darice – Heat tool

Learn to Make a Pendant from Clay

by Iris Rodriguez

Learn to Make a Pendant from Clay

Making your own jewelry can be so rewarding. You get to make fun and exciting creations, express yourself and make a statement. Making beads out of polymer clay is a great way to get started or simply experiment and see if you like it. The beads can be stamped, colored, and even embossed. For this project, I made a round, dome-shaped bead, stamped it and embossed with silver embossing powder.

Skill: Intermediate
Time: 30 minutes + baking time according to clay manufacturer instructions

Directions


Step 1

Set out your mat. Ceramic, glass or special mats like Polyform’s Sculpey Make ‘N Bake Mat surfaces work best when working with clay.


Step 2

Begin by conditioning the clay with a clay roller, or pasta machine. When first taking the clay out of the package, roll the clay a few times in order to soften it. If it cracks when running it through the pasta machine or roller; this means that it’s not conditioned. So continue to condition. If using a pasta machine, roll one sheet of clay to the third thickest setting. If using a roller, aim for 1/16 inch thickness. Place stamp over the clay, press firmly into the clay with your fingers or clay roller.


Step 3

Remove stamp. Ensure you get a deep indentation so that you have good dimension.


Step 4

Using the Premo Sculpey Circle cutters, cut out the clay. Use the second largest cutter from the set.


Step 5

Prepare the pendant for baking. In order to get a dome shape, place the clay over a rounded object, like a burned out light bulb or the round edge of a ceramic bowl. Bake the clay according to the manufacturer’s instructions on the package.


Step 6

While the clay is baking, prepare the bail. Using the Premo Sculpey Circle cutters, cut out a circle. Use the second smallest cutter from the set. Then use the smallest cutter and cut out tiny slices off on opposite sides of each other.


Step 7

After the clay cures, roll out a small sheet of clay to the 4th thickest setting in the pasta machine. Spread a little bit of liquid clay on the back of the bead. The liquid clay adheres the clay to each other. Adhere the newly rolled out sheet of clay. Cut out the excess with a precision knife. Texture the back. This is in case, the bead flips while you are wearing it and it will still look fabulous. Add a couple of drops of liquid clay to the bail and adhere to the bead. Before doing so, lay down a piece of wire, so that it bakes with an opening. This is where the cord will go through. Bake the bead according to the manufacturer’s instructions on the package.


Step 8

Ink the raised areas with the VersaMark ink. Add embossing powder in Silver. The clay tends to attract the embossing powder so it will want to go into the non-inked area. Use a liner brush to remove the embossing powder from the crevices.


Step 9

Heat set the embossing powder, just like you would on paper. The clay will tend to get a little soft with the heat. Let cool off, do not touch and risk distorting it. The clay will harden again. Seal the bead with Sculpey Gloss Glaze. It is very important to seal the clay. It protects the embossing powder and clay. Add the leather or cotton cord and clasp. Now you have a necklace to add to your wardrobe.

Supplies

Imagine
Other
  • Polyform – Sculpey Souffle Clay in Poppy Seed, Gloss Glaze, Graduated Cutter Circle Set
  • Lightbulb
  • Rubber Stamp
  • Leather or Cotton Cord
  • Jewelry Hardware: jump ring, clasp, needle nose pliers
  • Ceramic tile, crafting glass, or Sculpey Work ‘N Bake Clay Mat