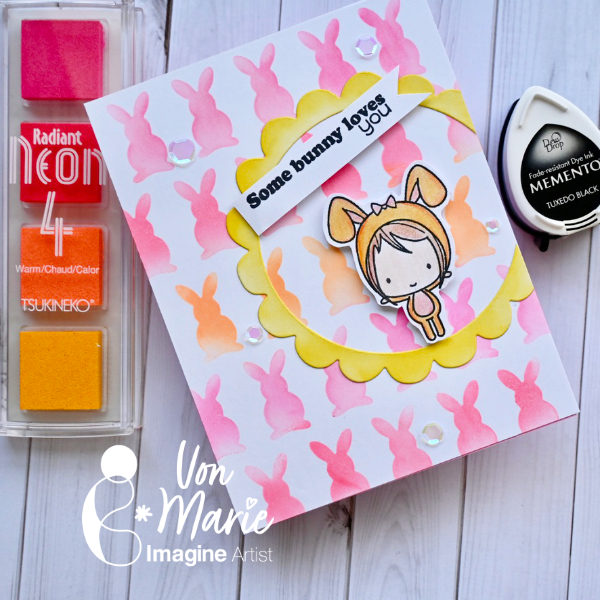
Hello everyone. Von Marie here and I have my latest video sharing an Easter card today. So much fun and we will use lots of fun TSUKINEKO inks to help us stencil and easily make this cute Easter Bunny Card. The video will have more details.
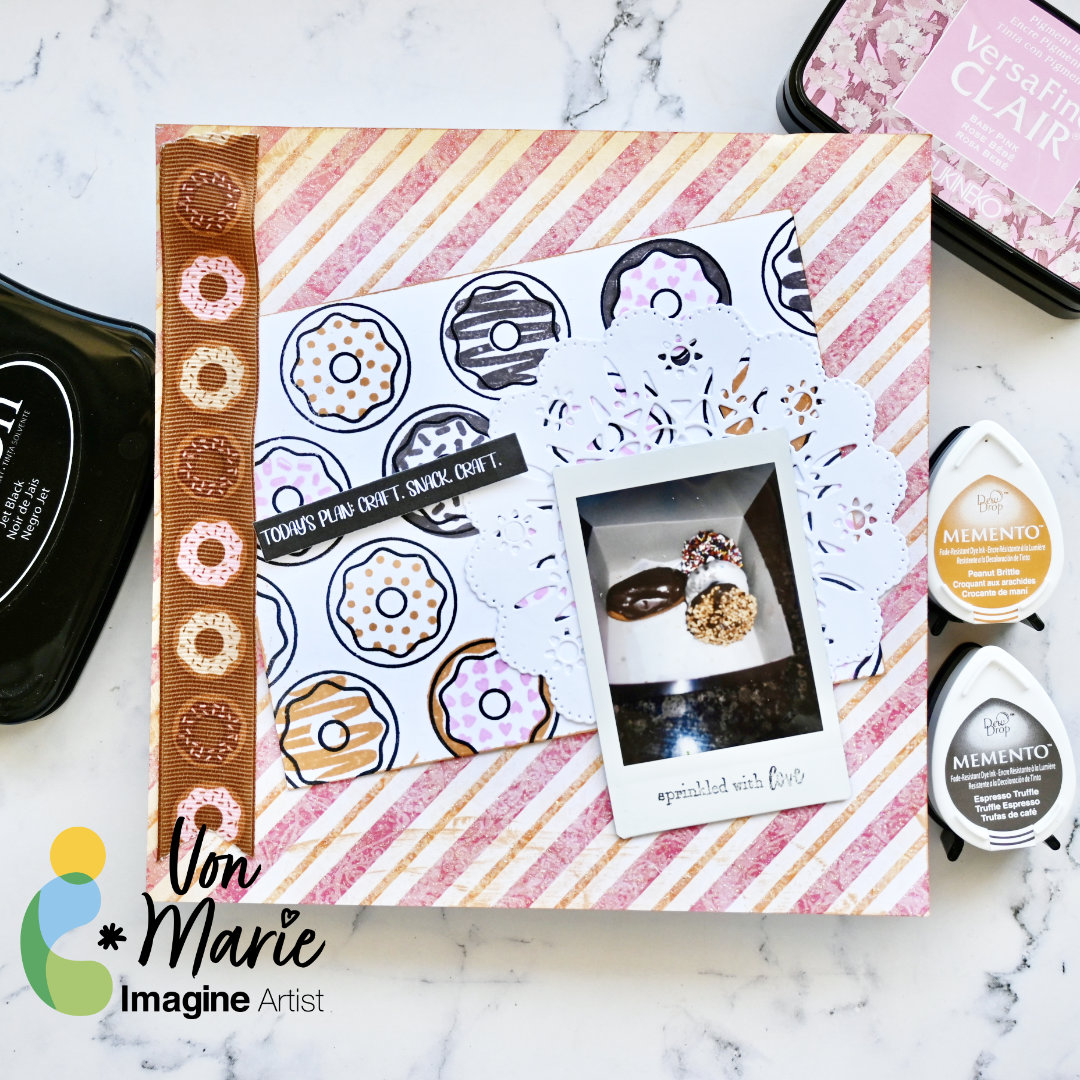
Hello everyone. Von Marie here and I have my newest video sharing an easy and fun Donuts Mini Layout Page perfect for hanging in your craft room. I love donuts and this page is so much fun to create using Memento inks. You can make any kind of page perfect to hang in your craft room. The video will have more details.
Skill: Beginner Beginner Time: 30 Minutes
Craft Supplies
• 100lb white Hammermill Paper • A2 Card Base Glue • Photo • Pattern Paper • Ribbon • Clips • Doily Die-cut • Stamping Block
• Taylored Expressions Donut Days Cling & Clear Combo • Stamps Of Life Doily 1 Die Set • LV Handcrafted Gnome Love Sentiment Printable • Donut Ribbon from my stash • Instax Mini SE
ALTERNATIVE PRODUCTS THAT CAN BE USED TO RECREATE SOMETHING SIMILAR Any stamps, inks, and or pattern paper
You can watch how to create this Donuts Mini Layout Click Here
Here’s an Autumn-themed card created with Memento and VersaMagic inks using a lovely stencil and a meaningful quote. This card is meant to encourage a friend who had an accident who is a bit patient for nature to take its course.
Skill Level: Intermediate Time: 1.5 hours
Directions:
Step 1: Use magnets and low-tack tape to secure a piece of mixed media cardstock to a magnetic page. Add a curvy piece of low-tack tape along the bottom as shown. Use a Sponge dauber to apply Danube Blue Memento Ink horizontally across the cardstock.
Step 2: Use another Sponge Dauber to apply Summer Sky Memento ink horizontally across the cardstock, filling in open spaces.
Step 3: Use another Sponge Dauber to add Angel Pink Memento Ink to add some warmth to the sky.
Step 4: Place the other side of the curvy low-tack tape over the bottom part of the sky area. Use a Sponge Dauber to apply Bamboo Leaves Memento ink over the tape horizontally to begin to create a grassy area.
Step 5: Tear a piece of cardstock and use the Sponge Dauber to continue applying Bamboo Leaves Memento ink. Use another Sponge Dauber to apply New Sprout Memento Ink to fill in the grassy area.
Step 6: Use low-tack tape and magnets to secure the Tree Stencil over the sponged paper and the magnetic page. Place low-tack tape over the leaves around the tree trunk and branches. Use a Sponge Dauber to apply Jumbo Java VersaMagic over the stencil onto the paper. Remove the tape to reveal the tree’s leaves. Use a paper towel to wipe the brown ink off of the stencil.
Steps 7A, 7B, 7C, and 7D: Use a Sponge Dauber to Apply Mango Madness VersaMagic Ink over some of the stencil’s leaves (7A). Use a dry paper towel to wipe the ink off the stencil. Use separate Sponge Daubers to apply Aloe Vera, Tea Leaves, Pink Grapefruit, Pumpkin Spice, Red Magic, and Perfect Plumeria VersaMagic Inks over the stencil’s leaves (7B, 7C). 7D shows the completed tree. Heat set.
Step 8: Use magnets to secure the image panel onto the base of the a stamping platform. Place the sentiment facedown where desired. Press the platform’s lid onto the back of the stamp, lift the lid, ink the stamp with Shady Lane VersaFine Clair Ink, and stamp. Re-ink and stamp again if necessary to attain a good impression. Remove the card front from the stamping platform. Heat set the sentiment.
Step 9: Cut a piece of white textured cardstock to 10” x 7”. Score at 5” and fold to form a 5” x 7” card. Place a piece of scrap paper inside the card to protect it. Use a Sponge Dauber to apply Shady Lane VersaFine Clair around the outer .5” perimeter of the card. Heat set.
Step 10: Use Tear It! Tape to adhere the card front to the inked 5” x 7” card.
Hello crafty friends! It’s Ceal, here. Today I’m sharing a fun card using this humorous stamp and water coloring it with Memento Inks.
Skill Level: Beginner Time: 30 minutes
Directions: Gather your supplies. You will need a outline stamp, I used one by Unity Stamp Co. You will need several colors of dye inks. The inks must be a dye ink like Memento to react with water. You will also need a pigment ink VersaFine Clair to stamp the image so it will not react with the water. The last thig you will need is a water brush or paintbrush.
Step 1: Stamp the image using VersaFine Clair Nocturne ink
Step 2: Using a Water brush, color in your image. I used Peanut Brittle and Cantaloupe Memento ink for the kitty
Step 3: Using a water brush finish coloring your image. I used Teal Zeal to color the coffee cup.
Step 4: Using a stitched die, cut out the panel and stamp the sentiment under the image. To finish the card, I used a piece of patterned paper as a mat and adhered the panel to it and then t the base.
Other Supplies: Neenah Classic Crest Solar White 120Lb Neenah Classic Crest Solar White 80lb Patterned Paper from Lawn Fawn MISTI Stamp Platform – My Sweet Petunia Pissy Kitty Stamp Set – Unity Stamp Co Stitched Rectangle Die – My Favorite Things
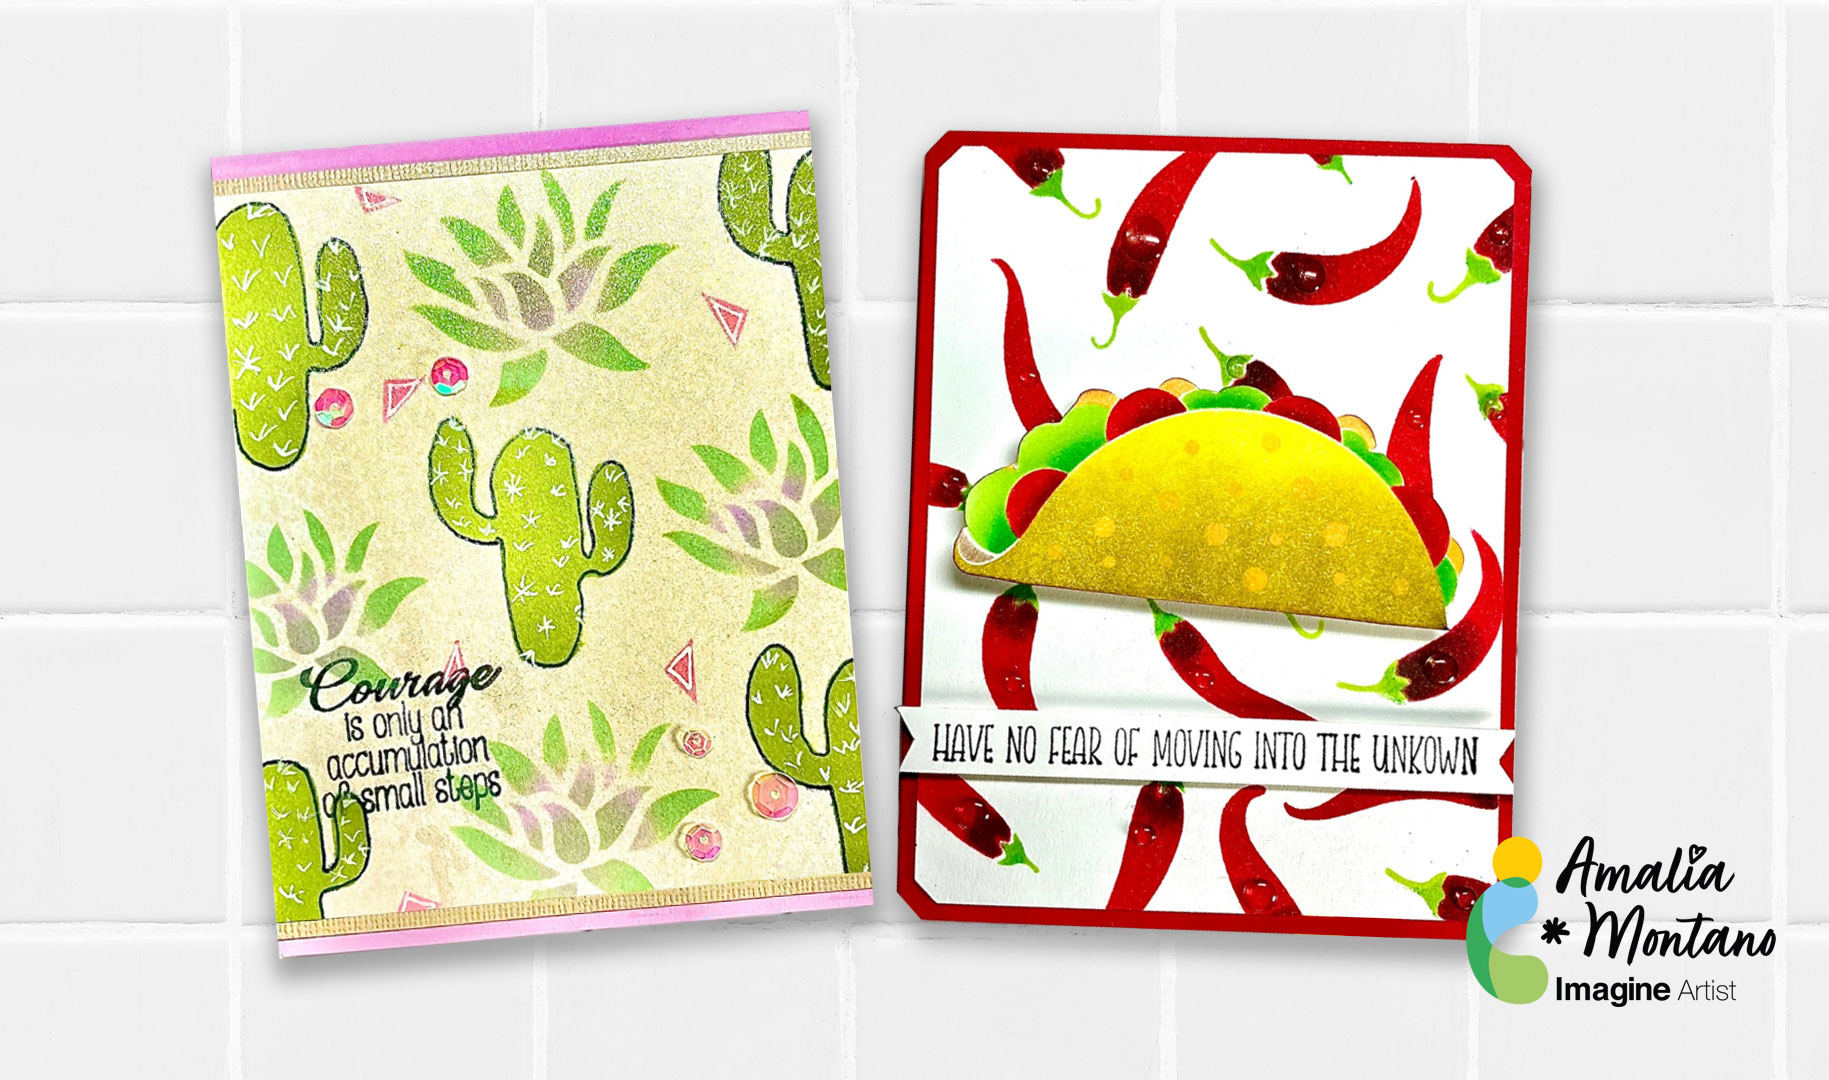
I’ve had these stencils for some time, and the vibrant colors and rich textures of Tsukineko inks were perfect for these designs. I love Tsukineko inks for their versatility, stunning colors, and ease of use. They also come in various themed color sets. For this project, I used both VersaFine colors and Dew Drop VersaMagic ink pads.
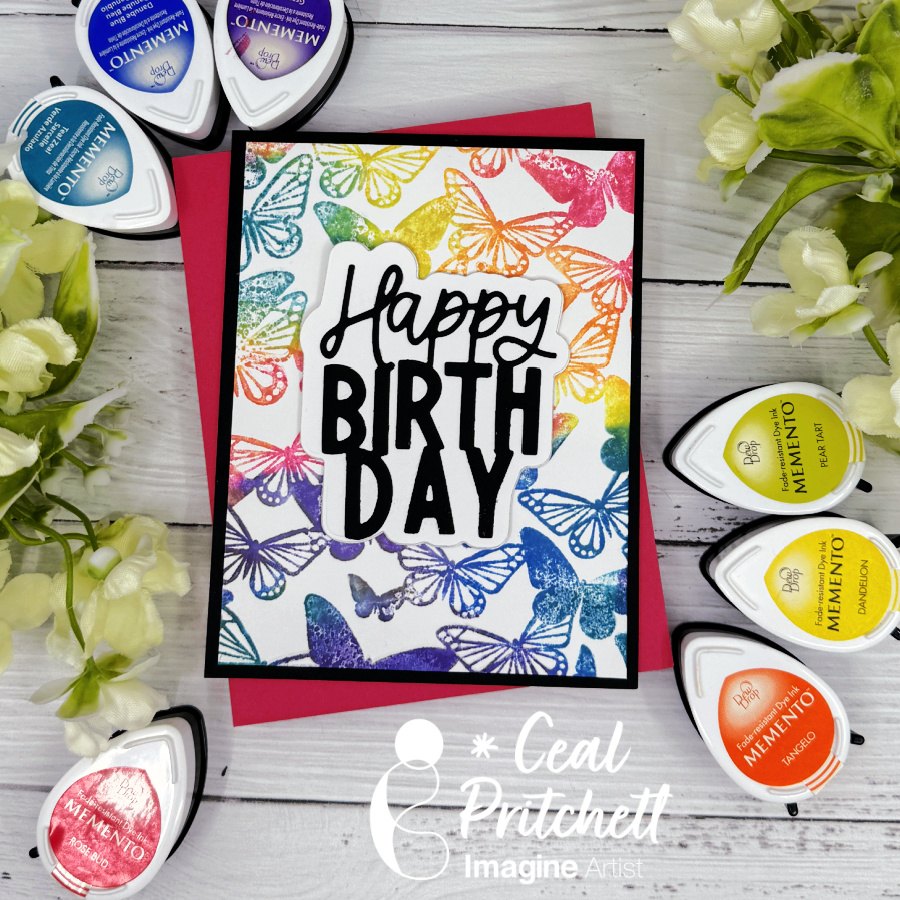
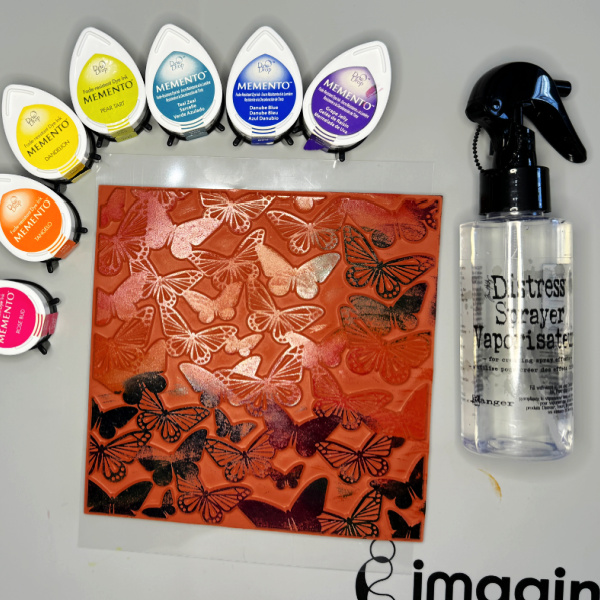
Today I am sharing some creativity using the Memento Dew Drops in rainbow colors. To make my card, I used a faux watercolor technique that I will share the steps below.
Skill: Beginner to Intermediate Time: 30 to 45 minutes
Directions:
For the background, you will need a water friendly piece of cardstock, like Bristol or heavystock which I am using. A background stamp, a rainbow of ink colors and a water mister bottle.
Step 1: Randomly ink up the background stamp with the different colors of ink and ten spritz with water.
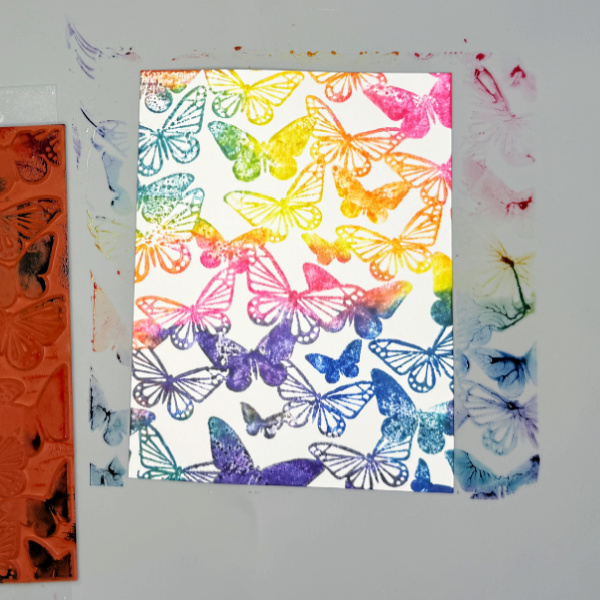
Step 2: Place your panel of cardstock down on your craft mat, then place the inked background stamp that you spritzed with water over it and press down. Allow it to sit for a few seconds and then lift the stamp off to see the results.
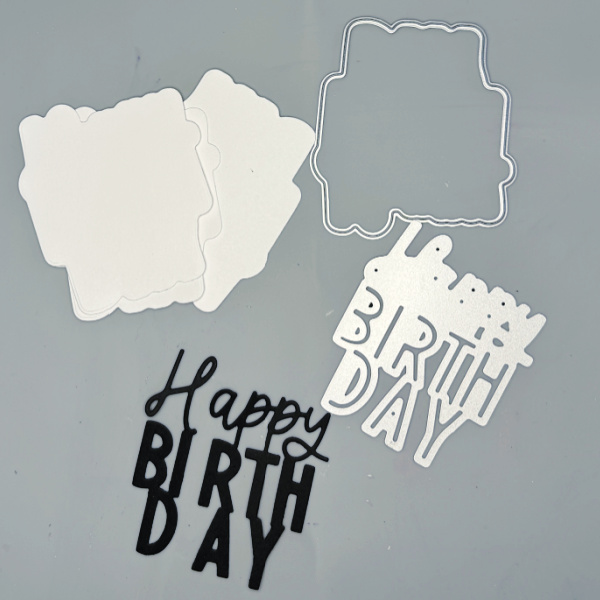
Step 3: Die cut the sentiment. I cut three of the backers in white and the sentiment once out of black. Adhere them together using On Point glue.
To finish the card, adhere an A2 black panel of cardstock to the A2 card base. Cut down the butterfly panel to 4 X 5.25 and adhere to black panel. Adhere the die cut sentiment in the center of the butterfly panel.
Other Supplies: Butterfly background stamp – Hero Arts Happy Birthday Die – Honey Bee Stamps Pitch Black cardstock – Hero Arts 120lb Classic Solar White cardstock – Neenah Distress White Heavystock – Ranger